
FreeStyle SI6290 - Iron BRAUN - Free user manual and instructions
Find the device manual for free FreeStyle SI6290 BRAUN in PDF.
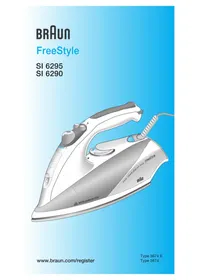


| Product type | Steam iron |
| Model | FreeStyle SI6290 |
| Brand | Braun |
| Power rating | 2400 W |
| Voltage | 220-240 V, 50-60 Hz |
| Soleplate material | Ceramic (Eloxal Plus) |
| Water tank capacity | 300 ml |
| Continuous steam output | 35 g/min |
| Steam boost | 150 g/min |
| Vertical steam function | Yes |
| Spray function | Yes |
| Anti-drip system | Yes |
| Self-cleaning function | Yes (Anti-Calc) |
| Auto shut-off | Yes (8 min horizontal, 30 sec vertical) |
| Cord length | 2.5 m |
| Dimensions (L x W x H) | 28.0 x 12.0 x 15.0 cm |
| Weight | 1.3 kg |
| Water fill opening | Wide opening for easy filling |
| Ergonomic design | FreeStyle 3D swivel heel |
| Safety features | Thermal fuse, automatic shut-off |
| Spare parts availability | Yes (soleplate, water tank, buttons) |
Frequently Asked Questions - FreeStyle SI6290 BRAUN
Note: Do not use scented or chemical additives.
Tip: The spray function can be used to dampen stubborn wrinkles.
To restart: Move the iron gently.
User questions about FreeStyle SI6290 BRAUN
0 question about this device. Answer the ones you know or ask your own.
Ask a new question about this device
Download the instructions for your Iron in PDF format for free! Find your manual FreeStyle SI6290 - BRAUN and take your electronic device back in hand. On this page are published all the documents necessary for the use of your device. FreeStyle SI6290 by BRAUN.
USER MANUAL FreeStyle SI6290 BRAUN
F
G Cleaning the anti-calc valve

H Anticalc system


Deutsch
Our products are engineered to meet the highest standards of quality, functionality and design. We hope you enjoy your new Braun FreeStyle.
Notice: Remove the sole plate label, if any, before first use.
Important safeguards
- Before using the iron, read the use instructions completely. Keep the use instructions during the entire life of the iron.
- Make sure your voltage corresponds to the voltage printed on the iron. Connect the iron to alternating current only.
- Caution: Due to the high power of this steam iron please make sure that your mains supply is sufficient. Please contact your local electric power company to make sure that the so called mains impedance is not higher than 0.32 Ohm.
- Always unplug the iron before filling with water and make sure the steam button is in its lower position (steam off). Always pull the plug, not the cord. The cord should never come in contact with hot objects or with the hot sole plate.
- Never pull out the steam button (3) during ironing.
- The iron must be used and rested on a stable surface.
- During ironing pauses, always place the iron upright on its heel rest and ensure that the heel rest is placed on a stable surface.
- Never immerse the iron in water or other liquids.
- Unplug it when leaving the room, even if only for a short time.
- This appliance is not intended for use by children or persons with reduced physical or mental capabilities, unless they are given supervision by a person responsible for their safety.
- Keep the iron away from children. Electric irons combine high temperatures and hot steam that could lead to burns.
- Check the cord regularly for possible damage.
- The iron is not to be used if it has dropped, if there are visible signs of damage or if it is leaking. Regularly check the cord for damage.
- If the appliance (including cord) shows any defect, stop using it and take it to a Braun Service Centre for repair. Faulty or unqualified repair work may cause accidents or injury to the user. Braun electric appliances meet applicable safety standards.
A Description
1 Spray nozzle
2 Water tank opening
3 Steam button
3a Steam regulator
4 Spray button 5 Power shot button 6 Temperature selector 7 Temperature pilot light 8 Textile Protector Plus
B Before starting off
- This iron is designed for tap water. If you have extremely hard water, we recommend to use a mixture of 50% tap water and 50% distilled water. Fill the water tank to «max» marking. Never use distilled water exclusively. Do not add any additives (e.g. starch).
- Keep the iron in the upright position and connect it to the mains. Select the temperature according to the ironing guide on the heel rest of the iron or on the label in your garments.
- The temperature pilot light (7) goes off when the desired temperature is reached (after approximately 1 minute).
C Ironing
1 Steam on/off
For steam ironing, the temperature selector (6) must be set within the red range. Press the steam button (3) to start the steam mode.
Steam on

With the steam button in its upper position (steam on), turn the steam regulator (3a) to adjust the steam quantity.
We recommend a medium steam setting for all normal ironing. Only when ironing linen, thick cotton, or similar fabrics do we recommend the maximum steam setting.
Preconditioning
Steam also develops horizontally at the front area of the soleplate. This preconditions the textiles by "pre-steaming," thus making ironing easier. Be careful – steam comes out laterally.
2 Power shot
Prior to use, press the power shot button (5) 3 to 4 times to activate it. Press the power shot button at intervals of at least 5 seconds.
Power shot can be activated when dry ironing. However, the temperature selector has to be set in the range between "●●●" and "max." The power shot function can also be used in the vertical position for steaming hanging clothes.
3 Spray function
Press the spray button (4).
4 Dry ironing
Turn the steam mode off by pressing the steam button (3) so that it catches in the lower position.
Automatic shut-off (model 6295 only)
The auto-off mechanism causes a slight rattling noise during ironing. This is normal and in no case indicates a fault of the iron. The temperature pilot light (7) will flash when the automatic shut-off is activated. This happens when the iron has rested ...
- horizontally on its sole plate for about 30 seconds or - vertically on its heel rest for about 8 minutes.
To turn on the iron again, just move it. When the temperature pilot light stops flashing, the electrical power is on again. The automatic shut-off will be activated approximately 2 minutes after the iron is plugged into a socket.
D Textile Protector Plus
Before attaching the Textile Protector (8) for the first time, iron approximately 2 minutes without the Textile Protector.
The Braun Textile Protector protects delicate fabrics from heat damage and makes it possible to iron most dark fabrics without an intermediate cloth. To check the reaction of your fabrics before you start ironing, we recommend that you iron a small section of material on the reverse side. With the Protector, you are able to iron delicate fabrics with the temperature setting «●●●» or «max», so that you can use all steam functions your iron offers.
After having attached the Textile Protector, wait about 1 1/2 minutes before you start ironing.
E After ironing
- Unplug the iron and press the steam on/off button (3) so that it catches in its lower position (steam off).
- To prolong the life of the iron, empty the water tank.
- Store the cool iron in a dry place always standing on its heel rest.
F Maintenance and cleaning
To clean the sole plate, use steel wool. Then wipe the sole plate clean with a cloth. Never use a scouring pad, vinegar nor other chemicals. To clean the soft material of handle and power shot and spray buttons, use soapy water.
G Cleaning the anticalc valve
The iron's anticalc valve is located at the lower end of the steam button (3). It has to be decalcified regularly (e.g. when the steam development is insufficient). Proceed as follows:
1) Unplug the iron and empty the water tank.
2) Press the steam button so it is lifted.
3) Remove carefully (some water may now leak from the sole plate).
4) Do not touch the anticalc valve.
5) Immerse in vinegar (not vinegar essence) or lemon juice until the lime becomes soft.
6) Use a non-metallic brush until all openings are clean.
7) Rinse under running water.
8) Re-insert the steam button.
9) Press to check the steam on/off function.
Note: the iron must never be used without the steam button.
H Decalcifying / anticalc system
When scale particles come out of the steam vents or when the steam development is insufficient even after cleaning the anticalc valve, you should clean the steam chamber as follows:
1) Make sure the steam button is in its lower position.
2) - 3) Fill water into the tank, connect to the mains and select the «●●●» temperature setting.
4) - 5) Wait until the pilot light turns off. Unplug the iron.
6) - 7) Hold the iron over a sink, then press the steam button so it is lifted, carefully pull it up, turn it and rest it in this position.
Caution: When the steam button is pulled up, hot water and steam will come out from the sole plate.
8) Push back the steam button until it catches in the lower position.
9) – 10) Fill water into the tank, connect to the mains and select the «●●●» temperature setting.
11) - 13) When the pilot light goes off, press the power shot button 4 times to rinse the iron. Disconnect the iron and wait for the sole plate to cool off, then clean it as described above in section «G».
Note: the iron must never be used without the steam button.
I Trouble-shooting guide
Problem Remedy
Drops Turn the steam regulator coming out counter-clockwise to of the steam reduce the steam or vents press the steam button
to turn the steam off. Take longer intervals when pressing the power shot button. Select a higher temperature setting.
No steam Press the steam button at all so that it is lifted.
Less steam Clean the anticalc valve develops or (see «G»). no steam at all
Calcium par- Decalcify the steam ticles coming chamber (see «H»). through the steam vents
Subject to change without notice.
This product conforms to the European Directives EMC 2004/108/EC and Low Voltage 2006/95/EC.
Please do not dispose of the product in the household waste at the end of its useful life. Disposal can take place at a Braun Service Centre or at appropriate collection points provided in your country.


Guarantee
We grant a 2 year guarantee on the product commencing on the date of purchase. Within the guarantee period we will eliminate any defects in the appliance resulting from faults in materials or workmanship, free of charge either by repairing or replacing the complete appliance at our discretion.
This guarantee extends to every country where this appliance is supplied by Braun or its appointed distributor.
This guarantee does not cover: damage due to improper use, normal wear or use as well as defects that have a negligible effect on the value or operation of the appliance. The guarantee becomes void if repairs are undertaken by unauthorised persons and if original Braun parts are not used.
To obtain service within the guarantee period, hand in or send the complete appliance with your sales receipt to an authorised Braun Customer Service Centre.
For UK only:
This guarantee in no way affects your rights under statutory law.
Russian
- DEUTSCH
- IMPORTANT SAFEGUARDS
- A DESCRIPTION
- B BEFORE STARTING OFF
- C IRONING
- STEAM ON/OFF
- PRECONDITIONING
- POWER SHOT
- SPRAY FUNCTION
- DRY IRONING
- AUTOMATIC SHUT-OFF (MODEL 6295 ONLY)
- D TEXTILE PROTECTOR PLUS
- E AFTER IRONING
- F MAINTENANCE AND CLEANING
- G CLEANING THE ANTICALC VALVE
- H DECALCIFYING / ANTICALC SYSTEM
- I TROUBLE-SHOOTING GUIDE
- PROBLEM REMEDY
- GUARANTEE
- FOR UK ONLY
- RUSSIAN
Brand : BRAUN
Model : FreeStyle SI6290
Category : Iron