
MS2339BB - Microwave LG - Free user manual and instructions
Find the device manual for free MS2339BB LG in PDF.
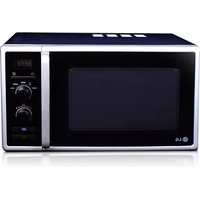


| Product type | Microwave oven |
| Brand | LG |
| Model | MS2339BB |
| Capacity | 23 liters |
| Microwave power | 800 W |
| Dimensions (W x H x D) | 476 x 287 x 376 mm |
| Net weight | 11.2 kg |
| Power supply | 230 V / 50 Hz |
| Control type | Electronic with LED display |
| Main functions | Defrosting, reheating, cooking, melting butter/chocolate |
| Interior light | Yes |
| Turntable | Yes, 270 mm diameter |
| Timer | Yes, up to 99 minutes 59 seconds |
| Child safety | Yes, key lock |
| Easy cleaning | Easy-to-clean enamel interior coating |
| Interior material | Stainless steel |
| Color | Black |
| Energy class | A |
| Noise level | 52 dB(A) |
| Maintenance and cleaning | Clean with a damp cloth and mild detergent, avoid abrasive products |
| Safety | Automatic stop function when door is open, safety lock system |
| Spare parts and repairability | Parts available through authorized after-sales service |
| General information | User manual and instructions available in PDF at notice-facile.com |
Frequently Asked Questions - MS2339BB LG
User questions about MS2339BB LG
0 question about this device. Answer the ones you know or ask your own.
Ask a new question about this device
Download the instructions for your Microwave in PDF format for free! Find your manual MS2339BB - LG and take your electronic device back in hand. On this page are published all the documents necessary for the use of your device. MS2339BB by LG.
USER MANUAL MS2339BB LG


- Front plate
- Viewing window
- Door seal
- Safety lock system
- Control panel
- Glass tray
- Roller rest
- Grill rack
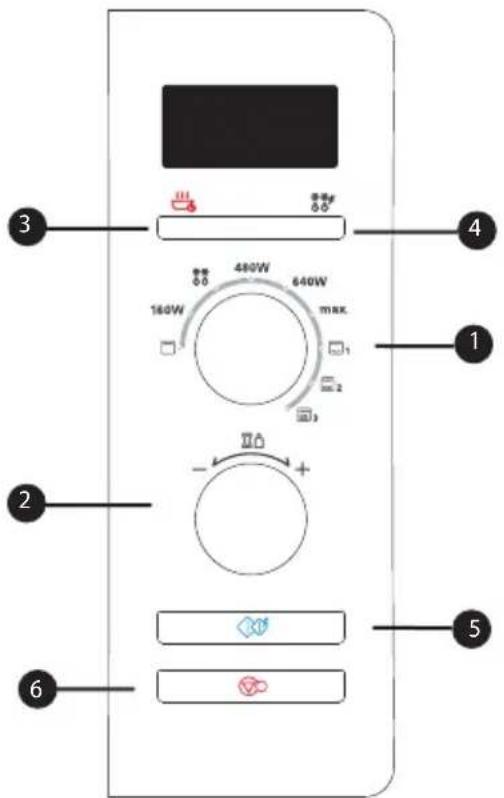
Control Panel

MS2339H/MS2339HS/MS2339HB MS2339B/MS2339BS/MS2339BB MS-4330W

MH6339H/MH6339HS/MH6339HB MH6339B/MH6339BS/MH6339BB MH6330NS
① Power selector
Allows selection of desired power.
2 Timer
Permits selection of the desired cooking time.
3 Tastesaver/Clock
Keep hot cooked foods warm in your oven/setting time of day.
4 Defrost
5 Start
6 Stop
PRECAUTIONS TO AVOID POSSIBLE EXPOSURE TO EXCESSIVE MICROWAVE ENERGY
The oven cannot be operated with the door open due to the safety interlocks built into the door mechanism which switch off cooking functions when the door is opened. Operating the oven with the door open could result in harmful exposure to microwave energy. It is important not to tamper with the door mechanism.
Do not place any object between the oven front face and the door or allow soil or cleaner residue to accumulate on sealing surfaces.
Do not operate the oven if it is damaged. It is particularly important that the oven door closes properly and that there is no damage to the (1) door (bent), (2) hinges and latches (broken or loosened), (3) door seals and sealing surfaces.
The oven should not be adjusted or repaired by anyone except qualified service personnel.
WARNING
When heating liquids, e.g. soups, sauces and beverages in your microwave oven, delayed eruptive boiling can occur without evidence of bubbling. This could result in a sudden boil over of the hot liquid. To prevent this possibility the following steps should be taken:
- Avoid using straight-sided containers with narrow necks.
- Do not overheat.
- Stir the liquid before placing the container in the oven and again halfway through the heating time.
- After heating, allow to stand in the oven for a short time. Stir or shake the contents (especially feeding bottles and baby foods) and carefully check the temperature before use.
Installation
- Remove all packing materials and accessories.
- Place the oven on a level surface a minimum of 85cm above the floor with at least 30cm above and 10cm rear space to allow adequate ventilation. The side of the oven should be kept clear so there is air flow for ventilation. The front of the oven should be at least 8cm from the edge of the surface to prevent tipping. An exhaust outlet is located on top or side of the oven. Blocking the outlet can damage the oven.
- Plug your oven into a standard voltage household outlet. Ensure that the electrical circuit is at least 10 amps (13 amps for models MH6339H/MH6339HS/MH6339HB/MH6339B/MH6339BS/MH6339BB/MH-6330NS) and that the oven is the only appliance on the circuit.
NOTE: • This appliance should not be used for commercial catering purposes.
WARNING: THIS APPLIANCE MUST BE EARTHED
The wires in the mains lead are coloured in accordance with the following code: Blue - Neutral Brown - Live Green and Yellow - Earth If the power cord is damaged, it must be replaced by the manufacturer or its service agent or a similarly qualified person in order to avoid hazard.
Important safety instructions
Read carefully and keep for future reference
WARNING: Please ensure cooking times are correctly set as over cooking may result in FIRE and subsequent DAMAGE to the OVEN.
1 Do not attempt to tamper with, or make any adjustments or repairs to the door, control panel, safety interlock switches, or any other part of the oven. It is hazardous for anyone to carry out any service or repair operation that involves the removal of any cover which gives protection against exposure to microwave energy. Repairs should only be undertaken by a qualified service technician. 2 Do not operate the oven when empty. It is best to leave a glass of water in the oven when not in use. The water will safely absorb all microwave energy if the oven is accidentally started. 3 Do not use the oven for the purpose of dehumidification. It can cause serious damage to safety. (e.g., operating the microwave oven with wet newspapers, clothes, toys, pets, or portable electric devices, etc.) 4 Do not cook food wrapped in paper towels unless your cookbook contains instructions for the food you are cooking. 5 Do not use newspaper in place of paper towels for cooking. 6 Do not use wooden containers. They may heat up and char. Do not use ceramic containers that have metallic (e.g., gold or silver) inlays. Always remove metal twist ties. Metal objects in the oven may arc, which can cause serious damage. 7 Do not operate the oven with a kitchen towel, a napkin, or any other obstruction between the door and the front edges of the oven, which may cause microwave energy leakage. 8 Do not use recycled paper products since they may contain impurities that may cause sparks and/or fires when used in cooking. 9 Do not rinse the turntable by placing it in water just after cooking. This may cause breakage or damage. 10 Small amounts of food require shorter cooking or heating time. If normal times are allowed, they may overheat and burn. 11 Be certain to place the oven so the front of the door is 8 cm or more behind the edge of the surface on which it is placed, to avoid accidental tipping of the appliance.
12 Before cooking, pierce the skin of potatoes, apples or any such fruit or vegetable. 13 Do not cook eggs in their shell. Pressure will build up inside the egg which will burst. 14 Do not attempt deep fat frying in your oven. 15 Remove the plastic wrapping from food before cooking or defrosting. Note though that in some cases food should be covered with plastic film, for heating or cooking. 16 If the oven door or door seals are damaged, the oven must not be operated until it has been repaired by a qualified service technician. 17 If smoke is observed, switch off or disconnect the oven from the power supply and keep the oven door closed in order to stifle any flames. 18 When food is heated or cooked in disposable containers of plastic, paper or other combustible materials, check the oven frequently due to the possibility of the food container deteriorating. 19 Only allow children to use the oven without supervision when adequate instructions have been given so that the child is able to use the oven in a safe way and understands the hazards of improper use. 20 Liquids or other foods must not be heated in sealed containers since they are liable to explode. 21 Do not operate the oven if the door seals and adjacent parts of the microwave oven are faulty, until the oven has been repaired by a qualified service technician. 22 Check that the utensils are suitable for use in microwave ovens before use. 23 Do not touch the oven door, outer cabinet, rear cabinet, oven cavity, accessories and dishes during grill mode, convection mode and auto cook operations, unless wearing thick oven gloves, as they will become hot. Before cleaning, make sure they are not hot. 24 Only use utensils that are suitable for use in microwave ovens. 25 When heating food in plastic or paper containers, keep an eye on the oven due to the possibility of ignition.
Important safety instructions
26 If smoke is observed, switch off or unplug the appliance and keep the door closed in order to stifle any flames. 27 Microwave heating of beverages can result in delayed eruptive boiling, therefore care must be taken when handling the container. 28 The contents of feeding bottles and baby food jars shall be stirred or shaken and the temperature checked before consumption, in order to avoid burns. 29 Eggs in their shell and whole hard-boiled eggs should not be heated in microwave ovens since they may explode, even after microwave heating has ended. 30 Details for cleaning door seals, cavities and adjacent parts. 31 The oven should be cleaned regularly and any food deposits removed. 32 Failure to maintain the oven in a clean condition could lead to deterioration of the surface that could adversely affect the life of the appliance and possibly result in a hazardous situation. 33 Only use the temperature probe recommended for this oven (for appliances having a facility to use a temperature-sensing probe).
34 If heating elements are provided, during use the appliance becomes hot. Care should be taken to avoid touching heating elements inside the oven. 35 The appliance is not intended for use by young children or infirm persons without supervision. 36 The microwave oven must be operated with the decorative door open. 37 This connection may be achieved by having the plug accessible or by incorporating a switch in the fixed wiring in accordance with the wiring rules. 38 Do not use harsh abrasive cleaners or sharp metal scrapers to clean the oven door glass since they can scratch the surface, which may result in shattering of the glass. 39 This appliance is not intended for use by persons (including children) with reduced physical, sensory or mental capabilities, or lack of experience and knowledge, unless they have been given supervision or instruction concerning use of the appliance by a person responsible for their safety.
WARNING: If the door or door seals are damaged, the oven must not be operated until it has been repaired by a competent person.
WARNING: It is hazardous for anyone other than a competent person to carry out any service or repair operation that involves the removal of a cover which gives protection against exposure to microwave energy.
WARNING: Liquids and other foods must not be heated in sealed containers since they are liable to explode.
WARNING: Only allow children to use the oven without supervision when adequate instructions have been given so that the child is able to use the oven in a safe way and understands the hazards of improper use.
WARNING: When the appliance is operated in the combination mode, children should only use the oven under adult supervision due to the temperatures generated.
WARNING: Accessible parts may become hot during use. Young children should be kept away.
WARNING: Should be monitored to ensure that children do not play with the device.
WARNING: The devices are not intended to be operated by an external timer or by a separate control.
Cooking Utensils
COOKING UTENSILS
Utensils should be checked to ensure that they are suitable for use in the microwave oven.
The following chart summarises the proper use of cooking utensils in your oven:
| Cooking utensils Microwave Grill | ||
| Heat resistant glass, glass ceramic yes yesCeramic, china yes yesMetal cookware no yesNon-heat resistant glass no noMicrowave plastic yes noPlastic wrap yes noPaper (cup, plates, towels) yes noStraw, wicker and wood no no | (Do not use china with gold or silver trim.) |
Microwave
- Most glass, glass ceramic, and heat resistant glassware utensils are excellent. Those with metal trim should not be used in a microwave oven.
- Paper napkins, towels, plates, cups, cartons, and cardboard can be used in the microwave oven. Do not use recycled paper products since they may contain impurities which may cause sparks and/or fires when used in cooking. (Consult your cookbook for correct use of these products.)
- Plastic dishes, cups, freezer bags, and plastic wraps may be used in the microwave oven. Follow the manufacturer's instructions or the information given in the cookbook when using plastics in the microwave oven.
- Metal utensils and utensils with metallic trim should not be used in the microwave oven. For more information on the proper use of metal in your oven, please read the introduction section in the cookbook. If the use of aluminum foil, skewers, or utensils containing metal in the oven is specified in the recipe, allow at least 2.5cm clearance between the metal object and the interior oven wall. If arcing (sparks) occurs, remove immediately.
Note:
Consult your cookbook, individual recipes, and charts for correct use of cooking containers, products, and other useful information.
Grill
- Heat resistant glassware, ceramic and metal cookware can be used.
- Paper napkins, towels, and plastics should not be used.
Notes:
- Care should be taken when removing utensils or the glass turntable, as they may become hot during cooking.
- Only use a thermometer that is designed or recommended for use in the microwave oven.
- Ensure the turntable is in place when you operate the oven.
Other Helpful Instructions
For best results and more enjoyable cooking, please read these comments thoroughly.
For Best Results:
- When determining the time for a particular food, begin by using minimum time and checking condition occasionally. It is easy to overcook food because microwaves cook very quickly.
- Small quantities of food, or foods with low water content may dry out and become hard if cooked too long.
Defrosting Frozen Foods:
- Foods that have been frozen can be placed directly in the oven for thawing. (Be certain to remove any metallic ties or wraps.)
- Defrost according to the Defrosting Tips found in this Manual.
- For areas of the food thawing faster than others, cover with small pieces of aluminium foil. This helps slow down or stop the defrosting process.
- Some foods should not be completely thawed before cooking. For example, fish cooks so quickly that it is sometimes better to begin cooking while still slightly frozen.
- It may be necessary to increase or decrease the cooking time in some recipes, depending on the starting temperature of the foods.
NOTE:
Air from the vent may become warm during cooking.
Browning:
There are a few foods which are not cooked long enough in the microwave oven to brown and may need additional colour.
Coatings such as paprika, and browning agents such as Worcestershire sauce may be used on chops, meat patties or chicken pieces.
Roasts, poultry or ham, cooked for 10-15 minutes or longer, will brown without extra additives.
Cleaning and Care
BE SURE THE OVEN IS TURNED OFF BEFORE CLEANING.
Keep the oven interior surfaces clean and dry. As a general rule, clean after each use.
INTERIOR WALLS
Remove any crumbs and food remains between the door and oven using a damp cloth. This area has to be particularly well cleaned to ensure the door will close properly. Remove any grease splashes with a soapy cloth, then rinse and dry. Do not use abrasives which may scratch and damage the painted surface of the oven. NEVER POUR WATER INTO THE OVEN
ROLLER REST
The roller rest should be removed and cleaned in hot soapy water at least once a week to prevent grease restricting the rotation of the wheels.
DOOR
The door and door seals should be kept clean at all times. Use only warm, soapy water to rinse, then dry thoroughly. DO NOT USE ABRASIVE MATERIALS, SUCH AS CLEANING POWDERS OR STEEL AND PLASTIC PADS. Metal parts will be easier to maintain if wiped frequently with a damp cloth. Do not use any steam cleaner.
EXTERIOR
Clean with mild soap and warm water, rinse and dry with a soft cloth. Do not use abrasive materials. Do not spill water in the vents. If the power lead becomes soiled, wipe it with a damp cloth.
MICROWAVE COOKING
- Open the oven door, place the food on the turntable in the oven, and close the oven door.
- Press stop (6). Set the power selector (1) to the desired power level. There are five power levels. The power selector can be set to any one of these positions.
- Set the timer selector (2) to the desired cooking time. Press start (5). The turntable begins to rotate and cooking starts.
At the end of cooking time, four short beep sounds are emitted, the lamp is turned off, and "End" will be shown in the display.
NOTE:
- Opening the door during cooking automatically turns off the oven and stops the timer. If cooking is to continue, close the door and press start (5).
- The oven will turn on and the timer will resume counting.
- The turntable may rotate in either direction.
- To cancel the operation when the oven is cooking, it is advisable to press stop (6).
- Even though the timer selector is not rotating during cooking, the setting time is elapsed. This is not a fault.
- During cooking, change of cooking time is possible, but the power level can't be changed. After cooking is over, an End Reminder Beep sounds every 1 minute for 5 minutes until the oven door is opened.
WEIGHT DEFROST COOKING
Defrosting frozen food is one of the benefits of a microwave oven. Defrosting using a microwave oven is much faster than in the refrigerator and safer than at room temperature, as it does not promote the growth of harmful bacteria.
It is important to remember that defrosting takes longer than normal cooking.
Check the food, turning it over at least once during defrosting.
- Press stop (6).
- Turn the power selector (1) to set the defrosting mode (*** Defrost)
- Turn the timer selector (2) clockwise to set the time.
- Press start (5).
CAUTION:
Be careful when removing your food the container will be hot!
TASTESAVER / CLOCK
Warning: Every time when your oven is plugged in, "24H" appears on the display.
It reminds you to set clock.
If you want, please operate as below.
If not, press STOP (6) to exit clock function.
SETTING TIME OF DAY
- Press TASTESAVER / CLOCK (3) to select "12H" or "24H".
- Turn TIMER (2) to set the hours.
- Press START (5) or TASTESAVER / CLOCK (3).
- Turn TIMER (2) to set the minutes.
- Press START (5) or TASTESAVER / CLOCK (3).
Operating Procedure
| MH6339H/MH6339HB/MH6339HSMH6339B/MH6339BB/MH6339BSMH-6330NS MH-6330NS | MH6339H/MH6339HB/MH6339HSMH6339B/MH6339BB/MH6339BS |
| TASTESAVERYou can keep cooked food warm in your microwave oven. This function keeps food warm at a desired temperature level controlled by the heating element.1. Press STOP (6).2. Press TASTESAVER (3) to select low or high level. “Ho-L” or “Ho-H” will appear on the display.3. Press START (5).4. If you want to quit the function, press STOP (6) twice. | WARNING:⚠️ TASTESAVER function can last for 90 minutes.⚠️ The turntable, oven lamp and fan doesn’t work during TASTESAVER.⚠️ When the TASTESAVER function runs, you can press TASTESAVER(3) to show left time,or press STOP (6) to show warm level, and press START (5) to go on.⚠️ The TASTESAVER function will pause when you open the door. when you close the door, and press START (5),the fuction goes on.⚠️ TASTESAVER function can’t keep the temperature exactly.⚠️ The food’s temperature will have small difference depending on cooking time weight, type of food, etc. |
| NOTE:* The TASTESAVER feature keeps food warm by using a radiant heat element source not a bulb or microwaves.* Food cooked should be covered during TASTESAVER.* Pastry items (pies, turnovers, etc.) should be uncovered during TASTESAVER.* Completed meals kept warm on a dinner plate can be covered during TASTESAVER.* When the function is over, you will hear four tones and “End” will appear in the oven display. |
Quick Defrost
Use this function to thaw only 0.5kg of minced meat very quickly.
This will require a standing time to allow the center to thaw. The following example will show you how to defrost 0.5kg of frozen minced meat.
Press STOP (6).
Weigh the food that you are about to defrost. Be certain to remove any metallic ties or wraps; then place the food in your oven and close the oven door.
Press Quick Defrost (4) to select the meat defrosting programme. The oven will start automatically.
During defrosting your oven will "BEEP", at which point open the oven door, turn food over and separate to ensure even thawing. Remove any portions that have thawed or shield them to help slow down thawing. After checking, close the oven door and press START (5) to resume defrosting.
Your oven will not stop defrosting (even when the beep sounded) unless the door is opened.
Quick Defrost Guide
Use this function to defrost quickly for minced meat.
Remove the meat completely from its wrapping. Place the mince onto a microwave-safe plate.
When "BEEP", at this point remove the mince from the microwave oven, turn the mince over and return to the microwave oven. Press start to continue. At the end of the program, remove the mince from the microwave oven, cover with foil and allow to stand 5-15 minutes or until completely thawed.
| CATEGORY | WEIGHT | UTENSIL | INSTRUCTIONS |
| 1. Minced Meat | 0.5kg Microwave ware(Flat plate) | Minced meat.Turn food over at beep.After defrosting, let stand for 5-15 minutes. |
Operating Procedure
| MH6339H/MH6339HB/MH6339HSMH6339B/MH6339BB/MH6339BSMH-6330NS MH-6330NS | MH6339H/MH6339HB/MH6339HSMH6339B/MH6339BB/MH6339BS |
| GRILL COOKINGSee page 3.1. Open the oven door, place the food on the rack in the oven, and close the oven door.2. Press stop (6).3. Turn the function & power selector (1) to grill mode (☐).4. Set the timer selector (2) to the desired cooking time.5. Press start (5). The turntable begins to rotate and cooking starts .At the end of cooking time four short beep sounds, and the lamp is turned off and “End” will be shown in the display.Refer to the note under MICROWAVE COOKING if you want to check the cooking condition.Don’t touch the viewing window during grill operation, because the temperature of the glass may rise up to 100°C.Prevent children from touching the front screen!When the grill is operated for the first time after purchasing the oven, some smoke may be observed.This will soon disappear. | COMBINATION COOKING See page 3.The above models have a combination cooking mode which allows you to cook food with grill (☐) and microwave (☐/☐/☐) atthe same time.The time it takes to cook food using this mode is generally shorter than using the two features separately.Open the oven door, place the food on the turntable or rack in the oven and close the oven door.Press stop (6).Turn the function & power selector (1) to COMBI mode (☐/☐/☐) .Set the timer selector (2) to the desired cooking time. Press start (5) . The turntable begins to rotate and cooking starts.At the end of cooking time four short beep sounds, and the lamp is turned off and “End” will be shown in the display.The grills the surface of the food while microwave cooking reaches inside. |
| Note:Use of the grill rack is preferable, as time and performance of cooking will vary when turntable is used alone. | CAUTION:Be careful when removing your food the container will be hot! |
Heating or Reheating Guide
To heat or reheat successfully in the microwave, it is important to follow several guidelines. Measure the amount of food in order to determine the time needed to reheat. Arrange the food in a circular pattern for best results. Room temperature food will heat faster than refrigerated food. Canned foods should be taken out of the can and placed in a microwavable container. The food will be heated more evenly if covered with a microwavable lid or vented plastic wrap. Remove cover carefully to prevent steam burns. Use the following chart as a guide for reheating cooked food.
| Item | Cook time (at HIGH) | Special Instructions |
| Sliced meat 13 slices (0.5cm thick) Cover with plastic wrap and vent. | 1/2 21/2 minutes Place sliced meat on microwavable plate. | Note: Gravy or sauce helps to keep meat juicy. |
| Chicken pieces1 breast 21 leg and thigh 1 | 31/2 minutes Place chicken pieces on microwavable plate. 1/2 21/2 minutes Cover with plastic wrap and vent. | |
| Fish fillet 1(170-230g) Cover with plastic wrap and vent. | 21/2 minutes Place fish on microwavable plate. | |
| Lasagne Place lasagne on microwavable plate.1 serving (300g) 4 | 1/2 7 minutes Cover with plastic wrap and vent. | |
| Casserole1 cup 14 cups | 1/2 31/2 minutes COOK covered in microwavable casserole dish. 5 71/2 minutes Stir once halfway through cooking. | |
| Casserolecream or cheese1 cup 14 cups | 1/2 3 minutes COOK covered in microwavable casserole dish. 4 61/2 minutes Stir once halfway through cooking. | |
| Sloppy Joe orBarbecued beef1 sandwich(1/2 cup meat filling)without bun | 1~3 minutes | Reheat filling and bun separately.Cook filling covered in microwavable casserole dish.Stir once. Heat bun as directed in chart below. |
| Mashed potatoes1 cup 24 cups | 31/2 minutes COOK covered in microwavable casserole dish. 6 81/2 minutes Stir once halfway through cooking. | |
| Baked beans COOK covered in microwavable casserole dish.1 cup 2 | 31/2 minutes Stir once halfway through cooking. | |
| Ravioli or pasta in sauce1 cup 34 cups | 41/2 minutes COOK covered in microwavable casserole dish. 8 111/2 minutes | Stir once halfway through cooking. |
| Rice1 cup 14 cups | 1/2 2 minutes COOK covered in microwavable casserole dish. 4 6 minutes | Stir once halfway through cooking. |
| Sandwich roll or bun1 roll | 20~35 seconds | Wrap in paper towel and place on glass tray. |
| Vegetables1 cup 14 cups | 1/2 3 minutesCOOK covered in microwavable casserole dish. 4 6 minutes | COOK covered in microwavable casserole dish.Stir once halfway through cooking. |
| Soup1 serving (8 oz.) | 2~3 minutes | COOK covered in microwavable casserole dish.Stir once halfway through cooking. |
Fresh Vegetable Chart
| Vegetable | Amount | Cook time (at HIGH) | Instructions | Standing Time |
| Artichokes 2 medium 5(230g each) 4 medium 11 | ~8 Trim. ~13 Cover. | Add 2 tsp water and 2 tsp juice. 2-3 minutes | ||
| Asparagus, 450g 3Fresh, Spears | ~7 Add | 1/2 cup water. Cover. 2-3 minutes | ||
| Green Beans 450g 8 | ~12 | Add 1/2 cup water in 1.5 litre casserole dish. Stir halfway through cooking. | 2-3 minutes | |
| Beets, Fresh | 450g | 13~18 | Add 1/2 cup water in 1.5 litre covered casserole dish. Rearrange halfway through cooking. | 2-3 minutes |
| Broccoli, Fresh, 450g 5Spears | ~9 Place | broccoli in baking dish. Add 1/2 cup water. | 2-3 minutes | |
| Cabbage, Fresh, Chopped | 450g 6 | ~8 Add | 1/2 cup water in 1.5 litre covered casserole dish. Stir halfway through cooking. | 2-3 minutes |
| Carrots, Fresh, Sliced | 200g 3 | ~6 Add | 1/4 cup water in 1 litre covered casserole dish. Stir halfway through cooking. | 2-3 minutes |
| Cauliflower, Fresh, Whole | 450g 8 | ~10 | Trim. Add 1/4 cup water in 1 litre covered casserole dish. Stir halfway through cooking. | 2-3 minutes |
| Fresh, Flowerettes Celery, Fresh, Sliced | 2 cups 4 cups | 3~6 Slice. 8~10 | Add 1/2 cup water in 1.5 litre covered casserole dish. Stir halfway through cooking. | 2-3 minutes |
| Corn, Fresh | 2 ears 5 | ~9 Husk. | Add 2 tbsp water in 1.5 litre baking dish. Cover. | 2-3 minutes |
| Mushrooms, Fresh, Sliced | 230g 2 | ~3 Place | mushrooms in 1.5 litre covered casserole dish. Stir halfway through cooking. | 2-3 minutes |
| Parsnips, Fresh, 450g 4 Sliced | ~8 Add | 1/2 cup water in 1.5 litre covered casserole dish. Stir halfway through cooking. | 2-3 minutes | |
| Peas, Green, Fresh | 4 cups | 7~10 | Add 1/2 cup water in 1.5 litre covered casserole dish. Stir halfway through cooking. | 2-3 minutes |
| Sweet Potatoes Whole Baking (170~230g each) | 2 medium 4 medium | 5~10 7~13 | Pierce potatoes several times with fork. Place on 2 paper towels. 2-3 minutesTurn over halfway through cooking. | 2-3 minutes |
| White potatoes, Whole Baking (170~230g each) | 2 potatoes 4 potatoes | 6~8 Pierce 10~15 | potatoes several times with fork. Place on 2 paper towels.Turn over halfway through cooking. | 2-3 minutes |
| Spinach, Fresh, Leaf | 450g 5 | ~8 Add | 1/2 cup water in 2 litre covered casserole dish. | 2-3 minutes |
| Courgette, Fresh, Sliced | 450g 5 | ~8 Add | 1/2 cup water in 1.5 litre covered casserole dish. Stir halfway through cooking. | 2-3 minutes |
| Courgette, Fresh, 450g 7 Whole | 450g 7 | ~10 | Pierce. Place on 2 paper towels.Turn courgette over and rearrange halfway through cooking. | 2-3 minutes |
Defrosting Tips
Defrosting meats tips & techniques
- You can defrost meats in their original wrapping as long as no metal is present. If necessary, shield small areas of meat or poultry with flat pieces of aluminium foil. This will prevent thin areas becoming warm during defrosting. Ensure the foil does not touch the oven walls.
- Food to be defrosted should be in a suitable microwave safe container and placed uncovered on the glass turntable.
- Defrost meats only as long as necessary. Separate items like minced meat, chops, sausages and bacon as soon as possible. Remove defrosted portions and continue to defrost remaining pieces. It is essential that food is checked during DEFROSTING as different foods vary in their defrosting speed.
- Whole pieces of meat are ready for standing time as soon as a fork can be pushed into the center of the meat using moderate pressure. The center will still be icy. Allow to stand until completely thawed.
- Defrost meat on defrost mode.
| Food Weight | Defrosting time (minutes) (minutes) | Standing time (minutes) | Remark | |
| BEEF | ||||
| Frankfurter | 450g | 4-5 | 5-10 | Turn over after half the time. |
| Minced beef | 500g | 7-9 | 5-10 | Turn over after two thirds of the time, remove thawed portion. |
| Steak, sirloin | 450g | 5-7 | 5-10 | Turn over after half the time. Separate. |
| Roast, loin(boneless) | 1000g | 10-15 | 10-15 | Turn over after half the time.Shield as needed. |
| Patties | 4ea (114g) | 5-8 | 5-10 | Turn over after half the time. |
| PORK | ||||
| Mince | 500g | 7-9 | 5-10 | Turn over after two thirds of the time, remove thawed portion. |
| Chops | 450g | 5-6 | 5-10 | Separate and turn over once. |
| Roast, loin(boneless) | 1000g | 10-15 | 10-15 | Turn over after half the time.Shield as needed. |
| POULTRY | ||||
| Whole Chicken | 1000g | 17-23 | 10-15 | Separate and rearrange once.Shield as needed. |
| Breasts (with bone) | 450g | 5-7 | 5-10 | Separate and rearrange once. |
| Drumsticks | 450g | 8-9 | 5-10 | Separate and rearrange once. |
| Thighs | 450g | 8-9 | 5-10 | Separate and rearrange once. |
| Wings | 450g | 6-8 | 5-10 | Separate and rearrange once. |
| FISH & SEAFOOD | ||||
| Whole fish | 450g | 6-8 | 5-10 | Turn over after half the time.Shield as needed. |
| Fish fillets | 500g | 7-9 | 5-10 | Separate and rearrange once. |
| Shrimp | 250g | 4-6 | 5-10 | Separate and rearrange once. |
Grill Cooking Chart
Directions for grilling meat on grill
- Trim excess fat from meat. Cut fat, making sure you do not cut into the lean. (This will stop the fat curling.)
- Arrange on the rack. Brush with melted butter or oil. Halfway through, turn the meat over.
| Item Weight Cooking time Hints | Approx. (in minutes) | |
| Beefburgers 50g x 2 13-16 | 100g x 2 19-23 | Baste with oil or melted butter. Thin items should be placed on the grill rack. Thick items can be placed on to a drip tray. Turn food over after half the cooking time. |
| Beefsteaks (2.5cm (1") thick)Rare 230g x 2 18-20Medium 230g x 2 22-24Well 230g x 2 26-28 | ||
| Pork chops (2.5cm (1") thick) 230g x 2 27-32 | ||
| Lamb chops (2.5cm (1") thick) 230g x 2 25-32 | ||
| Sausages 230g 13-16 Turn frequently. |
Directions for grilling fish and seafood
Place fish and seafood on the rack. Whole fish should be scored diagonally on both sides before grilling. Brush fish and seafood with melted butter, margarine or oil before and during cooking. This helps stop the fish drying out. Grill for times recommended in the chart. Whole fish and fish steaks should be carefully turned over halfway through grilling time. If desired thick fillets can also be turned halfway.
| Item Weight Cooking time Hints | Approx. (in minutes) | ||
| Fish fillets1cm ( 1/2 ") thick1.5cm ( 3/4 ") thick | 230g230g | 17-2120-24 | Brush with melted butter and turn over halfway through cooking. |
| Fish steaks2.5cm (1") thick | 230g | 24-28 | |
| Whole fish | 225-350g each450g | 16-2024-28 | Allow extra time for thick and oily fish. |
| ScallopsPrawns uncooked | 450g450g | 16-2016-20 | Baste well during cooking. |
Questions and Answers
Q. What's wrong when the oven light will not glow?
A. ■ Light bulb has blown.
■ Door is not closed.
Q. Why is steam coming out of the air exhaust vent and/or why is water dripping from the bottom of the door?
A. Steam is normally produced during cooking operations. The microwave has been made to vent this steam out of the side vent, occasionally this steam condenses on the door and water then drips out at the bottom of the door. This is quite normal and safe.
Q. Does microwave energy pass through the viewing screen in the door?
A. No. The metal screen reflects the energy to the oven cavity. The holes, or ports are made to allow light to pass; they do not let microwave energy through.
Q. Will the microwave oven be damaged if it operates while empty?
A. Yes. Never run it empty.
Q. Why do eggs sometimes pop?
A. When baking or poaching eggs, the yolk may pop due to steam build-up inside the yolk membrane. To prevent this, simply pierce the yolk with a toothpick before cooking. Never cook eggs without piercing their shells.
Q. Why is standing time recommended after the cooking operation has been completed?
A. Standing time is very important. With microwave cooking, the heat is in the food, not in the oven.
Many foods build up enough internal heat to allow the cooking process to continue, even after the food is removed from the oven. Standing time for joints of meat, large vegetables and cakes is to allow the inside to cook completely, without overcooking the outside.
Q. Why does my oven not always cook as fast as the microwave cooking guide says?
A. Check your cooking guide again, to make sure you've followed directions exactly; and to see what might cause variations in cooking time. Cooking guide times and heat settings are suggestions, to help prevent over-cooking . . . the most common problem in getting used to a microwave oven. Variations in the size, shape and weights and dimensions could require longer cooking time. Use your own judgement along with the cooking guide suggestions to check whether the food has been properly cooked just as you would do with a conventional cooker.
Q. Why do sparks and crackling (arcing) occur in the oven?
A. There may be several reasons why sparks and crackling (arcing) within cavity happens.
■ You are using dishes with metal parts or trim (silver or gold). ■ You have left a fork or other metal utensil in the oven. ■ You are using a large amount of metal foil. ■ You are using a metal twist-tie.
Technical Specifications
| MS2339H/MS2339HB/MS2339HS/MS2339B MS2339BB/MS2339BS/MS-4330W | |
| Power Inpu 230VAC, 50 Hz | |
| Output (IEC 60705 RATING STANDARD | 800 Watts |
| Microwave Frequenc 2450 MHz | |
| Outside Dimensions (W x H x D mm) | 485 x 280 x 385 |
| Power Consumption | |
| Microwave 1200 Watts |
| MH6339H/MH6339HB/MH6339HS/MH6339BMH6339BB/MH6339BS/MH-6330NS | |
| Power Inpu | 230 V AC, 50 Hz |
| Output (IEC 60705 RATING STANDARD | 800 Watts |
| Microwave Frequenc | 2450 MHz |
| Outside Dimensions (W x H x D mm) | 485 x 280 x 385 |
| Power Consumption | |
| Microwave 1200 Watts | |
| Gril | 1100 Watts |
| Combinatio | 2250 Watts |
• Dimensions shown are approximate. - Because we continually strive to improve our products we may change specifications without prior notice.

Disposal of your old appliance
- When this crossed-out wheeled bin symbol is attached to a product it means the product is covered by the European Directive 2002/96/EC.
- All electrical and electronic products should be disposed of separately from the municipal waste stream via designated collection facilities appointed by the government or the local authorities.
- The correct disposal of your old appliance will help prevent potential negative consequences for the environment and human health.
- For more detailed information about disposal of your old appliance, please contact your city office, waste disposal service or the shop where you purchased the product.
USER MANUAL
MICROWAVE OVEN
READ THIS USER MANUAL CAREFULLY BEFORE USING THE APPLIANCE.
MH6339H/MH6339B/MH6339HS/MH6339BS/MH6339HB/MH6339BB MH-6330NS/MS2339H/MS2339B/MS2339HS/MS2339BS/MS2339HB MS2339BB/MS-4330W
Four


MS2339H/MS2339HS/MS2339HB MS2339B/MS2339BS/MS2339BB MS-4330W

MH6339H/MH6339HS/MH6339HB MH6339B/MH6339BS/MH6339BB MH6330NS


- Front
- Window
- Door seal
- Safety lock
- Control panel
- Glass tray
- Rotating support
- Grill rack
Control Panel

MS2339H/MS2339HS/MS2339HB MS2339B/MS2339BS/MS2339BB MS-4330W
MH6339H/MH6339HS/MH6339HB MH6339B/MH6339BS/MH6339BB MH6330NS
① Power selector
WARNING: THIS APPARATUS MUST BE EARTHED


- CONTROL PANEL
- PRECAUTIONS TO AVOID POSSIBLE EXPOSURE TO EXCESSIVE MICROWAVE ENERGY
- WARNING
- INSTALLATION
- WARNING: THIS APPLIANCE MUST BE EARTHED
- IMPORTANT SAFETY INSTRUCTIONS
- READ CAREFULLY AND KEEP FOR FUTURE REFERENCE
- COOKING UTENSILS
- MICROWAVE
- NOTE
- GRILL
- NOTES
- OTHER HELPFUL INSTRUCTIONS
- FOR BEST RESULTS AND MORE ENJOYABLE COOKING, PLEASE READ THESE COMMENTS THOROUGHLY
- FOR BEST RESULTS
- DEFROSTING FROZEN FOODS
- BROWNING
- CLEANING AND CARE
- BE SURE THE OVEN IS TURNED OFF BEFORE CLEANING
- INTERIOR WALLS
- ROLLER REST
- DOOR
- EXTERIOR
- MICROWAVE COOKING
- WEIGHT DEFROST COOKING
- CAUTION
- TASTESAVER / CLOCK
- SETTING TIME OF DAY
- OPERATING PROCEDURE
- QUICK DEFROST
- QUICK DEFROST GUIDE
- HEATING OR REHEATING GUIDE
- FRESH VEGETABLE CHART
- DEFROSTING TIPS
- DEFROSTING MEATS TIPS & TECHNIQUES
- GRILL COOKING CHART
- DIRECTIONS FOR GRILLING MEAT ON GRILL
- DIRECTIONS FOR GRILLING FISH AND SEAFOOD
- QUESTIONS AND ANSWERS
- TECHNICAL SPECIFICATIONS
- DISPOSAL OF YOUR OLD APPLIANCE
- USER MANUAL
- MICROWAVE OVEN
- FOUR
- ① POWER SELECTOR
- WARNING: THIS APPARATUS MUST BE EARTHED
Brand : LG
Model : MS2339BB
Category : Microwave