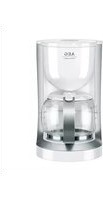
KF3130 - Coffee machine AEG - Free user manual and instructions
Find the device manual for free KF3130 AEG in PDF.


| Product Type | Coffee machine (filter coffee maker) |
| Brand | AEG |
| Model | KF3130 |
| Dimensions (H x W x D) | Approx. 33 x 20 x 25 cm |
| Weight | Approx. 1.5 kg |
| Power Source | 220-240 V, 50 Hz |
| Power Consumption | 850-1000 W |
| Water Tank Capacity | 1.25 L (approx. 10 cups) |
| Carafe Capacity | 1.25 L (approx. 10 cups) |
| Brewing Method | Drip filter |
| Filter Type | Paper filter (size 4) |
| Auto Shut-off | Yes, after 40 minutes |
| Keep Warm Function | Yes, hot plate |
| Anti-Drip System | Yes |
| Water Level Indicator | Yes, transparent tank with markings |
| Removable Filter Holder | Yes |
| Detachable Power Cord | No, fixed |
| Maintenance | Regular descaling recommended |
| Spare Parts Available | Carafe, water filter, filter holder |
| Repairability Index | Not specified, but generic parts available |
Frequently Asked Questions - KF3130 AEG
User questions about KF3130 AEG
0 question about this device. Answer the ones you know or ask your own.
Ask a new question about this device
Download the instructions for your Coffee machine in PDF format for free! Find your manual KF3130 - AEG and take your electronic device back in hand. On this page are published all the documents necessary for the use of your device. KF3130 by AEG.
USER MANUAL KF3130 AEG
natural_image
Exterior view of a modern AEG Electrolux coffee maker with clear glass and lid (no text or symbols on the device itself)COFFEE MAKER MODEL KF 31xx
D·GR·NL·F·GB
D Anleitung 3–10
GB Instruction book .....11-14
Before using the appliance for the first time, please read the safety advice on page 12 carefully.

D
Teile
natural_image
Exterior view of a modern kitchen coffee maker with a side panel and power outlet (no text or symbols visible)D
natural_image
Close-up of a coffee maker with a digital scale showing MAX, 15/10, and 12/8 (no visible text or symbols on the device itself)-
Kaff eezubereitung: Die Abdeckung öff nen und den Wassertank bis zur gewünschten Höhe mit frischem kalten Wasser füllen. Im Wassertank und an der Kaff eekanne sind Markierungen für 2–10 große bzw. 4–15 kleine Tassen. (Die Maschine darf nicht mit leerem Tank verwendet werden!)
-
Παρασκευή του καφέ: ανοίξτε το καπάκι και γεμίστε το δοχείο νερού με κρύο καθαρό νερό έως την επιθυμητή στάθμη νερού. Υπάρχει ένας δείκτης στάθμης για 2–10 μεγάλα φλιτζάνια/ 4–15 μικρά φλιτζάνια στο δοχείο νερού και στην κανάτα του καφέ. (Η μηχανή δεν πρέπει να χρησιμοποιείται με άδειο δοχείο!)
-
Koffi e maken: open het deksel en vul het waterreservoir met koud water tot het gewenste niveau. Op het waterreservoir en de koffi ekan ziet u een aanduiding voor 2-10 grote koppen / 4-15 kleine kopjes. (Gebruik het apparaat nooit met een leeg reservoir!)
-
Préparation du café : ouvrez le couvercle et remplissez le réservoir d'eau froide jusqu'au niveau souhaité. Le réservoir et la verseuse disposent tous deux d'une graduation de 2 à 10 grandes tasses / 4 à 15 petites tasses. (La cafetière ne doit pas fonctionner alors que le réservoir est vide!)

natural_image
Close-up of a coffee maker with a glass lid and open lid, pouring liquid from a white cup (no text or symbols visible)-
Einen Papierfi Iter der Größe 1x4 in den Filterhalter einlegen und mit Kaff eepulver füllen. Für einen durchschnittlich starken Kaff ee reicht ein Messlöff el voll (ca. 6–7 g) pro Tasse. Die Abdeckung des Wassertanks schließen und die Kanne (mit Abdeckung) auf die Wärmeplatte stellen.
-
Τοποθετήστε φίλτρο μεγέθους 1x4 στη θήκη του φίλτρου και γεμίστε το με αλεσμένο καφέ. Για δυνατό καφέ μια κουταλιά ανά φλιτζάνι είναι αρκετή (περίπου 6-7 γρ.). Κλείστε το καπάκι του δοχείου νερού και τοποθετήστε την κανάτα (μαζί με το καπάκι) πάνω στη θερμαινόμενη πλάκα.
-
Plaats een papieren 1x4-fi Iter in de fi Iterhouder en vul dit met gemalen koffi e. Voor koffi e met een gemiddelde sterkte is één maatschepje (ongeveer 6-7 g) per kopje voldoende. Sluit het deksel van het waterreservoir en plaats de koffi e kan (met deksel) op het warmhoudplaatje.
-
Placez un fi ltre en papier de taille n°4 dans le porte-fi ltre et remplissez-le de café moulu. Pour obtenir un café moyennement corsé, une cuillère doseur (env. 6 à 7 g) par tasse suffi t. Refermez le couvercle du réservoir d'eau et placez la verseuse (avec son couvercle) sur la plaque chauff ante.

natural_image
Exterior view of a modern coffee maker with a side panel (no text or symbols visible)-
Die Maschine über den EIN/AUS-Schalter einschalten. Die Stromanzeige leuchtet auf und heißes Wasser läuft in den Filter. Wenn kein Wasser mehr fließt, hält die Wärmeplatte den Kaff ee heiß, bis die Maschine über den EIN/AUS-Schalter ausgeschaltet wird.
-
Εκκινήστε τη μηχανή με το διακόπτη ΟΝ/ΟFF (ΕΝΕΡΓΟΠΟΙΗΣΗ/ΑΠΕΝΕΡΓΟΠΟΙΗΣΗ). Η ενδεικτική λυχνία λειτουργίας ανάβει και το ζεστό νερό ρέει στο φίλτρο. Όταν σταματήσει να ρέει το νερό, η θερμαινόμενη πλάκα διατηρεί τον καφέ ζεστό έως ότου η μηχανή απενεργοποιηθεί από το διακόπτη ΟΝ/ΟFF (ΕΝΕΡΓΟΠΟΙΗΣΗ/ΑΠΕΝΕΡΓΟΠΟΙΗΣΗ).
-
Zet het apparaat aan door op de AAN/UIT-knop te drukken. Het voedingslampje gaat branden en heet water stroomt in het fi lter. Als het water is doorgestroomd, houdt het warmhoudplaatje de koffi e heet totdat u het apparaat uitschakelt met de AAN/UIT-knop.
-
Allumez la machine en appuyant sur l'interrupteur marche/arrêt. Le voyant d'alimentation s'allume et l'eau chaude commence à s'écouler dans le fi ltre. A la fi n de la préparation du café, la plaque chauff ante maintient le café au chaud, jusqu'à l'arrêt de la cafetière à l'aide bouton marche/arrêt.

natural_image
Close-up of a mechanical component with a dashed circular annotation highlighting a specific area (no text or symbols present)-
Wird die Kanne entnommen, verhindert das Filterventil, dass Kaff ee auf die Wärmeplatte tropft. (Während der Zubereitung darf die Kanne nicht länger als 30 Sekunden entnommen werden, da sonst der Filter überläuft.)
-
Εάν η κανάτα αφαιρεθεί, η βαλβίδα του φίλτρου εμποδίζει τον καφέ να πέσει πάνω στη θερμαινόμενη πλάκα. (Κατά το βράσιμο, δεν πρέπει να αφαιρείτε την κανάτα για πάνω από 30 δευτερόλεπτα. Διαφορετικά, το φίλτρο θα ξεχειλίσει.)
-
Als u de koffi ekan verwijdert, voorkomt het fi Iterklepje dat koffi e op het warmhoudplaatje druppelt. (Tijdens het koffi ezetten mag de koffi ekan niet meer dan 30 seconden worden verwijderd, anders stroomt het fi liter over.)
-
Lorsque la verseuse est retirée, le système anti-gouttes empêche le café de goutter sur la plaque chauffe ante. (Pendant le passage du café, ne pas retirer la verseuse pendant plus de 30 secondes, le fi ltre risquerait de déborder.)
Reinigung und Pflege / Καθαρισμός και φροντίδα / Reiniging en onderhoud / Nettoyage et entretien
natural_image
Exterior view of a coffee maker with a cloth cover and a switch symbol (no text or labels)
natural_image
Diagram showing a bucket pouring into a container with an arrow indicating upward motion (no text or symbols present)
natural_image
3D rendering of a coffee maker with liquid pouring from a cup into a bottle (no text or symbols visible)D
natural_image
Modern coffee maker with a glass lid and control panel, no visible text or symbolsnatural_image
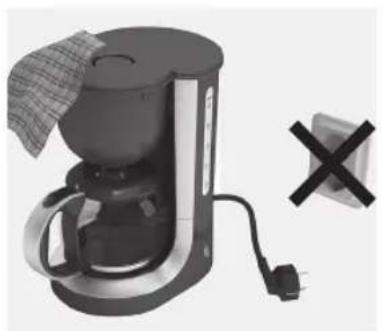
Close-up of a medical or laboratory device with a metallic handle and a magnified inset showing a mechanical component (no visible text or symbols)- Mindestens zweimal nur Wasser durch die Maschine laufen lassen. Dann die Kaff eekanne, die Abdeckung und den Filterhalter gründlich unter fließendem Wasser abspülen. Dabei das Filterventil mehrmals aktivieren.
- Αφήστε τη μηχανή να λειτουργήσει τουλάχιστον δύο φορές μόνο με καθαρό νερό. Έπειτα, πλύνετε καλά την κανάτα του καφέ, το καπάκι και τη θήκη φίλτρου σε τρεχούμενο νερό. Να ενεργοποιείτε συνεχόμενα τη βαλβίδα του φίλτρου κατά το πλύσιμο.
- Laat ten minste twee keer gewoon water door het apparaat lopen. Reinig vervolgens de koffi ekan, het deksel en de fi Iterhouder grondig onder stromend water en druk het fi Iterklepje regelmatig in tijdens het reinigen.
- Faire au minimum deux rinçages complets de la cafetière.Rincez ensuite abondamment la verseuse, le couvercle et le porte-fi Itre à l'eau courante en activant le système anti-gouttes de celui-ci à plusieurs reprises.
A. ON/OFF switch with power indicator light
B. Water tank
C. Water level indicator
D. Hinged lid
E. Filter holder with anti-drip valve
F. Coffee jug with graduation on both sides
G. Warming plate
H. Power cord & plug
Safety advice
GB
Read the following instruction carefully before using the appliance for the first time.
- This appliance is not intended for use by persons (including children) with reduced physical, sensory or mental capabilities, or lack of experience and knowledge, unless they have been given supervision or instruction concerning use of the appliance by a person responsible for their safety.
• Children should be supervised to ensure that they do not play with the appliance. - The appliance may only be connected to a power supply whose voltage and frequency comply with the specifications on the rating plate!
- Never use or pick up the appliance if
- the supply cord is damaged,
- the housing is damaged.
-
The appliance must only be connected to an earthed socket. If necessary an extension cable suitable for 10 A can be used.
-
If the appliance or the supply cord is damaged, it must be replaced by the manufacturer, its service agent or similarly qualified person, in order to avoid hazard.
• Always place the appliance on a flat, level surface. - Never leave the appliance unattended while connected to the supply mains.
- The appliance must be switched off and the mains plug withdrawn each time after use, before cleaning and maintenance.
- The appliance and accessories become hot during operation. Use only designated handles and knobs. Allow to cool down before cleaning or storage.
- The mains cable must not come into contact with any hot parts of the appliance.
- Do not immerse the appliance in water or any other liquid.
-
Do not exceed the maximum filling volume as indicated on the appliances.
-
Do not use or place the appliance on a hot surface or near source of heat.
• Appliance is for indoor use only. - This appliance is intended for domestic use only. The manufacturer cannot accept any liability for possible damage caused by improper or incorrect use.
Disposal
Disposal Packaging materials
The packaging materials are environmentally friendly and can be recycled. The plastic components are identified by markings, e.g. >PE<, >PS<, etc. Please dispose of the packaging materials in the appropriate container at the community waste disposal facilities.
Old appliance
The symbol 📁 on the product or on its packaging indicates that this product may not be treated as household waste. Instead it shall be handed over to the applicable collection point for the recycling of electrical and electronic equipment. By ensuring this product is disposed of correctly, you
will help prevent potential negative consequences for the environment and human health, which could otherwise be caused by inappropriate waste handling of this product. For more detailed information about recycling of this product, please contact your local city office, your household waste disposal service or the shop where you purchased the product.
Getting started
natural_image
Exterior view of a modern coffee maker with open lid and side-mounted power outlet (no text or symbols visible)GB
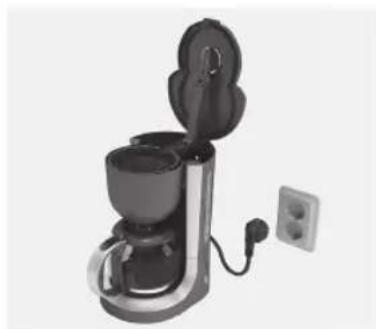
- Place the machine on a fl at surface. When starting the machine for the fi rst time, fi ll the tank with cold water. Start the machine with the ON/OFF switch. Let a full tank of water pass through the machine once or twice to clean it, without using paper fi liter or coffee.

natural_image
Exterior view of a modern coffee maker with a digital display showing max scale (no text or symbols on the device itself)- Making coff ee: open the lid and fill the water tank with fresh cold water up to the desired level. There is a gauge for 2–10 big cups / 4–15 small cups in the water tank and on the coff ee jug. (The machine must not be used with empty tank!)

natural_image
Close-up of a coffee maker with a glass lid and open lid, pouring liquid from a container (no text or symbols visible)- Insert a size 1x4 paper fi lter in the fi lter holder and fi ll it with ground coff ee. For average strong coff ee one measuring spoon (approx. 6-7 g) per cup is sufficient. Close the water tank lid and place the jug (complete with lid) onto the warming plate.
GB

natural_image
Modern coffee maker with a round handle and black cup, no visible text or symbols- Start the machine with the ON/OFF switch. The power indicator light will come on and hot water will flow into the filter. When water has stopped flowing, the warming plate keeps the coffee hot until the machine is turned off with the ON/OFF switch.

natural_image
Close-up of a mechanical component with a dashed circular annotation highlighting a raised section (no text or symbols present)- If the jug is removed, the fi lter valve prevents coff ee from dripping onto the warming plate. (While boiling, the jug must not be removed for longer than 30 seconds or the fi lter will overflow.)
Cleaning and care
 | 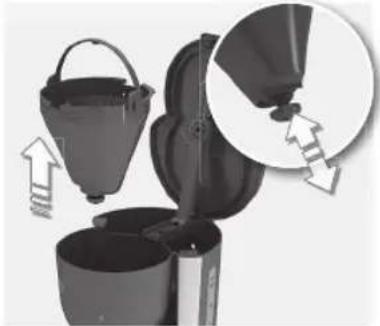 |  | |
| GB | 1. Turn the machine off and unplug the power cord. Wipe all outer surfaces with a damp cloth. Coff ee jug and jug lid are dishwasher proof. Never use caustic or abrasive cleaners, and never immerse the machine in liquid! | 2. To clean the fi lter holder, lift up the handle and remove the fi lter holder. To clean the fi lter valve thoroughly, rotate it several times while it is being rinsed. | 3. Decalcifying is recommended regularly, depending on water hardness. Fill the tank with water and decalcifi er according to product instructions, then follow steps 4 and 5. |
 |  | ||
| 4. Place the coff ee jug with its lid onto the warming plate. Allow the decalcifi er to take eff ect for about 15 minutes, then switch the machine on. Switch it off when the solution has fi nished fl owing through. If necessary repeat the decalcifying process. | 5. Allow the machine to run at least twice with plain water. Then thoroughly rinse the coff ee jug, lid and fi lter holder under running water, activate the fi lter valve repeatedly during the rinse process. |
D Deutschland
Electrolux Home Products Belgium
Divisie Floor Care
Bergensesteenweg, 719
1502 LEMBEEK
Tel.: 02/363 05 41
Belgique
DÉCLARATION DE CONDITIONS DE GARANTIE
Electrolux Home Products Belgium
Division Floor Care
Bergensesteenweg, 719
1502 LEMBEEK
Tel.: 02/363 05 41
AEG
Electrolux
Share more of our thinking at www.electrolux.com
3481 A KF31xx02020909
Brand : AEG
Model : KF3130
Category : Coffee machine