
Series 3000 QG3320 - Beard trimmer PHILIPS - Free user manual and instructions
Find the device manual for free Series 3000 QG3320 PHILIPS in PDF.


| Product type | Beard trimmer |
| Brand | Philips |
| Model | Series 3000 QG3320 |
| Dimensions (L x W x H) | 17 x 5 x 4 cm |
| Weight | 180 g |
| Power source | Rechargeable, Li-ion battery |
| Runtime | 45 minutes |
| Charging time | 10 hours |
| Main functions | Precision cutting, dual cutting direction, adjustable grid |
| Number of length settings | 14 (from 0.5 to 7 mm) |
| Included cutting combs | 4 combs (1, 3, 5, 7 mm) |
| Care and cleaning | Removable blades washable under running water |
| Blade material | Stainless steel |
| Safety | Automatic shutdown in case of overheating, cordless use |
| Spare parts and repairability | Replacement blades available (model QG3000) |
| Included accessories | Cleaning brush, charger, storage case |
| Warranty | 2 years |
| Color | Black |
Frequently Asked Questions - Series 3000 QG3320 PHILIPS
User questions about Series 3000 QG3320 PHILIPS
0 question about this device. Answer the ones you know or ask your own.
Ask a new question about this device
Download the instructions for your Beard trimmer in PDF format for free! Find your manual Series 3000 QG3320 - PHILIPS and take your electronic device back in hand. On this page are published all the documents necessary for the use of your device. Series 3000 QG3320 by PHILIPS.
USER MANUAL Series 3000 QG3320 PHILIPS


English 6
Dansk 22
Deutsch 38
Español 57
Français 74
Italiano 92
Nederlands 110
Norsk 128
Português 144
Suomi 162
Svenska 179
Türkçe 195
Ελληνικα 211
English
Introduction
Congratulations on your purchase and welcome to Philips! To fully benefit from the support that Philips offers, register your product at www.philips.com/welcome.
General description (Fig. 1)
1 Full size trimmer
2 Attachment connector
3 Handle
4 On/off slide
5 Detail trimmer
6 Detail foil shaver
7 Nose trimmer rotary
8 Eyebrow and detail comb
9 Beard and stubble comb (1-18mm)
10 Body comb (3-12mm)
11 Beard comb (1-12mm)
12 Hair comb (3-20mm)
13 Supply unit
14 Small plug
15 Comb
16 Cleaning brush
17 Pouch
The accessories supplied may vary for different products. The box shows the accessories that have been supplied with your appliance.
Important safety information
Read this important information carefully before you use the appliance and its accessories and save it for future reference. The accessories supplied may vary for different products.
Danger

- Keep the supply unit dry.
Warning
- To charge the battery, only use the detachable supply unit (A00390) provided with the appliance.
- The supply unit contains a transformer. Do not cut off the supply unit to replace it with another plug, as this causes a hazardous situation.
- This appliance can be used by children aged from 8 years and above and persons with reduced physical, sensory or mental capabilities or lack of experience and knowledge if they have been given supervision or instruction concerning use of the appliance in a safe way and understand the hazards involved. Children shall not play with the appliance. Cleaning and user maintenance shall not be made by children without supervision.
- Always unplug the appliance before you clean it under the tap.
- Always check the appliance before you use it. Do not use the appliance if it is damaged, as this may cause injury. Always replace a damaged part with one of the original type.
- Do not open the appliance to replace the rechargeable battery.
Caution

- Never immerse the charging stand in water and do not rinse it under the tap.
- Never immerse the appliance in water. Do not use the appliance in the bath or shower.
- Never use water hotter than 60°C to rinse the appliance.
- Only use this appliance for its intended purpose as shown in the user manual.
- For hygienic reasons, the appliance should only be used by one person.
- Do not use the supply unit in or near wall sockets that contain an electric air freshener to prevent irreparable damage to the supply unit.
- Never use compressed air, scouring pads, abrasive cleaning agents or aggressive liquids such as petrol or acetone to clean the appliance.
Electromagnetic fields (EMF)
This Philips appliance complies with all applicable standards and regulations regarding exposure to electromagnetic fields.
General

- This appliance can be safely cleaned under the tap.
- The supply unit is suitable for mains voltages ranging from 100 to 240 volts.
- The supply unit transforms 100-240 volts to a safe low voltage of less than 24 volts.
Charging
Charge the appliance before you use it for the first time and when the battery is almost empty.
Charging takes approx. 10 hours.
A fully charged appliance, has an operating time of up to 60 minutes (QG3352, QG3347, QG3344, QG3342, QG3340, QG3339, QG3337, QG3335, QG3332, QG3330, QG3329, QG3327, QG3322,
QG3320) or 45 minutes (QG3338, QG3334, QG3321, QG3341, QG410).
Charging with the supply unit

Note: This appliance can only be used without cord.
1 Make sure the appliance is switched off.
2 Put the small plug in the appliance and put the supply unit in the wall socket.
3 After charging, remove the supply unit from the wall socket and pull the small plug out of the appliance.
Using the appliance
The accessories supplied may vary for different products. The box shows the accessories that have been supplied with your appliance.
Always check the appliance and all accessories before use. Do not use the appliance or any accessory if it is damaged, as this may cause injury. Always replace a damaged part with one of the original type.
Trimming tips
- If you are trimming for the first time, be careful. Do not move the appliance too fast. Make smooth and gentle movements
- Since all hairs do not grow in the same direction, you may want to try different trimming positions (i.e. upwards, downwards, or across). Practice is best for optimum results.
- Always make smooth and gentle movements and be sure the surface of the comb always stays in contact with your skin.
Note: This appliance can only be used without cord.
Switching the appliance on and off
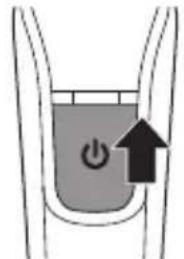
1 To switch on the appliance, slide the on/off button up.
2 To switch off the appliance, slide the on/off button down.
Detaching and attaching combs

1 To detach a comb from a cutting element, press the length setting selector, grab the sides and pull it upwards off the cutting element.

2 To attach any type of comb on a cutting element, slide it into the guiding grooves on both sides of the handle.
Detaching and attaching cutting elements

1 To detach a cutting element, turn it anti-clockwise and pull it upwards off the handle.

2 To attach a cutting element, place it on the handle and turn it clockwise.
12 English
Precision attachments for use on face
- Make controlled movements against the hair growth and move it over the part that needs trimming.
Nose trimming
You can use the nose trimmer attachment to trim your nose hair and ear hair.
- Make sure your nostrils are clean. Make sure your outer ear channels are clean and free from wax.
- Do not insert the tip more than 0.5cm and make controlled movements.
Nosetrimmer rotary

Trimming nose hair:
1 Gently move the tip in and out your nose while turning it round to remove unwanted hairs.
2 Switch off and clean the appliance after each use (see 'Cleaning and maintenance').
Trimming ear hair:

1 Slowly move the tip round the ear to remove hairs that stick out beyond the rim of the ear.
2 Gently move the tip in and out the outer ear channel to remove unwanted hairs.
3 Switch off and clean the appliance after each use (see 'Cleaning and maintenance').
Detail trimmer

You can use the detail trimmer without comb to create fine lines and contours around your facial style, close to the skin (to a length of 0.5mm).
1 Hold the detail trimmer perpendicular to the skin and move it upwards or downwards with gentle pressure.
2 Switch off and clean the appliance after each use (see 'Cleaning and maintenance').
Eyebrow and detail comb

You can use the 21mm detail trimmer with the detail comb attached for tidying up your eyebrows or trimming your sideburns.

1 Slide the detail comb onto the detail trimmer.
2 Comb your eyebrows in the direction of hair growth.
3 Move the comb over the eyebrow from the outer tip of the eyebrow towards the base of the nose (against the direction of hair growth).
4 Switch off and clean the appliance after each use (see 'Cleaning and maintenance').
Detail foil shaver

You can use the detail foil shaver to shave unwanted hairs on your cheeks and chin with precision.
1 Gently press the detail foil shaver onto the skin and shave along contoured edges to remove any hairs.
2 Switch off and clean the appliance after each use (see 'Cleaning and maintenance').
Attachments for use on beard
- We advise you to start at the highest setting to familiarize yourself with the appliance.
- Make controlled movements against the hair growth and move it over the part that needs trimming.
Full size trimmer

You can use the full size trimmer without comb to trim hair close to the skin or to get clean lines around your beard, neck and sideburns (to a length of 0.5mm).
1 To trim hair close to the skin, place the flat side of the trimming head against your skin and make strokes in the desired direction.
2 For contouring, hold the trimming head perpendicular to the skin and move the trimming head upwards or downwards with gentle pressure.
3 Switch off and clean the appliance after each use (see 'Cleaning and maintenance').
Beard and stubble comb (1-18mm)

You can use the beard and stubble comb attached to the full size trimmer to evenly trim your beard, stubble and moustache. You can choose any setting between 1 and 18mm in steps of 1mm.
1 Attach the beard and stubble comb onto the appliance.
2 Press the length selector and then slide it up or down to select the desired hair length setting.
3 To trim most effectively, move the appliance against the hair growth direction. Make sure that the surface of the comb always stays in contact with the skin.
4 Switch off and clean the appliance after each use (see 'Cleaning and maintenance').
Beard comb (1-12mm)

You can use the beard comb attached to the full size trimmer to evenly trim your beard and moustache. You can choose any setting between 1 and 12mm in steps of 1mm.
1 Attach the beard and stubble comb onto the appliance.
2 Select the desired hair length setting.
3 To trim most effectively, move the appliance against the hair growth direction.
Note: Make sure that the surface of the comb always stays in contact with the skin.
4 Switch off and clean the appliance after each use (see 'Cleaning and maintenance').
Attachments for use on head

Hair clipping with comb:
1 Comb the hair in the growth direction.
2 Slowly move the trimmer against the hair growth direction. Press lightly.
3 Since hair grows in different directions, you need to move the appliance in different directions as well (upward, downward or across).
- Always make sure that the flat part of the comb is in full contact with the scalp to obtain an even result.
- When you trim for the first time, start at the highest length setting (20mm) to familiarise yourself with the appliance.
Hair clipping without comb:
Be careful when you trim without comb because the cutting unit removes every hair it touches.
1 Before you start to contour the hairline around the ears, with any comb attachment, comb the hair ends over the ears
2 Tilt the appliance in such a way that only one edge of the trimmer touches the hair.
3 Only cut the hair ends. The hairline should be close to the ear.
4 To contour the neckline and sideburns, turn the appliance and make downward strokes.
5 Move the appliance slowly and smoothly. Follow the natural hairline.
Full size trimmer
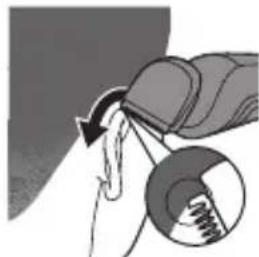
You can use the full size trimmer without comb to clip hair very close to the skin (to a length of 0.5mm) or to create contours around your ears or neck.
Switch off and clean the appliance after each use (see 'Cleaning and maintenance').
Hair comb (3-20mm)

You can use the hair comb attached to the full size trimmer for an even haircut. You can choose any setting between 3 and 20mm in steps of 1mm.
Switch off and clean the appliance after each use (see 'Cleaning and maintenance').
Attachments for use on body
Body trimming with comb
- It is recommended to trim your body hair when it is dry because wet hair tends to stick to the body.
- Take your time when you first start to trim sensitive areas. You have to acquire practice with the appliance. Your skin also needs some time to adjust to the procedure.
- When you trim sensitive areas, we advise you not to use the trimmer without the trimming comb.
- When too many hairs have accumulated on the appliance, blow out before use, for best trimming results.
Body trimming (3-12mm)

You can use the body comb attached to the full size trimmer, to trim hairs below the neckline. You can choose any setting between 3 and 12mm in steps of 1 mm.
Switch off and clean the appliance after each use (see 'Cleaning and maintenance').
Cleaning and maintenance
Regular cleaning guarantees better grooming results.
Never clean, remove or replace a shaving or cutting unit while the appliance is switched on.
Always check if the water is too hot, to prevent burning your hands.
Never dry cutting units or shaving foils with a towel or tissue, as this may cause damage.
Never use compressed air, scouring pads, abrasive cleaning agents or aggressive liquids such as petrol or acetone to clean the appliance.
Cleaning and storage
Never use scouring pads, abrasive cleaning agents or aggressive liquids such as petrol or acetone to clean the appliance.

Always switch off the appliance and disconnect it from the wall socket before cleaning.
Never dry the trimmer teeth with a towel or tissue, as this may damage the trimmer teeth.
1 Remove any comb or attachment from the appliance.
2 Blow and/or shake out any hair that has accumulated in the attachments and/or combs.
3 Clean the attachments, the combs and the appliance under lukewarm water after every use.
4 Carefully shake off excess water and let all parts air dry completely.
5 Store the appliance and its attachments in the storage pouch to prevent damage.
Cleaning shaving foils
The shaving foil is very delicate. Handle it carefully. Replace the shaving foil if it is damaged.
Detail foil shaver
1 Pull the top part of the detail-foil shaver off the bottom part.


2 Blow and/or shake out any hair that has accumulated inside the detail-foil shaver.
3 Clean the top part of the detail-foil shaver under a lukewarm tap.
4 Carefully shake off excess water and let air dry completely.
Ordering accessories
To buy accessories or spare parts, visit www.shop.philips.com/service or go to your Philips dealer. You can also contact the Philips Consumer Care Center in your country (see the international warranty leaflet for contact details).
Recycling

- This symbol means that this product shall not be disposed of with normal household waste (2012/19/EU).
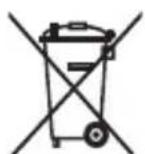
- This symbol means that this product contains a built-in rechargeable battery which shall not be disposed of with normal household waste (2006/66/EC). Please take your product to an official collection point or a Philips service center to have a professional remove the rechargeable battery.
- Follow your country's rules for the separate collection of electrical and electronic products and rechargeable batteries. Correct disposal helps prevent negative consequences for the environment and human health.
Removing the rechargeable battery
Only remove the rechargeable battery when you discard the product. Before you remove the battery, make sure that the product is disconnected from the wall socket and that the battery is completely empty.
Take any necessary safety precautions when you handle tools to open the product and when you dispose of the rechargeable battery.
1 Make sure the appliance is disconnected from the mains.
2 Remove the attachment.
3 Remove the on/off button of the appliance with a flathead screwdriver.
4 Remove the front panel of the appliance with a flathead screwdriver.
5 To pull out the inner body, apply a tilting force in the indicated hole with a flathead screwdriver. Pull upward on the top cover.


6 Separate the inner body and the tube.
7 Remove the on/off contact.

8 Unhook and remove the rest of the cover to expose the rechargeable battery.
9 Cut the wires to separate the rechargeable battery from the appliance.
Warranty and support
If you need information or support, please visit www.philips.com/support or read the international warranty leaflet.
Warranty restrictions
Cutting units are not covered by the terms of the international warranty because they are subject to wear.
Introduktion
1 Tænd apparatet ved at trykke on/off-knappen opad.
2 Sluk apparatet ved at trykke on/off-knappen nedad.
Klipning med kam:


Recorte del pelo de la nariz:


Neushaar trimmen:
Lading tar ca. 10 timer.
Trimme nesehår:
Kroppstrimming (3–12 mm)

Tørk aldri tennene på trimmeren med et håndkle eller tørkepapir. Det kan skade tennene på trimmeren.

Encomendar acessórios
Trimma näshår:
Tarakla saç kesimi:
75% recycled paper
75% papier recyclé
- ENGLISH
- INTRODUCTION
- GENERAL DESCRIPTION (FIG. 1)
- IMPORTANT SAFETY INFORMATION
- DANGER
- WARNING
- CAUTION
- ELECTROMAGNETIC FIELDS (EMF)
- GENERAL
- CHARGING
- CHARGING WITH THE SUPPLY UNIT
- USING THE APPLIANCE
- TRIMMING TIPS
- SWITCHING THE APPLIANCE ON AND OFF
- DETACHING AND ATTACHING COMBS
- DETACHING AND ATTACHING CUTTING ELEMENTS
- PRECISION ATTACHMENTS FOR USE ON FACE
- NOSE TRIMMING
- NOSETRIMMER ROTARY
- DETAIL TRIMMER
- EYEBROW AND DETAIL COMB
- DETAIL FOIL SHAVER
- ATTACHMENTS FOR USE ON BEARD
- FULL SIZE TRIMMER
- BEARD AND STUBBLE COMB (1-18MM)
- BEARD COMB (1-12MM)
- ATTACHMENTS FOR USE ON HEAD
- HAIR COMB (3-20MM)
- ATTACHMENTS FOR USE ON BODY
- BODY TRIMMING (3-12MM)
- CLEANING AND MAINTENANCE
- CLEANING AND STORAGE
- CLEANING SHAVING FOILS
- ORDERING ACCESSORIES
- RECYCLING
- REMOVING THE RECHARGEABLE BATTERY
- WARRANTY AND SUPPORT
- WARRANTY RESTRICTIONS
- INTRODUKTION
- KROPPSTRIMMING (3–12 MM)
- TØRK ALDRI TENNENE PÅ TRIMMEREN MED ET HÅNDKLE ELLER TØRKEPAPIR. DET KAN SKADE TENNENE PÅ TRIMMEREN
- ENCOMENDAR ACESSÓRIOS
Brand : PHILIPS
Model : Series 3000 QG3320
Category : Beard trimmer