
24MT48VF - Television LG - Free user manual and instructions
Find the device manual for free 24MT48VF LG in PDF.


| Product type | LED HD Television |
| Brand | LG |
| Model | 24MT48VF |
| Screen size (diagonal) | 60 cm (24 inches) |
| Resolution | 1366 x 768 pixels (HD) |
| Display technology | LED |
| Dimensions with stand (W x H x D) | 55.4 x 38.2 x 15.1 cm |
| Dimensions without stand (W x H x D) | 55.4 x 33.5 x 5.6 cm |
| Weight with stand | 3.8 kg |
| Weight without stand | 3.5 kg |
| Power supply | 100-240 V, 50/60 Hz |
| Power consumption (operation) | 30 W |
| Power consumption (standby) | 0.5 W |
| Tuner | DVB-T/T2/C/S2 (depending on country) |
| Connectivity | HDMI (x2), USB, VGA (PC), composite input, headphone output, antenna |
| Speakers | 2 x 5 W (stereo) |
| Main functions | LED screen, picture modes, sleep timer, parental lock, teletext |
| Care and cleaning | Soft dry cloth, do not use abrasive or liquid products |
| Safety instructions | Do not expose to moisture, do not open, ventilate properly |
| Spare parts and repairability | Remote control, table stand, internal power adapter; parts available through authorized service |
Frequently Asked Questions - 24MT48VF LG
User questions about 24MT48VF LG
0 question about this device. Answer the ones you know or ask your own.
Ask a new question about this device
Download the instructions for your Television in PDF format for free! Find your manual 24MT48VF - LG and take your electronic device back in hand. On this page are published all the documents necessary for the use of your device. 24MT48VF by LG.
USER MANUAL 24MT48VF LG
natural_image
Illustration of a flat-screen television displaying (no text or symbols)



www.lg.com

English Read Safety and Reference.
natural_image
Technical line drawing of a device with a handle and internal components, no text or symbols present
natural_image
Line drawing of a computer monitor with an arrow pointing to it, no text or symbols present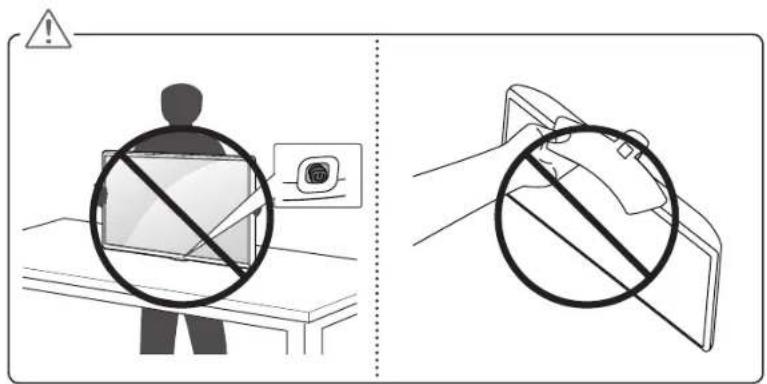


flowchart
graph TD
    A["USB IN 5V = 0.5 A"] --> B["USB Plug"]
    A --> C["USB Switch"]
flowchart
graph TD
    A["AC/DC"] --> B["AC/DVD"]
    B --> C["HDMI OUT"]
    C --> D["AC/DVD"]
    D --> E["RGB IN (PC)"]
    E --> F["RGB OUT"]
    F --> G["Audio OUT"]
    H["VIDEO"] --> I["VIDEO"]
    J["VIDEO"] --> K["VIDEO"]
    L["VIDEO"] --> M["VIDEO"]
    N["VIDEO"] --> O["VIDEO"]
    P["VIDEO"] --> Q["VIDEO"]
    R["VIDEO"] --> S["VIDEO"]
    T["VIDEO"] --> U["VIDEO"]
    V["VIDEO"] --> W["VIDEO"]
    X["VIDEO"] --> Y["VIDEO"]
    Z["VIDEO"] --> AA["VIDEO"]
    AB["VIDEO"] --> AC["VIDEO"]
    AD["VIDEO"] --> AE["VIDEO"]
    AF["VIDEO"] --> AG["VIDEO"]
    AH["VIDEO"] --> AI["VIDEO"]
    AJ["VIDEO"] --> AK["VIDEO"]
    AL["VIDEO"] --> AM["VIDEO"]
    AN["VIDEO"] --> AO["VIDEO"]
    AP["VIDEO"] --> AQ["VIDEO"]
    AR["VIDEO"] --> AS["VIDEO"]
    AT["IN"] --> AU["IN"]
    AV["IN"] --> AW["IN"]
    AX["AV IN"] --> AY["Pa"]
    AX["AV IN"] --> AZ["Pb"]
    AX["AV IN"] --> BA["Pc"]
    AX["AV IN"] --> BB["L"]
    AX["AV IN"] --> BC["R"]
    BD["IN"] --> BE["Pd"]
    BD["AV IN"] --> BF["Pf"]
    BG["IN"] --> BH["Pg"]
    BG["AV IN"] --> BI["Ph"]
    BJ["IN"] --> BK["Pi"]
    BL["IN"] --> BM["Pj"]
    BN["IN"] --> BO["Pk"]
    BP["IN"] --> BQ["Pl"]
    BR["IN"] --> BS["Pq"]
    BT["IN"] --> BU["Pr"]
    BV["IN"] --> BW["Ps"]
    BX["IN"] --> BY["Pt"]
    BZ["IN"] --> CA["Pz"]
    CB["IN"] --> CC["Pc"]
    CD["IN"] --> CE["Pd"]
    CF["IN"] --> CG["Pe"]
    CH["IN"] --> CI["Pf"]
    CJ["IN"] --> CK["Pg"]
    CL["IN"] --> CM["Ph"]
    CN["IN"] --> CO["Pi"]
    CP["IN"] --> CY["Pj"]
    DD["IN"] --> DE["Pk"]
    DF["IN"] --> DG["Pl"]
    DH["IN"] --> DI["Pq"]
    DJ["IN"] --> DK["Pr"]
    DL["IN"] --> DM["Pf"]
    DN["IN"] --> DO
    DB["AV IN"] --> DC["Pa"]
    DB["AV IN"] --> DV["Pb"]
    DB["AV IN"] --> DW["Pc"]
    DB["AV IN"] --> DX["Pd"]
    DB["AV IN"] --> DXA["Pf"]
    DB["AV IN"] --> DXB["Pg"]
DC-IN (19 V--)


Depending on model


natural_image
Simple line drawing of a mechanical component with two cylindrical parts and a handle (no text or symbols)
natural_image
Diagram of a mechanical component with an arrow indicating rotation (no text or symbols)
natural_image
Simple line drawing of a mechanical component with an arrow indicating direction (no text or symbols)
OWNER'S MANUAL
Safety and Reference
LED TV*
*Disclaimer
LG LED TV applies LCD screen with LED backlights.
Please read this manual carefully before operating your set and retain it for future reference.
MT48*
Table of contents
3 Safety precautions
5 Licenses
5 Open Source Software Notice Information
6 Preparing
6 Lifting and moving the TV
6 Setting up the TV
7 Using the joystick button
7 Basic functions
7 Adjusting the menu
7 Mounting on a table
8 Using the kensington security system
8 Mounting on a wall
9 Connections (Notifications)
9 Antenna connection
9 Other connections
9 Connecting to a PC
10 Remote control
11 Settings
15 To see web manual
15 Maintenance
15 Cleaning your TV
15 - Screen, frame, cabinet, and stand
15 - Power cord
15 Preventing "Image burn" or "Burn-in" on your TV screen
16 Troubleshooting
17 Specifications
20 Environmental information
Service
Unplug the monitor from the wall outlet and refer servicing to qualified service personnel when :
• The power cord or plug is damaged or frayed.
• Liquid has been spilled into the monitor.
• The monitor has been exposed to rain or water.
- The monitor does not operate normally following the operating instructions. Adjust only those controls that are covered in the operating instructions. An improper adjustment of other controls may result in damage and often requires extensive work by a qualified technician to restore the monitor to normal operation.
• The monitor has been dropped or the cabinet has been damaged.
• The monitor exhibits a distinct change in performance.
- Snapping or popping from the monitor is continuous or frequent while the monitor is operating. It is normal for some monitors to make occasional sounds when being turned on or off, or when changing video modes.
Do not attempt to service the monitor yourself, as opening or removing covers may expose you to dangerous voltage or other hazards. Refer all servicing to qualified service personnel.
Safety precautions
Please read these safety precautions carefully before using the product.

RNING
If you ignore the warning message, you may be seriously injured or there is a possibility of accident or death.

CAUTION
If you ignore the caution message, you may be slightly injured or the product may be damaged.
Precautions in installing the product

WARNING
- Keep away from heat sources like electrical heaters.
▶ Electrical shock, fire, malfunction or deformation may occur. - Keep the packing anti-moisture material or vinyl packing out of the reach of children.
Anti-moisture material is harmful if swallowed. If swallowed by mistake, force the patient to vomit and visit the nearest hospital. Additionally, vinyl packing can cause suffocation. Keep it out of the reach of children.
- Do not put heavy objects on the product or sit upon it.
▶ If the product collapses or is dropped, you may be injured. Children must pay particular attention.
- Do not leave the power or signal cable unattended on the pathway.
The passerby can falter, which can cause electrical shock, fire, product breakdown or injury.
• Install the product in a neat and dry place.
▶ Dust or moisture can cause electrical shock, fire or product damage.
- If you can smell smoke or other odors or hear a strange sound unplug the power cord and contact the service center.
▶ If you continue to use without taking proper measures, electrical shock or fire can occur.
- If you dropped the product or the case is broken, turn off the product and unplug the power cord.
▶ If you continue to use without taking proper measures, electrical shock or fire can occur. Contact the service center.
- Do not drop an object on or apply impact to the product. Do not throw any toys or objects on the product screen.
▶ It can cause injury to human, problem to product and damage the display.
- Do not let the product fall or drop when connecting it with an external device.
▶ This may cause injury and/or damage to the product.
- When connecting it with a game device, keep a distance of four times as long as the diagonal measurement of the screen from the device.
▶ If the product falls because of the short cable, this may cause injury and/or damage to the product.
- Leaving a fixed image on the screen for a long time may cause damage to the screen and cause image burn-in. To use the product for a long period of time, use a screen saver on the PC or utilize the residual image prevention function on the product, and when the product is not used, turn off the power. Burn-in and related problems are not covered by the warranty on this product.
- Do NOT install this product on a wall where there is high risk of exposure to oil fumes or mist.
▶ This may damage product and cause is to fail.

CAUTION
- Make sure the product ventilation hole is not blocked. Install the product in a suitably wide place (more than 100 mm from the wall).
▶ If you install the product too close to the wall, it may be deformed or fire can break out due to internal heat.
- Do not block the ventilation hole of the product by a tablecloth or curtain.
▶ The product can be deformed or fire can break out due to overheating inside the product.
• Install the product on a flat and stable place that has no risk of dropping the product.
▶ If the product is dropped, you may be injured or the product may be broken.
• Install the product where no EMI occurs.
- Keep the product away from direct sunlight.
▶ The product can be damaged.
- If you install the product in a place that does not meet the recommended conditions, this may cause serious damage to the product's picture quality, life cycle and appearance. Please check with LG or a qualified installer before installing. This caution applies to a place where there is an abundance of fine dust or oil mist, chemical substances are used, the temperature is very high or low, the humidity is very high, or the product is likely to remain turned on for a long period of time (airport and train station), failure to do so will invalidate the warranty.
- Do not install the product in an area with poor ventilation (e.g. on a bookshelf, in a closet) or outside and avoid placing on cushions or carpets.
- In addition, do not install it where there are heating objects such as lighting equipment.
Precautions to the AC adapter and electrical power

WARNING
- If water or any foreign substance goes inside the product (TV, monitor, power cord, or AC adapter), disconnect the power cord immediately and contact the service center.
▶ Otherwise, this may cause a fire or electric shock due to damage to the product. - Do not touch the power plug or AC adapter with wet hands. If the pins of the plug are wet or dusty, wipe and dry them before use.
▶ Otherwise, this may cause a fire or electric shock.
• Make sure to completely insert the power cord into the AC adapter.
▶ If loosely connected, the poor connection may cause a fire or electric shock.
- Be sure to use power cords and AC adapters provided or approved by LG Electronics, Inc.
The use of non-approved products may cause a fire or electric shock.
- When unplugging the power cord, always pull it by the plug. Do not bend the power cord with excessive force.
▶ The power line can be damaged, which may cause electric shock or fire.
- Be careful not to step or place heavy objects (electronic appliances, clothing, etc.) on the power cord or AC adapter. Be careful not to damage the power cord or AC adapter with sharp objects.
▶ Damaged power cords may cause a fire or electric shock.
- Never disassemble, repair or modify the power cord or AC adapter.
▶ This may cause a fire or electric shock.
• Make sure to connect the power cable to the grounded current.
▶ You may be electrocuted or injured.
• Use the rated voltage only.
▶ The product can be damaged, or you may be electrocuted.
- In the presence of thunder and lightning, never touch the power cord and signal cable because it can be very dangerous.
▶ It can cause electric shock.
- Do not connect several extension cords, electrical appliances or electrical heaters to a single outlet. Use a power bar with a grounding terminal designed for exclusive use with the computer.
▶ A fire can break out due to overheating.
- Do not touch the power plug with wet hands. Additionally, if the cord pin is wet or covered with dust, dry the power plug completely or wipe dust off.
▶ You may be electrocuted due to excess moisture.
- If you don't intend to use the product for a long time, unplug the power cable from the product.
▶ Covering dust can cause a fire, or insulation deterioration can cause electric leakage, electric shock or fire.
• Fix the power cable completely.
▶ If the power cable is not fixed completely, a fire can break out.
- Do not insert a conductor (like a metal chopstick) into one end of the power cable while the other end is connected to the input terminal on the wall. Additionally, do not touch the power cable right after plugging into the wall input terminal.
▶ You may be electrocuted.
• The appliance coupler is used as the disconnect device.
- Please make sure the device is installed near the wall outlet to which it is connected and that the outlet is easily accessible.
- As long as this unit is connected to the AC wall outlet, it is not disconnected from the AC power source even if the unit is turned off.
CAUTION
-
Be sure to keep the outlet, AC adapter, and pins of the power plug clean from dust and etc.
▶ This may cause a fire. -
Do not unplug the power cord while the product is in use.
▶ Electrical shock can damage the product. - Use only the power cord supplied with the unit. If you use another power cord, make sure that it is certified by the applicable national standards when not provided by the supplier. If the power cable is faulty in any way, please contact the manufacturer or the nearest authorized repair service provider for a replacement.
Precautions in moving the product
WARNING
• Make sure to turn off the product.
▶ You may be electrocuted or the product can be damaged.
• Make sure to remove all cables before moving the product.
▶ You may be electrocuted or the product can be damaged.
- Make sure the panel faces forward and hold it with both hands to move. If you drop the product, the damaged product can cause electric shock or fire. Contact an authorized the service center for repair.
- Make sure the product is turned off, unplugged and all cables have been removed. It may take 2 or more people to carry larger apparatus. Do not press against or put stress on the front panel of the apparatus.
CAUTION
• Do not shock the product when moving it.
▶ You may be electrocuted or the product can be damaged.
- Do not dispose the product-packing box. Use it when you move.
Precautions in using the product
WARNING
- Do not disassemble, repair or modify the product at your own discretion.
▶ Fire or electric shock accident can occur.
▶ Contact the service center for check, calibration or repair. - When the display is to be left unattended for an extended period of time, unplug it from the wall outlet.
- Keep the product away from water.
▶ Fire or electric shock accident can occur. - Do not shock or scratch the front and sides of the screen with metallic objects.
▶ Otherwise, it may cause damage to the screen. - Avoid high temperatures and humidity.
CAUTION
• Do not put or store inflammable substances near the product.
There is a danger of explosion or fire due to careless handling of the inflammable substances.
- When cleaning the product, unplug the power cord and scrub gently with a soft cloth to prevent scratching. Do not clean with a wet cloth or spray water or other liquids directly onto the product. An electric shock may occur. (Do not use chemicals such as benzene, paint thinners or alcohol.)
• Take a rest from time to time to protect your vision.
- Keep the product clean at all times.
- Take a comfortable and natural position when working with a product to relax the muscles.
• Take a regular break when working with a product for a long time.
- Do not press strongly upon the panel with a hand or sharp object such as nail, pencil or pen, or make a scratch on it.
- Keep the proper distance from the product.
▶ Your vision may be impaired if you look at the product too closely.
- Set the appropriate resolution and clock by referring to the User's Guide.
▶ Your vision can be impaired.
- Use authorized detergent only when cleaning the product. (Do not use benzene, thinner or alcohol.)
▶ Product can be deformed.
- Do not expose to dripping or splashing and do not place objects filled with liquids, such as vases, cups, etc. on or over the apparatus(e.g. on shelves above the unit).
- Batteries should not be exposed to excessive heat. For example, keep away from direct sunlight, open fireplace and electric heaters.
- Do NOT place non-rechargeable batteries in charging device.
- Using headsets (earphones) for a long time or listening loudly can cause damage to your hearing.
- Spray water onto a soft cloth 2 to 4 times, and use it to clean the front frame; wipe in one direction only. Too much moisture may cause staining.

flowchart
graph LR
    A["WATER"] --> B["Reinjection"]
    B --> C["Filter"]
    C --> D["Extraction"]
    D --> E["Disinfection"]
- Do not use products using high voltage around the Monitor. (ex. Electrical Swatter)
▶ Monitor may have malfunction as its electrical shock.
Mounting on a wall
- Do NOT install this product by yourself as you may injure yourself or cause damage to product. Please contact Service personnel authorised by Manufacturer.
Licenses
Supported licenses may differ by model. For more information about licenses, visit www.lg.com

DOLBY. DIGITAL PLUS
Manufactured under license from Dolby Laboratories. Dolby and the double-D symbol are trademarks of Dolby Laboratories.
HDMI
The terms HDMI and HDMI High-Definition Multimedia Interface, and the HDMI logo are trademarks or registered trademarks of HDMI Licensing LLC in the United States and other countries.
DIVX HD
This DivX Certified ^® device has passed rigorous testing to ensure it plays DivX ^® video.
To play purchased DivX movies, first register your device at vod.divx.com. Find your registration code in the DivX VOD section of your device setup menu.
DivX Certified ^® to play DivX ^® video up to HD 1080p, including premium content.
DivX ^® , DivX Certified ^® and associated logos are trademarks of DivX, LLC and are used under license.
Covered by DivX Patents 7,295,673; 7,515,710; RE45,052; and others available at [www.divx.com/patents]
Open Source Software Notice Information
To obtain the source code under GPL, LGPL, MPL, and other open source licenses, that is contained in this product, please visit http://opensource.lge.com.
In addition to the source code, all referred license terms, warranty disclaimers and copyright notices are available for download.
LG Electronics will also provide open source code to you on CD-ROM for a charge covering the cost of performing such distribution (such as the cost of media, shipping, and handling) upon email request to opensource@lge.com. This offer is valid for three (3) years from the date on which you purchased the product.
Preparing

NOTE
- Image shown may differ from your TV.
- Your TV's OSD (On Screen Display) may differ slightly from that shown in this manual.
- The available menus and options may differ from the input source or product model that you are using.
• New features may be added to this TV in the future. - The TV can be placed in standby mode in order to reduce the power consumption. And the TV should be turned off if it will not be watched for some time, as this will reduce energy consumption.
- The energy consumed during use can be significantly reduced if the level of brightness of the picture is reduced, and this will reduce the overall running cost.
- The items supplied with your product may vary depending on the model.
- Product specifications or contents of this manual may be changed without prior notice due to upgrade of product functions.
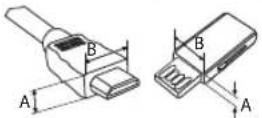
- For an optimal connection, HDMI cables and USB devices should have bezels less than 10 mm thick and 18 mm width.
- Use an extension cable that supports USB 2.0 if the USB cable or USB memory stick does not fit into your TV's USB port.
*A≤0mm
*B≤8mm
- Use a certified cable with the HDMI logo attached. If you do not use a certified HDMI cable, the screen may not display or a connection error may occur.
- Recommended HDMI cable types -High-Speed HDMI®/™ cable
-High-Speed HDMI®/™ cable with Ethernet

CAUTION
- Do not use any unapproved items to ensure the safety and product lifespan of the product.
- Any damages or injuries by using unapproved items are not covered by the manufacturer's warranty.
- Some models have a thin film attached on to the screen and this must not be removed.
- Do not use any unapproved items to ensure the safety and product lifespan of the product.
- Any damages or injuries by using unapproved items are not covered by the manufacturer's warranty.
- Do not use any unapproved items to ensure the safety and product lifespan of the product.
- Any damages or injuries by using unapproved items are not covered by the manufacturer's warranty.
- Some models have a thin film attached on to the screen and this must not be removed.
CAUTION
Lifting and moving the TV
Please note the following advice to prevent the TV from being scratched or damaged and for safe transportation regardless of its type and size.
- It is recommended to move the TV in the box or packing material that the TV originally came in.
- Before moving or lifting the TV, disconnect the power cord and all cables.
- It is recommended to move the TV in the box or packing material that the TV originally came in.
- Before moving or lifting the TV, disconnect the power cord and all cables.

- When holding the TV, the screen should face away from you to avoid damage.
- Hold the top and bottom of the TV frame firmly. Make sure not to hold the transparent part, speaker, or speaker grille area.

- When transporting the TV, do not expose the TV to jolts or excessive vibration.
- When transporting the TV, keep the TV upright; never turn the TV on its side or tilt towards the left or right.
- Do not apply excessive pressure to cause flexing /bending of frame chassis as it may damage screen.

CAUTION
- Avoid touching the screen at all times, as this may result in damage to the screen.
- When handling the TV, be careful not to damage the protruding joystick button.
Setting up the TV

CAUTION
- Do not carry the TV upside-down by holding the stand body (or stand base) as this may cause it to fall off, resulting in damage or injury.
- When attaching the stand to the TV set, place the screen facing down on a cushioned table or flat surface to protect the screen from scratches.

NOTE
- Lift up the latch at the bottom of the stand base and detach the stand base from the TV.
Using the joystick button
You can simply operate the TV functions, pressing or moving the joystick button up, down, left or right.
• Image shown may differ from your TV.

Basic functions
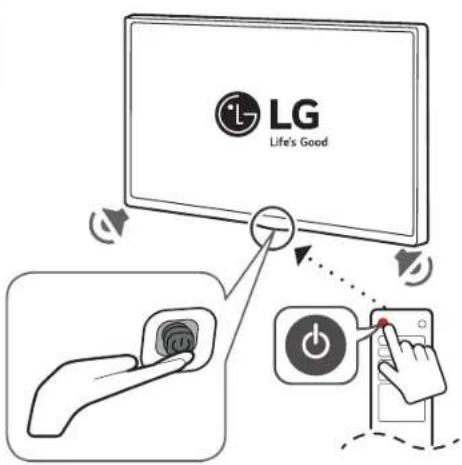
 | Power On | When the TV is turned off, place your finger on the joystick button and press it once and release it. |
 | Power Off | When the TV is turned on, place your finger on the joystick button, press it once for a few seconds and release it. (However, if the menu button is on the screen, pressing and holding the joystick button will let you exit the menu.) |
 | Volume Control | If you place your finger over the joystick button and move it left or right, you can adjust the volume level you want. |
 | Programmes Control | If you place your finger over the joystick button and move it up or down, you can scroll through the saved programmes you want. |
Mounting on a table
• Image shown may differ from your TV.
1 Lift and tilt the TV into its upright position on a table.
- Leave a 100 mm (minimum) space from the wall for proper ventilation.

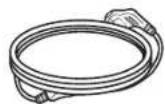
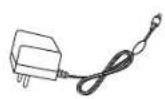
2 Connect the AC-DC Adapter and Power Cord to a wall outlet.

CAUTION
- Do not place the TV near or on sources of heat, as this may result in fire or other damage.
- Please be sure to connect the TV to the AC-DC power adapter before connecting the TV's power plug to a wall power outlet.

NOTE
- If you press the joystick button first, you may not adjust the volume level and saved programmes.

CAUTION
- When your finger over the joystick button and push it to the up, down, left or right, be careful not to press the joystick button.
Adjusting the menu
When the TV is turned on, press the joystick button one time. You can adjust the menu items moving the joystick button up, down, left, or right.
| Turns the power off. | |
| Accesses the main menu. | |
| × | Clears on-screen displays and returns to TV viewing. |
| Changes the input source. |
Using the kensington security system
(This is not available for all models.)
• Image shown may differ from your TV.
The Kensington security system connector is located at the rear of the TV. For more information of installation and using, refer to the manual provided with the Kensington security system or visit http://www.kensington.com.
Connect the Kensington security system cable between the TV and a table.

natural_image
Illustration of a monitor connected to a cable with two magnified insets showing mechanical components (no text or symbols)
NOTE
- The Kensington security system is optional. You can obtain additional accessories from most electronics stores.
Mounting on a wall
For proper ventilation, allow a clearance of 100 mm on each side and from the wall. Detailed installation instructions are available from your dealer, see the optional Tilt Wall Mounting Bracket Installation and Setup Guide.
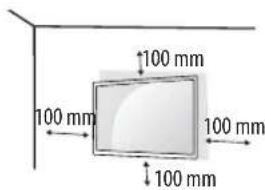
If you intend to mount the TV to a wall, attach Wall mounting interface (optional parts) to the back of the TV. When you install the TV using the wall mounting interface (optional parts), attach it carefully so it will not drop.
1 If you use screw longer than standard, the TV might be damaged internally.
2 If you use improper screw, the product might be damaged and drop from mounted position. In this case, LG Electronics is not responsible for it.
| Model | 20MT48*24MT48* | 28MT48* |
| Wall Mount(A x B) | 75 x 75 100 x 100 | |
| Standard screw M4 x L10 | ||
| Number of screws 4 | ||
| Wall mount bracket(optional) | RW120 | |

CAUTION
- Disconnect the power cord first, and then move or install the TV. Otherwise electric shock may occur.
- If you install the TV on a ceiling or slanted wall, it may fall and result in severe injury. Use an authorized LG wall mount and contact the local dealer or qualified personnel.
- Do not over tighten the screws as this may cause damage to the TV and void your warranty.
- Use the screws and wall mounts that meet the VESA standard. Any damages or injuries by misuse or using an improper accessory are not covered by the manufacturer's warranty.
- Screw length from outer surface of back cover should be under 8 mm.


NOTE
- Use the screws that are listed on the VESA standard screw specifications.
- The wall mount kit includes an installation manual and necessary parts.
- The wall mount bracket is not provided. You can obtain additional accessories from your local dealer.
- The length of screws may differ depending on the wall mount. Make sure to use the proper length.
- For more information, refer to the manual supplied with the wall mount.
Connections (Notifications)
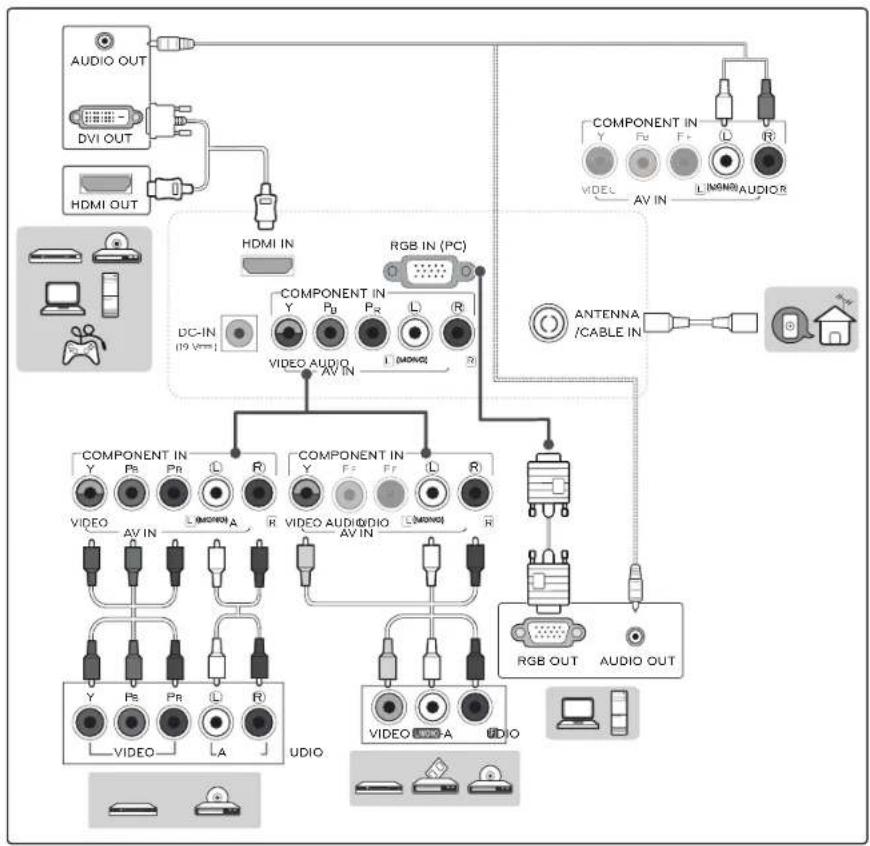
Connect various external devices to the TV and switch input modes to select an external device. For more information about an external device's connection, refer to the manual supplied with each device. Available external devices are: HD receivers, DVD players, VCRs, audio systems, USB storage devices, PC, camcorders or cameras, gaming devices, and other external devices.

NOTE
• The external device connection may differ from the model.
- Connect external devices to the TV regardless of the order of the TV port.
- If you record a TV programme on a DVD recorder or VCR, make sure to connect the TV signal input cable to the TV through a DVD recorder or VCR. For more information of recording, refer to the manual provided with the connected device.
- Refer to the external equipment's manual for operating instructions.
- If you connect a gaming device to the TV, use the cable supplied with the gaming device.
- In PC mode, there may be noise associated with the resolution, vertical pattern, contrast or brightness. If noise is present, change the PC output to another resolution, change the refresh rate to another rate or adjust the brightness and contrast on the PICTURE menu until the picture is clear.
- In PC mode, some resolution settings may not work properly depending on the graphics card.
Antenna connection
Connect the TV to a wall antenna socket with an RF cable (75 Ω) (Not Provided).

NOTE
• Use a signal splitter to use more than 2 TVs.
- If the image quality is poor, install a signal amplifier properly to improve the image quality.
- If the image quality is poor with an antenna connected, try to realign the antenna in the correct direction.
• An antenna cable and converter are not supplied.
- Supported DTV Audio: MPEG, Dolby Digital, Dolby Digital Plus, HE-AAC
Other connections
Connect your TV to external devices. For the best picture and audio quality, connect the external device and the TV with the HDMI cable. Some separate cable is not provided.
USB port supports 0.5 A electric current. If you need more electric current in case of HDD, use the separate power adaptor.

NOTE
- Supported HDMI Audio format : Dolby Digital (32 KHz, 44.1 KHz, 48 KHz), PCM (32 KHz, 44.1 KHz, 48 KHz, 96 KHz, 192 KHz) (Depending on model)
Connecting to a PC
Your TV supports the Plug and Play* feature and has the built-in speakers with Virtual Surround that reproduces sound clearly with a rich bass.
* Plug and Play: The function when a PC recognizes a connected device that users connect to a PC and turn on, without device configuration or user intervention.

NOTE
- If you want to use HDMI-PC mode, you must set the Input Label to PC mode.
- The OSD (On Screen Display) is displayed on the screen as shown below.
-When turning the product on in HDMI input.
-When switching to HDMI input.

- If you select "YES" the size and image quality are optimised for your PC.
- If you select "NO" the size and image quality are optimised for the AV device (DVD player, set-top box).
- If you select "Do not show message again" this message does not appear until the TV is reset. You can change the set value in

(Home) inputs Input Label.
Remote control
The descriptions in this manual are based on the buttons on the remote control. Please read this manual carefully and use the TV correctly. To replace batteries, open the battery cover, replace batteries (1.5 V AAA) matching the and ends to the label inside the compartment, and close the battery cover. To remove the batteries, perform the installation actions in reverse.

CAUTION
- Do not mix old and new batteries, as this may damage the remote control.
- In Analogue TV and some countries, some remote control buttons may not work.
Make sure to point the remote control toward the remote control sensor on the TV.

A
(Power) Turns the TV on or off.
TV/RAD Radio, TV and DTV programme.
SUBTITLE Recalls your preferred subtitle in digital mode.
① INFews the information of the current programme and screen.
TV/PC Selects TV or PC mode.
(Input) Changes the input source.
B
Number buttons Enters numbers.
LIST Accesses the saved programme list.
Q.VIEW Returns to the previously viewed programme.
+Δ- Adjusts the volume level.
FAV Accesses your favourite programme list.
GUIDE Shows programme guide.
(Mute) Mutes all sounds.
^P Scrolls through the saved programmes.
^PAGEves to the previous or next screen.

C
Teletext buttons (☐) TEXT / T.OPT These buttons are used for teletext.
(Home) Accesses the Home menu.
Settings) Accesses the Settings menu.
Q.MENU Accesses the Quick menus.
▲,▼,◀,▶ (Navigation buttons) Scrolls through menus or options.
OKelects menus or options and confirms your input.
BACK Returns to the previous level.
EXIT Clears on-screen displays and returns to TV viewing.
D
PIP/* Turns the PIP mode on or off. (Depending on model)
AD/*By pressing the AD button, audio descriptions function will be enabled. (Depending on model)
- RECarts to record and display record menu.
LIVE TV Returns to LIVE TV.
■, ◀, ▶, Ⅱ, ▶ (Control buttons) Controls media contents.
(Colour buttons) These access special
functions in some menus.
(Gaming mode) Turns the gaming mode on or off.
- ⚙ + (Backlight) Adjusts the brightness of the screen by controlling the screen backlight.

NOTE
- On MHEG programme, you cannot adjust the backlight with the yellow or blue key.
- AD(Audio Description) service may not be available on all models and is also dependant on broadcast service in your country.
Settings
Automatically Setting Up Programme
Settings Programmes Auto Tuning
Automatically tunes the programmes.
- If Input Source is not connected properly, programme registration may not work.
- Auto Tuning only finds programmes that are currently broadcasting.
- If Lock System is turned on, a pop-up window will appear asking for password.
To select Picture Mode
Settings Picture Picture Mode Settings
Picture Mode
Select the picture mode optimized for the viewing environment or the programme.
- Vivid: Heightens contrast, brightness and sharpness to display vivid images.
- Standard : Displays images in standard levels of contrast, brightness and sharpness.
- Eco/APS : [Depending on model] The Energy Saver feature changes settings on the TV to reduce power consumption.
- Cinema/Game : Displays the optimum picture for movie, game.
- Soccer/Cricket : [Depending on model] Optimizes the video image for high and dynamic actions by emphasizing primary colours such as white, grass, or sky blue.
isf Expert 1, 2: Menu for adjusting picture quality that allows experts and amateurs to enjoy the best TV viewing. This is the adjustment menu provided for ISF-certified picture tuning professionals. (ISF logo can only be used on ISF-certified TVs.) ISFccc: Imaging Science Foundation Certified Calibration Control
- Depending on input signal, available range of picture modes may differ.
isf Expert mode is for picture tuning professionals to control and fine-tune using a specific image. For normal images, the effects may not be dramatic.
• The ISF function is only available on some models.
Fine-tuning Picture Mode
Settings Picture Picture Mode Settings
This feature allows you to adjust the selected picture mode in detail.
- Backlight: Controls the level of screen brightness by adjusting the backlight. The closer to 100, the brighter the screen.
- Contrast: Adjusts the contrast of the bright and dark areas of the picture. The closer to 100, the higher the contrast.
- Brightness: Adjusts the overall screen brightness. The closer to 100, the brighter the screen.
- Sharpness: Adjusts the sharpness of the image. The closer to 50, the sharper and clearer the image.
-
Colour: Tones down or up the colours displayed on the screen. The closer to 100, the deeper the colour.
-
Tint: Adjusts the colour balance between red and green displayed on the screen. The closer to Red 50, the more red the colour will be. The closer to Green 50, the more green the colour will be.
- Colour Temperature: Adjusts the colour temperature from cold to warm.
- Depending on input signal or other picture settings, the range of detailed items for adjustment may differ.
To set advanced control
Settings Picture Picture Mode Settings
→ Advanced Control / Expert Control
Calibrates the screen for each picture mode; or adjusts picture settings for a special screen.
- Dynamic Contrast: Adjusts the contrast to the optimal level according to the brightness of the image.
- Dynamic Colour: Adjusts colours to make the image appear in more natural colours.
- Preferred Colour: Adjust the colours of skin, grass and sky to your personal preferences.
- Gamma : Sets the gradation curve according to the output of picture signal in relation to the input signal.
• Colour Gamut : [Depending on model] Selects the range of colours that can be expressed.
- Edge Enhancer : [Depending on model] Shows clearer and distinctive yet natural edges of the video.
- Colour Filter: [Depending on model] Filters a specific colour spectrum in RGB colours to fine-tune colour saturation and hue accurately.
- White Balance: Adjusts the overall tone of the screen as desired.
- Colour Temperature : [Depending on model] Adjusts the overall tone of the screen as desired. In Expert mode, detailed fine-tuning can be set via Gamma method, etc.
- Colour Management System : [Depending on model] This is a system that experts use when they adjust colour with a test pattern. They can select from six colour areas (Red / Green / Blue / Cyan / Magenta / Yellow) without affecting other colours. For normal images, adjustments may not result in noticeable colour changes.
- Depending on input signal or other picture settings, the range of detailed items for adjustment may differ.
To set additional picture options
Settings Picture Picture Mode Settings
→ Picture Options
[Depending on model]
Adjusts detailed setting for images.
- Noise Reduction: Eliminates noise in the picture.
- MPEG Noise Reduction : Eliminates noise generated while creating digital picture signals.
- Black Level: Adjusts the brightness and contrast of the screen to suit the black level of the input picture by using the blackness (black level) of the screen.
• Real Cinema : Optimizes the screen for movie viewing.
- Motion Eye Care: Automatically adjusts brightness and reduces image blur based on image data to reduce eyestrain.
- Depending on input signal or other picture settings, the range of detailed items for adjustment may differ.
Resetting picture settings
(Settings) Picture Picture Mode Settings ⇒ Picture Reset
Resets picture settings that the user customizes. Each picture mode is reset. Select the picture mode you wish to reset.
To use Gaming Mode
Settings Picture Gaming Mode
[Available only for RGB/HDMI-PC]
This mode allows you to optimize the picture quality for games.
- DAS Mode : [Depending on model] This mode minimizes the time taken to display the video signal received from the input device to ensure faster gameplay. (The screen will flicker when turning DAS Mode On or Off.) - DAS Mode : Dynamic Action Sync Mode
- Black Stabilizer objects can be seen more clearly on a dark screen by adjusting the black levels. Increasing the Black Stabilizer value brightens the low gray levels on the screen. (You can easily distinguish objects on a dark game screen.) Reducing the Black Stabilizer value darkens the low gray levels and increases the dynamic contrast on the screen.
- You can configure the detailed settings for Gaming Mode using the gray on the remote control.
- You can set DAS Mode only when the frequency for vertical input is 50 Hz/60 Hz.
- When PIP is turned on, the DAS Mode is unavailable. (Depending on model)
To use Energy Saving feature
Settings Picture → Energy Saving
Reduces power consumption by adjusting screen brightness.
• Off: Turns off the Energy Saving mode.
- Minimum / Medium / Maximum : Applies the pre-set Energy Saving mode.
- Screen Off: Screen is turned off and only sound is played. Press any button except Power button on the remote control to turn the screen back on.
To use Eye Comfort Mode feature
Settings Picture Eye Comfort Mode
If you turn this option on, colour temperature will be automatically adjusted to reduce eye strain.
- On: Automatically adjusts the screen color temperature.
- Off: Turns off the Eye Comfort Mode.
Capturing the TV screen
[Depending on model]
You can capture your TV screen.
1 Connect the USB device to the USB port on the side or back of the TV.
2 During watch the live broadcast, press the ⓄOK button. (Only DTV)
3 Press the SCREEN CAPTURE button left corner of the screen. (or press the ▼ (Red) button on the Remote Control.)
4 Screen-captured image will be saved in connected USB device.
• Applies to digital broadcasting.
- You can view screen-captured images in the My Media 'Screen Capture' Folder.
• The captured image is saved in the same size as the original image.
Select Sound Mode
Settings Sound Sound Mode Settings
→ Sound Mode
Adjusts TV audio to an optimal level based on a selected sound mode.
- Standard: Optimizes the sound for all types of content.
- Clear Voice: Boosts voice clarity from the TV.
- Music/Bollywood : [Depending on model] Optimizes the sound for music.
• Cinema : Optimizes the sound for cinemas. - Soccer/Cricket : [Depending on model] Optimizes the sound for sports.
• Game : Optimizes the sound for gameplay.
Adjusting audio balance
Settings Sound Sound Mode Settings Balance
Adjust the volume of the left and right speakers.
Using the Sound Effect function
Settings Sound Sound Mode Settings
The user can select various sound effects.
- Virtual Surround : Enjoy an immersive soundscape with the virtual multi-channel surround sound effect.
- Equalizer : Set the desired sound by adjusting the equalizer directly.
- Reset: Reset the sound effect settings.
- This is only available if Sound Mode is set to Standard.
To synchronize audio and video
Settings Sound AWSync Adjustment
[Depending on model]
Synchronizes video and audio directly when they do not match. If you set AV Sync Adjustment to On, you can adjust the sound output (TV speakers) to the screen image.
- If you select the Bypass, Outputs the broadcast signals or the sound from external devices without any audio delay. The audio may be output before the video because of the time the TV takes to process the video input.
Using Music Catch
[Depending on model]
It is a function you can use to record the music from the TV any time.
1 Connect the USB device to the USB port on the side or back of the TV.
2 During watch the Live broadcast, press the OK button.
3 Press the START MUSIC RECORDING button right corner of the screen.
4 If you want to stop the music recording, press the STOP MUSIC RECORDING button.
- If there is not enough remaining space in the USB device, Music Catch may not work properly. To use Music Catch function, you need the USB device which has at least 100 MB.
- Stored files can be viewed in the My Media 'Music Catch' Folder, and you can open them on your PC or portable devices.
• Recorded files are stored in .wav format.
- If you switch apps or input during recording, recording automatically ends and the recorded files will be saved.
- With the Music Catch function, you can play a music for up to two hours.
- If the USB device is removed by force while music recording, the music recording will not complete properly.
Setting USB AutoRun
Settings General USB AutoRun
Play photos or videos of USB automatically when TV is turned on or USB is connected.
- Off: Turn off the USB AutoRun.
• Videos : Play videos of USB automatically.
• Photos : Play photos of USB automatically.
- Only plays the files in the top level folder of the USB device in sequence.
- While playing, press the BACK or EXIT button on the remote control to end this function.
- If the files are invalid or corrupted, the following message appears before returning to the previous input status: "This file is invalid."
- When the USB device is reconnected after being disconnected during video playback, Continue watching starts automatically and resumes the video from the last viewed scene (only applies to the first video).
To use SIMPLINK
[Depending on model]
SIMPLINK is a feature that enables you to control and manage various multimedia devices conveniently via the SIMPLINK menu.
1 Connect the TV's HDMI IN terminal and the SIMPLINK device's HDMI output terminal using an HDMI cable.
2 Select ⚙️ (Settings) □ General SIMPLINK. SIMPLINK menu window appears.
3 In SIMPLINK Setting window, set SIMPLINK function to On.
4 Configure the Auto Power Sync settings to On or Off.
5 In SIMPLINK menu window, selects the device you want to control.
- You can also set the SIMPLINK (Home) Inputs → SIMPLINK.
- This function is only compatible with devices with the SIMPLINK logo.
-
To use the SIMPLINK function, you need to use a high-speed HDMI® cable (with CEC (Consumer Electronics Control) feature added). High-speed HDMI® cables have the No. 13 pin connected for information exchange between devices.
• If you switch to another input, the SIMPLINK device will stop. -
If a third-party device with the HDMI-CEC function is also used, the SIMPLINK device may not work normally.
- If you select or play media from a the device with a home theatre function, the HT Speaker(Speaker) is automatically connected
SIMPLINK function description
- Direct Play : Plays the multimedia device on the TV instantly.
- Controlling devices with the TV remote control : Manages the multimedia device with the TV remote control.
- Main Power Off: If Auto Power Sync is set to On in the SIMPLINK settings and turn off your TV, the devices connected to your TV via SIMPLINK will also be turned off.
- Main Power On: If Auto Power Sync is set to On in the SIMPLINK settings, turning on a SIMPLINK-linked device will turn the TV on.
To set password
Settings Safety Set Password
Sets or changes the TV password.
The initial password is set to '0000'.
To return Reset to Initial Settings
Settings General Reset to Initial Settings
All stored information is deleted and TV settings are reset. The TV turns itself off and back on, and all settings are reset.
- When Lock System is in place, a pop-up window appears and asks for password
- Do not turn off the power during initialization.
To remove the USB device
Select the connected USB HDD from (Home) inputs and select the Eject button to disconnect the USB HDD storage device. When you see a message that the USB device has been removed, separate the device from the TV.
- Once a USB device has been selected for removal, it can no longer be read. Remove the USB storage device and then re-connect it.
Using a USB storage device - warning
- If the USB storage device has a built-in auto recognition program or uses its own driver, it may not work.
• Some USB storage devices may not work or may work incorrectly. - Use only USB storage devices formatted with the Windows FAT32 or NTFS File System.
- For external USB HDDs, it is recommended that you use devices with a rated voltage of less than 5 V and a rated current of less than 500 mA.
- It is recommended that you use USB memory sticks of 32 GB or less and USB HDDs of 2 TB or less.
- If a USB HDD with power-saving function does not work properly, turn the power off and on. For more information, refer to the user manual of the USB HDD.
- Data in the USB storage device can be damaged, so be sure to back up important files to other devices. Data maintenance is the user's responsibility and the manufacturer is not responsible for data loss.
My Media supporting file
• Maximum data transfer rate : 20 Mbps (Mega bit per second)
- External supported subtitle formats : *.srt (SubRip), *.smi (SAMI), *.sub (SubViewer, MicroDVD, DVDsubtitleSystem, SubIdx(Vobsub)), *.ass/*.ssa (SubStation Alpha), *.txt (TMplayer), *.psb (PowerDivX)
- Internal supported subtitle formats: *.dat/*.mpg/*.mpeg/*.vob (DVD Subtitle), *.ts/*.tp/*.m2ts/(DVB Subtitle), *.mp4 (DVD Subtitle, UTF-8 Plain Text), *.mkv (ASS, SSA, UTF-8 Plain Text, Universal Subtitle Format, VobSub, DVD Subtitle), *.divx/*.avi (XSUB ^1 , XSUB+)
1 XSUB : Supports internal subtitles generated from DivX6
Supported Video Formats
• Maximum: 1920 x 1080 @ 30p (only Motion JPEG 640 x 480 @ 30p)
• .asf, .wmv
[Video] MPEG-4 Part2, XViD, H.264/AVC, VC1(WMV3, WVC1), MP43 [Audio] WMA Standard, WMA9(Pro), MP3, AAC, AC3
• .divx, .avi
[Video] MPEG-2, MPEG-4 Part2, DivX3.11, DivX4, DivX5, DivX6, XViD, H.264/AVC
[Audio] HE-AAC, LPCM, ADPCM, MPEG-1 Layer I, MPEG-1 Layer II, Dolby Digital, MPEG-1 Layer III (MP3)
• .ts, .trp, .tp, .mts, .m2ts
[Video] H.264/AVC, MPEG-2, H.265/HEVC
[Audio] MPEG-1 Layer I, MPEG-1 Layer II, MPEG-1 Layer III (MP3), Dolby Digital, Dolby Digital Plus, AAC, HE-AAC
• .vob
[Video] MPEG-1, MPEG-2
[Audio] Dolby Digital, MPEG-1 Layer I, MPEG-1 Layer II, DVD-LPCM
- .mp4, .m4v, .mov
[Video] MPEG-2, MPEG-4 Part2, DivX3.11, DivX4, DivX5, XViD, H.264/AVC
[Audio] AAC, MPEG-1 Layer III (MP3)
• .mkv
[Video] MPEG-2, MPEG-4 Part2, XViD, H.264/AVC
[Audio] HE-AAC, Dolby Digital, MPEG-1 Layer III (MP3), LPCM
- motion JPEG
[Video] MJPEG
[Audio] LPCM, ADPCM
- .mpg, .mpeg, .mpe
[Video] MPEG-1, MPEG-2
[Audio] MPEG-1 Layer I, MPEG-1 Layer II, Dolby Digital, LPCM
• dat
[Video] MPEG-1, MPEG-2
[Audio] MP2
• flv
[Video] Sorenson H.263, H.264/AVC
[Audio] MP3, AAC, HE-AAC
• *rm, *rmvb
[Video] RV30, RV40
[Audio] Dolby Digital, AAC, HE-AAC, RA6(Cook)
• 3gp, 3gp2
[Video] H.264/AVC, MPEG-4 Part2
[Audio] AAC, AMR(NB/WB)
• *rm / *rmvb : Depending on model
Supported Audio Formats
- File type : mp3
[Bit rate] 32 Kbps \~ 320 Kbps
[Sample freq.] 16 kHz \~ 48 kHz
[Support] MPEG1, MPEG2, Layer2, Layer3 - File Type : AAC
[Bit rate] Free Format
[Sample freq.] 8 kHz \~ 48 kHz
[Support] ADIF, ADTS - File Type : M4A
[Bit rate] Free Format
[Sample freq.] 8 kHz \~ 48 kHz
[Support] MPEG-4 - File Type: WMA
[Bit rate] 128 Kbps \~ 320 Kbps
[Sample freq.] 8 kHz \~ 48 kHz
[Support] WMA7, WMA8, WMA9 Standard - File Type: WMA 10 Pro
[Bit rate] \~ 768 Kbps
[Channel / Sample freq.]
M0 : up to 2 Channel @ 48 kHz (Except LBR mode),
M1: up to 5.1 Channel @ 48 kHz,
M2: up to 5.1 Channel @ 96 kHz
[Support] WMA 10 Pro - File Type : OGG
[Bit rate] Free Format
[Sample freq.] 8 kHz \~ 48 kHz
[Support] OGG Vorbis
- File Type: WAV
[Bit rate] 64 kbps \~ 1.5 Mbps
[Sample freq.] 8 kHz \~ 48 kHz
[Support] LPCM
[Bitdepth] 8 bit / 16 bit / 24 bit
Supported Photo Formats
Category : 2D (jpeg, jpg, jpe)
[Available file type]
SOFO : Baseline,
SOF1 : Extend Sequential,
SOF2 : Progressive
[Photo size]
Minimum : 64 x 64,
Maximum (Normal Type) : 15360 (W) x 8640 (H),
Maximum (Progressive Type) :1920 (W) x 1440 (H)
Category : BMP
[Photo size] Minimum : 64 x 64, Maximum : 9600 x 6400
Category : PNG
[Available file type] Interlace, Non-Interlace
[Photo size]
Minimum : 64 x 64,
Maximum (Interlace) : 1200 x 800,
Maximum (Non-Interlace) : 9600 x 6400
• BMP and PNG format files may be slower to display than JPEG.
To see web manual
To obtain detailed User Guide information, please visit www.lg.com.
Maintenance
Cleaning your TV
Clean your TV regularly to keep the best performance and to extend the product lifespan.
- Make sure to turn the power off and disconnect the power cord and all other cables first.
- When the TV is left unattended and unused for a long time, disconnect the power cord from the wall outlet to prevent possible damage from lightning or power surges.
Screen, frame, cabinet, and stand
To remove dust or light dirt, wipe the surface with a dry, clean, and soft cloth.
To remove major dirt, wipe the surface with a soft cloth dampened in clean water or a diluted mild detergent. Then wipe immediately with a dry cloth.
- Avoid touching the screen at all times, as this may result in damage to the screen.
- Do not push, rub, or hit the surface with your fingernail or a sharp object, as this may result in scratches on the screen and image distortions.
- Do not use any chemicals as this may damage the product.
- Do not spray liquid onto the surface. If water enters the TV, it may result in fire, electric shock, or malfunction.
Power cord
Remove the accumulated dust or dirt on the power cord regularly.
Preventing "Image burn" or "Burn-in" on your TV screen
- If a fixed image displays on the TV screen for a long period of time, it will be imprinted and become a permanent disfigurement on the screen. This is "image burn" or "burn-in" and not covered by the warranty.
- If the aspect ratio of the TV is set to 4:3 for a long period of time, image burn may occur on the letterboxed area of the screen.
- Avoid displaying a fixed image on the TV screen for a long period of time (2 or more hours for LCD) to prevent image burn.
Troubleshooting
Cannot control the TV with the remote control.
- Check the remote control sensor on the product and try again.
- Check if there is any obstacle between the product and the remote control.
- Check if the batteries are still working and properly installed

No image display and no sound is produced.
• Check if the product is turned on.
- Check if the power cord is connected to a wall outlet.
- Check if there is a problem in the wall outlet by connecting other products.
The TV turns off suddenly.
- Check the power control settings. The power supply may be interrupted.
- Check if the Auto Power Off (Depending on model) / Sleep Timer / Timer Power Off feature is activated in the Timers settings.
- If there is no signal while the TV is on, the TV will turn off automatically after 15 minutes of inactivity.
When connecting to the PC (HDMI/RGB), 'No Signal', 'Check signal cable' or 'Unsupported Format' is displayed.
• Turn the TV off/on using the remote control.
• Reconnect the HDMI/RGB cable.
- Restart the PC with the TV on.
If TV is turned off automatically.
- If Timer Power On is enabled, the TV will be turned on at the specified time. If you do not operate the TV for two hours, the TV will be turned off automatically.
• To disable this function, use your remote control to go to

Specifications
Product specifications may be changed without prior notice due to upgrade of product functions.
| Models | Dimensions (W x H x D) (mm) Weight (kg) Power | consumption(Outgoingcondition) | Powerrequirement | |||
| With stand Without | out stand With stand | Without stand | ||||
| 20MT48VF 4 | 67.0 x 330.5 x 146.3 467 | 0 x 278.0 x 52.7 2.4 2.2 | 22 W 19 V | ——1.2 A | ||
| 24MT48VF | 556 x 387.3 x 146.3 | 556 x 345.2 x 53.1 | 3.4 | 3.2 | 28 W | 19 V —— 1.6 A |
| 28MT48VF | 641.5 x 435.5 x 186.1 | 641.5 x 396.3 x 57.5 | 4.7 | 4.5 | 33 W | 19 V —— 2.0 A |
| Environment condition | Operating Temperature | 0 °C to 40 °C |
| Operating Humidity | Less than 80 % | |
| Storage Temperature | -20 °C to 60 °C | |
| Storage Humidity | Less than 85 % |
| AC/DC Adapter | 20MT48VF | 24MT48VF | 28MT48VF |
| Manufacturer : Lien ChangModel : LCAP21Manufacturer : HonorModel : ADS-40SG-19-3 19025G | Manufacturer : Lien ChangModel : LCAP21AManufacturer : HonorModel : ADS-40SG-19-3 19032G | Manufacturer : Lien ChangModel : LCAP21CManufacturer : HonorModel : ADS-45SN-19-3 19040G | |
| In : AC 100 – 240 V ~ 50/60 HzOut : DC 19 V ____ 1.3 A | In : AC 100 – 240 V ~ 50/60 HzOut : DC 19 V ____ 1.7 A | In : AC 100 – 240 V ~ 50/60 HzOut : DC 19 V ____ 2.1 A |
| Digital TV | Analogue TV | |
| Television system | DVB-T/T2 | PAL B/B, PAL B/G, PAL D/K, PAL-I, SECAM B/G, SECAM D/K, NTSC-M |
| Programme coverage | VHF, UHF | VHF, UHF, CATV |
| Maximum number of storable programmes | 2000 | |
| External antenna impedance | 75 Ω | |
RGB (PC) / HDMI (PC) supported mode
| Resolution | Horizontal Frequency (kHz) | Vertical Frequency (Hz) |
| 720 x 400 31.468 | 70.080 | |
| 640 x 480 | 31.469 | 59.940 |
| 37.500 | 75.000 | |
| 800 x 600 | 37.879 | 60.317 |
| 46.875 | 75.000 | |
| 1024 x 768 | 48.363 | 60.004 |
| 60.023 | 75.029 | |
| 1280 x 800 49.702 | 59.810 | |
| 1366 x 768 47.717 | 59.79 |

NOTE
• The optimal display resolution is 1366 x 768 @ 60 Hz.
• The optimal timing in each mode is vertical frequency 60 Hz.
HDMI (DTV) supported mode
| Resolution | Horizontal Frequency (kHz) | Vertical Frequency (Hz) |
| 720 x 480 | 31.469 | 59.940 |
| 31.5000 | 60.000 | |
| 720 x 576 31.250 | 50.000 | |
| 1280 x 720 | 37.500 | 50.000 |
| 44.960 | 59.940 | |
| 45.000 | 60.000 | |
| 1920 x 1080 | 33.720 | 59.940 |
| 33.750 | 60.000 | |
| 28.125 | 50.000 | |
| 27.000 | 24.000 | |
| 33.750 | 30.000 | |
| 56.250 | 50.000 | |
| 67.430 | 59.940 | |
| 67.500 | 60.000 |
Component supported mode
| Resolution | Horizontal Frequency (kHz) | Vertical Frequency (Hz) |
| 720 x 480 | 15.730 | 59.940 |
| 15.750 | 60.000 | |
| 31.470 | 59.940 | |
| 31.500 | 60.000 | |
| 720 x 576 | 15.625 | 50.000 |
| 31.250 | 50.000 | |
| 1280 x 720 | 44.960 | 59.940 |
| 45.000 | 60.000 | |
| 37.500 | 50.000 | |
| 1920 x 1080 | 33.720 | 59.940 |
| 33.750 | 60.000 | |
| 28.125 | 50.000 | |
| 56.250 | 50.000 | |
| 67.432 | 59.940 | |
| 67.500 | 60.000 |
Component port connecting information
| Component ports on the TV Y P | B | P_R |
| Video output ports on DVD player | Y | P_B | P_R |
| Y B-Y R-Y | |||
| Y Cb Cr | |||
| Y Pb Pr | |||
Environmental information
Information for environmental preservation
LGE. announced the 'LG Declaration for a Cleaner Environment' in 1994, and this ideal has served as a guiding managerial principle ever since. The Declaration is a foundation that has allowed us to undertake environmentally friendly activities in careful consideration of economic, environmental, and social aspects. We promote activities for environmental preservation, and we specifically develop our products to embrace the concept of environment-friendly. We minimize the hazardous materials contained in our products. For example, there is no cadmium to be found in our product.
Information for recycling
This product may contain parts which could be hazardous to the environment. It is important that this product be recycled after use.
LGE. handles all waste product through an environmentally acceptable recycling method. There are several take-back and recycling systems currently in operation worldwide. Many parts will be reused and recycled, while harmful substances and heavy metals are treated by an environmentally friendly method. If you want to find out more information about our recycling program, please contact your local LG vendor or a corporate representative of LG.
We set our vision and policies on a cleaner world by selecting the issue of the global environment as a task for corporate improvement. Please visit our website for more information about our 'green' policies.
http://www.lg.com/global/sustainability/environment/take-back-recycling.jsp
WARNING!
Never place a television set in an unstable location. A television set may fall, causing serious personal injury or death. Many injuries, particularly to children, can be avoided by taking simple precautions such as:
- Using cabinets or stands recommended by the manufacturer of the television set.
• Only using furniture that can safely support the television set. - Ensuring the television set is not overhanging the edge of the supporting furniture.
- Not placing the television set on tall furniture (for example, cupboards or bookcases) without anchoring both the furniture and the television set to a suitable support.
- Not placing the television set on cloth or other materials that may be located between the television set and supporting furniture.
• Educating children about the dangers of climbing on furniture to reach the television set or its controls.
If your existing television set is being retained and relocated, the same considerations as above should be applied.
Symbols
| ~ | Refers to alternating current(AC). |
| --- | Refers to direct current(DC). |
| Refers to class II equipment. | |
| Refers to stand-by. | |
| | | Refers to “ON” (power). |
| Refers to dangerous voltage. |
| |
The Ground Truth image displays a single, solid horizontal line. According to Rule 2 (UNDERSCORE & LINE RULES), if the GT contains lines used for stylistic emphasis or as background (like ruled paper), the OCR result must ignore them. The provided OCR content is "____", which consists of four underscores. This is incorrect because underscores are not equivalent to a solid line and are not permitted under the “Stylistic/Background Lines (Ignore)” rule. The OCR has hallucinated underscores where none should exist in the GT, violating the “Stylistic/Background Lines (Ignore)” rule. Therefore, the OCR result is inconsistent with the Ground Truth.
[Non-Text]
[Non-Text]
[Non-Text]
[Non-Text]
[Non-Text]
[Non-Text]
[Non-Text]
[Non-Text]
[Non-Text]
[Non-Text]
[Non-Text]
[Non-Text]
[Non-Text]
[Non-Text]
[Non-Text]
[Non-Text]
[Non-Text]
[Non-Text]
[Non-Text]
[Non-Text]
[Non-Text]
[Non-Text]
(No text to output)
(No text)
| |
[Non-Text]
Make sure to read the Safety Precautions before using the product. Keep the Owner's Manual in an accessible place for future reference. The model and serial numbers of the TV are located on the back and on one side of the TV. Record them below should you ever need service.
MODEL ____
SERIaL ____
MANUEL DE L'UTILISATEUR
natural_image
Illustration of a monitor connected to a cable with two magnified insets showing a mechanical device (no text or symbols present)
REMARQUE
[Audio] MP3, AAC, HE-AAC
• *rm, *rmvb
[Viséo] RV30, RV40
[Audio] Dolby Digital, AAC, HE-AAC, RA6(Cook)
• 3gp, 3gp2
[Viséo] H.264/AVC, MPEG-4 Part2
[Audio] AAC, AMR(NB/WB)
[Prise en charge] ADIF, ADTS
http://www.lg.com/global/sustainability/environment/take-back-recycling.jsp
AVERTISSEMENT!
MANUAL DE INSTRUÇÕES
natural_image
Illustration of a monitor connected to a cable with two magnified insets showing mechanical components (no text or symbols)
NOTA
ISFccc: Imaging Science Foundation Certified Calibration Control (Controlo de calibração certificado pela Imaging Science Foundation)
[Áudio] MP3, AAC, HE-AAC
• *rm, *rmvb
[Vídeo] RV30, RV40
[Áudio] Dolby Digital, AAC, HE-AAC, RA6 (Cook)
• 3gp,3gp2
[Vídeo] H.264/AVC, MPEG-4 Part2
[Áudio] AAC, AMR (NB/WB)
• *rm / *rmvb : Dependendo do modelo
Formatos de áudio suportados
[Suporte] ADIF, ADTS
The Ground Truth image displays a single, solid horizontal line. According to Rule 2 (UNDERSCORE & LINE RULES), if the GT contains lines used for stylistic emphasis or as background (like ruled paper), the OCR result must ignore them. The provided OCR content is "____", which consists of four underscores. This is incorrect because underscores are not equivalent to a solid line and are not permitted under the “Stylistic/Background Lines (Ignore)” rule. Outputting underscores for a stylistic line violates the rule and constitutes an error. Therefore, the OCR result is inconsistent with the Ground Truth.
[Non-Text]
[Non-Text]
[Non-Text]
[Non-Text]
[Non-Text]
[Non-Text]
[Non-Text]
[Non-Text]
[Non-Text]
[Non-Text]
[Non-Text]
[Non-Text]
[Non-Text]
[Non-Text]
[Non-Text]
[Non-Text]
[Non-Text]
[Non-Text]
[Non-Text]
[Non-Text]
[Non-Text]
[Non-Text]
[Non-Text]
The Ground Truth image displays a single, solid horizontal line. According to Rule 2 (UNDERSCORE & LINE RULES), if the GT contains lines used for stylistic emphasis or as background elements (like a ruled line), the OCR result must ignore them. The line in the GT is clearly a stylistic/background line, not a placeholder for text. Therefore, the OCR should not have output any underscores. Outputting `____` constitutes an error under Rule 2, as it hallucinates placeholder symbols where none are semantically intended. Hence, the OCR result is inconsistent with the Ground Truth.
The Ground Truth image displays a single, solid horizontal line. According to Rule 2 (UNDERSCORE & LINE RULES), this is a stylistic or background line, not a placeholder underscore. Therefore, the OCR result must ignore it and output nothing or only meaningful text. The provided OCR content is "____", which consists of four underscores. This is an incorrect interpretation of the line as a placeholder, violating the rule that stylistic lines must be ignored. The OCR has hallucinated placeholder underscores where none should exist in the GT. Hence, the OCR result is inconsistent with the Ground Truth.
The Ground Truth image displays a single, solid horizontal line. According to Rule 2 (UNDERSCORE & LINE RULES), this is a stylistic or background line, not a placeholder underscore. Therefore, the OCR result must ignore it and output nothing or only meaningful text.
(no text)
| |
[Non-Text]
| |
The Ground Truth image displays a single, solid horizontal line. According to Rule 2 (UNDERSCORE & LINE RULES), if the GT contains lines used for stylistic emphasis or as background (like ruled paper), the OCR result must ignore them. The provided OCR content is "____", which consists of four underscores. This is incorrect because underscores are not equivalent to a solid line and are not permitted under the “Stylistic/Background Lines (Ignore)” rule. Outputting underscores for a stylistic line violates the rule and constitutes an error. Therefore, the OCR result is inconsistent with the Ground Truth.
[Non-Text]
[Non-Text]
[Non-Text]
[Non-Text]
[Non-Text]
[Non-Text]
[Non-Text]
[Non-Text]
[Non-Text]
[Non-Text]
[Non-Text]
[Non-Text]
[Non-Text]
[Non-Text]
[Non-Text]
[Non-Text]
[Non-Text]
[Non-Text]
[Non-Text]
[Non-Text]
[Non-Text]
[Non-Text]
(No text)
(No text)
| |
[Non-Text]

LG
Life's Good
- OWNER'S MANUAL
- Safety and Reference
- Table of contents
- Safety precautions
- Open Source Software Notice Information
- Lifting and moving the TV
- Setting up the TV
- Using the joystick button
- Mounting on a table
- Mounting on a wall
- Connections (Notifications)
- Remote control
- To see web manual
- Maintenance
- Troubleshooting
- Specifications
- Service
- Safety precautions
- RNING
- CAUTION
- Precautions in installing the product
- WARNING
- Precautions to the AC adapter and electrical power
- Precautions in moving the product
- Precautions in using the product
- Mounting on a wall
- Licenses
- DOLBY. DIGITAL PLUS
- HDMI
- DIVX HD
- Open Source Software Notice Information
- Preparing
- NOTE
- Lifting and moving the TV
- Setting up the TV
- Using the joystick button
- Mounting on a table
- Adjusting the menu
- Using the kensington security system
- Connections (Notifications)
- Antenna connection
- Other connections
- Connecting to a PC
- Remote control
- A
- B
- C
- D
- Settings
- Automatically Setting Up Programme
- Settings Programmes Auto Tuning
- To select Picture Mode
- Settings Picture Picture Mode Settings
- Picture Mode
- Fine-tuning Picture Mode
- To set advanced control
- → Advanced Control / Expert Control
- To set additional picture options
- → Picture Options
- Resetting picture settings
- (Settings) Picture Picture Mode Settings ⇒ Picture Reset
- To use Gaming Mode
- Settings Picture Gaming Mode
- To use Energy Saving feature
- Settings Picture → Energy Saving
- To use Eye Comfort Mode feature
- Settings Picture Eye Comfort Mode
- Capturing the TV screen
- Select Sound Mode
- Settings Sound Sound Mode Settings
- → Sound Mode
- Adjusting audio balance
- Settings Sound Sound Mode Settings Balance
- Using the Sound Effect function
- To synchronize audio and video
- Settings Sound AWSync Adjustment
- Using Music Catch
- Setting USB AutoRun
- Settings General USB AutoRun
- To use SIMPLINK
- SIMPLINK function description
- To set password
- Settings Safety Set Password
- To return Reset to Initial Settings
- Settings General Reset to Initial Settings
- To remove the USB device
- Using a USB storage device - warning
- My Media supporting file
- Supported Video Formats
- Supported Audio Formats
- Supported Photo Formats
- To see web manual
- Maintenance
- Cleaning your TV
- Screen, frame, cabinet, and stand
- Power cord
- Preventing "Image burn" or "Burn-in" on your TV screen
- Troubleshooting
- Cannot control the TV with the remote control.
- No image display and no sound is produced.
- The TV turns off suddenly.
- When connecting to the PC (HDMI/RGB), 'No Signal', 'Check signal cable' or 'Unsupported Format' is displayed.
- If TV is turned off automatically.
- Specifications
- Environmental information
- Information for environmental preservation
- Information for recycling
- WARNING!
- MANUEL DE L'UTILISATEUR
- REMARQUE
- AVERTISSEMENT!
- MANUAL DE INSTRUÇÕES
- NOTA
- Formatos de áudio suportados
Brand : LG
Model : 24MT48VF
Category : Television