
SmartPro Compact FC8715 - Vacuum Cleaner PHILIPS - Free user manual and instructions
Find the device manual for free SmartPro Compact FC8715 PHILIPS in PDF.


| Product Type | Bagless Vacuum Cleaner |
| Brand | Philips |
| Model | SmartPro Compact FC8715 |
| Category | Canister Vacuum Cleaner |
| Dimensions (L x D x H) | 25 x 25 x 30 cm |
| Weight | 4 kg |
| Power Supply | Mains, 220-240 V, 50-60 Hz |
| Maximum Power | 750 W |
| Dust Container Capacity | 1.5 L |
| Filtration | Washable HEPA 13 |
| Noise Level | 80 dB |
| Cord Length | 6 m |
| Operating Range | 9 m |
| Number of Power Settings | 2 (Normal, Turbo) |
| Included Accessories | Long crevice tool, upholstery brush, crevice tool, mini turbo brush |
| Control Type | Handle control |
| Filter Maintenance | Wash with water every 3 months |
| Dustbin Cleaning | Empty after each use |
| Safety | Double insulation |
| Spare parts available | Yes, via Philips |
| Repairability | Repairability index 8/10 |
| Warranty | 2 years |
Frequently Asked Questions - SmartPro Compact FC8715 PHILIPS
User questions about SmartPro Compact FC8715 PHILIPS
0 question about this device. Answer the ones you know or ask your own.
Ask a new question about this device
Download the instructions for your Vacuum Cleaner in PDF format for free! Find your manual SmartPro Compact FC8715 - PHILIPS and take your electronic device back in hand. On this page are published all the documents necessary for the use of your device. SmartPro Compact FC8715 by PHILIPS.
USER MANUAL SmartPro Compact FC8715 PHILIPS
English 6
Deutsch 17
Español 29
Français 41
Italiano 53
Nederlands 64
Português 75
Svenska 86
Русский 97
Қазақша 109
6 English
Introduction
Introduction
Congratulations on your purchase and welcome to Philips! To fully benefit from the support that Philips offers, register your product at www.philips.com/welcome.
General description
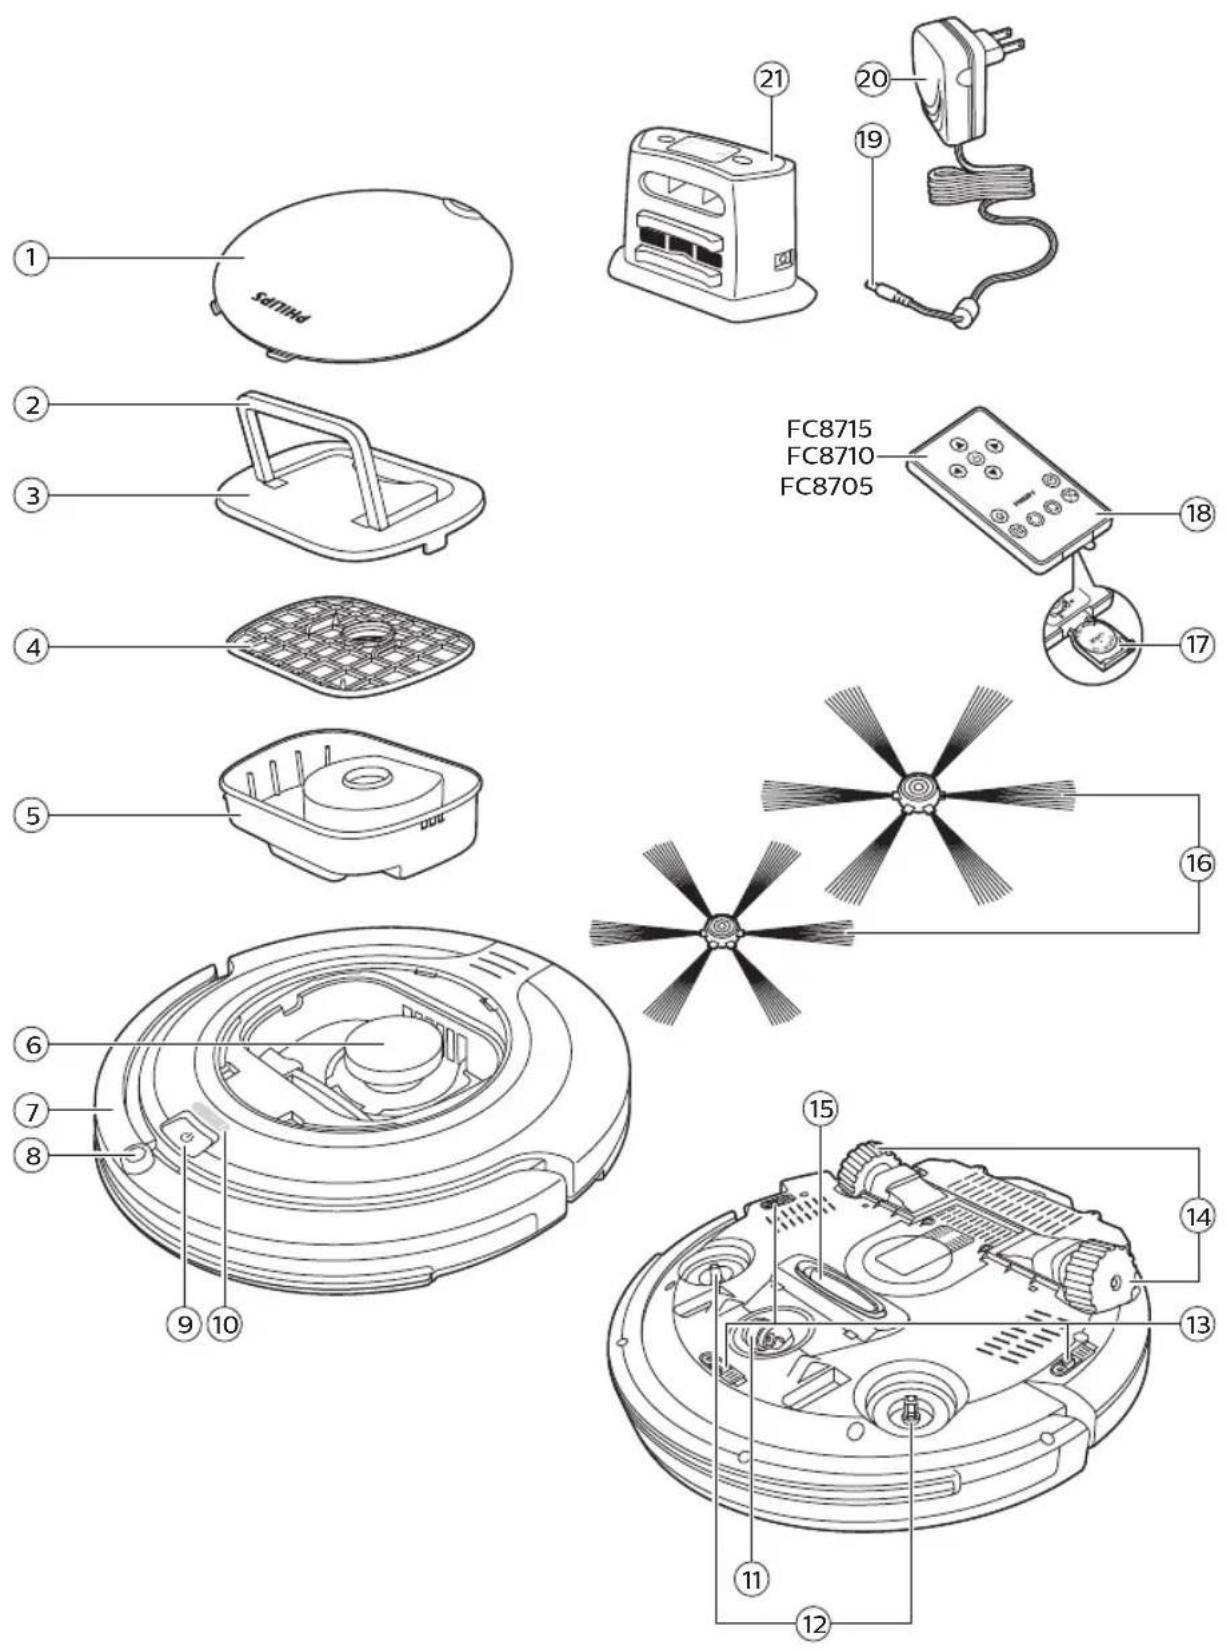
1 Top cover 2 Handle of dust container lid 3 Dust container lid 4 Filter 5 Dust container 6 Fan 7 Bumper 8 Docking station sensor 9 Start/stop button (to start or stop the robot) 10 Display 11 Front wheel 12 Side brush shafts 13 Drop-off sensors 14 Wheels 15 Suction opening 16 Side brushes 17 Battery holder 18 Remote control (FC8715, FC8710, FC8705) 19 Small plug 20 Adapter 21 Docking station
Display and remote control
Display (Fig. 2):
1 Warning indicator
2 Start/stop indicator
3 Dust container full indicator
Remote control (Fig. 3):
1 Navigation buttons and start/stop
2 Docking button
3 Cleaning time button
4 Cleaning mode buttons
1 Navigation buttons and start/stop 2 Docking button 3 Cleaning time button 4 Cleaning mode buttons
How your robot works
What your robot cleans
This robot is equipped with features that make it a suitable cleaner to help you clean the floors in your home.
The robot is especially suitable for cleaning hard floors, such as wooden, tiled or linoleum floors. It may experience problems cleaning soft floors, such as carpet or rugs. If you use the robot on a carpet or rug, please stay close by the first time to see if the robot can deal with this type of floor.
Because the robot uses infrared sensors to navigate, it may run into difficulties on very dark and shiny floors. If you use the robot on such surfaces, please stay close by the first time to see if the robot can deal with such a dark and shiny floor.
How your robot cleans
Cleaning system
The robot has a 2-stage cleaning system to clean your floors efficiently.
- The two side brushes help the robot clean in corners and along walls. They also help to remove dirt from the floor and move it towards the suction opening (Fig. 4).
- The suction power of the robot picks up loose dirt and transports it through the suction opening into the dust container (Fig. 5).
Cleaning patterns
In its auto cleaning mode, the robot uses an automatic sequence of cleaning patterns to clean each area of the room optimally. The cleaning patterns it uses are:
1 Z-pattern or zigzag pattern (Fig. 6)
2 Random pattern (Fig. 7)
3 Wall-following pattern (Fig. 8)
4 Spot-cleaning pattern (Fig. 9)
In its auto cleaning mode, the robot uses these patterns in a fixed sequence: z-pattern, random pattern, wall-following pattern, and spot-cleaning pattern.
When the robot has completed this sequence of patterns, it starts moving in Z-pattern again. The robot continues to use this sequence of patterns to clean the room until the rechargeable battery runs low, or until it is switched off manually.
Note (FC8715, FC8710, FC8705): You can also select each mode individually by pressing the appropriate button on the remote control. For more details, see chapter 'Using your robot', section 'Cleaning modes'.
How your robot avoids height differences
The robot has three drop-off sensors in its bottom. It uses these drop-off sensors to detect and avoid height differences such as staircases.
Note: It is normal for the robot to move slightly over the edge of a height difference, as its front drop-off sensor is located behind the bumper.
Caution: In some cases, the drop-off sensors may not detect a staircase or other height difference in time. Therefore monitor the robot carefully the first few times you use it, and when you operate it near a staircase or another height difference. It is important that you clean the drop-off sensors regularly to ensure the robot continues to detect height differences properly (see chapter 'Cleaning and maintenance' for instructions).
Before first use
Before first use
1 Unpack the side brushes and place the robot upside down on a table or on the floor. 2 Push the side brushes onto the shafts on the bottom of the robot (Fig. 10).
Note: Make sure you attach the side brushes properly. Press them onto the shaft until you hear them lock into position with a click.
Removing the protection tag from the remote control
This only applies to FC8715, FC8710, FC8705.
The remote control works on a CR2025 coin-shaped battery. This battery is protected with a protection tag that has to be removed before use.
1 Pull the battery protection tag out of the battery compartment of the remote control (Fig. 11). Now the remote control is ready for use.
Preparing for use
Installing the docking station
1 Insert the small plug of the adapter into the socket on the docking station (1) and insert the adapter into the wall socket (2) (Fig. 12). 2 Place the docking station on a horizontal, level floor against a wall.
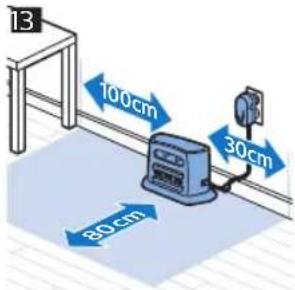
Note: Make sure that there are no obstacles or height differences 80 cm in front, 30 cm to the right and 100 cm to the left of the docking station (Fig. 13).
Important note: deep sleep mode
In deep sleep mode, the robot does not respond at all when you press a button. To reactivate the robot when it is in deep sleep mode:
1 Press the start/stop button on the robot for 1 second to bring the robot from deep sleep mode to standby mode. 2 Press the start/stop button on the robot or on the remote control briefly to start the robot. 3 If the robot does not start cleaning, place it on the plugged-in docking station to recharge its rechargeable battery.
The robot enters deep sleep mode when you press the start/stop button for 3 seconds. It may also enter the deep sleep mode when its battery is empty. The battery may, for instance, run empty if the robot is unable to find its docking station.
Charging
- When charging for the first time and when the rechargeable battery of the robot is empty, the charging time is 4 hours.
- When the rechargeable battery is fully charged, it has a runtime of about 130 minutes.
- Your robot can only be charged on the docking station.
Charging on the docking station
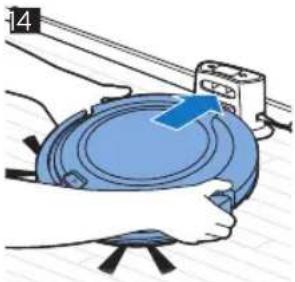
1. Place the robot on the plugged-in docking station (Fig. 14). 2. The robot starts charging automatically and the start/stop indicator starts flashing green slowly (Fig. 15). 3. When the rechargeable battery is fully charged, the start/stop indicator lights up solid green (Fig. 16).
Charging automatically during use
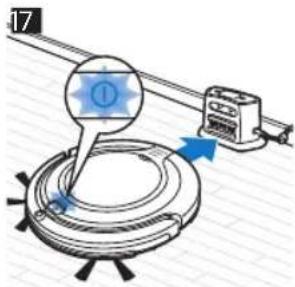
1. When the robot has finished cleaning or when only 15% of the battery power remains, it automatically searches for the docking station to recharge. When the robot searches for the docking station, the start/stop indicator flashes green slowly (Fig. 17). 2. When the battery runs low, the start/stop button turns solid red and the robot searches for the docking station. 3. When the rechargeable battery is fully charged, the start/stop indicator lights up solid green.
Note: The robot only searches for the docking station automatically when it started cleaning from the docking station.
Clap response
The clap response is enabled when the robot enters sleep mode in the following situations:
- when it stops cleaning due to an error
- when it cannot find its docking station in 20 minutes. If you do not see the robot, you can locate it by clapping your hands once. The robot will respond by beeping and by lighting up all icons on its display.
Using your robot
Preparing the room for a cleaning run
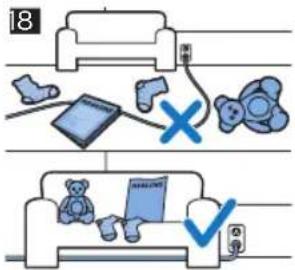
Before you start the robot on its cleaning run, make sure that you remove all loose and fragile objects from the floor (Fig. 18).
Also remove all cables, wires and cords from the floor.
Functions of the start/stop button
The start/stop button has the following functions:
How you press start/stop button / How robot responds
| Press start/stop button for 1 second Robot switches from sleep mode to standby |
| Press start/stop button briefly Robot starts or stops cleaning |
| Press start/stop button for 3 seconds Switches robot on or off. |
Signals and their meaning
The robot has a display with three indicators: a warning indicator, a start/stop indicator, and the dust container full indicator. The table below explains the meaning of the signals.
Signal Meaning
| The start/stop indicator lights up solid green. The robot is ready to clean. | |
| The start/stop indicator flashes green slowly. The robot is charging. | |
| The robot searches for the docking station because the battery is low. | |
| The start/stop indicator lights up solid red. The rechargeable battery of the robot runs low and the robot searches for its docking station. | |
| The dust container full indicator lights up solid red. | The dust container is full. |
| The warning indicator lights up solid red but the start/stop indicator is green. | The robot was lifted while it was cleaning. |
| The warning indicator is solid red. The bumper of the robot is stuck. | |
| The dust container is not present or not placed properly. | |
| The color of the floor is too dark. | |
| The warning indicator flashes red. A wheel or side brush is stuck. | |
| Charging error or battery is not present. | |
Starting and stopping
1 Press the start/stop button.
- You can press the start/stop button on the robot (Fig. 19). - FC8715, FC8710, FC8705: You can also press the start/stop button on the remote control (Fig. 20).
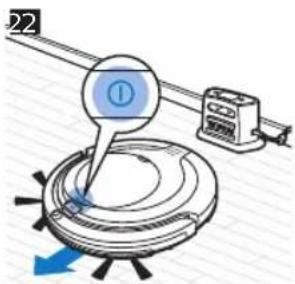
2 The start/stop indicator lights up solid green and the robot starts cleaning (Fig. 22).
3 The robot cleans in the auto-cleaning mode until its battery runs low. In the auto-cleaning mode, it follows repeated sequences of Z-pattern, random, wall-following, and spot-cleaning patterns (Fig. 21).
FC8715, FC8710, FC8705:
Note: To select an individual mode, press one of the mode buttons on the remote control. See section 'Cleaning mode selection' for more details.
4 When the battery runs low, the start/stop indicator turns solid red and the robot searches for the docking station to recharge (Fig. 17).
5 You can also press the start/stop button to interrupt or stop the cleaning run. If you press the start/stop button again and there is still enough energy in the rechargeable battery, the robot continues cleaning in the auto-cleaning mode.
6 FC8715, FC8710, FC8705: To make the robot return to the docking station before the rechargeable battery runs low, press the docking button on the remote control (Fig. 23).
The start/stop indicator starts flashing green slowly and the robot searches for the docking station to recharge (Fig. 24).
FC8715, FC8710, FC8705: If there is still enough energy in the rechargeable battery, you can press the docking button on the remote control to make the robot return to the docking station. If the
If the rechargeable battery is completely empty, you have to place the robot on the docking station manually.
Operating the docking station
The docking station has two controls that can be used to operate the robot.
Battery full and go button
If you press the battery full and go button on the docking station while the robot is charging, the robot starts cleaning as soon as the rechargeable battery is full (Fig. 25).
24h button
If you press the 24h button on the docking station, the docking station starts to count down the 24 hours until the next cleaning run. When the countdown is finished, the robot starts cleaning until its battery runs low and then returns to the docking station automatically to recharge (Fig. 26).
Cleaning mode selection
Cleaning mode selection is only possible with the remote control (FC8715, FC8710, FC8705). Next to the auto-cleaning mode, this robot has four individual cleaning modes that can each be activated by pressing the appropriate button on the remote control.
Z-pattern mode
In Z-pattern mode, the robot cleans by making Z-shaped loops through the room to clean large areas (Fig. 27).
Random mode
In this mode, the robot cleans the room in a mixed pattern of straight and crisscross movements (Fig. 28).
Wall-following mode
In this mode, the robot follows the walls of the room to give the area alongside the walls an extra clean (Fig. 29).
Spot-cleaning mode
In this mode, the robot moves randomly on a small area to clean this area thoroughly (Fig. 30).
Note: The manually selected modes are only active for a couple of minutes. After that, the robot switches to auto-cleaning mode.
Manual driving
You can drive the robot manually with buttons on the remote control (FC8715, FC8710, FC8705).
1 Use the arrow buttons above and below and to the left and right of the start/stop button on the remote control to navigate the robot through the room (Fig. 31).
Note: Be careful when you drive the robot manually close to height differences and staircases.
Note: The vacuuming function and the side brushes only work when the robot is driven forward. The left, right or back buttons are only for maneuvering the robot.
Using the cleaning time button on the remote control
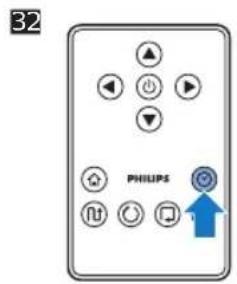
FC8715, FC8710, FC8700: Press the cleaning time button on the remote control to make the robot clean for 35 minutes. When the cleaning time is finished, the robot stops (Fig. 32).
Cleaning and maintenance
Emptying and cleaning the dust container
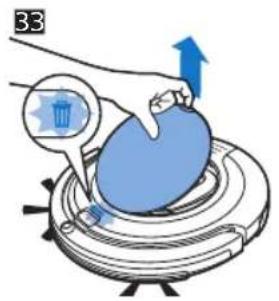
Empty and clean the dust container when the dust container full indicator lights up solid red.
1 Remove the cover (Fig. 33).
2 Pull up the handle of the dust container lid and lift the dust container out of the dust container compartment (Fig. 34).
Note: When you remove or reinsert the dust container, take care not to damage the blades of the motor fan.
3 Carefully lift the lid off the dust container (1) and take out the filter (2) (Fig. 35).
4 Shake the dust container over a dustbin to empty it. Clean the filter and the inside of the dust container with a cloth or a toothbrush with soft bristles. Also clean the suction opening in the bottom of the dust container (Fig. 36).
Caution: Do not clean the dust container and the filter with water or in the dishwasher.
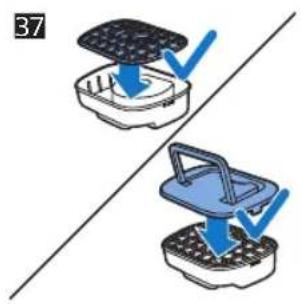
5 Put the filter back into the dust container (1). Then place the lid on the dust container (2) (Fig. 37).
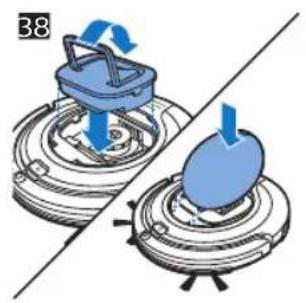
6 Put the dust container back into the dust container compartment and put the top cover back on the robot (Fig. 38).
Caution: Always make sure the filter is present inside the dust container. If you use the robot without the filter inside the dust container, the motor will be damaged.
Cleaning the robot
To maintain good cleaning performance, you have to clean the drop-off sensors, the wheels, the side brushes and the suction opening from time to time.
1 Place the robot upside down on a flat surface.
2 Use a brush with soft bristles (e.g. a toothbrush) to remove dust or fluff from the drop-off sensors. (Fig. 39)
Note: It is important that you clean the drop-off sensors regularly. If the drop-off sensors are dirty, the robot may fail to detect height differences or staircases.
3 Use a brush with soft bristles (e.g. a toothbrush) to remove dust or fluff from the front wheel and side wheels (Fig. 40).
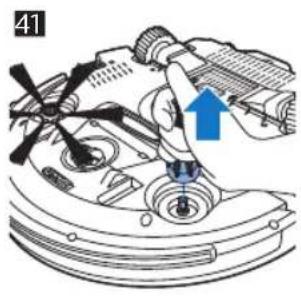
4 To clean the side brushes, grab them by the bristles and pull them off their shafts (Fig. 41).
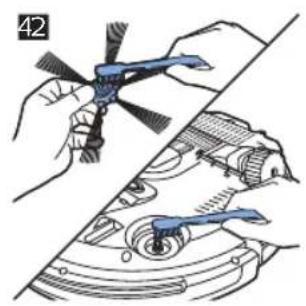
5 Remove fluff, hairs and threads from the shaft and from the side brush with a soft brush (e.g. a toothbrush) or a cloth (Fig. 42).
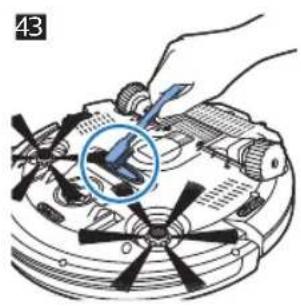
6 Clean the suction opening with a soft brush (e.g. a toothbrush) (Fig. 43).
7 Check the side brushes and the bottom of the robot for any sharp objects that could damage your floor.
Ordering accessories
To buy accessories or spare parts, visit www.philips.com/parts-and-accessories or go to your Philips dealer. You can also contact the Philips Consumer Care Center in your country (see the international warranty leaflet for contact details).
Replacement
Replacing the filter
Replace the filter if it is very dirty or damaged. You can order a new filter under order number FC8065. See 'Emptying and cleaning the dust container' in chapter 'Cleaning and maintenance' for instructions on how to remove the filter from the dust container and how to place it in the dust container.
Replacing the side brushes
Replace the side brushes after some time to ensure proper cleaning results.
Note: Always replace the side brushes when you notice signs of wear or damage. We also recommend that you replace both side brushes at the same time. You can order a set of two side brushes and two filters under type number FC8067.
1 To replace the side brushes, grab the old side brushes by the bristles and pull them off their shafts. 2 Push the new side brushes onto the shafts.
Replacing the rechargeable battery
The rechargeable battery of the robot may only be replaced by qualified service engineers. Take the robot to an authorized Philips service center to have the battery replaced when you can no longer recharge it or when it runs out of power quickly. You can find the contact details of the Philips Consumer Care Center in your country in the international warranty leaflet or on the website at www.philips.com/support.
Replacing the battery of the remote control (FC8715, FC8710, FC8705)
The remote control works on a CR2025 coin-shaped battery. Replace the battery when the robot no longer responds when you press the buttons on the remote control.
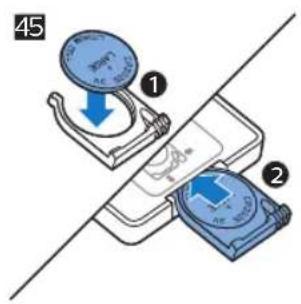
1 Hold the remote control upside down. Push the release button on the battery holder and at the same time slide the battery holder out of the remote control (Fig. 44). 2 Remove the empty battery from the battery holder and place a new battery in the battery holder. Then slide the battery holder back into the remote control (Fig. 45).
Storage
When you are not going to use the robot for more than one month, press the start/stop button on the robot for 3 seconds to make the robot enter deep sleep mode to protect its rechargeable battery. Unplug the docking station to save energy.
Removing the rechargeable battery
Warning: Only remove the rechargeable battery when you discard the appliance. Make sure the battery is completely empty when you remove it.
To remove the rechargeable battery, follow the instructions below. You can also take the robot to a Philips service center to have the rechargeable battery removed. Contact the Philips Consumer Care Center in your country for the address of a service center near you.
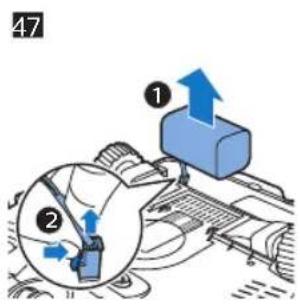
1 Start the robot from a place somewhere in the room and not from the docking station. 2 Let the robot run until the rechargeable battery is empty to make sure that the rechargeable battery is completely discharged before you remove it and dispose of it. 3 Undo the screws of the battery compartment lid and remove the lid (Fig. 46). 4 Lift out the rechargeable battery and disconnect it (Fig. 47). 5 Take the robot and the rechargeable battery to a collection point for electrical and electronic waste.
Troubleshooting
This chapter summarizes the most common problems you could encounter with the appliance. If you are unable to solve the problem with the information below, visit www.philips.com/support for a list of frequently asked questions or contact the Consumer Care Center in your country.
| Problem | Possible cause Solution | |
| The robot does not start cleaning when I press the start/stop button. | The rechargeable battery is empty. | Charge the rechargeable battery (see chapter 'Preparing for use'). |
| The robot is in deep sleep mode. | Press the start/stop button for 1 second to switch on the robot. When you press the start/stop button briefly again, the robot starts cleaning. If the battery is completely empty, place the robot on the plugged-in docking station. | |
| The robot does not respond when I press one of the buttons. | The rechargeable battery is empty. | Place the robot on the plugged-in docking station. After a few seconds, you will hear a beep and the display lights up. |
| The warning indicator lights up solid red. | One or both wheels are stuck. | Remove the fluff, hair, thread or wire that is caught around the wheel suspension. |
| One or both side brushes are stuck. | Clean the side brushes (see chapter 'Cleaning and maintenance'). | |
| The dust container is not present or is not placed properly. | When the dust container is not present or is not placed properly, the warning indicator lights up solid red and the robot stops working. Place the dust container in the robot in the robot properly. |
Problem Possible cause Solution
| The bumper is stuck. Lift the robot so that its bumper comes free. Place the robot at some distance from the obstacle and press the start/stop button to make it resume cleaning. | ||
| The robot was lifted while it was cleaning. | Place the robot on the floor. Then press the start/stop button to make the robot resume cleaning. | |
| The robot does not clean properly. | The bristles of one or both side brushes are crooked or bent. | Soak the brush or brushes in warm water for a while. If this does not restore the bristles to their proper shape, replace the side brushes (see chapter 'Replacement'). |
| The filter in the dust container is dirty. | Clean the filter in the dust container with a cloth or a toothbrush with soft bristles. You can also clean the filter and dust container with a regular vacuum cleaner at a low suction power setting. | |
| If brushing or vacuuming does not help to clean the filter, replace the filter with a new one. We advise you to replace the filter at least once a year. | ||
| The suction opening in the bottom of the dust container is clogged. | Clean the suction opening (see chapter 'Cleaning and maintenance'). | |
| The front wheel is jammed with hair or other dirt. | Clean the front wheel (see chapter 'Cleaning and maintenance'). | |
| The robot is cleaning a very dark or shiny surface, which triggers the drop-off sensors. This causes the robot to move in an unusual pattern. | Press the start/stop button and then move the robot to a lighter colored piece of the floor. If the problem continues to occur on lighter colored floors, please go to www.philips.com/support or contact the Consumer Care Center in your country. | |
| The robot is cleaning a floor that reflects sunlight quite strongly. This triggers the drop-off sensors and causes the robot to move in an unusual pattern. | Close the curtains to block sunlight from entering the room. You can also start cleaning when the sunlight is less bright. | |
| The rechargeable battery can no longer be charged or runs empty very fast. | The rechargeable battery has reached the end of its life. | Have the rechargeable battery replaced by a Philips service center (see chapter 'Replacement'). |
Problem Possible cause Solution
| FC8715, FC8710, FC8705: The battery of the remote control runs empty too fast. | Perhaps you did not insert the correct type of battery. | For the remote control, you need a CR2025 coin-shaped battery. If the problem persists, go to the website at www.philips.com/support or contact the Consumer Care Center in your country. |
| The robot is moving in circles. | The robot is in spot-cleaning mode. | This is normal behavior. The spot-cleaning mode can be activated when a lot of dirt is detected on the floor for a thorough clean. It is also part of the auto cleaning mode. After approximately one minute the robot resumes its normal cleaning pattern. You can also stop the spot-cleaning mode by selecting a different cleaning mode on the remote control. |
| FC8715, FC8710, FC8705: You can also stop the spot-cleaning mode by selecting a different cleaning mode on the remote control. | ||
| The robot cannot find the docking station. | There is not enough room for the robot to navigate towards the docking station. | Try to find another place for the docking station. See 'Installing the docking station' in chapter 'Preparing for use'. |
| The robot is still actively searching. | Give the robot around 20 minutes to return to the docking station. |
Introduction
Introduction
FC8715, FC8710, FC8705:
FC8715, FC8710, FC8705:
Charging on the docking station
FC8715, FC8710, FC8705:
2 Start/stop indicator
FC8715, FC8710, FC8705:
Ordering accessories
FC8715, FC8710, FC8705:
FC8715, FC8710, FC8705:
102 Russian
FC8715, FC8710, FC8705:


6
7
8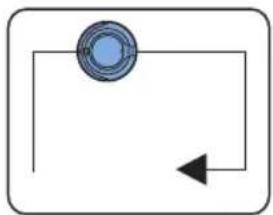
9![graph TD A["Blue Circle"] --> B["Black Arrow"] B --> C["Downward Arrow"]](/content/2026/06/1288118/images/fe8d6ec5ecfe4c59c99bec310b16a7d3743bddc057d444ecc2bcdd3c6155090e.jpg)
10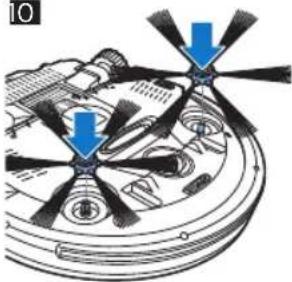
11
12
15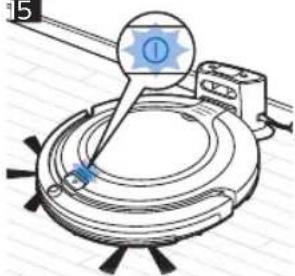
16
19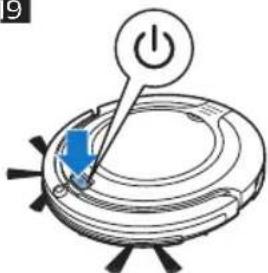
20
21![graph TD A["Component 1"] --> B["Process Unit 1"] B --> C["Component 2"] C --> D["Process Unit 2"] D --> E["Output"] style A fill:#f9f,stroke:#333 style E fill:#bbf,stroke:#333](/content/2026/06/1288118/images/8ca8c015a17ab56c782fdb5fd0d34ccd6554a6b320283c6076c6ee154a47a106.jpg)
23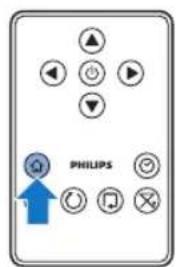

25

![graph TD A["Node 27"] --> B["Node"] B --> C["Node"] C --> D["Node"] D --> E["Node"] E --> F["Node"] F --> G["Node"] G --> H["Node"] H --> I["Node"] I --> J["Node"] J --> K["Node"] K --> L["Node"] L --> M["Node"] M --> N["Node"] N --> O["Node"] O --> P["Node"] P --> Q["Node"] Q --> R["Node"] R --> S[…](/content/2026/06/1288118/images/71e81cbca26ce95278bfd8ef1f22c8d21945ab76a34a10e05f31e1812f45833d.jpg)
![graph TD A["Circle"] --> B{Decision} B --> C["Node 1"] B --> D["Node 2"] B --> E["Node 3"] B --> F["Node 4"] C --> G["Circle 5"] D --> G E --> G F --> G G --> H["End"]](/content/2026/06/1288118/images/2cc52e4ceb116dfad6ff30e163a31da8ef63ea3b4689b2532291132da3107d2d.jpg)
![graph TD A["29"] --> B["Document Icon"] B --> C["Layout"] C --> D["Layout"] D --> E["Layout"] E --> F["Layout"] F --> G["Layout"] G --> H["Layout"] H --> I["Layout"] I --> J["Layout"] J --> K["Layout"] K --> L["Layout"] L --> M["Layout"] M --> N["Layout"] N --> O["Layout"] O --> P["Layout"] P --> Q[…](/content/2026/06/1288118/images/b538671edf29a49f5aeec4e313a20a9c0cf36bfceaf84e91027b6d1e185cc595.jpg)

![graph TD A["Device Icon"] --> B((Circular Component)) B --> C["Arrow Up"] B --> D["Arrow Down"] B --> E["Arrow Left"] B --> F["Arrow Right"]](/content/2026/06/1288118/images/ce0dc7e8ff14b886b6d3a62f926fd9dc58e7c10238faca350f0137e410ee5c9e.jpg)






- 6 ENGLISH
- INTRODUCTION
- GENERAL DESCRIPTION
- DISPLAY AND REMOTE CONTROL
- HOW YOUR ROBOT WORKS
- WHAT YOUR ROBOT CLEANS
- HOW YOUR ROBOT CLEANS
- CLEANING SYSTEM
- CLEANING PATTERNS
- HOW YOUR ROBOT AVOIDS HEIGHT DIFFERENCES
- BEFORE FIRST USE
- REMOVING THE PROTECTION TAG FROM THE REMOTE CONTROL
- PREPARING FOR USE
- INSTALLING THE DOCKING STATION
- IMPORTANT NOTE: DEEP SLEEP MODE
- CHARGING
- CHARGING ON THE DOCKING STATION
- CHARGING AUTOMATICALLY DURING USE
- CLAP RESPONSE
- USING YOUR ROBOT
- PREPARING THE ROOM FOR A CLEANING RUN
- FUNCTIONS OF THE START/STOP BUTTON
- SIGNALS AND THEIR MEANING
- STARTING AND STOPPING
- OPERATING THE DOCKING STATION
- BATTERY FULL AND GO BUTTON
- 24H BUTTON
- CLEANING MODE SELECTION
- Z-PATTERN MODE
- RANDOM MODE
- WALL-FOLLOWING MODE
- SPOT-CLEANING MODE
- MANUAL DRIVING
- USING THE CLEANING TIME BUTTON ON THE REMOTE CONTROL
- CLEANING AND MAINTENANCE
- EMPTYING AND CLEANING THE DUST CONTAINER
- CLEANING THE ROBOT
- ORDERING ACCESSORIES
- REPLACEMENT
- REPLACING THE FILTER
- REPLACING THE SIDE BRUSHES
- REPLACING THE RECHARGEABLE BATTERY
- REPLACING THE BATTERY OF THE REMOTE CONTROL (FC8715, FC8710, FC8705)
- STORAGE
- REMOVING THE RECHARGEABLE BATTERY
- TROUBLESHOOTING
- 102 RUSSIAN
Brand : PHILIPS
Model : SmartPro Compact FC8715
Category : Vacuum Cleaner