
DP-X1 - Mp3 player ONKYO - Free user manual and instructions
Find the device manual for free DP-X1 ONKYO in PDF.


| Product Type | High-Resolution Digital Audio Player |
| Brand | Onkyo |
| Model | DP-X1 |
| Operating System | Android 5.1.1 (Lollipop) |
| Display | 4.7-inch IPS LCD, 1280 x 720 pixels |
| Processor | Qualcomm Snapdragon 800 (MSM8974) |
| RAM | 2 GB |
| Internal Storage | 32 GB (expandable via microSD up to 200 GB) |
| Audio DAC | ESS ES9018K2M (dual DAC) |
| Supported Audio Formats | MP3, WMA, WAV, FLAC, ALAC, AIFF, DSD (DSD64/128/256), MQA |
| Output Connectors | 3.5mm headphone jack, 2.5mm balanced headphone jack |
| Wireless Connectivity | Wi-Fi 802.11 a/b/g/n/ac, Bluetooth 4.0 |
| Battery Capacity | 3600 mAh (approx. 16 hours playback) |
| Dimensions (W x H x D) | 75.9 x 130.6 x 14.6 mm |
| Weight | approximately 190 g |
| Charging | via micro USB (USB 2.0) |
| Accessories Included | USB cable, screen protector (pre-applied), quick start guide |
| Maintenance | Clean with soft dry cloth; avoid moisture and extreme temperatures |
| Safety | Do not disassemble; use only approved chargers; keep away from water |
| Spare Parts & Repair | Contact authorized Onkyo service centers for battery replacement and repairs |
| General Information | Designed for audiophile-grade portable music listening |
Frequently Asked Questions - DP-X1 ONKYO
User questions about DP-X1 ONKYO
0 question about this device. Answer the ones you know or ask your own.
Ask a new question about this device
Download the instructions for your Mp3 player in PDF format for free! Find your manual DP-X1 - ONKYO and take your electronic device back in hand. On this page are published all the documents necessary for the use of your device. DP-X1 by ONKYO.
USER MANUAL DP-X1 ONKYO
Switching the screen
The home screen
The app list screen
Customizing the home screen
Entering text
Switching the screen
This is a portable music player that uses the Android™ OS. The basic screens are the home screen and the app list screen. Tap the icons at the bottom of the screen to switch between the screens.
Home screen App list screen


These icons are shown in all screens even if you switch screens.

Returns to the previous screen.
Switches to the home screen.

Displays a thumbnail list of apps you have recently used. You can delete the app from the list by tapping on the " ✗" on the upper right of the thumbnail or flicking the thumbnail left to right.
The home screen
The screen that appears immediately after you turn the unit on is called the home screen. Flick left to right to switch the home screen.

Home screen 1 Home screen 2
Home screen 1

- Status bar
2.

Google
A folder containing a collection of Google™ apps, such as the Google Chrome browser to view web pages and the YouTube™ app.

Manual
Gives you access to this document.

Useful Apps
A collection of installers to download apps.

Play Store
Gives you access to the "Google Play™ Store" where you can download apps for the Android OS. You may not be able to access this store in some areas.
Music
The Music app for playing music.

Switches to the app list screen.

Settings
Takes you to the settings screen where you can set "Wi-Fi", "Language & input", "Date & time", etc.
Home screen 2

3. Music widget
You can play music, pause, skip, etc.
4.
Line Out
You can switch the headphone output to the line output mode to connect external equipment.
Stand-alone
You can improve sound quality by turning off Wi-Fi ® , the Bluetooth ® function, and the LCD.
Balanced
A mode suitable for when you have connected balanced headphones. Compared to the normal single-ended operation, you can get a larger output and the high voltage is not grounded together with the small signal, so you can anticipate a superior effect in the background of the music. Because you get a larger output, you can drive headphones with a higher impedance.
ACG
A mode suitable for when you have connected balanced headphones. The basic operating method is the same as the balanced mode, but uses technology to even more forcefully fix grounding standards, so you can enjoy a sound quality with improved clarity and more stability than the balanced mode. Output volume is the same as the regular single-ended operation, however.
The app list screen
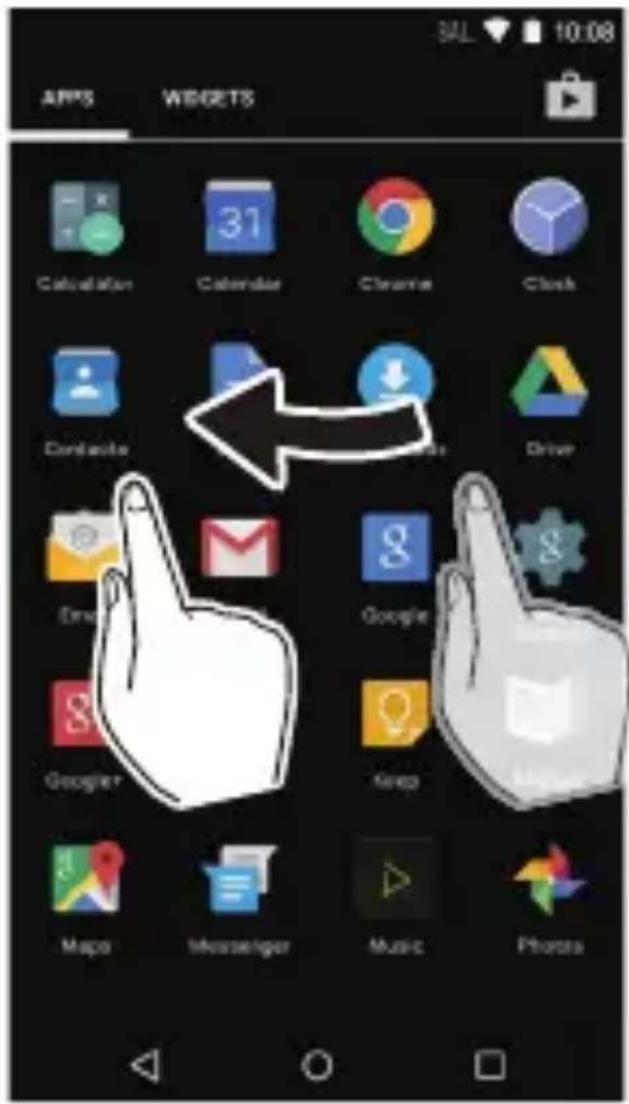
When you tap the app list icon in the home screen, the app list screen is displayed.

When there are a lot of apps, flick to the left or right to change the screen.

Customizing the home screen
You can put shortcuts for apps and widgets* such as clocks on the home screen, and you can customize it to suit yourself.
* Widgets are small apps that you can put in the home screen so that a clock is shown all the time or shortcuts to your favorite home pages can be shown.
Creating an app shortcut on the home screen
1 Tap the app list icon in the home screen.

2 Long tap on the app in the app list screen.

3 The background changes to the home screen, so drag to the desired position and release your finger.

■ Adding a widget to the home screen
1 Tap the app list icon in the home screen.

2 Tap "WIDGETS" at the top left of the screen.
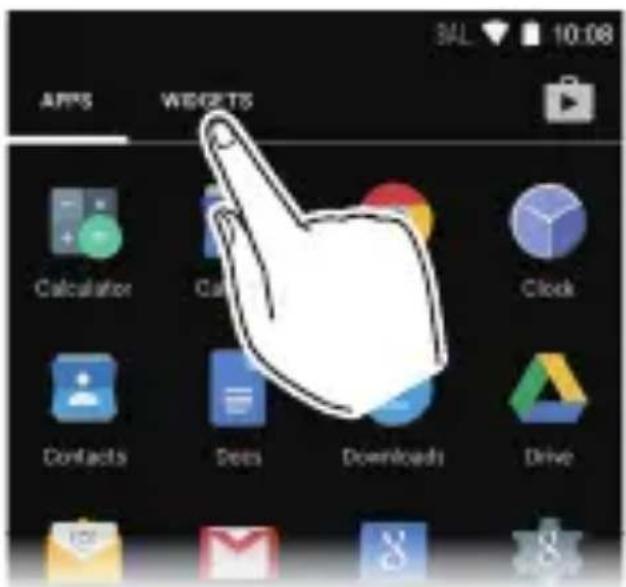
3 Long tap the widget you want to add.

4 The background changes to the home screen, so drag to the desired position and release your finger.

Changing the wallpaper in the home screen
1 Long tap in an area of the home screen where there is nothing.

2 Tap "Wallpapers".
- Select "Photos" to set a favorite photo or image as your wallpaper. To take a screen shot, press the power button (⏻) and the skip button (◄◄◄) at the same time.
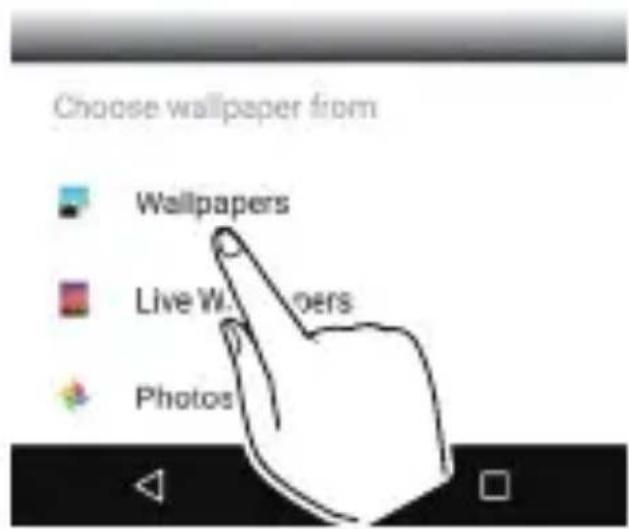
3 Tap the wallpaper you want to change to.

4 Tap "Set wallpaper".

- Deleting shortcuts and widgets
1 Long tap the shortcut or widget you want to delete.

2 Drag to "Remove" and release your finger.

When you tap a text box or other place to enter text, a keyboard is automatically displayed.

- Tap to enter text.
- Tap to switch between upper case and lower case. Double-tap to lock upper-case.
- Tap to change the type of text.
- The method of entry changes.
- Enters a space.
- Removes a character on the left of the cursor.
- Tap to confirm.
Playing Music
Playing from a microSD card
▶ Copying from a computer and playing
Play operation details
Editing a play list
Equalizer settings
Slide menu
Playing from a microSD card
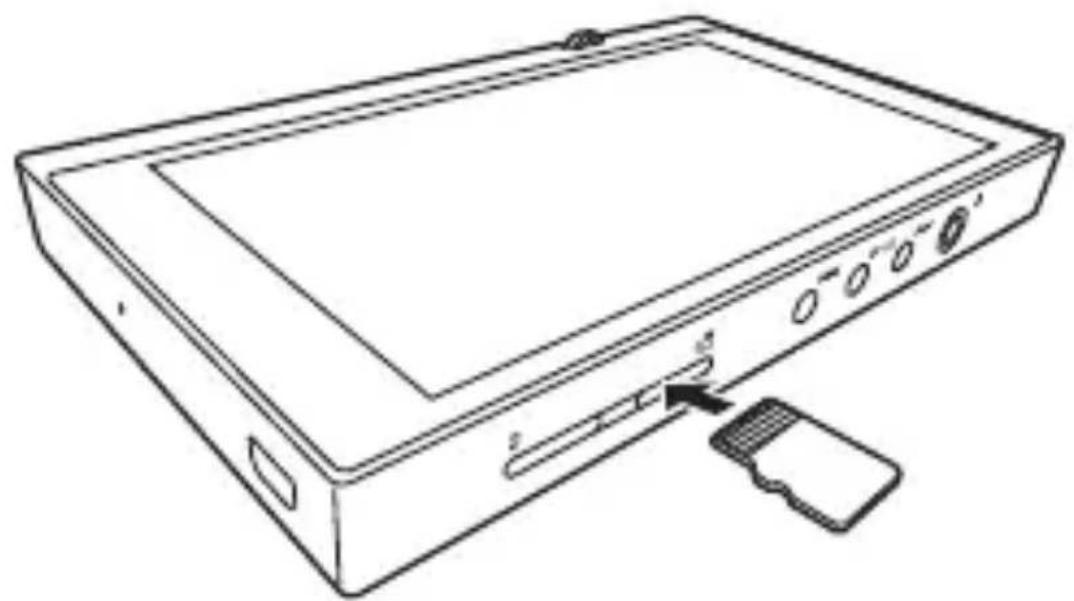
Insert a microSD card that has music files on it and play them.
natural_image
Line drawing of a rectangular electronic device with ports and a separate clip attached (no text or symbols)1 Insert the microSD card into the card slot (either 1 or 2).
- With the contacts facing up, push in completely so the card clicks into place.
2 Tap Music in the home screen.

- Do not connect headphones that have an impedance outside the rated range as this may result in damage.
→ See here for headphone ratings
3 In the library, tap the track you want to play.
- It may take some time for tracks to be displayed in the library.

Tap or click here Play operation details.
■ Removing the microSD card
Unmount the microSD card using the following procedure before removing it. The card can be damaged or may stop working properly if you fail to unmount the card first.
1 Tap "Settings" in the home screen.

Settings
2 Tap "Storage" - "Unmount SD card" - "OK".
3 Push the microSD card in until you hear a click and then pull straight out.
- The microSD card will spring out so take care not to lose it.
Copying from a computer and playing
If you are using a Windows computer, you can copy music data stored on your computer to the built-in storage on this unit or to a microSD card in this unit.
Copy with the data copying software "X-DAP Link" and play
X-DAP Link is compatible with Windows 10 (32 bit/64 bit), Windows 8/8.1 (32 bit/64 bit) and Windows 7 (32 bit/64 bit).
1 Start your computer and download the installer for X-DAP Link from the following site.
http://www.jp.onkyo.com/audiovisual/dap/
2 Double-click "setup.exe" to install.
- Follow the on-screen instructions to install. A shortcut is created on the desktop after installation.
3 Turn on the power of the unit.
• To copy to a microSD card, insert a microSD card into the card slot (1 or 2).
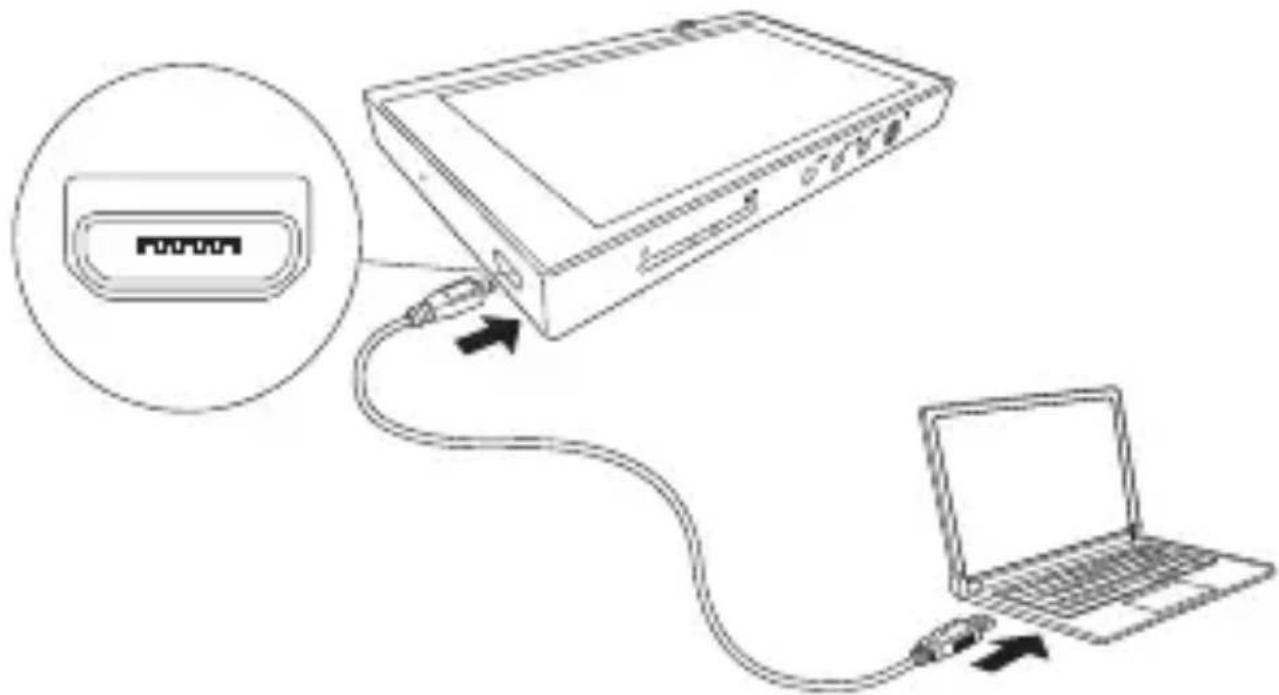
4 Connect this unit to the computer with the supplied USB cable and start X-DAP Link.
- Connect so the wider side of the plug is up. You may damage the plug or jack if you try to insert it the wrong way.

5 Select the folder that contains the file(s) you want to copy from ①.
onkyo music
If there are files you have downloaded from onkyo music (a site that distributes music files), select this folder.
iTunes Media
If you are using iTunes®, a play list and content are displayed.
When adding a folder in the computer, click
② and add the folder you want to display.

6 Click ③ to select built-in storage, SD card 1, or SD card 2 as the copy destination, then click "OK".

- You can also click ④⑤ to specify different copy destinations to ③.
7 To select and copy only certain files to add, select "No" in this screen. Select "Yes" to reflect files that have already been copied to the list. If you do this, music files that you have deselected will be deleted from this unit during copying.

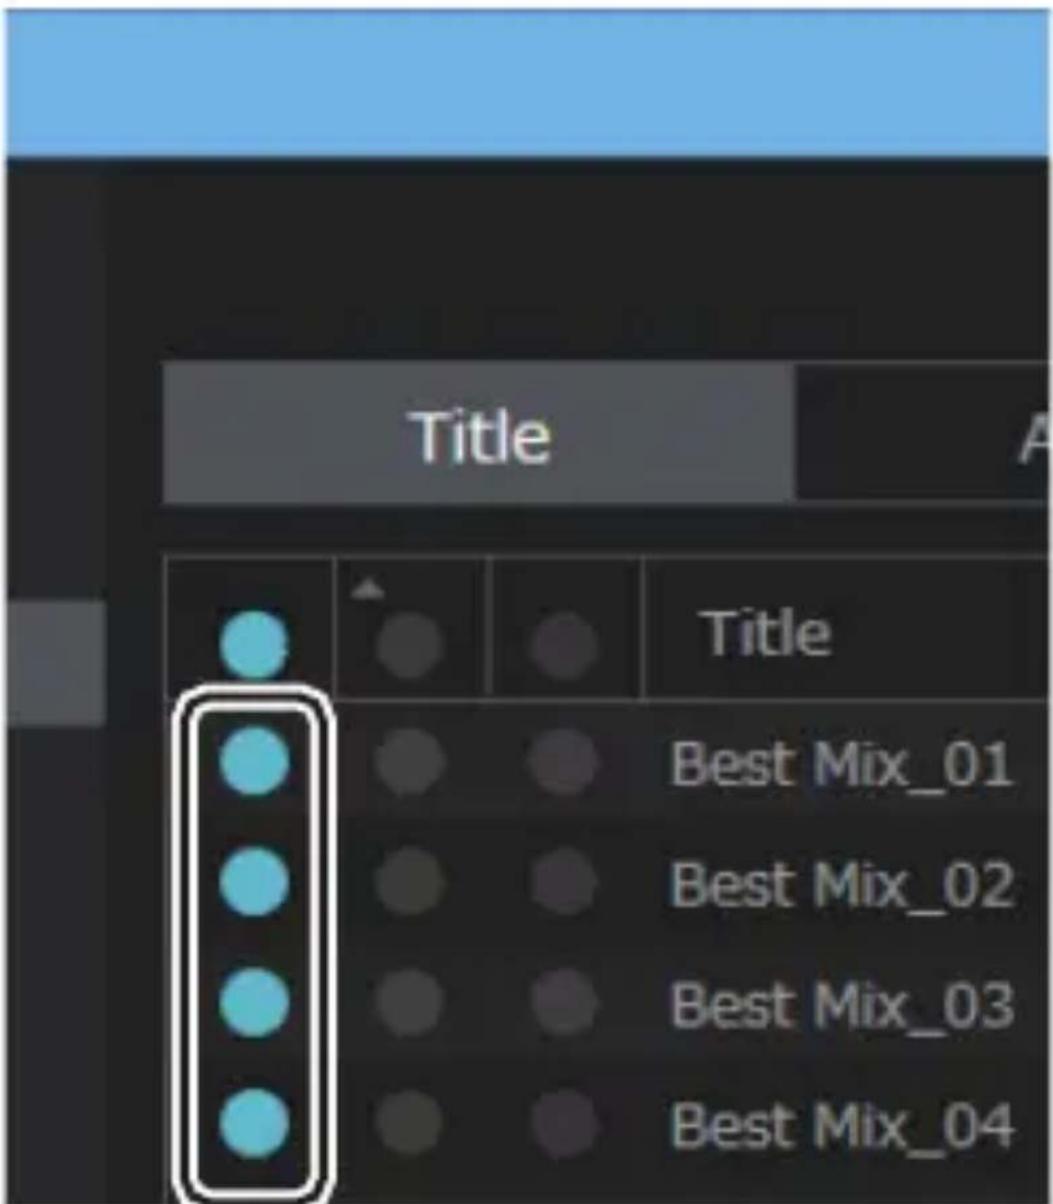
8 Select the music files you want to copy according to the copy destination.

When this copy destination is selected:

When this copy destination is selected:
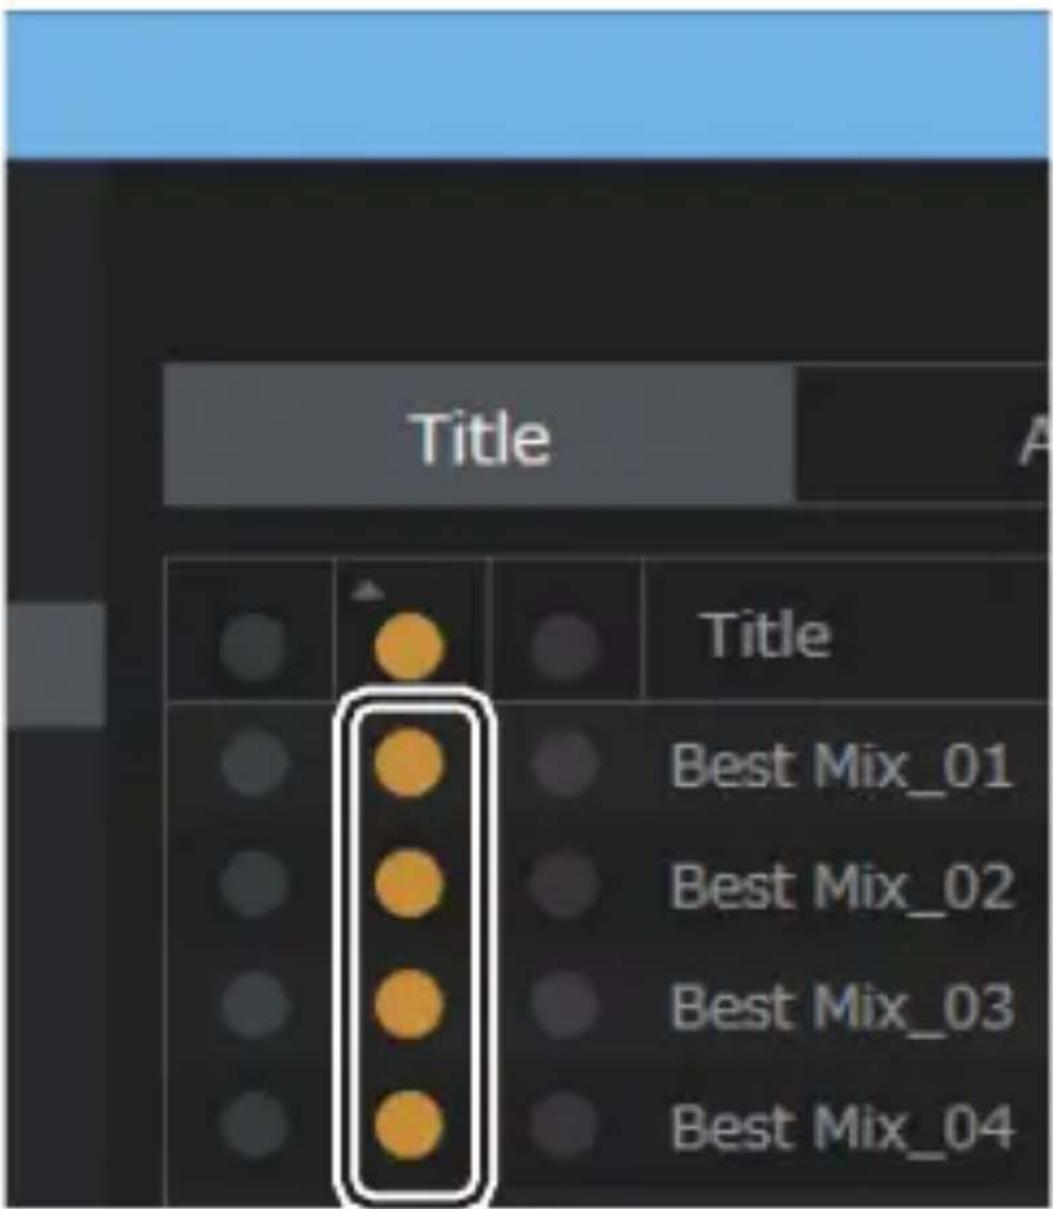

When this copy destination is selected:

9 Click the copy button with the same color as the one you selected in step 8.
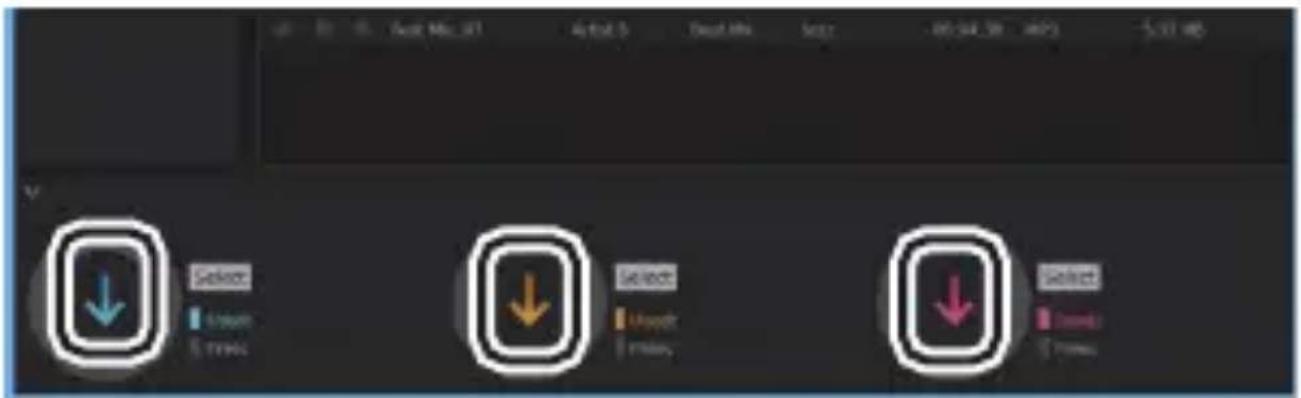
- The selected music files are copied to this unit.
10 Tap Music in the home screen of this unit.

- Do not connect headphones that have an impedance outside the rated range as this may result in damage.
→ See here for headphone ratings
11 In the library, tap the track you want to play.
- It may take some time for tracks to be displayed in the library.

Tap or click here Play operation details.
Drag and drop to copy and play
1 Use the supplied USB cable to connect this unit to a computer.
- Connect so the wider side of the plug is up. You may damage the plug or jack if you try to insert it the wrong way.

- If "AutoPlay" or similar is displayed on your computer, select "Open folder to view files" and then proceed to step 3.
2 Select this unit from the "PC" option on your computer.
3 Open the folder you want to save to.
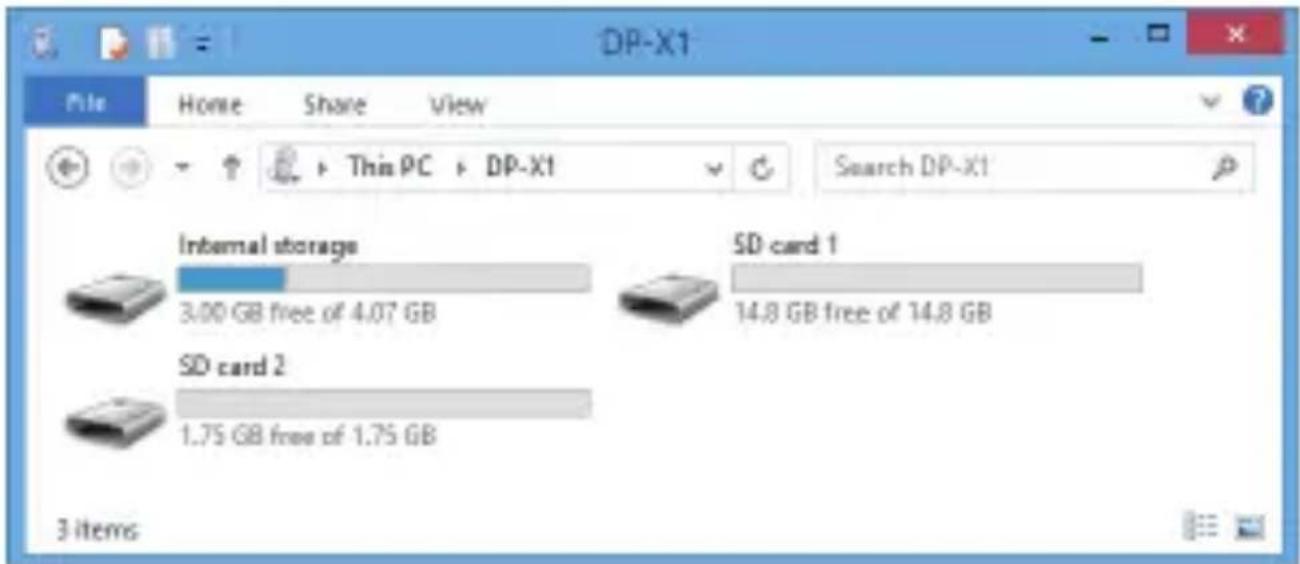
- To copy to the built-in storage, open the "Music" folder in the built-in storage.
• To copy to a microSD card, open the folder for the microSD card you want to copy to.
4 Drag and drop the folder on your computer that contains the music files that you want to copy to the copy destination folder.
5 Tap Music in the home screen of this unit.

- Do not connect headphones that have an impedance outside the rated range as this may result in damage.
→ See here for headphone ratings
6 In the library, tap the track you want to play.
- It may take some time for tracks to be displayed in the library.
→ Tap or click here Play operation details.
Library display
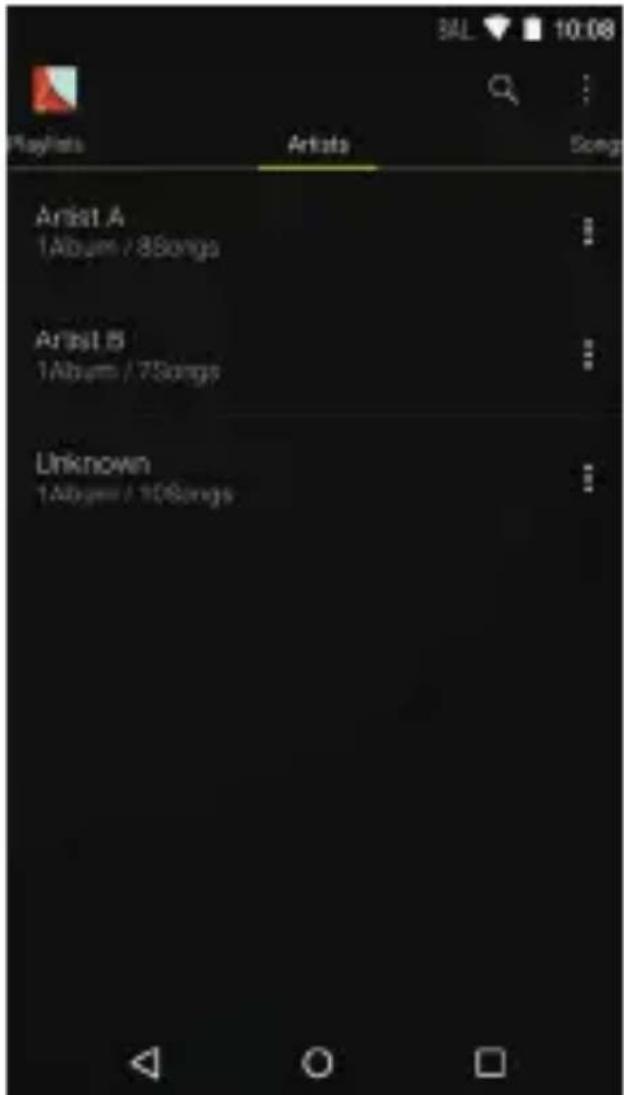
When Music starts the library (a list of tracks synched with Music) is displayed. Flick the library screen left or right to change the categorization.

Playlists
Displays a list of play lists you have created. Artists
Displays by artist.
Songs
Displays all tracks.
Albums
Displays by album.
Genres
Displays by genre.
Compilations
Displays by compilation albums.
Composers
Displays by song writer.
Format
Displays by data format.
- Tap the search icon above the list screen to search for a track.
- When "Automatic" or "Music Folders" have not been set up, tracks may not be displayed.
Tap or click here to read "HD Library Sync" for more details.

Play operations
When you tap the track you want to play in the library, the screen changes to the play screen and play starts. Tap △to return to the library.


Play operations using the screen
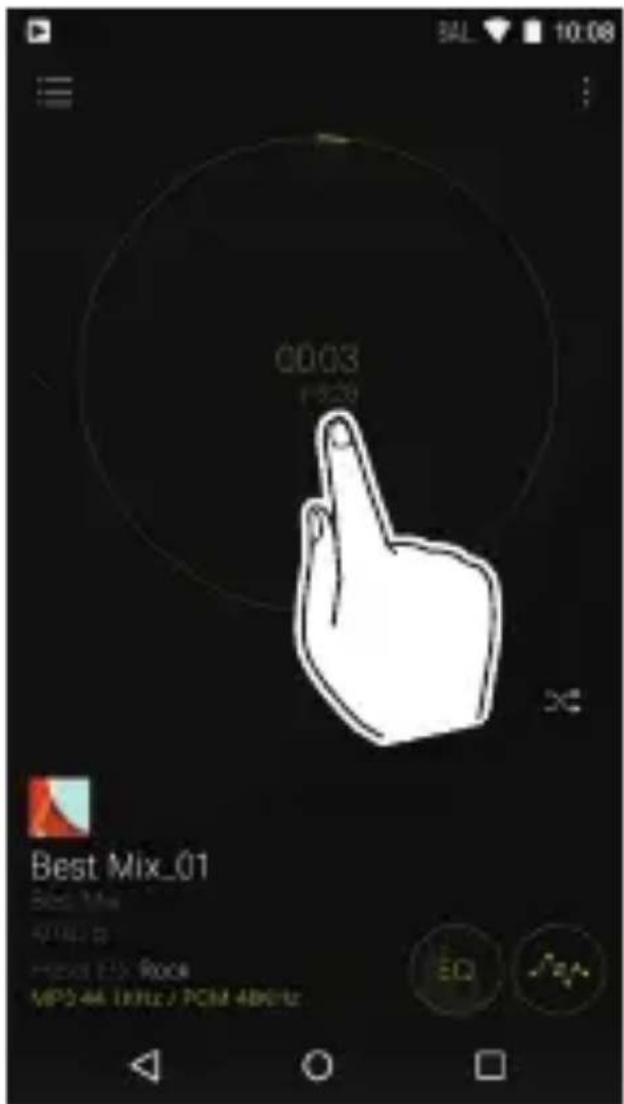
Play/pause
Tap inside the displayed circle.
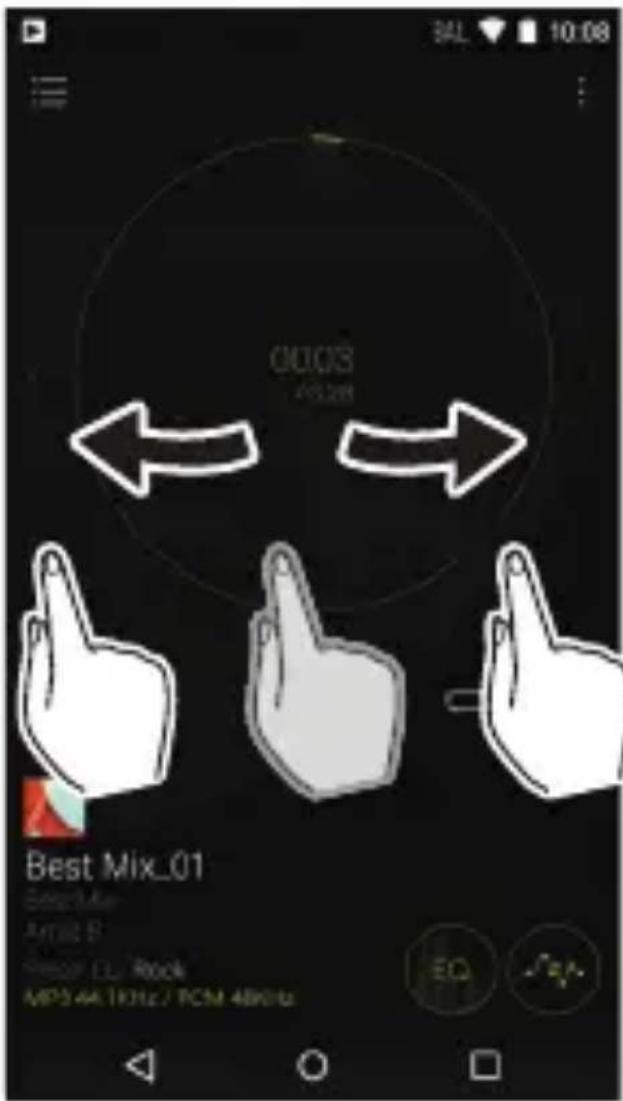
Skipping tracks
Flick the play screen side to side.
Adjusting the volume
The volume bar is displayed on the screen when you turn the volume dial. You can then adjust the volume by dragging the bar up or down. You can also adjust the volume with the volume dial.

natural_image
Line drawing of a hand holding a rectangular object, no text or symbols present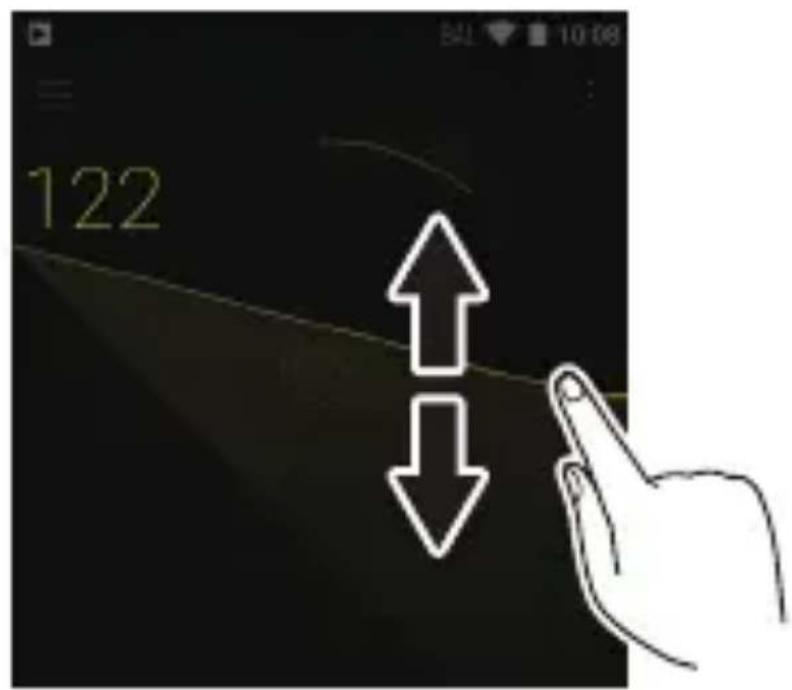
The play screen
A
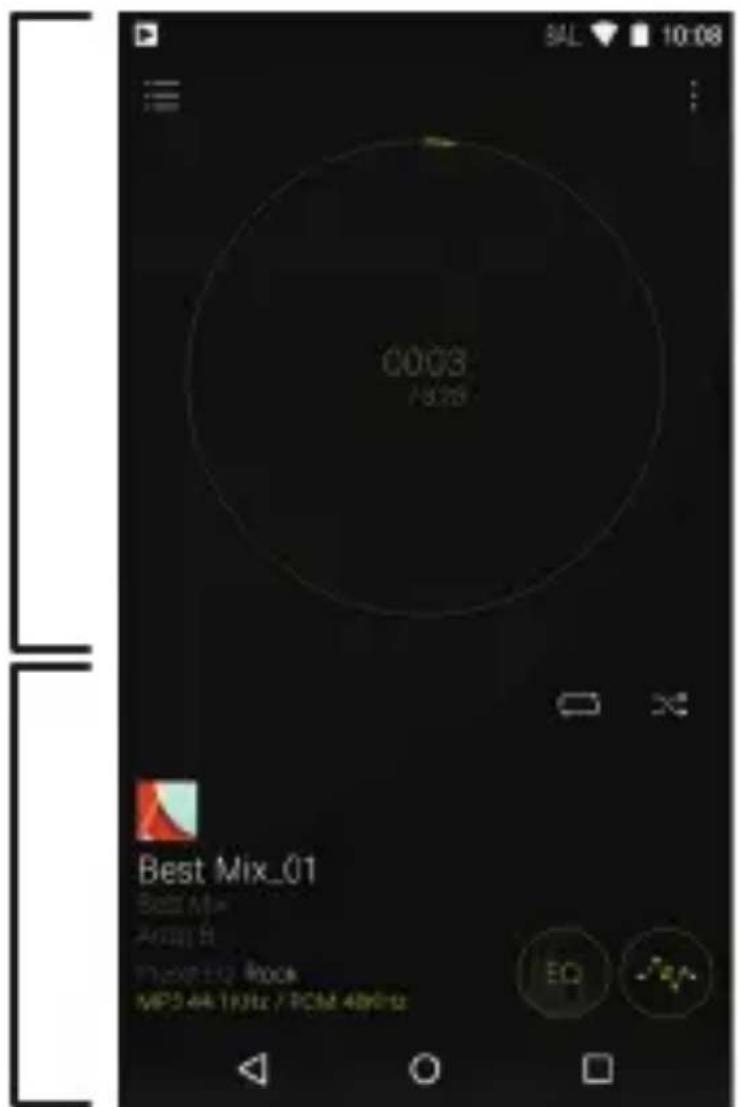
B

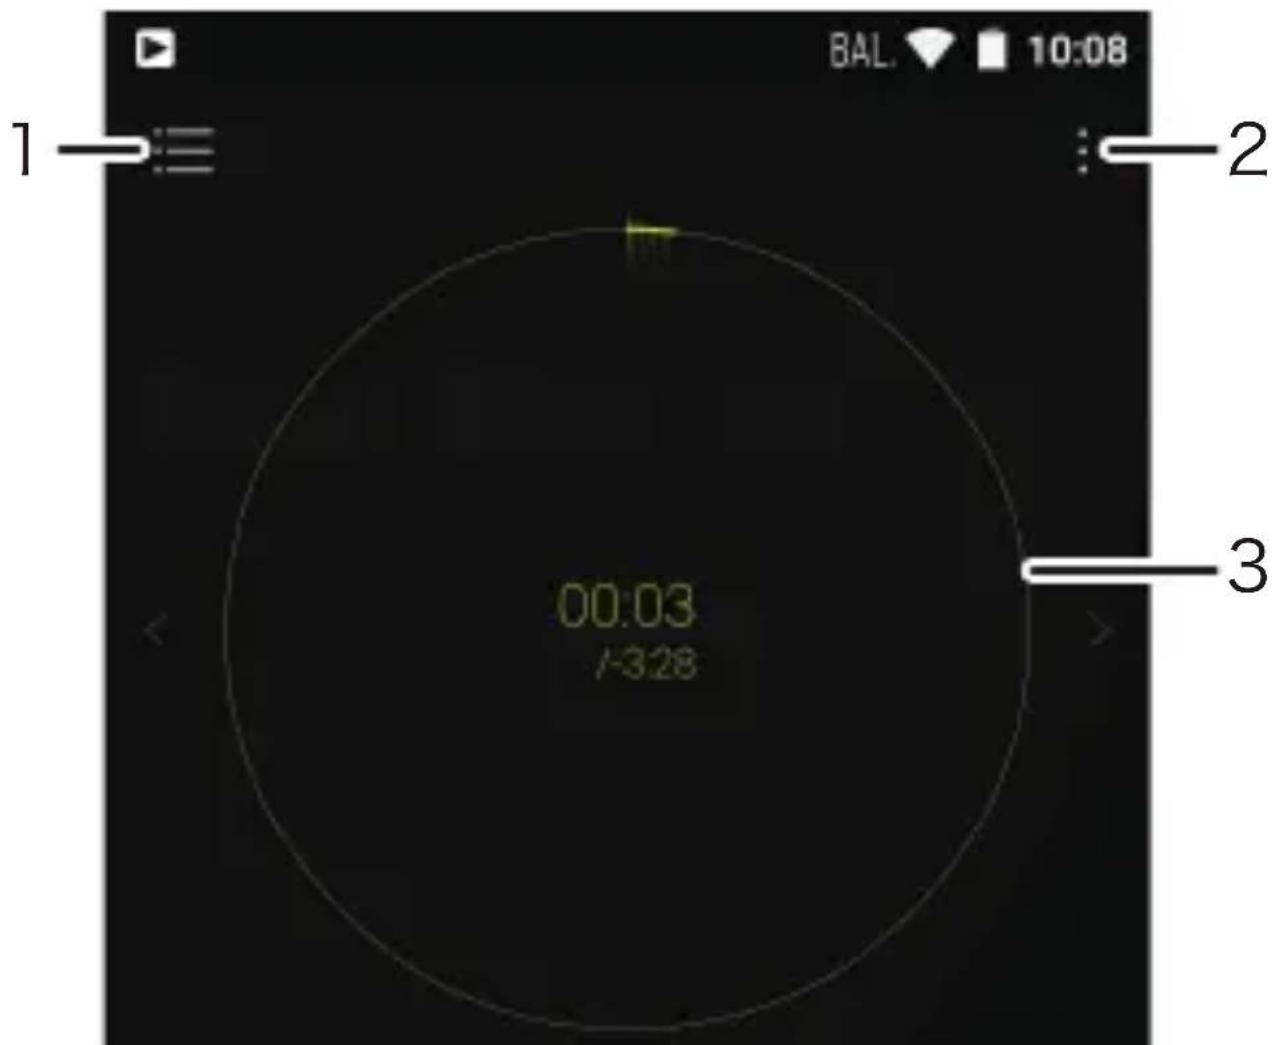
- Move to the queue.
The currently playing tracks and songs in the album are displayed in order in a queue. - Displays the slide menu where you can change play and sound settings.
- Seek bar
Progresses along with the track's progress. Tap on the edge of the circle to skip to that position in the track.

- Tap to see details about the track.
- Repeat mode
Tap to change the mode: 1 track repeat → all track repeat → no repeat.
- Shuffle mode
Tap to turn random play on or off.
- Tap to turn the equalizer on or off.
- Move to the equalizer setting screen.
Play operations using buttons on the main unit

1. Volume dial
- When you put this unit in a pocket or case, the volume dial may turn accidentally, changing the volume. Turn "Volume lock" on to disable volume control with the volume dial.
→ Tap or click here for more details.
- Skip (◀◀) button
Skip to the beginning of the track or to the previous track.
-
Play/pause (▶/■) button
-
Skip (▶▶) button
Skip to the next track.
Volume settings (Only for countries/areas complying with European Directives)
- A warning is displayed when the volume level exceeds 130. Check the message and tap "OK".
- When the volume level is 130 or over and the elapsed play time exceeds 20 hours, a message is displayed and this unit shuts down. (The elapsed play time is reset when the unit shuts down.)
Creating a play list
Select the tracks you like to create your own play list.
1 In the library, tap the icon at the right of the screen for the track you want to add to the play list to display the list menu.

2 Tap "Replace Up Next".
3 Tap the icon at the right of the screen for the track you want to add next to display the list menu, then tap "Play Next".

4 Repeat step 3 to make a list of tracks you want to save as a play list.
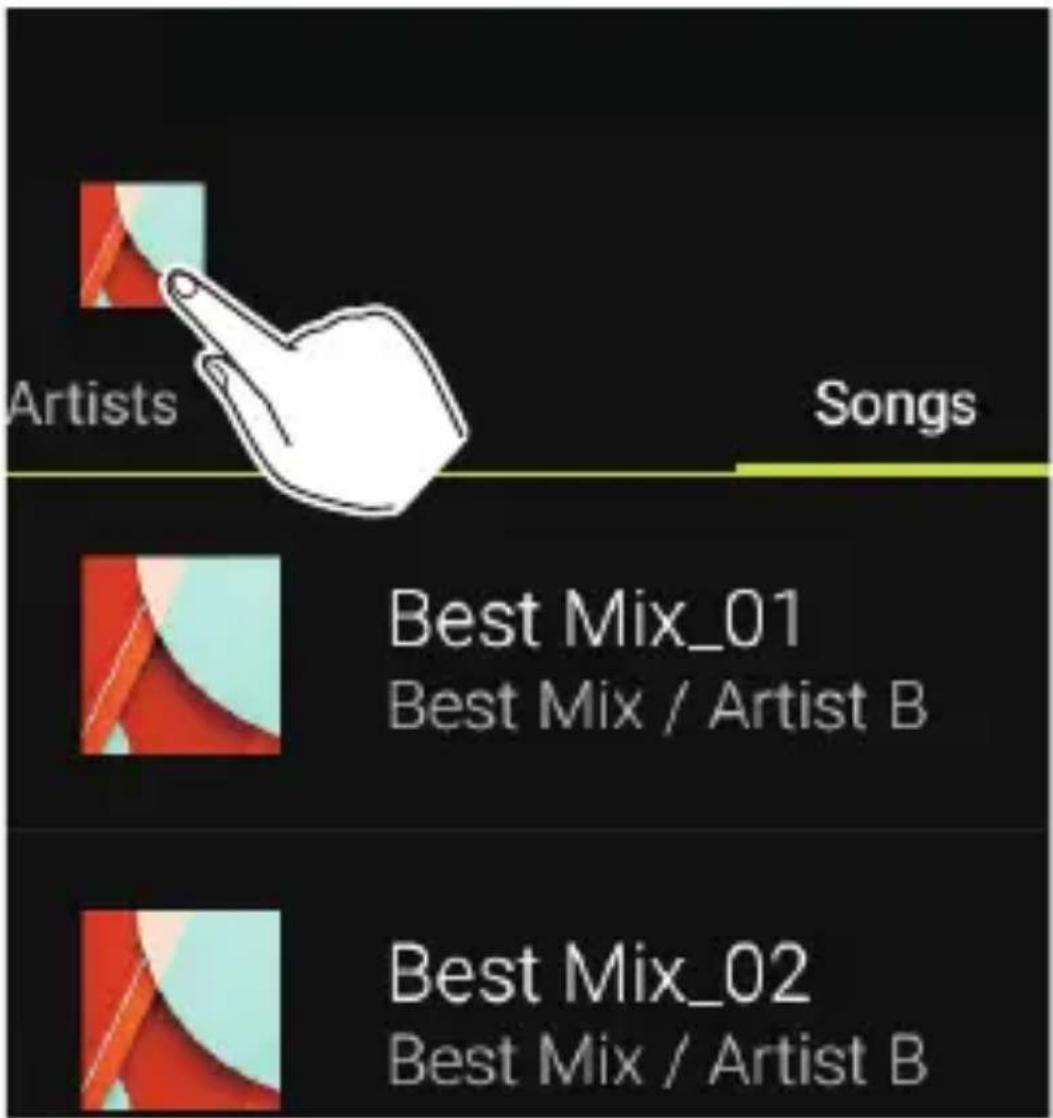
5 Tap the jacket image icon at the top left of the screen to move to the play screen.
6 Tap the icon at the top left of the screen to move to the queue.

natural_image
Hand cursor pointing at a curved path with a play button icon above (no text or symbols on the hand or path)7 Tap "Save as playlist", enter a title and tap "SAVE".

- New play lists cannot be created from play lists created outside of Music, for example with iTunes.
Editing a play list
Editing a play list
Display the list of play lists from the library and tap "Edit".

To delete a play list:
Tap the icon of the play list you want to delete then tap "OK".

To change the order of a play list:
Drag the icon of the play list you want to reorder.

To change the name of a play list:
Tap the play list you want to rename, enter the name and tap "OK".
To finish editing:
Tap "Done".
Editing tracks in a play list
Display the list of play lists from the library, tap the play list you want to edit, and tap "Edit".

To delete a track from a play list:
Tap the icon of the track you want to delete then tap "OK".

To change the order of tracks in a play list: Drag the icon of the track you want to reorder.

To finish editing:
Tap "Done".
- Tracks are not deleted from the unit even if you delete them from a play list.
Equalizer settings
You can adjust the sound quality how you like by setting the equalizer.
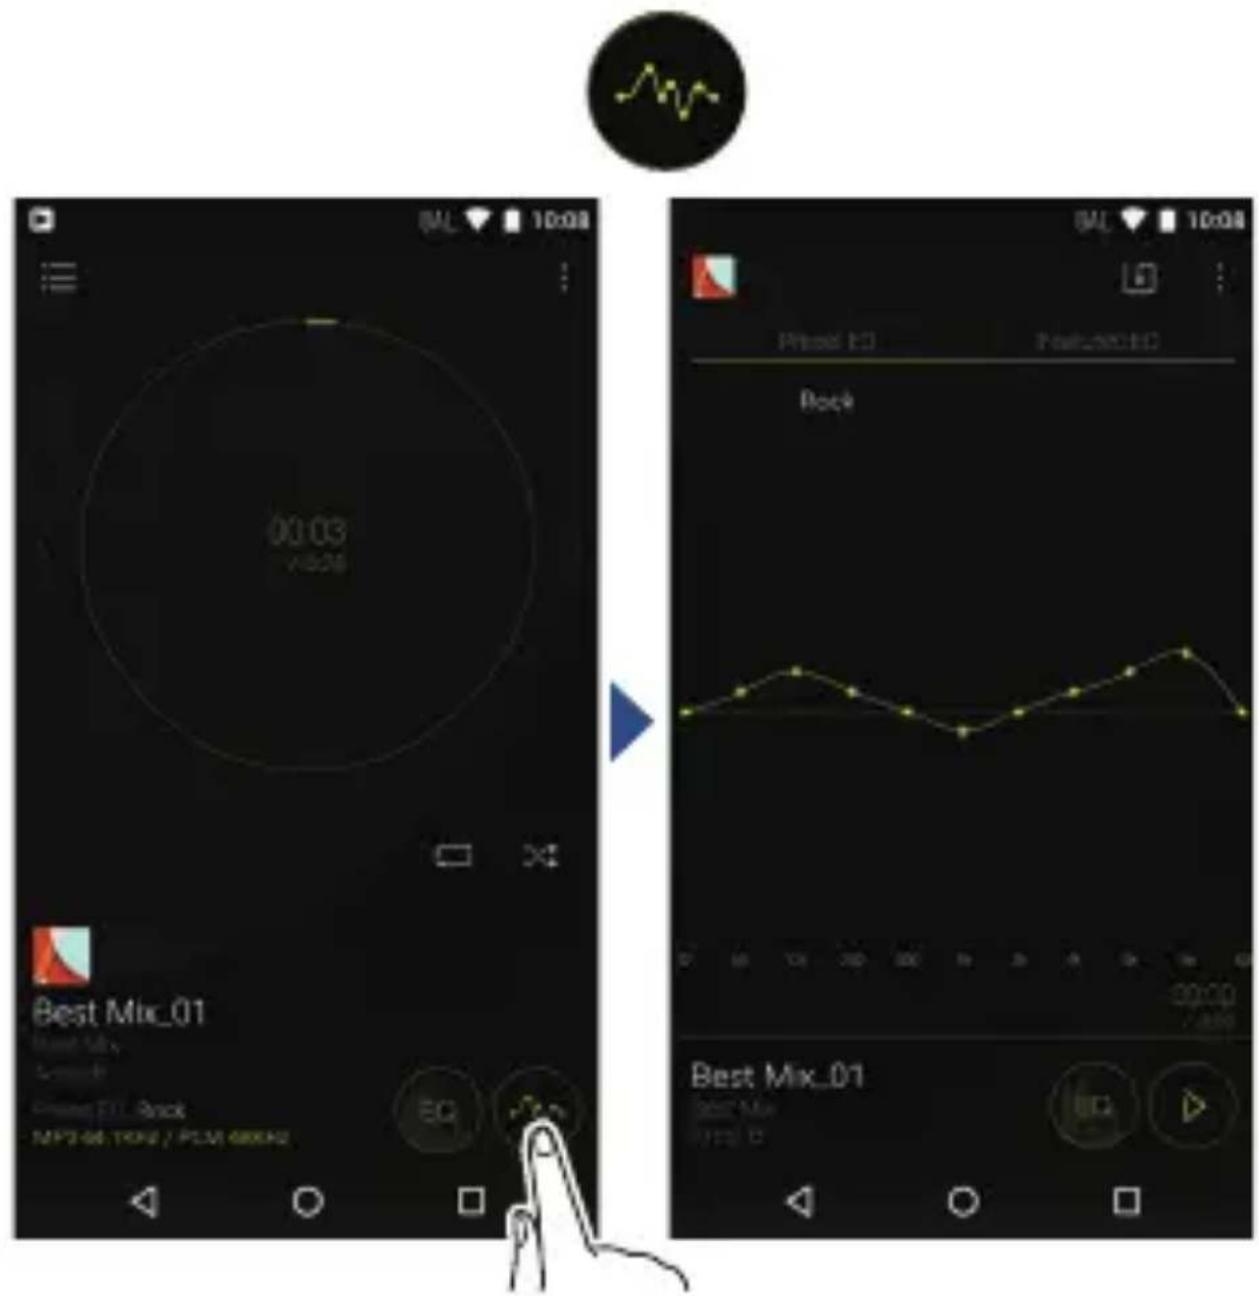
Switching to the equalizer screen
Tap the equalizer screen icon in the play screen to move to the equalizer screen.
Selecting preset equalizers
1 Tap "Preset EQ" in the equalizer screen.
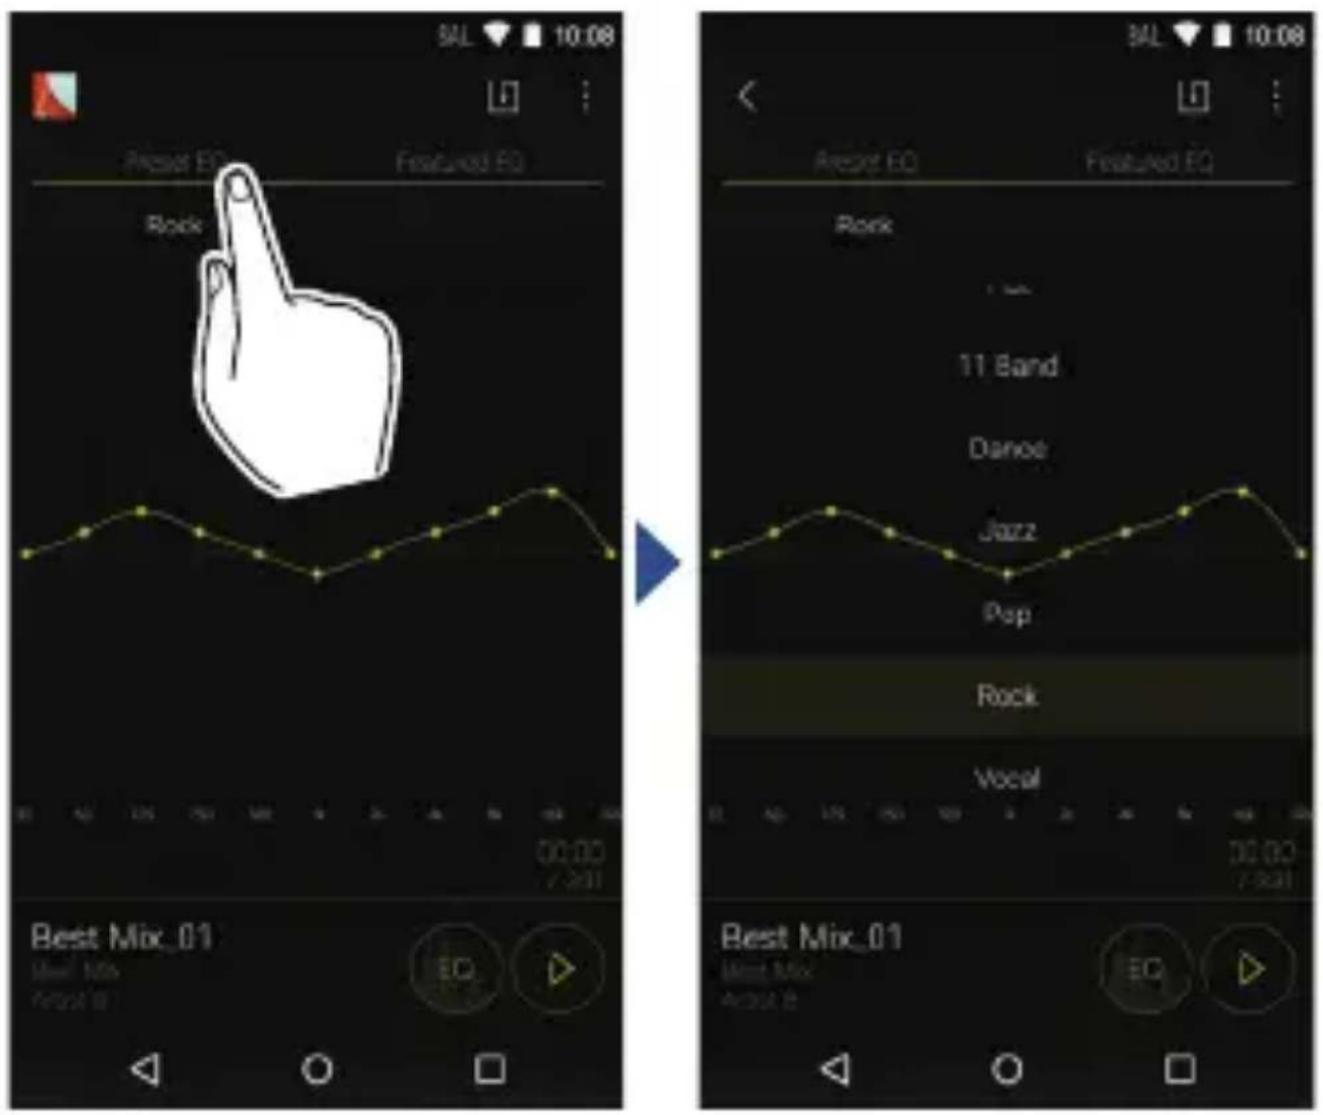
2 Tap the equalizer you want to set. Flat/11Band/Dance/Jazz/Pop/Rock/Vocal
3 Tap the icon at the top left of the screen to return to the play screen.

- Tap the icon to turn the equalizer on or off.

Equalizer on Equalizer off
■ Selecting equalizers created by famous musicians
1 Tap "Featured EQ" in the equalizer screen.

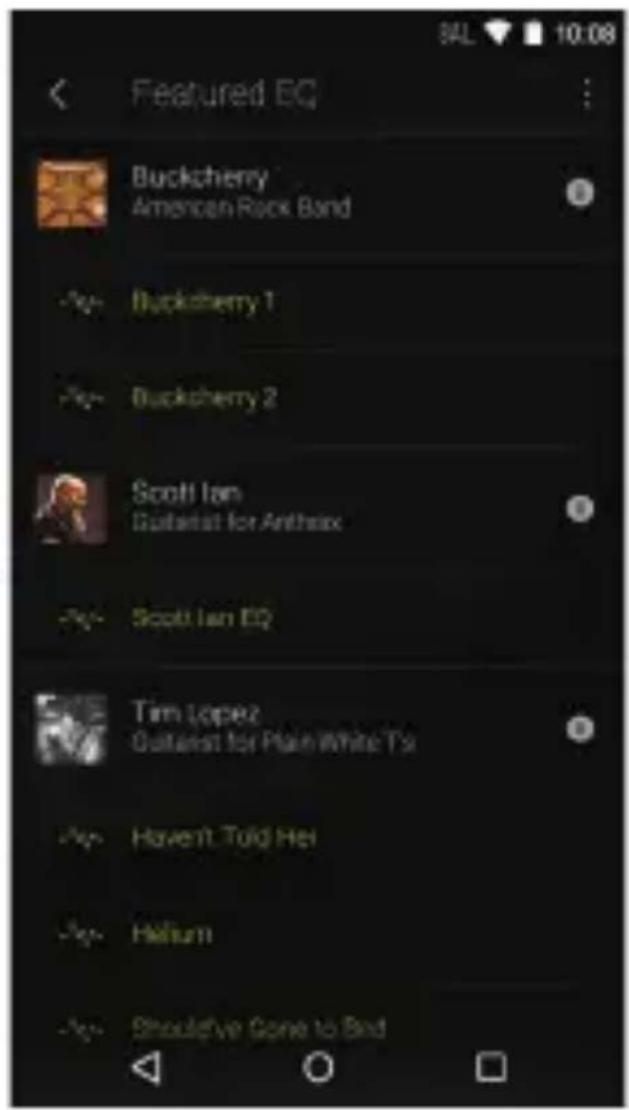
2 Tap the equalizer of the musician that interests you.
- Tap the icon to turn the equalizer on or off.


Equalizer on Equalizer off
- Click the icon of the musician to view the profile of the musician.

■ Modifying the equalizer
You can make your own original equalizer settings by modifying the equalizer curves. You can give the equalizer you modified a name and save it.
1 Turn the equalizer on or select any equalizer.
2 Drag the points on the equalizer curve side to side to change the frequency and up or down to change the boost.

line
| Frequency | Value | | --------- | --------- | | 4064Hz | +3.0dB |- You can add a point by tapping on the curve where there isn't a point.
- You can move all equalizer points up or down by dragging from a point off the equalizer curve.
3 Tap the save icon at the top right of the screen, enter a name, and tap "SAVE".

To delete a saved equalizer
Tap the icon of the equalizer you want to delete from "Preset EQ" and tap "Delete".

Slide menu
Tap the icon at the top right of the Music screen to display the slide menu.

Sound setting
DSP function
Use to turn on or off the equalizer and other items in the slide menu at once ("Upsampling Mode" and "Real-time DSD Conversion").
Lock Range Adjust
You can improve sound quality by adjusting the lock range of the audio input signal's jitter (modulation). The lock range can be adjusted from the more precise Narrow up to Wide in seven steps.
- If you change the lock range and the sound is interrupted, adjust to the Normal or Wide ends.
Digital filter
By modifying the filter characteristics of the built-in digital converter you can modify the audio sound quality for output to headphones.
SHARP/SLOW/SHORT
Upsampling Mode
You can upsample the sampling frequency of tracks to suit the specifications of the unit or a device connected via USB. (The initial setting is a maximum of 192 kHz.)
Off/On
Upsampling upper limit
Set the limit for upsampling.
96 kHz/192 kHz/384 kHz (USB audio only)
External device
Select playback device
A list of output destinations is displayed, including headphones, Bluetooth enabled device, and USB devices. Select from the list to change the audio output destination.
- Tap "SEARCH FOR USB DEVICES" to search for USB devices connected to this unit.
Settings
Settings
HD Library Sync
Automatic
Automatically synchronize music files you have copied to this unit from a computer or music files on a microSD card with the files in the library.
Music Folders
You can select a folder to synchronize with the library.
Sync Now
Manually synchronize music files you have copied to this unit from a computer or music files on a microSD card with the files in the library.
SYNC ALL:
Select to synchronize all transferred tracks.
SYNC ADDED SONGS:
Select to synchronize only tracks that have been added.
FAQ
Display a list of frequently asked questions and their answers.
Playback
Crossfade
At the point where one song ends and another begins, you can fade out the song ending and fade into the song beginning.
Gain setting
You can set the volume level when converting DSD format music files to PCM. 0 db/-3 db
Always keep screen on
Turns the function that keeps the light on all the time on or off.
Output Audio Route
A list of output destinations is displayed, including headphones, Bluetooth enabled device, and USB devices. Select from the list to change the audio output destination.
- Tap "SEARCH FOR USB DEVICES" to search for USB devices connected to this unit.
SEARCH FOR USB DEVICES
Searches for USB devices connected to this unit.
USB Audio
USB Host Audio Driver is valid.
You can output high-res sources by USB when you enable this setting.
Enables volume control in the background.
This setting allows you to control the volume of a connected USB device with this unit.
DSD Output Format
This allows you to select the format output from the USB when playing DSD format music files.
PCM/DoP/Direct Transfer
- You need to have a device that supports direct transferring before you can select "Direct Transfer". (Supported devices: DAC-HA300, XPA-700)
Direct transfer output frequency maximum
Set the upper limit for frequency when "Direct Transfer" is selected in "DSD Output Format". Select the frequency that your connected USB device can process. Auto/2.8 MHz/5.6 MHz/11.2 MHz
DoP Pause Operation
When you select "Output DSD Zero", you can reduce the reoccurrence of noise when DoP is paused by outputting a muted DSD signal for a maximum of 10 minutes even while sound is not being output.
Stop Output/Output DSD Zero
Output DSD 3/6 MHz via DoP
Outputs DSD format music files as DoP format.
- When the setting is canceled, even if DoP is selected in "DSD Output Format", only DSD 3 MHz and 6 MHz are automatically converted to PCM.
Real-time DSD Conversion
Converts in real time music files such as MP3, WAV, and FLAC to DSD. You can enjoy non-high-resolution music files with high quality sound.
Off/DSD 2.8 MHz/High-Precision DSD
2.8 MHz/DSD 5.6 MHz/High-Precision
DSD 5.6 MHz
- You can enjoy a better sound quality if you select one of the high-precision modes, but the burden on the CPU increases and power consumption rises, which may lead to some jumping of the sound under some usage conditions.
Other
Home screen wallpaper setting
Makes the wallpaper of the home screen the jacket image.
- This cannot be selected when "Album artwork" is OFF.
Headphone Type
Plays using the optimum frequency characteristics when using Onkyo headphones. Select from the model numbers displayed on the screen.
About
Displays the licenses for open source software.
Version
Displays the version information for this unit.
Build
Displays the Build Number.
Reset Settings
Reset the settings for Music to the initial settings.
Album artwork
Displays the jacket images of the album being played as wallpaper. When you turn this OFF, the jacket image goes dark and the "Home screen wallpaper setting" is also turned OFF.
SNS
You can post the track currently playing to a social network.
A list of usable SNS apps is displayed.
- You need to install an SNS app to use the SNS service.
USB output
You can connect a headphone amplifier or D/A converter, for example, that has a USB connector. You will need a USB OTG (On-The-Go) cable (commercially available) to connect to this unit. Make sure you have the correct type of USB cable for the USB port of the device you are connecting to the OTG cable. (If it is a microUSB port, you can use the USB cable included with this unit.)

If the device connected supports high-res sources, connect after performing the following procedure to enable high-res output. Proceed to step 4 if not supported.
1 Tap Music in the home screen.

Music
2 Tap the icon at the top right of the screen.

3 Tap "Settings" - "USB Host Audio Driver is valid." to turn on.
4 Turn on the device you are connecting to this unit and connect, using an OTG cable, etc.
- Make sure you plug the cable in the right way up when connecting. You may damage the plug or jack if you try to insert it the wrong way.
5 A message is displayed on the unit's screen. Tap "OK".
Music
Allow the app Music to access the USB device?

Use by default for this USB device
CANCEL
OK

natural_image
Simple line drawing of a hand with index finger extended (no text or symbols)- You can make other settings such as selecting the output format and setting the upper limit for the frequency.
Tap or click here to read "USB Audio" for more details.
Bluetooth® function
You can listen to music wirelessly by using Bluetooth enabled devices such as headphones or speakers. The coverage area is about 10 meters.
- This unit supports aptX. You can enjoy higher quality wireless sound by connecting headphones and wireless speakers that support aptX.
Pairing for play
Pairing is necessary when connecting the Bluetooth enabled devices for the first time. Make sure the Bluetooth enabled device you want to connect is ready to be detected.
1 Tap "Settings" in the home screen.

Settings
2 Tap "Bluetooth".
• If it is "Off", tap it to turn it "On".
3 Tap the equipment to be connected.
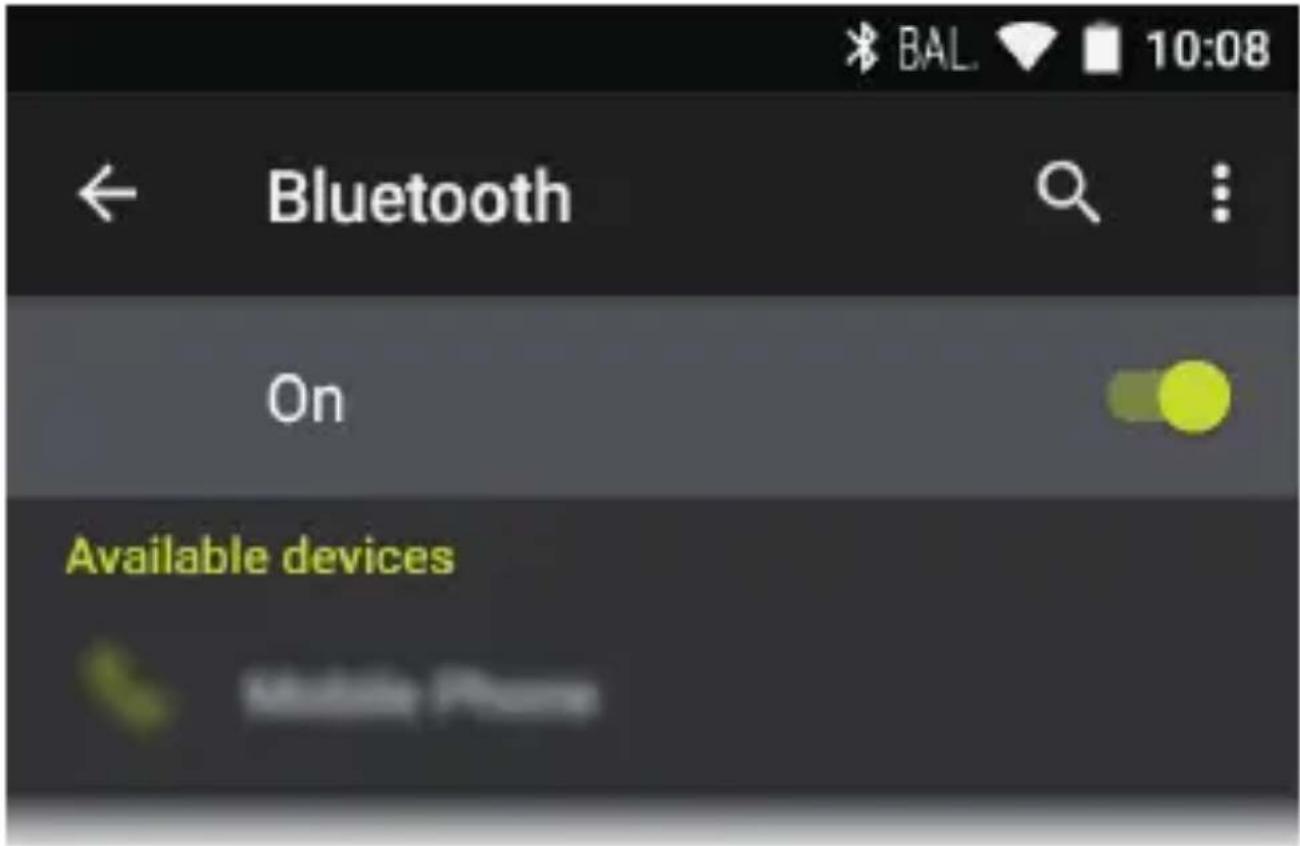
- Pairing will end after a short time.
4 Tap Music in the home screen.

Music
5 Tap the track you want to start play.
When connecting after the first time
1 Tap "Settings" in the home screen.

Settings
2 Tap "Bluetooth" and tap the device you want to connect in "Paired devices".
Canceling a connection
1 Tap "Settings" in the home screen.

Settings
2 Tap "Bluetooth".
3 Select the device you want to disconnect and tap "OK".
- Pairing information is not deleted even if you cancel the connection. Tap the icon displayed with the device whose pairing information you want to delete and tap "FORGET".

Various settings
Make sound and output settings
Updating
Backing up and resetting
Make sound and output settings
This section explains the items in "Sound & notification" in "Settings" that help you enjoy high-quality sound.
1 Tap "Settings" in the home screen.

Settings
2 Tap "Sound & notification" and select the item to change the setting.
Output select
Switching the headphone output.
Balanced
A mode suitable for when you have connected balanced headphones. Compared to the normal single-ended operation, you can get a larger output and the high voltage is not grounded together with the small signal, so you can anticipate a superior effect in the quality of the music, which means you can drive headphones that have a high impedance.
A.C.G.
A mode suitable for when you have connected balanced headphones. The basic operating method is the same as the balanced mode, but uses technology to even more forcefully fix grounding standards, so you can enjoy a sound quality with improved clarity and stability than the balanced mode. Output volume is the same as the single-ended operation, however.
OFF
A mode suitable for when you have connected regular headphones.
- This is set to "OFF" when you have connected headphones to the normal headphone jack.
- When Auto Volume is ON, the volume for headphone output, balanced headphone output, USB audio output, and Bluetooth audio output is automatically set to the same level.
Line out mode
You can switch the headphone output to the line output mode to connect external equipment.
- When you have "Line out mode" on, output through the headphone jack is at maximum volume, so do not use headphones. Adjust the volume on the connected device.
Stand-alone mode
You can improve sound quality by turning off Wi-Fi, the Bluetooth function, and the LCD.
- The "Stand-alone mode" is canceled when you press the power button to turn the screen on.
Digital filter setting
By modifying the filter characteristics of the built-in digital converter you can enjoy three different types of modified sound quality.
SHARP/SLOW/SHORT
Lock range adjust
You can improve sound quality by adjusting the lock range of the audio input signal's jitter (modulation). The lock range can be adjusted from the more precise Narrow up to Wide in seven steps.
- If you change the lock range and the sound is interrupted, adjust to the Normal or Wide ends.
Volume Limiter
Set the limit for maximum volume.
Gain setting
You can select the headphone output level to suit your headphones.
HIGH/NORMAL/LOW
- Lower the volume first if you intend to select "HIGH".
- When connecting a pair of headphones for the first time, set to "LOW" and change the volume level gradually.
Volume lock
Disables volume control with the volume dial on the main unit. The effect works when the screen is off.
- It is recommended to turn this ON to avoid unexpected changes in volume during use.
Updates the software on this unit to the latest version. A message is displayed on the screen when an update file is released for the software. Tap the message and follow the on screen instructions to update.
Check whether there is an update file
You can check whether there is an update file for the software.
1 Tap "Settings" in the home screen.

Settings
2 Tap "Device Information" - "System updates".
Backing up
You can back up your apps and settings to a Google server.
1 Tap "Settings" in the home screen.

Settings
2 Tap "Backup & reset" and turn "Back up my data" on.
Resetting
Reset the unit to the condition it was in when you purchased it. All data, downloads, etc. are deleted when you reset the unit.
1 Tap "Settings" in the home screen.

Settings
2 Tap "Backup & reset" - "Factory data reset" - "RESET DEVICE".
Others
Specifications
Recommended Apps
Supported playback formats
Continuous play time
Number of music files recordable
Cautions for use
License and Trademark Information
Platform:
Android5.1.1
Display:
4.7-inch, 1280 × 720 dot resolution Interfaces and input/output jacks:
- Headphone jack
3-conductor, 3.5 mm, impedance: 16 to 300 Ω
• Headphone jack (balanced output)
4-conductor, 2.5 mm, impedance: 32 to 600 Ω
* Do not connect headphones that have an impedance outside the rated range as this may result in damage.
• 1 microUSB port, 2 microSD card slots
Network Section:
• Wireless LAN: IEEE802 a/b/g/n/ac compliant
- Bluetooth: A2DP, AVRCP, HSP, OPP, HID, PAN
Rated input:
5 V dc, 1.5 A
Battery power:
1,630 mAh
Operating temperature:
5irc C to 35irc C
Internal memory:
32 GB (including system area for Android)
Mass of main unit:
203 g (7.2 oz)
External dimensions (excluding protrusions):
129 mm × 75.9 mm × 12.7 mm
(5-1/16" × 3" × 1/2") (height/width/depth)
Specifications and features are subject to change without notice.
Recommended Apps
There is a collection of app installers in the "Useful Apps" section of the app list. This is an introduction to a selection of these.
Onkyo Music
An app to help you access the Onkyo Music site, where high-res sources are distributed.
Integra remote
An app that enables you to wirelessly stream music from this unit to an Integra receiver.
You can also use this unit as a remote controller.
Pioneer ControlApp
An app that allows you to use this unit as a remote controller to operate Pioneer audio products.
SX-N30 Control App
An app that allows you to use this unit as a remote control to operate SX-N30.
Onkyo Remote
An app that enables you to wirelessly stream music from this unit to Onkyo audio devices.
You can also use this unit as a remote controller.
iControlAV5
An app that allows you to use this unit as a controller to operate Pioneer AV receivers and BD players.
• MP3/AAC (up to 48 kHz)*
- DSF/DSDIFF (2.8 MHz/3 MHz/5.6 MHz/6 MHz/11.2 MHz PCM conversion/DoP output)* 2
- FLAC/ALAC/WAV/AIFF (up to 384 kHz), OggVorbis (up to 192 kHz)
*1 Files that are protected by DRM cannot be played.
*2 Converted to PCM for playback on the main device.
Continuous play time
Times shown are a guide. Playback times depend on settings.
• FLAC lossless 24 bit 192 kHz 15 hours
• MP3 128 kbps 16 bit 44.1 kHz * 18 hours
• DSD 5.6 MHz * 12 hours
* Screen off, playing with Music Battery charge retention time Maximum 500 hours (Wi-Fi and Bluetooth function off, no devices connected)
This is a guide to the number of music files you can record to the internal memory of this unit.
- Internal memory
Approximately 4,000 tracks (available space: approximately 20 GB, MP3 format: when 5 M B)
Approximately 100 tracks (available space: approximately 20 GB, FLAC lossless 24 bit/192 kHz: when 200 MB)
This unit
- Use a 4-conductor plug for the 2.5 mm diameter headphone jack of this unit, and use a 3-conductor plug for the 3.5 diameter headphone jack. The jacks are not compatible with the plugs of microphone-equipped headsets.
- This unit does not support simultaneous use of the balanced headphone jack and the headphone jack. Using both jacks at the same time may result in damage.
• Take care that dust and foreign objects do not get into the entrance of the microSD card slot, as this can cause a malfunction. - Do not press down with force on the unit when the unit is placed with the screen facing down. This can damage the LCD and the volume dial.
- The antenna is built into the bottom of the back of the main unit. The transmission speed of the unit may be adversely affected if you block the antenna area with your hand.
Recharging
- If you turn this unit off and connect it by USB to a computer, the recharging mark is displayed on the screen. The recharging mark may not appear immediately depending on the condition of this unit. When this occurs, the recharging mark is displayed as recharging occurs, so please wait for a few minutes.
Playing audio
- Play may stop momentarily when you turn the Bluetooth function OFF while using balanced headphone output. If this happens, start play again.
- Play may stop momentarily when you turn "Stand-alone mode" ON. If this happens, start play again.
- If you have connected a USB device and are in the middle of playing it, sound may cease to be output if you switch the output to "Balanced". Disconnect the USB device to play in this case.
Copying music files
- When copying a music file with X-DAP Link and an error message is displayed, restart this unit and perform the copy operation again. If the error message is displayed again, use your computer to delete the "xdaplink" folder from the built-in storage of this unit.
■ FCC electronic authorization labeling
You can confirm information related to authorizations using the following procedure:
1 Tap "Settings" in the home screen.

Settings
2 Tap "Device Information" - "Legal information" - "Certification".

Bluetooth
The BLUETOOTH® word mark and logos are registered trademarks owned by Bluetooth SIG, Inc. and any use of such marks by Onkyo & Pioneer Innovations Corporation is under license. Other trademarks and trade names are those of their respective owners.
Onkyo & Pioneer Innovations Corporation does not guarantee BLUETOOTH compatibility between this unit and all BLUETOOTH enabled devices.
For compatibility between this unit and another device with BLUETOOTH technology, consult the device's documentation and dealer. In some countries, there may be restrictions on using BLUETOOTH devices. Check with your local authorities.
The Wi-Fi CERTIFIED Logo is a certification mark of the Wi-Fi Alliance®.
Windows and the Windows logo are trademarks or registered trademarks of Microsoft Corporation in the United States and/or other countries.
iTunes is a trademark of Apple Inc., registered in the U.S. and other countries.
Google, Android, Google Play and other marks are trademarks of Google Inc.
DSD and the Direct Stream Digital logo are trademarks of Sony Corporation.

The product with this logo is conformed to Hi-Res Audio standard defined by Japan Audio Society. This logo is used under license from Japan Audio Society.
All other trademarks are the property of their respective owners.
- Switching the screen
- The home screen
- Home screen 1
- Home screen 2
- Music widget
- Line Out
- Stand-alone
- Balanced
- ACG
- The app list screen
- Customizing the home screen
- Creating an app shortcut on the home screen
- ■ Adding a widget to the home screen
- Changing the wallpaper in the home screen
- Tap "Wallpapers".
- - Deleting shortcuts and widgets
- Playing Music
- Playing from a microSD card
- Tap Music in the home screen.
- ■ Removing the microSD card
- Copying from a computer and playing
- Copy with the data copying software "X-DAP Link" and play
- onkyo music
- iTunes Media
- Tap Music in the home screen of this unit.
- Drag and drop to copy and play
- Open the folder you want to save to.
- Drag and drop the folder on your computer that contains the music files that you want to copy to the copy destination folder.
- Tap Music in the home screen of this unit.
- Library display
- Playlists
- Songs
- Albums
- Genres
- Compilations
- Composers
- Format
- Play operations
- Play operations using the screen
- Play/pause
- Skipping tracks
- Adjusting the volume
- The play screen
- Play operations using buttons on the main unit
- Volume dial
- Creating a play list
- Tap "Save as playlist", enter a title and tap "SAVE".
- Editing a play list
- To delete a play list:
- To change the order of a play list:
- To change the name of a play list:
- To finish editing:
- Editing tracks in a play list
- To delete a track from a play list:
- To change the order of tracks in a play list: Drag the icon of the track you want to reorder.
- Equalizer settings
- Switching to the equalizer screen
- Selecting preset equalizers
- Tap "Preset EQ" in the equalizer screen.
- ■ Selecting equalizers created by famous musicians
- Tap the equalizer of the musician that interests you.
- ■ Modifying the equalizer
- To delete a saved equalizer
- Slide menu
- Sound setting
- DSP function
- Lock Range Adjust
- Digital filter
- Upsampling Mode
- Upsampling upper limit
- External device
- Select playback device
- Settings
- HD Library Sync
- Automatic
- Music Folders
- Sync Now
- SYNC ALL:
- SYNC ADDED SONGS:
- FAQ
- Playback
- Crossfade
- Gain setting
- Always keep screen on
- Output Audio Route
- SEARCH FOR USB DEVICES
- USB Audio
- Enables volume control in the background.
- DSD Output Format
- PCM/DoP/Direct Transfer
- Direct transfer output frequency maximum
- DoP Pause Operation
- Stop Output/Output DSD Zero
- Output DSD 3/6 MHz via DoP
- Real-time DSD Conversion
- Off/DSD 2.8 MHz/High-Precision DSD
- MHz/DSD 5.6 MHz/High-Precision
- DSD 5.6 MHz
- Other
- Home screen wallpaper setting
- Headphone Type
- About
- Version
- Build
- Reset Settings
- Album artwork
- SNS
- USB output
- Music
- Bluetooth® function
- Pairing for play
- Tap the equipment to be connected.
- Tap Music in the home screen.
- Tap the track you want to start play.
- When connecting after the first time
- Canceling a connection
- Various settings
- Make sound and output settings
- Output select
- A.C.G.
- OFF
- Line out mode
- Stand-alone mode
- Digital filter setting
- SHARP/SLOW/SHORT
- Volume Limiter
- HIGH/NORMAL/LOW
- Volume lock
- Check whether there is an update file
- Backing up
- Resetting
- Others
- Platform:
- Display:
- Network Section:
- Rated input:
- Battery power:
- Recommended Apps
- Integra remote
- Pioneer ControlApp
- SX-N30 Control App
- Onkyo Remote
- iControlAV5
- Continuous play time
- This unit
- Recharging
- Playing audio
- Copying music files
- ■ FCC electronic authorization labeling
- Bluetooth
Brand : ONKYO
Model : DP-X1
Category : Mp3 player