
Epicon 6 - Loudspeaker Dali - Free user manual and instructions
Find the device manual for free Epicon 6 Dali in PDF.


| Product Type | Floorstanding Speaker |
| Brand | Dali |
| Model | Epicon 6 |
| Dimensions (H x W x D) | 1055 x 230 x 410 mm |
| Weight | 30.5 kg per speaker |
| Impedance | 4 ohms |
| Sensitivity | 89 dB (2.83V/1m) |
| Frequency Response | 36 Hz - 30 kHz (±3 dB) |
| Recommended Amplifier Power | 50 - 300 watts |
| Driver Configuration | 3-way: 2 x 6.5" woofers, 1 x 6.5" midrange, 1 x ribbon tweeter |
| Crossover Frequency | 800 Hz / 3,000 Hz |
| Terminals | Bi-wire / bi-amp (gold-plated) |
| Cabinet Finish | High-gloss lacquer: Black, White, Walnut, Maroon |
| Grille | Magnetic, removable |
| Power Handling | 300 watts (peak) |
| Placement | Floorstanding, free-standing |
| Cleaning | Use dry soft cloth; avoid liquids |
| Safety | Ensure stable placement; keep away from moisture and heat |
| Spare Parts & Repairability | Contact Dali authorized service for replacement drivers or tweeters |
| Warranty | 5 years (subject to registration) |
| Package Contents | Pair of speakers, manual, spikes, protective cloth bags |
Frequently Asked Questions - Epicon 6 Dali
User questions about Epicon 6 Dali
0 question about this device. Answer the ones you know or ask your own.
Ask a new question about this device
Download the instructions for your Loudspeaker in PDF format for free! Find your manual Epicon 6 - Dali and take your electronic device back in hand. On this page are published all the documents necessary for the use of your device. Epicon 6 by Dali.
USER MANUAL Epicon 6 Dali
natural_image
Diagram of a server unit with a double door and circular components, showing a directional arrow (no text or symbols)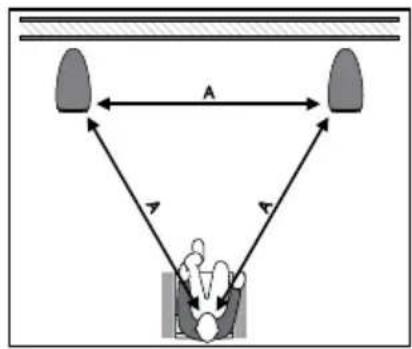
flowchart
graph TD
    A["Object 1"] --> B["Object 2"]
    B --> C["Human Figure"]
    C --> A
    style A fill:#999
    style B fill:#999
    style C fill:#fff
    note1["A"]
    note2["A"]
    note3["A"]

FIGURE 2C FIGURE 3 FIGURE 4A

flowchart
graph TD
    A["Step 1: Square with bidirectional arrow"] --> B["Step 2: Triangle with group of people"]
    B --> C["Checkmark ✓"]
    B --> D["%"]

natural_image
Technical line drawing of a mechanical component with mounting holes and a curved base (no text or symbols)FIGURE 4B FIGURE 5A FIGURE 5B

natural_image
Technical line drawing of a mechanical component with mounting base and four circular fasteners (no text or symbols)
natural_image
Technical line drawing of a mechanical component with mounting holes and a curved base (no text or symbols)
natural_image
Technical line drawing of a mechanical component with mounting base (no text or symbols)FIGURE 5C FIGURE 6 FIGURE 7A
natural_image
Technical line drawing of a mechanical assembly with mounting base and support columns (no text or symbols)
natural_image
Technical line drawing of a mechanical component with mounting holes and curved surfaces (no text or symbols)
FIGURE 7B FIGURE 7C

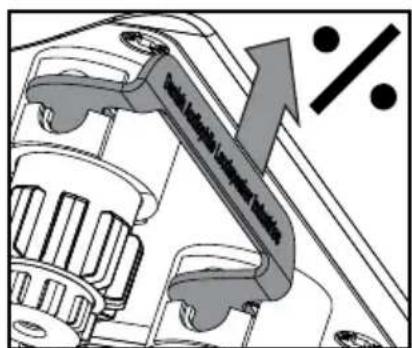
FIGURE 7D
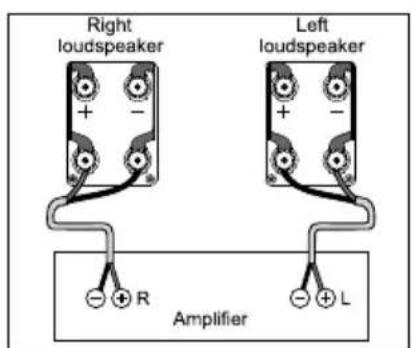
FIGURE 7E FIGURE 7F
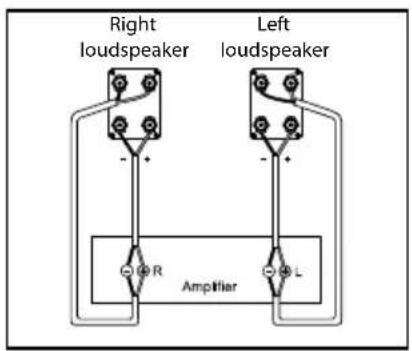
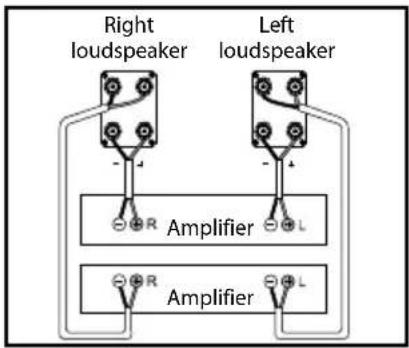
FIGURE 8

FIGURE 9

natural_image
Technical diagram of a mechanical assembly with concentric circles and directional arrows indicating motion (no text or symbols)CONTENTS
1.0 INTRODUCTION 6
2.0 UNPACKING 6
3.0 POSITIONING 6
4.0 CONNECTION 7
5.0 RUNNING-IN 8
6.0 CLEANING & MAINTENANCE 8
7.0 DISPOSAL 8
8.0 POWER AND ACOUSTIC PRESSURE 8
9.0 THE LISTENING ROOM 9
10.0 TECHNICAL SPECIFICATIONS 9
1.0 INTRODUCTION
Congratulations with your new DALI EPICON loudspeaker. It is important to us that your new DALI loudspeakers are set up and connected optimally. For this reason, we recommend that you read this manual and follow its instructions. The manual contains instructions for setup and connection, as well as tips and advice on how to get the most out of your new loudspeakers. DALI is acclaimed around the world for unique loudspeakers built to our uncompromising standards for design and performance. The goal for every single DALI loudspeaker is always our foremost commitment: to create a listening experience in your home that will make you forget time and place.
Remember to sign up for the DALI newsletter at www.dali-speakers.com.
Enjoy!
2.0 UNPACKING
Be careful not to damage the contents when you unpack the parts. Check that all parts are contained in the cardboard box (see Table 1). Keep the packaging materials should your speaker need to be relocated or serviced.
2.1 GRILLES
The grille front is held in position by magnets. If you wish to remove the grille front, loosen it by tugging at the top part of the grille (see Figure 1)
3.0 POSITIONING
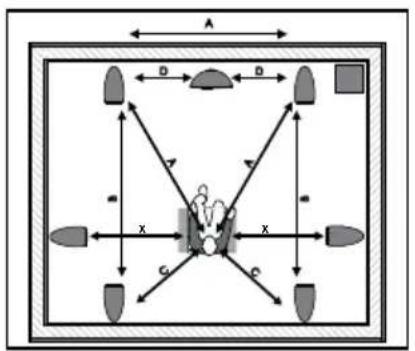
To achieve the best results, the loudspeaker setup should be symmetrical round your favourite listening position (except for the subwoofer), (see Figure 2A – 2C). We recommend that you experiment with the position of your loudspeakers – the sound quality will change depending on the loudspeaker position. The EPICON 6 and 8 have been designed as floor standing speakers. EPICON 6 should be positioned minimum 25 cm (10") from the rear wall. EPICON 8 should be positioned minimum 35 cm (14") from the rear wall.
For EPICON 2 and VOKAL, the speakers should ideally be positioned, so that the height of the tweeter is approximately at ear height when seated in your favorite listening position.
Objects positioned between the speaker and listening position might negatively affect sound quality. The EPICON speakers are designed to meet our wide dispersion principle, so they should not be angled towards the listening position, but be positioned parallel with the rear wall (see Figure 3). By parallel positioning, the distortion in the main listening area will be lowered and the room integration will be better. The wide dispersion principle also ensures that sound is spread evenly within a large area in the listening room.
3.1 DALI EPICON 6 and 8
The speakers are designed to stand on the floor, using spikes or rubber bumpers under the speakers, (see Figure 4A + 4B + 5A + 5B). Be careful not to over tighten the contra nuts. Spikes or rubber bumpers can improve the sound quality. You can try both to hear what gives the best sound quality in your setup. Please be aware that spikes may damage the floor if it is not protected.
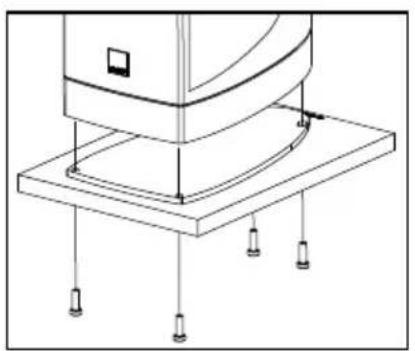
For increased stability your EPICON 6/8 speaker can be mounted on the base included in the box (see Figure 5C)
3.2 DALI EPICON 2
The speaker can be positioned on a stand or shelf. The enclosed rubber bumpers can be mounted under the speaker for stable and vibration free positioning, see Figure 6.
EPICON 2 should be positioned minimum 25 cm (10") from the rear wall.
3.3 DALI EPICON VOKAL
EPICON VOKAL is the dedicated centre channel and has been specially designed to be positioned close to the large surface of the TV screen. You can place it above or below the screen, on a stand or on a shelf. We recommend fitting the enclosed feet to ensure a stable, vibration-free setup (see Figure 9). EPICON VOKAL can be positioned close to the wall.
4.0 CONNECTION
Correct, tight connections to your amplifier are extremely important for your listening experience. Always use cables of the same type and length for left and right channels. We recommend using special speaker cables from DALI, available from your dealer.
Connection in correct phase is a detail that is often ignored. The red (+) terminal of the amplifier must be connected to the red (+) terminal of the loudspeaker. The black (-) terminal of the amplifier must be connected to the black (-) terminal of the loudspeaker (see figure 7D). Even a single loudspeaker connected out-of-phase in a stereo or surround installation will make the bass weaker and the stereo image unfocused.
For the optimal listening experience, the right loudspeaker (as seen from the listening position) must be connected to the amplifier output terminals marked "R" or "Right". The left loudspeaker must be connected to the amplifier output terminals marked "L" or "Left".
NOTE: Before connecting cables, connect the two pairs of terminals with the included terminal links (see Figure 7A+7B+7C)
NOTE: Before connecting cables or changing any connections, ALWAYS turn off your amplifier.
NOTE: Make sure that the bare conductors are tightly gripped by the terminals with no loose wires which could cause a short circuit and damage the amplifier (see figure 8).
NOTE: If you are using DALI EPICON speakers in a surround system, follow the instructions included with your surround amplifier.
4.1 SINGLE-WIRING vs. BI-WIRING/BI-AMPING
Your speakers can be connected by means of a single speaker cable set, when connecting the two pairs of terminals with the included terminal links (see figure 7D).
However, DALI EPICON speakers are fitted with two pairs of terminals, allowing you the option of running two sets of cables to each speaker. The top terminal pair is internally connected to the crossover network's high frequency section. The bottom terminal pair is internally connected to the crossover network's bass section.
NOTE: When bi-wiring or bi-amping, ALWAYS remove the metal links between the terminals before connecting cables.
For bi-wiring, connect two sets of loudspeaker cables, one to the top terminals and one to the bottom terminals of the speakers. At the amplifier end, connect both sets of loudspeaker cables to the same pair of terminals on the amplifier (see figure 7E).
For bi-amping, connect two sets of loudspeaker cables, one to the top terminals and one to the bottom terminals. At the amplifier end, connect one set of loudspeaker cables to one amplifier, and connect the other set of cables to the second amplifier (see figure 7F).
5.0 RUNNING-IN
Like any mechanical system, a loudspeaker requires a “running-in” period to perform at its best. You will experience a gradual increase in sound quality during the first period of use. The break-in period will vary depending on use and playback volume. You should expect up to 100 hours of playback until maximum performance is reached. Unlike other mechanical systems, the lifespan of a loudspeaker is increased by normal, regular playback of music.
6.0 CLEANING & MAINTENANCE
Clean the cabinets with a soft, dry cloth. If the cabinets are dirty, wipe with a soft cloth dipped in all-purpose cleaner and then well wrung out. Be very careful when wiping the speaker cones as they are very fragile. Grille fronts can be cleaned with a clothes brush and wiped with a wellwrung, lint-free cloth and mild all-purpose cleaner.
6.1 AVOID DIRECT SUNLIGHT
The surfaces of the speakers may fade or become discoloured over time when exposed to direct sunlight. Therefore avoid positioning the speakers in direct sunlight.
7.0 DISPOSAL
If you want to dispose of this product, do not mix it with general household waste. There is a separate collection system for used electronic products in accordance with legislation that requires proper treatment, recovery and recycling. Private households in the EU member states, Switzerland, Liechtenstein and Norway may return their used electronic products free of charge to designated collection facilities or to a retailer (if you purchase a similar new one). If you reside in countries not mentioned above, please contact your local authorities for the correct method of disposal. By following this process, you will ensure that your disposed product undergoes the necessary treatment, recovery and recycling and thus prevent potential negative effects on the environment and human health.
8.0 POWER AND ACOUSTIC PRESSURE
How loud a speaker is able to play and still sound good is completely dependent on the signal it has to reproduce. So, in practice, it is not possible to define an unequivocal level for use in comparing different speakers.
Lots of pure, undistorted output from a large amplifier is better than a distorted signal from a small amplifier stretched beyond its capacity. The signal from a distorting (clipping) amplifier contains much more high-frequency information than an undistorted signal, and therefore puts a heavy strain on the tweeter. Consequently, speakers are often damaged by small amplifiers, having to work too hard - and very rarely by large amplifiers, which are practically running idle.
It is worth noting that turning tone controls above the neutral setting significantly burdens both speakers and amplifier. On a good sound system tone controls should only be used to compensate for poor recordings and not to permanently compensate for weaknesses elsewhere in the system.
Therefore DALI recommends that the tone controls generally be set to the neutral position, and you achieve your desired sound image through correct positioning of the speakers. Ensuring that you keep the volume low enough for the sound to remain clear and undistorted will minimize the strain on both speakers and amplifier.
All DALI loudspeakers are designed with linear impedance for an optimal amplifier load. The result is a significantly more open and detailed sonic image.
9.0 THE LISTENING ROOM
Every room has its own distinctive acoustics, which influence the way we experience sound from a speaker. The sound you hear consists of direct sound from the speakers and reflected sound from the floor, ceiling and walls. The latter will affect how you experience the sound. As a basic rule, try to avoid large, hard and reflective areas in the immediate vicinity of your loudspeakers as it will typically cause strong reflections, which might disturb the precision and spatial effect of the sound reproduction. Reflection might be suppressed by positioning e.g. a plant between the speaker and the reflecting surface. Soft items such as carpets, curtains etc. might help if the sound is too bright. Both the amount and quality of the deep bass depend on the size and shape of the room, and the position of the speakers. Positioning the speakers near a side or back wall will accentuate the bass.
A corner location will accentuate it even more, but will also increase the reflections.
10.0 TECHNICAL SPECIFICATIONS
In Table 2 you will find the most common specifications for our speakers. Please have in mind that there are countless methods for measuring speakers. However, none of them tell you anything useful about how a speaker really sounds. Only your ears can decide whether one speaker sounds better than another. Like all our speakers, DALI EPICON speakers are designed to reproduce music as honestly as possible.
Enjoy your new DALI EPICON!
INHALT
| EPICON 8 EPICON 6 EPICON 2 EPICON VOKAL | ||||
| Frequency Range [+/- 3] dB [Hz] 35-30.000 35-30.000 47-30.000 49-30.000 | ||||
| Sensitivity [2.83V/1m] [dB] 89.0 88.0 87.0 89.5 | ||||
| Nominal Impedance [ohms] 5 5 4 6 | ||||
| Maximum SPL [dB] 112 110 108 111 | ||||
| Recommended Amp. Power [Watts] 50-500 50 - 300 30-200 | 50-300 | |||
| Crossover Frequencies [Hz] | 550/3.100/15.000 | 700/2.550/15.000 | 3.100 | 2.750/15.000 |
| Crossover Principle | 3+1⁄2-way | 21⁄2+1⁄2-way | 2-way | 2+1⁄2-way |
| High Frequency Driver | 1 x 29 mm soft dome1 x 10 x 55 mm ribbon | 1 x 29 mm soft dome1 x 10 x 55 mm ribbon | 1 x 29 mm soft dome | 1 x 29 mm soft dome1 x 10 x 55 mm ribbon |
| Low Frequency/Midrange Driver(s) | 2 x 8" / 1 x 61⁄2" | 2 x 61⁄2" | 1 x 61⁄2" | 2 x 61⁄2" |
| Enclosure Type | Bass reflex | Bass reflex | Bass reflex | Bass reflex |
| Bass Reflex Tuning Frequency [Hz] | 28.0 32.5 43.0 46.5 | |||
| Connection Input(s) | Bi-wire / Bi-Amp | Bi-wire / Bi-Amp | Bi-wire / Bi-Amp | Bi-wire / Bi-Amp |
| Recommended Placement | Floor | Floor | Stand | Stand/Below TV screen |
| Recommended Distance from rear wall to speaker's rear side [cm] | >35 | >25 | >25 | >5 |
| Magnetic Shielding | NO | NO | NO | NO |
| Dimensions (H x W x D) [mm] | 1225 x 264 x 485 | 1025 x 232 x 441 | 386 x 214 x 366 | 247 x 816 x 349 |
| Dimensions (H x W x D) [inches] 48.23 x 10.39 x 19.09 | 40.35 x 9.13 x 17.36 | 15.20 x 8.43 x 14.41 | 9.72 x 32.13 x 13.74 | |
| Dimensions with base (H x W x D) [mm] | 1262 x 353 x 497 | 1062 x 320 x 459 | - | - |
| Dimensions with base (H x W x D) [inches] | 49.69 x 13.90 x 19.57 | 41.69 x 12.60 x 18.07 | - | - |
| Weight [kg/lb] | 47.5/104.7 | 30.0/65.7 | 10.3/22.7 | 18.4/40.6 |
| Accessories | DALI SPIKE SET, DALI TERMINAL LINK SET, Base plate, Polishing cloth, Rubber feet, Manual | DALI SPIKE SET, DALI TERMINAL LINK SET, Base plate, Polishing cloth, Rubber feet, Manual | DALI TERMINAL LINK SET, Polishing cloth, Rubber feet, Manual | 3 x Damper feet DALI TERMINAL LINK SET, Polishing cloth, Manual |
All technical specifications are subject to change without notice.
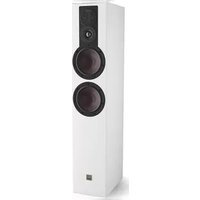

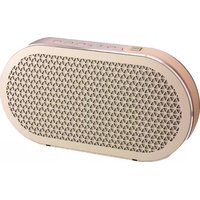


Brand : Dali
Model : Epicon 6
Category : Loudspeaker