
Falcon 8x40 - Binoculars Praktica - Free user manual and instructions
Find the device manual for free Falcon 8x40 Praktica in PDF.


| Product Type | Binoculars |
| Brand | Praktica |
| Model | Falcon 8x40 |
| Magnification | 8x |
| Objective Lens Diameter | 40 mm |
| Exit Pupil | 5 mm |
| Eye Relief | 12 mm |
| Field of View at 1000 m | 140 m |
| Prism Type | Porro (BaK-4) |
| Lens Coating | Fully multi-coated |
| Focus | Central via wheel |
| Diopter Adjustment | Right eyepiece |
| Dimensions (L x W x H) | 170 x 130 x 55 mm |
| Weight | 710 g |
| Power | None (optical) |
| Housing Material | Reinforced plastic and rubber |
| Waterproof | No (splash resistant) |
| Tripod Adapter | Yes (standard 1/4 inch thread) |
| Care and Cleaning | Clean lenses with a microfiber cloth, avoid solvents |
| Safety | Do not look directly at the sun, risk of eye injury |
| Spare parts and repairability | Contact Praktica customer service |
| Warranty | 2 years (depending on retailer) |
Frequently Asked Questions - Falcon 8x40 Praktica
User questions about Falcon 8x40 Praktica
0 question about this device. Answer the ones you know or ask your own.
Ask a new question about this device
Download the instructions for your Binoculars in PDF format for free! Find your manual Falcon 8x40 - Praktica and take your electronic device back in hand. On this page are published all the documents necessary for the use of your device. Falcon 8x40 by Praktica.
USER MANUAL Falcon 8x40 Praktica
Product Guide
Produktführer
Guide des Produits
Guía del Producto
Guida al Prodotto
We thank you for choosing this product from PRAKTICA International Ltd. If you have any questions, please consult your specialist dealer or contact us directly at www.praktica.com
Operation
Adjusting the Interpupillary Distance (IPD)
The interpupillary distance, or the distance between the pupils, varies from person to person. The binoculars must be correctly aligned (adjusted) to the distance between your pupils to achieve a single, clear image. To adjust this distance, lift the binoculars up to your eyes (using both hands) and look at an object in the distance. Move the two barrels (halves) of the binoculars closer together or further apart until you see a single, clear image. Check that the interpupillary distance is set correctly every time you use your binoculars.
WARNING: Viewing the Sun may cause permanent eye damage. Do not view the Sun with your binoculars or even with the naked eye.

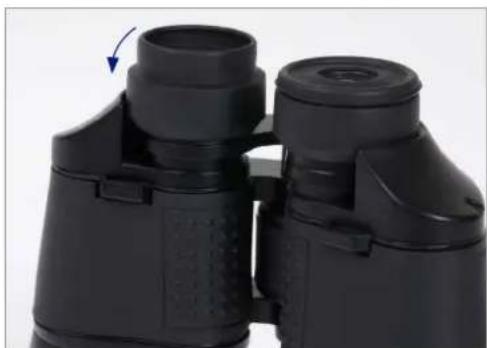
Eyecup Adjustment
Leave the rubber eyecups up if you do not wear eyeglasses but fold them down if you do wear eyeglasses to obtain the maximum field of view
Focusing
- Adjust the interpupillary distance by moving the center hinge until you see a single circular image.
- The diopter adjustment ring is located directly below the right eyecup (A). Make sure the diopter adjustment is set to
"zero" for now (raised index tab on the diopter ring is lined up with center mark on the binoculars). Keep both eyes open at all times.
- Using the attached lens cap or your hand, cover the objective (front) lens on the right side of the binoculars as you look into the evepieces.
- Using the center focus knob (B), focus on a distant object with fine detail (e.g., brick wall, tree branches, etc) until it appears as sharp as possible on the left side.
- Uncover the objective lens on the right side, and cover the left objective lens while continuing to view the same object.
- Rotate the diopter adjustment ring (A) to bring the object into focus in the right side of the binoculars. Avoid over-turning or forcing the diopter mechanism. If you are unable to bring the object into focus on the right side by adjusting the diopter ring, make sure the left side is still focused and that the center focus knob was not moved from its original setting. The diopter adjustment only affects the right side.
- Your binoculars should now be adjusted for your eyes. Focusing for any distance can now be done simply by turning the center focus knob. (B)

Tripod Adaptability
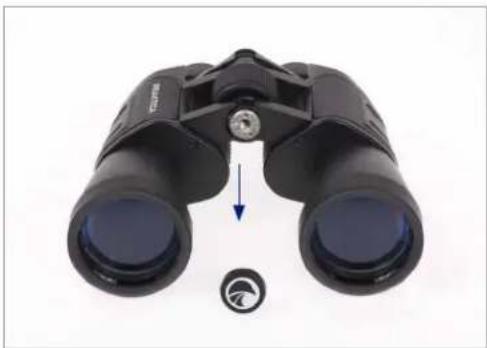
PRAKTICA binoculars feature a built-in thread that allows the binoculars to be attached to a tripod using a binocular tripod adapter. This thread can be accessed by unscrewing the logo plate found on the front of the hinge. To attach the binocular to a tripod, thread the adapter into the binoculars and attach the other end of the adapter to a photographic tripod. Mounting the binoculars on a tripod allows for added stability and comfort during prolonged viewing.
Neck Strap Attachment
Thread the ends of the neck strap through the strap lugs on each side of the binoculars, then back through the plastic buckle. Adjust the position of the binoculars on your chest as they hang around your neck by changing the length of the strap portion which passes through the lug and buckle (by an equal amount on each side).

Maintenance & Care
Your PRAKTICA binoculars will provide years of trouble-free service if it receives the normal care you would give any fine optical instrument.
- Avoid sharp impacts. Set the binoculars down gently on hard surfaces.
- Tug on the strap after attaching it to make sure it is securely fastened to the binoculars before placing it around your neck.
- Protect the optics of your binoculars by putting on all lens caps when not in use.
- Store your binoculars in a cool, dry place whenever possible.
- When storing for an extended period of time, place the binoculars in a plastic bag or airtight container with a desiccant.
- Do not leave the binoculars in a car on a hot/sunny day or near anything that generates heat as this may cause damage.
- Clean any dust, dirt or water that may get on the binoculars or inside moving parts as soon as possible to prevent any unforeseen damage.
Cleaning
We have designed all elements and surfaces to require little care. To ensure the long-lasting optical brilliance of your binoculars, you should keep the glass surfaces free of dirt, oil and grease. When cleaning the lenses, first remove larger particles with an optical lens brush. For the subsequent thorough cleaning we recommend breathing onto the lens surface to form a coat of condensation and then cleaning it with a soft, moist cloth. The housing is best cleansed with a soft, moist cloth (don't use the lens-cleaning cloth).
In the event of hard-to-remove dirt (e.g. sand) the eye cups can be unscrewed and cleaned very easily.
Lens-Cleaning Cloth
You can clean high sensitive lens surfaces with the enclosed special microfibre cloth. It is suitable for objective lenses, ocular lenses and spectacles.
Please keep the cloth clean, as dirt can damage the lens surface. If the cloth becomes soiled it can be washed in lukewarm soapy water and left to dry. Please only use for cleaning lens surfaces!
Warranty
PRAKTICA grant a worldwide warranty of 25 years from the date of purchase in accordance with the following conditions:
If defects in material and/or workmanship appear, we will take over material costs for the entire warranty period. We reserve the right in such instances to repair or replace the instrument or the defective part at our discretion. During the first five years we will take over all labour costs.
This guarantee in no way limits the statutory warranty obligations.
In the event that our range of products are updated, we reserve the right to repair defective instruments or to replace them with those of equal value.
We undertake no liability for repairs carried out by a repair shop which has not been authorized by us, nor for damages caused by improper use, nor for direct or indirect damages brought about by defects on the instrument. In addition, all parts are excluded from the warranty which are subject to natural wear, such as eyepiece caps, objective lens caps, carry straps, cases, armouring, etc.
Fokussieren
Wartung und Pflege
Mise Au Point
Enfoque
Correa
Messa a Fuoco
Manutenzione e Cura
Product Support
www.praktica.com
T: ++44 (0) 344 822 9940
E: care@praktica.com
PRAKTICA International Ltd
5 Century Point, Halifax Road
High Wycombe, Bucks, HP12 3SL
United Kingdom


Brand : Praktica
Model : Falcon 8x40
Category : Binoculars