
T884XLHP - Tumble dryer ASKO - Free user manual and instructions
Find the device manual for free T884XLHP ASKO in PDF.


| Product Type | Heat Pump Dryer |
| Brand | Asko |
| Model | T884XLHP |
| Drying Capacity | 9 kg |
| Energy Class | A++ |
| Annual Energy Consumption | 235 kWh (standard estimate) |
| Installation Type | Freestanding or stackable (kit required) |
| Dimensions (H x W x D) | 850 x 600 x 585 mm |
| Net Weight | 50 kg |
| Voltage / Frequency | 230 V / 50 Hz |
| Rated Power | 1200 W |
| Drying Programs | AutoDry, SensorDry, Cotton, Synthetics, Delicates, Wool, Quick, Anti-Allergy |
| Special Functions | Anti-crease, Delayed Start, Low Temperature Drying, Honeycomb Drum |
| Noise Level | 65 dB(A) |
| Maintenance | Cleanable lint filter, self-cleaning condenser, drainable water tank |
| Safety | Child lock, automatic stop at end of cycle, door safety |
| Spare Parts and Repairability | Repairability index 7.4/10 (manufacturer data), parts available for 10 years |
| Warranty | 2 years (extension possible) |
| Country of Manufacture | Sweden |
Frequently Asked Questions - T884XLHP ASKO
User questions about T884XLHP ASKO
0 question about this device. Answer the ones you know or ask your own.
Ask a new question about this device
Download the instructions for your Tumble dryer in PDF format for free! Find your manual T884XLHP - ASKO and take your electronic device back in hand. On this page are published all the documents necessary for the use of your device. T884XLHP by ASKO.
USER MANUAL T884XLHP ASKO
natural_image
Close-up of a stainless steel kitchen sink with a mesh grater and cloth, no visible text or symbols
natural_image
Stacked fabric folds with textured surfaces, one showing a distinct pattern (no text or symbols visible)GB Installation Instructions for the Tumble Dryer with heat pump
DA Installationsvejledning til tørretumbler med varmepumpe
DE Installationsanleitung für den Wäschetrockner mit Wärmepumpe
ES Instrucciones de instalación de la secadora con bomba de calor
FR Instructions d'installation du séchoir à tambour avec pompe à chaleur
HR Upute za instalaciju sušilice s toplinskom pumpom
IT Istruzioni per l'installazione dell'asciugatrice con pompa di calore
NO Installasjonsanvisning for tørketrommel med varmepumpe
NL Installatie-instructies voor de wasdroger met warmtepomp
PT Instruções de instalação para máquina de secar roupa com bomba de calor
RU Инструкция по установке сушильной машины с тепловым насосом
F1 Lämpöpumpulla varustetun kuivausrummun asennusohje
SE Installationsanvisning för torktumlare med värmepump
UA Інструкції зі встановлення сушильної машини з тепловим насосом
Dansk 4
Deutsch 8
English 12
Español 16
Francais 20
Hrvatski 24
Italiano 28
Norsk 32
Nederlands 36
Português 40
Русский 44
Suomea 48
Svenska 52
Українська 56
DA Retten til ændringer forbeholdes.
DE Änderungen vorbehalten.
ES Reservado el derecho a hacer modifi caciones.
FI Oikeus muutoksiin pidätetään.
FR Sous réserve de modification.
EN We reserve the right to make changes.
HR Zadržavamo pravo na izmjene.
IT Ci riserviamo il diritto di apportare modifi che.
NL Wij behouden ons het recht voor wijzigingen aan te brengen.
NO Retten til endringer forbeholdes.
PT Reservamo-nos o direito de fazer alterações.
RU Мы оставляем за собой право на внесение изменений.
SV Rätten till ändringar förbehålles.
UK Ми залишаємо за собою право на внесення змін.
Tørretumblerens placering
natural_image
Line drawing of a front-loading washing machine with front panel and side door (no text or symbols)natural_image
Line drawing of a table with a magnified view of a small object on top (no text or symbols)natural_image
Technical line drawing of a washing machine with a circular component and a separate 2X mounting bracket (no text or symbols)natural_image
Line drawing of a mechanical device with a circular component and mounting feet (no text or symbols)natural_image
Diagram showing two views of a refrigerator with arrows indicating direction (no text or symbols)Justér födderne
natural_image
Line drawing of a simple kitchen appliance with a circular vent and side-mounted door (no text or symbols)
natural_image
Diagram of a mechanical spring assembly with directional arrows indicating rotation (no text or labels)Kondensvandet
Transport/Vinteropbevaring
natural_image
Front view of a computer monitor with scroll and control buttons (no visible text or symbols)
natural_image
Front view of a gray electronic device control panel with buttons and ports (no visible text or symbols)Startinstruktion
natural_image
Front view of a horizontal control bar with buttons and a small icon (no text or symbols visible)

natural_image
Line drawing of a washing machine with front panel and side door (no text or symbols)Montage:
natural_image
Line drawing of a table with a magnified inset showing an arrow labeled 'O' (no text or symbols present)natural_image
Line drawing of a washing machine with a circular component and a separate close-up view (no text or symbols)natural_image
Line drawing of a laboratory oven with a circular vent and side-mounted control panel (no text or symbols)natural_image
Diagram showing two views of a refrigerator with arrows indicating direction (no text or symbols)Justieren der Füße
natural_image
Technical line drawing of a mechanical device with a circular component and mounting base (no text or symbols)
natural_image
Technical diagram of a mechanical spring assembly with directional arrows indicating rotation (no text or labels)Kondenswasser
natural_image
Front view of a computer monitor with scroll and control buttons (no visible text or symbols)
natural_image
Front view of a gray electronic device control panel with buttons and ports (no visible text or symbols)Startanleitung
natural_image
Close-up of a metallic audio player interface with no visible text or symbols

Positioning the tumble dryer
The tumble dryer can be free-standing or in a stack. Remember that the tumble dryer produces heat and should therefore not be located in a room that is too small. If the room is very small, drying will take longer due to the limited quantity of air.
Tip!
- Do not install the machine in a room where there is a risk of frost occurring. At temperatures around freezing point the machine may not be able to operate properly.
- The room in which the appliance is installed should be adequately ventilated, with temperature between 15°C and 25°C.
Caution!
- Any electrical installation must be carried out by qualified professionals.
- The machine must not be installed behind a lockable door, a sliding door or a door with hinges on the opposite side to those of the tumble dryer.
- The tumble dryer's plinth ventilation must not be blocked by a rug or the like.
Tip!
• To improve ventilation, leave the door to the room where the tumble dryer is located open.
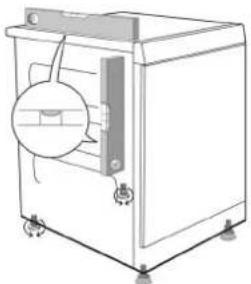
A. Freestanding
The tumble dryer can be positioned beside the washing machine. An air gap of at least 5 mm must be left between the washing machine and the tumble dryer.
If the customer has a problem with the machine sliding when on a low-friction floor, the plastic cups can be used under the feet of the tumble dryer (between foot and floor).
B. Stacking
The tumble dryer can be placed on top of a ASKO washing machine. In this case you use the stacking attachments (foot cups and anti-tilt devices) that come with the machine. Two rubber feet and two anti-tipping brackets are supplied in the bag found in the drum of the dryer.

natural_image
Line drawing of a front-loading washing machine with front panel and side door (no text or symbols)How to assemble the stack:
I. Undo the screw on the back of the ASKO washing machine as shown in the figure.

natural_image
Line drawing of a table with a magnified inset showing a small circular object labeled 'O' (no text or symbols present)- Secure the anti-tilt device using the screws as shown in the picture.
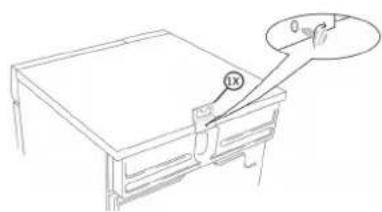
- Take the other anti-tipping bracket from the bag and attach it on the dryer with two screws as shown in the figure.

natural_image
Pure technical diagram showing a curved channel with a spiral pattern and two labeled points (X) at the bottom, no text or symbols present.- Place the two rubber feet on the front feet of the dryer.

natural_image
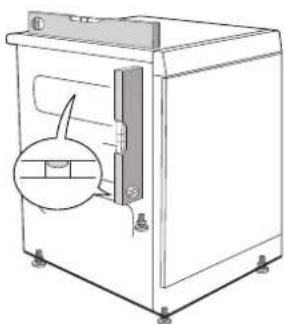
Line drawing of a mechanical device with a circular component and a separate 2X-labeled component (no text or symbols)- Fasten or undo the rear feet of the appliance until it is fully level, either on the floor or on the washing machine.

natural_image
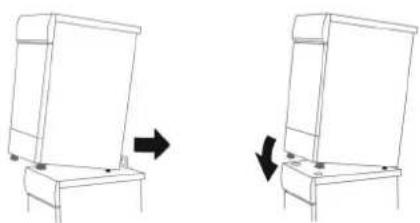
Line drawing of a laboratory instrument with a circular component inside, no text or symbols present- Slide the dryer backward until it reaches the anti-tipping bracket. Make sure the front of the appliance is raised by 50 to 150 mm as you slide it back.

natural_image
Diagram showing two views of a mechanical device with arrows indicating direction (no text or symbols)Adjusting the feet
Screw the feet in or out so that the tumble dryer is steady and balanced on the floor or on the washing machine.
natural_image
Line drawing of a simple kitchen appliance with a circular vent and side-mounted door (no text or symbols)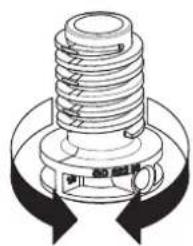
natural_image
Technical diagram of a mechanical spring assembly with directional arrows indicating rotation (no text or labels)Condensed water
Transport/Winter storage
The machine is supplied as shown in Option I (inset). This means that the condensed water is pumped into the condensed water container. This must then be removed and emptied by hand.
Option 2 allows you to remove the small short hose from the nipple. Attach the rubber hose supplied to the same nipple. The water can then be pumped out into a sink or a floor drain (2a).

Note!
- Do not pull on the drain hose and do not stretch it or allow it to become kinked as it could get damaged.
- Secure the hose carefully (e.g. by trying it to a tap to make sure it cannot slip during use). Otherwise there is a risk of overflowing water which could cause damage.
Warning!
If the tumble dryer is to be connected to a drainage system already in use by another appliance it is essential to fit a non-return valve.
The non-return valve will prevent the risk of back-flow into the dryer which could cause damage.
The machine must be transported upright! Leave the machine to stand for 24 hours after transporting. If you need to move your machine or store it over the winter in unheated premises, make sure that you drain the condensed water container beforehand.
Electrical installation
- The electrical wall socket must be placed outside of the installation area to be easily accessible.
- The machine must only be connected to an earthed wall socket.
- Any residual current devices must be type A.
Connection on delivery
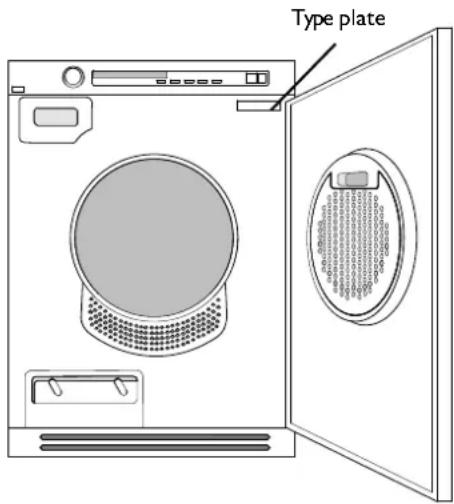
Information about the electrical connection can be found on the type plate. Compare the data with the mains supply data.
Start instructions

Start instructions
You will be prompted to select the display language when you have connected your machine and start it for the first time.
- Turn the programme selector and choose the required language.
- Press Start to save the selection and return to the programme menu.

natural_image
Close-up of a handheld electronic device with a circular button and horizontal scroll (no visible text or symbols)
natural_image
Front view of a computer monitor with scroll, buttons, and control knob (no visible text or symbols)Start instructions
The first time the machine is connected to a power supply, you need to select the language for the machine's menus and set the clock. If the power is cut before this is completed, the process must be restarted.
Note:
All selections must be made.
Select language
If you want to use the default language, press the Start button to confi rm. Otherwise, use the up and down arrow buttons to select: AU English, US English, svenska, dansk, norsk, suomea, Francais, Deutsch, Italiano, espanol, Русский, nederlands. Press the Start button to confi rm.
Set the clock to 12h, 24h, or remaining program time display
The clock is displayed in the middle of the display. Use the up and down arrow buttons to choose 12h, 24h, or remaining program time display. Press the Start button to confirm. If you select 12h or 24h, the clock setting menu automatically opens.
Set the clock
Press the up arrow button until the correct hour is displayed. Press the program selector (the big arrow) to save. Press the down arrow button until the correct minutes are displayed. Press the Start button to confirm.
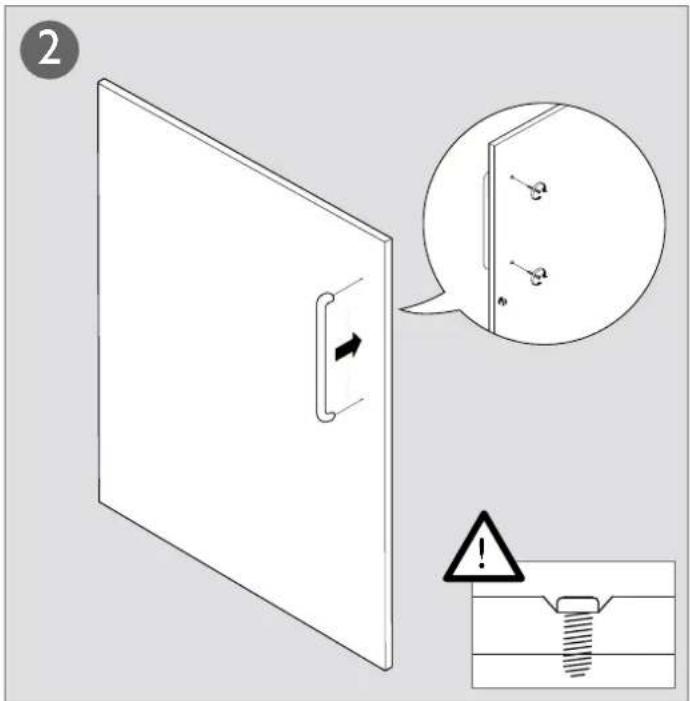
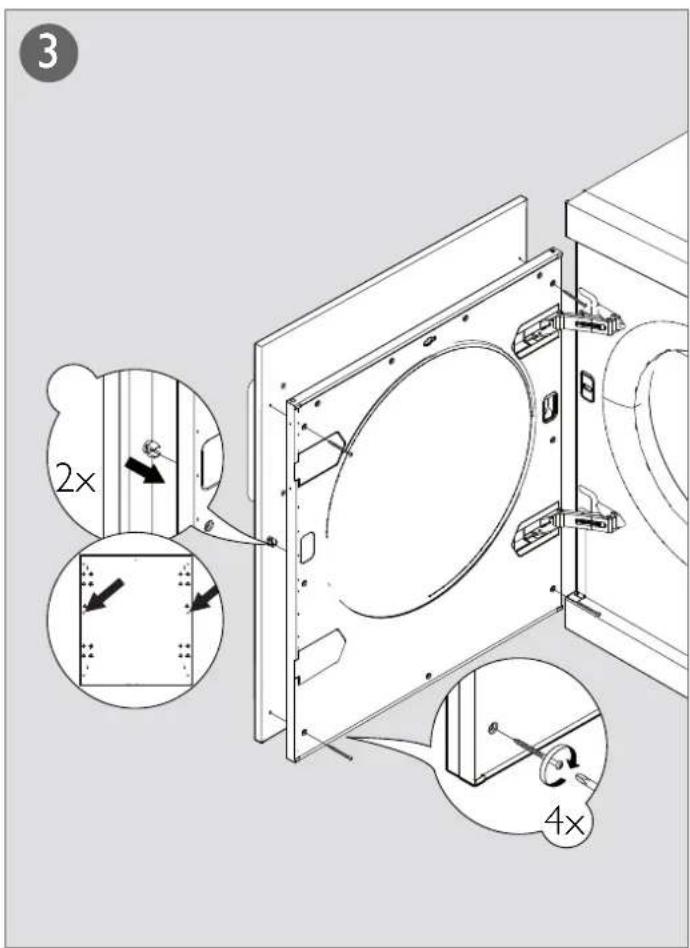
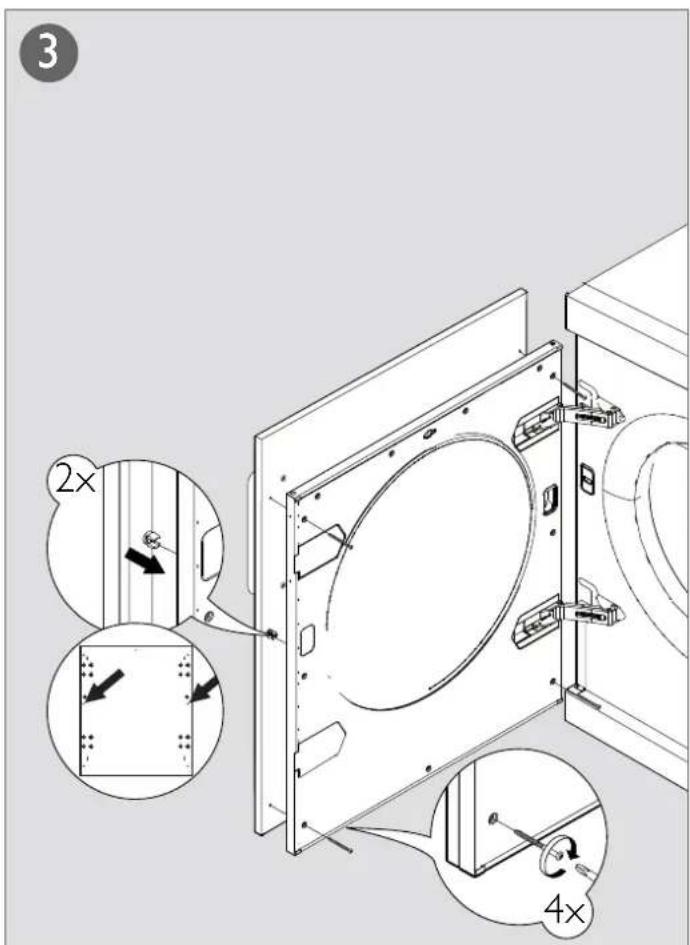
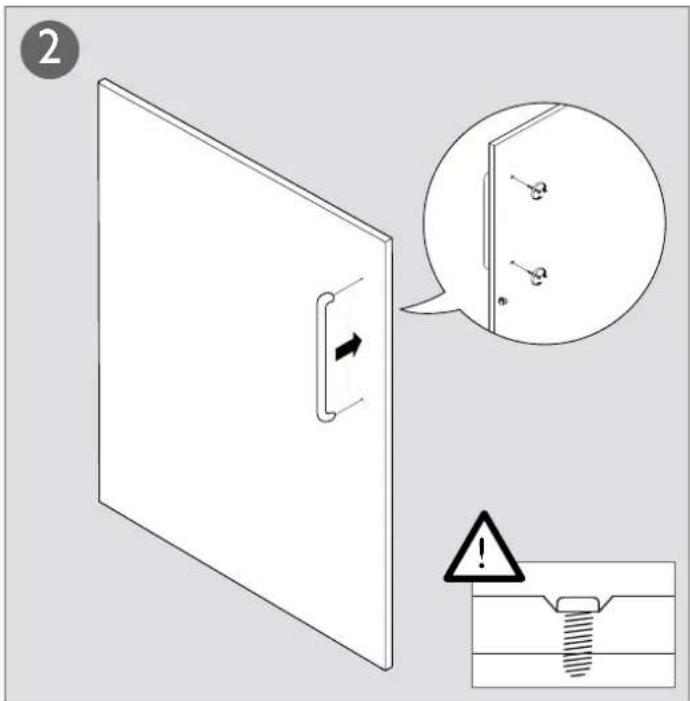
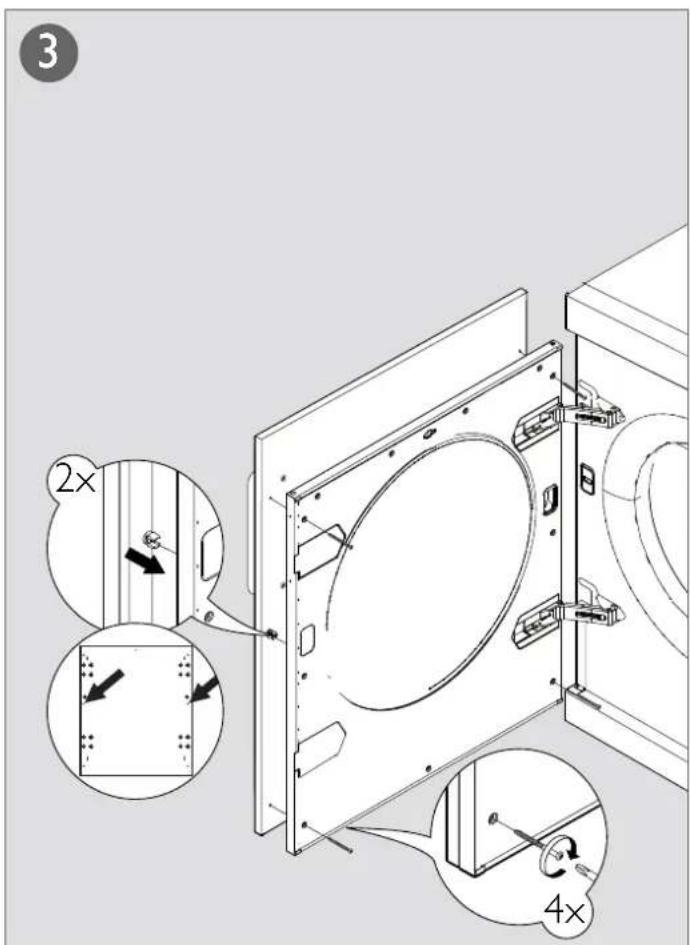
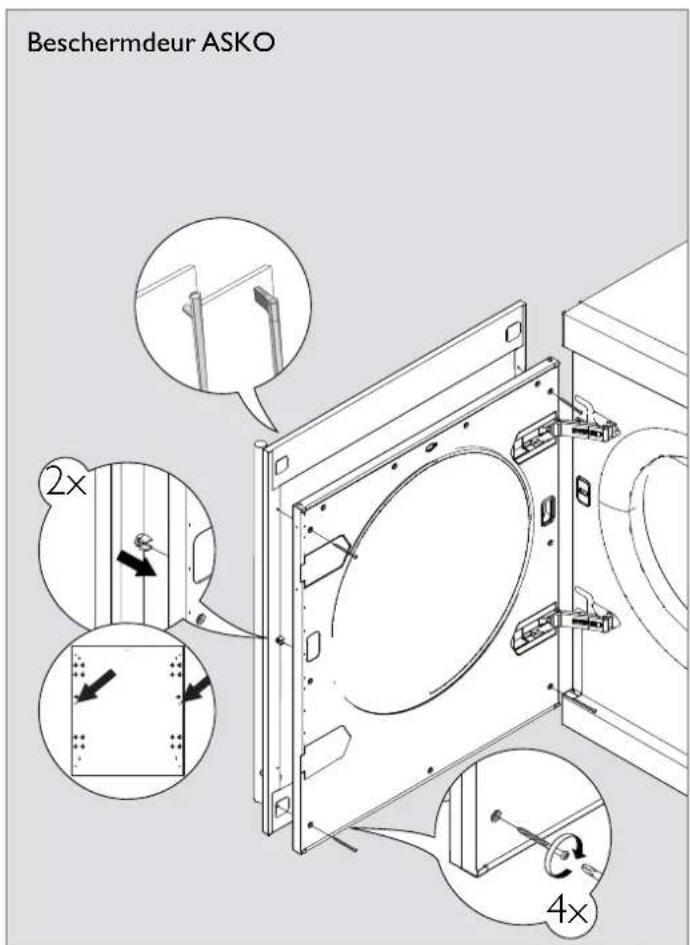
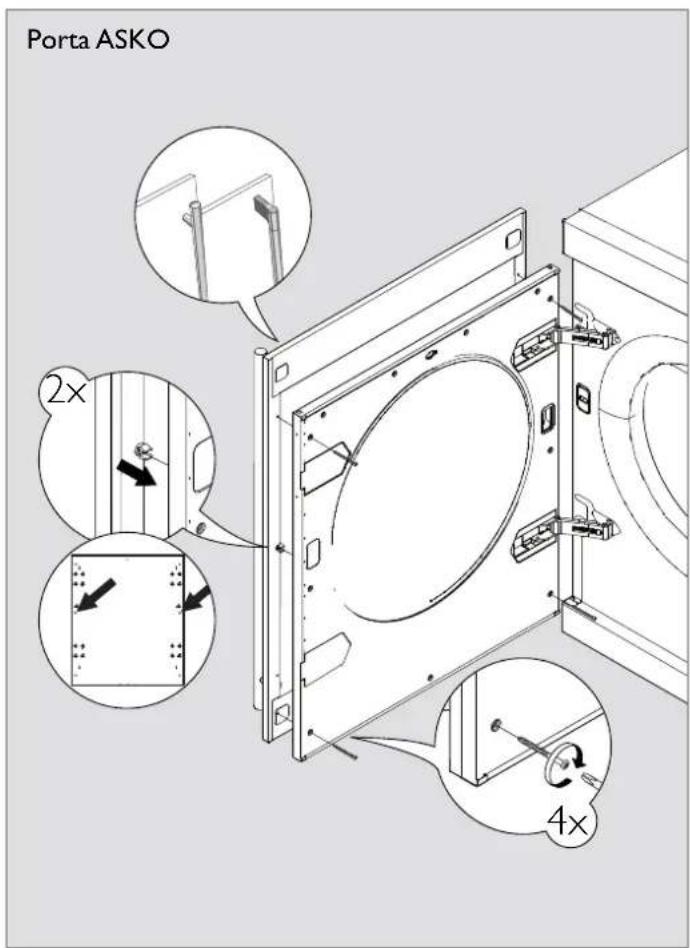
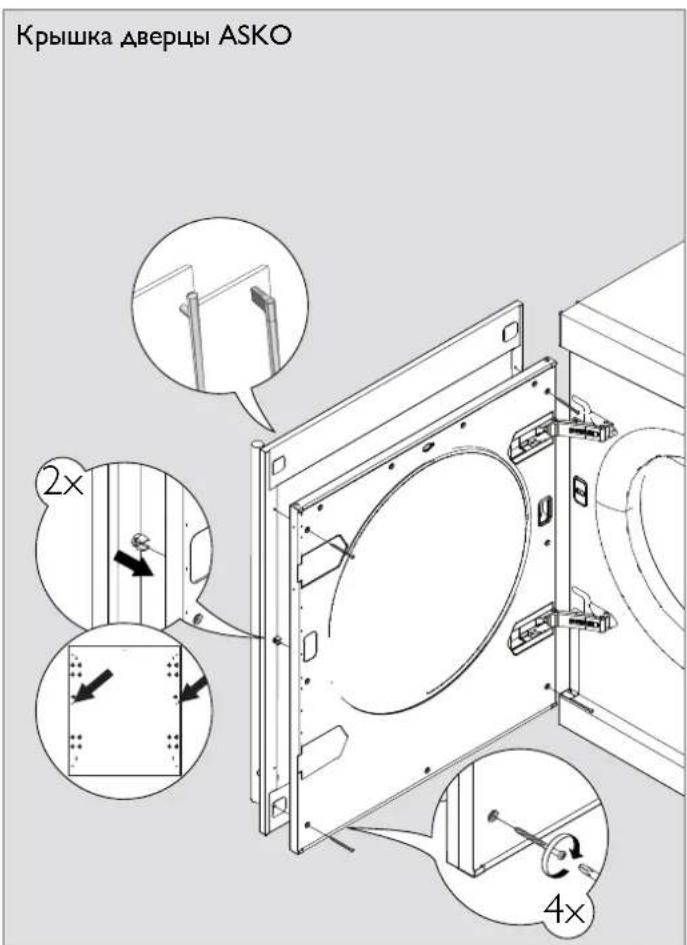
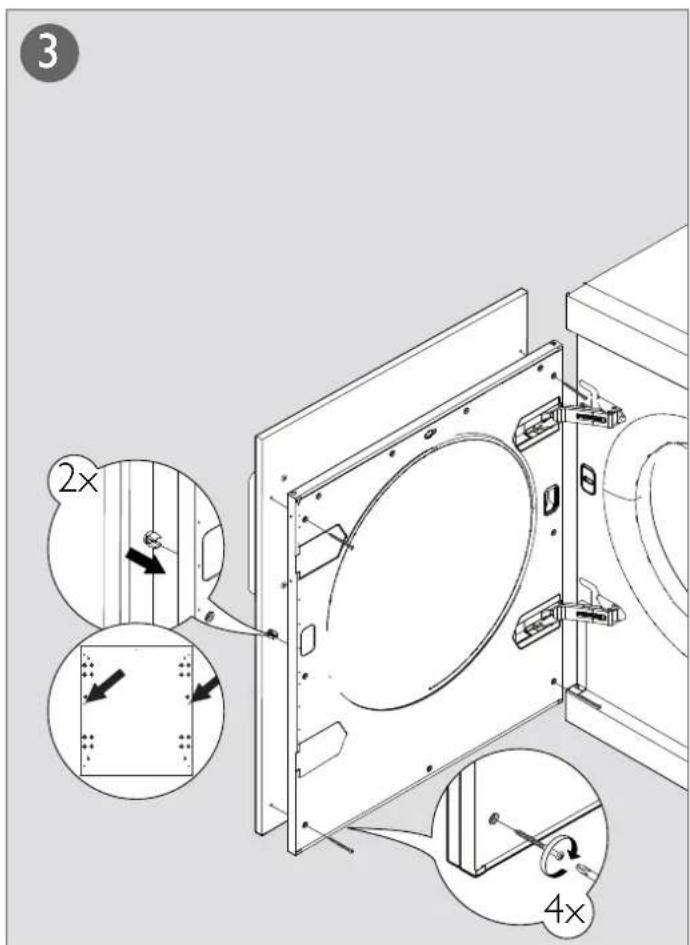
Fitting the cover door


natural_image
Close-up of a metallic control panel with buttons and a central knob (no visible text or symbols)Note!
The instructions for fitting the cover door only apply to the illustrated model.
![1 595 383 766 555 2× [mm]](/content/2026/06/1285153/images/77b3189fe9c61a1c12f1de388296ec58f422822cb6ecf2196a503dc3035180b1.jpg)

natural_image
Line drawing of a front-loading washing machine with front panel and side door (no text or symbols)Montage:
natural_image
Line drawing of a mechanical component with a circular arrow indicating direction (no text or symbols)natural_image
Pure technical line drawing of a mechanical part with no text or symbolsnatural_image
Technical line drawing of a washing machine with a circular component and a separate 2X bolt (no text or symbols)natural_image
Line drawing of a portable oven with a circular vent and wheels (no text or symbols)natural_image
Diagram showing two views of a mechanical device with arrows indicating direction (no text or symbols)Ajuste de las patas
natural_image
Line drawing of a simple industrial machine with a circular component on the side panel (no text or symbols)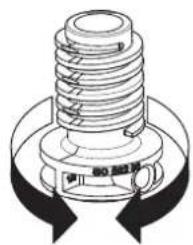
natural_image
Technical diagram of a mechanical spring assembly with directional arrows indicating rotation (no text or labels)natural_image
Close-up of a black horizontal bar with circular ends and a small circular button, no visible text or symbols.
natural_image
Front view of a computer monitor with scroll and control buttons (no visible text or symbols)natural_image
Front view of a horizontal control bar with circular buttons and a button labeled 'OK' (no text or symbols on the bar itself)

natural_image
Line drawing of a multi-tiered washing machine with front panel and side door (no text or symbols)Montage:
natural_image
Line drawing of a mechanical component with a circular arrow and dimension label (no text or symbols)natural_image
Technical line drawing of a mechanical assembly with no visible text or symbolsnatural_image
Pure technical line drawing of a mechanical part with no text or symbolsnatural_image
Line drawing of a mechanical device with a circular component and a separate 2X button (no text or symbols)natural_image
Line drawing of a simple industrial machine with wheels and a circular component (no text or symbols)natural_image
Diagram showing two views of a mechanical device with arrows indicating direction (no text or symbols)Réglage des pieds
natural_image
Line drawing of a simple kitchen oven with a circular vent and side-mounted door (no text or symbols)
natural_image
Diagram of a mechanical spring assembly with directional arrows indicating rotation (no text or labels)Eau de condensation
natural_image
Line drawing of a front view of a washing machine with a circular vent and side panel (no text or symbols)natural_image
Front view of a computer monitor with scroll and control buttons (no visible text or symbols)
natural_image
Front view of a gray electronic device with a black tab and control buttons (no visible text or symbols)natural_image
Front view of a gray electronic device control panel with buttons and a scroll (no visible text or symbols)N.B.!

natural_image
Line drawing of a front-loading washing machine with front panel and side door (no text or symbols)Slaganje aparata:
- Odvijte vijak na stražnjoj strani perilice kao što je prikazano na slici.

natural_image
Line drawing of a mechanical component with a circular arrow indicating direction (no text or symbols)natural_image
Line drawing of a mechanical device with a handle and circular annotation (no text or symbols)- Iz kutije izvadite drugi dio kompleta protiv nagibanja uređaja (drugi držač) i dva vijka. Drugi držač protiv nagibanja uređaja pričvrstite pomoću dva vijka na stroj za sušenje rublja.

natural_image
Line drawing of a washing machine with a circular component and a separate plastic housing (no text or symbols)- Nožice privijte ili odvijte toliko da stroj za sušenje rublja izravnate u potpuno vodoravan položaj, bilo na tlu ili na perilici rublja.
natural_image
Line drawing of a portable oven or machine with a circular vent and wheels (no text or symbols)- Stroj za sušenje gumite unazad, sve dok se držači za sprječavanje nagibanja, montirani na perilici i na sušilici rublja međusobno ne podudaraju. Za vrijeme dok gurate stroj za sušenje unazad, neka njegov prednji rub bude podignut za otprilike 50 do 150 mm.

natural_image
Diagram showing two views of a refrigerator with arrows indicating direction (no text or symbols)Podešavanje nožica
Pritežite i otpuštajte nožice tako da sušilica bude stabilna i uravnotežena na podu ili na perilici rublja.

natural_image
Technical line drawing of a mechanical device with a circular component and mounting base (no text or symbols)
natural_image
Technical diagram of a mechanical spring assembly with directional arrows indicating rotation (no text or labels)Kondenzat
natural_image
Digital audio workstation scroll with a key and control buttons (no text or symbols visible)
natural_image
Front view of a gray electronic device with a black tab and control buttons (no visible text or symbols)Upute za pokretanje
Kada se aparat prvi put priključuje na napajanje, morate odabrati jezik izbornika i postaviti sat. Ako se napajanje prekine prije dovršetka tog postupka, morate krenuti od početka.
Napomena:
Morate odabrati sve postavke.
Odabir jezika
Ako želite koristiti zadani jezik, za potvrdu pritisnite tipku za pokretanje. U suprotnom, pomoću tipki sa strelicama odaberite sljedeće: AU English (australski engleski), US English (američki engleski), svenska (švedski), dansk (danski), norsk (norveški), suomea (fi nski), Francais (francuski), Deutsch (njemački), Italiano (talijanski), espanol (španjolski), Русский (ruski), nederlands (nizozemski).
Pritisnite tipku za pokretanje da biste potvrdili odabir.
Podesite sat na 12 h, 24 h ili na prikaz preostalog vremena programa.
Sat se prikazuje na sredini zaslona.
Pomoću strelica za gore ili dolje podesite sat na 12 h, 24 h ili na prikaz preostalog vremena programa.
Pritisnite tipku za pokretanje da biste potvrdili odabir.
Ako odaberete 12 h ili 24 h, automatski se otvara izbornik s postavkama sata.
Postavljanje sata
Pritišćite tipku sa strelicom prema gore dok se ne prikaže točan sat. Pritišćite programator (velika strelica) da biste spremili postavku. Pritišćite tipku sa strelicom prema dolje dok se ne prikažu točne minute.
Pritisnite tipku za pokretanje da biste potvrdili odabir.
natural_image
Close-up of a metallic control lever with adjustment knobs and a button (no visible text or symbols)Napomena!
Upute za montažu vanjskih vrata odnose se samo prikazani model.
![1 595 766 2x 555 383 [mm]](/content/2026/06/1285153/images/4ec9df3bd47db15054f2313cc8945d0f59b0eeadc92efa55adb59800bc422c47.jpg)


natural_image
Line drawing of a front-loading refrigerator with front panel and side door (no text or symbols)natural_image
Line drawing of a mechanical device with a cylindrical component and an arrow indicating direction (no text or symbols)natural_image
Pure technical line drawing of a mechanical part with no text or symbolsnatural_image
Line drawing of a washing machine with a circular component and a separate close-up view (no text or symbols)natural_image
Line drawing of a laboratory instrument with a circular component and control knobs (no text or symbols)natural_image
Diagram showing two views of a refrigerator with arrows indicating direction (no text or symbols)natural_image
Technical line drawing of a mechanical device with a circular component and mounting base (no text or symbols)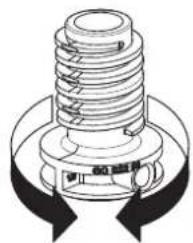
natural_image
Diagram of a mechanical spring assembly with directional arrows indicating rotation (no text or labels)Acqua di condensa
natural_image
Close-up of a handheld electronic device with a circular button and horizontal scroll (no visible text or symbols)
natural_image
Front view of a computer monitor with scroll, buttons, and control knob (no visible text or symbols)natural_image
Close-up of a metallic control panel with buttons and a central knob (no visible text or symbols)

natural_image
Line drawing of a front-loading washing machine with a side panel (no text or symbols)natural_image
Line drawing of a table with a magnified view of a small object on top (no text or symbols)natural_image
Line drawing of a washing machine with a circular component and a separate close-up view (no text or symbols)natural_image
Diagram showing two views of a refrigerator with arrows indicating direction (no text or symbols)Justere føttene
natural_image
Line drawing of a simple kitchen appliance with a circular vent and side-mounted door (no text or symbols)
natural_image
Diagram of a mechanical spring assembly with directional arrows indicating rotation (no text or labels)Kondensvannet
Transport/vinterlagring
Startanleitungen

Startanleitungen
natural_image
Front view of a computer monitor with scroll and control buttons (no visible text or symbols)
natural_image
Front view of a gray electronic device with a black tab and control buttons (no visible text or symbols)Startanleitungen
natural_image
Front view of a gray electronic device control panel with buttons and indicator lights (no readable text or symbols)Obs!
Montering av påhengsdør gjelder kun for den modelltypen som er vist på bildet.
![1 595 383 766 555 2× [mm]](/content/2026/06/1285153/images/a87c9ca4647bab8c0b7c9ed5165593bf94f5ca387322334ecdb7348d80daef76.jpg)


natural_image
Line drawing of a double refrigerator with front panel and side door (no text or symbols)natural_image
Line drawing of a mechanical component with a circular arrow and dimension label (no text or symbols)natural_image
Line drawing of a mechanical setup with a table and bracket, no text or symbols presentnatural_image
Pure technical line drawing of a mechanical part with no text, numbers, or symbolsnatural_image
Line drawing of a washing machine with a circular vent and a separate component labeled 2X (no text or symbols on the device itself)natural_image
Line drawing of a simple industrial machine with a circular component and wheels (no text or symbols)natural_image
Diagram showing two mechanical components with arrows indicating motion, no text or symbols presentnatural_image
Line drawing of a simple kitchen appliance with a circular vent and side-mounted door (no text or symbols)
natural_image
Technical illustration of a mechanical spring assembly with directional arrows indicating rotation (no text or symbols)Condenswater
Transport/Winteropslag
natural_image
Front view of a computer monitor with scroll and control buttons (no visible text or symbols)
natural_image
Front view of a gray electronic device control panel with buttons and ports (no visible text or symbols)Startinstructies
natural_image
Front view of a gray electronic device control panel with buttons and indicator lights (no readable text or symbols)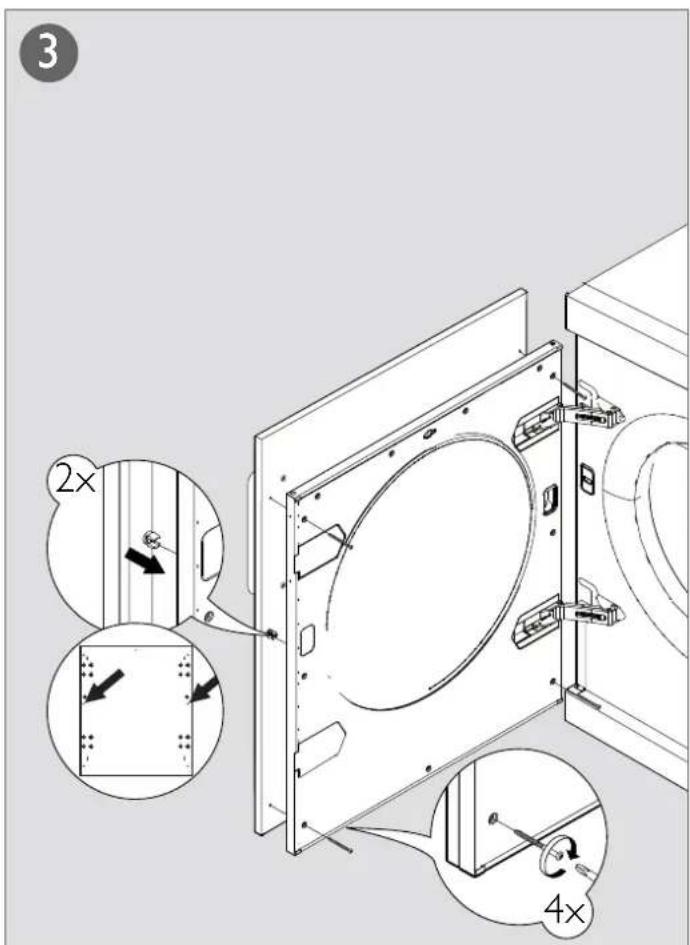
natural_image
Line drawing of a front-loading washing machine with front panel and side panels (no text or symbols)natural_image
Line drawing of a table with a magnified view of a circular object labeled 'O' (no text or symbols on the diagram itself)- Aperte o esquadro anti-queda da máquina de lavar roupa como indicado na fi gura.

natural_image
Line drawing of a mechanical assembly with a base plate and clamping mechanism (no text or symbols)natural_image
Pure technical line drawing of a mechanical part with no text or symbolsnatural_image
Technical line drawing of a mechanical device with a circular component and a separate 2X button (no text or symbols)natural_image
Line drawing of a portable oven or machine with a circular vent and wheels (no text or symbols)- Empurre a máquina de secar roupa contra o esquadro da máquina de lavar roupa; para isso, mantenha a máquina de secar roupa inclinada levantando-a para a frente de 50 a 150 mm.
natural_image
Diagram showing two views of a mechanical device with arrows indicating direction (no text or symbols)Ajustar os pés
natural_image
Line drawing of a simple kitchen appliance with a circular vent and side-mounted door (no text or symbols)
natural_image
Technical diagram of a mechanical spring assembly with directional arrows indicating rotation (no text or labels)Água condensada
natural_image
Close-up of a handheld electronic device with a circular button and horizontal scroll (no visible text or symbols)
natural_image
Front view of a computer monitor with scroll, buttons, and control knob (no visible text or symbols)natural_image
Close-up of a metallic control panel with buttons and a central knob (no visible text or symbols)
natural_image
Line drawing of a multi-tiered refrigerator with front panel and side door (no text or symbols)natural_image
Line drawing of a table with a magnified view of a small object on top (no text or symbols)natural_image
Line drawing of a mechanical assembly with a base plate and clamping mechanism (no text or symbols)natural_image
Pure technical line drawing of a mechanical part with no text, numbers, or symbolsnatural_image
Technical line drawing of a washing machine with a circular component and a separate view showing a circular component (no text or symbols)natural_image
Line drawing of a simple industrial machine with a circular vent and wheels (no text or symbols)natural_image
Diagram showing two views of a mechanical device with arrows indicating direction (no text or symbols)Регулировка ножек
natural_image
Line drawing of a mechanical device with a circular component and mounting base (no text or symbols)
natural_image
Technical diagram of a mechanical spring assembly with directional arrows indicating rotation (no text or labels)Конденсат
natural_image
Close-up of a black horizontal bar with circular ends and a small circular button, no visible text or symbols.
natural_image
Front view of a computer monitor with scroll and control buttons (no visible text or symbols)natural_image
Front view of a gray electronic device control panel with buttons and a scroll (no visible text or symbols)Внимание!

natural_image
Line drawing of a multi-tiered refrigerator with front and back panels (no text or symbols)natural_image
Line drawing of a mechanical device with a circular arrow and dimension label (no text or symbols)natural_image
Pure technical line drawing of a mechanical part with no text or symbolsnatural_image
Technical line drawing of a washing machine with a circular component and a separate 2X mounting bracket (no text or symbols)natural_image
Line drawing of a simple industrial machine with a circular vent and wheels (no text or symbols)natural_image
Diagram showing two views of a refrigerator with arrows indicating direction (no text or symbols)Säädä jalat
natural_image
Line drawing of a simple kitchen appliance with a circular vent and side panel (no text or symbols)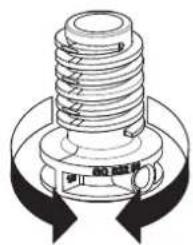
natural_image
Diagram of a mechanical spring assembly with directional arrows indicating rotation (no text or labels)Kondenssivesi
natural_image
Front view of a computer monitor with scroll and control buttons (no visible text or symbols)
natural_image
Front view of a gray electronic device with a black tab and control buttons (no visible text or symbols)Käynnistysohje
natural_image
Front view of a gray electronic device control panel with buttons and indicator lights (no readable text or symbols)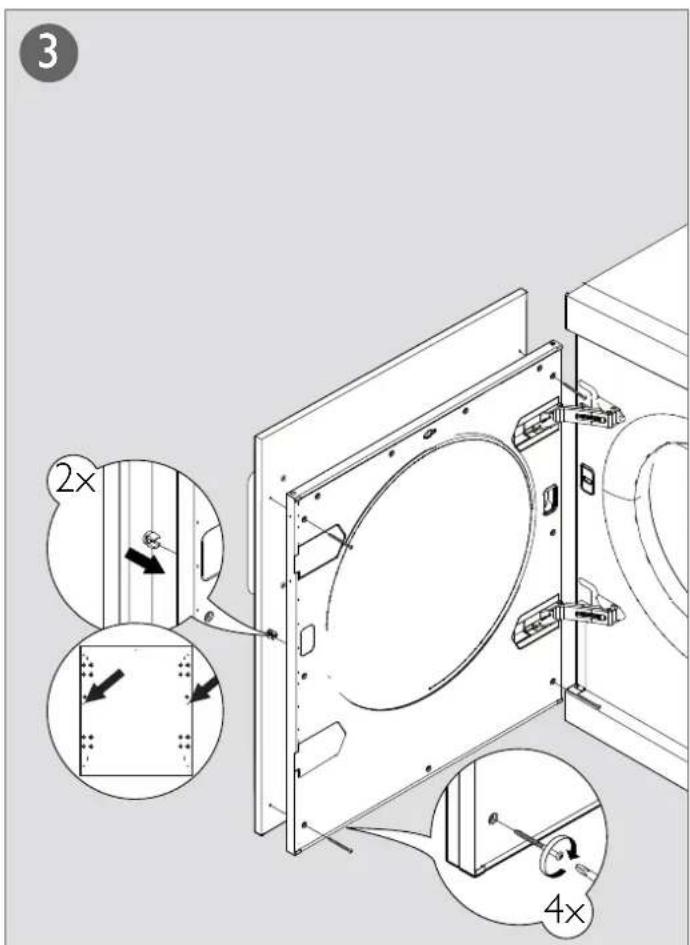

Torktumlarens placering
natural_image
Line drawing of a double-door refrigerator with a front-mounted speaker (no text or symbols)natural_image
Line drawing of a table with a magnified view showing an arrow and a small circle (no text or symbols)natural_image
Line drawing of a mechanical assembly with a base plate and clamping mechanism (no text or symbols)natural_image
Pure technical line drawing of a mechanical part with no text or symbolsnatural_image
Line drawing of a mechanical device with a circular component and a separate circular component labeled (2X), no text or symbols present.natural_image
Line drawing of a laboratory instrument with a circular component and control knobs (no text or symbols)natural_image
Diagram showing two views of a mechanical device with arrows indicating direction (no text or symbols)Justera fötterna
natural_image
Line drawing of a simple industrial machine with a circular component and mounting base (no text or symbols)
natural_image
Mechanical component diagram showing a threaded spring assembly with directional arrows indicating rotation (no text or symbols)Kondensvattnet
natural_image
Front view of a computer monitor with scroll and control buttons (no visible text or symbols)
natural_image
Front view of a black rectangular electronic device with control buttons and indicator lights (no visible text or symbols)Startinstruktion
natural_image
Close-up of a metallic control panel with buttons and a scroll (no visible text or symbols)Obs!

natural_image
Line drawing of a front-loading washing machine with front panel and side door (no text or symbols)natural_image
Line drawing of a table with a magnified view of a small object on top (no text or symbols)natural_image
Pure technical line drawing of a mechanical part with no text, numbers, or symbolsnatural_image
Technical line drawing of a mechanical device with a circular component and a separate circular component labeled 2X (no text or symbols present)natural_image
Line drawing of a simple industrial machine with a circular component inside, no text or symbols presentnatural_image
Diagram showing two views of a refrigerator with arrows indicating direction (no text or symbols)Регулювання ніжок
natural_image
Line drawing of a simple kitchen appliance with a circular vent and side-mounted door (no text or symbols)
natural_image
Technical illustration of a mechanical spring assembly with directional arrows indicating rotation (no text or symbols)Конденсат
natural_image
Front view of a computer monitor with scroll and control buttons (no visible text or symbols)
natural_image
Front view of a gray electronic device with a black tab and control buttons (no visible text or symbols)natural_image
User interface control bar with slider and control buttons (no text or symbols)

Swedish quality since 1950
- GB Installation Instructions for the Tumble Dryer with heat pump
- Tørretumblerens placering
- Justér födderne
- Kondensvandet
- Transport/Vinteropbevaring
- Startinstruktion
- Montage:
- Justieren der Füße
- Kondenswasser
- Startanleitung
- Positioning the tumble dryer
- Tip!
- Caution!
- Freestanding
- Stacking
- How to assemble the stack:
- Adjusting the feet
- Condensed water
- Transport/Winter storage
- Note!
- Warning!
- Electrical installation
- Connection on delivery
- Start instructions
- Note:
- Select language
- Set the clock to 12h, 24h, or remaining program time display
- Set the clock
- Fitting the cover door
- Ajuste de las patas
- Réglage des pieds
- Eau de condensation
- Slaganje aparata:
- Podešavanje nožica
- Kondenzat
- Upute za pokretanje
- Napomena:
- Odabir jezika
- Podesite sat na 12 h, 24 h ili na prikaz preostalog vremena programa.
- Postavljanje sata
- Acqua di condensa
- Justere føttene
- Kondensvannet
- Transport/vinterlagring
- Startanleitungen
- Condenswater
- Transport/Winteropslag
- Startinstructies
- Ajustar os pés
- Água condensada
- Регулировка ножек
- Конденсат
- Säädä jalat
- Kondenssivesi
- Käynnistysohje
- Torktumlarens placering
- Justera fötterna
- Kondensvattnet
- Регулювання ніжок
Brand : ASKO
Model : T884XLHP
Category : Tumble dryer