
On Stage III WM - Docking Station JBL - Free user manual and instructions
Find the device manual for free On Stage III WM JBL in PDF.


| Product Type | Docking Station |
| Brand | JBL |
| Model | On Stage III WM |
| Compatible Devices | iPod, iPhone (30-pin connector) |
| Speaker Configuration | 2 x 1.5" full-range drivers |
| Power Output | 12W RMS total |
| Frequency Response | 70 Hz – 20 kHz |
| Input Power | 18V DC, 2A (AC adapter included) |
| Dimensions (H x W x D) | 4.8 x 6.7 x 6.7 in (122 x 170 x 170 mm) |
| Weight | 1.5 lbs (0.68 kg) |
| Alarm Clock | Yes, with snooze function |
| Remote Control | Included (CR2025 battery) |
| AUX Input | Yes, 3.5mm stereo |
| Color | White |
| Warranty | 1 year limited |
| Maintenance & Cleaning | Wipe with a soft, dry cloth; avoid liquids |
| Safety Precautions | Keep away from water and heat sources; do not disassemble |
| Repairability & Spare Parts | No user-serviceable parts; contact JBL support for repair options |
Frequently Asked Questions - On Stage III WM JBL
User questions about On Stage III WM JBL
0 question about this device. Answer the ones you know or ask your own.
Ask a new question about this device
Download the instructions for your Docking Station in PDF format for free! Find your manual On Stage III WM - JBL and take your electronic device back in hand. On this page are published all the documents necessary for the use of your device. On Stage III WM by JBL.
USER MANUAL On Stage III WM JBL
iPhone and iPod not included / iPhone et iPod non inclus

natural_image
Black and white photo of a Samsung 3.08 phone on a black electronic device (no visible text or symbols on the device body)JBL On Stage™ IIIP portable loudspeaker dock for iPhone and iPod


JBL On Stage™ IIIP Important Safety Instructions
Please read the following precautions before use:
- Read these instructions, heed all warnings, and keep for future reference.
• Do not use this apparatus near water. - Clean only with dry cloth.
- Do not block any ventilation openings; a minimum distance of 10mm around the entire apparatus is required for sufficient ventilation.
- No naked flame sources such as lighted candles should be placed on or near apparatus.
- Attention should be drawn to the environmental aspects of battery disposal.
- Apparatus is to be used in moderate climates only.
- Do not install near any heat sources such as radiators, heat registers, stoves or other apparatuses (including amplifiers) that produce heat.
- Do not defeat the safety purpose of the polarized or grounding-type plug. A polarizing plug has two blades with one wider than the other. A grounding-type plug has two blades and a third grounding prong. The wide blade or third prong is provided for safety. If the provided plug does not fit into your outlet, consult an electrician for replacement of the obsolete outlet.
- Protect the power cord from being walked on or pinched, particularly at the plugs and convenience receptacles, and at the point where they exit from the apparatus.
- Only use attachments/accessories specified by the manufacturer.
- Unplug this apparatus during lightning storms or when unused for long periods of time
- Refer all servicing to qualified service personnel. Servicing is required when the apparatus has been damaged in any way, such as power-supply cord or plug is damaged, liquid has been spilled or objects have fallen into the apparatus, or the apparatus has been exposed to rain or moisture, does not operate normally, or has been dropped.
- To be completely disconnected from the power input, the main plug of AC/DC adaptor shall be disconnected from the main.
- The main plug of AC/DC adaptor should not be obstructed OR should be easily accessed during intended use.
• The marking information is located at the bottom of apparatus. - Battery shall not be exposed to excessive heat such as sunshine, fire or the like.
• The apparatus and AC/DC adaptor shall not be exposed to dripping or splashing and that no objects
filled with liquids, such as vases, shall be placed on apparatus and AC/DC adaptor
• TO PREVENT THE RISK OF ELECTRIC SHOCK, DO NOT REMOVE THE COVER (OR BACK). THERE ARE NO USER-SERVICEABLE PARTS INSIDE THIS UNIT. PLEASE REFER SERVICING TO QUALIFIED HARMAN CONSUMER GROUP, INC., SERVICE PERSONNEL. - Never remove grille covers in order to service the speaker system. The speaker system does not contain any user-serviceable parts.
IMPORTANT
The appropriate adapter must be installed before inserting your iPod into the JBL On Stage IIIP. Make sure that the iPod connector is properly aligned with the JBL On Stage IIIP's connector when installing your iPod. Failure to do so may cause permanent damage to the iPod connector, rendering the iPod inoperable.
Important Note for All Electronic Products:
Before inserting or unplugging audio cables from the source device's headphones or line-level output jacks, it is good practice to turn off the device first. This will prolong the life of your unit, help protect your device from static electricity and prevent potential damage.
WARNING: TO PREVENT FIRE OR ELECTRICAL SHOCK
HAZARD. DO NOT EXPOSE THIS PRODUCT TO RAIN
OR MOISTURE.
WARNING: THE APPARATUS SHOULD NOT BE
EXPOSED TO DRIPPING OR SPASHING AND NO
OBJECTS FILLED WITH LIQUID, SUCH AS VASES, SHOULD
BE PLACED ON THE APPARATUS.
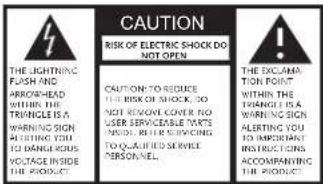
THE LIGHTNING FLASH AND ARROWHEAD WITHIN THE TRIANGLE IS A WARNING SIGN ALERTING YOU TO DANGEROUS VOLTAGE INSIDE THE PRODUCT
CAUTION: TO REDUCE THE RISK OF SHOCK, DO NOT REMOVE COVER. NO USER SERVICEABLE PARTS INSIDE. REFER SERVICING TO QUALIFIED SERVICE PERSONNEL.
THE EXCLAMATION POINT WITHIN THE TRIANGLE IS A WARNING SIGN ALERTING YOU TO IMPORTANT INSTRUCTIONS ACCOMPANYING THE PRODUCT
fcc regulations
FCC Declaration of Conformity Statement
This device complies with Part 15 of the FCC Rules. Operation is subject to the following two conditions: (1) This device may not cause harmful interference; and (2) this device must accept any interference received, including interference that may cause undesired operation.
Radio and Television Interference
This equipment has been tested and found to comply with the limits for a Class B digital device, pursuant to Part 15 of the FCC Rules. These limits are designed to provide reasonable protection against harmful interference in a residential installation. This equipment generates, uses and can radiate radio frequency energy and, if not installed and used in accordance with the instructions, may cause harmful interference to radio communications. However, there is no guarantee that interference will not occur in a particular installation.
If this equipment does cause interference to radio or television reception, which can be determined by turning the equipment off and then on, the user is encouraged to try to correct the interference by one or more of the following measures:
- Increase the separation between the equipment and receiver.
- Connect the equipment to a different outlet so that the equipment and receiver are on different branch circuits.
- Consult the dealer or an experienced radio/TV technician for help.
Changes or modifications not expressly approved by JBL, Inc., could void the user's authority to operate the equipment.
Unpacking
Carefully unpack your JBL On Stage™ IIIP and identify all its components:
-
JBL On Stage IIIP
-
Dock adapter for iPod

natural_image
Technical line drawing of a circular mechanical component with a central slot and two mounting holes (no text or symbols)
-
Power adapter
-
3.5mm Audio cable


- IR remote
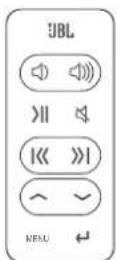
Getting to know your JBL On Stage IIIP

Adapters for iPod
For detailed information regarding selection, installation and removal of the dock adapters, visit www.jbl.com.
To remove an adapter, insert a fl at-head screwdriver (sold separately) into the slot on the back of the adapter and lift up.
Make sure your iPod is securely docked into the JBL On Stage IIIP, using the correct adapter.

natural_image
Technical line drawing of a mechanical component with concentric rings and a central pin (no text or symbols)JBL On Stage IIIP easy setup guide
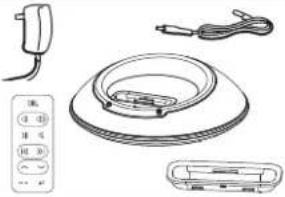 |  | 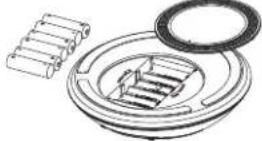 |  |
| Step 1. Unpack the JBL On Stage IIIP, adapter, remote control, power adapter and input cable. Read these instructions completely. | Step 2. Rotate the battery door to the unlocked position to open the battery compartment. | Step 3. Place 6 AA batteries in the battery compartment. | Step 4. Connect the power adapter into the input marked on the rear of the JBL On Stage IIIP; plug the power adapter into a wall outlet or power strip. |
 or or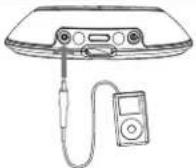 |  |  | |
| Step 5. Place the appropriate iPod adapter onto JBL On Stage IIIP. Place your iPod on the docking connector or connect the audio input cable to the rear of the JBL On Stage IIIP. Connect the audio cable to the audio source. | Step 6. Press the Power button on the back of the JBL On Stage IIIP. A green LED will light when the JBL On Stage IIIP system is on. | Step 7. Adjust the volume using (+) to increase and (−) to decrease. Press both to mute the JBL On Stage IIIP. Press either button to unmute. | |
Battery Disposal
Alkaline batteries are considered nonhazardous and can be disposed of with your regular household trash.
Rechargeable batteries (i.e., nickel cadmium, nickel metal-hydride, lithium and lithium-ion) are considered hazardous household materials and may pose an unnecessary health and safety risk. Unwanted materials should be disposed of in an environmentally sound manner. Contact your local waste management officials for other information regarding the environmentally sound collection, recycling and disposal of used batteries.
DO NOT MIX BATTERY TYPES
DO NOT MIX CHARGED AND PARTIALLY CHARGED BATTERIES
BATTERIES WILL NOT RECHARGE WHILE IN JBL ON STAGE IIIIP
JBL On Stage IIIP remote easy setup guide

| JBL 10-Button Remote Technical Specifications | |
| Transmission: | IR |
| Frequency: | 5kHz |
| Operating Range: | 20 feet |
| Battery Type: | Cr203.5V |
| Dimensions: | |
| Width: | 1.2g" (3mm) |
| Height: | 5.58" (85mm) |
| Depth: | 0.23" (6mm) |
| Weight (including battery): | 1.2 oz. |
Navigation Control Mode
Turn iPod on: Press any button on the remote control to wake the iPod.
Turn iPod off: Press and hold the Play/Pause button for two seconds.
Bring up iPod menu: Press the Menu button.
Scroll up: Press the Scroll Up button.
Scroll down: Press the Scroll Down button.
Go to previous menu: Press the Menu button.
Select menu/track/feature: Press the Select button.
Music Control Mode
Play a track: Press the Play/Pause button.
Note: If the iPod is at the Main Menu, pressing
Play/Pause will cause the iPod to start playing all of
its music.
Pause a track: Press the Play/Pause button while a song is playing.
Skip to next track: Press the Next/Fast Forward button.
Skip to previous track: Press the Previous/Rewind button.
Fast-advance track: Press and hold the Next/Fast Forward button.
Fast-reverse track: Press and hold the Previous/Rewind button.
Increase volume: Press the Volume Up button.
Decrease volume: Press the Volume Down button.
Mute: Press the Mute/Unmute button.
Go to previous menu: Press the Menu button.
Select menu/track/feature: Press the Select/Enter button.
troubleshooting your JBL On Stage IIIP
| Technical Specifications | Symptom Possible Problem Solution | ||
| Sound Quality | |||
| Frequency Response:70Hz – 20kHzPower Consumption:20W MaximumPower Input:12V/1.5AJBL On Stage IIIP Transducer:(4) 1Full range per channelDimensions:Diameter – 7 1/2"(190mm)Height – 2"(51mm)System Weight:1.12 lb (0.51kg)Battery:Size – AAType – Alkaline, NiMhDO NOT MIX BATTERY TYPES.DO NOT MIX CHARGED AND PARTIALLY CHARGED BATTERIES.BATTERIES WILL NOT RECHARGE WHILE IN JBL ON STAGE IIIP. | No sound from the JBL On Stage IIIP speaker system. | No power to the system.Power adapter plug is not inserted correctly. | Ensure that the power supply is connected to a live power source and properly connected to the JBL On Stage IIIP. Note: When the JBL On Stage IIIP is powered, a green power LED on the JBL On Stage IIIP should light up. |
| No volume or low volume. | Touch the volume “Up” (+) pad on the volume control to unmute and/or increase the system volume level.Note: Touching the volume “Down” (−) pad lowers the system volume. Touching both the (+) and (−) volume control pads at the same time will mute the system. | ||
| Input source volume is low. | Increase the volume level on the audio source device. | ||
| Low or drained batteries. | Replace the batteries. | ||
| iPod is paused. | Press the Play button on the iPod or remote control. | ||
If you have any questions or need further assistance, please visit www.jbl.com. Features, specifications and appearance are subject to change without notice.
| Symptom Possible Problem Solution | ||
| No power; green LED is not on. Wall adapter is not plugged into the JBL On Stage IIIP correctly.Wall adapter is not receiving AC power. | Check the connection of the wall adapter.Place the wall adapter in a known powered outlet. Test the outlet with a lamp or other device. | |
| Error message: “Device is not iPhone Compatible” is displayed on iPhone after docking on the unit. | iPhone has an old firmware version. | Upgrade iPhone firmware to latest version.Undock & re-dock iPhone in unit. |
| Charging | ||
| iPod will not charge. No power to input. Check input cable connection. | ||
| Wrong adapter is used. Replace adapter. | ||
| Turn the JBL On Stage IIIP off and connect it to another wall outlet. | ||
| iPod is not making full contact with the docking station. | ||
JBL is a trademark of Harman International Industries, Incorporated, registered in the United States and/or other countries.
* JBL On Stage is a trademark of Harman International Industries, Incorporated.
iPod is a trademark of Apple Inc., registered in the U.S. and other countries. iPhone is a trademark of Apple Inc. iPod and iPhone not included. "Made for iPod" means that an electronic accessory has been designed to connect specifically to iPod and has been certified by the developer to meet Apple performance standards. "Works with iPhone" means that an electronic accessory has been designed to connect specifically to iPhone and has been certified by the developer to meet Apple performance standards. Apple is not responsible for the operation of this device or its compliance with safety and regulatory standards.
Harman Consumer Group, Inc.
8500 Balboa Boulevard, Northridge, CA 91329 USA
1.516.255.4525 (USA only)
www.jbl.com
© 2008 Harman International Industries, Incorporated. All rights reserved. Tous droits réservés.
Part Number: 950-0234-001 Rev. D
H A Harman International Company
JBL
- JBL On Stage™ IIIP Important Safety Instructions
- IMPORTANT
- Important Note for All Electronic Products:
- fcc regulations
- FCC Declaration of Conformity Statement
- Radio and Television Interference
- Unpacking
- Getting to know your JBL On Stage IIIP
- Adapters for iPod
- JBL On Stage IIIP easy setup guide
- Battery Disposal
- JBL On Stage IIIP remote easy setup guide
- Navigation Control Mode
- Music Control Mode
- Harman Consumer Group, Inc.
Brand : JBL
Model : On Stage III WM
Category : Docking Station