
VR34408LV - Vacuum Cleaner LG - Free user manual and instructions
Find the device manual for free VR34408LV LG in PDF.


| Product type | Robot vacuum |
| Brand | LG |
| Model | VR34408LV |
| Dimensions (L x W x H) | 34.0 x 34.0 x 8.9 cm |
| Weight | 3.1 kg |
| Power supply | Rechargeable lithium-ion battery, 14.4 V, 2400 mAh |
| Runtime | Up to 90 minutes |
| Charging time | Approximately 3 hours |
| Dustbin capacity | 0.6 L |
| Suction power | 25 W |
| Noise level | Approximately 60 dB |
| Main functions | Vacuuming, sweeping, weekly scheduling, automatic return to charging station |
| Sensors | Drop sensors, obstacle sensors |
| Filter | HEPA filter |
| Maintenance | Regular cleaning of brushes and filter |
| Safety | Stair detection, overload protection |
| Spare parts | Battery, brushes, filters, wheels |
| Repairability | Modular assembly, repairable by a professional |
| Warranty | 2 years |
Frequently Asked Questions - VR34408LV LG
User questions about VR34408LV LG
0 question about this device. Answer the ones you know or ask your own.
Ask a new question about this device
Download the instructions for your Vacuum Cleaner in PDF format for free! Find your manual VR34408LV - LG and take your electronic device back in hand. On this page are published all the documents necessary for the use of your device. VR34408LV by LG.
USER MANUAL VR34408LV LG
By having adopted a brand new concept design that is appropriate for walls, the Robot Cleaner's cleaning performance is incredibly efficient.
Learning Mode
The Robot Cleaner is capable of memorizing the cleaning environment via its Smart Operation feature for smarter cleaning.
Turbo Mode
In the Turbo mode, the Robot Cleaner operates the suction motor and the brushes at a greater speed giving cleaner results.
Drawer Mop Plate (Selected models only (VR*.LVM))
The "Drawer mop plate" makes it much easier for users to fit and remove the mop without having to turn over the device over.
My Space Mode
By commanding it to clean a particular area, the Robot Cleaner quickly cleans that desired area.
Repeat Cleaning
The Robot Cleaner will continuously clean until the battery runs out.
Location Search Function
If the Robot Cleaner is moved from a spot while operating, the device will automatically search for the previous location and return to the spot from where it was interrupted.
CONTENTS
1 BEFORE USING
2~5 Safety precautions
6 Included with product
7~8 Parts description
9~10 Button functions
11 Display status information
12 Before you start
13 Overview
2 METHOD OF USE
14 How to install the home station
15 How to turn the Robot Cleaner power supply on & off
16 How to start and stop cleaning
17 How to charge the battery
18~19 Cleaning modes
20 Auxiliary cleaning modes
21 Mop cleaning
(Selected models only (VR*.LVM))
22 Location search function
23~24 Smart diagnosis
3 HANDLING METHOD AFTER USE
25 Cleaning the dust bin
26 Cleaning the dust bin filter
27 Cleaning the brush
28 Cleaning the sensors/charging terminals
29 Cleaning the side brush
30 Cleaning the ultra microfiber mop
(Selected models only (VR*.LVM))
4 ADDITIONAL INFORMATION
31~33 Troubleshooting
34 Before you call for service
5 REFERENCE
35 Reference items
The purpose of the safety precautions described below is for the user to use the product safely and correctly to prevent any unexpected risk of injury or damage.
Basic safety precautions
After reading this manual, please keep it in an easily accessible location.

This is the safety alert symbol. This symbol alerts you to potential hazards that can result in property damage and/or serious bodily harm or death.

WARNING
Indicates a hazardous situation which, if not avoided, could result in death or serious injury.

CAUTION
Indicates a hazardous situation which, if not avoided, could result in minor or moderate injury.

WARNING
- This appliance is not intended for use by persons (including children) with reduced physical, sensory or mental capabilities, or lack of experience and knowledge, unless they have been given supervision or instruction concerning use of the appliance by a person responsible for their safety.
- Children should be supervised to ensure that they do not play with the appliance.
- If the supply cord is damaged, it must be replaced by LG Electronics Service Agent in order to avoid a hazard.
- This appliance can be used by children aged from 8 years and above and persons with reduced physical, sensory or mental capabilities or lack of experience and knowledge if they have been given supervision or instruction concerning use of the appliance in a safe way and understand the hazards involved. Children shall not play with the appliance. Cleaning and user maintenance must not be made by children without supervision.

For your safety, do not remove the battery from the Robot Cleaner. If you need to replace the battery of the Robot Cleaner, take it to the nearest authorized LG Electronics service center or dealer for assistance.
Failure to follow this warning can cause fire or product failure.

Never use the Robot Cleaner with a battery and/or home station from any other product than the Robot Cleaner.
Doing so can cause fire or product failure.

WARNING

Make sure the power cord of the home station is not crushed under a heavy object or damaged by contact with sharp objects.
Failure to follow this warning can cause electric shock, fire or product failure. If the power cord is broken, do not plug it in. Take the product to an LG Electronics Authorised service repairer.

Do not use the Robot Cleaner when candles or fragile objects are placed on the floor.
Doing so can cause fire or product failure.

Do not place the home station and the Robot Cleaner near a heating device.
Doing so can cause product deformation, fire, or product failure.

Always use a dedicated power outlet with a 10 amp rating.
If multiple appliances are connected to an outlet simultaneously, they can generate enough heat to cause a fire.

Do not force the power plug to bend. Do not use the power plug when it has been damaged or loosened.
Doing so can cause fire or product failure.

When pulling out the home station power plug, always pull it out by grabbing the plug, not the cord. When pulling out the power plug, do not touch the prongs with your fingers.
Doing so can cause an electric shock.

Do not touch the power plug with wet hands.
Doing so can cause electric shock.

Do not allow children or pets to play with or rest upon the Robot Cleaner at any time. Do not use the Robot Cleaner while an object is hanging from it.
Doing so can cause injury or product damage.

Do not spray or use flammable materials, surfactants, or drinking water in the vicinity of the Robot Cleaner.
Doing so can cause fire or product failure. * Flammable materials: gasoline, thinner, etc. * Surfactant: detergent, articles for bath, etc.

Turn the power supply off immediately if any abnormal sound, odor, or smoke is generated from the Robot Cleaner by removing it from the home station and turning off the main switch on the rear side of the unit.
Failure to do so can cause fire or product failure.

Do not insert any part of the body, such as a hand or foot, below the brush or wheels of the
Robot Cleaner while in use.
Doing so can cause injury or product damage.

Do not operate the Robot Cleaner in a room where a child is sleeping.
Doing so can cause injury or product damage.

Do not operate the Robot Cleaner on narrow and high furniture such as a wardrobe, refrigerator, desk, table, etc.
Doing so can cause injury, product failure, or damage which is not covered by the warranty.

Do not leave children or pets near the Robot Cleaner unsupervised.
Doing so can cause injury or product damage.
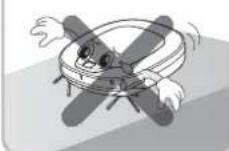
Do not activate the device on a floor that has more than a 10-degree incline.
The device may not work properly.
This product is intended for indoor domestic home use and should not be used in mobile applications. It should not be used in commercial applications such as workshops or garages, or around indoor swimming pools, etc.

CAUTION

Frequently empty the dust bin and maintain its cleanliness.
The dust collected in the dust bin can trigger allergies and may contain harmful insects. It should be cleaned after each use.

Do not drop the Robot Cleaner or subject it to strong impacts.
Doing so can cause injury or product failure not covered by the warranty.

Use the Robot Cleaner indoors only.
Using it outdoors can cause product failure and irreparable damage to the unit.

Do not expose the Robot Cleaner to cold temperatures (less than -5 °C) for a long period of time.
Doing so can cause product failure.

Close the cover of the dust bin on the main unit before starting cleaning.
If the cover is not closed, it can cause injury or product damage.

Remove any cables or string from the floor before starting.
Cable or string can get tangled in the wheels of Robot Cleaner and cause product failure or the cord of an appliance can be disconnected.

DO NOT use the Robot Cleaner around a banister, staircase or any other dangerous place.
Doing so could cause injury or damage to the unit.

Make sure the Robot Cleaner is not put on a table or desk, with the power ON.
It may result in an injury or damage to the product.

In rare cases, the Robot Cleaner's brush can damage carpet. If this happens, immediately stop the cleaning operation.
When a carpet has long tassels, the tassels can be damaged.

Do not allow the Robot Cleaner to sweep up liquids, blades, thumb tacks, sharp objects or ashes, hot or cold, etc.
These items can cause product failure or damage.

Do not let the main unit and charging terminal of the home station come into contact with metallic objects.
Doing so can cause product failure.

Do not put sharp objects into the opening of the Robot Cleaner's ultrasonic sensors.
Doing so can cause product failure.

Do not put water, detergent, etc. into or onto the Robot Cleaner.
Doing so can cause product failure. Do not put any water or detergent on the Robot Cleaner. If liquids get inside of the Robot Cleaner, turn off the power supply and contact an LG Electronics sales agent or customer care center.

Do not use the Robot Cleaner when the dust bin is completely full.
Doing so can cause product failure.

CAUTION

If the floor is wet or has wet spots, wipe them up before using the Robot Cleaner. Do not use the Robot Cleaner on a wet surface.
Doing so can cause product failure.

When the robot cleaner is operating, it may hit the chair leg, desk leg, table leg or other narrow pieces of furniture.
For quicker and better cleaning, place the dining chairs on top of the dining table.

When attaching the mop, ensure that it is fitted correctly so that it does not block the lower camera sensor.
Blocking the bottom camera sensor may not allow the product to work correctly. (Some models may not have the sensor.)

NOTE: Very low thresholds will allow the Robot cleaner to go over them and perhaps into an undesirable location. Make sure that all the doors of the rooms that are not to be cleaned are closed.

To save energy when the Robot Cleaner is not in use for longer periods, turn off the power switch, and turn on the power switch again just prior to using the Robot cleaner again.

Tip
Check the following items before use:
- Empty the dust bin after each operation or before it fills up.
- Remove any cables or long strings from the floor.
- Remove any moisture from the floor before cleaning.
- Close the cover of the dust bin before cleaning.
- Remove fragile or unnecessary objects from the room to be cleaned. For example, remove expensive ceramics and valuables from the floor.
- Confirm whether the battery has sufficient power, and if it is low, recharge it.
- Close the doors of any room that you do not want the Robot Cleaner to enter. During cleaning, the Robot Cleaner may enter another room and continue cleaning.
- Do not use this product in the room where a child is sleeping alone. The child can be hurt or woken.
- Remove towels, foot towels, or any other thin cloth from the floor as they can get caught by the brush.
- Before starting the device, it's better to remove carpets that are thicker than 20 mm as they may cause it to malfunction.
- Please close any balcony doors as the wheels may get stuck while cleaning.

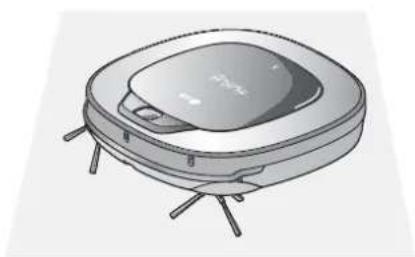
Robot Cleaner
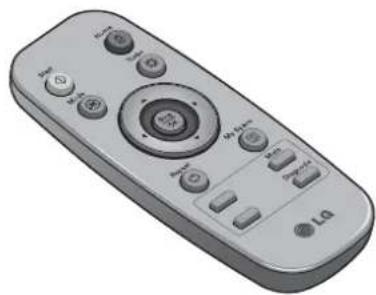
Remote controller

Home station
Figures can be different from actual objects.
Cleaning Tool

Dust bin filter (spare) (Optional)

DVD Manual

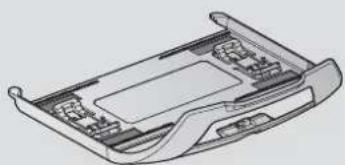
Mop plate (Selected models only (VR*.LVM))

Ultra microfiber mop (2 pieces) (Selected models only (VR*.LVM))

Cleaning brush (It's on the dust bin cover)
Batteries for remote controller (2 units of AAA size)
Plan view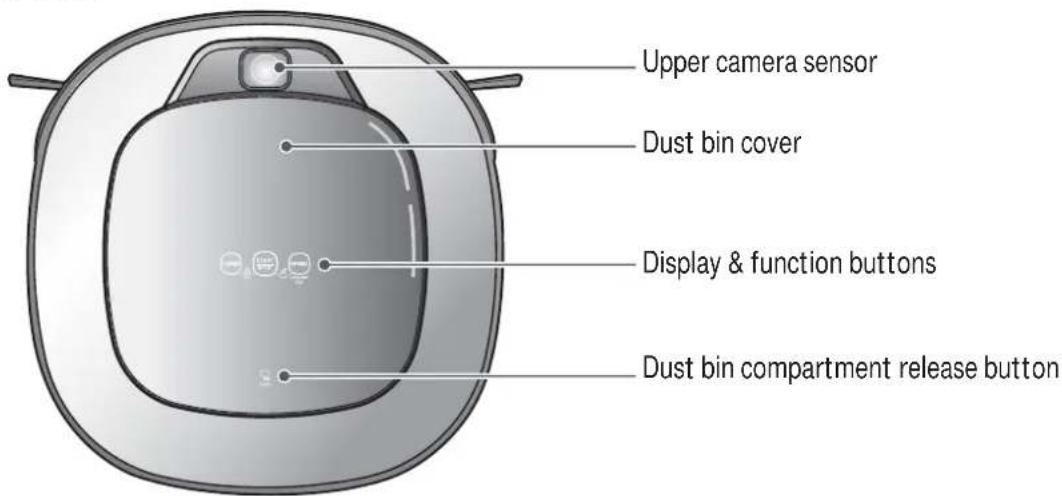
Front view
Rear view
Bottom view
Figures can be different from actual objects.
Home station
Dust bin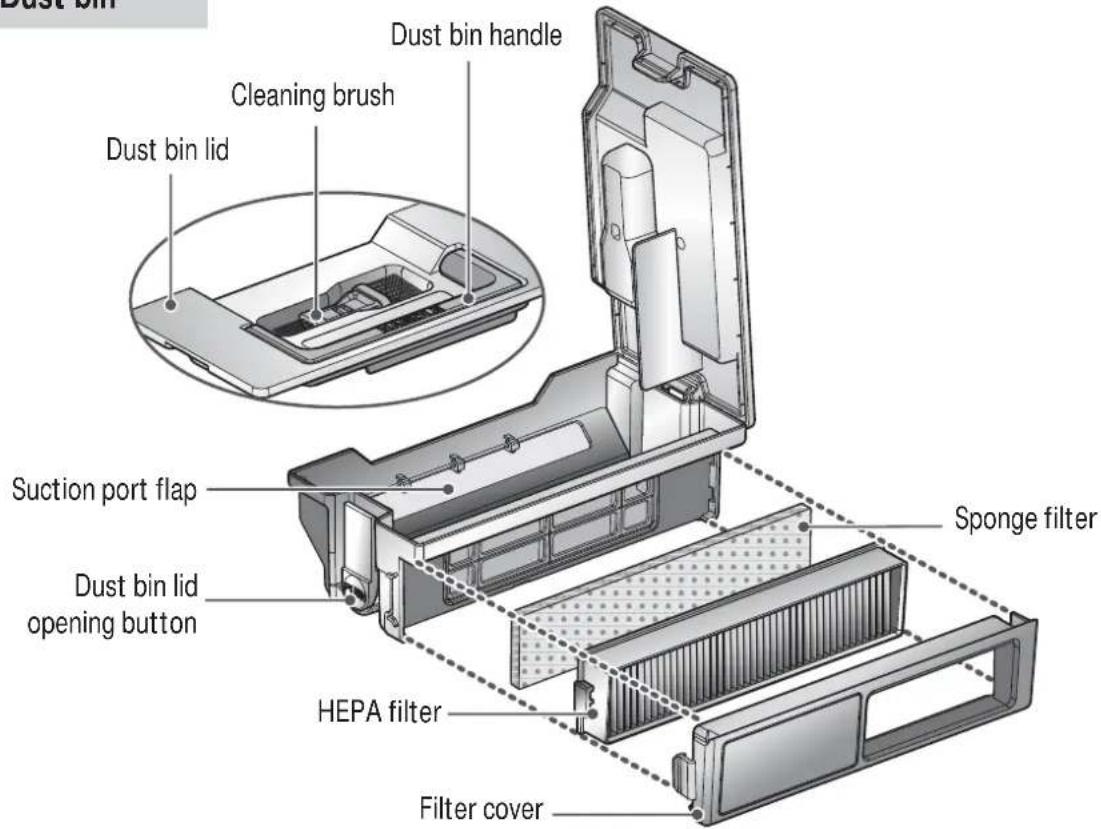
Figures can be different from actual objects.
![graph TD A["Robot"] --> B["TURBO"] B --> C["START STOP"] C --> D["HOME"] D --> E["Language 3sec"] style A fill:#f9f,stroke:#333 style B fill:#ccf,stroke:#333 style C fill:#cfc,stroke:#333 style D fill:#fcc,stroke:#333](/content/2026/06/1282544/images/25978efe6f2c45b38ee710988594b70a43026e4976586ba10b185f0bcc38b3de.jpg)
| TURBO | ·If the button is pressed, 'TURBO Mode' will be set with a voice confirmation.·If the button is pressed whilst in 'TURBO Mode', it will be canceled. |
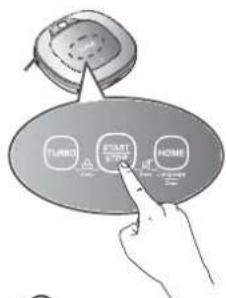
| START/STOP | ·Used to turn the power on from Standby, start or stop cleaning.·If the button is pressed whilst the unit is powered ON, it will start cleaning.·If button is pressed during the cleaning, it will stop the cleaning.·If the button is pressed for about 2 sec. whilst the power is ON, the power will be returned to Standby.·If the button is pressed in 'Smart Diagnosis' mode, it will end the diagnosis. |
| HOME | ·Used to return the Robot Cleaner back to the home station for charging.·If cleaning is finished or the battery is low, the Robot Cleaner will return to the Home Station by itself to recharge its battery. |
| BUTTON LOCK On/Off | ·Pressing the 'TURBO' and 'START/STOP' button for 3 seconds will activate or deactivate the Lock function.·If 'Lock' is ON, a voice announcement "Key lock has already been set" will be heard each time a button is pressed. |
| Voice Alert On/Off | ·Press and hold both the 'START/STOP' and HOME button on the main unit for 3 sec. to turn ON/OFF the Voice Alert.·If the Voice Alert is OFF, the Mute lamp will be ON.·You cannot use this feature with the buttons on the remote control. |
| Language Change | ·Pressing the 'HOME' button for 3 seconds will change the language for the voice massage.·You cannot use this function with the button on the remote controller. |


Tip
- Remote Controller does NOT provide a Power ON function.
- With the machine's power OFF, the Remote Controller will not work. • To turn the power ON/OFF, use the 'START/STOP' button on the upper section of the Robot Cleaner.
- The 'Mode' and 'My Space' button can only be used after stopping the Robot Cleaner or whilst it is charging on the Home station.
![graph TD A["Robot with 3D mode"] --> B["Turbo Mode icon"] A --> C["Repeat Mode icon"] A --> D["Operational Status icon"] A --> E["Mute icon"] A --> F["Homing icon"] B --> G["Operating status of Robot Cleaner"] C --> H["Repeats for Repeat Mode"] D --> I["Repeats for Voice Alert"] E --> J["Repeats for…](/content/2026/06/1282544/images/651e49e342db496f7561b691eea67bd066fb565d5c0baae7209713a7f874d6b0.jpg)
Check these items before cleaning
- Do not use this device in a room where a child is left alone. The child could be injured.
- Remove fragile or unnecessary objects from the room to be cleaned. Especially, remove expensive ceramics and valuables from the floor.
- Close the cover of the dust bin compartment before cleaning.
- Remove any moisture that might be on the floor.
- Remove cables, strips, towels, mats etc. from the floor so they will not get tangled in the brushes.
- Confirm whether the battery charge is sufficient, and if it is low, recharge it.
- Empty the dust bin before or after each clean, or before it becomes full.
- Close the doors of any room that you do not want the Robot Cleaner to enter. During cleaning, the Robot Cleaner may enter another room and continue cleaning.
- When the Mop plate (Selected models only (VR*.LVM)) is attached. Robot Cleaner will not be able to go over thresholds of 5 mm or higher. If you are not planning to use the mop for cleaning, remove the mop before using Robot Cleaner.
- Before starting the device, it's better to remove carpets that are thicker than 20 mm as they may cause it to malfunction.
- Please close any balcony as the wheels may get stuck while cleaning.
Loading the remote controller battery
- Open the battery cover by lifting the rear hook of the remote controller.
- Insert two AAA batteries, checking for +, - nodes while loading.
- Close the battery cover completely so that the batteries will not fall out.


Precautions while using the remote control
- Only press one button at a time.
- Do not drop or subject it to any impact.
- Do not store it near devices that give off heat, fire or hot air.
- Certain fluorescent lamps, such as the three band radiation lamp, can interfere with the activation of the remote control. Therefore, use it as far away as possible from such lamps.
- If the remote control is far from the Robot Cleaner when activated, it may fail to operate properly. Use the remote within 3 m of the Robot Cleaner if possible.
1
Install the home station. (p14)
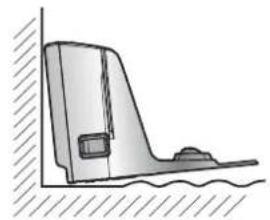
Insert the power cord plug into an outlet and locate the station against a wall. If power is not supplied to the home station, the Robot Cleaner will not charge.

2
Turn on the power supply of the Robot Cleaner. (p15)
Turn ON the power switch on the rear-left of Robot Cleaner, and press the 'START/STOP' button on the top.
※ If the power supply is not turned on, refer to page 15.

3
Check the dust bin.
Check the cleanness of the dust bin before starting cleaning and close the dust bin compartment cover on the main unit.

4
Start cleaning. (p16)
Press the START/STOP button once again while the Robot Cleaner is turned on. You will hear an announcement of the cleaning mode and cleaning will begin once the Robot Cleaner has reversed and turned around.
5
Automatic charge. (p17)
The Robot Cleaner will self-diagnose and automatically return to the home station to recharge before the complete discharge of the battery. It takes approximately three hours to charge the battery.

6
Use the cleaning mode and auxiliary functions. (p18~21)
Use the buttons on the Robot Cleaner and Remote Controller to use each cleaning mode and supporting features.
For Cleaning Mode, you can choose among ZigZag, My Space, and Repeat; for secondary features, Manual and Microfibre Mop (Selected models only (VR*.LVM)).

When the Robot Cleaner is operated with the dust bin compartment lid left open, it can cause an injury or serious damage to the product.
How to Install the Home Station
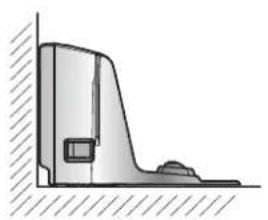
- Position the home station against a wall on hard level flooring to prevent sliding during docking.
Remove objects within 1.5 m to the right and left side and within 2 m to the front.
O

X

- Plug the power cord into an outlet.
Wrap the remaining power cord around the fixed hook on the back side of the home station or along the wall surface so that the travel path of the Robot Cleaner will not be obstructed.

O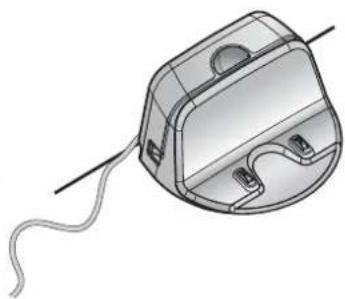
X

Fixing hook of power cord
- Fix the home station against the wall so that it does not move. Then turn on the power switch.
- When the remote controller is not used, store it in the remote controller holder on the home station.


Tip
• Always keep the home station plugged in when in use. If the home station is not plugged in, the Robot Cleaner will not return to the station to charge automatically.
< Warning >
Do not operate the Robot Cleaner if the Home Station has a damaged cord or plug, if it is not working properly, or if it has been damaged or dropped. To avoid electrical hazards, the cord must be replaced by LG Electronics, Inc. or a qualified service person.
Turning on the main power supply
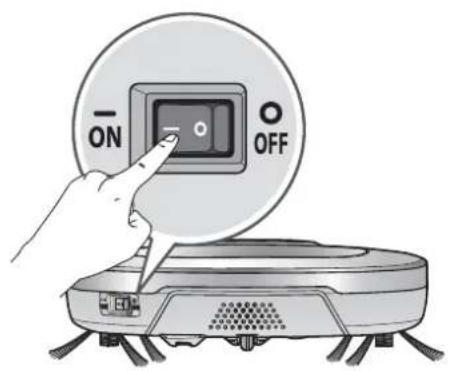
Make sure the Power Switch is on at the rear-left of the Robot Cleaner. If the power is OFF, turn the switch ON.
※ When turning on the power switch, do not press or touch any button located on the upper section of the Robot Cleaner. Button operations can be delayed. * Turn off the power switch if the Robot Cleaner is not used for a long period of time in order to protect the battery. The Robotic Cleaner cannot charge if the main switch is in the "OFF" position.
Turning on from Stand By power.
With the Standby power of the Robot Cleaner OFF, press 'START/STOP' button for 1 second until a "Ting" sound is heard. In about 10 seconds, the power will be on and a melody will sound.
※ If 10 minutes elapse without the Robot Cleaner having been given an active command after being turned on, the power will automatically return to Standby again.

Turning off the power supply
Press and hold the START/STOP button for two seconds while the Robot Cleaner is turned on. A melody will sound when the power is turned off.

Tip
- If the power cannot be turned on, do the following.
- Turn the main power switch OFF, wait 5 seconds then ON again.
- Press the 'START/STOP' button after the main power switch has been turned on again.
- If the power is not turned on or if there is no display but only the "Ting" sound, put the Robot Cleaner manually on to the home station as the battery may be flat.
Using the buttons on the Robot Cleaner
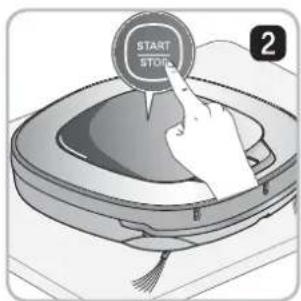
After the Robot Cleaner main power switch is turned on, press the START/STOP button to begin cleaning. A melody will sound and cleaning will begin.
Press the START/STOP button during the cleaning cycle to stop cleaning.
* When the 'START/STOP' button is pressed while the power supply of the Robot Cleaner is in Standby, the power will be turned on. Press the 'START/STOP' button one more time to start cleaning.

Using the remote controller
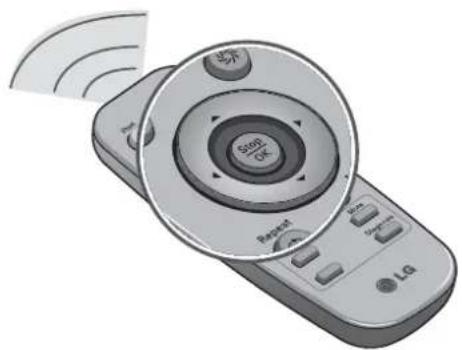
After the Robot Cleaner is turned on from the Robotic Cleaner, press the 'Start' button on the remote control. A melody will sound and cleaning will begin.
Press the 'Stop/OK' button during the cleaning cycle to stop cleaning.
* The Robot Cleaner cannot be turned on from Standby, by using the remote controller when the power of the Robot Cleaner is off. When the power is off, press the 'START/STOP' button on the upper side of Robot Cleaner to turn the power on and to allow the remote to be used.

※ During cleaning, collisions can happen when the sensor cannot detect objects because of their shape (Thin chairs and table legs, furniture corner). When this happens, the internal impact detecting sensor will react by using a backward motion.
※ If the Robot Cleaner is set to start cleaning at a location away from the home station, put the Robot Cleaner on a flat floor in order to prevent a malfunction of the obstacle detecting sensor. In addition, start cleaning from a location where there are no obstacles. For example, curtains or walls must be 30 cm from the Robot Cleaner.

Tip
For best results:
- Briefly scan the area to be cleaned for large and small objects that may cause difficulty for the Robot Cleaner.
- If cleaning is started when the Robot Cleaner is at the home station, the device can rapidly return to the home station as the current home position has been accurately read.
- When the Mop plate (Selected models only (VR*.LVM)) is installed, to prevent secondary contamination from the contaminated mop, it will not go over door sills of 5 mm or higher.
Automatic charging
The Robot Cleaner returns to the home station at the end of a cleaning cycle or when its battery is running low.
※ If 10 minutes elapse without the Robot Cleaner moving or the battery is too low, the power will be automatically turned OFF.
※ Do NOT turn OFF the Main Power Switch as the battery will not be recharged. If the machine is returned manually with the Main Power Switch OFF, it announces an error message, "Main power switch on the back of the Robot cleaner is turned off. Please turn the switch on."
※ In the event that the unit returns to the Home Station due to a low battery during cleaning, cleaning will be started, after recharging, from the nearest place of the area which has not been cleaned before.
* If Robot Cleaner is unable to dock to the home station on its first attempt, it will try again until it docks successfully.
※ When Robot Cleaner has completed all areas that it can clean, it will return to the home station even when the battery level is not low.

Manual charging
You can manually charge the battery prior to using the Robot Cleaner for the first time or to charge the battery during cleaning.
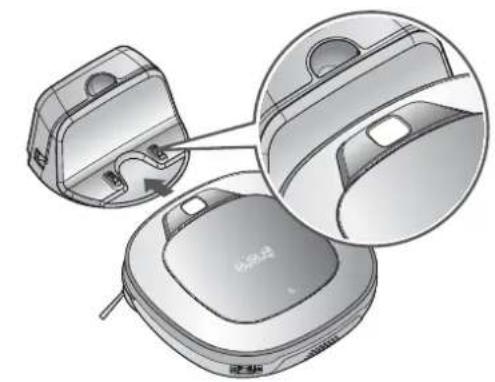
Method 1. Attach the Robot Cleaner to the home station by aligning to the front side of the home station. A melody sound will be generated along with an audio message to start charging.
※ If a voice message, "Main power switch on the back of the Robot cleaner is turned off. Please turn the switch on." is announced repeatedly, then turn on the Main Power Switch.
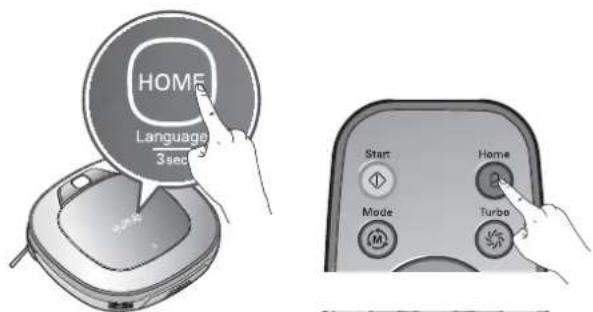
Method 2. When the 'Home' button of the remote control or the Robot Cleaner is pressed, charging will be prompted by automatically generating a searching signal and returning the Robot Cleaner to the home station.
※ If the Robot Cleaner did not start cleaning from the home station or if the Robot Cleaner is manually charged by pressing the 'Home' button, it may take slightly longer to find the home station.
※ If the Robot Cleaner is within 10 cm of the front of the charging terminal while the power is turned on from Standby, it will automatically be returned to the home station and charging will begin.

Tip
Take the following precautions when using the home station:
- If foreign material is caught on the charging terminal, charging may not be activated. Wipe the terminal from time to time with a dry cloth after the power plug is disconnected. (p28) • To prevent electric shock or damage to the home station, do not touch the charging terminal with any metallic objects. • To avoid fire or electric shock, never disassemble or modify the home station.
- Do not place the Robot Cleaner, the home station, or the power plug near a heating source.
Zigzag Cleaning
In 'Zigzag' mode, the Robot Cleaner repeats a zigzag operation to clean every spot in the cleaning area.
If you need to quickly clean an area, choose 'Zigzag' mode. Press the 'Mode' button on the Remote Controller to select 'Zigzag' mode and press the 'Start' button.
※ Factory release default setting is 'Zigzag'.

Manual Cleaning
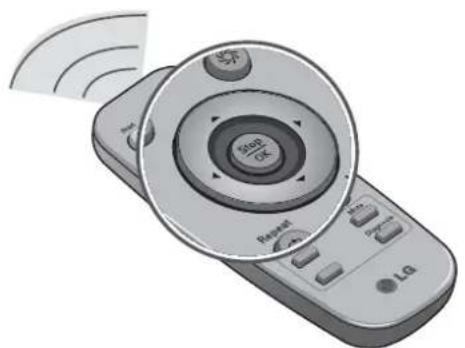
By pressing a direction key on the Remote Controller, you can move the Robot Cleaner in Manual mode.
The Robot Cleaner will clean the area, moving forward/backward/left/right, according to the input of the direction key.
While in 'Manual' mode, the Robot Cleaner will run into obstacles placed behind it if the backward key on the remote remains held down.


My Space Cleaning
Pressing 'My Space' on the Remote Controller will set the My Space cleaning mode with a voice message. For cleaning of particular spaces, select this mode.
The 1st stage:
Use the Remote Controller to manually set the parameters of each cleaning block.
※ This cleaning mode will be accepted when the distance of the start and end position is less than 1 m.

![graph TD A["Stop"] --> B["My Space"] B --> C["Home Control System"]](/content/2026/06/1282544/images/f3cf38009bb8186b48ede64e0b70ede8da21706ac8d3ce339549ac5035062aaa.jpg)
The 2nd stage:
Pressing the 'Start' button will then make the Robot Cleaner clean the manually outlined area by itself.
※ Upon failure to correctly outline a zone, a voice will announce, which says "Area does not meet the specified conditions. Please continue to make specified area for cleaning process." Use the Remote Controller to assign a zone, again. ※ When My Space cleaning is completed, the mode is switched to Auto Clean (ZigZag).


Tip
- While recharging, you cannot activate 'My Space clean' mode.
- To change the cleaning mode while the Robot Cleaner is in operation, press 'Stop/OK' button first then select a cleaning mode. The cleaning will then start from the beginning.
Turbo Mode
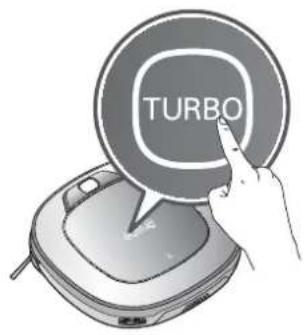
Pressing the 'Turbo' button on the Remote Controller or main unit will activate 'Turbo' mode, with a voice message.
While in 'Turbo' mode, pressing the same button will cancel 'Turbo' mode, with a voice message.
In 'Turbo' mode, Robot Cleaner runs more intensely for a powerful clean. Mode mode will reduce the battery duration.

Repeat Mode
Pressing the 'Repeat' button on the Remote Controller will activate 'Repeat' mode, accompanied by a voice message. While in 'Repeat' mode, pressing the same button again will cancel 'Repeat' mode, also with a voice message. In 'Repeat' mode, the Robot Cleaner repeats the cleaning in progress until the battery runs out, without returning to the home station.

Learning Mode
The Robot Cleaner is capable of memorizing the cleaning environment through its Learning mode for an intelligent cleaning operation.
* 'Learning Mode' is available only when the machine starts cleaning from the Home Station.


Tip
• Precautions with Smart Operation
- This Learning mode enables memorizing locations with obstacles to help bypass them. The Robot Cleaner memorizes every aspect of the environment it was subjected to from when it started cleaning from the Home Station to the moment it finishes its course.
- The Robot Cleaner learns new conditions again when the location of the Home Station has been changed.
- If the learning mode is accepted, a voice message will say "Environment has been studied by learning process."
MOP CLEANING (Selected models only (VR*.LVM))
By attaching the ultra microfiber mop, you can effectively use the Robot Cleaner to remove dust on hard floor surfaces.
When the mop plate is attached, the Robot Cleaner will not climb onto carpets or over thresholds, in order to prevent transferring dirt from the mop.

For mop cleaning, mount the mop and mop plate to the Robot Cleaner according to the following instructions:
- Attach the ultra microfiber mop to the Velcro of the mop plate as shown in the figure.

![graph LR A["Backplane Case"] --> B["Internal compartments"] B --> C["Backplane Case with Internal Bracket"] C --> D["Backplane Case with Internal Bracket"]](/content/2026/06/1282544/images/5be5e455a6049708a04245e22ca493e392eb6692b6d09366042ecacb0c2e0a90.jpg)
- Firmly slide the Mop Plate into the furrows until you hear a 'click' sound.
Note that, if the Mop Plate is not secured correctly, it may separate during cleaning.

- It is essential that the fixing hooks on the Mop Plate align correctly onto the fixing grooves on the underside of the cleaner.


Tip
• To avoid odors, wash any foreign material or dust off the mop after cleaning is completed. - To avoid staining floors, do not use the ultra microfiber mop to clean when dirt is contaminated with liquids such as coffee or ink. - To avoid damage to carpets from the Velcro or dirt transfer from the mop, do not attempt to clean the carpet while the mop plate or mop is attached. - Keep the ultra microfiber mop dry. Do not use it on wet surfaces. If there is moisture on the floor, it can interfere with the navigation and damage the unit. - Smart Diagnosis feature is not available when the Mop Plate is attached. • Some models may not come with Microfibre Mop or Mop Plate.
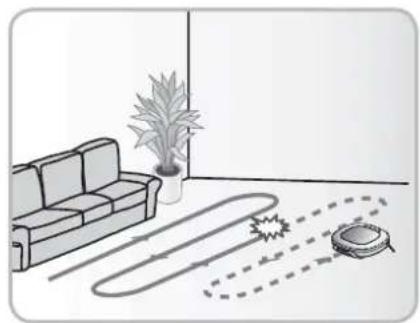
The Robot Cleaner remembers its location while cleaning.
If the user moves the Robot Cleaner while it is operating, it will search for the location it was moved from by using its navigational location search function before continuing to clean.
The navigating function will be activated after the Robot Cleaner adequately recognizes the cleaning environment.

Change location
Manual Relocation.
- With the power off, locate the Robot Cleaner near the location where it was originally moved from.
* The location search is more effective when the Robot Cleaner is closer to the location where it was moved from. * If it is moved from its original cleaning position by more than 1 m, it becomes difficult for the Robot Cleaner to search for its previous location.

Location of incident
- Press the START/STOP button on the Robot Cleaner or 'Start' button on the remote controller. Robot Cleaner will then start the location search function along with an audio guide.
When the location search is successfully completed, it will continue cleaning from where it was moved. If the location search fails, it will start again from the beginning.

Location of incident


Tip
- If the power is turned off after the location search function is set, the location search function will be canceled.
- Location search will be more effective when the Robot Cleaner is closer to the location where it was moved from.
Robot Cleaner uses this Smart Diagnosis feature to run a self-diagnosis.
If any irregularity is found from the diagnosis, please contact the local LG Electronics service center.
※ During Smart Diagnosis, the Robot Cleaner will move about within a 50 cm radius. So, make sure no objects are in the way within a 1 m radius around the Home Station, before starting Smart Diagnosis.
- Smart Diagnosis will operate when the main power switch of the Robot cleaner and the Home station are turned on, and the unit docked on the Home station.
* Smart Diagnosis is only possible when the Robot Cleaner is attached to the Home Station.
- Press 'Diagnosis' button on the Remote Controller, then the process will start with a voice message which says "Robot cleaner smart diagnosis will be started. Please step away and clear around 1 meter around the home station."
※ If the Mop Plate(Selected models only (VR*.LVM)) is attached, the process will not be activated.
- When the Smart Diagnosis has successfully finished, Robot Cleaner will return back to the Home Station and inform the result through a voice message. After the voice message, pressing the 'Home' button on the Remote Controller or main unit will allow the voice message to be repeated. To terminate the diagnosing process, press the 'Stop/OK' button on the Remote Controller or main unit.
※ After the Smart Diagnosis voice message, the Robot Cleaner will start recharging after 1 minute.
※ If an error is detected with any of the Sensors whilst in Smart Diagnosis, a voice message will announce, and the unit will not return to the home station.


Tip
- Be careful not to touch the Robot Cleaner or disturb its operation before Smart Diagnosis is complete. If it is accidentally interrupted, turn the main power switch OFF then ON again to resume the diagnosis. • Smart Diagnosis will not be activated in each of the following cases.
In each case, check the problem and try again.
- Robot Cleaner is detached from Home Station
- Battery level is insufficient
- No Dust Bin Filter is fitted.
- Mop Plate (Selected models only (VR*.LVM)) is attached
If a voice message is announced after Smart Diagnosis, refer to the following table to take proper actions.
| Voice message Measures (for reference) | |
| Robot Cleaner smart diagnosis will be started. Please step away and clear around 1 meter around the home station. | Clear any object within a 1 m radius around Home Station, and stay back until the diagnosis is complete. |
| Smart diagnosis can start when it is being charged. Please dock Robot Cleaner to the home station to charge. | Move Robot cleaner to the Home Station to recharge it. |
| No defect found during diagnosis. | |
| Diagnosis mode cannot be operated due to a low battery. Please try again after the battery is charged. | Try the Smart Diagnosis again after recharging the battery. |
| Please check if the dust bin is installed with the filter. | Open the Dust Bin Cover and examine the bin. |
| Charging cannot be done due to a problem in infrared sensor. | Run Smart Diagnosis again and, if the same message is announced, contact an LG Electronics service center. |
| Charging cannot be done due to a problem in ultrasonic sensor. | Run Smart Diagnosis again and, if the same message is announced, contact an LG Electronics service center. |
| Charging cannot be done due to a problem in the cliff detection sensors on the bottom. Please clean the sensors. | Clean the three Cliff Sensors on the bottom at the front of the unit. |
| Please wipe the obstacle detecting sensor window on the left and right side of the Robot Cleaner. | Clean the lens of the Obstacle Sensors on both the left and right hand sides. |
| A problem has been found on the Gyro Sensor. | Run Smart Diagnosis again and, if the same message is announced, contact an LG Electronics service center. |
| Please check for dirt on the left wheel. Check for foreign materials on the left wheel. | |
| Please check for dirt on the right wheel. | Check for foreign materials on the right wheel. |
| A problem has been found on the left wheel sensor. | Run Smart Diagnosis again and, if the same message is announced, contact an LG Electronics service center. |
| A problem has been found on the right wheel sensor. | Run Smart Diagnosis again and, if the same message is announced, contact an LG Electronics service center. |
| Please check the brushes for obstructions. | Check for any foreign material stuck in the Brush. |
| A problem has been found in the suction motor. | Run Smart Diagnosis again and, if the same message is announced, contact an LG Electronics service center. |
| A problem has been found in the acceleration sensor. | Run Smart Diagnosis again and, if the same message is announced, contact an LG Electronics service center. |
| In order to listen to the smart diagnosis result again, please press the charging button. To stop, please press the stop button. | If you need to repeat the diagnosis result, press the 'Home' button, or press 'Stop/OK' button to finish the diagnosis. |
| Please try smart diagnosis again after turning the main power switch off and on from the back of Robot Cleaner. If the problem continues, please contact LG Electronics customer care. | |
| Smart diagnosis mode will be turned off. | |
| Smart Diagnosis mode cannot be operated with mop plate being attached. Please try again after removing it. | Run Smart Diagnosis again after removing the Mop Plate. |
| Smart diagnosis has failed to operate. Please try it again after turning off and on the main power switch on the back of the Robot Cleaner. | Turn the main power switch OFF and then ON again to resume the diagnosis. Do NOT touch the robot or disturb its operation until the diagnosis is complete. |
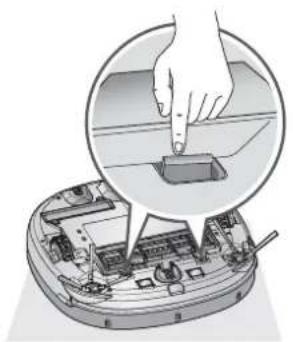
If the dust bin is full, suction power can be reduced. Clean the dust bin before or after each cleaning session. Clean the dust bin using the following sequence:
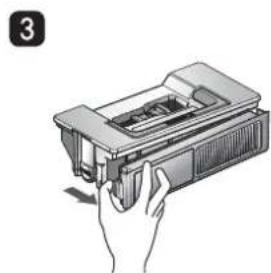
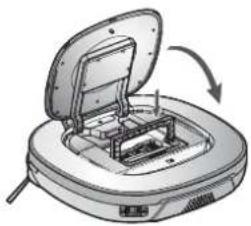
- Open the dust bin compartment cover by pressing the PUSH button on the Robot Cleaner.
- Grab the handle of the dust bin and pull it upward.
- Pull the hook on the left of Filter Cover on the rear of Dust Bin to separate the filter and the sponge.
* Note that separating the filter may result in dust dropping.
*Refer to p.26 when cleaning the Dust Bin Filter.
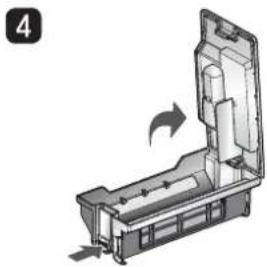
- Lift the dust bin lid upward while pressing the separation button on the dust bin.
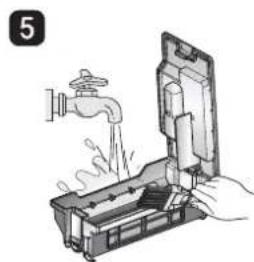
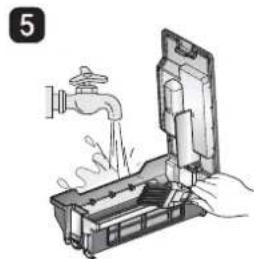
- Empty the dust bin and clean it with a cleaning brush or under running water.
- After cleaning with water, completely dry the dust bin in a well-ventilated area out of the direct sunlight.
- When reassembling or fitting the cleaned Dust Bin, close the lid and put in the Sponge and HEPA Filter.
※ Refer to p.26 for detailed assembly guides.
- Put the dust bin into the Robot Cleaner and close the dust bin compartment cover.




Tip
- Operating the unit without Filters fitted to the dust bin can cause a motor malfunction not covered by warranty.
- After cleaning the Dust Bin, make sure to assemble the filter and fit it to the Dust Bin. If you initiate cleaning, with no filters fitted to the dust bin or Filter Cover not assembled, a voice message will be announced which says "Please check if the dust bin is installed with the filter."
- Always ensure that the dust bin lid is refitted correctly after cleaning the dust bin so that it closes easily and accurately.

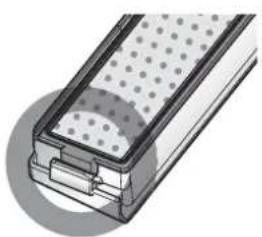
The Dust Bin Filter consists of a HEPA Filter and Sponge Filter. Clean both the HEPA and Sponge filters as per the following sequence.
- Pull the hook on the left of the HEPA Filter module on the rear side of Dust Bin to separate the HEPA Filter and the sponge.


- Thoroughly clean out the fine dust particles on the HEPA Filter, with a vacuum cleaner or cleaning brush.
* Do NOT wash the HEPA Filter with water. Its suction power will be reduced.

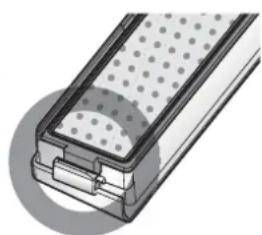
- Use a cleaning brush to clean the Sponge Filter. If using water to clean it, allow it to dry completely in the shade before refitting.

- Assemble the HEPA and Sponge filters back onto the Filter housing as per the following sequence.
※ Fit the rectangular locator on the HEPA Filter into the locating slot of the filter body.
※ Be careful not to incorrectly assemble HEPA and Sponge Filter onto the Filter housing.


Tip
• To preserve the performance of the Robot Cleaner, clean the HEPA Filter at least once a week, with a brush or vacuum cleaner. - The HEPA and sponge filters must be fitted to the filter housing before refitting the filter to the dust bin. Operating the Robot cleaner without the HEPA and sponge filters will cause the suction motor to malfunction.
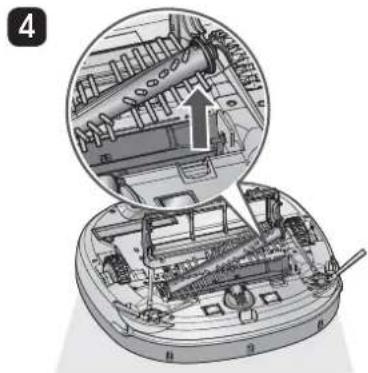
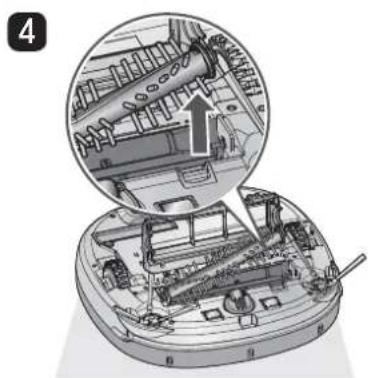
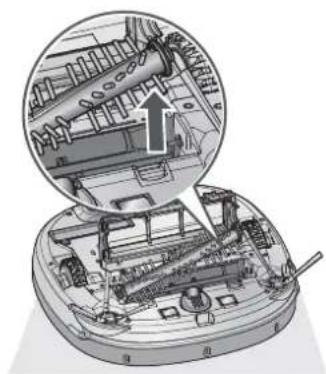
The rotating Brush, located on the bottom of Robot Cleaner, helps collect the dust. Clean the Brush as per the following sequence.
※ Before turning over the main unit, lay a soft cloth on the floor and remove the Dust Bin. Otherwise, the main unit can get scratched and dust will fall from Dust Bin.
1 Turn the Main Power Switch OFF before starting the clean. Put the Robot Cleaner upside down on a soft cloth.

4 Push the Brush all the way into the yellow protrusion.

7 Fit the Fixing Hook (rectangular shape) on the side of the Brush into the slots, with the colors matching.

2 After checking for foreign materials, press down the Fixing Hook and pull it up to separate the brush Cover.
5 While pushing the Brush, lift the white protrusion part up to separate it from the main unit.

8 While pushing the Brush to the arrow direction, fit the Fixing Hook (rectangular shape) on the opposite side into the slot.

3 By using the cleaning tool, clear hairs and other debris and foreign materials on the Brush and from the 2 smaller jockey wheels.

6 Carefully clean the Brush with a vacuum cleaner or scissors.

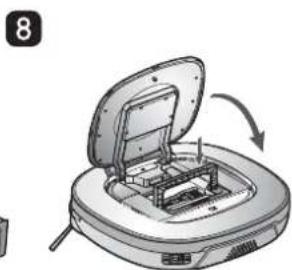
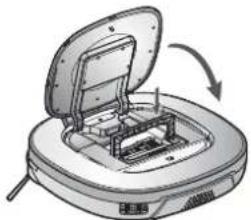
9 Press down and close the Cover until a 'crack' sound is heard from both sides of Fixing Hook.
※ Be careful not to trap the side brush bristles under the cover when closing it.

CLEANING THE SENSORS/CHARGING TERMINALS
There are sensors on the Robot Cleaner that detect obstacles, stairways and the home station for charging the battery. In order to maintain the performance of the Robot Cleaner, regularly clean the sensors and charging terminals as follows:
- Turn off the power switch on the rear side of the Robot Cleaner. Injury can be caused by the activation of the Robot Cleaner if the main power is not turned off.
- Lay a smooth cloth on the floor, turn over the Robot Cleaner and put it on the cloth. ※ Please make sure to remove the dust bin before rotating the main body. Otherwise, the dust in the dust bin may fall out.
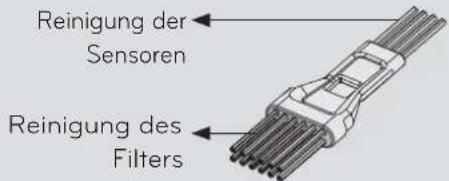
- Use a smooth cloth or cleaning brush to wipe the dust off each of the 3 cliff sensors, camera sensors and ultrasonic sensors and the charging terminal as described below.


Tip
- Do not clean the Robot Cleaner by directly spraying it with water, thinners, solvents, benzene, or any other liquids.
- Call the service center if the sensor or charging terminal is damaged. Sensor and terminal damage can cause the product to malfunction. • To clean the sensor/charging terminals, use the cleaning brush.
- Some models may not have a Camera Sensor, on the bottom.
Foreign objects/materials such as hair can easily adhere to the side brush. Remove such materials at least once a week.
If excessive amounts of foreign materials are stuck to the brush, there is the risk of damage to the brushes.

If the floor is rough or frequently cleaned, the side brushes may bend or become damaged. In this case, use the following method to straighten the side brush.
- The following procedure is helpful in restoring deformed brushes.
- Turn off the power by switching the main switch off on the rear of the unit.
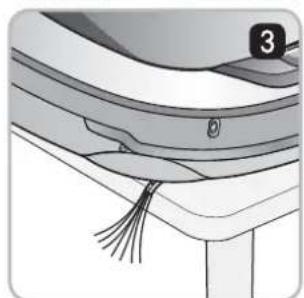
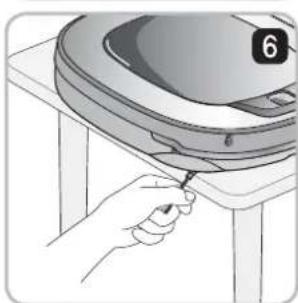
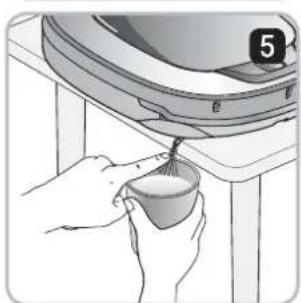
- Place the Robot Cleaner at the end of a table to make cleaning the side brush easier. Make sure that the Robot Cleaner is not in danger of falling.
- Soak the side brush in warm to hot water.
- Press down on the side brush for about ten seconds so that it is completely submerged in the water.
- Slowly wipe the side brush by sliding it through your hand.
- Rotate the side brush and repeat steps 4-6 for each section of the brush.
- Use the side brush only after it has completely dried.
Side Brush management
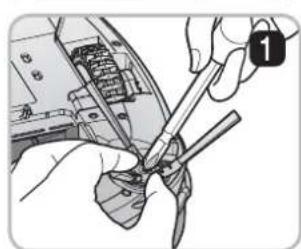
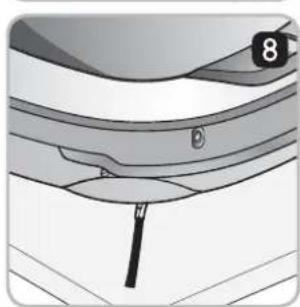
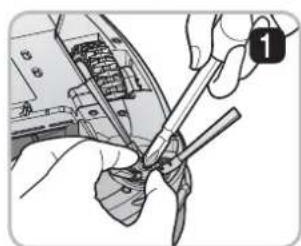
- Remove the screws by using a suitable screw driver and separate the Side Brush from the main unit.
- Remove any hair after the separation.
- Assemble the Side Brush by replacing it onto the bottom of the Robot Cleaner, with the 'R' and 'L' markings of the Brush matching the counterparts on the Robot Cleaner.



CLEANING THE ULTRA MICROFIBER MOP (Selected models only (VR*.LVM))
To avoid odors, dirt and dust should be washed off the mop after it is used for cleaning.
Follow these directions to wash the ultra microfiber mop:
- Separate the ultra microfiber mop from the mop plate.

- Carefully clean it with warm water.

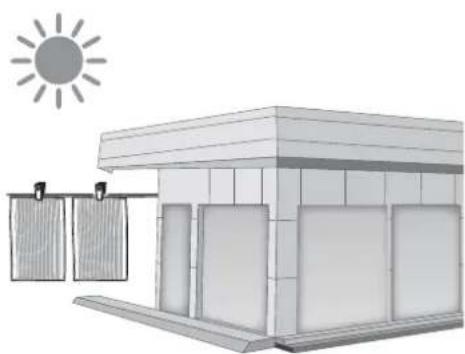
- Use the Mop after completely drying it in direct sunlight.
※ If the Mop is used in a damp or wet state, it will cause the Robot Cleaner to malfunction.

Tip
• To avoid product malfunction, only use the ultra microfiber mop provided with the Robot Cleaner. • Additional microfiber mops can be purchased by visiting a nearby LG Electronics service center. - Some models may not come with Microfibre Mop or Mop Plate.
Upon a voice message,
"The wheels are not touching the floor. Please move Robot cleaner onto flat floor."
A warning message will be given if a wheel does not contact the floor surface for any reason.
• Is a wheel trapped in the front door, balcony, stairway, etc?
▶ Move the Robot Cleaner on to the flat floor.


Upon a voice message, "Please remove foreign material on the left/right wheel."
• Is any foreign material wound around the wheel?
▶ Turn off the main power switch on the rear side of the Robot cleaner. Then lay a soft cloth on the floor, turn over the Robot Cleaner, and put it on the cloth. Remove foreign material after observing the wheel. ※ Please make sure to remove the dust bin before turning over the main body. Otherwise, the dust in the dust bin may fall out.


Upon a voice message,
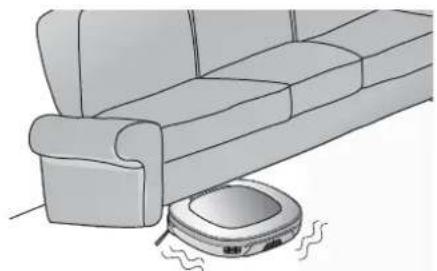
"Robot cleaner cannot continue cleaning. Please check the area around Robot Cleaner."
A warning message will be given if Robot Cleaner cannot go on cleaning due to any unfavourable condition.
• Is the Robot Cleaner stuck?
▶ After removing it from the obstacle, place the Robot Cleaner on flat floor.
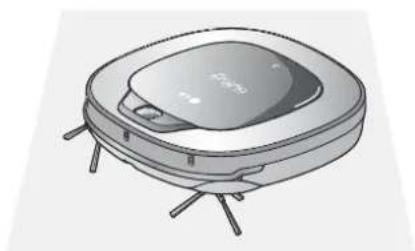
Upon a voice message, "Please check if the dust bin is installed with the filter."
A warning message will be given if there is no Dust Bin or Filter housing fitted.
• Is the Dust Bin fitted to the Robot Cleaner?
▶ Open the Dust Bin compartment cover and check to ensure the Dust Bin is in place. ▶ Do NOT leave the Dust Bin Cover open.


- Make sure the Filter housing is assembled onto the Dust Bin.


Upon a voice message,
"Battery is low. Please move Robot cleaner onto the home station to charge."
When the remaining amount of battery power is almost nil, the voice, "Battery is low", is generated.
- Initiate battery charging of the Robot Cleaner by moving it to the home station.
▶ When the Robot Cleaner is attached to the docking station successfully, it will start the recharging with the recharging start melody.


Upon a voice message, "Please remove foreign material from the brushes on the bottom."
A warning message will be given if foreign materials restrict the Brush's rotation.
Turn off the main power switch on the rear of the Robot Cleaner.
Lay a soft cloth on the floor and put the Robot Cleaner upside down on it.
* Before turning over the main unit, remove the Dust Bin. Otherwise, it will cause dust to fall from Dust Bin.
• The brush is making a loud, abnormal sound.
▶ Confirm the correct assembly of the brush by checking the separation groove of the brush ▶ Remove the lower rotating brush from the Robot Cleaner and remove any foreign material from the brush.


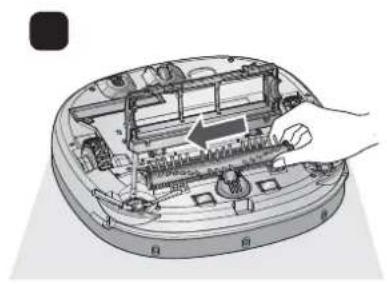


• The lower rotating brush or side brush is stuck. ▶ Remove any foreign materials such as cables, thread of hair caught in the side brush or the lower rotating brush.


* For a more detailed description of this process, refer to the instructions on page 27, 29.
Confirm before reporting the failure of Robot Cleaner.
| Problem Solutions (Reference page) | |
| The power supply cannot be turned on. | Check that the power switch is turned on. (Page 15) |
| The power supply automatically turns off. | This is not a failure. Robot Cleaner has its own power saving function.If it is not used for ten minutes after the power supply is turned on,the power will automatically turn off. (Page 17) |
| The Robot Cleaner will not charge. Check whether the main power switch is turned on.Remove objects around the home station. (Page 15)Confirm that the power supply is connected to the home station. (Page 14)Wipe the charging terminals with a dry cloth. | |
| Suction power becomes weak. Check whether there is foreign material blocking the suction port. (Page 27)Empty the dust bin. (Page 25)Clean the dust bin filter. (Page 26) | |
| Noise becomes louder. | Confirm that the dust bin has been mounted properly.Confirm that the dust bin filter has been mounted properly. (Page 26)Check whether foreign material is caught in the brush. (Page 27) |
| The Robot Cleaner will not activate. | Confirm that the power switch is turned on. (Page 15)Confirm that the battery has been charged. (Page 17) |
| The lower brush does not rotate. | Clean the brush. (Page 27)Confirm that the brush has been mounted properly. (Page 27) |
| Movements or travel path are abnormal. | Carefully wipe the sensors with a dry soft cloth. (Page 28)If the ultra microfi ber mop is attached,confi rm that it is mounted properly. (Page 21)Turn the main power switch off and on. |
| The Robot Cleaner cannot be activated with the remote control. | Replace the remote control batteries. (Page 12)Confirm that the control is within the coverage area of the main unit,which is less than 3 m. (Page 12)Check whether the main power switch is turned on. (Page 15) |
Open source software notice
To obtain the source code under GPL, LGPL, MPL and other open source licenses, that is contained in this product, please visit http://opensource.lge.com.
In addition to the source code, all referred license terms, warranty disclaimers and copyright notices are available for download.
Dis/Assembling the battery
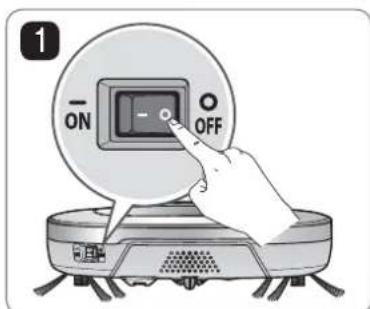
Turn off the main power switch on the back-left side of the Robot Cleaner.


Place a soft cloth on the floor, remove the dust bin, and flip the Robot Cleaner over.


Remove the screws by using a Phillips head screwdriver.

Assemble the battery in the reverse order.


Separate the wire from the battery while pressing the connector hook.


Remove the battery from the device.

WARNING
Please be careful of fire, explosion, electric shock, or breakdown.
- Do not charge this Battery Pack (Pack hereafter) with any other type of charger other than the one originally provided with the Robot Cleaner.
- Do not damage the Pack in such ways as drop, crush, puncture, cut or short external contacts.
- Do not attempt to disassemble the pack in any case. When the Pack is damaged or malfunctioning, bring it and the Robot cleaner and Home station to an authorized service center.
- Do not place this pack near a heat source or do not dispose of in fire or water.
- Please keep the Pack away from any damp or wet environment when the pack is charged.
- Please keep away from children, infant or pets.

Corner expert
Turbo mode
Mop tray
My space
Search location
Cleaning robot

Remote control

Base
DVD Manual
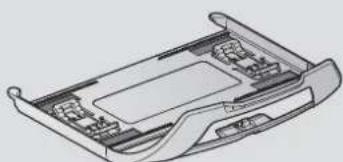
Ultra-microfiber cloth (2 units) (optional)


3
4
6


Tips
Manual charging
Manual cleaning


Tips
![graph LR A["Top: 3000 L"] B["Left: 2500 L"] C["Right: 1500 L"] D["Bottom: 1500 L"]](/content/2026/06/1282544/images/96e13118f6e645cb680f5900396db260289f6b3e5943a94108a714d585a7a9f6.jpg)
Changing location

Tips



Tips
CLEANING THE DUST TANK FILTER


Tips
CLEANING THE SENSOR/CHARGING TERMINAL






CLEANING THE ULTRAMICROFIBER CLOTH (OPTIONAL)

Tips





Insert the battery.


WARNING
Cleaning corners
Turbo function
My Space mode
Robot vacuum

Remote control

Charging base
Cleaning tool

Filter (Hepa11) (optional)

DVD Manual
Microfiber cloth holder (optional)

Microfiber cloths (2 pieces) (optional)


3
4
6


Note
Power off
Manual cleaning
My Space
Step 2

Note
![graph LR A["Top panel with 3D box"] --> B["Back panel with internal compartments"] B --> C["Bottom panel with 2D box"] C --> D["Back panel with internal compartments"]](/content/2026/06/1282544/images/cea7258621a0de94d968a26e990c4c976a1cf5645b6808ed44327339c06c5df8.jpg)
Zone change
Incident zone

Note


Note


Note
CLEANING THE DUST BIN FILTER


Note
MAINTENANCE OF SENSORS / CHARGING DOCK





CLEANING THE MICROFIBER CLOTH (OPTIONAL)

Note




WARNING


HOM-BOT

Remote control

Charging base
Manual DVD

Cloth (optional)


3
4
6


Tip
Using the remote control
Manual charging
Manual cleaning
My Space cleaning
Second phase:

Tip
![graph LR A["Backplane Case"] --> B["Internal compartments"] B --> C["Assembly to the same case"]](/content/2026/06/1282544/images/aa3b74a30760ab3f9f3a5a54d36f7a8dd6aa54244a4a7a0dcd0075a9ddfba96d.jpg)

Tip
Advice




Advice



Advice



CLEANING THE SENSOR/CHARGING TERMINAL


CLEANING THE MICROFIBER CLOTH (OPTIONAL)

Advice




Corner Master
Learning Mode
Turbo Mode
Slide-in mop (optional)
My Space Mode
ReLocation function
HomBot

Remote control

Charging station
Cleaning device

DVD manual

Slide-in mop (optional)

Microfiber mop (2 pieces) (optional)


3
4
6
O
X

Cable holder

O
X

Tip
Manual charging
Clean manually
My Space Cleaning
Second stage:

Tip
! CAUTION
![graph LR A["Top Back Panel"] --> B["Step 1: Insert Seat"] B --> C["Step 2: Insert Seat"] C --> D["Step 3: Insert Seat"]](/content/2026/06/1282544/images/f94da1dd02251ad850ddecab15399c6cbcaa425d318394474ee0739aaa01bf09.jpg)
Change location


Tip


Tip



Tip
CLEANING THE FILTER ON THE DUST CONTAINER


Tip
CLEANING THE SENSOR/CHARGING STATION


CLEANING THE MICROFIBER MOP (OPTIONAL)
- Wash carefully.


Tip


- LEARNING MODE
- TURBO MODE
- DRAWER MOP PLATE (SELECTED MODELS ONLY (VR*.LVM))
- MY SPACE MODE
- REPEAT CLEANING
- LOCATION SEARCH FUNCTION
- CONTENTS
- BEFORE USING
- METHOD OF USE
- HANDLING METHOD AFTER USE
- ADDITIONAL INFORMATION
- REFERENCE
- BASIC SAFETY PRECAUTIONS
- WARNING
- CAUTION
- TIP
- CHECK THESE ITEMS BEFORE CLEANING
- LOADING THE REMOTE CONTROLLER BATTERY
- PRECAUTIONS WHILE USING THE REMOTE CONTROL
- INSTALL THE HOME STATION. (P14)
- TURN ON THE POWER SUPPLY OF THE ROBOT CLEANER. (P15)
- CHECK THE DUST BIN
- START CLEANING. (P16)
- AUTOMATIC CHARGE. (P17)
- USE THE CLEANING MODE AND AUXILIARY FUNCTIONS. (P18~21)
- HOW TO INSTALL THE HOME STATION
- TURNING ON THE MAIN POWER SUPPLY
- TURNING ON FROM STAND BY POWER
- TURNING OFF THE POWER SUPPLY
- USING THE BUTTONS ON THE ROBOT CLEANER
- USING THE REMOTE CONTROLLER
- FOR BEST RESULTS
- AUTOMATIC CHARGING
- MANUAL CHARGING
- ZIGZAG CLEANING
- MANUAL CLEANING
- MY SPACE CLEANING
- THE 1ST STAGE
- THE 2ND STAGE
- REPEAT MODE
- MOP CLEANING (SELECTED MODELS ONLY (VR*.LVM))
- MANUAL RELOCATION
- CLEANING THE SENSORS/CHARGING TERMINALS
- SIDE BRUSH MANAGEMENT
- CLEANING THE ULTRA MICROFIBER MOP (SELECTED MODELS ONLY (VR*.LVM))
- UPON A VOICE MESSAGE
- THE WHEELS ARE NOT TOUCHING THE FLOOR. PLEASE MOVE ROBOT CLEANER ONTO FLAT FLOOR
- UPON A VOICE MESSAGE, "PLEASE REMOVE FOREIGN MATERIAL ON THE LEFT/RIGHT WHEEL
- ROBOT CLEANER CANNOT CONTINUE CLEANING. PLEASE CHECK THE AREA AROUND ROBOT CLEANER
- UPON A VOICE MESSAGE, "PLEASE CHECK IF THE DUST BIN IS INSTALLED WITH THE FILTER
- BATTERY IS LOW. PLEASE MOVE ROBOT CLEANER ONTO THE HOME STATION TO CHARGE
- UPON A VOICE MESSAGE, "PLEASE REMOVE FOREIGN MATERIAL FROM THE BRUSHES ON THE BOTTOM
- OPEN SOURCE SOFTWARE NOTICE
- DIS/ASSEMBLING THE BATTERY
- PLEASE BE CAREFUL OF FIRE, EXPLOSION, ELECTRIC SHOCK, OR BREAKDOWN
- CORNER EXPERT
- MOP TRAY
- MY SPACE
- SEARCH LOCATION
- TIPS
- CLEANING THE DUST TANK FILTER
- CLEANING THE SENSOR/CHARGING TERMINAL
- CLEANING THE ULTRAMICROFIBER CLOTH (OPTIONAL)
- CLEANING CORNERS
- TURBO FUNCTION
- NOTE
- POWER OFF
- STEP
- CLEANING THE DUST BIN FILTER
- MAINTENANCE OF SENSORS / CHARGING DOCK
- CLEANING THE MICROFIBER CLOTH (OPTIONAL)
- USING THE REMOTE CONTROL
- SECOND PHASE
- ADVICE
- CORNER MASTER
- SLIDE-IN MOP (OPTIONAL)
- RELOCATION FUNCTION
- CLEAN MANUALLY
- SECOND STAGE
- CLEANING THE FILTER ON THE DUST CONTAINER
- CLEANING THE SENSOR/CHARGING STATION
- CLEANING THE MICROFIBER MOP (OPTIONAL)
Brand : LG
Model : VR34408LV
Category : Vacuum Cleaner