
TSX-B15D - Hi-Fi System YAMAHA - Free user manual and instructions
Find the device manual for free TSX-B15D YAMAHA in PDF.


| Brand | Yamaha |
| Model | TSX-B15D |
| Product type | Compact Hi-Fi system with CD player, DAB+/FM radio and Bluetooth connectivity |
| Dimensions (W x H x D) | Approx. 28 x 12 x 28 cm |
| Weight | Approx. 2.5 kg |
| Power supply | Mains 220-240 V, 50/60 Hz |
| Power consumption | Operating: approx. 20 W; standby: less than 0.5 W |
| Supported audio formats | CD, CD-R/RW (MP3, WMA), USB (MP3, WMA, AAC, WAV), Bluetooth (A2DP, AVRCP) |
| Radio | DAB+/FM (RDS) with 30 presets |
| Speakers | 2 x 5 cm full-range with bass-reflex |
| Output power | 2 x 10 W (RMS) |
| Connectivity | AUX input (3.5 mm mini-jack), USB port (charging and playback), headphone output (3.5 mm mini-jack) |
| Main functions | CD playback, DAB+/FM radio, Bluetooth streaming, alarm clock, sleep timer, clock |
| Included accessories | Remote control, FM antenna, power cable, user manual |
| Care and cleaning | Unplug before cleaning. Use a soft, dry cloth. Avoid solvents and abrasive products. |
| Safety | Do not expose to moisture or splashes. Do not block ventilation openings. |
| Spare parts and repairability | Contact an authorized Yamaha service center for repairs. Parts available through the after-sales network. |
| General information | 2-year warranty (according to legislation). Made in China. |
Frequently Asked Questions - TSX-B15D YAMAHA
User questions about TSX-B15D YAMAHA
0 question about this device. Answer the ones you know or ask your own.
Ask a new question about this device
Download the instructions for your Hi-Fi System in PDF format for free! Find your manual TSX-B15D - YAMAHA and take your electronic device back in hand. On this page are published all the documents necessary for the use of your device. TSX-B15D by YAMAHA.
USER MANUAL TSX-B15D YAMAHA
IMPORTANT SAFETY INSTRUCTIONS


- Explanation of Graphical Symbols
The lightning flash with arrowhead symbol, within an equilateral triangle, is intended to alert you to the presence of uninsulated “dangerous voltage” within the product’s enclosure that may be of sufficient magnitude to constitute a risk of electric shock to persons.

The exclamation point within an equilateral triangle is intended to alert you to the presence of important operating and maintenance (servicing) instructions in the literature accompanying the appliance.
IMPORTANT
Please record the serial number of this unit in the space below.
MODEL:
Serial No.:
The serial number is located on the rear of the unit. Retain this Owner's Manual in a safe place for future reference.
1 Read these instructions.
2 Keep these instructions.
3 Heed all warnings.
4 Follow all instructions.
5 Do not use this apparatus near water.
6 Clean only with dry cloth.
7 Do not block any ventilation openings. Install in accordance with the manufacturer's instructions.
8 Do not install near any heat sources such as radiators, heat registers, stoves, or other apparatus (including amplifiers) that produce heat.
9 Do not defeat the safety purpose of the polarized or grounding-type plug. A polarized plug has two blades with one wider than the other. A grounding type plug has two blades and a third grounding prong. The wide blade or the third prong are provided for your safety. If the provided plug does not fit into your outlet, consult an electrician for replacement of the obsolete outlet.
10 Protect the power cord from being walked on or pinched particularly at plugs, convenience receptacles, and the point where they exit from the apparatus.
11 Only use attachments/accessories specified by the manufacturer.
12 Use only with the cart, stand, tripod, bracket, or table specified by the manufacturer, or sold with the apparatus. When a cart is used, use caution when moving the cart/apparatus combination to avoid injury from tip-over.
13 Unplug this apparatus during lightning storms or when unused for long periods of time.
14 Refer all servicing to qualified service personnel. Servicing is required when the apparatus has been damaged in any way, such as power-supply cord or plug is damaged, liquid has been spilled or objects have fallen into the apparatus, the apparatus has been exposed to rain or moisture, does not operate normally, or has been dropped.
We Want You Listening For A Lifetime
Yamaha and the Electronic Industries Association's Consumer Electronics Group want you to get the most out of your equipment by playing it at a safe level. One that lets the sound come through loud and clear without annoying blaring or distortion – and, most importantly, without affecting your sensitive hearing. Since hearing damage from loud sounds is often undetectable until it is too late, Yamaha and the Electronic Industries Association's Consumer Electronics Group recommend you to avoid prolonged exposure from excessive volume levels.
FCC INFORMATION (for US customers)
1 IMPORTANT NOTICE: DO NOT MODIFY THIS UNIT!
This product, when installed as indicated in the instructions contained in this manual, meets FCC requirements. Modifications not expressly approved by Yamaha may void your authority, granted by the FCC, to use the product.
2 IMPORTANT: When connecting this product to accessories and/or another product use only high quality shielded cables. Cable/s supplied with this product MUST be used. Follow all installation instructions. Failure to follow instructions could void your FCC authorization to use this product in the USA.
3 NOTE: This product has been tested and found to comply with the requirements listed in FCC Regulations, Part 15 for Class "B" digital devices. Compliance with these requirements provides a reasonable level of assurance that your use of this product in a residential environment will not result in harmful interference with other electronic devices. This equipment generates/uses radio frequencies and, if not installed and used according to the instructions found in the users manual, may cause interference harmful to the operation of other electronic devices.
Compliance with FCC regulations does not guarantee that interference will not occur in all installations. If this product is found to be the source of interference, which can be determined by turning the unit “OFF” and “ON”, please try to eliminate the problem by using one of the following measures:
Relocate either this product or the device that is being affected by the interference.
Utilize power outlets that are on different branch (circuit breaker or fuse) circuits or install AC line filter/s.
In the case of radio or TV interference, relocate/reorient the antenna. If the antenna lead-in is 300 ohm ribbon lead, change the lead-in to coaxial type cable.
If these corrective measures do not produce satisfactory results, please contact the local retailer authorized to distribute this type of product. If you can not locate the appropriate retailer, please contact
Yamaha Corporation of America A/V Division, 6600
Orangethorpe Avenue, Buena Park, CA 90620, USA.
The above statements apply ONLY to those products distributed by Yamaha Corporation of America or its subsidiaries.
FCC CAUTION
Change or modifications not expressly approved by the party responsible for compliance could void the user's authority to operate the equipment.
FOR CANADIAN CUSTOMERS
To prevent electric shock, match wide blade of plug to wide slot and fully insert.
CAN ICES-3 (B)/NMB-3(B)
This device complies with Part 15 of the FCC Rules and RSSGen of IC Rules.
Operation is subject to the following two conditions: 1) this device may not cause harmful interference, and 2) this device must accept any interference received including interference that may cause undesired operation.
NOTICE
This equipment has been tested and found to comply with the limits for a Class B digital device, pursuant to part 15 of the FCC Rules. These limits are designed to provide reasonable protection against harmful interference in a residential installation.
This equipment generates, uses and can radiate radio frequency energy and, if not installed and used in accordance with the instructions, may cause harmful interference to radio communications. However, there is no guarantee that interference will not occur in a particular installation. If this equipment does cause harmful interference to radio or television reception, which can be determined by turning the equipment off and on, the user is encouraged to try to correct the interference by one or more of the following measures:
– Reorient or relocate the receiving antenna.
– Increase the separation between the equipment and receiver.
- Connect the equipment into an outlet on a circuit different from that to which the receiver is connected.
- Consult the dealer or an experienced radio/TV technician for help.
This equipment compiles with FCC/IC radiation exposure limits set forth for uncontrolled equipment and meets the FCC radio frequency (RF) Exposure Guidelines and RSS-102 of the IC radio frequency (RF) Exposure rules. This equipment has very low levels of RF energy that it deemed to comply without maximum permissive exposure evaluation (MPE). But it is desirable that it should be installed and operated with at least 20 cm and more between the radiator and person's body.
This transmitter must not be co-located or operated in conjunction with any other antenna or transmitter.
CAUTION: READ THIS BEFORE OPERATING YOUR UNIT.
1 To assure the finest performance, please read this manual carefully. Keep it in a safe place for future reference.
2 Install this unit in a well ventilated, cool, dry, clean place - away from direct sunlight, heat sources, vibration, dust, moisture and cold. For proper ventilation, allow the following minimum clearances.
Top: 15 cm (6 in)
Rear: 10 cm (4 in)
Sides: 10 cm (4 in)
3 Locate this unit away from other electrical appliances, motors, or transformers to avoid humming sounds.
4 Do not expose this unit to sudden temperature changes from cold to hot, and do not locate this unit in an environment with high humidity (i.e. a room with a humidifier) to prevent condensation inside this unit, which may cause an electrical shock, fire, damage to this unit, and/or personal injury.
5 Avoid installing this unit where foreign object may fall onto this unit and/or this unit may be exposed to liquid dripping or splashing. On the top of this unit, do not place:
- Other components, as they may cause damage and/or discoloration on the surface of this unit.
– Burning objects (i.e. candles), as they may cause fire, damage to this unit, and/or personal injury. - Containers with liquid in them, as they may fall and liquid may cause electrical shock to the user and/or damage to this unit.
6 Do not cover this unit with a newspaper, tablecloth, curtain, etc. in order not to obstruct heat radiation. If the temperature inside this unit rises, it may cause fire, damage to this unit, and/or personal injury.
7 Do not plug in this unit to a wall outlet until all connections are complete.
8 Do not operate this unit upside-down. It may overheat, possibly causing damage.
9 Do not use force on switches, knobs and/or cords.
10 When disconnecting the power cable from the wall outlet, grasp the plug; do not pull the cable.
11 Do not clean this unit with chemical solvents; this might damage the finish. Use a clean, dry cloth.
12 Only voltage specified on this unit must be used. Using this unit with a higher voltage than specified is dangerous and may cause fire, damage to this unit, and/or personal injury. Yamaha will not be held responsible for any damage resulting from use of this unit with a voltage other than specified.
13 To prevent damage by lightning, keep the power cable disconnected from a wall outlet or this unit during a lightning storm.
14 Do not attempt to modify or fix this unit. Contact qualified Yamaha service personnel when any service is needed. The cabinet should never be opened for any reasons.
15 When not planning to use this unit for long periods of time (i.e. vacation), disconnect the AC power plug from the wall outlet.
16 Be sure to read the “TROUBLESHOOTING” section on common operating errors before concluding that this unit is faulty.
17 Before moving this unit, press ⓑ set the system to off, and disconnect the AC power plug from the wall outlet.
18 Condensation will form when the surrounding temperature changes suddenly. Disconnect the power cable from the outlet, then leave this unit alone.
19 When using this unit for a long time, this unit may become warm. Turn the system off, then leave this unit alone for cooling.
20 Install this unit near the wall outlet and where the AC power plug can be reached easily.
21 Be sure to use the AC adaptor supplied with this unit. Using an AC adaptor other than the one provided may cause fire or damage to this unit.
This unit is not disconnected from the AC power source as long as it is connected to the wall outlet, even if this unit itself is turned off by ⏻ in this state, this unit is designed to consume a very small quantity of power.
WARNING
TO REDUCE THE RISK OF FIRE OR ELECTRIC SHOCK, DO NOT EXPOSE THIS UNIT TO RAIN OR MOISTURE.
- This unit's speakers use magnets. Do not place items that are sensitive to magnetism, such as CRT-type TVs, clocks, credit cards, floppy disks, etc., on or beside this unit.
- There is a chance that placing this unit too close to a CRT-based (Braun tube) TV set might impair picture color. Should this happen, move this unit away from the TV set.
Do not use this unit within 22 cm (9 inches) of persons with a heart pacemaker implant or defibrillator implant.
Radio waves may affect electro-medical devices. Do not use this unit near medical devices or inside medical facilities.
CONTENTS
NAMES OF PARTS AND THEIR FUNCTIONS .... 2
BASIC FUNCTIONS....4
LISTENING TO FM STATIONS....6
LISTENING TO MUSIC FROM YOUR Bluetooth DEVICE ....7
LISTENING TO EXTERNAL SOURCES 10
CHARGING WITH THE USB PORT 10
TROUBLESHOOTING....11
SPECIFICATIONS 13
■Features
- Playback of Bluetooth devices, FM radio, and external devices with an AUX connector.
- Setting alarm using an FM radio.
– Supplying power to smartphones, tablets, etc. via USB port on the rear panel.
– Rich sound by 5cm full-range custom speaker and DSP (Digital Signal Processor) made by Yamaha. -
Enhanced treble and thick mid/bass, even when playing a compressed audio source, such as MP3, etc. (Music Enhancer)
-
iNotes precautions for use of the unit and its feature limitations.
• indicates supplementary explanations for better use.
■Supplied accessories
AC adaptor FM antenna

natural_image
Simple line drawing of a coiled cable with a rectangular component (no text or symbols)DC 12 V, 1.5 A, model number: MU18-D120150-A1

natural_image
Illustration of a coiled cable or wire with connectors (no text or symbols)NAMES OF PARTS AND THEIR FUNCTIONS
■Top panel
①VOLUME
Controls volume. When you control the volume, the volume level will be displayed on the display for a while.
②CLOCK
Sets the clock (page 4).
③ ALARM
Sets the alarm (page 4).
④ TUNING
Adjust the time or radio frequency ( page 4, 6).
⑤PRESET
Stores up to five favorite FM radio stations ( page 6).
⑥SOURCE (PAIRING)
Selects an input source from (Bluetooth), AUX, or RADIO.
⑦ Display

⑧Indicators
(1 ● 1) (Alarm): Lights when the alarm function is on ( page 4).
RADIO: Lights when the radio is selected as an input source ( page 6).
AUX: Lights when AUX is selected as an input source ( page 10).
(Bluetooth): Lights when (✗) Bluetooth is selected as an input source or during Bluetooth pairing/connection (✗ page 7, 9).

Dimmer function
Press CLOCK repeatedly to set the brightness of the display and indicators.
Press to turn on the system or enter standby mode.
Eco Standby mode
- This can reduce power consumption. Press and hold for more than 3 seconds to set the system to power saving mode. All the indicators and display turn off, and Bluetooth operation, audio playback, input via buttons except are disabled. To cancel Eco Standby mode, press
- Even in standby mode or Eco Standby mode, the alarm function is available.
Auto Standby ( page 5)
- This unit has a function that automatically activates standby mode when no audio signal is input from a connecting device, or when the connecting device is playing at a low volume for a certain period (about 20 minutes).
Caution
A grille is attached to this product to protect the speakers.
- Since the grille cloth is made of soft material, it can be easily damaged, so do not scratch it with a sharp object.
- Do not overstress the grille cloth. If it is overstressed, it will become contorted and damaged. This may cause damage to the speakers. Be careful when handling the grille cloth.
■Rear panel

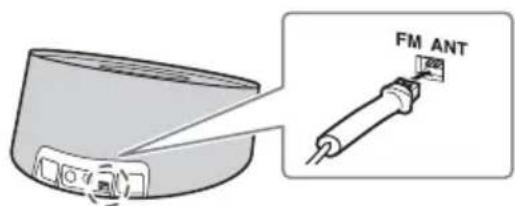
Connecting the FM antenna
1
2

natural_image
Illustration of a person using a tool to observe a camera on a screen, with no text or symbols present.1 Connect the supplied antenna to the unit.
② Pin the antenna where the best reception is obtained.
Note
- Be sure to stretch out the antenna as the illustration shows.
- If FM reception is poor, change the height or direction of the antenna, or relocate the unit.
Caution
If you listen to an FM radio station while USB charging, noise may interfere with the radio reception. In this case, disconnect the USB cable from the unit.
BASIC FUNCTIONS
Adjusting the clock
![1, 3 CLOCK ALARM VOLUME TUNING 2 RADIO SOURCE PRESET (AUX) [PAIRING] (••)](/content/2026/06/1282394/images/fb0ebaf4613ff9cafa8d7fcefadf8f7a115b2e7c0900589f8852e081578f2aee.jpg)
1 Press and hold CLOCK for more than 2 seconds. The display flashes.

2 Adjust the time with TUNING.

If you press and hold TUNING, the numbers advance quickly.
3 Press CLOCK.
If you want to cancel clock setting mode, press ⏻.

If you press PRESET in step 2, you can select the time display method (12 hours/24 hours).
Note
The time settings are lost approximately one week after unplugging the unit.
Alarm setting
This unit can play back the radio and emit beeps at the set time.
■Setting the time and sound
Note
If you press ALARM to complete the setting of the alarm without changing the alarm time and volume, the alarm setting mode will be cancelled and the alarm will not be set to on.
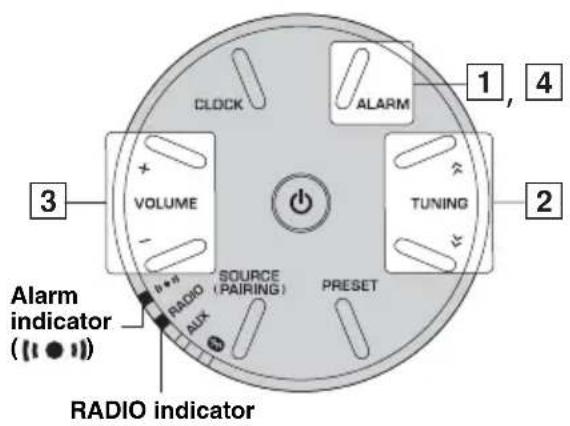
1 Press and hold ALARM for more than 2 seconds.
The alarm indicator (1), the RADIO indicator and display flash.

2 Set the alarm time with TUNING.
3 Set the alarm volume with VOLUME.
The volume level is displayed.

4 Press ALARM.
Alarm is set and the alarm indicator (i) lights.

- The alarm type of this unit is the radio and beeping only.
• The radio turns on 3 minutes before the alarm time and beeping starts at the alarm time.
■Switching the alarm on/off
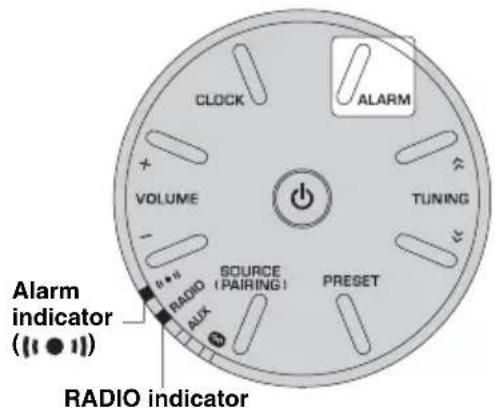
Press ALARM.
When the alarm is on, the alarm indicator (1)● 1 and the RADIO indicator light and the alarm time is displayed for a while.
Operations during playing back alarm sound
At the set time, alarm sound plays back. During playback, operations below are available.
■Stopping the alarm

Press ALARM or ⏻

- Unless you stop the alarm, the alarm stops after 60 minutes automatically.
- When you stop the alarm, the alarm time setting, etc., is saved for convenient use next time.
- Press any button except ALARM and once to stop the beeping, and twice to stop the radio source (snooze function). 4 minutes after the radio source is stopped, it will start fading in again and after another minute the beeping will resume.
- When the snooze function is activated, the display, alarm indicator (I) and RADIO indicator flash.
Auto Standby
The system automatically enters standby mode under the following circumstance.
- No audio signal is input from a connecting device or when the connecting device is playing at a low volume for a certain period (about 20 minutes).
- If no operation is performed for more than 8 hours while music is being played back or stopped.
- Disconnect the Bluetooth connection from the Bluetooth device.
LISTENING TO FM STATIONS
Tuning radio stations

1 Press SOURCE to select RADIO. The RADIO indicator lights.
② For automatic tuning, press and hold TUNING. For manual tuning, press TUNING repeatedly.
Note
If you tune into a station manually, the sound is monaural.
Presetting radio stations
You can store up to five favorite FM radio stations with the preset function.

1 Press TUNING to select a favorite radio station. The radio frequency is displayed temporally.

2 Press and hold PRESET for more than 2 seconds. The preset number is displayed on the display and flashes.

3 Press PRESET to select the preset number you want to store to. The preset number is displayed as follows: P1 → P2 → P3 → P4 → P5 → P1
4 Press and hold PRESET for more than 2 seconds to complete.
Selecting preset radio stations
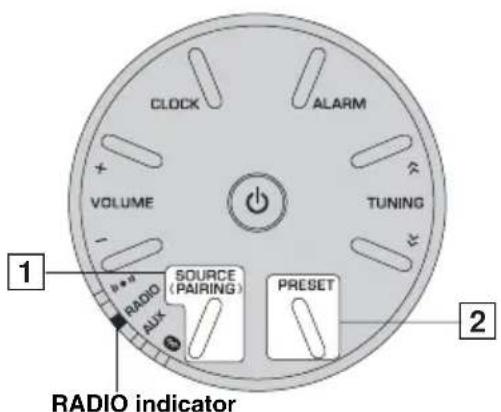
1 Press SOURCE to select RADIO. The RADIO indicator lights.
2 Press PRESET repeatedly to select the preset radio station.
LISTENING TO MUSIC FROM YOUR Bluetooth DEVICE
This unit provides Bluetooth functionality. You can enjoy wireless music playback from your Bluetooth device (smartphone, digital audio player, etc.). Please also refer to the owner's manual of your Bluetooth device.
Installation

Install in a stable place, being careful of the following points:
- Do not place on top of steel or other metal plates.
- Do not cover with a cloth, etc.
• Install in the same room as the device with which signals are to be exchanged (Bluetooth profile A2DP compatible smartphone, digital audio player, etc.) within a direct line-of-sight distance of 10 m (33 ft). - Make sure there are no obstacles between this unit and the Bluetooth device.
Pairing this unit with your Bluetooth device

What is pairing?
Pairing is an operation that registers the communicating device (subsequently called “the connecting device”) with this unit. You will need to perform the pairing operation the first time you use your Bluetooth device with this unit, or if the pairing settings have been deleted. Once pairing has been completed, subsequent reconnection will be easy even after the Bluetooth connection is disconnected. If pairing is not successful, refer to the item “Bluetooth” in “TROUBLESHOOTING” ( page 12).
Note
- This unit can be paired with up to four connecting devices. When pairing with the fifth device has succeeded, pairing data for the device with the oldest connection date will be deleted.
- If this unit is connected via Bluetooth to another device, press and hold SOURCE to disconnect the Bluetooth connection before you perform the pairing operation.
■Pairing (Registration)

- If using an iPhone/iPad/iPod touch

1 Turn on the system.
2 Press and hold SOURCE for more than 2 seconds to enter paring mode.
- Pairing mode lasts for 5 minutes.
- In paring mode, the Bluetooth indicator (✗) will light in orange and blue alternately.
3 On your iPhone/iPad/iPod touch, turn [Settings] → [Bluetooth] on.
The Bluetooth connection list will appear in [Devices].
(This procedure or display may differ depending on the type of your iPhone/iPad/iPod touch.)
4 From the Bluetooth connection list of the connecting device, choose this unit (TSX-B15 Yamaha).
- When pairing has been completed, your iPhone/iPad/iPod touch will indicate "Connected".
• The Bluetooth indicator ( ) will light in blue.
- If using other than an iPhone/iPad/iPod touch
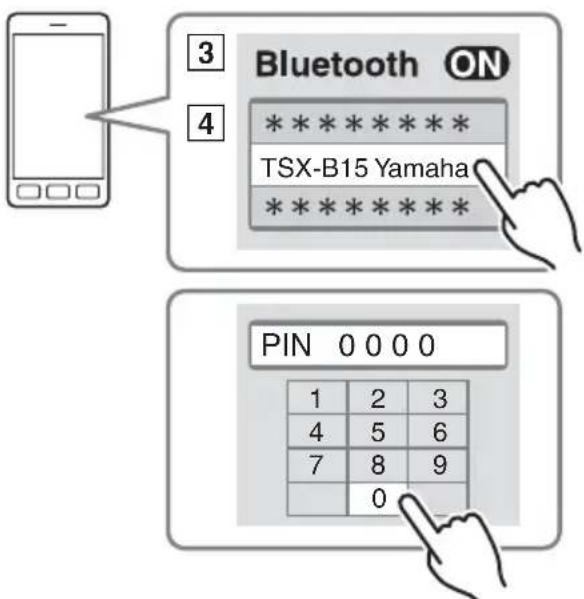
Within about 5 minutes
3 Perform Bluetooth pairing on the connecting device.
For details, refer to the owner's manual of the connecting device.
4 From the Bluetooth connection list of the connecting device, choose this unit (TSX-B15 Yamaha).
When pairing has been completed, the Bluetooth indicator ( ) will light in blue.

If you are prompted for a passkey, enter the numerals "0000".
Note
Check that the pairing process on the connecting device has been completed. If the pairing process fails, start over from step 2. For details, see the connecting device's operating instructions.
Listening to a Bluetooth device
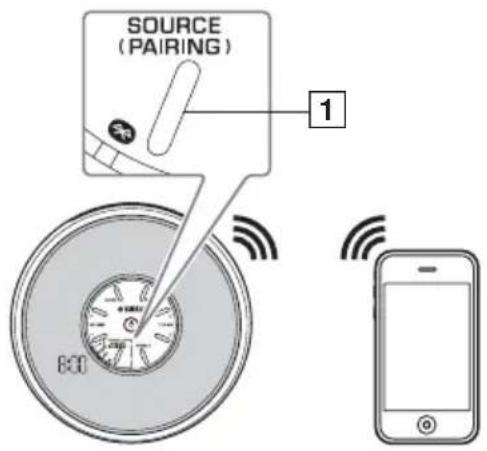
1 Press SOURCE to select 📊 (Bluetooth).
2 Connect this unit and your connecting device via Bluetooth.
3 Play back music from your connecting device.
Note
Take care that the volume setting of this unit is not too high. We recommend that you adjust the volume on the connecting device.

- While the system is in standby mode, if you connect a Bluetooth device to the unit, the system will automatically turn on.
- If you disconnect the Bluetooth connection from the connecting device, the system will enter standby mode.
Connecting an already-paired device via Bluetooth
Once pairing with a device has been completed, connecting with that device via Bluetooth will be easy next time.
■Connecting from this unit
Press SOURCE to select 🧆 (Bluetooth).
The Bluetooth indicator (Ⓧ will light in orange.
This unit will search for the connecting device that was most recently connected via Bluetooth, and will then establish a connection (You must first turn on the Bluetooth setting of the connecting device).
When the Bluetooth connection has been established, the Bluetooth indicator (✗) will light in blue.
Note
Yamaha does not guarantee all connections between this unit and Bluetooth device.
■Connecting from the connecting device
1 In the Bluetooth settings of the connecting device, turn Bluetooth on.
2 From the Bluetooth connection list of the connecting device, choose this unit (TSX-B15 Yamaha).
The Bluetooth connection will be established, and the Bluetooth indicator (✗) will light in blue.
Note
Bluetooth connections cannot be established from the connecting device when this unit is in Eco Standby mode. Turn the system on.
Disconnecting a Bluetooth connection
If any of the following operations are performed while a Bluetooth connection is established, the Bluetooth connection will be disconnected.
- Press and hold SOURCE for more than 2 seconds.
- Press SOURCE to select a playback source other than ⚙ (Bluetooth).
- Press to enter standby mode.
- Disconnect the Bluetooth connection from the Bluetooth device.
LISTENING TO EXTERNAL SOURCES

1 Connect your portable audio device to AUX using a commercially available 3.5 mm (1/8in) mini plug cable.
Note
Turn down the volume of this unit and your portable audio device before connection.
2Turn on the system.
3 Press SOURCE to set the playback source to AUX. The AUX indicator lights.
4 Start playback on the connected portable audio device.
CHARGING WITH THE USB PORT
Connecting a portable device such as a smartphone or tablet computer to the USB port on this unit charges the connected device (power supply of up to 5 V/1 A is supported).
Prepare a USB cable that is compatible with the portable device and confirm that the device is supported for charging via USB connection before use. In addition, read the documentation provided with the portable device.

1 Connect your portable device to the USB port on this unit using a commercially available USB cable.
Charging automatically starts.
② Disconnect the USB cable from the unit when charging completes.
Check the charging status on the portable device.
Note
- The USB port is for charging use only. The USB port does not support audio playback.
- Charging may not be possible depending on the portable device.
- In Eco Standby mode, power supply stops, and charging is not available.
- This unit does not function as memory storage.
- Yamaha will not be held responsible for any damage to the portable device or data loss occurred while using this unit.
- Disconnect the USB cable immediately after charging completes, since power continues to be supplied to the connected device.
TROUBLESHOOTING
Refer to the table below if the unit does not operate properly. If the problem you are experiencing is not listed below, or if the instruction below does not help, press to enter standby mode, disconnect the power cable, and contact the nearest authorized Yamaha dealer or service center.
General
| Problem Cause Solution | ||
| The speakers make no sound. | The volume may be set to the minimum level. | Adjust the volume level. |
| The source may be incorrect. Select the correct source. | ||
| The unit is setting the alarm. | Press ALARM to complete the alarm setting. | |
| Sound suddenly turns off. | Auto Standby function is enabled. Turn on | the system and play the source again. |
| Since the connecting device outputs at a very low volume, the Auto Standby function is enabled. | Raise the volume of the connecting device. | |
| Sound is cracked/distorted or there is abnormal noise. | Input source volume is excessive, or volume of this unit is excessive. | Adjust the volume with VOLUME. |
| The unit does not operate properly. | The unit may have received a strong electrical shock such as lightning or excessive static electricity, or power supply may have dropped. | Press ♦ to enter standby mode and disconnect the power cable. Wait about 30 seconds, reconnect the power cable, and turn on the system. |
| The system turns on but immediately shuts off. | The power cable may be connected improperly. | Make sure the power cable is plugged into the wall outlet firmly. |
| The unit may have received a strong electrical shock such as lightning or excessive static electricity. | Disconnect the power cable. Wait about 30 seconds, reconnect the power cable, and turn on the system. | |
| A digital or high-frequency equipment produces noises. | The unit may be placed too close to the digital or high-frequency equipment. | Place the unit farther away from the equipment. |
| The clock setting has been cleared. | The unit is left more than one week after you disconnect the power cable from the wall outlet. | Plug the power cable into the wall outlet firmly, and set the clock again ( page 4). |
| The clock flashes. | The unit is setting CLOCK or ALARM. | Press ⏻ to cancel setting CLOCK or ALARM. |
FM radio reception
| Problem Cause Solution | ||
| Too much noise during stereo broadcast. | The radio station you selected may be far from your area, or the radio wave reception is weak in your area. | Try manual tuning to improve the signal quality ( page 6) or change the height or direction of the antenna, or relocate the unit ( page 3). |
Bluetooth
| Problem Cause Solution | ||
| Cannot make this unit paired with the connecting device. | The connecting device does not support A2DP. | Perform pairing operations with a device which supports A2DP. |
| The passkey of the connecting device that you want to pair with this unit is a passkey other than “0000”. | Use a connecting device with a passkey “0000”. | |
| This unit and the connecting device are too far apart. | Move the connecting device closer to this unit. | |
| There is a device (microwave oven, wireless LAN, etc.) that outputs signals in the 2.4 GHz frequency band nearby. | Move this unit away from the device that is emitting radio-frequency signals. | |
| The unit is in standby mode. | Turn the unit on and perform pairing ( page 8). | |
| Another Bluetooth device is connected. | Terminate current Bluetooth connection, and perform pairing with the new device. | |
| Cannot establish a Bluetooth connection. | This unit is not registered on the connecting device’s Bluetooth connection list. | Perform pairing operations again ( page 7). |
| The unit is in Eco Standby mode. | Turn the unit on, then establish a Bluetooth connection ( page 9). | |
| Another Bluetooth device is connected. | Terminate current Bluetooth connection, then establish a Bluetooth connection with that device again. | |
| The Bluetooth function of the device is turned off. | Turn on the Bluetooth function of the device. | |
| The pairing information has been deleted. | Perform pairing again ( page 7). This unit can be paired with four devices. If pairing with the fifth device is performed, the pairing information with the earliest connection date will be deleted. | |
| Delete any pairing history of TSX-B15 on the iPhone/iPad/iPod touch, then pair with the TSX-B15 again ( page 8). | ||
| No sound is produced or the sound is interrupted during playback. | The Bluetooth connection of this unit with the connecting device is disconnected. | Perform Bluetooth connection operations again ( page 9). |
| This unit and the connecting device are too far apart. | Move the connecting device closer to this unit. | |
| There is a device (microwave oven, wireless LAN, etc.) that outputs signals in the 2.4 GHz frequency band nearby. | Move this unit away from the device that is emitting radio-frequency signals. | |
| The connecting device’s Bluetooth function is off. | Turn on the Bluetooth function of the connecting device. | |
| The connecting device is not set to send Bluetooth audio signals to this unit. | Check that the Bluetooth function of the connecting device is set properly. | |
| The pairing setting of the connecting device is not set to this unit. | Set the pairing setting of the connecting device to this unit. | |
| The connecting device’s volume is set to the minimum. | Increase the volume level. | |
| The connecting device is connected to more than two Bluetooth speakers and this unit (TSX-B15) is not selected as a playback device. | Select this unit as a playback device for the connecting device. | |
USB port charging
| Problem Cause Solution | ||
| Cannot charge the connected portable USB device. | An incompatible USB device is connected to the unit. Or the USB device is not connected to this unit properly. | Press to enter standby mode, and reconnect the USB device to the unit. If it does not resolve the problem, the USB device is not chargeable with the unit. |
SPECIFICATIONS
■PLAYER SECTION
AUX IN
- Input connector ......STEREO L/R: 3.5 mm (1/8 in) STEREO mini Jack
■AMPLIFIER SECTION
- Driver unit ....5 cm (2 in) full-range driver × 2
Bluetooth SECTION
- Bluetooth version......Ver. 3.0
- Supported protocols....A2DP
- Supported codecs.... SBC
- Wireless output......Bluetooth Class 2
- Maximum communication distance .... 10 m (33 ft) (without obstructions)
- Supported contents protection .... SCMS-T method
TUNER SECTION
- Tuning range (FM) 87.5 to 107.9 MHz
■CHARGING CONNECTOR SECTION
- Connector type .... USB type A
- Output rating....5 V/1 A
GENERAL
• Power Supply..... AC 120 V, 60 Hz
• Power consumption ....11 W
- Standby consumption
(Clock displayed, Bluetooth ready for connection) ....1.0 W
- Eco Standby consumption ....0.2 W
- Time of power management (Auto Standby)
....No sound: about 20 minutes
....No operation: about 8 hours
- Weight.... 0.9 kg (2.0 lbs.)
- Dimensions
180 mm (7-1/8 in)

natural_image
Circular diagram with concentric rings and central hub, no text or symbols present
Specifications are subject to change without notice.
Bluetooth
- Bluetooth is a technology for wireless communication between devices within an area of about 10 meters (33 ft) employing the 2.4 GHz frequency band, a band which can be used without a license.
- Bluetooth is a registered trademark of the Bluetooth SIG and is used by Yamaha in accordance with a license agreement.
Handling Bluetooth communications
- The 2.4 GHz band used by Bluetooth compatible devices is a radio band shared by many types of equipment. While Bluetooth compatible devices use a technology minimizing the influence of other components using the same radio band, such influence may reduce the speed or distance of communications and in some cases interrupt communications.
- The speed of signal transfer and the distance at which communication is possible differs according to the distance between the communicating devices, the presence of obstacles, radio wave conditions and the type of equipment.
- Yamaha does not guarantee all wireless connections between this unit and devices compatible with Bluetooth function.
iPad, iPhone, and iPod touch are trademarks of Apple Inc., registered in the U.S. and other countries.
PRÉCAUTIONS CONCERNANT LA SÉCURITÉ

RISK OF ELECTRIC SHOCK DO NOT OPEN
CAUTION
ATTENTION : POUR RÉDUIRE LES RISQUES D'INCENDIE ET DE DÉCHARGE ELECTRIQUE, NE PAS RETIRER LE COUVERCLE (OU LE PANNEAU ARRIÈRE). AUCUNE PIÈCE INTERNE NE PEUT ÊTRE CHANGÉE PAR L'UTILISATEUR. POUR L'ENTRETIEN, S'ADRESSER À UN PERSONNEL QUALIFIÉ.
natural_image
Two types of cable connectors shown side by side: a small electrical component and a coiled cable with two probes (no text or symbols present)natural_image
Illustration of a medical or laboratory setup with a needle inserted into a device and a magnified inset showing the needle tip (no text or symbols present)Communications Bluetooth
natural_image
Line drawing of a cable with a small rectangular component attached (no text or symbols)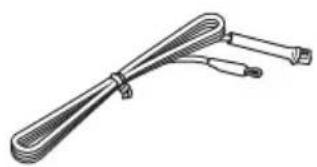
natural_image
Illustration of a coiled cable or hose with two connectors (no text or symbols)12 V CC, 1,5 A, número de modelo: MU18-D120150-A1
natural_image
Illustration of a person using a tool to observe a device on a table, with no visible text or symbols.


- IMPORTANT SAFETY INSTRUCTIONS
- IMPORTANT
- We Want You Listening For A Lifetime
- FCC INFORMATION (for US customers)
- IMPORTANT NOTICE: DO NOT MODIFY THIS UNIT!
- FCC CAUTION
- FOR CANADIAN CUSTOMERS
- NOTICE
- CAUTION: READ THIS BEFORE OPERATING YOUR UNIT.
- WARNING
- CONTENTS
- ■Features
- ■Supplied accessories
- NAMES OF PARTS AND THEIR FUNCTIONS
- ■Top panel
- ①VOLUME
- ②CLOCK
- ③ ALARM
- ④ TUNING
- ⑤PRESET
- ⑥SOURCE (PAIRING)
- ⑦ Display
- ⑧Indicators
- Dimmer function
- Eco Standby mode
- Auto Standby ( page 5)
- Caution
- ■Rear panel
- Connecting the FM antenna
- Note
- BASIC FUNCTIONS
- Adjusting the clock
- Alarm setting
- ■Setting the time and sound
- ■Switching the alarm on/off
- Press ALARM.
- Operations during playing back alarm sound
- ■Stopping the alarm
- Press ALARM or ⏻
- Auto Standby
- LISTENING TO FM STATIONS
- Tuning radio stations
- Presetting radio stations
- Selecting preset radio stations
- LISTENING TO MUSIC FROM YOUR Bluetooth DEVICE
- Installation
- Pairing this unit with your Bluetooth device
- What is pairing?
- ■Pairing (Registration)
- - If using an iPhone/iPad/iPod touch
- - If using other than an iPhone/iPad/iPod touch
- Listening to a Bluetooth device
- Connecting an already-paired device via Bluetooth
- ■Connecting from this unit
- ■Connecting from the connecting device
- Disconnecting a Bluetooth connection
- LISTENING TO EXTERNAL SOURCES
- CHARGING WITH THE USB PORT
- TROUBLESHOOTING
- SPECIFICATIONS
- ■PLAYER SECTION
- AUX IN
- ■AMPLIFIER SECTION
- Bluetooth SECTION
- TUNER SECTION
- ■CHARGING CONNECTOR SECTION
- GENERAL
- Bluetooth
- Handling Bluetooth communications
- PRÉCAUTIONS CONCERNANT LA SÉCURITÉ
- Communications Bluetooth
Brand : YAMAHA
Model : TSX-B15D
Category : Hi-Fi System