
KC-C70E - Air purifier SHARP - Free user manual and instructions
Find the device manual for free KC-C70E SHARP in PDF.


| Product type | Air purifier with humidifier |
| Brand | Sharp |
| Model | KC-C70E |
| Dimensions (W x D x H) | 360 x 265 x 580 mm |
| Weight | 8.5 kg |
| Power supply | 220-240 V, 50/60 Hz |
| Power consumption | 45 W |
| Recommended coverage area | Up to 30 m² |
| Purification technology | Plasmacluster, HEPA filter, activated carbon filter |
| Main functions | Purification, humidification, 3-speed fan, night mode |
| Noise level | 30 - 45 dB(A) |
| Humidification type | Natural evaporation |
| Water tank capacity | 3.0 L |
| Maximum airflow | 200 m³/h |
| Filters | Pre-filter (washable), HEPA filter, activated carbon filter |
| Maintenance and cleaning | Clean pre-filter every month, replace HEPA filter every 2 years |
| Safety | Automatic shutdown in case of tip-over, dust sensor |
| Spare parts and repairability | Filters and nebulizer available |
| Color | White |
Frequently Asked Questions - KC-C70E SHARP
User questions about KC-C70E SHARP
0 question about this device. Answer the ones you know or ask your own.
Ask a new question about this device
Download the instructions for your Air purifier in PDF format for free! Find your manual KC-C70E - SHARP and take your electronic device back in hand. On this page are published all the documents necessary for the use of your device. KC-C70E by SHARP.
USER MANUAL KC-C70E SHARP
*Plasmacluster is a trademark of Sharp Corporation.

KC-C70E KC-C100E KC-C150E
SHARP
SHARP ELECTRONICS (Europe) GmbH
AIR PURIFIER with Humidifying Function OPERATION MANUAL
Please read before operating your new Air Purifier
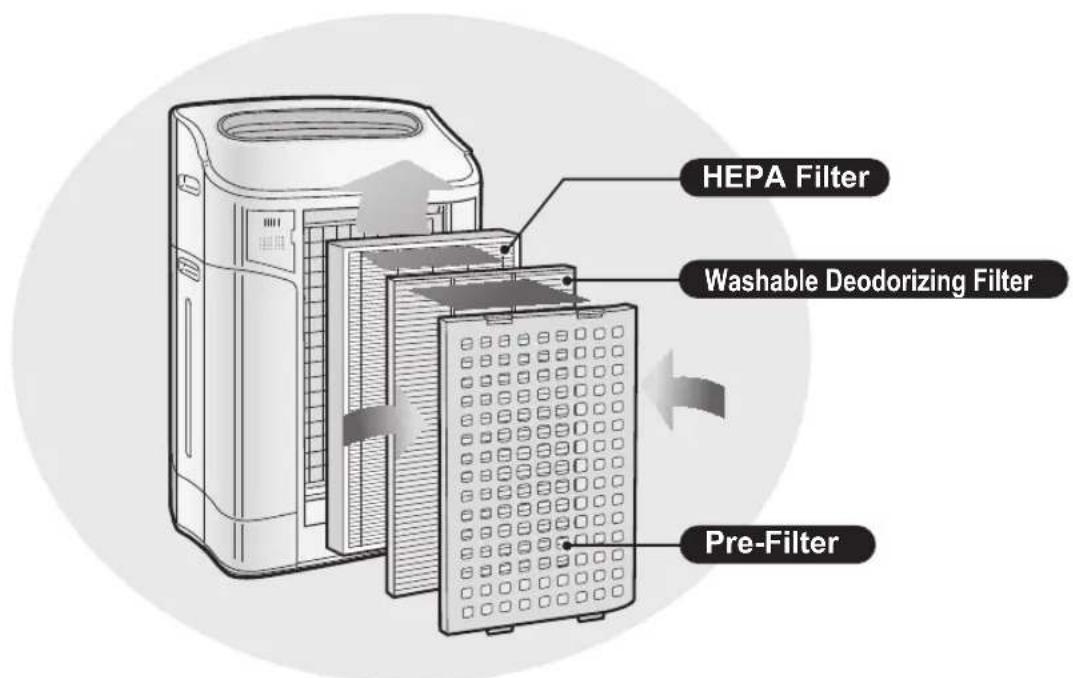
The air purifier draws in room air from the air intake, passes the air through a Pre-Filter, a Washable Deodorizing Filter and a HEPA Filter inside of the unit, then discharges the air through the air outlet. The HEPA Filter can remove 99.97% of dust particles as small as 0.3 microns that pass through the filter and also helps absorb odours. The Washable Deodorizing Filter gradually absorbs odours as they pass through the filter.
Some odours absorbed by the filters may break down over time, resulting in additional odour. Depending on the usage environment, especially when the product is used in extreme environments (significantly more severe than normal household use), this odour may become strong in a shorter period than expected. If the odour persists, the filters should be replaced.
NOTE
- The air purifier is designed to remove air-suspended dust and odour, but not harmful gases (for example, carbon monoxide contained in cigarette smoke). If the source of the odour still exist, the air purifier may not completely remove the odor.
FEATURES
Unique Combination of Air Treatment Technologies
Triple Filtration System + Plasmacluster + Humidification
TRAPS DUST*
Washable pre-filter traps dust and other large airborne particles.
DECREASES ODOURS
Washable deodorizing filter absorbs many common household odours.
REDUCES POLLEN & MOLD*
HEPA filter traps 99.97% of particles as small as 0.3 microns.
FRESHENS
Plasmacluster treats the air similar to the way nature cleans the environment by emitting a balance of positive and negative ions.
HUMIDIFIES
Runs up to 10 hours per filling.**
*When air is drawn through the filter system.
**Room size:
up to 48m² (KC-C150E)
up to 38m² (KC-C100E)
up to 26m² (KC-C70E)
Sensor Technology continuously monitors air quality, automatically adjusting operation based on detected air purity and humidity.
CONTENTS
IMPORTANT SAFETY INSTRUCTIONS... E-2
- WARNING E-2
• CAUTIONS CONCERNING OPERATION .E-3
• INSTALLATION GUIDELINES .....E-3
• FILTER GUIDELINES .....E-3
PART NAMES ......E-4
- ILLUSTRATIVE DIAGRAM ......E-4
- BACK E-4
- FRONT MONITOR ....E-5
PREPARATION FOR USE ......E-6
• FILTER INSTALLATION .....E-6
• REFILLING WATER TANK .....E-7
OPERATION......E-8
- MAIN UNIT DISPLAY ....E-8
- CLEAN AIR & HUMIDIFY MODE ......E-8
- CLEAN AIR MODE ......E-9
- CLEAN ION SHOWER MODE ....E-9
• FAN SPEED BUTTON .....E-9 - Plasmacluster ON/OFF BUTTON ......E-10
• LIGHTS ON/OFF BUTTON .....E-10
• WATER SUPPLY INDICATOR LIGHT ....E-10
• ADJUSTMENT OF SENSOR DETECTION SENSITIVITY ..E-10
CARE AND MAINTENANCE ......E-11
• FILTER INDICATOR LIGHT .....E-11
- BACK PANEL AND SENSORS ......E-11
- UNIT ......E-11
- WATER TANK ......E-12
- WASHABLE DEODORIZING FILTER ....E-12
• HUMIDIFYING TRAY .....E-13
• HUMIDIFYING FILTER .....E-14
• FILTER REPLACEMENT GUIDELINES ....E-15
TROUBLESHOOTING .....E-16
SPECIFICATIONS......E-18
INFORMATION ON PROPER DISPOSAL..E-19
IMPORTANT SAFETY INSTRUCTIONS
When using electrical appliances, basic safety precautions should be followed, including the following:
WARNING - To reduce the risk of electrical shock, fire or injury to persons:
- Read all instructions before using the unit.
- Use only a 220\~240 volt outlet.
- Do not use the unit if the power cord or plug is damaged or the connection to the wall outlet is loosened.
• Periodically remove dust from the plug. - Do not insert fingers or foreign objects into the air intake or air outlet.
- When removing the power plug, always hold the plug and never pull on the cord. Electrical shock and/or fire from a short circuit may result.
- Do not remove the plug when your hands are wet.
- Do not use this unit near gas appliances or fireplaces.
- When refilling the Water Tank, cleaning the unit, or when the unit is not in use, be sure to unplug the unit. Electrical shock and/or fire from a short circuit may result
- If the power cord is damaged, it must be replaced by the manufacturer, its service agent, a Sharp authorized Service Centre or similarly qualified person in order to avoid a hazard.
- Do not operate when using aerosol insecticides or in rooms where there is oily residue, incense, sparks from lit cigarettes, chemical fumes in the air, or in locations where the unit may get wet, such as a bathroom.
- Be cautious when cleaning the unit. Strong corrosive cleansers may damage the exterior.
- Only a Sharp Authorized Service Centre should service this air purifier. Contact the nearest Service Centre for any problems, adjustments, or repairs.
- When carrying the unit, remove the Water Tank and Humidifying Tray first and hold the unit by handles on both sides.
- Do not drink the water in the Humidifying Tray or Water Tank.
- Change the water in the Water Tank daily with fresh tap water and regularly clean the Water Tank and Humidifying Tray. (See E-12 and E-13). When unit is not in use, dispose of the water in the Water Tank and Humidifying Tray. Leaving water in the Water Tank and/or Humidifying Tray may result in mold, bacteria, and bad odours.
In rare cases, this bacteria may cause harmful physical effects.
NOTE - Radio or TV Interference
If this air purifier should cause interference to radio or television reception, try to correct the interference by one or more of the following measures:
- Reorient or relocate the receiving antenna.
- Increase the separation distance between the unit and radio/TV receiver.
- Connect the equipment into an outlet on a circuit different from that to which the receiver is connected.
- Consult the dealer or an experienced radio/TV technician for help.
CAUTIONS CONCERNING OPERATION
- Do not block the intake and/or air outlet.
- Do not use the unit near or on hot objects, such as stoves or heaters or where it may come into contact with steam.
• Always operate the unit in an upright position.
- Hold the unit by using the handles on both sides when moving.
Do not move when the unit is operating.
- Do not operate the unit without the filters, Water Tank, and Humidifying Tray properly installed.
- Do not wash and reuse the HEPA filter.
Not only does it not improve filter performance, it may cause electric shock or malfunction.
- Clean the exterior with a soft cloth only.
The unit surface may be damaged or cracked. In addition, the sensors may malfunction as a result.
- Frequency of maintenance required (descaling) will depend on the hardness or the impurities of the water that you use; the harder the water the more often descaling will be necessary.
- Keep the unit away from water.
INSTALLATION GUIDELINES
- When using the unit, place at least 2m away from equipment utilizing electric waves such as televisions or radios to avoid electrical interference.
- Avoid a location where the sensor is exposed to direct wind.
The unit may not operate properly.
- Avoid use in locations where furniture, fabrics or other items may come in contact with and restrict the air intake and/or air outlet.
- Avoid use in locations where the unit is exposed to condensation or drastic temperature changes. Appropriate conditions are when room temperature is between 5-35°C.
- Place on a stable surface with sufficient air circulation.
When placing the unit on a heavily carpeted area, the unit may vibrate slightly.
Place the unit on an even surface to avoid water leakage from the Water Tank and/or Humidifying Tray.
- Avoid locations where grease or oily smoke is generated.
The unit surface may crack or the sensor may malfunction as a result.
- Leave about 60cm of clearance when placing near a wall.
The wall directly behind the air outlet may become dirty over time. When using the unit for an extended period of time in the same location, periodically clean the wall and protect the wall with a vinyl sheet, etc. to prevent the wall from becoming dirty.
FILTER GUIDELINES
- Follow the instructions in this manual for correct care and maintenance of the filters.
ILLUSTRATIVE DIAGRAM - FRONT

KC-C150E, KC-C100E

KC-C70E
BACK
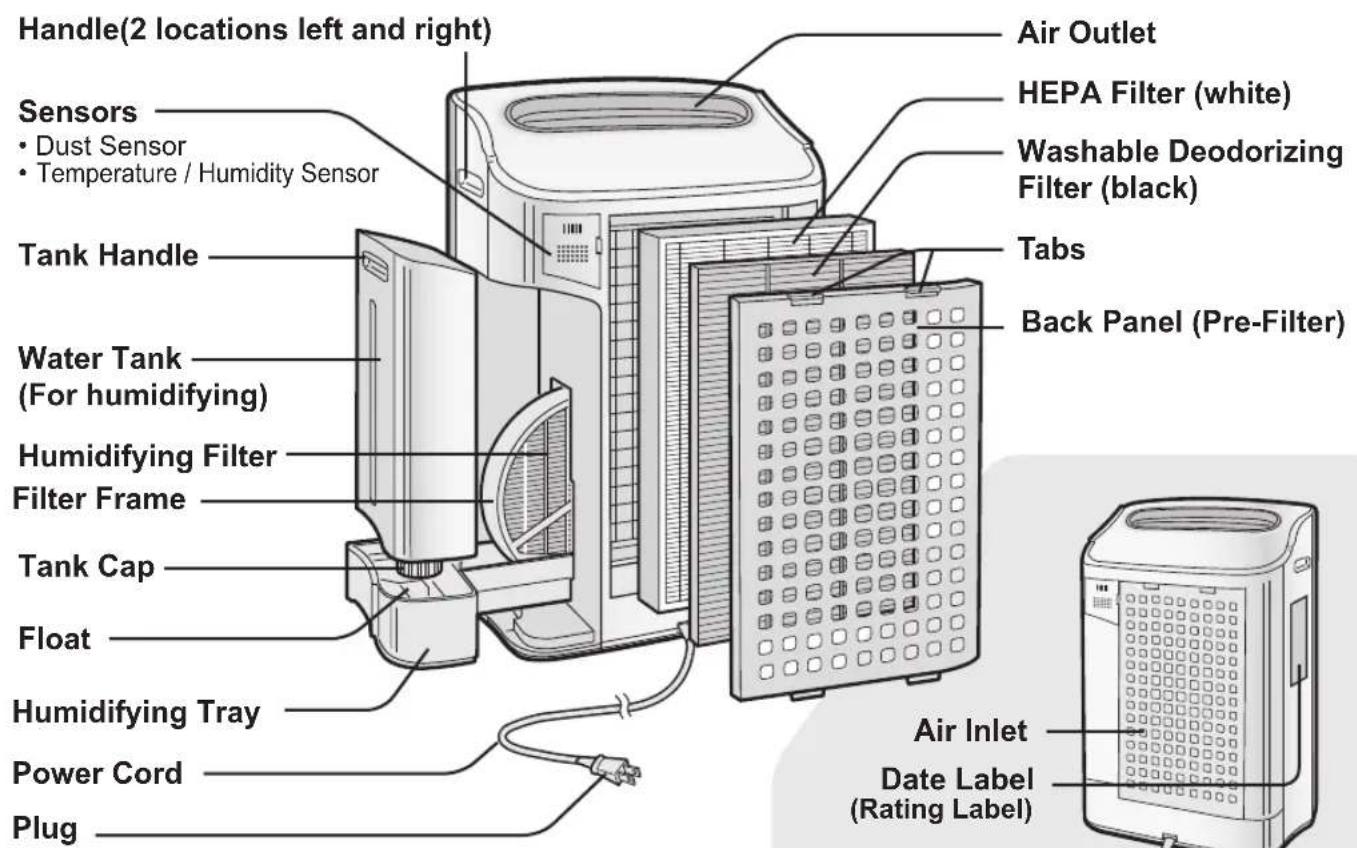
(Shape of plug depends on country.)
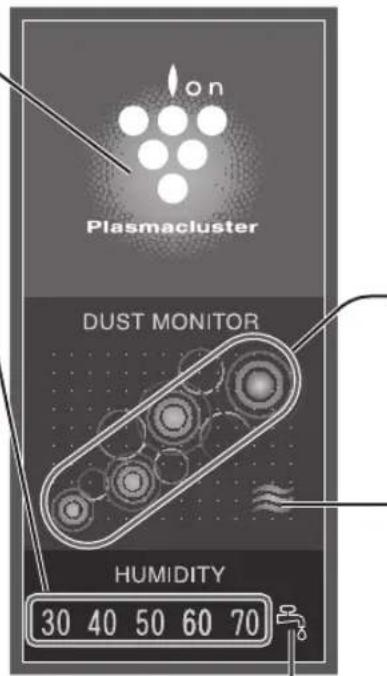
FRONT MONITOR
Indicates condition and humidity of room air.
KC-C100E, KC-C150E
Plasmacluster Indicator Light(blue)
Blue : Plasmacluster ON Light off : Plasmacluster OFF
Humidity Indicator Light (green)
Displays the approximate humidity level in the room. Only displays when the Clean Air & Humidify Mode is selected. Humidity setting cannot be adjusted.
(Ex.) At 60% humidity

DUST MONITOR
The dust sensor continuously monitors the air and changes colour depending on air purity.
ODOUR MONITOR
The odour sensor continuously monitors the air and changes colour depending on odour intensity.
Odour in the room
storongfaint

green yellow red
Water Supply Indicator Light(red)
This light will illuminate when the water tank needs to be refilled.
KC-C70E
Plasmacluster Indicator Light(blue)
Blue : Plasmacluster ON Light off : Plasmacluster OFF
Humidity Indicator Light (green)
Displays the approximate humidity level in the room. Only displays when the Clean Air & Humidify Mode is selected. Humidity setting cannot be adjusted.
High - 65% or more Med - 65% or less of 40% or more Low - 40% or less

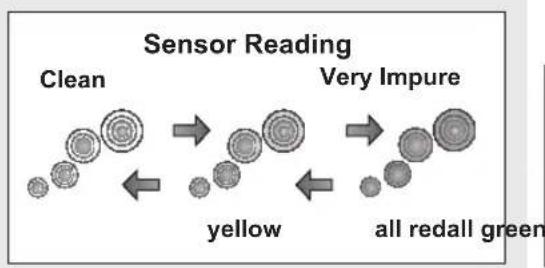
DUST MONITOR
The dust sensor continuously monitors the air and changes colour depending on air purity.

flowchart
graph LR
    A["Clean"] --> B["yellow"]
    B --> C["all redall green"]
    style A fill:#f9f,stroke:#333
    style B fill:#f9f,stroke:#333
    style C fill:#f9f,stroke:#333
Water Supply Indicator Light(red)
This light will illuminate when the water tank needs to be refilled.
FILTER INSTALLATION
To maintain the quality of the filters, they are packed in plastic bags and placed in the unit. Be sure to remove the filters from the plastic bags and replace the filters in the unit before initial use.

Remove the filters
1 Remove the Back Panel.
Gently push down on the tabs, then tilt and remove the back panel.
Tabs on the top
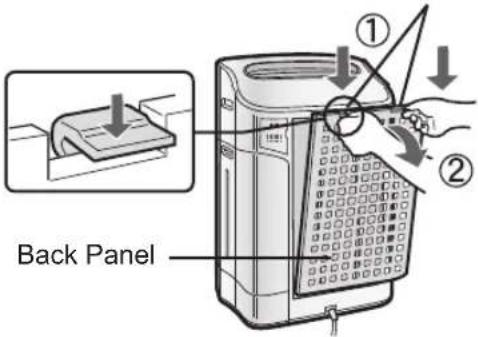
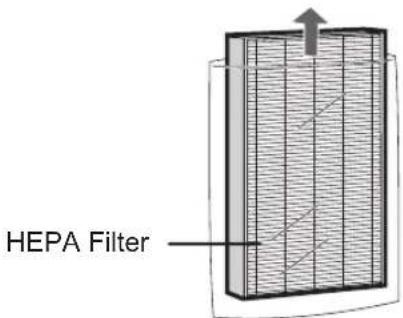
2 Remove the Wash-able Deodorizing Filter (black) and HEPA Filter (white) from the plastic bags.


Install the filters
1 Install the HEPA Filter.
Please make sure that the HEPA Filter is placed in proper orientation.
Installing the filter backwards will affect the performance of the unit.

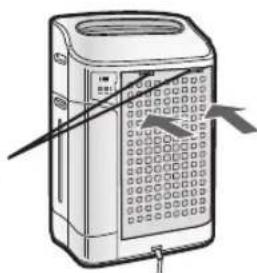
2 Insert the Back Panel's 2 bottom tabs (left and right) into the small holes in the unit, and slide the Washable Deodorizing Filter between the HEPA Filter and the Back Panel.
Washable Deodorizing Filter
Back Panel
Bottom tabs

natural_image
Line drawing of a server rack with a control panel and indicator lights (no text or symbols)3 Gently push in the upper tabs (left and right) to lock in place.
Upper tabs
natural_image
Illustration of a portable electronic device with a grid keypad and indicator lights (no text or symbols visible)4 Fill in the usage start date on the Date Label.
Use the usage start date as a guide for when the filters should be replaced.
Date Label

natural_image
Illustration of a portable electronic device with a grid panel and ventilation slots (no text or symbols visible)REFILLING THE WATER TANK
The unit can be used in the Clean Air Mode without putting water in the Water Tank. When using the Clean Air & Humidify Mode, or the CLEAN ION SHOWER Mode, the Water Tank should be filled with water.
1 Remove the Water Tank by unlatching the top.
2 Remove the Water Tank Cap and carefully fill the Water Tank with tap water.
- Change the water in the Water Tank every day with fresh tap water.
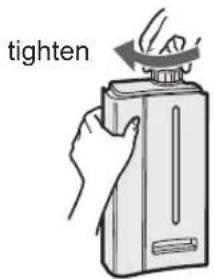
3 After filling, securely tighten the Tank Cap.
- Check to see that there is no water leaking.
- Be sure to wipe off any excess water on the outside of the Water Tank.
- When carrying the Water Tank, hold it with both hands so that the Water Tank opening is facing up.
4 Replace the Water Tank in the unit.
- The top latch will "click" in place when the Water Tank is properly installed.



CAUTION
- Do not expose the unit to water. Short circuit and/or electrical shock may occur as a result.
- Do not use hot water (40°C), chemical agents, aromatic substances, dirty water, or other damaging substances, deformation and/or malfunction may occur.
- Use only fresh tap water. Use of other water sources may promote the growth of mold, fungus and/or bacteria.
MAIN UNIT DISPLAY
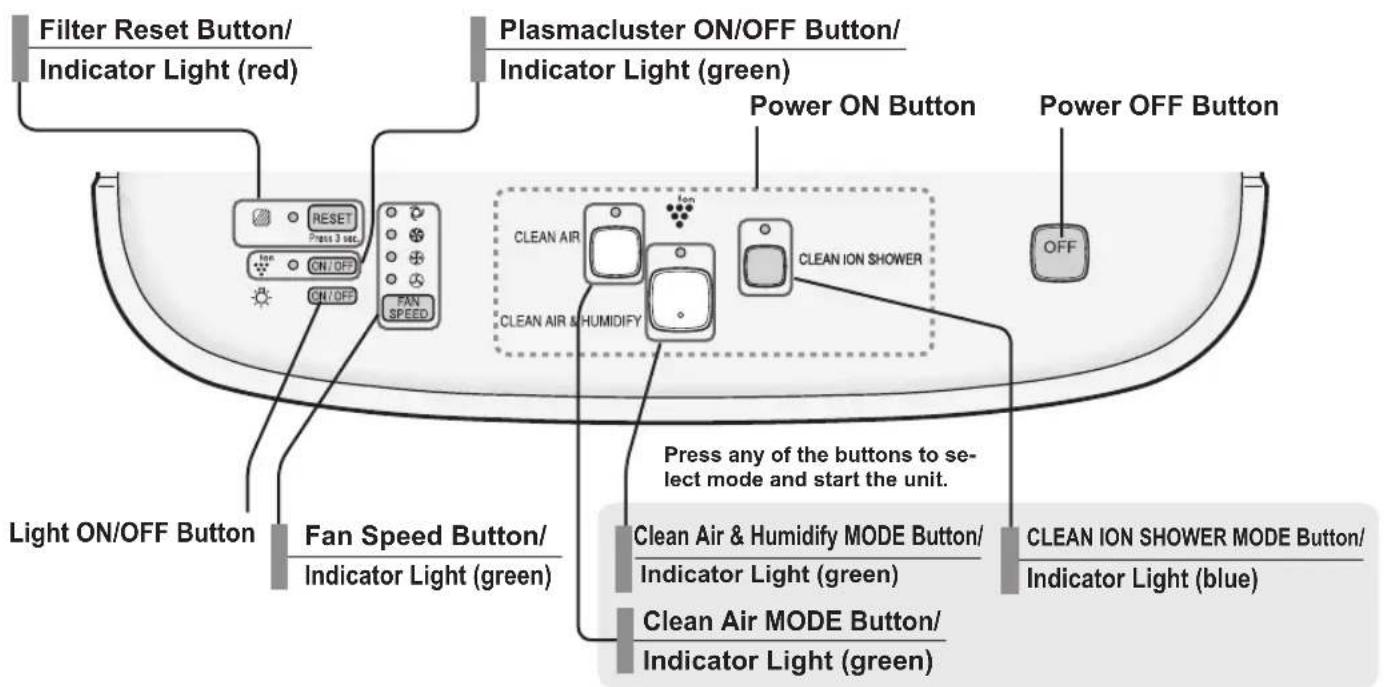
CLEAN AIR & HUMIDIFY MODE
Use the Clean Air & Humidify Mode to quickly clean the air, reduce odours and to humidify.
1 Fill Water Tank. (See E-7)
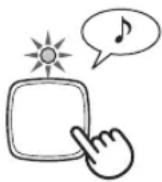
Press the CLEAN AIR & HUMIDIFY MODE Button.
- If the power cord was not unplugged between uses, the unit will automatically re-start at the previously selected settings.
CLEAN AIR & HUMIDIFY

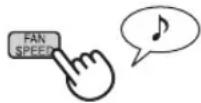
3 Press the FAN SPEED Button to select the desired fan speed.
- Indicator lights will show the fan speed currently selected.


flowchart
graph LR
    A["●"] --> B["○"]
    B --> C["●"]
    C --> D["○"]
    D --> E["●"]
    E --> F["○"]
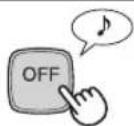
Press the Power OFF Button to turn the unit off.
About Automatic Humidify Mode
About the Temperature/Humidity Sensors. The Temperature/Humidity sensors automatically detect and adjust humidity according to changes in room temperature. Depending on the size and humidity of the room, humidity may not reach 55\~65%. In such cases, it is recommended that CLEAN AIR & HUMIDIFY/MAX MODE be used.
| Temperature | Humidity |
| ~18°C | 65% |
| 18°C~24°C | 60% |
| 24°C~ | 55% |
CLEAN AIR MODE
Use the Clean Air Mode when additional humidity is not required.
1 Press the CLEAN AIR MODE Button on the display.
- If the power cord was not unplugged between uses, the unit will automatically re-start at the previously selected settings.
CLEAN AIR
2 Press the FAN SPEED BUTTON to select the desired fan speed.
- Indicator lights will show the fan speed currently selected.

flowchart
graph LR
    A["●"] --> B["○"]
    B --> C["●"]
    C --> D["○"]
    D --> E["●"]
    E --> F["○"]
Press the Power OFF Button to turn the unit off.
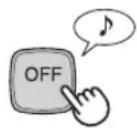
CLEAN ION SHOWER MODE
CLEAN ION SHOWER Mode with humidification releases concentrated Plasmacluster ions. By repeating strong and gentle airflow cycles, the unit effectively removes airborne dust, pollen, mold and allergens from the air drawn through the filter system. Water must be in the Water Tank when this mode is selected.
The unit humidifies when there's water in the Water Tank, and it operates without humidifying when there's no water in it.
1 Press the CLEAN ION SHOWER MODE Button on the display to select this mode.
When the operation finishes, the unit will return to the prior operation.

Press the Power OFF Button to turn the unit off.
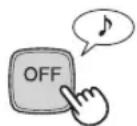
The Fan Speed
Please note the fan speed cannot be adjusted during the CLEAN ION SHOWER MODE.
| AUTO operation 📊 | The fan speed is automatically switched (between HIGH and LOW) depending on the amount of impurities in the air. The sensors detect impurities for efficient air purification. |
| MAX operation 🌐 | The unit will operate at maximum fan speed. |
| MEDIUM operation 🌐 | The unit will operate at medium fan speed. |
| LOW operation 🌐 | The unit will operate quietly using minimal air intake. |
*HiGH fan speed is an intermediate speed between MEDIUM and MAX.
Plasmacluster ON/OFF Button
Press the Plasmacluster ON/OFF Button to turn Plasmacluster Ion Mode ON and OFF. A green light will indicate that the Plasmacluster Ion Mode in ON.

LIGHTS ON/OFF Button
Press this button to turn Front Panel monitor lights ON and OFF.

WATER SUPPLY INDICATOR LIGHT
When the Water Tank is empty, the Water Supply Indicator Light will flash to indicate that the Water Tank should be refilled.
Please note the light will not flash even when the Water Tank is empty during the Clean Air Mode and the Clean ION SHOWER Mode.
Sound indicator setting for water supply.
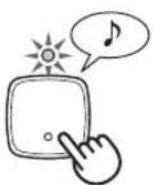
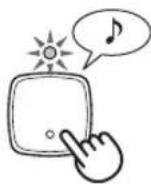
In addition to the Indicator Light, the unit can be set to signal with an audible beep when the Water Tank is empty. With the unit OFF, press the Lights ON/OFF button for 3 seconds to turn the audible signal ON.
Cancellation
To cancel the audible signal, with the unit OFF, press the Lights ON/OFF button again more than 3 seconds.


ADJUSTMENT OF SENSOR DETECTION SENSITIVITY
Set to ‘low’ if the DUST MONITOR and ODOUR MONITOR is constantly red to reduce sensitivity, and set to ‘high’ if the DUST MONITOR and ODOUR MONITOR is constantly green to increase sensitivity.
1 With the unit OFF, press the Fan Speed Button for 3 seconds. The Fan Speed Indicator Lights will display the currently set sensor sensitivity lo
The Fan Speed Indicator Lights will display the currently set sensor sensitivity level. The factory setting is Standard, indicated by the MED light.
2 Press the Fan Speed Button to set the desired sensor sensitivity.
Refer to the diagram on the right to select the desired sensor sensitivity level.
2 Press the Power OFF Button.
Note that if the Power OFF Button is not pushed within 8 seconds of adjusting sensor sensitivity, the setting will be saved automatically. The sensor sensitivity setting will be saved even if the unit is unplugged.
Fan Speed Indicator Light Sensor Detection sensitivity

flowchart
graph TD
    A["●"] --> B["⊗"]
    C["○"] --> D["⊗"]
    E["●"] --> F["⊗"]
    G["●"] --> H["⊗"]
    style A fill:#fff,stroke:#000
    style C fill:#fff,stroke:#000
    style E fill:#fff,stroke:#000
    style G fill:#fff,stroke:#000
    style B fill:#fff,stroke:#000
    style D fill:#fff,stroke:#000
    style F fill:#fff,stroke:#000
    style H fill:#fff,stroke:#000
    note1["...... High"] --> A
    note2["...... Standard"] --> C
    note3["...... Low"] --> E
CARE AND MAINTENANCE
To maintain optimum performance of this air purifier, please clean the unit including the sensor and filters periodically.
When cleaning the unit, be sure to first unplug the power cord, and never handle the plug with wet hands. Electrical shock and/or bodily injury may occur as a result.
FILTER INDICATOR LIGHT
Care Cycle
After 720 hours of use (30 days × 24 hours = 720
The Filter Indicator Light will illuminate as a reminder to perform maintenance of the Back Panel, Sensors, and Humidifying Filter. The Indicator Light will turn on after approximately 720 hours of use.
After performing maintenance, reset the Filter Indicator. Plug the unit in, turn power ON, and press the RESET button for 3 seconds. The Filter Indicator Light will go off. Even if the filter indicator light is already off, the RESET button should be pressed to reset the maintenance timer.

BACK PANEL and SENSORS
Care Cycle
Whenever dust accumulates on the unit or every 2 months
Gently remove dust from the sensor opening and the back panel, using a vacuum cleaner attachment or similar tool.
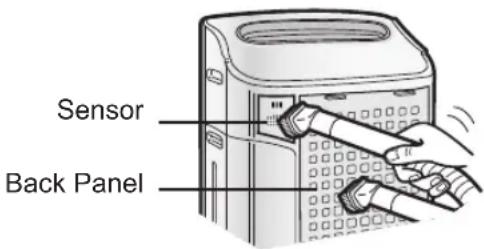
SENSOR FILTER CARE
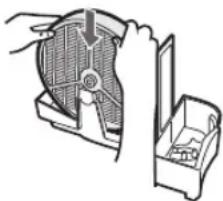
Remove the sensor filter and tap it lightly over a sink or trashcan to dislodge dust. If it is very dirty, wash it gently with lukewarm water. Do not use any detergents or chemicals of any kind to clean the filter. Dry filter completely before replacing in the unit. Do not operate unit without all filters properly installed.

natural_image
Illustration of a hand holding a curved object with directional arrows, no text or symbols presentSensor Filter
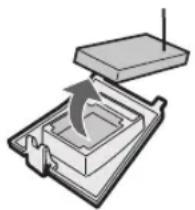
natural_image
Diagram of a mechanical device with an open lid and internal components, showing a downward arrow indicating motion (no text or symbols present)UNIT
Care Cycle Whenever dust accumulates on the unit or every 2 months
To prevent dirt or stains on the unit, clean regularly. If stains are allowed to remain, they may become difficult to remove.
Wipe with a dry, soft cloth
For stubborn stains or dirt, use a soft cloth dampened with warm water.
Do not use volatile fluids
Benzene, paint thinner, polishing powder, may damage the surface.
Do not use detergents
Detergent ingredients may damage the unit.
CARE AND MAINTENANCE
WATER TANK
Care Cycle
Every day when Humidifying
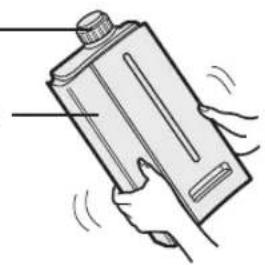
Rinse the inside of the tank by leaving a small amount of lukewarm water inside, closing the tank cap firmly, and shaking the tank. Mild household detergents may be used to clean the inside of the tank, but detergent should be diluted and the tank should be thoroughly rinsed to remove all detergent residue.
(Note the Water Tank is not dishwasher safe.)
Tank Cap
Water Tank
natural_image
Illustration of a hand holding a cylindrical object with motion lines indicating movement (no text or symbols)WASHABLE DEODORIZING FILTER CARE
HAND WASH ONLY! DO NOT DRY IN CLOTHES DRYER!
Care Cycle
When an unpleasant odour is noticed from the air outlet. When performance of filter seems to be reduced and odours persist.
1 Rinse dirt from the WASHABLE DEODORIZING FILTER under lukewarm water.
CAUTION
- When washing the filter for the first time, the rinse water may be brown. This does not affect deodorization performance.
- Avoid bending or folding the filter when washing.

natural_image
Illustration of hands using a tool to lift a block, no text or symbols present2 Drip dry filter to remove excess water.
3 Dry filter completely in a well ventilated area. If possible, dry outdoors.
Dry filter in a sideways position to avoid warping of the filter.

natural_image
Illustration of two woven baskets and a sun with '6G' symbol (no text or symbols on the objects)CAUTION
- Avoid drying filter outdoors during inclement weather (e.g. rain or cold temperatures). Do not allow filter to freeze.
- If filter is dried indoors, take precautions, such as placing towels, etc under the filter to prevent water damage to the floor.
4 Replace the filter in unit. (See E-6).
Dry filter completely before replacing to prevent odours. Do not operate unit without all filters properly installed.
HUMIDIFYING TRAY
Care Cycle 1 month
Frequency of maintenance cycle will depend on the hardness of the water. Avoid spilling water when removing or cleaning the tray.
1 Remove the Water Tank and Humidifying Tray.
Unlatch the Water Tank first, then remove the tray. Use both hands when pulling out the Humidifying Tray to avoid spilling water.

2 Remove the Water Tank and Humidifying Filter from the Humidifying Tray. Drain accumulated water by tilting the Humidifying Tray slowly.
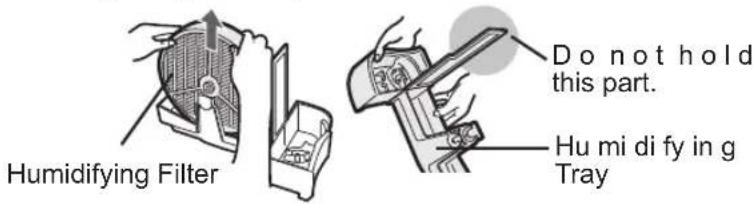
3 Rinse the inside of the Humidifying Tray with lukewarm water to remove impurities.
- Do not remove the Styrofoam float. - Clean difficult-to-reach parts with a cotton-tipped swab or tooth brush.
Float

natural_image
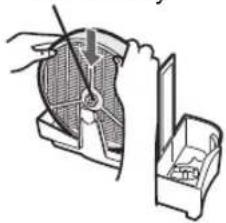
Technical line drawing of a mechanical component with hands operating it (no text or symbols)4 Replace the Humidifying Filter and replace the Humidifying Tray in the unit.
The Humidifying Filter will not fit if placed in backwards. Be sure there is no gap between the Humidifying tray and the unit when the Humidifying Tray is replaced in the unit. The unit may not operate properly if the Humidifying Tray is not properly replaced in the unit.
Color:Gray
natural_image
Illustration of a hand using a tool to adjust or install a fan component, with no visible text or symbols.When Water Deposits are Difficult to Remove
1 Fill Humidifying Tray half-way with lukewarm water, add a small amount of mild kitchen detergent, and leave to soak for about 30 minutes.
Dilute detergent according to instructions on the container. Clean difficult-to-reach parts with a cotton swab or tooth brush.

natural_image
Simple line drawing of a mechanical assembly with a handle and base (no text or symbols)2 Rinse the Humidifying Tray with lukewarm water.
- Rinse until all detergent residue is removed.
- Inadequate rinsing may cause the detergent odor or changes in the shape/ color of the main unit.

natural_image
Technical line drawing of a mechanical bracket or clamp assembly (no text or symbols)CAUTION
- Use only mild kitchen detergents to clean the Humidifying Tray. Use of non-designated chemicals or detergents can cause deformation, tarnishing, cracking (water leakage).
If the Styrofoam float comes off, replace by inserting the tabs of the Float into the holes in the Humidifying Tray as shown in the diagram.
② Insert the tab of the float into the hole.

natural_image
Diagram of a car interior showing a door handle and internal components (no text or symbols)① Insert the float below this tab.
③ Insert the tab on the other side of the float into the hole.
HUMIDIFYING FILTER
Care Cycle Once a month or when the Filter Indicator Light is on.
Frequency of maintenance cycle will depend on the hardness or the impurities of the water that you use; the harder the water the more often descaling will be necessary.
Pay attention not to spill water when cleaning the filter.
1 Remove the Water Tank and Humidifying Tray.
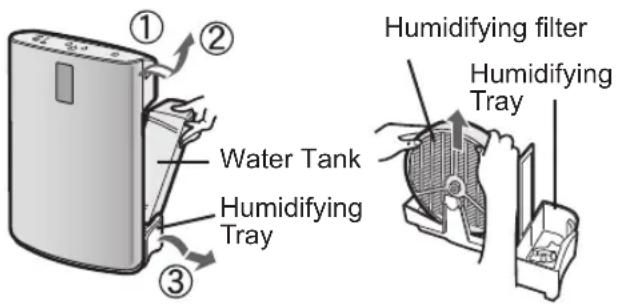
2 Remove the Humidifying Filter from the Humidifying Tray.
Avoid spilling water from the Humidifying Tray
3 Preparing the descaling solution.
Citric acid, available at some drugstores, or 100% bottled lemon juice are used for descaling. Choose either one to use, and prepare the descaling solution.
Dissolve 3 teaspoons of citric acid and 2 1/2 cups of lukewarm water in a suitable container, and stir well.
100% bottled lemon juice can be used for descaling. Use only 100% bottled lemon juice with no pulp (strain juice if necessary). Combine 1/4 cup lemon juice and 3 cups of lukewarm water in a container large enough to hold the Humidifying Filter and stir well.
4 Pre-soak the Humidifying Filter in the solution for 30 minutes before cleaning.
When using lemon juice, it is recommended to pre-soak longer than citric acid.

5 Rinse the Humidifying Filter repeatedly with lukewarm water to remove all the solution residue.
Inadequate rinsing may cause odour and affect the performance and/or appearance of the unit.
* Do not scrub the Humidifying Filter, rinse gently under lukewarm water only.

6 Attach the Humidifying Filter to the Humidifying Tray, and replace the Humidifying Tray in the unit.
•The Humidifying Filter will not fit if placed in backwards. Be sure there is no gap between the Humidifying tray and the unit when the Humidifying Tray is replaced in the unit. The unit may not operate properly if the Humidifying Tray is not properly replaced in the unit.
- When not using the unit for a long period of time, dry the Humidifying Filter completely before replacing.
natural_image
Illustration of a hand holding a fan next to a small box with internal components (no text or symbols)7 Plug in the unit, turn power ON, and press the Filter Reset Button on the display more than 3 seconds to reset.
You may notice reddish-brown or white deposits forming on the surface of the Humidifying Filter. These impurities (calcium, etc.) are due to the impurities contained in tap water; this is not a defect. Replace the Humidifying Filter when it is covered completely in white deposits.
FILTER

FILTER REPLACEMENT GUIDELINES
Filter life will vary depending on the room environment, usage, and location of the unit. If dust or odours persist, replace the filters.
(Refer to "Please read before operating your new Air Purifier")
Guide for filter replacement timing
HEPA Filter
Up to 5 years after opening
Filter life can be greatly reduced depending on the room environment. Cigarette smoke, pet dander, and other airborne particles can reduce filter life. Check filters regularly and replace as necessary.
Washable Deodorizing Filter
The filter can be repeatedly used after washing, or it can be replaced.
Humidifying Filter
Up to 2 years after opening
Filter life can be greatly reduced depending on the room environment. Even if 2 years have not passed, replace the Humidifying Filter if you notice the following:
- Mineral deposits (white, black, or red masses) which are not removed after cleaning or the Humidifying Filter is still dirty.
- Filter is severely damaged or warped.
Replacement Filters
- True HEPA Filter: 1unit Model FZ-C150HFE(for KC-C150E) FZ-C100HFE(for KC-C100E) FZ-C70HFE (for KC-C70E)
- Washable Deodorizing Filter: 1unit Model FZ-C150DFE(for KC-C150E) FZ-C100DFE(for KC-C100E) FZ-C70DFE (for KC-C70E)
• Humidifying Filter: 1unit Model FZ-C100MFE

Replacing the Filters
- Replace filters according to the instructions provided with the replacement filters.
- Use the date labels as a reminder for when the filters should be replaced.
Disposal of Filters
Please dispose of used filters according to any local laws and regulations.
HEPA Filter materials:
- Filter: Polypropylene • Frame: Polyester
Washable Deodorizing Filter Materials: - Polyester, Rayon, Activated charcoal
Humidifying Filter materials: - Rayon, Polyester
TROUBLESHOOTING
Before calling for service, please review the Troubleshooting chart below, since the problem may not be a unit malfunctions.
| SYMPTOM | REMEDY(not a malfunction) |
| Odours and smoke are not removed. | Clean or replace the filters if they appear to be heavily soiled. (See E-11,E-12,E-14) |
| The Front Monitor illuminates green even when the air is im-pure. | The air could be impure at the time the unit was plugged in. Unplug the unit, wait one minute, and plug the unit in again. |
| The Front Monitor illuminates or-ange or red even when the air is clean. | Sensor operation is affected if the dust sensor openings are dirty or clogged. Gently clean the dust sensors (See E-11). |
| A clicking or ticking sound is heard from the unit. | Clicking or ticking sounds may be audible when the unit is generating ions. |
| The discharged air has an odour. | Check to see if the filters are heavily soiled.Clean or replace the filters.Plasmacluster Air Purifiers emit small traces of ozone which may produce an odour. |
| The unit does not operate when cigarette smoke is in the air. | Is the unit installed in a location that is difficult for the sen-sor to detect cigarette smoke?Are the dust sensor openings blocked or clogged?(In this case, clean the openings.) (See E-11) |
| Filter Indicator Light is illu-minated. | After replacing filters, connect the power cord to an outlet and press the Filter Reset Button. (See E-11) |
| The Front Monitor are turned off. | Check to see if the Lights OFF Mode selected. If so, then press the Lights ON/OFF Button to activate the indicator lights. (See E-10) |
| The Water Supply Indicator Light does not illuminate when the tank is empty. | Check Styrofoam float for impurities. Clean the Humidifying-Tray. Ensure unit is located on a level surface. |
| Water lever in the tank does not decrease or decreases slowly. | Check to see if the Humidifying Tray and Water Tank are correctly installed. Check the Humidifying Filter.Clean or replace the filter when it is heavily soiled(See E-14 and E-15). |
| The Front Monitor lights change colour frequently. | The Front Monitor lights automatically change colours as impurities are detected by the dust sensor and odour sen-sor. |
ERROR DISPLAY
If error occurs again, contact the Sharp Service Centre.
| LAMP INDICATION | ERROR DETAILS | REMEDY |
| Flashing of the Fan Speed Indicator Light 'AUTO' or the 'CLEAN ION SHOWER' Light. | Problem in circuit board | Unplug the unit, wait one minute, and plug the unit in again. |
| Flashing of the Humidity Indicator Light '30'. | Abnormal temperature-humidity sensor | |
| Flashing of the Humidity Indicator Light '70'. | ||
| Flashing of the Fan Speed Indicator Light 'LOW'. | Abnormal fan motor | Turn power OFF to cancel the error display, wait one minute, and then turn power ON. |
| Flashing of the Clean Air & Humidify Indicator Light. | Abnormal humidity filter | Verify if the Humidifying Filter, Humidifying Tray and Water Tank are properly installed and then turn power ON again. |
| Model | KC-C100E | KC-C70EKC-C150E | ||||||||
| Power supply | 220~240V 50/60Hz | |||||||||
| Fan Speed Adjustment | MAX | MED | LOW | MAX | MED | LOW | MAX | MED | LOW | |
| CLEAN AIR | Fan Speed (m3/hour) | 396 | 234 | 84 | 306 | 168 | 60 | 210 | 132 | 48 |
| Rated Power(W) | 56 | 18.5 | 5.5(4.9) | 41 | 11.6 | 3.8(3.3) | 26 | 9.5 | 3.7(3.4) | |
| Noise Level(dBA) | 51 | 39 | 17 | 47 | 35 | 15 | 45 | 34 | 15 | |
| CLEAN AIR & HUMIDIFY | Fan Speed (m3/hour) | 390 | 234 | 120 | 288 | 168 | 84 | 186 | 132 | 54 |
| Rated Power(W) | 54 | 20 | 8.8(8.2) | 40 | 13.5 | 6.8(6.3) | 21 | 11.5 | 6.1(5.8) | |
| Noise Level(dBA) | 50 | 39 | 25 | 47 | 35 | 22 | 42 | 34 | 20 | |
| Humidification(mL/hour)*2 | 730 | 500 | 300 | 600 | 400 | 230 | 450 | 330 | 170 | |
| Recommended Room Size(m2)*1 | ~48 | ~38 | ~26 | |||||||
| Water Tank Capacity(L) | 4.3 | 4.0 | 3.0 | |||||||
| Sensors | Dust/odour/Temperature & Humidity | Dust/Temperature & Humidity | ||||||||
| Filter type | Dust collection | HEPA with Microbial control *3 | ||||||||
| Deodorization | Washable Deodorizing | |||||||||
| Cord Lenght(m) | 2.0 | |||||||||
| Dimensions(mm) | 398(W)×288(D)×627(H) | 378(W)×265(D)×586(H) | 360(W)×233(D)×550(H) | |||||||
| Weight(kg) | 11.0 | 9.0 | 8.0 | |||||||
*1 •The Recommended Room Size is appropriate for operating the unit of maximum fan speed. •The Recommended Room Size area indicates the space where a certain amount of dust particles can be removed in 30 minutes. *2 •Humidification Amount changes in accordance with indoor and outdoor temperature and humidity.
Humidification Amount increases as temperatures rise or humidity decreases.
Humidification Amount decreases as temperatures decrease or humidity rises.
•Measurement Condition : 20°C, 30% humidity (JEM1426)
*3 •The class of the HEPA filter by EN1822 is H10.
Standby Power
In order to operate the electrical circuits while the power plug is inserted in the wall outlet, this product
consumes about 0.7W of standby power.
For energy conservation, unplug the power cord when the unit is not in use.

natural_image
Symbol of a trash bin crossed with no text or numbers, representing waste sorting or restriction (no text present)Attention: Your product is marked with this symbol. It means that used electrical and electronic products should not be mixed with general household waste. There is a separate collection system for these products.
A. Information on Disposal for Users (private households)
1. In the European Union
Attention: If you want to dispose of this equipment, please do not use the ordinary dust bin!
Used electrical and electronic equipment must be treated separately and in accordance with legislation that requires proper treatment, recovery and recycling of used electrical and electronic equipment.
Following the implementation by member states, private households within the EU states may return their used electrical and electronic equipment to designated collection facilities free of charge*. In some countries* your local retailer may also take back your old product free of charge if you purchase a similar new one.
*) Please contact your local authority for further details.
If your used electrical or electronic equipment has batteries or accumulators, please dispose of these separately beforehand according to local requirements.
By disposing of this product correctly you will help ensure that the waste undergoes the necessary treatment, recovery and recycling and thus prevent potential negative effects on the environment and human health which could otherwise arise due to inappropriate waste handling.
2. In other Countries outside the EU
If you wish to discard this product, please contact your local authorities and ask for the correct method of disposal.
For Switzerland: Used electrical or electronic equipment can be returned free of charge to the dealer, even if you don't purchase a new product. Further collection facilities are listed on the homepage of www.swico.ch or www.sens.ch.
B. Information on Disposal for Business Users.
1. In the European Union
If the product is used for business purposes and you want to discard it:
Please contact your SHARP dealer who will inform you about the take-back of the product. You might be charged for the costs arising from take-back and recycling. Small products (and small amounts) might be taken back by your local collection facilities.
For Spain: Please contact the established collection system or your local authority for take-back of your used products.
2. In other Countries outside the EU
If you wish to discard of this product, please contact your local authorities and ask for the correct method of disposal.

natural_image
Illustration of a portable electronic device with a grid keypad and indicator lights (no text or symbols)natural_image
Illustration of a portable electronic device with grid and ventilation slots (no text or symbols)AUFFÜLLEN DES WASSERBEHÄLTERS
VORSICHT
CLEAN AIR & HUMIDIFY
natural_image
Illustration of a hand inserting a component into a device panel (no text or symbols visible)
natural_image
Illustration of a hand holding a curved object with directional arrows, no text or symbols present
GERÄT
natural_image
Illustration of a hand holding a cylindrical object with motion lines indicating movement (no text or symbols)natural_image
Illustration of a hand using a tool to lift a block, creating a wavy line (no text or symbols)natural_image
Illustration of two shopping bags with a handle and a sun symbol (no text or labels)ACHTUNG
natural_image
Illustration of a mechanical device with a tool interacting with a housing (no text or symbols visible)natural_image
Technical line drawing of a mechanical assembly with a hand operating a tool (no text or symbols)natural_image
Technical line drawing of a mechanical bracket or clamp assembly (no text or symbols)ACHTUNG
natural_image
Illustration of a hand holding a fan next to a box, showing internal components (no text or symbols)SHARP machines are proprietary articles which are produced with precision and care according to most modern production methods.
In case of proper handling and with considering of the instruction book, this machine will serve you well for a long time.
Of course, a defect cannot be ruled out.
If your appliance has a warrantyable defect in the period of warranty, please contact your dealer, where you bought the appliance. This dealer is your only contact person for any claim of warranty.
As proof for repairs during Warranty period, you need the invoice of the machine.
Please bring your defect appliances also to your dealer (where you bought the appliance) when the warranty period is over.
SHARP ELECTRONICS (EUROPE) GmbH
Parts & Technical Service
SERVICE VORGEHENSWEISE - GILT NUR FÜR DEUTSCHLAND
Lieber SHARP-Kunde
Parts & Technical Service
natural_image
Line drawing of a portable electronic device with a control panel and indicator lights (no text or symbols)natural_image
Illustration of a portable electronic device with control panel and indicator lights (no text or symbols)natural_image
Illustration of a portable electronic device with control panel and buttons (no text or symbols visible)REMLISSAGE DU RÉSERVOIR D'EAU
ATTENTION
natural_image
Illustration of a hand holding a curved cable or wire with directional arrows, no text or symbols presentFiltre de capteur

natural_image
Diagram of a mechanical device with an open lid and internal components, showing a force arrow (no text or symbols)APPAREIL
Cycle d'entretien
natural_image
Illustration of a hand holding a cylindrical object with motion lines indicating movement (no text or symbols)ENTRETIEN DU FILTRE DÉSODORISANT LAVABLE
LAVAGE À LA MAIN UNI- QUEMENT! PAS DE SÉCHAGE EN MA- CHINE!
Cycle d'entretien
natural_image
Illustration of a hand using a tool to spray or brush over a surface, with no visible text or symbols.natural_image
Illustration of two gift bags with a sun symbol above (no text or symbols)ATTENTION
natural_image
Mechanical assembly diagram showing a motor or conveyor system with a handle and base, no visible text or symbolsnatural_image
Illustration of a hand using a tool to adjust or install a mechanical component, with no visible text or symbols.natural_image
Technical line drawing of a mechanical assembly with a handle and bracket (no text or symbols)natural_image
Technical line drawing of a mechanical bracket or clamp assembly (no text or symbols)ATTENTION
natural_image
Diagram of a car interior showing a mounted device with no visible text or symbolsnatural_image
Illustration of a hand holding a fan blade next to a small box (no text or symbols visible)INFORMATIE OVER DE AFVALVERWERKING...N-19
BELANGRIJKE VEILIGHEIDSVOORSCHRIFTEN
natural_image
Illustration of a portable electronic device with a grid keypad and indicator lights (no text or symbols)natural_image
Illustration of a portable electronic device with a grid of buttons and a handle (no visible text or symbols)VULLEN VAN HET WATERRESERVOIR
LET OP
CLEAN AIR & HUMIDIFY
3 Druk op de VENTILATORSNELHEIDKNOP om de gewenste ventilatorsnelheid te selecteren.
WATER BIJVUL-INDICATOR
natural_image
Illustration of a hand holding a tool interacting with a grid-patterned object (no text or symbols visible)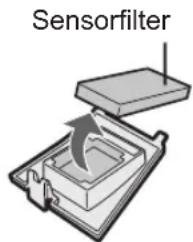
LUCHTREINIGER
natural_image
Illustration of a hand holding a cylindrical object with motion lines indicating movement (no text or symbols)ONDERHOUD VAN HET AFWASBAAR GEURFILTER
ALLEEN MET DE HAND WASSEN! NIET DROGEN IN DE DROOGTROMMEL!
Onderhouds- cyclus
natural_image
Illustration of a hand using a tool to lift a block, creating a wavy line (no text or symbols)natural_image
Illustration of two shopping bags and a sun symbol (no text or symbols present)LET OP
natural_image
Illustration of a hand using a tool to adjust or install a mechanical component, with no visible text or symbols.natural_image
Technical line drawing of a mechanical assembly with a handle and base (no text or symbols)natural_image
Technical line drawing of a mechanical bracket or clamp assembly (no text or symbols)LET OP
natural_image
Diagram of a car interior showing a door handle and internal components (no text or symbols)natural_image
Illustration of a hand holding a fan blade next to a box with tools (no text or symbols visible)- WIDOK OD TYŁU....PL-4
• PANEL PRZEDNI....PL-5
PRZYGOTOWANIE PL-6
- INSTALACJA FILTRÓW PL-6
• NAPEŁNIANIE ZBIORNIKA WODA....PL-7
OBSŁUGA....PL-8
• WYŚWIETLACZ NA URZĄDZENIU GŁÓWNYM .....PL-8
• TRYB OCZYSZCZANIA I NAWILŻANIA....PL-8
• TRYB OCZYSZCZANIA PL-9
• ZMYWALNY FILTR USUWAJACY ZAPACHY .....PL-12
• POJEMNIK NAWILŻACZA PL-13
• FILTR NAWILŻAJĄCY.... PL-14
• WSKAZÓWKI DOTYCZĄCE WYMIANY FILTRÓWPL-15
ROZWIAZYWANIE PROBLEMÓW.... PL-16
DANE TECHNICZNE.... PL-18
USUWANIE ZUŻYTEGO PRODUKTU....PL-19
natural_image
Line drawing of a portable electronic device with grid-patterned front panel and control buttons (no text or symbols)PANEL PRZEDNI
natural_image
Illustration of a portable electronic device with a grid keypad and indicator lights (no text or symbols)natural_image
Line drawing of a portable electronic device with grid and ventilation slots (no text or symbols)NAPEŁNIANIE ZBIORNIKA WODĄ
OSTRZEŻENIE
CLEAN AIR & HUMIDIFY

Przycisk PLASMACLUSTER ON/OFF
natural_image
Illustration of a hand holding a tool with curved lines and a grid pattern, no text or symbols presentFiltr czujnika

natural_image
Diagram of a mechanical device with an open lid and internal components, showing a downward arrow indicating motion (no text or symbols present)URZĄDZENIE GŁÓWNE
Częstotliwość
natural_image
Illustration of a hand using a tool to lift a block, with motion lines indicating speed (no text or symbols)OSTRZEŻENIE
natural_image
Illustration of two gift bags and a sun symbol (no text or symbols present)OSTRZEŻENIE
natural_image
Illustration of a hand using a tool to adjust or install a device into a container (no text or symbols visible)natural_image
Simple line drawing of a mechanical device with a handle and lever (no text or symbols)natural_image
Technical line drawing of a mechanical assembly with no visible text or symbolsOSTRZEŻENIE
natural_image
Diagram of a device's internal structure with no visible text or symbolsnatural_image
Illustration of a hand inserting a fan into a box, showing internal components (no text or symbols)natural_image
Symbol of a trash bin crossed with a diagonal line, no text or numbers presentnatural_image
Illustration of a portable electronic device with a grid panel and control panel (no text or symbols visible)SU TANKININ YENİDEN DOLDURULMASI
DİKKAT
CLEAN AIR & HUMIDIFY

natural_image
Illustration of a hand holding a curved object with directional arrows, no text or symbols present
ÜNİTE
natural_image
Illustration of a hand holding a cylindrical object with motion lines indicating movement (no text or symbols)natural_image
Illustration of a hand using a showerhead to clean or spray the surface, with no text or symbols present.natural_image
Illustration of two stylized objects with a sun icon above them, no text or symbols presentDİKKAT
natural_image
Line drawing of a mechanical device with a handle and internal components (no text or symbols)natural_image
Technical line drawing of a mechanical assembly with no visible text or symbolsDIKKAT
natural_image
Diagram of a car seatbelt with a small device inside, showing no text or symbolsnatural_image
Illustration of a hand holding a fan next to a small box (no text or symbols visible)(KC-C150E J) FZ-C150HFE
(KC-C70E J) FZ-C70HFE
natural_image
Illustration of a hand operating a fan next to a small box (no text or symbols visible)natural_image
Diagram of a mechanical device with a handle and lever mechanism (no text or symbols)natural_image
Technical line drawing of a mechanical assembly with no visible text or symbolsتحذیر
natural_image
Illustration of hands using a tool to lift a rectangular object, no text or symbols presentnatural_image
Illustration of two stylized shopping bags and a sun with a smiling face (no text or symbols)تحذیر
تحذیر
natural_image
Illustration of a vintage computer monitor with a grid of function keys (no text or symbols visible)natural_image
Illustration of a portable electronic device with a grid keypad and indicator lights (no text or symbols)natural_image
Illustration of a portable electronic device with a grid keypad and indicator lights (no text or symbols visible)إزالة المصافي
1
natural_image
Diagram of a rectangular container with internal vertical channels and an upward arrow, no text or symbols present.المرقب Adamsamy


- SHARP
- Please read before operating your new Air Purifier
- NOTE
- FEATURES
- CONTENTS
- IMPORTANT SAFETY INSTRUCTIONS
- NOTE - Radio or TV Interference
- CAUTIONS CONCERNING OPERATION
- INSTALLATION GUIDELINES
- FILTER GUIDELINES
- FRONT MONITOR
- Plasmacluster Indicator Light(blue)
- Humidity Indicator Light (green)
- DUST MONITOR
- ODOUR MONITOR
- Water Supply Indicator Light(red)
- FILTER INSTALLATION
- Remove the filters
- Remove the Back Panel.
- Remove the Wash-able Deodorizing Filter (black) and HEPA Filter (white) from the plastic bags.
- Install the filters
- Install the HEPA Filter.
- Insert the Back Panel's 2 bottom tabs (left and right) into the small holes in the unit, and slide the Washable Deodorizing Filter between the HEPA Filter and the Back Panel.
- Gently push in the upper tabs (left and right) to lock in place.
- Fill in the usage start date on the Date Label.
- REFILLING THE WATER TANK
- CAUTION
- CLEAN AIR & HUMIDIFY MODE
- About Automatic Humidify Mode
- CLEAN AIR MODE
- Press the CLEAN AIR MODE Button on the display.
- Press the FAN SPEED BUTTON to select the desired fan speed.
- CLEAN ION SHOWER MODE
- Press the CLEAN ION SHOWER MODE Button on the display to select this mode.
- The Fan Speed
- Plasmacluster ON/OFF Button
- LIGHTS ON/OFF Button
- WATER SUPPLY INDICATOR LIGHT
- Cancellation
- ADJUSTMENT OF SENSOR DETECTION SENSITIVITY
- CARE AND MAINTENANCE
- FILTER INDICATOR LIGHT
- BACK PANEL and SENSORS
- Care Cycle
- SENSOR FILTER CARE
- UNIT
- Care Cycle Whenever dust accumulates on the unit or every 2 months
- Wipe with a dry, soft cloth
- Do not use volatile fluids
- Do not use detergents
- WATER TANK
- Every day when Humidifying
- WASHABLE DEODORIZING FILTER CARE
- Rinse dirt from the WASHABLE DEODORIZING FILTER under lukewarm water.
- Drip dry filter to remove excess water.
- Dry filter completely in a well ventilated area. If possible, dry outdoors.
- Replace the filter in unit. (See E-6).
- HUMIDIFYING TRAY
- Care Cycle 1 month
- Remove the Water Tank and Humidifying Tray.
- Remove the Water Tank and Humidifying Filter from the Humidifying Tray. Drain accumulated water by tilting the Humidifying Tray slowly.
- Rinse the inside of the Humidifying Tray with lukewarm water to remove impurities.
- Replace the Humidifying Filter and replace the Humidifying Tray in the unit.
- When Water Deposits are Difficult to Remove
- Fill Humidifying Tray half-way with lukewarm water, add a small amount of mild kitchen detergent, and leave to soak for about 30 minutes.
- Rinse the Humidifying Tray with lukewarm water.
- HUMIDIFYING FILTER
- Remove the Humidifying Filter from the Humidifying Tray.
- Preparing the descaling solution.
- Pre-soak the Humidifying Filter in the solution for 30 minutes before cleaning.
- Rinse the Humidifying Filter repeatedly with lukewarm water to remove all the solution residue.
- Attach the Humidifying Filter to the Humidifying Tray, and replace the Humidifying Tray in the unit.
- Plug in the unit, turn power ON, and press the Filter Reset Button on the display more than 3 seconds to reset.
- FILTER REPLACEMENT GUIDELINES
- Guide for filter replacement timing
- HEPA Filter
- Washable Deodorizing Filter
- Replacement Filters
- Replacing the Filters
- Disposal of Filters
- TROUBLESHOOTING
- ERROR DISPLAY
- Standby Power
- Information on Disposal for Users (private households)
- In the European Union
- In other Countries outside the EU
- Information on Disposal for Business Users.
- AUFFÜLLEN DES WASSERBEHÄLTERS
- VORSICHT
- GERÄT
- ACHTUNG
- SHARP ELECTRONICS (EUROPE) GmbH
- SERVICE VORGEHENSWEISE - GILT NUR FÜR DEUTSCHLAND
- REMLISSAGE DU RÉSERVOIR D'EAU
- ATTENTION
- APPAREIL
- ENTRETIEN DU FILTRE DÉSODORISANT LAVABLE
- BELANGRIJKE VEILIGHEIDSVOORSCHRIFTEN
- VULLEN VAN HET WATERRESERVOIR
- LET OP
- WATER BIJVUL-INDICATOR
- LUCHTREINIGER
- ONDERHOUD VAN HET AFWASBAAR GEURFILTER
- ALLEEN MET DE HAND WASSEN! NIET DROGEN IN DE DROOGTROMMEL!
- Onderhouds- cyclus
- PANEL PRZEDNI
- NAPEŁNIANIE ZBIORNIKA WODĄ
- OSTRZEŻENIE
- Przycisk PLASMACLUSTER ON/OFF
- URZĄDZENIE GŁÓWNE
- Częstotliwość
- SU TANKININ YENİDEN DOLDURULMASI
- DİKKAT
- ÜNİTE
- DIKKAT
- تحذیر
- إزالة المصافي
- 1
- المرقب Adamsamy
Brand : SHARP
Model : KC-C70E
Category : Air purifier