
TR-56C - Radio DENVER - Free user manual and instructions
Find the device manual for free TR-56C DENVER in PDF.


| Product type | Portable radio |
| Brand | Denver |
| Model | TR-56C |
| Dimensions (approx.) | 150 x 80 x 30 mm |
| Weight (approx.) | 200 g (with batteries) |
| Power supply | 2 AA batteries (not included) or 3 V DC power adapter (not included) |
| Frequency ranges | FM: 87.5 – 108 MHz; AM: 520 – 1710 kHz |
| Speaker | Built-in 66 mm speaker |
| Headphone jack | 3.5 mm jack |
| Display | LCD display with backlight |
| Main functions | FM/AM radio, auto scan, station presets, alarm clock, programmable sleep timer, clock display |
| Antenna | Telescopic antenna for FM; built-in ferrite antenna for AM |
| Cleaning | Wipe with a soft, dry cloth. Do not use chemical products. |
| Safety | Do not expose to water or excessive heat. Remove batteries during prolonged non-use. |
| Spare parts and repairability | No user-serviceable parts. Contact Denver after-sales service for any repairs. |
| Package contents | TR-56C radio, user manual |
Frequently Asked Questions - TR-56C DENVER
User questions about TR-56C DENVER
0 question about this device. Answer the ones you know or ask your own.
Ask a new question about this device
Download the instructions for your Radio in PDF format for free! Find your manual TR-56C - DENVER and take your electronic device back in hand. On this page are published all the documents necessary for the use of your device. TR-56C by DENVER.
USER MANUAL TR-56C DENVER
Operating Instructions

SAFETY INSTRUCTIONS
THESE IMPORTANT SAFETY INSTRUCTIONS ARE INCLUDED, AS APPLICABLE TO THE APPLIANCE, CONVEYING TO THE USER THE INFORMATION ITEMIZED BELOW
- Read instructions-All the safety and operating instructions should be read before the appliance is operated.
- Retain instructions-The safety and operating instructions should be retained for future reference.
- Warnings-All warnings and cautions on the appliance and in the operating instructions should be adhered to.
- Follow instructions-All operating and use instructions should be followed.
- Water and Moisture-The appliance should not be used near water, e.g. near a bathtub, washbowl, kitchen sink, laundry tub, in a wet basement, or near a swimming pool or the like.
- Wall or Ceiling Mounting-The appliance should not be mounted to a wall or ceiling.
- Ventilation-The appliance should be situated in the location or position which does not interfere with its proper ventilation. For example, the appliance should not be situated on a bed, sofa, rug or similar surface that may block the ventilation openings, or placed in a built-in installation, such as a bookcase or cabinet, that may impede the flow of air through the ventilation openings.
- Heat-The appliance should be situated away from heat sources such as radiators, heat registers, stoves, or other appliances (including amplifiers) that produce heat.
- Power Sources-The product should be operated only with the type of power supply indicated on the marking label. If you are not sure of the type of power supply to your home, consult your product dealer or local power company. For products intended to operate from battery power, or other sources, refer to the operation instructions.
- Grounding Polarization-This product may be equipped with a polarized alternating current line plug (a plug having one blade wider than the other). This plug will fit into the power outlet only one way this is a safety feature. If you are unable to insert the plug fully into the outlet, try reversing the plug. If the plug should still fail to fit, contact your electrician to replace your obsolete outlet. Do not defeat the safety purpose of the polarized plug.
- Power-Cord Protection-Power supply cords should be routed so that they are not likely to be walked on or pinched by items placed upon or against them, paying particular attention to cords at plugs, convenience receptacles, and the point where they exit from the appliance.
- Cleaning-The appliance should be cleaned only as recommended by the manufacturer.
- Not in use periods-The power cord of the appliance should be unplugged from the outlet when left or not use for a long period of time.
- Object and Liquid Entry-Care should be taken so that objects do not fall and liquids are not spilled into the product case through product openings.
- Damage for repairing-Unplug this product from the wall outlet and take it to qualified service personnel under the following conditions.
a) When the power-supply cord or plug is damaged.
b) If liquid has been spilled into, or objects have fallen into the product.
c) If the product has been exposed to rain or water.
d) If the product does not operate when used according to the operating instructions.
Adjust only those controls that are covered by the operating instructions as an improper adjustment of other controls may interfere with the product's normal operation.
e) If the product has been dropped or damaged in any way.
f) When the product exhibits a distinct change in performance—this indicates a need for service. - Servicing-The user should not attempt to service the product beyond that described in the operating instruction. All servicing should be referred to qualified service personnel.
- Power Lines-An outside antenna system should not be located in the vicinity of overhead power lines, or other electric light or power circuits, or where it can fall into such power lines or circuits. When installing an outside antenna system, extreme care should be taken to keep from touching power lines or circuits as contact with them might be fatal.
- If an outside antenna is connected to the receiver, be sure the antenna system is grounded so as to provide some protection against voltage surges and built up static. Section 810 of the National Electrical Code ANSI/NEFA 70 provides information with respect to proper grounding of the mast and supporting structure, grounding conductress, location of antenna-discharge unit, size of grounding electrodes, and requirements for the grounding electrode (see figure).
- Cleaning-Unplug this product from the wall outlet before cleaning. Do not use liquid cleaners or aerosol cleaners. Use a damp cloth for cleaning.
- Lightning-For added protection for this product during a lightning storm, or when it is left unattended and unused for long period of time, unplug it from the wall outlet and disconnect the antenna or cable system. This will prevent damage to the product due to lightning and power-line surges.
- Safety Check-Upon completion of any service or repairs to this product, ask the service technician to perform safety checks to determine that the product is in proper operation condition.
- Overloading-Do not overload wall outlets, extension cords, or integral convenience receptacles as this can result in a risk of fire or electric shock.

- VOLUME CONTROL KNOB
- ON/FM SWITCH
- TUNER
- POWER INDICATOR
- LOUD SPEAKER
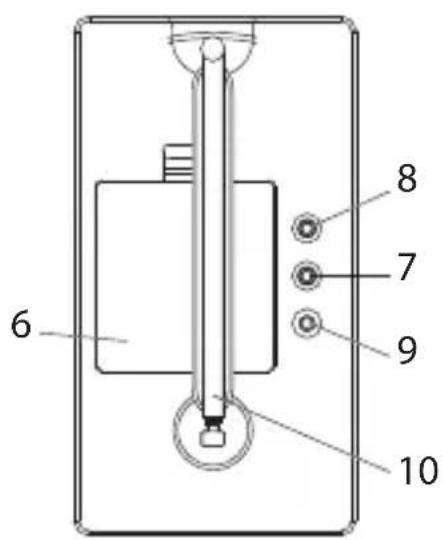
- BATTERY COMPARTMENT
- AUX IN
- PHONES JACK
- DC 6V JACK
- TELESCOPIC ANTENNA
Setup
For use with battery power, remove the Battery Compartment Cover and insert 4 “AA” size alkaline batteries, observing the proper polarity (+/-) as indicated inside the Battery Compartment. Reattach Battery Compartment Cover.
For use with electrical AC power, plug the AC Power Cord into a standard 230-volt AC electrical outlet.
DC 6V JACK
Connect to the DC power adaptor.
To Use
- Turn on the radio by selecting the Switch to FM.
- Turn the Volume Control Knob clockwise to adjust the volume to the desired level.
- Select station by rotating the Tuning Knob.
- To listen to an external input source such as a portable CD player or MP3 player, plug a patch cable (not included) from the external device into the 3.5mm AUX IN Jack on the rear of the unit.
- When finished using your radio, turn the Band Selector Switch to the "OFF" position.
NOTES:
- Be sure your headphones have a 3.5mm stereo plug. When headphones are connected, the speakers will be automatically disconnected. Adjust the volume control to the desired level.
Care and Maintenance
CAUTION: Do not allow any liquids on the inside of the product.
- Use a soft, damp cloth to clean the unit's exterior.
- Never use benzene or other strong chemical cleaners, as these could damage the product's finish.
Battery Handling and Usage
WARNING: Only adults should handle batteries. Do not allow a child to use this product unless the Battery Compartment Cover is securely attached to the Battery Compartment in accordance with all product usage instructions.
- Follow the battery manufacturer's safety and usage instructions.
- Keep batteries away from children and pets.
- Do not mix a used battery with a new battery, or mix different chemistries or sizes of batteries.
- Insert the batteries observing the proper polarity (+/-) as indicated inside the battery compartment. Failure to properly align the battery polarity can cause personal injury and/or property damage.
- Remove spent or discharged batteries from the product. Remove the batteries when the product will not be used for extended periods of time.
- Never throw batteries into a fire. Do not expose batteries to fire or other heat sources.
- Battery Disposal: Spent or discharged batteries must be properly disposed of and recycled in compliance with all applicable laws. For detailed information, contact your local solid waste authority.
ALL RIGHTS RESERVED, COPYRIGHT DENVER ELECTRONICS A/S
DENVER®
www.denver-electronics.com


Electric and electronic equipment contains materials, components and substances that can be hazardous to your health and the environment, if the waste material (discarded electric and electronic equipment) is not handled correctly.
Electric and electronic equipment is marked with the crossed out trash can symbol, seen below. This symbol signifies that electric and electronic equipment should not be disposed of with other household waste, but should be disposed of separately.
All cities have established collection points, where electric and electronic equipment can either be submitted free of charge at recycling stations and other collection sites, or be collected from the households. Additional information is available at the technical department of your city.
Imported by:
DENVER ELECTRONICS A/S
Stavneagervej 22
DK-8250 Egaa
Denmark
www.facebook.com/denverelectronics
DENVER ELECTRONICS
FM RADIO
Model: TR-56C
SIKKERHEDSANVISNINGER
DISSE VIGTIGE SIKKERHEDSANVISNINGER ER MEDTAGET FOR AT GIVE BRUGER AF APPARATET DE N∅DVENDIGE OPLYSNINGER, SOM SPECIFICERET HERUNDER
SAFETY INSTRUCTIONS
DEZE BELANGRIJKE VEILIGHEIDINSTRUCTIES ZIJN VAN TOEPASSING OP EN MEEGELEVERD MET HET APPARAAT, OM DE GEBRUIKER VAN DE VOLGENDE INFORMATIE TE VOORZIEN
TURVALLISUUSOHJEET
TÄTÄ LAITETTA KOSKEVAT TÄRKEÄT TURVALLISUUSOHJEET OVAT MUKANA JA ANTAVAT KÄYTTÄJÄLLE SEURAAVAT TIEDOT
SICHERHEITSHINWEISE
SÄKERHETSINSTRUKTIONER
DESSA VIKTIGA SÄKERHETSANVISNINGAR INGÅR, EFTERSOM DE ÄR TILLÄMPLIGA PÅ APPARATEN, OCH FÖRMEDLAR DEN DETALJERADE INFORMATIONEN NEDAN TILL ANVÄNDAREN


- SAFETY INSTRUCTIONS
- THESE IMPORTANT SAFETY INSTRUCTIONS ARE INCLUDED, AS APPLICABLE TO THE APPLIANCE, CONVEYING TO THE USER THE INFORMATION ITEMIZED BELOW
- Setup
- DC 6V JACK
- To Use
- NOTES:
- Care and Maintenance
- Battery Handling and Usage
- ALL RIGHTS RESERVED, COPYRIGHT DENVER ELECTRONICS A/S
- DENVER®
- DENVER ELECTRONICS
- FM RADIO
- SIKKERHEDSANVISNINGER
- DISSE VIGTIGE SIKKERHEDSANVISNINGER ER MEDTAGET FOR AT GIVE BRUGER AF APPARATET DE N∅DVENDIGE OPLYSNINGER, SOM SPECIFICERET HERUNDER
- DEZE BELANGRIJKE VEILIGHEIDINSTRUCTIES ZIJN VAN TOEPASSING OP EN MEEGELEVERD MET HET APPARAAT, OM DE GEBRUIKER VAN DE VOLGENDE INFORMATIE TE VOORZIEN
- TURVALLISUUSOHJEET
- TÄTÄ LAITETTA KOSKEVAT TÄRKEÄT TURVALLISUUSOHJEET OVAT MUKANA JA ANTAVAT KÄYTTÄJÄLLE SEURAAVAT TIEDOT
- SICHERHEITSHINWEISE
- SÄKERHETSINSTRUKTIONER
- DESSA VIKTIGA SÄKERHETSANVISNINGAR INGÅR, EFTERSOM DE ÄR TILLÄMPLIGA PÅ APPARATEN, OCH FÖRMEDLAR DEN DETALJERADE INFORMATIONEN NEDAN TILL ANVÄNDAREN
Brand : DENVER
Model : TR-56C
Category : Radio