
VPL-DX126 - Projector SONY - Free user manual and instructions
Find the device manual for free VPL-DX126 SONY in PDF.


| Product type | Projector |
| Brand | Sony |
| Model | VPL-DX126 |
| Display technology | 3LCD |
| Native resolution | XGA (1024 x 768) |
| Brightness | 3200 ANSI lumens |
| Contrast ratio | 3000:1 |
| Lamp life (standard mode) | 3000 hours |
| Lamp life (eco mode) | 5000 hours |
| Zoom lens | Manual, 1.2x optical zoom |
| Keystone correction | Vertical ±30 degrees |
| Video inputs | 1x HDMI, 1x VGA, 1x Composite, 1x S-Video |
| Audio inputs | 1x stereo mini-jack |
| Audio output | 1x built-in speaker (1W) |
| Control ports | 1x RS-232C, 1x USB type B |
| Noise level (standard mode) | 35 dB |
| Noise level (eco mode) | 29 dB |
| Dimensions (W x D x H) | 315 x 223 x 103 mm |
| Weight | 2.9 kg |
| Power supply | AC 100-240V, 50/60 Hz |
| Power consumption (max) | 270 W |
| Standby power consumption | Less than 1 W |
| Maintenance and cleaning | Clean the air filter regularly. Use a soft, dry cloth for the exterior. |
| Safety | Adequate ventilation required. Do not obstruct vents. |
| Spare parts and repairability | Replacement lamp (model: LMP-D213), air filter. Contact an authorized Sony service center. |
Frequently Asked Questions - VPL-DX126 SONY
User questions about VPL-DX126 SONY
0 question about this device. Answer the ones you know or ask your own.
Ask a new question about this device
Download the instructions for your Projector in PDF format for free! Find your manual VPL-DX126 - SONY and take your electronic device back in hand. On this page are published all the documents necessary for the use of your device. VPL-DX126 by SONY.
USER MANUAL VPL-DX126 SONY
Sony Corporation Printed in China
VPL-DX146/DX126 VPL-DW126
© 2013 Sony Corporation
安全のために
natural_image
Line drawing of a portable air conditioner unit emitting steam (no text or symbols)natural_image
Simple line drawing of a rectangular object with a circular opening, next to a prohibition symbol (no text or labels)natural_image
Simple line drawing of a box emitting smoke or vapor, with a prohibition symbol above (no text or labels)熱感知器や煙感知器のそばに設置しない

禁止
natural_image
Diagram of a kitchen appliance with a plate, lid, and drain, emitting steam (no text or symbols)natural_image
Simple line drawing of a rectangular device with a chain and a plate, no text or symbols present.natural_image
Simple 3D diagram of a rectangular block with a shaded side and a prohibition symbol above it (no text or labels)natural_image
Illustration of a portable stove emitting smoke next to a computer and printer, with a prohibition symbol above (no text or labels)natural_image
Diagram showing airflow around a ventilation duct with a circular symbol (no text or labels)natural_image
Diagram of a kitchen appliance with a bowl, smokestack, and no visible text or symbolsnatural_image
Illustration of a cigarette emitting smoke next to a smoking box (no text or symbols)natural_image
Line drawing of a remote control with buttons and triangular indicators (no text or symbols)電源コード(1 本)
natural_image
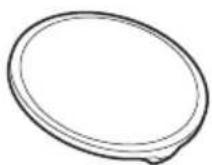
Line drawing of a multi-pin cable with two connectors and a central connector (no text or symbols)レンズキャップ (1 個)

キャリングケース(1個)

natural_image
Simple line drawing of an open book or folded paper (no text or symbols)簡易說明書(本書)(1 部)
保証書 (1 部)
取扱説明書(CD-ROM)(1 枚)
Projector Station for Network
natural_image
Simple diagram of a U-shaped container with a downward arrow indicating downward motion (no text or symbols)2 リチウム電池をはめ込む。

3 リチウム電池入れを差し込む。
警告
natural_image
Line drawing of a kitchen appliance with a brush applying material to a sink (no text or symbols)
natural_image
Diagram of a kitchen appliance with a handle, drawer, and vent (no text or symbols)natural_image
Diagram of a projector with a basket and fan, showing internal components and airflow direction (no text or symbols)ご注意
natural_image
Technical line drawing of a mechanical device with a screwdriver inserted into a housing (no text or symbols)ご注意
natural_image
Technical line drawing of a mechanical device with a screwdriver inserted into a housing (no text or symbols)natural_image
Line drawing of a projector with a circular lens and control panel, showing no text or symbolsエアーフィルターカバー
To reduce the risk of fire or electric shock, do not expose this apparatus to rain or moisture.
To avoid electrical shock, do not open the cabinet. Refer servicing to qualified personnel only.
WARNING
THIS APPARATUS MUST BE EARTHED.
WARNING
When installing the unit, incorporate a readily accessible disconnect device in the fixed wiring, or connect the power plug to an easily accessible socket-outlet near the unit. If a fault should occur during operation of the unit, operate the disconnect device to switch the power supply off, or disconnect the power plug.
CAUTION
About the LAN connector
For safety, do not connect the connector for peripheral device wiring that might have excessive voltage to this port.
WARNING: THIS WARNING IS
APPLICABLE FOR USA ONLY.
If used in USA, use the UL LISTED power cord specified below.
DO NOT USE ANY OTHER POWER CORD.
Plug Cap Parallel blade with ground pin (NEMA 5-15P Configuration)
Cord Type SJT, three 16 or 18 AWG wires
Length Minimum 1.5 m (4 ft. 11 in.), Less than 4.5 m (14 ft. 9 in.)
Rating Minimum 10 A, 125 V
Using this unit at a voltage other than 120V may require the use of a different line cord or attachment plug, or both. To reduce the risk of fire or electric shock, refer servicing to qualified service personnel.
WARNING: THIS WARNING IS APPLICABLE FOR OTHER COUNTRIES.
1 Use the approved Power Cord (3-core mains lead) / Appliance Connector / Plug with earthing-contacts that conforms to the safety regulations of each country if applicable.
2 Use the Power Cord (3-core mains lead) / Appliance Connector / Plug conforming to the proper ratings (Voltage, Ampere).
If you have questions on the use of the above Power Cord / Appliance Connector / Plug, please consult a qualified service personnel.
IMPORTANT
The nameplate is located on the bottom.
For kundene i Norge
Dette utstyret kan kobles til et IT-strømfordelingssystem.
For the customers in the U.S.A.
This equipment has been tested and found to comply with the limits for a Class B digital device, pursuant to Part 15 of the FCC Rules. These limits are designed to provide reasonable protection against harmful interference in a residential installation. This equipment generates, uses, and can radiate radio frequency energy and, if not installed and used in accordance with the instructions, may cause harmful interference to radio communications. However, there is no guarantee that interference will not occur in a particular installation. If this equipment does cause harmful interference to radio or television reception, which can be determined by turning the equipment off and on, the user is encouraged to try to correct the interference by one or more of the following measures:
- Reorient or relocate the receiving antenna.
– Increase the separation between the equipment and receiver. - Connect the equipment into an outlet on a circuit different from that to which the receiver is connected.
- Consult the dealer or an experienced radio/TV technician for help.
If you have any questions about this product, you may call; Sony Customer Information Service Center 1-800-222-7669 or http://www.sony.com/
Declaration of Conformity
Trade Name : SONY
Model : VPL-DX146
VPL-DX126
VPL-DW126
Responsible party : Sony Electronics Inc.
Address : 16530 Via Esprillo,
San Diego, CA
92127 U.S.A.
Telephone Number: 858-942-2230
This device complies with part 15 of the FCC Rules. Operation is subject to the following two conditions: (1) this device may not cause harmful interference, and (2) this device must accept any interference received, including interference that may cause undesired operation.
You are cautioned that any changes or modifications not expressly approved in this manual could void your authority to operate this equipment.
All interface cables used to connect peripherals must be shielded in order to comply with the limits for a digital device pursuant to Subpart B of Part 15 of FCC Rules.
This device complies with Part 15 of the FCC Rules. Operation is subject to the following two conditions: (1) this device may not cause harmful interference, and (2) this device must accept any interference received, including interference that may cause undesired operation.
For the customers in Canada
CAN ICES-3 (B)/NMB-3(B)
For the customers in Europe
This product has been manufactured by or on behalf of Sony Corporation, 1-7-1 Konan Minato-ku Tokyo, 108-0075 Japan. Inquiries related to product compliance based on European Union legislation shall be addressed to the authorized representative, Sony Deutschland GmbH, Hedelfinger Strasse 61, 70327 Stuttgart, Germany. For any service or guarantee matters, please refer to the addresses provided in the separate service or guarantee documents.
For the customers in Taiwan only

廢電池請回收
For the State of California, USA only
Perchlorate Material - special handling may apply, See www.dtsc.ca.gov/hazardouswaste/perchlorate
For the Customers in Brazil only DESCARTE DE PILHAS E BATERIAS

- Check that the operating voltage of your unit is identical with the voltage of your local power supply. If voltage adaptation is required, consult with qualified Sony personnel.
- Should any liquid or solid object fall into the cabinet, unplug the unit and have it checked by qualified Sony personnel before operating it further.
- Unplug the unit from the wall outlet if it is not to be used for several days.
- To disconnect the cord, pull it out by the plug. Never pull the cord itself.
- The wall outlet should be near the unit and easily accessible.
- The unit is not disconnected from the AC power source (mains) as long as it is connected to the wall outlet, even if the unit itself has been turned off.
- Do not look into the lens while the lamp is on.
- Do not place your hand or objects near the ventilation holes — the air coming out is hot.
- Be careful not to catch your fingers by the front foot when you adjust the height of the unit. Do not push hard on the top of the unit with the front foot out.
- Avoid using an extension cord with a low voltage limited since it may cause the short-circuit and physical incidents.
- Do not catch your finger between the unit and surface of the floor when moving the projector installed on the floor.
- Do not carry the projector with the cabinet on and with its cover open.
- Do not install the unit in a location near heat sources such as radiators or air ducts, or in a place subject to direct sunlight, excessive dust or humidity, mechanical vibration or shock.
- Never mount the projector on the ceiling or move it by yourself. Be sure to consult with qualified Sony personnel (charged).
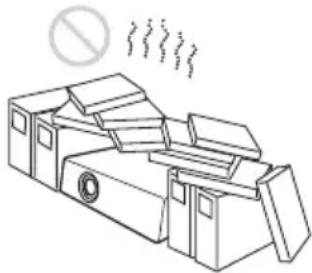
- If the ventilation holes are blocked, internal heat builds up, and it may cause a fire or damage the unit. To allow adequate air circulation and prevent internal heat build-up, follow the items below:
- Leave space around the unit (page 6).
natural_image
Line drawing of a steam machine with smoke and a prohibition symbol above (no text or labels)- Avoid using something to cover the ventilation holes (exhaust/intake).

natural_image
Simple line drawing of a rectangular object with a circular opening and a prohibition symbol above it (no text or labels)- Do not place the unit on surfaces such as an original packing sheet, soft cloth, papers, rugs, or scraps of paper. The ventilation holes may take in such materials.

natural_image
Simple line drawing of a smokestack on a platform with a prohibition symbol above (no text or labels)- Do not place any object just in front of the lens that may block the light during projection. Heat from the light may damage the object. Use the picture muting function to cut off the picture.

natural_image
Simple line drawing of a rectangular block with a shaded side and a prohibition symbol above it (no text or labels)- Do not use the Security bar for the purpose of preventing theft for transporting or installing the unit. If you lift the unit by the Security bar or hang the unit by this bar, it may cause the unit to fall and be damaged, and may result in personal injury.

natural_image
Simple line drawing of a rectangular device with a chain and a plate, no text or symbols present.For dealers
- Be sure to secure the cabinet cover firmly when installing to the ceiling firmly.
Safety precautions for installing the unit on a ceiling
- Never mount the projector on the ceiling or move it by yourself. Be sure to consult with qualified Sony personnel (charged). - When installing the unit on a ceiling, be sure to use a safety wire, etc., to prevent the unit from falling. Entrust the installation to an experienced contractor or installer.
On Installation
- When installing the unit, leave space between any walls, etc. and the unit as illustrated.
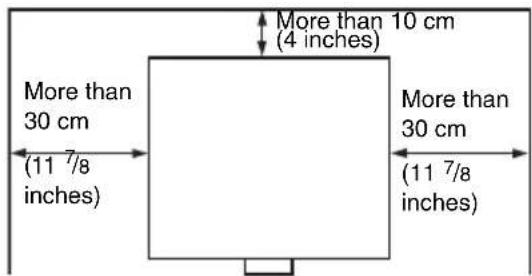
- Avoid using if the unit is tilted more than 15 degrees horizontally.

- Avoid using the unit in a location where the temperature or humidity is very high, or temperature is very low.

natural_image
Illustration of a steam rising from a chimney to a portable computer with smoke, no text or symbols present- Avoid installing the unit in a location subject to direct cool or warm air from an air-conditioner. Installing in such a location may cause malfunction of the unit due to moisture condensation or rise in temperature.

natural_image
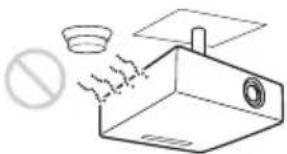
Diagram showing a ventilation system with a gridded fan and a vent, emitting exhaust smoke (no text or symbols)- Avoid installing the unit in a location near a heat or smoke sensor. Installing in such a location may cause malfunction of the sensor.
natural_image
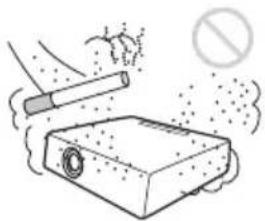
Diagram of a portable stove with steam rising, no text or symbols present- Avoid installing the unit in a very dusty or extremely smoky environment. Otherwise, the air filter will become obstructed, and this may cause a malfunction of the unit or damage it.
natural_image
Illustration of a hand using a cigarette to exhaust smoke from a trash can into a box, with no text or symbols present.- When using the unit at an altitude of 1,500 m or higher, set “High Altitude Mode” to “On” in the Installation menu. Failing to set this mode when using the unit at high altitudes could have adverse effects, such as reducing the reliability of certain components.
On cleaning the lens and the cabinet
- Be sure to disconnect the AC power cord from the AC outlet before cleaning.
- If you rub on the unit with a stained cloth, the cabinet may be scratched.
- If the unit is exposed to volatile materials such as insecticide, or the unit is in contact with a rubber or vinyl resin product for a long period of time, the unit may deteriorate or the coating may come off.
- Do not touch the lens with bare hands.
- On cleaning the lens surface: Wipe the lens gently-with a soft cloth, such as a glass cleaning cloth. Stubborn stains may be removed with a soft cloth lightly dampened with water. Never use solvent such as alcohol, benzene or thinner, or acid, alkaline or abrasive detergent, or a chemical cleaning cloth.
- On cleaning the cabinet: Clean the cabinet gently with a soft cloth. Stubborn stains may be removed with a soft cloth lightly dampened with mild detergent solution and wrung, followed by wiping with a soft dry cloth. Never use solvent such as alcohol, benzene or thinner, or acid, alkaline or abrasive detergent, or a chemical cleaning cloth.
On Illumination
To obtain the best picture, the front of the screen should not be exposed to direct lighting or sunlight.
On Heat Dissipation
The temperature of the projector's cabinet may increase during or immediately after use; however, this is not a malfunction.
On Screen
When using a screen with an uneven surface, stripes pattern may rarely appear on the screen depending on the distance between the screen and the unit or the zooming magnifications. This is not a malfunction of the unit.
On Fan
Since the projector is equipped with a fan inside to prevent internal temperature from rising, there may be some noise. This is a normal result of the manufacturing process and does not indicate a malfunction. If, however, in a case of abnormal noise, consult with qualified Sony personnel.
On Lamp
The lamp used as a light source contains mercury that has high internal pressure. A high-pressure mercury lamp has the following characteristics:
- Brightness of the lamp will be lowered as the elapse of time used.
- The lamp may break with a loud noise as a result of shock, damage, or deterioration caused by the elapse of time. The lamp may become unlit and may burn out.
- The lamp life varies with individual differences or usage conditions of each lamp. Therefore, it may break or will not light even before the specified replacement time.
- It may possibly break after the replacement time has elapsed. Replace the lamp with a new one as soon as possible if a message displayed on the projected image, even if the lamp normally lights.
For carrying
This unit is precision equipment. When carrying the unit, do not subject the unit to shocks, or fall. It may damage the unit.
On LCD Projector
The LCD projector is manufactured using high-precision technology. You may, however, see tiny black points and/or bright points (red, blue, or green) that continuously appear on the LCD projector. This is a normal result of the manufacturing process and does not indicate a malfunction. Also, when you use multiple LCD projectors to project onto a screen, even if they are of the same model, the color reproduction among projectors may vary, since color balance may be set differently from one projector to the next.
On Condensation
If the room temperature where the projector is installed changes rapidly, or if the projector is moved suddenly from a cold to a warm place, condensation in the projector may occur. As the condensation may cause malfunction, be careful in adjusting temperature settings of the air conditioner. If condensation occurs, leave the projector turned on for about two hours before use.
SONY WILL NOT BE LIABLE FOR DAMAGES OF ANY KIND RESULTING FROM A FAILURE TO IMPLEMENT PROPER SECURITY MEASURES ON TRANSMISSION DEVICES, UNAVOIDABLE DATA LEAKS RESULTING FROM TRANSMISSION SPECIFICATIONS, OR SECURITY PROBLEMS OF ANY KIND.
Notes
• Always verify that the unit is operating properly before use. SONY WILL NOT BE LIABLE FOR DAMAGES OF ANY KIND INCLUDING, BUT NOT LIMITED TO, COMPENSATION OR REIMBURSEMENT ON ACCOUNT OF THE LOSS OF PRESENT OR PROSPECTIVE PROFITS DUE TO FAILURE OF THIS UNIT, EITHER DURING THE WARRANTY PERIOD OR AFTER EXPIRATION OF THE WARRANTY, OR FOR ANY OTHER REASON WHATSOEVER.
- SONY WILL NOT BE LIABLE FOR CLAIMS OF ANY KIND MADE BY USERS OF THIS UNIT OR MADE BY THIRD PARTIES.
- SONY WILL NOT BE LIABLE FOR THE TERMINATION OR DISCONTINUATION OF ANY SERVICES RELATED TO THIS UNIT THAT MAY RESULT DUE TO CIRCUMSTANCES OF ANY KIND.
Checking the Supplied Accessories
RM-PJ8 Remote Commander (1)
Lithium battery (CR2025) (1)
The battery is already installed. Before using the remote commander, remove the insulation film.

natural_image
Line drawing of a remote control with buttons and a triangular indicator (no text or symbols)AC power cord (1)
Mini D-sub 15 pin cable (1.8 m) (1) (1-970-584-11/Sony)

natural_image
Line drawing of a coiled electrical plug with two connectors (no text or symbols)Lens cap (1)

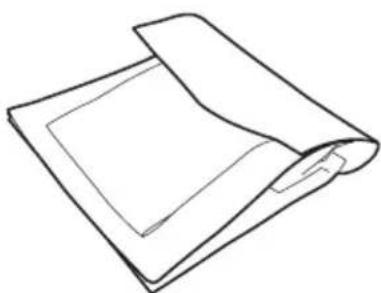
Carrying case (1)

natural_image
Simple line drawing of a rolled-up document or scroll (no text or symbols)Quick Reference Manual (this manual) (1)
Operating Instructions (CD-ROM) (1)
Projector Station for Network Presentation application (CD-ROM) (1)
USB wireless LAN module IFU-WLM3 (1)
Using the CD-ROM Manuals
Insert the supplied CD-ROM into the CD-ROM drive of your computer, and the CD-ROM will start automatically in a few moments. Select the Operating Instructions you want to read. If the CD-ROM does not start automatically, open the "index.html" file on the CD-ROM.
You must have Adobe Acrobat Reader 5.0 or higher installed in your computer to read the Operating Instructions stored on the CD-ROM.
Installing Projector Station for Network Presentation
1 Close all running applications.
2 Insert the supplied CD-ROM into the CD-ROM drive of the computer.
3 Open the CD-ROM and double-click the .exe file.
When the message "User Account Control" is displayed, click "Allow" or "Yes."
4 Follow the on-screen instructions to install the software.
Installing Batteries
1 Pull out the lithium battery compartment.
Pull out the battery compartment with a stick as shown in the illustration.

natural_image
Simple diagram of a U-shaped container with a downward arrow indicating downward motion (no text or symbols)2 Insert a lithium battery.
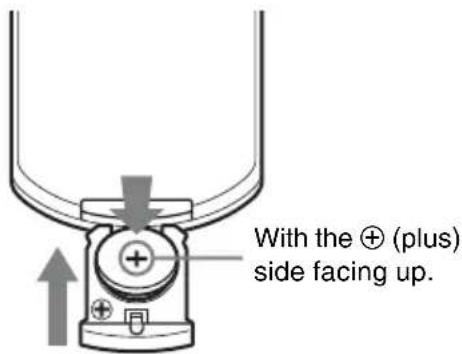
3 Close the lithium battery compartment.
CAUTION
Danger of explosion if battery is incorrectly replaced.
Replace only with the same or equivalent type recommended by the manufacturer. When you dispose of the battery, you must obey the law in the relative area or country.
Installing batteries
One lithium battery (CR2025) is supplied for the RM-PJ8 Remote Commander. To avoid risk of explosion, use a lithium battery (CR2025).
Selecting the Menu Language
The factory setting for the language for displaying menus, messages, etc. is English. To change the on-screen language, proceed as follows:

1 Plug in the AC power cord into a wall outlet.
2 Turn on the projector.
Press the I/⏻ key.
3 Press the MENU key to display the menu.
If the display cannot be properly seen, adjust the focus, size, and position of the projected image (page 16).
4 Select the menu language.
① Press the ↑ or ↓ key to select the Operation ( ) menu then press the ENTER key.
② Press the or key to select "Language (A) then press the ENTER key.
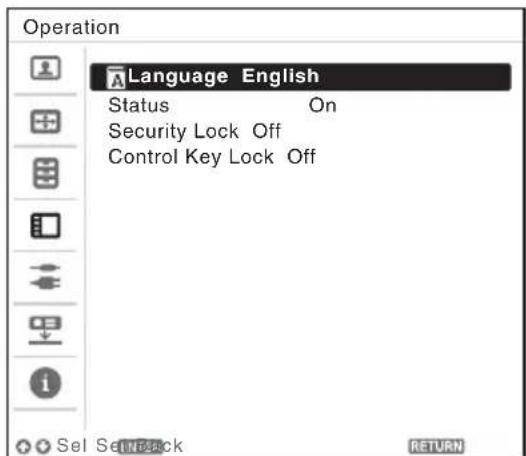
③ Press the /// key to select a language, then press the ENTER key.
5 Press the MENU key to turn off the menu screen.
Connecting the Projector
You can connect the projector to external devices with an RGB or HDMI output connector. In addition, you can use the following methods to connect the projector to external devices:
USB connector (Type B) ()
For connecting to a computer with a USB connector (“Projecting an Image using USB Connection”).
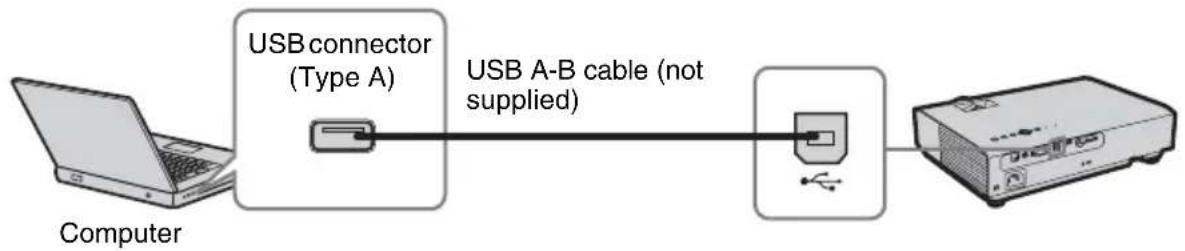
flowchart
graph LR
    A["Computer"] --> B["USB connector (Type A)"]
    B --> C["USB A-B cable (not supplied)"]
    C --> D["Device"]
USB connector (Type A) ()
For connecting a USB memory device (“Using USB Media Viewer”).

flowchart
graph LR
    A["USB memory device (not supplied)"] --> B["External Device"]
LAN connector
For connecting to a computer, tablet PC, or smartphone via a hub or router (“Presentation Function via Network”).

flowchart
graph TD
    A["Computer"] -->|Wired connection| B["LAN connector"]
    C["Tablet PC/Smartphone"] -->|Wireless connection| D["Hub, router (wireless), etc."]
    E["Computer"] -->|Wireless connection| D
    F["LAN cable (straight type) (not supplied)"] --> D
    D --> G["LAN"]
USB connector (Type A) ()
For connecting a USB wireless LAN module IFU-WLM3 (supplied) (“Presentation Function via Network”).

flowchart
graph LR
    A["Tablet PC/Smartphone"] -->|Wireless Signal| B["USB wireless LAN module IFU-WLM3 (supplied)"]
    C["Computer"] -->|Wireless Signal| B
    B --> D["IRPU"]
Notes
- Undesignated USB wireless LAN modules do not work.
- When connecting/disconnecting the USB wireless LAN module, make sure that the projector is in Standby mode (Standby Mode: "Low"), or the AC power cord is unplugged from the wall outlet.
- When wirelessly connecting a tablet PC/smartphone to the projector via USB wireless LAN Module IFU-WLM3 (supplied), set “Access Point Setup” to “Manual” in the projector’s “WLAN Settings”.
- The factory default settings for "Manual" are as follows.
SSID: VPL + MAC address for LAN
Security Method: WEP(64bit)
Password: sony1
Projecting an Image
The size of a projected image depends on the distance between the projector and screen. Install the projector so that the projected image fits the screen size. For details on projection distances and projected image sizes, see “Projection Distance.”

1 Plug the AC power cord into the wall outlet.
2 Connect all equipment to the projector.
3 Press the I/⏻ key to turn on the unit.
4 Turn on the connected equipment.
5 Select the input source.
Press the INPUT key on the projector to display the menu for switching input signal on the screen. Press the INPUT key repeatedly, or press the ↑/↓ key to select an image to be projected.
6 When projecting a computer image, switch your computer's output to external display.
The method to switch the output varies depending on the type of computer.
(Example)

To project image files stored in a USB memory device, see “USB Media Viewer”. To project an image using USB Connection, see “Projecting an Image using USB Connection”. To use Presentation Function via Network, see “Presentation Function via Network”. For instructions regarding the above, refer to the Operating Instructions (CD-ROM).
7 Adjust the focus, size and position of the projected image (page 16).
Displaying Images or Files Sent from a Tablet PC/ Smartphone
You can project JPEG images, PDF files, etc. stored in a tablet PC/smartphone wirelessly by using a specific application. ^*1
For downloading ^*2 or detailed method of using the application, access the following URL.
http://PWPresenter.pixelworks.com

*1: To use the application, one of the following conditions is required.
- Connected to network where wireless connection can be established (page 12).
- Connected to a wireless network via USB wireless LAN module IFU-WLM3 (supplied) that is connected to the projector (page 13).
*2: Depending on your Internet connection, a data communication fee for downloading the application may apply.
Adjusting the Projected image
| Focus Size (Zoom) | Position | |
 ↓ ↓ |  | 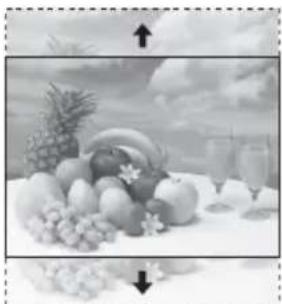 |
 | Zoom ring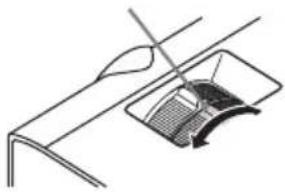 | Foot adjustbutton Front foot(adjustable)Rear feet (adjustable) Front foot(adjustable)Rear feet (adjustable) |
Foot adjust button
Front foot (adjustable)
Adjusting the tilt of the projector with the foot adjust button/rear feet (adjustable)
By changing the tilt of the projector with the foot adjust button/rear feet (adjustable), you can adjust the position of the projected image.
1 Press and hold the foot adjust button, then lift up the front of the projector to adjust the angle.

natural_image
Technical illustration showing two steps of a door opening process: first with a magnifying glass, second with a tool inserted into a component (no text or symbols)2 When the desired angle is achieved, release the foot adjust button to lock the position.
3 Set the angle of the projector precisely by turning the rear feet (adjustable).

natural_image
Diagram of a projector with a rotating base and fan blade, showing internal components (no text or symbols)Notes
- Be careful not to let the projector down on your fingers.
- Do not push hard on the top of the projector with the front foot (adjustable) extended.
- Do not forcedly turn the rear feet (adjustable) more than they should be adjusted. Doing so may break them.
Changing the aspect ratio of the projected image
Press the ASPECT key on the remote commander to change the aspect ratio of the projected image. You can also change the setting in Aspect of the Screen menu.
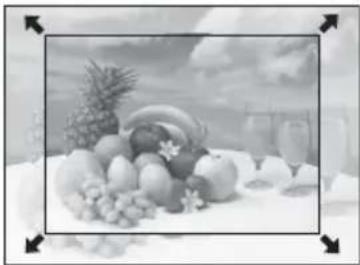
Correcting trapezoidal distortion of the projected image (Keystone feature)
Keystone feature may not work automatically when the screen is tilted. In this case, set keystone manually.
1 Press the KEYSTONE key on the remote commander or select V Keystone in the Installation menu.
2 Use the /// the keys to set the value. The higher the value, the narrower the top of the projected image. The lower the value, the narrower the bottom.
Note
Since the Keystone adjustment is an electronic correction, the image may be deteriorated.

flowchart
graph TD
    A["Increase the number towards plus"] --> B["Increase the number towards minus"]
Displaying a pattern
You can display a pattern for adjusting the projected image or a grid pattern with the PATTERN key on the remote commander. Press the PATTERN key again to restore the previous image. You can use a grid pattern as a guide to write text or to draw lines and shapes on the whiteboard or blackboard without using a computer.
Note
You cannot use this key when “Type A USB”, “Type B USB” or “Network” is selected as the input.
Automatically adjusts Phase, Pitch and Shift of projected image while a signal is input from a computer (APA (Auto Pixel Alignment))
Press the APA key on the remote commander. Press again to cancel adjusting during the setting. You can also set APA in the Screen Menu. If Smart APA in the Function menu is set to “On”, executes APA automatically when a signal is input.
Turning Off the Power
1 Press the I/⏻ key on the unit or the remote commander.
The projector starts shutdown and turns off. If you press the I/⏻ key within 10 seconds of the message being displayed, shutdown is canceled.
2 Unplug the AC power cord from the wall outlet.
To turn off without displaying confirmation message
Press and hold the I/ key on the unit for a few seconds.
ECO gauge
This gauge indicates the current effectiveness of the projector's ECO function.
(For details on the ECO function, see “ECO MODE key” and “ECO.”)
The leaf icons are displayed when the projector is shut down. The number of displayed icons varies according to how much energy is saved as a result of using the ECO function.
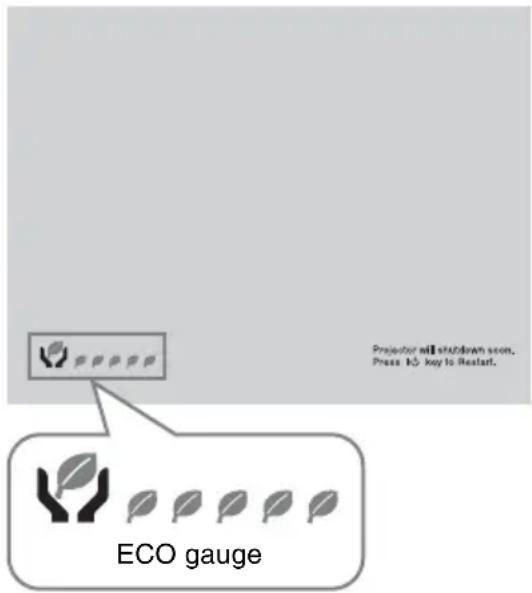
Indicators
The indicators allow checking the status and notify you of abnormal operation of the projector. If the projector exhibits abnormal status, address the problem in accordance with the table below.
ON/STANDBY indicator
| Status Meaning/Remedies | |
| Lights in red The projector is in Standby mode. | |
| Flashes in green • The projector is ready to operate after having been turned on.• The lamp cools after the projector is turned off. | |
| Lights in green The projector's power is on. | |
| Lights in orange The projector is in With No Input (Lamp Cutoff). | |
| Flashes in red The projector is in abnormal status. Symptoms are indicated by number of flashes. Address the problem in accordance with the following. If a symptom persists, despite having taken measures below, consult with qualified Sony personnel. | |
| Flashes twice The internal temperature is unusually high. Check the items below.• Check if nothing is blocking the ventilation holes.• Check if the air filter is not clogged. (page 23)• Check if the Installation Attitude in the Installation menu is set correctly. | |
| Flashes six times Unplug the AC power cord from a wall outlet. After checking that the ON/STANDBY indicator goes out, plug the power cord to a wall outlet again then turn on the projector. | |
| Other number of flashes | Consult with qualified Sony personnel. |
LAMP/COVER indicator
| Status Meaning/Remedies |
| Flashes in red Symptoms are indicated by number of flashes. Address the problem in accordance with the following. |
| Flashes twice The lamp cover is not attached securely. (page 21) |
| Flashes three times The temperature of lamp is unusually high. Turn off the power and wait for lamp to cool then turn on the power again. If the symptom is shown again, the lamp may be burnt out. In this case, replace the lamp with a new one (page 21). |
Replacing the Lamp
Replace the lamp with a new one if a message displayed on the projected image. Use an LMP-D213 projector lamp (not supplied) for replacement.
Caution
- The lamp remains hot after the projector is turned off. If you touch the lamp, you may burn your finger. When you replace the lamp, wait for at least an hour after turning off the projector for the lamp to cool sufficiently.
- Do not allow any metallic or inflammable objects into the lamp replacement slot after removing the lamp, otherwise it may cause electrical shock or fire. Do not put your hands into the slot.
Notes
- If the lamp breaks, contact qualified Sony personnel. Do not replace the lamp yourself.
- When removing the lamp, be sure to pull it out straight, by holding the designated location. If you touch a part of the lamp other than the designated location, you may be burned or injured. If you pull out the lamp while the projector is tilted, the pieces may scatter if the lamp breaks any may cause injury.
1 Turn off the projector, and disconnect the AC power cord from a wall outlet.
2 When the lamp has cooled sufficiently, open the lamp cover by loosening one screw.

natural_image
Technical line drawing of a mechanical device with a screwdriver inserted into a housing (no text or symbols)Note
For safety reasons, do not loosen any other screws.
3 Loosen the two screws on the lamp unit (①). Fold out the handle (②), then pull out the lamp unit by the handle (③).

Caution
Do not put your hands into the lamp replacement slot, and do not allow any liquid or other objects into the slot to avoid electrical shock or fire.
4 Insert the new lamp all the way in until it is securely in place (1). Tighten the two screws (2). Fold down the handle to replace it (3).
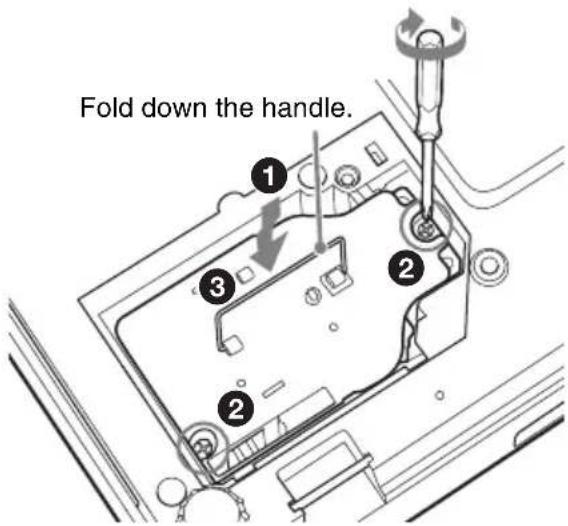
Notes
- Be careful not to touch the glass surface of the lamp and a inside conductor.
- Insert the handle firmly to attach it securely.
- The power will not turn on if the lamp is not secured properly.
5 Close the lamp cover and tighten the 1 screw.

natural_image
Technical line drawing of a mechanical device with a screwdriver inserted into a housing (no text or symbols)6 Connect the AC power cord to a wall outlet and turn on the projector.
7 Reset the lamp timer for notification of the next replacement time. Select “Lamp Timer Reset” on the Function menu then press the ENTER key. When a message appears, select “Yes” to reset the lamp timer.
Caution
Disposal of the used lamp
For the customers in the USA
Lamp in this product contains mercury. Disposal of these materials may be regulated due to environmental considerations. For disposal or recycling information, please contact your local authorities or the Telecommunications Industry Association (www.eiae.org).
Cleaning the Air Filter
When a message appears on the projected image indicating time for a filter cleaning, clean the air filter.
If the dust cannot be removed from the air filter even after cleaning, replace the air filter with a new one. For details on purchasing/fitting a new air filter, consult with the store where you purchased the projector, or contact qualified Sony personnel.
Caution
If you neglect to clean the air filter, dust may accumulate, clogging it. As a result, the temperature may rise inside the unit, leading to a possible malfunction or fire.
1 Turn off the projector, and disconnect the AC power cord from the AC outlet.
2 Slide out and remove the air filter cover from the unit.

natural_image
Line drawing of a mechanical device with a circular component inserted, showing a tool and directional arrow (no text or symbols)Air filter cover
3 Clean the air filter with a vacuum cleaner.
Pull out and remove the air filter, and clean it with a vacuum cleaner.

Air filter
4 Reattach the air filter cover to the unit.
Note
Install the air filter with its open weave side facing the bottom of the unit, then place the air filter cover back in the unit.
AVERTISSEMENT
natural_image
Line drawing of a portable air conditioner unit emitting steam (no text or symbols)natural_image
Simple line drawing of a rectangular object with a circular opening and a prohibition symbol above it (no text or labels)natural_image
Simple line drawing of a chimney emitting smoke from a chimney, with a prohibition symbol above (no text or labels)natural_image
Simple 3D diagram of a rectangular block with a shaded side and a circular symbol above (no text or labels)natural_image
Simple line drawing of a box with a chain and a plate, no text or symbols presentPour les revendeurs
natural_image
Illustration of a portable stove emitting steam, with a printer and a monitor nearby (no text or symbols)natural_image
Diagram showing a ventilation system with a gridded fan, smokestack, and air outlet (no text or symbols)natural_image
Simple line drawing of a kitchen appliance with a bowl, smoke, and a no-smoking symbol (no text or labels)natural_image
Illustration of a cigarette being dispensed from a box with a hand holding it, emitting exhaust smoke (no text or symbols)natural_image
Line drawing of a remote control with buttons and a triangular play button (no text or symbols)natural_image
Line drawing of a multi-pin electrical connector with coiled cable (no text or symbols)natural_image
Simple line drawing of a rolled-up document or scroll (no text or symbols)Application Projector Station for Network
Presentation (CD-ROM) (1)
Module LAN sans fil USB IFU-WLM3 (1)
Installation de Projector Station for Network Presentation
natural_image
Simple diagram of a U-shaped container with a downward arrow indicating downward motion (no text or symbols)natural_image
Technical diagram showing two steps of a washing machine component assembly, with no visible text or symbols.natural_image
Diagram of a projector with a rotating base and fan blade, showing internal components (no text or symbols)Remarques
natural_image
Line drawing of a screwdriver inserted into a device casing (no text or symbols)Remarque
natural_image
Technical line drawing of a mechanical device with a screwdriver inserted into a housing (no text or symbols)natural_image
Line drawing of a camera module with an arrow indicating direction (no text or symbols)natural_image
Line drawing of a steam machine with smokestacks and a prohibition symbol above (no text or labels)natural_image
Simple line drawing of a rectangular object with a circular opening and a prohibition symbol above it (no text or labels)natural_image
Simple line drawing of a chimney on a roof with smoke, no text or symbols presentnatural_image
Simple 3D diagram of a rectangular block with a shaded side and a prohibition symbol above it (no text or labels)natural_image
Simple line drawing of a box with a chain and a plate, no text or symbols presentnatural_image
Illustration of a steam machine emitting smoke next to a computer monitor and a chimney (no text or symbols)natural_image
Diagram showing a ventilation system with a gridded fan and a mounted structure emitting exhaust (no text or symbols)natural_image
Simple line drawing of a kitchen appliance with a bowl and smoke, no text or symbols presentnatural_image
Illustration of a cigarette being dispensed from a box with smoke, no text or symbols presentnatural_image
Line drawing of a remote control with buttons and triangular indicators (no text or symbols)natural_image
Line drawing of a multi-pin electrical plug with coiled cable (no text or symbols)Tapa del objetivo (1)
Funda de transporte (1)

natural_image
Simple line drawing of an open book or folded paper (no text or symbols)natural_image
Simple diagram of a U-shaped container with a downward arrow indicating downward motion (no text or symbols)natural_image
Line drawing of a kitchen appliance with a tool applying material to a sink (no text or symbols)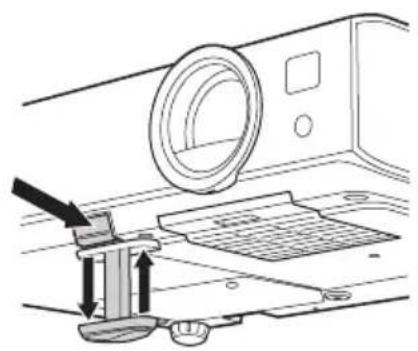
natural_image
Technical diagram of a mechanical assembly with no visible text or symbolsnatural_image
Diagram of a projector with a rotating base and fan blade, showing internal components (no text or symbols)Notas
natural_image
Line drawing of a mechanical device with a screwdriver inserted into a base (no text or symbols)Nota
natural_image
Technical line drawing of a mechanical device with a central screw and base plate (no text or symbols)natural_image
Line drawing of a device with a circular component inserted into a base, showing no text or symbols.Cubierta del filtro de aire
natural_image
Line drawing of a building with smokestacks emitting steam (no text or symbols)natural_image
Simple line drawing of a rectangular object with a circular opening and a circular hole, accompanied by a prohibition symbol (no text or labels)natural_image
Simple line drawing of a smokestack on a tray with a prohibition symbol above (no text or labels)natural_image
Simple 3D diagram of a rectangular block with a shaded side and a circular symbol above (no text or labels)natural_image
Simple line drawing of a box with a chain and a flat top, no text or symbols present.Für Händler
natural_image
Illustration of a portable stove emitting smoke next to a portable printer and a CRT monitor, with a prohibition symbol above (no text or labels)natural_image
Diagram showing a tray with liquid and a container with a lid, emitting exhaust smoke (no text or symbols)natural_image
Simple line drawing of a kitchen appliance with a bowl, smoke, and a prohibition symbol (no text or labels)natural_image
Illustration of a cigarette being dispensed from a box with smoke, no text or symbols presentnatural_image
Line drawing of a remote control with buttons and triangular indicators (no text or symbols)Netzkabel (1)
Mini-D-Sub 15-poliges Kabel (1,8 m) (1)
(1-970-584-11/Sony)

natural_image
Line drawing of a multi-pin electrical plug with coiled cable (no text or symbols)Objektivkappe (1)

Tragetasche (1)

natural_image
Simple line drawing of an open book or folded paper (no text or symbols visible)natural_image
Simple diagram of a U-shaped container with a downward arrow indicating downward motion (no text or symbols)Tablet/Smartphone

Computer

flowchart
graph LR
    A["USB-WLAN-Modul IFU-WLM3 (mitgeliefert)"] --> B["Interface"]
    B --> C["Device"]
Hinweise
natural_image
Technical diagram showing two steps of a washing machine component, with no visible text or symbols.natural_image
Diagram of a projector with a rotating base and fan blade, showing internal components (no text or symbols)Hinweise
natural_image
Technical line drawing of a mechanical device with a screwdriver inserted into a housing (no text or symbols)Hinweis
natural_image
Technical line drawing of a mechanical device with a screwdriver inserted into a housing (no text or symbols)natural_image
Line drawing of a device with a circular component inserted into a base, showing no text or symbols.Luftfilterabdeckung
natural_image
Line drawing of a commercial kitchen with steam rising (no text or symbols)natural_image
Simple line drawing of a rectangular object with a circular opening and a prohibition symbol (no text or labels)natural_image
Simple line drawing of a chimney emitting smoke from a chimney, with a prohibition symbol above (no text or labels)natural_image
Simple 3D diagram of a rectangular block with a side tab and a prohibition symbol above it (no text or labels)natural_image
Simple line drawing of a box with a chain and a plate, no text or symbols presentPer rivenditori
natural_image
Illustration of a portable stove emitting steam, with a computer and a prohibition symbol (no text or labels)natural_image
Diagram showing airflow around a ventilation duct with a prohibition symbol (no text or labels)natural_image
Simple line drawing of a kitchen appliance with a bowl, smoke, and a no-smoking symbol (no text or labels)natural_image
Illustration of a cigarette emitting smoke next to a box with a stopper, no text or symbols presentnatural_image
Line drawing of a remote control with buttons and triangular indicators (no text or symbols)natural_image
Line drawing of a multi-pin electrical plug with coiled cable (no text or symbols)Copriobiettivo (1)

Custodia (1)
natural_image
Simple line drawing of an open book or document (no text or symbols visible)natural_image
Simple diagram of a U-shaped container with a downward arrow indicating downward motion (no text or symbols)natural_image
Technical diagram showing two steps of a washing machine component assembly, with no visible text or symbols.natural_image
Diagram of a projector with rotating base and fan blade, no text or symbols presentNote
natural_image
Line drawing of a screwdriver inserted into a computer chassis (no text or symbols)Nota
natural_image
Technical line drawing of a mechanical device with a screwdriver inserted into a base (no text or symbols)natural_image
Line drawing of a camera module with an arrow indicating motion (no text or symbols)natural_image
Line drawing of a portable air conditioner unit emitting steam, with no text or symbols present.natural_image
Simple line drawing of a rectangular object with a circular opening, next to a circle with a prohibition symbol (no text or labels)natural_image
Simple line drawing of a smokestack emitting smoke from a tray, with a prohibition symbol above (no text or labels)natural_image
Simple 3D diagram of a rectangular block with a small protrusion and a prohibition symbol above it (no text or labels)natural_image
Simple line drawing of a rectangular device with a vertical rod and circular ports, no text or symbols present.致经销商
natural_image
Illustration of a portable stove emitting steam, next to a computer with smoke and a prohibition symbol (no text or labels)natural_image
Diagram showing airflow around a container with a stopper and a circular symbol (no text or labels)natural_image
Simple line drawing of a kitchen appliance with a bowl, chimney, and smokestack emitting steam (no text or symbols)- 勿将本机安装在多尘或多烟雾的环境中。否则,空气滤网会被堵塞,并可能导致本机故障或损坏。

natural_image
Illustration of a hand using a cigarette to exhaust smoke from a trash can (no text or symbols)natural_image
Line drawing of a remote control with buttons and triangular indicators (no text or symbols)交流电源线 (1)
natural_image
Line drawing of a multi-wire electrical connector with connectors (no text or symbols)镜头盖 (1)

便携包 (1)

natural_image
Simple line drawing of an open book or document (no text or symbols visible)快速参考手册 (本手册)(1)
使用说明书(CD-ROM)(1)
Projector Station for Network
安装 Projector Station for Network Presentation
natural_image
Simple diagram of a U-shaped container with a downward arrow indicating downward motion (no text or symbols)2 插入锂电池。

3 合上锂电池舱。
注意
natural_image
Line drawing of a kitchen appliance with a tool applying material to a sink (no text or symbols)
natural_image
Diagram of a mechanical assembly with a tool inserted into a component, showing no text or symbols.natural_image
Diagram of a projector with a circular base and internal components, showing rotational flow arrows (no text or symbols)注意
natural_image
Technical line drawing of a mechanical device with a screwdriver inserted into a housing (no text or symbols)注意
出于安全考虑,请勿松开任何其他螺丝。
natural_image
Technical line drawing of a mechanical device with a screwdriver inserted into a housing (no text or symbols)natural_image
Line drawing of a camera module with an arrow indicating left motion (no text or symbols)空气滤网盖
3 用吸尘器清洁空气滤网。


- VPL-DX146/DX126 VPL-DW126
- 安全のために
- 熱感知器や煙感知器のそばに設置しない
- 警告
- ご注意
- WARNING
- THIS APPARATUS MUST BE EARTHED.
- CAUTION
- About the LAN connector
- WARNING: THIS WARNING IS
- IMPORTANT
- For kundene i Norge
- For the customers in the U.S.A.
- Declaration of Conformity
- For the customers in Canada
- For the customers in Europe
- For the customers in Taiwan only
- 廢電池請回收
- For the State of California, USA only
- For the Customers in Brazil only DESCARTE DE PILHAS E BATERIAS
- For dealers
- Safety precautions for installing the unit on a ceiling
- On Installation
- On cleaning the lens and the cabinet
- On Illumination
- On Heat Dissipation
- On Screen
- On Fan
- On Lamp
- For carrying
- On LCD Projector
- On Condensation
- Notes
- Checking the Supplied Accessories
- Using the CD-ROM Manuals
- Installing Projector Station for Network Presentation
- Installing Batteries
- Pull out the lithium battery compartment.
- Insert a lithium battery.
- Close the lithium battery compartment.
- Selecting the Menu Language
- Connecting the Projector
- USB connector (Type B) ()
- USB connector (Type A) ()
- LAN connector
- Projecting an Image
- Displaying Images or Files Sent from a Tablet PC/ Smartphone
- Adjusting the Projected image
- Adjusting the tilt of the projector with the foot adjust button/rear feet (adjustable)
- Changing the aspect ratio of the projected image
- Correcting trapezoidal distortion of the projected image (Keystone feature)
- Note
- Displaying a pattern
- Automatically adjusts Phase, Pitch and Shift of projected image while a signal is input from a computer (APA (Auto Pixel Alignment))
- Turning Off the Power
- To turn off without displaying confirmation message
- ECO gauge
- Indicators
- Replacing the Lamp
- Disposal of the used lamp
- For the customers in the USA
- Cleaning the Air Filter
- AVERTISSEMENT
- Pour les revendeurs
- Installation de Projector Station for Network Presentation
- Remarques
- Remarque
- Notas
- Nota
- Für Händler
- Hinweise
- Hinweis
- Per rivenditori
- 致经销商
- 安装 Projector Station for Network Presentation
- 注意
Brand : SONY
Model : VPL-DX126
Category : Projector