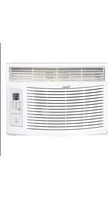
ESA412K - Air Conditioning HAIER - Free user manual and instructions
Find the device manual for free ESA412K HAIER in PDF.


| Product type | Portable monoblock air conditioner |
| Brand | Haier |
| Model | ESA412K |
| Dimensions (H x W x D) | 70 x 45 x 38 cm |
| Net weight | 28 kg |
| Power supply | 230 V ~ 50 Hz |
| Power consumption (cooling) | 1200 W |
| Cooling capacity | 12 000 BTU/h |
| Energy class (cooling) | A+ |
| Refrigerant | R32 |
| Main functions | Cooling, dehumidification, ventilation, night mode |
| Airflow (max) | 400 m³/h |
| Noise level (max) | 65 dB(A) |
| Water tank capacity | 1 L (continuous drainage possible) |
| Air filter | Washable filter |
| Maintenance and cleaning | Clean the filter every 2 weeks with a vacuum cleaner or with warm water |
| Safety | Automatic shutoff in case of overheating, compressor protection (3 min delay) |
| Spare parts available | Filter, remote control, exhaust kit |
| Repairability | Repairability index not communicated |
| Included accessories | Remote control, window exhaust kit, air hose |
Frequently Asked Questions - ESA412K HAIER
User questions about ESA412K HAIER
0 question about this device. Answer the ones you know or ask your own.
Ask a new question about this device
Download the instructions for your Air Conditioning in PDF format for free! Find your manual ESA412K - HAIER and take your electronic device back in hand. On this page are published all the documents necessary for the use of your device. ESA412K by HAIER.
USER MANUAL ESA412K HAIER
ROOM AIR CONDITIONER
Use & Care Guide
natural_image
Front view of a Haier air conditioner unit with ventilation grilles and control panel (no visible text or symbols on main body)Model:
ESA406K ESA406K-L ESA406K-T
ESA408K ESA408K-L ESA408K-T
ESA410K ESA410K-L ESA410K-T
ESA412K ESA412K-L ESA410K-E
ESA408K-E
For questions about features, operation/performance, parts, accessories or service call: 1-877-337-3639
AIR CONDITIONER SAFETY 3
INSTALLATION REQUIREMENTS....3
Tools and Parts ....3
Location Requirements 4
Electrical Requirements 4
INSTALLATION INSTRUCTIONS 5
Unpack the Air Conditioner....5
Prepare Air Conditioner for Installation....5
Prepare Window for Installation....6
Position Air Conditioner 7
Complete Installation ....8
AIR CONDITIONER USE....9
Starting Your Air Conditioner 9
Using the Remote Control....11
Changing Air Direction 12
Normal Sounds....12
AIR CONDITIONER CARE 12
Cleaning the Air Filter 12
Cleaning the Front Panel....13
Annual Maintenance....13
TROUBLESHOOTING 13
ASSISTANCE OR SERVICE....15
In the U.S.A. 15
In Canada 15
WARRANTY 16
ÍNDICE
SEGURIDAD DEL ACONDICIONADOR DE AIRE....17
ASSISTANCE OU SERVICE....42
AIR CONDITIONER SAFETY
Your safety and the safety of others is very important.
We have provided many important safety messages in this manual and on your appliance. Always read and obey all safety messages.

This is the safety alert symbol.
This symbol alerts you to potential hazards that can kill or hurt you and others.
All safety messages will follow the safety alert symbol and either the word "DANGER" or "WARNING."
These words mean:
DANGER
You can be killed or seriously injured if you don't immediately follow instructions.
WARNING
You can be killed or seriously injured if you don't follow instructions.
All safety messages will tell you what the potential hazard is, tell you how to reduce the chance of injury, and tell you what can happen if the instructions are not followed.
IMPORTANT SAFETY INSTRUCTIONS
WARNING: To reduce the risk of fire, electrical shock or injury when using your air conditioner, follow these basic precautions:
■ Plug into a grounded 3 prong outlet.
■ Do not use an extension cord.
■ Do not remove ground prong.
■ Unplug air conditioner before servicing.
■ Do not use an adapter.
■ Use two or more people to move and install air conditioner.
SAVETHESEINSTRUCTIONS
INSTALLATION REQUIREMENTS
Tools and Parts
Gather the required tools and parts before starting installation. Read and follow the instructions provided with any tools listed here.
Tools needed
■ Phillips head screwdriver
■ Flat-blade screwdriver
■ Scissors
■ Level
■ Socket wrench and sockets
■ Tape measure
■ Cordless drill and 1/8" bit
■ Pencil
■ Pliers
■ Adjustable wrench
Parts supplied:
Check that all parts are included in parts package.
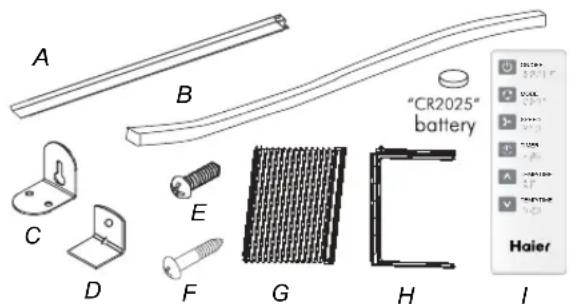
A. Top channel
B. Foam seal
C. Side brackets (2)
D. Window lock bracket
E. 13/32" screws :
ESA410K, ESA410K-L(4)
ESA412K, ESA412K-L(4)
ESA410K-T,ESA410K-E(4)
ESA406K, ESA406K-L(3)
ESA408K, ESA408K-L(3)
ESA406K-T, ESA408K-T(3)
ESA408K-E(3)
F. 3132 " screws (9)
G. Side curtains (2)
H.Side curtain
frames (2)
I. Remote control
Location Requirements
IMPORTANT: Observe all governing codes and ordinances. Check the location where the air conditioner will be installed. Make sure you have everything necessary for correct installation. The location should provide:
■ Grounded electrical outlet within 4 ft (122 cm) of where the power cord exits the air conditioner. (For model ESA406K, ESA408K, ESA406K-L, ESA408K-L, ESA406K-T, ESA408K-T, ESA408K-E electrical outlet can be grounded within 6 ft (183 cm))
NOTE: Do not use an extension cord.
■ Free movement of air in room to be cooled.
■ A large enough opening for the air conditioner. Installation parts are supplied for double-hung windows.
■ Adequate wall support for weight of air conditioner. Air conditioner weighs 44 lbs to 76 lbs (20.0 kg to 34.5 kg).
NOTE: Cabinet louvers must not be obstructed. Air must be able to pass freely through the cabinet louvers.

natural_image
Line drawing of a server rack unit with ventilation grilles and ventilation slots (no text or symbols)A. Cabinet louvers
Window Installation
Window opening measurements:

A. Width B. Height
| Dimension\MODEL | ESA406K ESA406K-LESA408K ESA408K-LESA406K-T ESA408K-TESA408K-E | ESA410K ESA410K-LESA412K ESA412K-LESA410K-TESA410K-E |
| A(inch) Min 25"(63.5cm) | 24 12 "(62.2cm) | |
| A(inch) Max | 36"(91.4cm) 38"(96.5cm) | |
| B(inch) Min | 13 38 "(34cm) 14 %6 "(37cm) | |
Electrical Requirements
WARNING

Electrical Shock Hazard
Plug into a grounded 3 prong outlet.
Do not remove ground prong.
Do not use an adapter.
Do not use an extension cord.
Failure to follow these instructions can result in death, fire, or electrical shock.
The electrical ratings for your air conditioner are listed on the model and serial number label. The model and serial number label is located either on the side or back of the air conditioner cabinet or behind the front grille.
Specific electrical requirements are listed in the chart below. Follow the requirements for the type of plug on the power supply cord.
Power Supply
Cord Wiring Requirements

■ 115-volt (103.5 min. to 126.5 max.)
■ 0 to 12 amps
■ 15-amp time-delay fuse or circuit breaker
■ Use on single outlet circuit only.
Recommended Grounding Method
This air conditioner must be grounded. This air conditioner is equipped with a power supply cord having a 3 prong grounding plug. The cord must be plugged into a mating, grounded 3 prong outlet, grounded in accordance with all local codes and ordinances. If a mating outlet is not available, it is the customer's responsibility to have a properly grounded 3 prong outlet installed by a qualified electrical installer.
It is the customer's responsibility:
■ To contact a qualified electrical installer.
Power Supply Cord
NOTE: Your air conditioner's device may differ from the one shown.

A. Test button
B. Reset button
This room air conditioner is equipped with a power supply cord required by UL. This power supply cord contains state-of-the-art electronics that sense current leakage. If the cord is crushed, the electronics detect current leakage and power will be disconnected in a fraction of a second.
WARNING

Electrical Shock Hazard
Plug into a grounded 3 prong outlet.
Do not remove ground prong.
Do not use an adapter.
Do not use an extension cord.
Failure to follow these instructions can result in death, fire, or electrical shock.
To test your power supply cord:
- Plug power supply cord into a grounded 3 prong outlet.
- Press RESET (on some devices, a green light will turn on).
- Press TEST (listen for click; Reset button will trip, and on some devices, a green light will turn off).
- Press and release RESET (listen for click; Reset button will latch, and on some devices, a green light will turn on). The power supply cord is ready for operation.
NOTES:
■ The Reset button must be pushed in for proper operation.
■ The power supply cord must be replaced if it fails to trip when the test button is pressed or fails to reset.
■ Do not use the power supply cord as an off/on switch.
■ A damaged power supply cord must be replaced with a new power supply cord obtained from the product manufacturer and must not be repaired.
■ The power supply cord contains no user serviceable parts. Opening the tamper-resistant case voids all warranty and performance claims.
INSTALLATION INSTRUCTIONS
Unpack the Air Conditioner Prepare Air Conditioner for Installation
WARNING
Excessive Weight Hazard
Use two or more people to move and install air conditioner.
Failure to do so can result in back or other injury.
Remove Packaging Materials
■ Remove and dispose of/recycle packaging materials. Remove tape and glue residue from surfaces before turning on the air conditioner. Rub a small amount of liquid dish soap over the adhesive with your fingers. Wipe with warm water and dry.
■ Do not use sharp instruments, rubbing alcohol, flammable fluids, or abrasive cleaners to remove tape or glue. These products can damage the surface of your air conditioner.
■ Handle the air conditioner gently.
Install Top Channel
- Place the top channel on the top of the air conditioner, lining up the holes in the top channel with the holes in the top of the air conditioner.
- Using four 13/32 " screws, attach the top channel to the air conditioner. (For model ESA406K, ESA408K, ESA406K-L, ESA408K-L, ESA406K-T, ESA408K-T, ESA408K-E three 13/32 " screws is needed to attach the top channel to the air conditioner.)
NOTE: Your model may differ from the one shown.
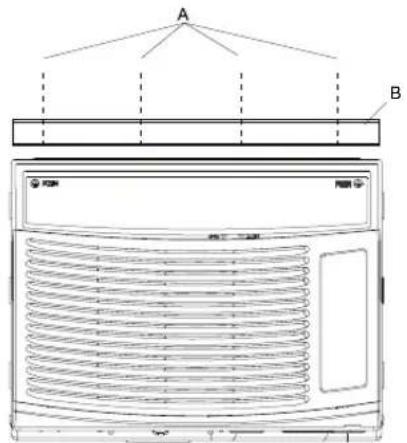
A. 1332 " screws B. Top channel
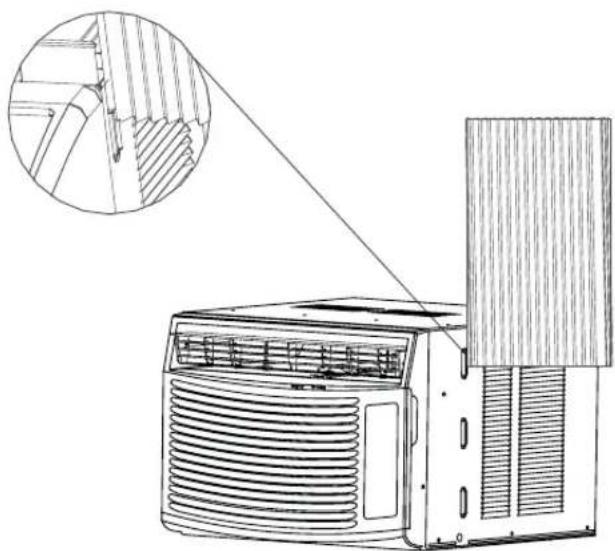
Install Side Curtains
NOTE: Attach curtains to the air conditioner before placing the air conditioner in window.
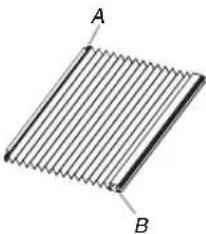
- Place the tabbed side of the side curtain in the track on the right-hand side of the air conditioner cabinet.
natural_image
Diagram of a corrugated metal sheet with labeled points A and B (no text or symbols beyond labels)A. Tabbed side of side curtain
B. Lock edge side of side curtain
- Slide the side curtain down the track until the curtain is aligned with the top and bottom of the air conditioner cabinet.
natural_image
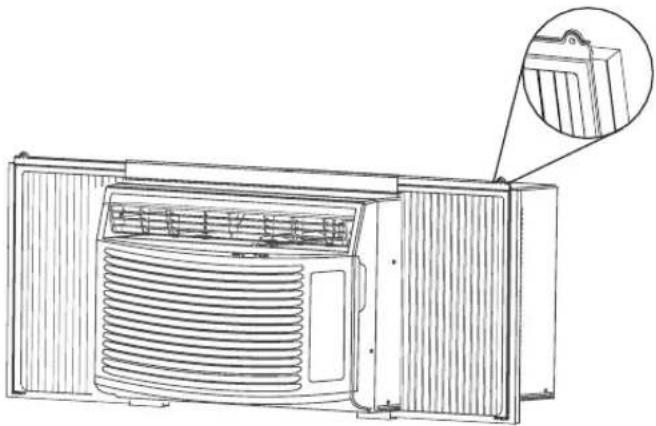
Line drawing of an air conditioner unit with a magnified inset showing internal structure (no text or symbols)- Slide the side curtain frame into the top channel on the top of the air conditioner and the track on the bottom of the air conditioner.

natural_image
Line drawing of an air conditioner unit with cooling fins and ventilation slots (no text or symbols)- Slide the side curtain frame as close to the air conditioner as necessary to lock the side curtain to the frame.
- Repeat above steps for the left-hand side curtain and frame.
natural_image
Technical line drawing of an air conditioner unit with a magnified inset showing internal components (no text or symbols)Prepare Window for Installation
- Measure the width of the window opening.
- Mark the center line on the inside windowsill.

A. Width of window opening
B. Center line
Position Air Conditioner
WARNING
Excessive Weight Hazard
Use two or more people to move and install air conditioner.
Failure to do so can result in back or other injury.
NOTES:
■ Handle the air conditioner gently.
■ Be sure your air conditioner does not fall out of the opening during installation or removal.
■ The place where the power cord exits the air conditioner should be no more than 4 ft (122 cm) from a grounded outlet. (For model ESA406K, ESA408K, ESA406K-L, ESA408K-L, ESA406K-T, ESA408K-T, ESA408K-E electrical outlet can be grounded within 6 ft (183 cm))
■ Do not block the louvers in the front panel.
■ Do not block the louvers on the outside of the air conditioner.
- Center the air conditioner in the window. Lower the window sash behind the top channel to hold the cabinet in place
NOTE: Your model may differ from the one shown.
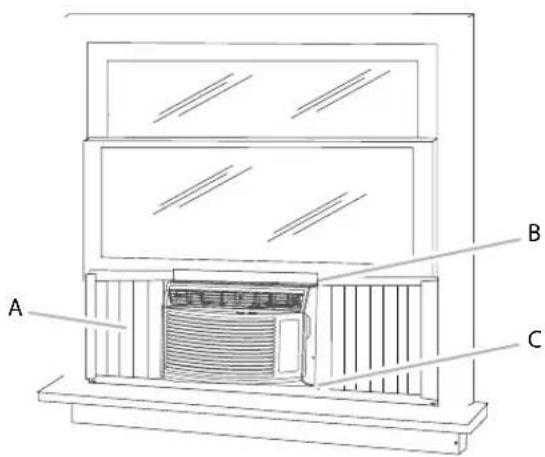
A. Side curtain against window channel
B. Window sash behind top channel
C. Bottom channel in behind windowsill
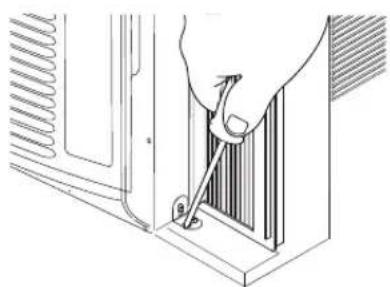
- Loosen the screw on the right-hand side of the air conditioner cabinet near the bottom.

natural_image
Line drawing of a hand adjusting a vertical panel or bracket component (no text or symbols present)- Slide the side bracket over the screw.
- Tighten the screw. The side bracket should be resting on the windowsill.

natural_image
Line drawing of a hand adjusting a vertical panel or bracket component (no text or symbols present)-
Use 18 " drill bit to drill a starter hole through the holes in the side bracket and windowsill.
-
Using two 3132 " screws, attach the side bracket to the windowsill.
natural_image
Line drawing of a hand using a tool to install a vertical panel or fixture (no text or symbols present)- Repeat for side bracket installation on the left-hand side of the air conditioner.
Attach Side Curtains to Window
- Pull the left-hand curtain out until it fits into the window channel.
- Use a 18 " drill bit to drill a starter hole through the top hole in the side curtain and into the window sash.
- Insert one of the 3132 " screws through the top hole of the lefthand curtain and into the window sash.
- Repeat for the right-hand curtain.
- Use a 18 " drill bit to drill a starter hole through the bottom hole in the side curtain and into the window frame.
- Insert one of the 3132 " screws through the bottom hole of the left-hand curtain and into the window frame.
- Repeat for the right-hand curtain.
Top View

natural_image
Technical line drawing of a door frame and adjacent wall-mounted panel (no text or symbols)Complete Installation
- Insert the foam seal behind the top of the lower window sash and against the glass of the upper window.
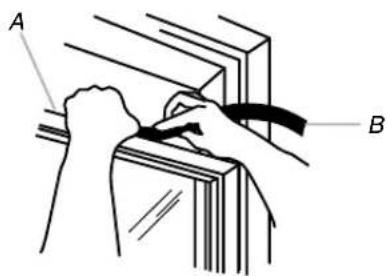
A. Top of lower window sash
B. Foam seal
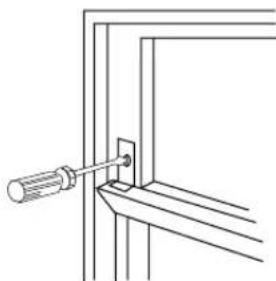
- Place the window lock bracket as shown. Use a 18 " drill bit to drill a starter hole through the hole in the window lock bracket and into the upper window.
-
Attach the window lock bracket to the upper window with one 3132 " screw to secure the window in place.
-
Plug into a grounded 3 prong outlet.
- Press RESET on the power supply cord. See "Electrical Requirements."
natural_image
Pure technical line drawing of a mechanical clamp or bracket assembly without any text, numbers, or symbolsWARNING

Electrical Shock Hazard
Plug into a grounded 3 prong outlet.
Do not remove ground prong.
Do not use an adapter.
Do not use an extension cord.
Failure to follow these instructions can result in death, fire, or electrical shock.
Notes: Push to open the air outlet before using the air conditioner.

Adjust to desired position.

AIR CONDITIONER USE
Operating your air conditioner properly helps you to obtain the best possible results.
This section explains proper air conditioner operation.
IMPORTANT:
If you turn off the air conditioner, wait at least 3 minutes before turning it back on. This keeps the air conditioner from blowing a fuse or tripping a circuit breaker.
- Do not try to operate your air conditioner in the Cool mode when outside temperature is below 61°F (16°C). The inside evaporator coil will freeze up, and the air conditioner will not operate properly.
Starting Your Air Conditioner

- Remove the clear plastic film from the control panel.
- Press POWER to turn on the air conditioner. The Power indicator light will turn on.

POWER
NOTE: When the air conditioner is plugged in, the LED display will show "88" for 3 seconds. After the air conditioner is turned on for the first time, the display will show the current room temperature and the fan is set to Low speed.
After the unit is plugged in, but before the unit is turned on, press and hold the POWER button for 5 seconds to switch the temperature display between Fahrenheit (F) and Celsius(C) degrees.
- Select mode. See "Mode."
- Select fan speed. See "Fan Speed."
- Set temperature. See "Temperature."
Mode
- Press MODE until you see the indicator light glow for the desired setting.
- Choose Fan, Cool, Energy Saver or Dehum.
■ Fan—Only the fan runs. Press SPEED to select High, Med or Low fan speed. The display shows the current room temperature.
■ Cool—Cools the room. Press SPEED to select High, Med or Low fan speed. Press the TEMP/TIME up or down arrow button to adjust the temperature.
■ Energy Saver—Fan runs only when cooling is needed. Press SPEED to select High, Med or Low fan speed.
Because the fan does not circulate the room air continuously, less energy is used, but the room air is not circulated as often.
■ Dehum—Dries the room. The air conditioner automatically selects the temperature.
NOTE:
■ Dehum mode should not be used to cool the room.
In Dehum mode, Please do not operate the speed button.
■ The fan will stop working automatically 3 minutes after the compressor stops with energy saver function.
MODE

FAN


Fan Speed
- Press FAN SPEED until you see the indicator light glow for the desired setting.
- Choose High, Med or Low.
■ High—for maximum cooling
■ Med—for normal cooling
■ Low—for minimum cooling
SPEED

HIGH
MED
LOW
Temperature
- Press the TEMP/TIME up arrow button to raise the temperature. Each time you press or hold the TEMP/TIME up arrow button, the temperature will go up 1°F until it reaches 86°F (30°C).
NOTE: After 5 seconds, the display will show the current room temperature.

TEMP/TIME

- Press the TEMP/TIME down arrow button to lower the temperature. Each time you press or hold the TEMP/TIME down arrow button, the temperature will go down 1°F until it reaches 61°F (16°C).
NOTE: After 5 seconds, the display will show the current room temperature.
Timer Delay
To set the Timer for a 1-hour to 24-hour delay until the air conditioner turns off (the air conditioner must be On):
- Press TIMER. Timer OFF indicator light will flash. Display will show remaining hours before the air conditioner will turn off.
TIMER

ON
OFF
- Press the TEMP/TIME up or down arrow button to change the delay time from 1 hour to 24 hours.
- After 5 seconds, Timer OFF indicator light will remain on. Display will show the current room temperature.
To set the Timer to turn on the air conditioner, keeping previous settings:
- Turn on the air conditioner.
- Press TIMER. Timer On indicator light will flash. Display will show remaining hours before the air conditioner will turn on.
- Press the TEMP/TIME up or down arrow button to change the delay time from 1 hour to 24 hours.
- Timer On indicator light will remain on.
To set the Timer to turn on the air conditioner, changing the previous settings:
- Turn on the air conditioner.
- Adjust the mode to Fan, Cool, Energy Saver or Dehum.
- For Fan, Cool or Energy Saver mode, adjust the fan speed to High, Med or Low.
- Adjust the temperature between 61irc F and 86irc F ( 16irc C and 30irc C).
NOTE: In Fan mode, the temperature cannot be set.
- Press TIMER. Timer On indicator light will flash. Display will show remaining hours before the air conditioner will turn on.
- Press the TEMP/TIME up or down arrow button to change the delay time from 1 hour to 24 hours.
- Timer On indicator light will remain on.
To clear Timer delay program:
NOTE: Air conditioner can be either on or off.
- Press TEMP/TIME once after it has been programmed. Display will show remaining time.
- While the display is showing the remaining time, press TIMER until Timer indicator light turns off.
To see or change the remaining time (in hours):
Timer Off :
- Press TEMP/TIME once after it has been programmed. Display on the air conditioner control panel will show remaining time.
- While the display is showing the remaining time, press the TEMP/TIME up or down arrow button to increase or decrease the time.
- After 5 seconds, the display on the air conditioner control panel will show the current room temperature.
Timer On :
- Display on the air conditioner control panel will show remaining time.
- While the display is showing the remaining time, press the TEMP/TIME up or down arrow button to increase or decrease the time.
Using the Remote Control
NOTE: Dots are Braille text for sight Impaired. Remote control may differ in appearance.
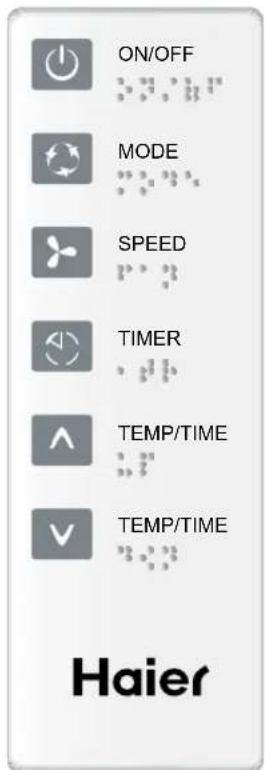
NOTE: One CR2025 battery (included) powers the remote control. Replace battery after 6 months of use, or when the remote control starts to lose power.
Power
Press ON/OFF to turn on the air conditioner.

ON/OFF

Mode
Press MODE to choose Fan, Cool, Energy Saver or Dehum.

MODE

Speed
Press SPEED to choose High, Med or Low.

SPEED

Temperature
■ Press the TEMP/TIME up arrow button to raise the temperature. Each time you press or hold the TEMP/TIME up arrow button, the temperature will go up 1°F until it reaches 86°F (30°C).

TEMP/TIME

■ Press the TEMP/TIME down arrow button to lower the temperature. Each time you press or hold the TEMP/TIME down arrow button, the temperature will go down 1°F until it reaches 61°F (16°C).

TEMP/TIME

Timer
To set the Timer for a 1-hour to 24-hour delay before the air conditioner is turned off (the air conditioner must be On):
- Press TIMER. Timer OFF indicator light on the air conditioner control panel will flash.

TIMER

- Press the TEMP/TIME up or down arrow button to change the delay time from 1 hour to 24 hours.
- After 5 seconds, Timer OFF indicator light on the air conditioner control panel will remain on.
To set Timer to turn on the air conditioner, keeping previous settings:
- Turn on the air conditioner.
- Press TIMER. Timer On indicator light on the air conditioner control panel will flash.
- Press the TEMP/TIME up or down arrow button to change the delay time from 1 hour to 24 hours.
- After 5 seconds, Timer On indicator light on the air conditioner control panel will remain on.
To set Timer to turn on the air conditioner, changing the previous settings:
- Turn on the air conditioner.
- Adjust the mode to Fan, Cool, Energy Saver or Dehum.
-
For Fan, Cool or Energy Saver mode, adjust the fan speed to High, Med or Low.
-
Adjust the temperature between 61irc F and 86irc F ( 16irc C and 30irc C).
NOTE: In Fan mode, the temperature cannot be set.
-
Press TIMER. Timer On indicator light on the air conditioner control panel will flash. Display will show remaining hours before the air conditioner will turn on.
-
Press the TEMP/TIME up or down arrow button to change the delay time from 1 hour to 24 hours.
-
Timer On indicator light on the air conditioner control panel will remain on.
To clear Timer delay program:
NOTE: Air conditioner can be either on or off.
-
Press TIMER once after it has been programmed. Display on the air conditioner control panel will show remaining time.
-
While the display is showing the remaining time, press TIMER until Timer indicator light turns off.
To see or change the remaining time (in hours):
Timer Off :
- Press TEMP/TIME once after it has been programmed. Display on the air conditioner control panel will show remaining time.
- While the display is showing the remaining time, press the TEMP/TIME up or down arrow button to increase or decrease the time.
- After 5 seconds, the display on the air conditioner control panel will show the current room temperature.
Timer On :
- Display on the air conditioner control panel will show remaining time.
- While the display is showing the remaining time, press the TEMP/TIME up or down arrow button to increase or decrease the time.
Changing Air Direction
4-Way Air Flow: The air directional louvers let you control the direction of the airflow to the desired direction. The airflow can be directed up-down, left-right.
Vent: The Fresh air vent allows the air conditioner to recirculat inside air, draw fresh air into the room and exhaust stale air to the outside. (NOTE: For model : ESA410K, ESA412K, ESA410K-L, ESA412K-L, ESA410K-T, ESA410K-E only)

natural_image
Technical line drawing of a mechanical component with spring and housing (no text or symbols)A. 4-Way Air Flow
B. Vent
Normal Sounds
When your air conditioner is operating normally, you may hear sounds such as:
■ Droplets of water hitting the condenser, causing a pinging or clicking sound. The water droplets help cool the condenser.
■ Air movement from the fan.
■ Clicks from the thermostat cycle.
■ Vibrations or noise due to poor wall or window construction.
■ A high-pitched hum or pulsating noise caused by the modern high-efficiency compressor cycling on and off.
AIR CONDITIONER CARE
Your new air conditioner is designed to give you many years of dependable service. This section tells you how to clean and care for your air conditioner properly.
Cleaning the Air Filter
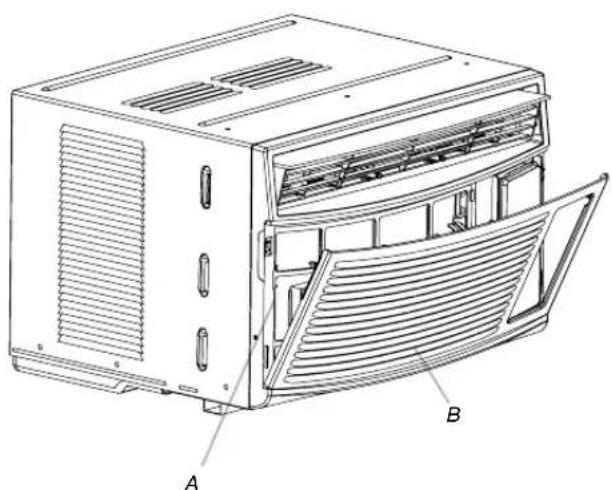
The air filter is removable for easy cleaning. A clean filter helps remove dust, lint, and other particles from the air and is important for best cooling and operating efficiency. Check the filter every 2 weeks to see whether it needs cleaning.
NOTE: Do not operate the air conditioner without the filter in place.
- Turn off the air conditioner.
- Remove the air filter by opening the front panel and removing the air filter.
natural_image
Technical line drawing of an air conditioner unit with labeled components A and B (no text or symbols beyond labels)A. Air filter
B. Front panel
- Use a vacuum cleaner to clean air filter. If the air filter is very dirty, wash it in warm water with a mild detergent. Do not wash the air filter in the dishwasher or use any chemical cleaners. Air dry the air filter completely before replacing to ensure maximum efficiency.
- Replace the air filter.
- Close the front panel.
- Turn on the air conditioner.
Cleaning the Front Panel
- Turn off the air conditioner.
- Clean the front panel with a soft, damp cloth.
- Air dry the front panel completely.
- Turn on the air conditioner.
Annual Maintenance
Air Conditioner
Your air conditioner needs annual maintenance to help ensure steady, top performance throughout the year. Call your local authorized dealer to schedule an annual checkup. The expense of an annual inspection is your responsibility.
TROUBLESHOOTING
Before calling for service, try the suggestions below to see whether you can solve your problem without outside help.
Air Conditioner Will Not Operate
WARNING

Electrical Shock Hazard
Plug into a grounded 3 prong outlet.
Do not remove ground prong.
Do not use an adapter.
Do not use an extension cord.
Failure to follow these instructions can result in death, fire, or electrical shock.
■ The power supply cord is unplugged. Plug into a grounded 3 prong outlet. See “Electrical Requirements.”
■ The power supply cord has tripped (Reset button has popped out). Press and release RESET (listen for click; Reset button will latch and on some devices, a green light will turn on) to resume operation.
- A household fuse has blown, or circuit breaker has tripped. Replace the fuse or reset the circuit breaker. If the problem continues, call an electrician. See “Electrical Requirements.”
■ The Power button has not been pressed or the Mode control knob is turned to Off. Press POWER or turn the Mode control knob to an active setting.
■ The local power has failed. Wait for power to be restored.
Air conditioner blows fuses or trips circuit breakers
■ Too many appliances are being used on the same circuit. Unplug or relocate appliances that share the same circuit.
■ Time-delay fuse or circuit breaker of the wrong capacity is being used. Replace with a time-delay fuse or circuit breaker of the correct capacity. See “Electrical Requirements.”
■ An extension cord is being used. Do not use an extension cord with this or any other appliance.
■ You are trying to restart the air conditioner too soon after turning off the air conditioner. Wait at least 3 minutes after turning off the air conditioner before trying to restart the air conditioner.
Air conditioner power supply cord trips (Reset button pops out)
■ Disturbances in your electrical current can trip (Reset button will pop out) the power supply cord. Press and release RESET (listen for click; Reset button will latch and on some devices, a green light will turn on) to resume operation.
■ Electrical overloading, overheating, cord pinching or aging can trip (Reset button will pop out) the power supply cord. After correcting the problem, press and release RESET (listen for click; Reset button will latch and on some devices, a green light will turn on) to resume operation.
NOTE: A damaged power supply cord must be replaced with a new power supply cord obtained from the product manufacturer and must not be repaired.
Air conditioner seems to run too much
- The current air conditioner replaced an older model. The use of more efficient components may cause the air conditioner to run longer than an older model, but the total energy consumption will be less. Newer air conditioners do not emit the “blast” of cold air you may be accustomed to from older air conditioners, but this is not an indication of lesser cooling capacity or efficiency. Refer to the efficiency rating (EER) and capacity rating (in Btu/h) marked on the air conditioner.
■ The air conditioner is in a heavily occupied room, or heatproducing appliances are in use in the room. Use exhaust vent fans while cooking or bathing and try not to use heatproducing appliances during the hottest part of the day. A higher capacity air conditioner may be required, depending on the size of the room being cooled.
Air conditioner cycles on and off too much or does not cool room in cooling mode
■ The air conditioner is not properly sized for your room. Check the cooling capabilities of your room air conditioner. Room air conditioners are not designed to cool multiple rooms.
■ The filter is dirty or obstructed by debris. Clean the filter.
■ There is excessive heat or moisture (open container cooking, showers, etc.) in the room. Use a fan to exhaust heat or moisture from the room. Try not to use heatproducing appliances during the hottest part of the day.
■ The louvers are blocked. Install the air conditioner in a location where the louvers are free from curtains, blinds, furniture, etc.
■ The outside temperature is below 61irc F ( 16irc C). Do not try to operate your air conditioner in the cooling mode when the outside temperature is below 61irc F ( 16irc C).
■ The temperature of the room you are trying to cool is extremely hot. Allow extra time for the air conditioner to cool off a very hot room.
■ Windows or doors to the outside are open. Close all windows and doors.
■ The Temperature control is not at a cool enough setting. Adjust the TEMP/TIME control to a cooler setting by pressing the minus button to reduce the temperature. Set the Fan Speed control to the highest setting.
Water drips from cabinet into your house
■ The air conditioner is not properly leveled. The air conditioner should slope slightly downward toward the outside. Level the air conditioner to provide a downward slope toward the outside to ensure proper drainage. See the Installation Instructions.
NOTE: Do not drill a hole into the bottom of the metal base and condensate pan.
ASSISTANCE OR SERVICE
Before calling for assistance or service, please check
“Troubleshooting.” It may save you the cost of a service call. If you still need help, follow the instructions below.
When calling, please know the purchase date and the complete model and serial number of your appliance. This information will help us to better respond to your request.
If you need replacement parts
If you need to order replacement parts, we recommend that you use only factory-specified replacement parts. Factory-specified replacement parts will fit right and work right because they are made with the same precision used to build every new appliance.
To locate factory-specified replacement parts in your area, call your nearest designated service center.
Please record your model's information.
Whenever you call to request service on your appliance, you need to know your complete model number and serial number.
You can find this information on the model and serial number label. See "Electrical Requirements" for the location of the model and serial number label.
Please record the model and serial number information below.
Also, record the purchase date of your appliance and the store's name, address, and telephone number.
Model Number
Serial Number
Purchase Date
Store Name
Store Address
Store Phone
Keep this book and the sales slip together for future reference.
In the U.S.A.
Visit www.haieramerica.com or call Haier America toll free 1-877-337-3639.
Our consultants provide assistance with:
■ Features and specifications on our appliances.
■ Installation information.
■ Use and maintenance procedures.
■ Repair parts sales.
■ Referrals to repair parts distributors, and service companies. Manufacturer-authorized service technicians are trained to fulfill the product warranty and provide after-warranty service, anywhere in the United States.
For Further Assistance
If you need further assistance, you can write with any questions or concerns to:
Haier America
1356 Broadway
New York, NY 10018
Please include a daytime phone number in your correspondence.
In Canada
Call Haier America toll free: 1-877-337-3639.
Our consultants provide assistance with:
■ Features and specifications on our appliances.
■ Installation information.
■ Use and maintenance procedures.
■ Repair parts sales.
■ Referrals to repair parts distributors, and service companies. Manufacturer-authorized service technicians are trained to fulfill the product warranty and provide after-warranty service, anywhere in the Canada.
For Further Assistance
If you need further assistance, you can write with any questions or concerns to:
Haier America
1356 Broadway
New York, NY 10018
Please include a daytime phone number in your correspondence.
LIMITED WARRANTY
ONE YEAR LIMITED WARRANTY
This warranty covers all defects in workmanship or material for the mechanical and electrical parts (including labor costs) contained in this product for a period of 12 months from the date of purchase. For commercial or rental application, the warranty is 90 days. You must keep and be able to provide your original sales receipt as proof of the date of purchase.
FIVE YEAR LIMITED WARRANTY ON THE SEALED SYSTEM
The sealed system and compressor (hermetic compressor, condenser and evaporator) contained in this product is for a period of 5 years from the date of purchase (excluding labor costs after the initial 12-month period). In commercial or rental use, the additional limited compressor warranty is for 1 year and 9 months (excluding labor costs after the initial 90-day period). You must keep and be able to provide your original sales receipt as proof of the date of purchase.
WHO IS COVERED
The original retail purchaser of this product.
WHAT WILL BE DONE
Haier America will repair or replace any mechanical, electrical part or the compressor, which proves defective in normal household use for a period of 12 months. Haier America will repair or replace (excluding labor costs) the sealed system and compressor (parts only) for an additional 4-year period.
HOW CAN YOU GET SERVICE
Contact your nearest manufacturer-authorized Service Depot. For the name of the Service Depot nearest you, contact Haier America at 1-877-337-3639.
All service must be performed by a manufacturer-authorized Service Depot.
THIS WARRANTY DOES NOT COVER
- Damages from improper installation.
- Damages in shipping
- Defects other than manufacturing.
- Damages from misuse, abuse, accident, alteration, lack of proper care and maintenance or incorrect current or voltage.
- Damage from other than household use.
- Damages from service by other than an authorized dealer or service center.
- Decorative trims or replaceable light bulbs.
- Labor, service, transportation and shipping charges for the removal of defective parts and installation of replacement parts beyond the initial 12-month period.
- Credit or refund for products over 30 days past date of purchase, or for any loss or injury caused by the product or defects to the product including but not limited to incidental or consequential damages.
- Food loss for food spoiled as a direct result of mechanical failure of a product or of any delay in providing service, repair or replacement.
- Refurbished product purchased as/like new or second-hand.
THIS LIMITED WARRANTY IS GIVEN IN LIEU OF ALL OTHER WARRANTIES, EXPRESS OR IMPLIED, INCLUDING THE WARRANTIES OF MERCHANTABILITY AND FITNESS FOR A PARTICULAR PURPOSE.
The remedy provided in this warranty is exclusive and is granted in lieu of all other remedies. This warranty does not cover incidental or consequential damages. Some states do not allow the exclusion of incidental or consequential damages, so this limitation may not apply to you. Some states do not allow limitations on how long an implied warranty lasts, so this limitation may not apply to you. This warranty gives you specific legal rights and you may also have other rights which vary from state to state.
This warranty covers units within the continental United States, Canada and Puerto Rico.
SEGURIDAD DEL ACONDICIONADOR DE AIRE
A. Canal superior
B. Sello de espuma
C. Soportes laterales (2)
natural_image
Line drawing of a portable air conditioner unit with ventilation grilles and ventilation slots (no text or symbols)natural_image
Diagram of a rectangular grid structure with labeled points A and B, no text or symbols presentnatural_image
Technical line drawing of an air conditioner unit with a magnified inset showing internal structure (no text or symbols)natural_image
Line drawing of an air conditioner unit with cooling fins and ventilation grilles (no text or symbols)natural_image
Line drawing of an air conditioner unit with ventilation grilles and a close-up inset showing the exterior panel detail (no text or symbols)natural_image
Line drawing of a hand inserting a spring into a wall-mounted panel (no text or symbols)natural_image
Line drawing of a hand adjusting a vertical panel or bracket component (no text or symbols present)natural_image
Line drawing of a hand using a tool to install a wall-mounted panel or fixture (no text or symbols present)natural_image
Line drawing of a door handle with a screw and bracket (no text or symbols)Vista inferior

natural_image
Technical line drawing of a room corner with vertical slats and a small component, no text or symbols presentnatural_image
Pure technical line drawing of a mechanical bracket with a screwdriver inserted (no text or symbols)ADVERTENCIA

natural_image
Technical line drawing of a mechanical component with labeled parts A and B (no text or symbols beyond labels)ESA408K, ESA408K-L(3)
ESA406K-T,ESA408K-T(3)
ESA408K-E(3)
natural_image
Diagram of a rectangular grid with labeled points A and B, no text or symbols presentnatural_image
Line drawing of an air conditioner unit with a close-up inset showing internal structure (no text or symbols)natural_image
Line drawing of an air conditioner unit with cooling fins and ventilation slots (no text or symbols)natural_image
Line drawing of an air conditioner unit with a close-up inset showing the exterior panel detail (no text or symbols)natural_image
Line drawing of a hand inserting a clip into a wall-mounted panel (no text or symbols)natural_image
Line drawing of a hand inserting a spring into a wall-mounted panel (no text or symbols)natural_image
Line drawing of a hand using a tool to install a vertical panel or vent (no text or symbols present)natural_image
Pure technical line drawing of a mechanical bracket with a screwdriver inserted (no text or symbols)AVERTISSEMENT

UTILISATION DU CLIMATISEUR
A. 4 Balayage d'Air
B. Passage
Sons normaux
natural_image
Technical line drawing of an air conditioner unit with labeled components A and B (no text or symbols beyond labels)ASSISTANCE OU SERVICE


- ROOM AIR CONDITIONER
- ÍNDICE
- AIR CONDITIONER SAFETY
- Your safety and the safety of others is very important.
- DANGER
- WARNING
- IMPORTANT SAFETY INSTRUCTIONS
- INSTALLATION REQUIREMENTS
- Tools needed
- Parts supplied:
- Location Requirements
- Window Installation
- Electrical Requirements
- Electrical Shock Hazard
- Power Supply
- Cord Wiring Requirements
- Recommended Grounding Method
- Power Supply Cord
- To test your power supply cord:
- NOTES:
- INSTALLATION INSTRUCTIONS
- Excessive Weight Hazard
- Remove Packaging Materials
- Install Top Channel
- Install Side Curtains
- Prepare Window for Installation
- Position Air Conditioner
- Attach Side Curtains to Window
- AIR CONDITIONER USE
- IMPORTANT:
- Starting Your Air Conditioner
- Mode
- NOTE:
- Fan Speed
- Temperature
- Timer Delay
- To set the Timer for a 1-hour to 24-hour delay until the air conditioner turns off (the air conditioner must be On):
- To set the Timer to turn on the air conditioner, keeping previous settings:
- To set the Timer to turn on the air conditioner, changing the previous settings:
- To clear Timer delay program:
- To see or change the remaining time (in hours):
- Using the Remote Control
- Power
- Speed
- Timer
- To set the Timer for a 1-hour to 24-hour delay before the air conditioner is turned off (the air conditioner must be On):
- To set Timer to turn on the air conditioner, keeping previous settings:
- To set Timer to turn on the air conditioner, changing the previous settings:
- Changing Air Direction
- Normal Sounds
- AIR CONDITIONER CARE
- Cleaning the Air Filter
- Cleaning the Front Panel
- Annual Maintenance
- Air Conditioner
- TROUBLESHOOTING
- Air Conditioner Will Not Operate
- Air conditioner blows fuses or trips circuit breakers
- Air conditioner power supply cord trips (Reset button pops out)
- Air conditioner seems to run too much
- Air conditioner cycles on and off too much or does not cool room in cooling mode
- Water drips from cabinet into your house
- ASSISTANCE OR SERVICE
- If you need replacement parts
- Please record your model's information.
- In the U.S.A.
- Our consultants provide assistance with:
- For Further Assistance
- In Canada
- LIMITED WARRANTY
- ONE YEAR LIMITED WARRANTY
- FIVE YEAR LIMITED WARRANTY ON THE SEALED SYSTEM
- WHO IS COVERED
- WHAT WILL BE DONE
- HOW CAN YOU GET SERVICE
- THIS WARRANTY DOES NOT COVER
- THIS LIMITED WARRANTY IS GIVEN IN LIEU OF ALL OTHER WARRANTIES, EXPRESS OR IMPLIED, INCLUDING THE WARRANTIES OF MERCHANTABILITY AND FITNESS FOR A PARTICULAR PURPOSE.
- SEGURIDAD DEL ACONDICIONADOR DE AIRE
- ADVERTENCIA
- AVERTISSEMENT
- UTILISATION DU CLIMATISEUR
- Sons normaux
- ASSISTANCE OU SERVICE
Brand : HAIER
Model : ESA412K
Category : Air Conditioning