
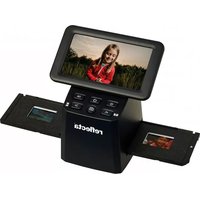
x8-Scan - Scanner Reflecta - Free user manual and instructions
Find the device manual for free x8-Scan Reflecta in PDF.


| Product Type | Film Scanner |
| Brand | Reflecta |
| Model | x8-Scan |
| Image Sensor | 1/3.2" 5-megapixel CMOS sensor |
| Lens Specification | F=6.1, EFL=11.0mm, field of angle=26° |
| Optical Resolution | 1800 dpi (enhanced to 3600 dpi via interpolation) |
| Supported Film Sizes | 135mm film (36mm x 24mm) |
| Supported Film Types | Color Negative, Black & White Negative, Slides |
| Color Depth | 24 bits RGB (48 bits color depth option in software) |
| Image Format | 135 Film 3:2 ratio |
| Light Source | 3 white LEDs (backlight) |
| Auto Exposure | Automatic |
| Auto Color Balance | Automatic |
| Focus | Fixed focus |
| PC Interface | USB 2.0 |
| Power Source | USB port (no external power adapter needed) |
| Dimensions (H x W x D) | 165.7 x 104 x 90 mm |
| Bundled Software | ArcSoft MediaImpression |
| Accessories Included | 135 Slide Holder, 135 Negative Film Holder, Clean Brush, Quick Start Guide, CD-ROM |
| System Requirements (Windows) | Pentium P4 1.6GHz, 512MB RAM, 500MB HDD, USB 2.0, CD-ROM, Windows XP SP2/Vista/7/8 (32/64-bit) |
| System Requirements (Mac) | PowerPC G5 or Intel Core Duo, 768MB RAM, 500MB HDD, USB 2.0, CD-ROM, Mac OS 10.5-10.9 |
| Safety Precautions | Keep away from water, do not open case, avoid use in aircraft or restricted areas, use only recommended power accessories, clean with soft dry cloth |
| Cleaning | Use supplied Clean Brush to clean glass surface periodically; ensure film and holders are dust-free before scanning |
Frequently Asked Questions - x8-Scan Reflecta
User questions about x8-Scan Reflecta
0 question about this device. Answer the ones you know or ask your own.
Ask a new question about this device
Download the instructions for your Scanner in PDF format for free! Find your manual x8-Scan - Reflecta and take your electronic device back in hand. On this page are published all the documents necessary for the use of your device. x8-Scan by Reflecta.
USER MANUAL x8-Scan Reflecta
natural_image
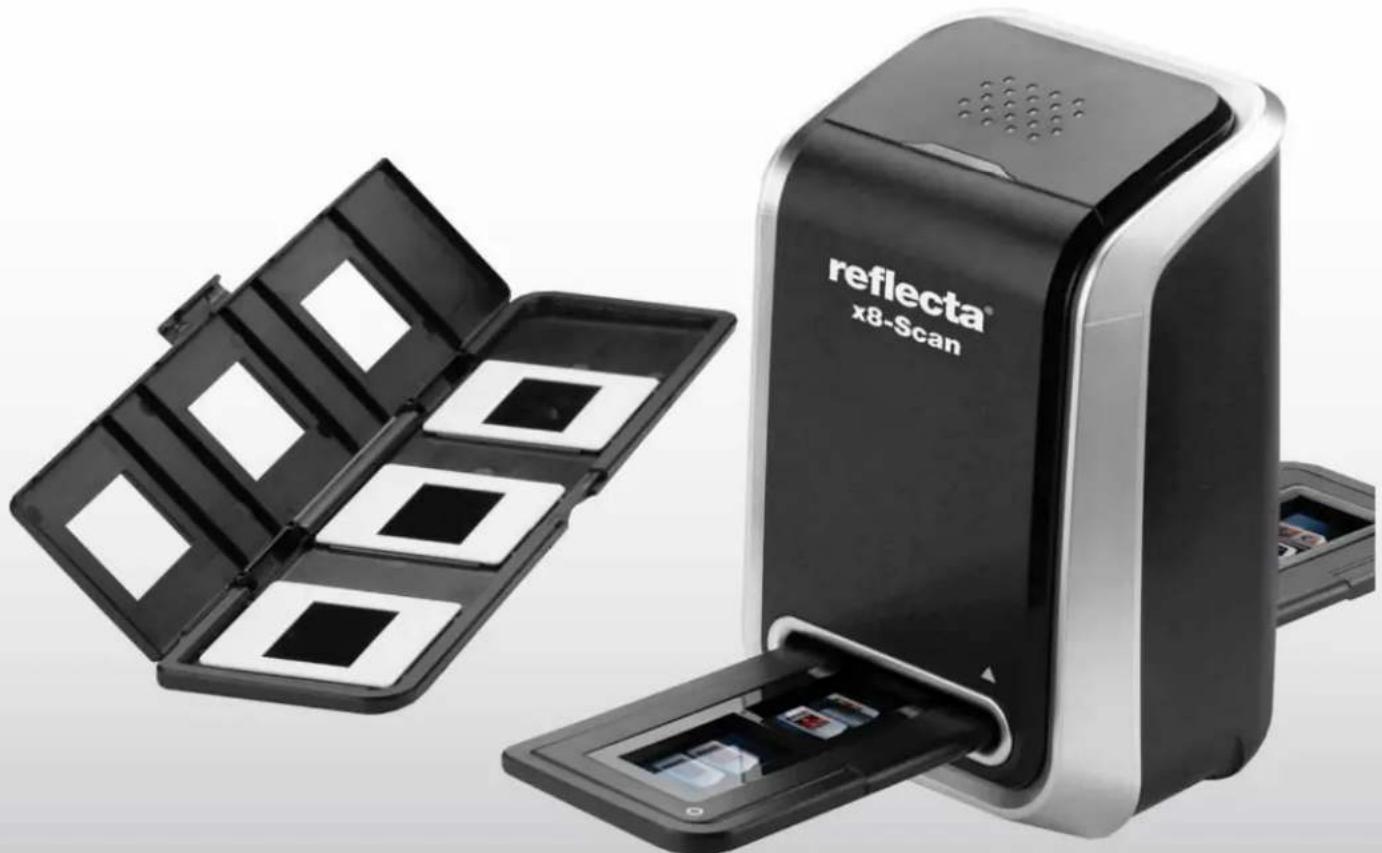
Product photo of a Reflecta x8-Scan scanner with open case and multiple square modules (no visible text or symbols on device body)Professional high resolution images
Table of Contents
EN
- Precautions.... 2
-
Preparation.... 5
-
Standard Accessories.... 5
-
Parts Names.... 6
-
Install The Software.... 7
-
Install the Software in Windows...... 7
-
Install the Software in Mac.... 8
-
Place Film/Slide into the Holder.... 9
- Connecting the reflecta x8-Scan.... 10
-
Acquire Picture.... 11
-
Acquire Picture from Windows.... 11
• Acquire Picture from Mac...... 15 -
Edit The Pictures / Photo Editing Tools.... 19
-
Adjust.... 19
- Retouch.... 23
-
Clipboard.... 25
-
Appendix......26
-
Specifications....26
- Trouble Shooting....27
- System Requirements......29
Welcome
Thank you for purchasing a reflecta x8-Scan.
Please take a moment to read through this manual. Its contents will send you on an educational journey into your recorder multiple capabilities.
1. Precaution
Before using reflecta x8-Scan, please ensure that you read and understand the safety precautions described below. Always ensure that the reflecta x8-Scan is operated correctly.
Never operate reflecta x8-Scan inside of an aircraft or anywhere else where operation of such devices is restricted. Improper use creates the risk of serious accident.
Do not try to open the case of reflecta x8-Scan or attempt to modify reflecta x8-Scan in any way. High-voltage internal components create the risk of electric shock when exposed. Maintenance and repairs should be performed only by authorized service providers.
Keep reflecta x8-Scan away from water and other liquids. Do not use reflecta x8-Scan with wet hands. Never use reflecta x8-Scan in the rain or snow. Moisture creates the danger of fire and electric shock.
Keep reflecta x8-Scan and its accessories out of the reach of children and animals to prevent accidents or damage to the reflecta x8-Scan.
If you notice smoke or a strange odor coming from reflecta x8-Scan, turn the power off immediately. Take reflecta x8-Scan to the nearest authorized service center for repair. Never attempt to repair reflecta x8-Scan on your own.
Use only the recommended power accessories. Use of power sources not expressly recommended for reflecta x8-Scan may lead to overheating, distortion of the equipment, fire, electrical shock or other hazards.
reflecta x8-Scan may become slightly warm during use. This does not indicate malfunction.
If the exterior of reflecta x8-Scan needs cleaning, wipe it with a soft, dry cloth.
FCC Notice
This equipment has been tested and found to comply with the limits for a Class B digital device, pursuant to Part 15 of the FCC Rules. These limits are designed to provide reasonable protection against harmful interference in a residential installation. This equipment generates, uses and can radiate radio frequency energy. If not installed and used in accordance with the instruction, it may cause harmful interference to radio communication. However, there is no guarantee that interference will not occur in a particular installation. If this equipment does cause harmful interference to radio or television reception, which can be determined by turning the equipment on the off, the user is encouraged to try to correct the interference by one or more the following suggestion.
- Reorient or relocate the receiving antenna.
- Increase the distance between the equipment and the receiver.
- Connect the equipment to a different power outlet other than the one where the receiver is connected.
- Consult an experienced television or radio technician for help.
CAUTION
To comply with the limits for a Class B digital device, pursuant to Part 15 of the FCC Rules, this device must only be installed on computer equipment certified to comply with the Class B limits.
Standard Accessories
natural_image
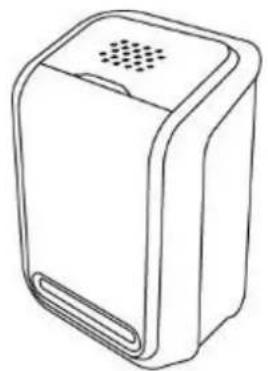
Line drawing of a rectangular electronic device with a perforated top and side panel (no text or symbols)reflecta x8-Scan
QSG

natural_image
Simple concentric circle diagram with no text or symbolsCD

natural_image
Line drawing of a rectangular tray with four square cutouts (no text or symbols)135 Slide Holder

natural_image
Simple line drawing of a rectangular tray with six compartments (no text or symbols)135 Negative Film Holder

natural_image
Line drawing of a tool or plunger with no text or symbolsClean Brush
Part Names

Note: We strongly suggest using the supplied Clean Brush to insert into the reflecta x8-Scan slot and clean the glass surface periodically to produce a clear image. Please make sure your film negatives/ mounted slides and cover trays are clean before inserting into the copier as well. Dust or dirt from the negatives and cover trays will affect the quality of your scanned images.
3. Install the Software
This reflects a x8-Scan is supported by Microsoft / Mac UVC (Universal Video Class) and Plug & Play technology. Therefore, it does not need a separate driver.
To use the reflecta x8-Scan you must install ArcSoft MediaImpression in the CD in advance.
Installing the Software in Windows OS computer
-
Insert the installation CD into the CD-ROM drive and the installation CD menu should appear.
-
When you see the following screen, choose "ArcSoft MedialImpression" to install the software.

- Follow the on-screen instructions.
- On Customer Information, please refer to the sticker with SN no. on the CD paper cover for License Key.
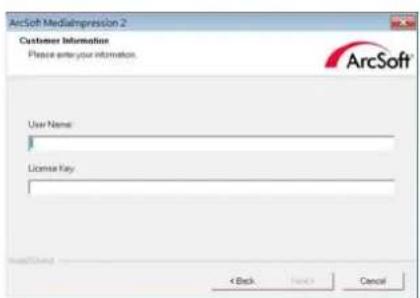

- The installed software will automatically create a Medialmpression logo on your desktop.
- Restart the computer.
Installing the Software in Mac OS computer
- Insert the installation CD into your computer's CD-ROM drive and click CD icon.
- Click" MedialImpression Installer"
- Follow the on-screen instructions.
- On Customer Information, please refer to the sticker with SN no. on the CD paper cover for License Key.


4. Place Film / Slide Into The Holder
EN
- Open the negative/ positive slide holder as Illustrated.

natural_image
Black rectangular panel with six white square cutouts and a curved arrow pointing to the middle section (no text or symbols)
natural_image
Black rectangular button with three white square holes and a curved arrow pointing right (no text or symbols)- Put a negative film/ positive slide into holder as shown.

natural_image
Black rectangular device with red LED display panel, no visible text or symbols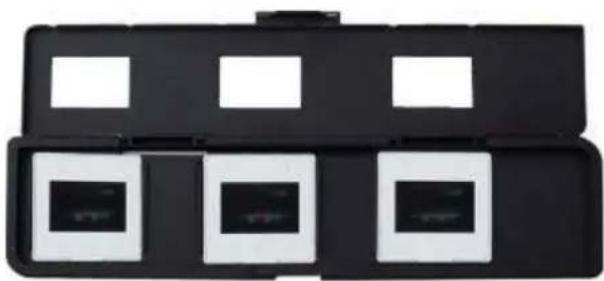
natural_image
Black rectangular device with four square cutouts, each containing a small black square (no text or symbols visible)- Close the holder and please make sure the holder close properly.

natural_image
Close-up of a black electronic device with red LED display and white arrow indicating rotation (no text or symbols)
natural_image
Close-up of a black electronic control panel with three square buttons and a white curved arrow indicating rotation (no text or symbols)5. Connecting the reflecta x8-Scan
- Plug the USB cable of reflecta x8-Scan into your computer's USB 2.0 port. Once connected the Power LED light will turn on.
- Insert the loaded film/ slide holder properly into the slot according to the triangular signs as shown.
IMPORTANT: INSERTING HOLDERS INCORRECTLY MAY DAMAGE YOUR reflecta x8-Scan

natural_image
Two-step photo showing a kitchen grater being inserted into a digital scanner, with red arrows indicating the process (no text or symbols present)(Insert through front entrance)
6. Acquire Picture
EN
Acquire Picture from Windows and Mac Computer
- Click on the MediaImpression icon on the desktop and you will see the following. For Mac computer the mediaImpression may be located in “Application” of your computer.
Media
Impression 2
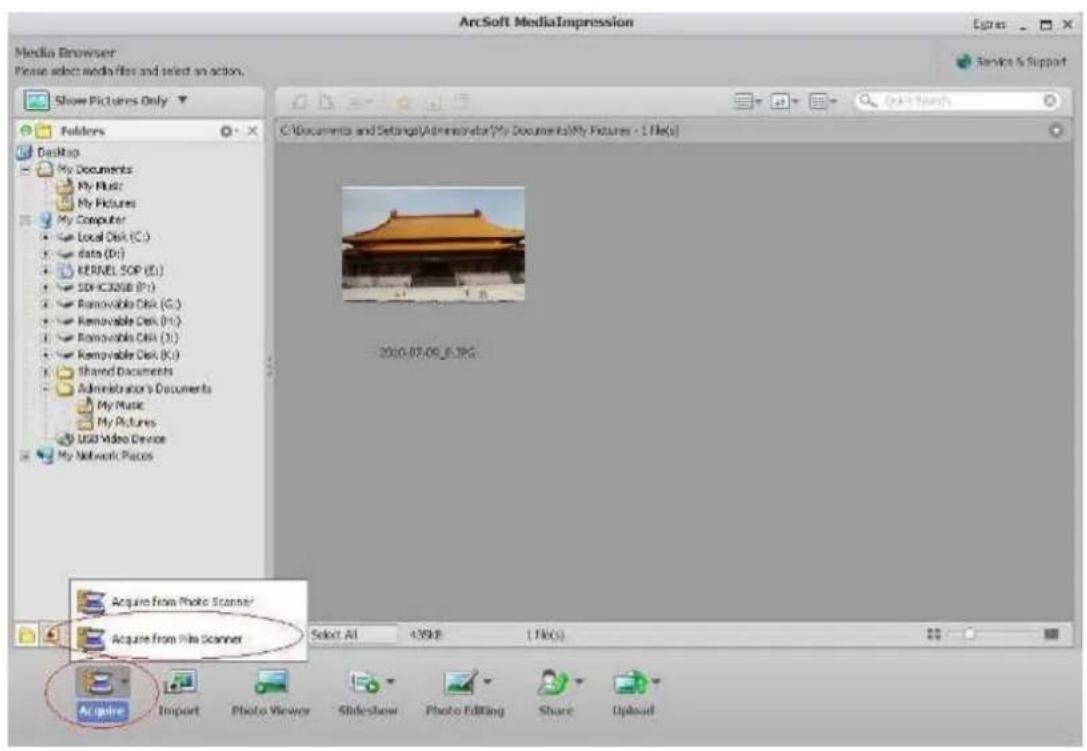
2. Click "Acquire".
Connect USB cable of your scanner to the computer Select “Acquire from Film Scanner”.
3. Define your save as settings:
a) There are two formats JPG or TIF for setting.

b) There are four quality levels (Highest/ High/ Normal/ Low) for selection in JPG format.

c) Select the location to save your image.
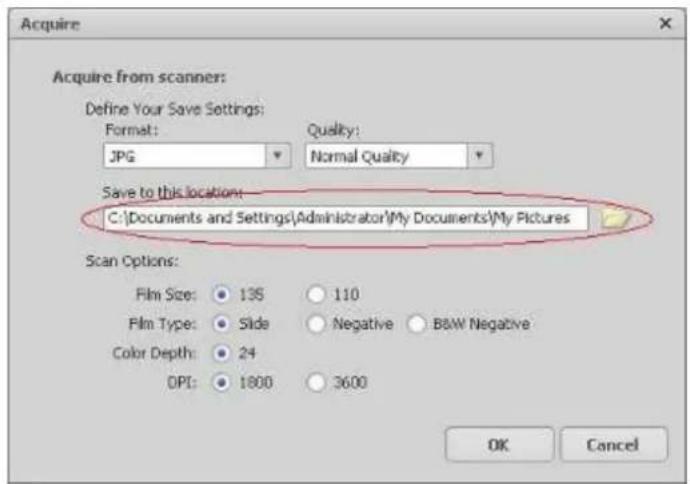
d) There are two film sizes (135 film) to choose from. You are suggested to select 135 film

e) Select the film type you are going to scan.
f) Click "OK".

4. Capturing images
You will see the image to be captured in the live view window, move the holder to avoid dark edge of the holder appears in the live view window, the dark edge will be captured if it appears. If the dark edge is on top or bottom when taking slide image, tilt the device left or right will help to locate the image correctly. Click “Capture” to save image to your computer.

- Move the film holder and press “Capture” for the next film scan.
7. Editing The Pictures
First, click on the picture you wish to edit, and then use the ArcSoft tools to edit.
Edit
Photo Editing Tools
The Photo Editing Tools module includes a complete set of photo enhancement, editing and retouching tools. The windows can be stretched to provide a large size view of the active photo. Double click the module's tool bar to maximize the window to fill the computer screen. In addition to the large photo workspace, the Photo Editing Tools module includes five distinct sets of tools:
1. Adjust
1.1 Enhance
The Enhance feature includes two types of tools:

- Auto Enhance
Click the “Auto Enhance” button to improve the overall quality of your pictures with a single click.
- Manual Fix
For precise image enhancement control, adjust the brightness, contrast and sharpen sliders.
How to enhance a photo manually:
- Move the sliders to adjust the level of brightness, contrast, saturation, hue and sharpness.
- Use the zoom slider to get a closer look at how the adjustment affects the photo.
- Click "Apply" if you like the result. Click "Cancel" if you do not.
1.2 Color
This feature is designed to fix digital photos that have incorrect colors or appear too dark. It's also great for fixing scanned versions of old pictures that have faded or whose colors have changed after many years.
How to fix the color of a picture:
- Drag the color balance sliders to make the photo color appear more natural. Add red or yellow to make the photo warmer. Add blue or green to make the photo cooler.
- Drag the Lighter/Darker slider to the left to reveal details hidden in a dark photo or to the right to make a faded photo look new again.
- Click "Apply" if you like the result. Clock "Cancel" if you do not.
1.3 Red-Eye
This feature makes it easy for you to fix a red-eye – a common problem in flash photography.
There are two ways to fix red-eye:
- Auto Fix

-
Simply click the "Fix Red-Eye" button to automatically find the fix all red-eyes.
-
If not all of the red-eyes are fixed, use the “Click to Fix” method.
- Manual Fix
-
Use the zoom slider on the toolbar to zoom in on the photo.
-
Drag the small white box inside the zoom navigator and move over a red eye.
- Place your cursor directly over the red eye and click.
- Repeat the process until all the red eyes are fixed.
- Click “Undo” if you make a mistake or don’t like the result.
1.4 Crop
This feature enables you to trim photos for a dramatic effect or cut off the distracting parts of a picture.
How to use the crop function:
- Choose the crop orientation (portrait or landscape).
- Select a fixed proportion for the crop rectangle (4:6, 5:7, 8:10) or choose “Custom” if you want to use a different ratio.
- Resize the crop rectangle by clicking and dragging the red lines.
- Move the crop rectangle into position by clicking and dragging inside the red box.
- Click “Crop”. The area inside the rectangle will be kept, the area outside will be trimmed away.
- Click “Undo” if you make a mistake or don’t like the result.
1.5 Straighten
This feature enables you to fix photos that appear to be tilted.
How to use Straighten:
- Move the slider (or click the rotate buttons) until the photo appears straight.
- Use the superimposed grid lines for vertical and horizontal reference.
- Click "Apply" if you like the result. Click "Cancel" if you do not.
1.6 Blur Background
This feature can be used in a subtle way – to tone down un-important background details, or for dramatic effect- by making the main subject of a photo “pop out” of the picture.
How to use the Blur Background function:
- With your cursor, trace a line around the person or object you want to strand out. When you release the mouse button, the area outside the traced line will become slightly blurred.
- Drag the first slider to make the transition between the blurred and non-blurred area sharp or smooth.
- Drag the second slider to increase or decrease the amount of blur.
- Click “Apply” if you like the result. Click “Cancel” if you do not.
Saving Your Results
When you're done editing a photo, click "Save as" to save your results. You can choose to overwrite the original file or save as a new one.
Click "Close" to exit the Photo Editing Module.
2. Retouch
2.1 Healing Brush

The Healing Brush is good for fixing dust, scratches and removing skin blemishes.
How to use the Healing Brush to fix a skin blemish:
- Establish a source point for the Healing Brush by holding the Shift key and clicking on an area of the skin that is close in color and texture to the area you want to heal.
- Use the zoom control to zoom in on the blemish.
- Adjust the size of the healing brush so the cursor (circle) is only slightly larger than the blemish.
- Paint over the blemish. The area will be concealed.
- Click “Undo” if you make a mistake or don’t like the result.
2.2 Clone

The Clone tool is good for the removing unwanted elements from a photo. It can also be used for a fun effect, like moving a nose from one person t another.
How to use the Clone tool to remove a telephone pole from the background of a photo:
-
Establish a source point for the Clone tool by holding the Shift key and clicking on an area of the sky that you want to use to paint over the telephone pole.
-
Adjust the brush size so the cursor (circle) is only slightly larger than the widest part of the telephone pole.
-
Click and hold your mouse button and carefully paint over the telephone pole. Do not release the mouse button until the job is done. The sky will be cloned into place.
- Click “Undo” if you make a mistake or don’t like the result.
2.3 Lighten/Darken

The Light/Darken tool is good for adjusting specific areas of a photo.
2.4 Smudge

Simulate the smearing of wet paint. Please click and drag the sliders below to change the brush size and sharpness.
2.5 Sharpen

Sharpen blurry areas. Click and drag the sliders below to change the brush size and transparency.
2.6 Blur

Smooth out rough areas. Click and drag the sliders below to change the brush size and intensity.

2.7 Paint Brush
Allows you to “paint” on your image when you click and drag the mouse. Click and drag the sliders below to change the brush size and transparency.
2.8 Line
Draw a straight line in the photo. Click and drag the sliders below to change the line width and transparency.
2.9 Eraser

Simulate an eraser, removing the image painting by paintbrush and line tools from your photo. Click and drag the sliders below to change the eraser size and effect.
3. Clipboard
Clip the pictures by selecting Rectangular, Elliptical, Freehand, Magic wand and Magnetic.
Note: For more detailed information, please refer to the [Help section] of program.
8. Appendix
| Specifications | |
| Image Sensor 1/3.2” 5 me | ega CMOS sensor,5 mega pixels |
| Lens Specification F=6.1 | EFL=11.0mm, field of angle=26° |
| Color Balance Automatic | |
| Exposure Control Automatic | |
| Supported film sizes auto cropping | 135mm film (36mm x 24mm) |
| Supported film types auto converting | Color Negative Film (135)Black & White Negative Film |
| Focusing | Fixed Focus |
| PC interface USB 2.0 | |
| Scan High Resolution 4.3 | M equal to 1,800 dpi (enhances to 3,600 dpi via interpolation) |
| Data Conversion 24 bits R.G.B color channel (48 bits color depth option in MediaImpression) | |
| Image Format | 135 Film 3:2 ratio |
| Light Source Back Light | 3 white LED |
| Power | From USB port |
| Dimension | 165.7(H) x 104(W) x 90(L) mm |
| Bundled Software | ArcSoft Medialmpression |
| Specifications are subject to change without prior notice. | |
Trouble Shooting
| Issue | Possible cause | Resolution |
| My computer does not recognize the reflecta x8-Scan. I get a Windows message that reads "device not recognized" | reflecta x8-Scan not plugged into a high-speed USB port. | Your computer must have a USB 2.0 to communicate with your reflecta x8-Scan. Check to see if USB 2.0 is installed on your computer. If you do not have a USB 2.0 installed on your computer you can upgrade your USB ports. This hardware is available at most electronic stores. |
| My installation disc will not auto start | May be a problem with install CD.May be a problem with your CD drive. | Check to see if your CD drive is operating properly. If possible check another computer to see if the disc is recognized.Some “Anti Virus” system may block the auto start, please install manually. |
| My reflecta x8-Scan works ok, but some of my slides or negatives look overexposed | Time for auto exposure varies according to your computer configuration. | The reflecta x8-Scan self adjusts to your slide/negative exposure. Wait for the live view window to stop adjusting for exposure and then click “Capture” to get image. Check your slides or negatives to see if they may have been overexposed when originally developed. You may use the MediaImpression software to adjust or improve the image quality. |
| Issue | Possible | cause | Resolu |
| I found black edge in preview mode | Slide might not in holder central position | Tilt the scanner left or right, slide will slip and check the preview photo again. | |
| I found the black edge when seeing the photo | Film/Slide size tolerance | Crop the photo by software, detail user guide, please refer to this manual “Edit the picture” point “1.4 Crop” | |
| Your software will expire in XX days. | You downloaded the similar trial software from ArcSoft website. | Uninstall the downloaded MediaImpression and install the software again from the CD. | |
| My Mac computer does not work with the copier. | Your Mac. OS is version 10.4 or below. | Some older Mac 10.4 version does not support UVC.Please upgrade to its latest version 10.4.11 or above. | |
tion
PC System Requirements
- Pentium® P4 1.6GHz or equivalent AMD Athlon
- Free USB2.0 port
- 512MB RAM
● 500MB free hard disk space
● 1024 x 768 pixel color monitor - CD-ROM drive
- Windows® XP Service Pack II / Vista™, 32/64 bits Windows 7/8
Mac System Requirements
● PowerPC G5 or Intel Core Duo processor recommended
- Free USB2.0 port
- 768MB RAM
- 500MB free hard disk space
● 1024 x 768 color monitor
- CD-ROM drive
● Mac 10.5 \~ 10.9
If you have any questions or requests, please contact us at the following number:
This symbol on the product or in the instructions means that your electrical and electronic equipment should be disposed at the end of its life separately from your household waste. There are separate collection systems for recycling in the EU. For more information, please contact the local authority or your retailer where you purchased the product.
natural_image
Simple line drawing of a trash bin with crossed lines indicating no waste or plastic discharge (no text or symbols)

- Table of Contents
- Welcome
- Precaution
- FCC Notice
- CAUTION
- Standard Accessories
- Part Names
- Install the Software
- Installing the Software in Windows OS computer
- Installing the Software in Mac OS computer
- Place Film / Slide Into The Holder
- Connecting the reflecta x8-Scan
- Acquire Picture
- Acquire Picture from Windows and Mac Computer
- Click "Acquire".
- Define your save as settings:
- Capturing images
- Editing The Pictures
- Edit
- Photo Editing Tools
- Adjust
- Enhance
- Color
- Red-Eye
- - Auto Fix
- - Manual Fix
- Crop
- Straighten
- How to use Straighten:
- Blur Background
- Saving Your Results
- Retouch
- Healing Brush
- Clone
- Lighten/Darken
- Smudge
- Sharpen
- Blur
- Paint Brush
- Line
- Eraser
- Clipboard
- Appendix
- PC System Requirements
- Mac System Requirements
Brand : Reflecta
Model : x8-Scan
Category : Scanner