
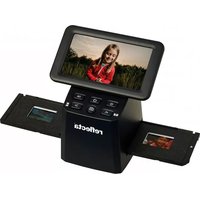
MidformatScan MF5000 - Scanner Reflecta - Free user manual and instructions
Find the device manual for free MidformatScan MF5000 Reflecta in PDF.


| Product Type | Medium Format Film Scanner |
| Brand | Reflecta |
| Model | MidformatScan MF5000 |
| Supported Film Types | 120 (6x4.5, 6x6, 6x7, 6x8, 6x9, 6x12 cm), 35mm (135), 135 Mounted Slides |
| Optical Resolution | 1000 dpi (default, adjustable) |
| Color Depth | 8 or 16 bits per channel (24/48-bit RGB) |
| Interface | USB 2.0 |
| Power Adapter Input | 100-240V AC, 50/60 Hz |
| Operating Temperature | 10°C to 40°C (50°F to 104°F) |
| Operating Humidity | 15% to 76% (non-condensing) |
| Included Software | CyberView X driver, Adobe Photoshop Elements (or similar) |
| System Requirements | 1 GB RAM minimum, USB 2.0 port |
| Scanning Modes | Positive (slide), Negative, Black & White |
| Image Adjustment Features | Brightness, Contrast, Saturation, Color Balance, Curves, Levels, Auto Exposure, Auto Balance, Auto Contrast, Digital Noise Reduction, Magic Touch (scratch removal) |
| Output File Formats | TIFF (uncompressed), JPEG (Good/Better/Best quality) |
| Package Contents | Scanner unit, 120 film holder, 135 film holder, 135 slide holder, power adapter, USB cable, CyberView X CD, application software CD, printed user manual |
| Warranty | 2 years (private use), 1 year (commercial use up to 20,000 scans) |
| Regulatory Compliance | FCC Class B |
Frequently Asked Questions - MidformatScan MF5000 Reflecta
User questions about MidformatScan MF5000 Reflecta
0 question about this device. Answer the ones you know or ask your own.
Ask a new question about this device
Download the instructions for your Scanner in PDF format for free! Find your manual MidformatScan MF5000 - Reflecta and take your electronic device back in hand. On this page are published all the documents necessary for the use of your device. MidformatScan MF5000 by Reflecta.
USER MANUAL MidformatScan MF5000 Reflecta
FEDERAL COMMUNICATIONS COMMISSION (FCC) STATEMENT
This Equipment has been tested and found to comply with the limits for a class B digital device, pursuant to Part 15 of the FCC rules. These limits are designed to provide reasonable protection against harmful interference in a residential installation. This equipment generates uses and can radiate radio frequency energy and, if not installed and used in accordance with the instructions, may cause harmful interference to radio communications. However, there is no guarantee that interference will not occur in a particular installation. If this equipment does cause harmful interference to radio or television reception, which can be determined by turning the equipment off and on, the user is encouraged to try to correct the interference by one or more of the following measures:
◆ Re-orient or relocate the receiving antenna.
- Increase the separation between the equipment and receiver.
- Connect the equipment into an outlet on a circuit different from which the receiver is connected to.
- Consult the dealer or an experienced radio/TV technician for help.
Warning : Use only shielded signal cables to connect I/O devices to this equipment. You are cautioned that changes or modifications not expressly approved by the party responsible for compliance could void your authority to operate the equipment.
TABLE OF CONTENS
Getting Started 7
Quick Installation Guide (QIG) 11
Installing Software and Driver 12
Installing Hardware 13
Loading 120 Films into the Holder 14
Loading 120 Film Holder into the Scanner 17
Loading 135 Film into the Holder 18
Loading 135 Mounted Slides into the Holder 20
Loading 135 Film and Slide Holder Into Scanner 20
How to Scan 23
STEP 1 - Powering On the Scanner 23
STEP 2 - Select Film Type 23
STEP 3 - Optional Prescan 24
STEP 4 - Set Scan Settings 24
STEP 5 - Scan 23
STEP 6 - Exit 27
User Interface 29
I Menu Commands (overview + full) 30
II Function Bar Diagram / Toolbar Diagram 30
III Active Frame Setting Area 42
Technical Support 45
GETTING STARTED
Check the package content before getting started.
For Quick Installation please refer to Quick Installation Guide. (Pg. 11)

Important! Save the original box, receipt and packing material for future shipping needs or to return for warranty issues.
Package Contents
Scanner unit.
Medium format film holder for one or two frames (6 x 4.5 cm, 6 x 6 cm), one frame (6 x 7 cm, 6 x 8 cm, 6 x 9 cm, 6 x 12 cm).
135 film holder.
◆ 135 slide holder.
Warning! Using any other power adapter may severely damage the scanner and will void the product warranty.
Power Adapter.
USB 2.0 Cable.
◆ CyberView X Driver.
◆ Application software CD for scan editing.
◆ Printed User's Manual.
NOTE:
Application software means the imaging software such as Adobe® Photoshop® Elements, this is subject to change without notice.
GENERAL GUIDANCE:
- Only use the supplied USB-cable. Connect the scanner to the computer directly using the USB 2.0 cable.
- Do not use a Hub or extension cable. Only use the USB ports on the back of desktop computers.
- If there are any other devices (multifunction device, printers, scanners, webcam) connected to the computer through USB disconnect them.
◆ A minimum of 1GB RAM (PC/Mac) is required. - When scanning Kodachrome or Black and White film, disable Magic Touch (scratch removal feature).
| Operating Ambient Temperature Range50° to 104°F (10° to 40°C) |
| note: Do not turn on the scanner unless it is within this range. If the scanner has been stored or transported outside of this range, allow it to return to within this range before turning it on. |
| Operating Ambient Humidity Range 15% to 76% relative humidity (non-condensing) |
| note: If the scanner is stored or to be transported in cold temperature and then brought into a warm / humid environment condensation may occur. |
This device is designed solely for private use and is not intended for commercial use. The warranty is reduced from 2 years to 1 year if errors or defects arising from inappropriate use, improper operation or stress occur. The guarantee period of the device for private use is 2 years or 20,000 scans.
QUICK INSTALLATION GUIDE (QIG)
Scanner - front view

Scanner - rear view

INSTALLING SOFTWARE AND DRIVER
for PC (Windows) User
WINDOWS SYSTEMS INSTALLATION: DURING DRIVER INSTALLATION A WARNING DIALOGUE BOX MAY APPEAR, IF THIS IS THE CASE PLEASE SELECT "INSTALL THIS DRIVER ANYWAY".

Be sure to install the Application Software (ex: Adobe® Photoshop® Elements) BEFORE installing the CyberView X scanner driver software.
You may install the scanner driver directly if you have already installed TWAIN compliant application software on your computer (i.e. photo editing software). Mac users can use iPhoto for editing.
- Place the application software DVD into the DVD drive. If you have CD autoplay disabled, right click and select "Explore". Select "AutoPlay.exe" and follow the on-screen instructions to complete the installation.
- Place the CyberView X CD into the drive. If you have CD/DVD autoplay disabled, right click and select "Explore" (ex.: D:\Install\Drivers\Package\CVX.exe), double click the file "CVX.EXE" and follow the on-screen instructions to complete the installation.
- Restart your computer.
- Once the drivers have been installed, connect the scanner. Verify that the scanner is switched OFF (light on the front is not lit) and connect the scanner to a power source. Then connect the scanner to a live USB port. When using desktop PC, connect the scanner to rear ports only - hub extensions and long USB cables are not supported.
- Switch on the power. The scanner is now ready to work.
Windows operating system should state "New hardware detected", and should begin installing or request to select an option - select "Locate and install driver software".
NOTE: Not all PC's will display the found new hardware window, some will install in the background.
INSTALLING SOFTWARE AND DRIVER
for Mac (OSX) User
Before Installing the scanner driver...
If you choose to use the provided application for image editing, install the application software (ex: Adobe ^® Photoshop ^® Elements) by inserting the application CD into the computer's CD/DVD drive. Follow the instructions that will be displayed in a window that opens automatically. If you have the iPhoto application (or other photo editing software) installed on your Mac, you can skip this step.
Installing Scanner Driver
a. Insert driver CD into the computer CD/DVD drive and look at the contents with "Finder".
b. Double click the "CyberView X" icon to begin the installation process. Follow the onscreen prompts to complete the installation process.
NOTE: Make sure the scanner is NOT connected to the computer during the CyberView X driver installation.
c. Restart the computer once the installation process is complete.
INSTALLING HARDWARE
for PC (Windows) and Mac (OSX) Users
Connect the scanner to a power source:
- Plug the AC adapter into an AC power source FIRST before plugging it into the scanner.
- Attach the USB cable to the computer using the standard USB adapter end. Attach the USB adapter end of the cable to back panel of the scanner.
- Switch on the power on the front side of the scanner.
For instructions on loading films into holders continue on p. 14. If you are familiar with loading film into film holders skip to p. 23.
Loading 120 film into the holder
120 film holder
ENGLISH

14
Loading 120 film into the holder (continued)
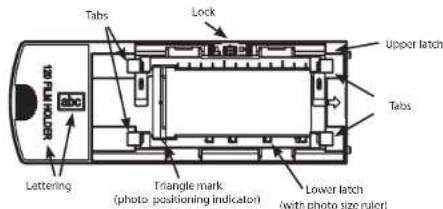
- As illustrated above, turn the holder with the embossed lettering "120 FILM HOLDER" facing towards the top, so that the letters "abc" and the numbers on the lower latch are oriented as indicated.

- Open the two latches on the sides of the holder by pressing the tabs of the latches towards the center from both sides and lifting.

- Orient the film according to the lettering "abc" on the holder. Align the film with the triangle mark in the lower left corner. Close the lower latch first.
ENSOLIDSH
15
- To flatten the film close the upper latch and adjust it by shifting it up and down.
Shift up and down
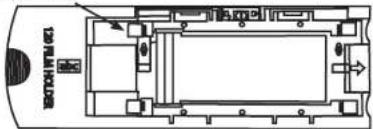
- OPTIONAL: Lock the film in the holder by moving the lock bar to the left. The silver fastener will be next to the closed lock icon embossed on the bar.

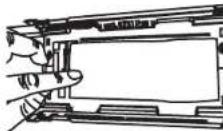
NOTE: Make sure that the film is as flat as possible between the latches (see below).

ex.: flattened film ex.: curved film
CORRECT INCORRECT
Loading 120 film into the holder (continued)

ex.: correctly positioned film, lower left corner at the triangle mark
natural_image
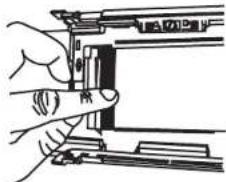
Hand holding a mechanical component with a ruler, no visible text or symbolsex.: incorrectly positioned film, not aligned with triangle mark
Loading 120 film holder into scanner
- Insert the holder into the front of the scanner, pushing it in as far as it will go.
• To release the holder, gently pull it out.
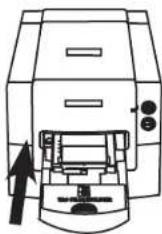
Note: Orientation of scanner in the diagrams is from the front of the unit. Take note of the "120 FILM HOLDER" embossed lettering on the front of the 120 film holder also facing towards the front of the scanner for correct orientation when loading the scanner.
16
17
#
Loading 135 film into the holder

18
Loading 135 film into the holder (continued)

c. Insert the orientated film negative into the holder between the horizontal guides. Carefully line up the dividers on the film negative with the dividers on the holder.
d. Close the holder and push the tab to the closed position.
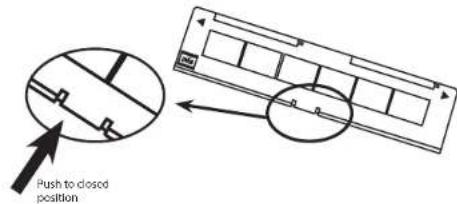
e. Place the film holder into the scanner from the left or right side into the small opening (film/scanner holder). Make sure that the orientation of white arrows on the holder correspond with the triangle mark on the scanner.

natural_image
Line drawing of a printer with a paper strip inserted into the cover (no text or symbols)Loading 135 mounted slides into the holder


a. Orient slides based on the example graphic "abc" on the holder.
b. Insert mounted slides into the holder.

INCORRECT CORRECT
Loading 135 film and slide holder into the scanner
Place the film holder into the scanner from the left or right side into the small opening. Make sure that the orientation of white arrows on the holder correspond with the triangle mark on the scanner (see previous page for illustration).
20
21
HOW TO SCAN
STEP 1 – Powering on the scanner
| Status LED Scanner Status | |
| Power on Cycle Unit will take | approx. 40-50 sec. to callibrate. The power LEDwill be solid green (not blinking) to indicate that the scannerIs ready to use. |
| Status LED - On solid Ready state. | Film holders can be inserted/removed |
| Blinks (on/off change) Scanner | is busy, do not turn the unit off.Insert/remove film holders. |
| Flashes several times,then a pause,then flashes again | Scanner is malfunctioning. Turn the unit off, close thesoftware. After approx. 10 sec. power on the scanner, wait forcalibration, then re-open CyberView X. |
STEP 2 - Select film type
a. Open the CyberView X scanning Interface.
b. Select the film type to be scanned - Positive, Negative or B&W (Black and White).


c. Once you have selected a film type you will have the option to select the frame sizes for the various 120 format films, after you have inserted the film holder into the unit.
NOTE: The 135 film will be auto-detected, a frame selection is not necessary.
STEP 3 - Optional Prescan
Pre-Scanning should be used to manually adjust color/edit settings before doing a final scan.
- In the CyberView interface click on the "Prescan" menu bar icon. The scanner will initialize the prescanning process.

- Once the prescan is complete, the image will appear in the CyberView interface:
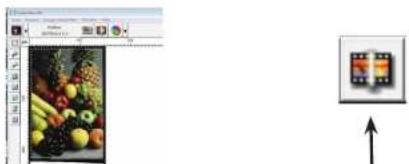
natural_image
Screenshot of a graphic design software interface showing a photo of fresh fruits and a preview window with two panels (no text or symbols on the image itself)- When the image appears on the screen, select the "Final scan icon" to scan the file into a folder on the hard drive.
STEP 4 – Set Scan Settings
- After clicking on the "Scan" button icon, a "Scan to file" setup dialog box will appear:
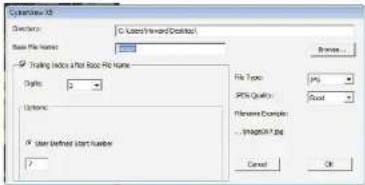
NOTE: The default scan-to directory is C:\Users\YOUR USER'S NAME\Pictures. To change the location, select "Browse" and choose a new destination to save the files.
- Editing of the image before saving can also be done by clicking on the "Image Adjustment" icon, (for more see "Advanced scanning options").
STEP 5 - Scan
Choose "Base file name" to label the scanned files. The default name "image" can be changed based on user's choice, ex.: 120 scans, slides, etc.
Scans can be made in sequential order with "User defined start number".
NOTE: CyberView will keep track of the numbering regardless of the scan to directory, (Ex.: Creating folders by scan category "Germany", "France", "Italy" etc., 25 images will be scanned into folder "Germany" and then change to the next ("France") folder. In the "France" folder, the starting number will automatically be 26, to re-start numbering at 1 in the new directory simply change the number to 1. If a file of the same name/number/configuration already exists, the following warning will be displayed:

"Trailing index after base file name" is available to increase or decrease the numbering sequence. "Digits 3" = image 001-999, "Digits 2" = image 01-99, and "Digits 4" = image 0001-9999.
"File format" can be TIFF or JPG.
TIFF is an uncompressed, very large file format for high quality. JPG uses photo quality JPEG compression which reduces the amount of data at the expense of image quality. JPG can be saved in 3 sizes: "Good" - small file size (ex.: for websites), "Better" - medium size quality (ex.: small photos for a family album), and "Best" - large files with least amount of compression applied.

STEP 5 - Scan (continued)
For details on scanning resolution and file sizes:
| Default Scanning Resolution | Color Depth | Film Size | Approx. File Size* |
| 1000dpi 8-bit 3 | mm 3.93 MB | ||
| 1000dpi 8-bit 6 | x 4.5 11.97 MB | ||
| 1000dpi 8-bit 6 | x 6 15.96 MB | ||
| 1000dpi 8-bit 6 | x 7 18.63 MB | ||
| 1000dpi 8-bit 6 | x 9 23.94 MB | ||
| 1000dpi 8-bit 6 | x 12 31.92 MB | ||
| 1000dpi 16-bit 6 | 85mm 7.87 MB | ||
| 1000dpi 16-bit 6 | x 4.5 23.95 MB | ||
| 1000dpi 16-bit 6 | x 6 31.92 MB | ||
| 1000dpi 16-bit 6 | x 7 37.21 MB | ||
| 1000dpi 16-bit 6 | x 9 47.89 MB | ||
| 1000dpi 16-bit 6 | x 12 63.85 MB | ||
| * TIFF uncompressed format, higher resolution will create larger file sizes. | |||
STEP 6 - Exit
All scanned images will be saved to the directory location set previously. The factory default locations are:
Windows: C:\Users[USERNAME\Documents;
MAC: Mac HD\Users[USERNAME]\Pictures\Cyberview Images),
Select "Scan > Exit" (for WIN) or "Scan > Quit" (for Mac) to close the driver. Scanned image files can be open/edited with any image editing software.
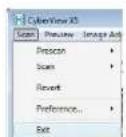
Select "Scan > Exit" (for WIN) or "Scan > Quit" (for Mac) to close the driver. Scanned image files can be open/edited with any image editing software.
NOTE: If using the supplied image editor, for help with this application see the Help from within the application or browse the supplied DVD for the help documentation.
UserInterface

English
29
There are three major parts of the CyberView X user interface:
- Menu Commands [Overview + Full]
II. Function Bar Diagram / Toolbar Diagram
III. Active Frame Settings Area
I. Menu Commands [Overview]
Zoom, Rotate & Flip features.
Menu Commands - Image Adjustment (overview)
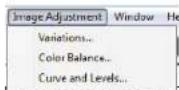
Color adjustment features.
Settings for the CyberView window and Exposure adjustment for the scanner.
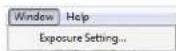
Default "Exposure Setting" is 100% for all 3 color channels. Increase the exposure of the scanning light source if images are too dark. Decrease exposure if images are too bright.

Menu Commands [Full]
Menu Commands - Scan (full)
a. Prescan
Prescan the existing film.
b. Scan
- Scan Selected to File... > Scan the selected film to a specified path.
- Enter the file name.
2-1. Trailing Index after Base File Name
◆ Digits: Defines the length of the file name and numbering sequence up to 6 digits Example image1 or image000001.
Options:
• Use Film Index: Use the number assigned to the film frame.
- User Defined Start Number: Enter a specific start number.
2-2. Choose the file type, "TIFF" or "JPG". (TIF uncompressed or JPG Compressed)
2-3. Choose image quality for JPEG. (Good, Better, or Best)
c. Revert
Discards all modifications and restores the image back to the original state.
d. Preference
Attribute setting windows.
e. Exit/Quit

Closes the CyberView X user interface.
A message pop-up will appear "Would you like to apply current scan resolution to default?" click "Yes" to save, "No" to discard the current setting or "Cancel" to return to CyberView X.
- Scan Settings
1-1. "Prescan Resolution" - Default pre-scan resolution.
320dpi vs 640dpi prescan resolution: the 640dpi produces a larger prescanned image in the CyberView window
NOTE: Higher prescan resolution results in longer prescanning time.
1-2. "Using default scan resolution" - Enables default scan resolution setting (1000dpi).
1-3. "Color Depth" – Default color depth while scanning.
8 bit = 3 channel RGB at 8 bits (each equal to 24 bit color mode),
16 bit = 3 channels RGB at 16 bits (each equal to 48 bit color mode).
1-4. "Scan Mode" – Default scan mode while scanning.
(Quality mode = slower scanning speeds and better quality scans).

2. Advanced Setting
Allows for automatic settings via the Cyberview software for Exposure, Balance and Contrast. With these items checked the software will perform automatic adjustments. When unchecked, no color correction etc. will be performed leaving the adjustment up to the user in the post scan/editing process in an image editing application software.
2-1. "Auto Exposure" - Apply Auto Exposure adjustment to all of the scanned films.
2-2. "Auto Balance" - Apply Auto Gamma adjustment to all of the scanned films.
2-3. "Auto Contrast" - Apply Auto Contrast adjustment to all of the scanned films.
2-4. "Digital Noise Reduction" – Apply Digital Noise Reduction filter to all scanned films.

3. Default Scanning Area
Allow users to define the scan area to be captured, for customized cropping.
Adjust the scanning size as well as adjust the "Scan Offset" setting to move the image position of slide.
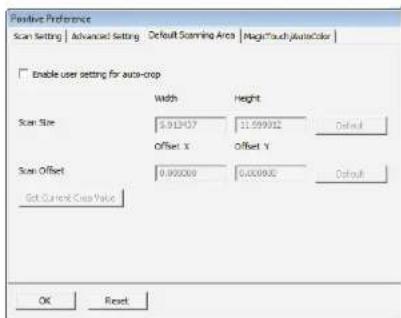
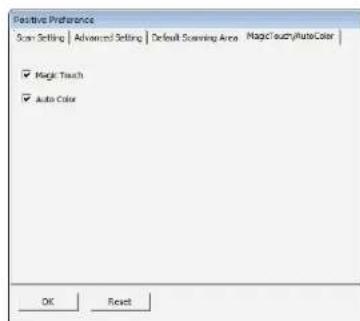
4. Magic Touch / Auto Color
When selected, Magic Touch / Auto Color will remove dust and scratches (Magic Touch) and automatically color correct (Auto Color).
Menu Commands - Preview

- Un/Lock scanning area.
- Zoom In: Magnify image.
- Zoom Out: Reduce Image.
- Rotate 90 Left: Turn the image 90° counter clockwise.
- Rotate 90 Right: Turn the image 90^ clockwise.
- Flip Horizontal: Flip the image horizontally.
- Flip Vertical: Flip the image vertically.
a. Image Adjustment
- Variations: Generates different views of image with options to make changes to highlights, midtones, etc.

2. Color Balance
To adjust the brightness, contrast, saturation, and color (CMY or RGB) of the image. Comparisons between before and after adjusted images are shown for reference.
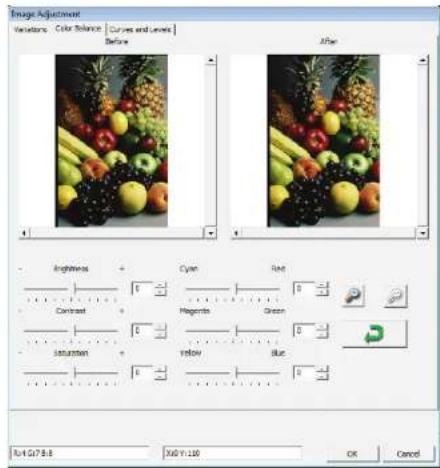
Example: If a previewed image appears too dark, use the "Brightness" slider in the "Color Balance" window to adjust the image by selecting the slider in the center and moving it to the right. The image's "After" view becomes lighter. Select "OK" to accept the changes which will be sent to the scanning hardware. This can also be used to adjust each of the functions in "Color Balance" by contrast, saturation and specific color ranges of cyan, magenta and yellow.
3. Curves and Levels
Adjust image settings by moving Curve and Levels settings. Comparison between before and after adjustment is displayed for reference.
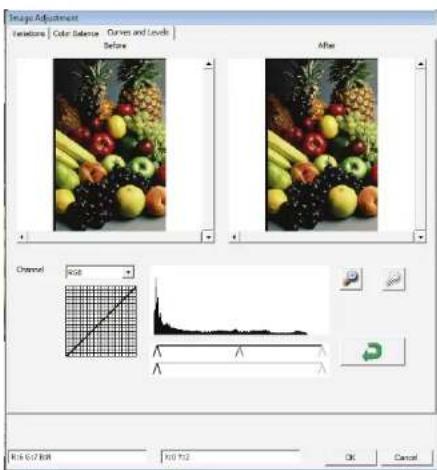
Example: When the previewed image appears to be too dark, adjustments with the Input slider in the Curves and Levels window can be made to correct the image. Selecting the Gray slider in the center and moving it to the left will result in changes in the "After" view resulting in a lighter image. Once the adjusted image is acceptable select "OK" to send changes to the scanning hardware. The same method can also be used to adjust each color channel independently, using the channel drop down menu "RGB = All colors" R = Red, G = Green, and B = Blue.
Menu Commands - Windows
Exposure Setting: To adjust the exposure time (R, G, B) press "Reset" to restore to the default setting.

Menu Commands - Help
- User Manual: Opens the electronic version of this user's manual.
- Update Firmware: Upgrade the firmware version, select the path where the file of firmware has been saved. (These files may be downloaded from our website)
- About: Display system information (including operation system, CPU), product information (including product name, model name, hardware version, firmware version, software version, device information including interface and optical resolution). This information is helpful to provide when requesting technical support.
II. Function Bar Diagram
In order to optimize scanned image quality, please select your film type and brand from the toolbar:
Negative

Positive 120 Film-6 x 4.5 Positive (also known as Slide) Black and White

Prescan: Pre-scan the current film.
Scan: Scan film
Image Adjustment: Press drop down button for more options.
Toolbar Diagram
Select scan area, more than one selection can be made at a time.

Un/Lock: Click to unlock/lock the scanning area.
Zoom In: Click to magnify the image where the cursor is currently located. The image will be magnified with every click until the maximum multiple (1000%) is reached.
Zoom Out: To reduce the size of the viewed image click the Zoom Out cursor to the desired area, the image will reduce by half with every click until the lowest multiple (25%) is reached.
Rotate 90 Left: To rotate the image counter clockwise 90 degrees.
Rotate 90 Right: To rotate the image clockwise 90 degrees.
Flip Horizontal: To Flip the image 180 degrees horizontally.
Flip Vertical: To Flip the image 180 degrees vertically.
Revert: Discard all modifications and restore the image back to the original state in preview windows.
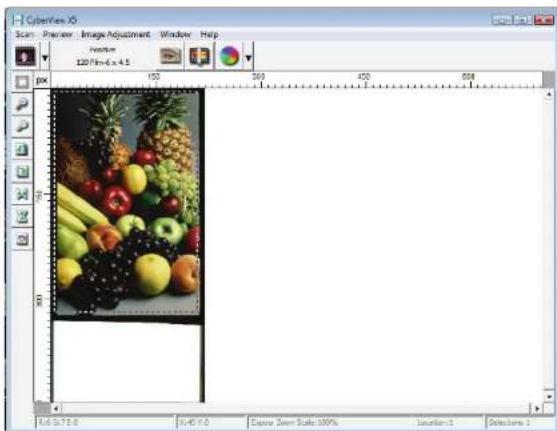
Preview Window
Preview the pre-scan image by selecting the measurement unit „in“- inches, „cm“- centimeters, „px“ - pixels by clicking the upper-left corner.
Status Line
In the lower left hand corner, the color level (RGB: red, green, blue) and coordinates of the location [ex: I] are displayed. The zoom scale, the current slide magazine location and how many areas selected to scan (2 or or higher indicates: Multiple scan areas on one slide [ex: II]).
1.

II.

40
41
III. Active Frame Setting Area
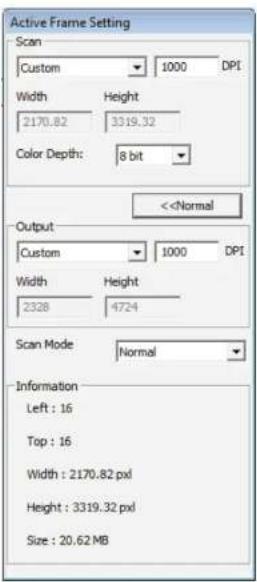
A comprehensive advanced mode is available to allow for more user defined adjustments.
Normal mode [ex: I] to input the basic parameter to scan (including scan resolution, film size, color depth).
Advanced mode [ex: ll] to input the parameter of scan and output (including scan resolution, size, color depth and output resolution, size, scan mode).
The "Active Frame Setting" only applies to the current preview image, click "Apply to All" to set parameters in all previewed images. This will not apply to direct scanning to file.


- FEDERAL COMMUNICATIONS COMMISSION (FCC) STATEMENT
- TABLE OF CONTENS
- GETTING STARTED
- Package Contents
- NOTE:
- GENERAL GUIDANCE:
- QUICK INSTALLATION GUIDE (QIG)
- INSTALLING SOFTWARE AND DRIVER
- Installing Scanner Driver
- INSTALLING HARDWARE
- Loading 120 film holder into scanner
- Loading 135 film into the holder
- Loading 135 film into the holder (continued)
- Loading 135 film and slide holder into the scanner
- HOW TO SCAN
- STEP 2 - Select film type
- STEP 3 - Optional Prescan
- STEP 4 – Set Scan Settings
- STEP 5 - Scan
- STEP 5 - Scan (continued)
- STEP 6 - Exit
- UserInterface
- Menu Commands [Overview]
- Menu Commands - Image Adjustment (overview)
- Menu Commands [Full]
- Menu Commands - Scan (full)
- Advanced Setting
- Default Scanning Area
- Magic Touch / Auto Color
- Menu Commands - Preview
- Color Balance
- Curves and Levels
- Menu Commands - Windows
- Menu Commands - Help
- Function Bar Diagram
- Toolbar Diagram
- Preview Window
- Status Line
- Active Frame Setting Area
- TECHNICAL SUPPORT
- CyberView X
- Bundled application software
Brand : Reflecta
Model : MidformatScan MF5000
Category : Scanner