
220CW8FB - Monitor PHILIPS - Free user manual and instructions
Find the device manual for free 220CW8FB PHILIPS in PDF.
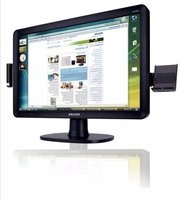


| Product Type | LCD Monitor |
| Brand | Philips |
| Model | 220CW8FB |
| Screen Size | 22 inches (widescreen) |
| Resolution | 1680 x 1050 (WSXGA+) |
| Aspect Ratio | 16:10 |
| Brightness | 300 cd/m² |
| Contrast Ratio | 1000:1 (typical) |
| Response Time | 5 ms (gray-to-gray) |
| Viewing Angles (H/V) | 160° / 160° |
| Backlight Type | CCFL |
| Connectivity | VGA (D-Sub), DVI-D (with HDCP) |
| Power Consumption (Typical) | 45 W |
| Weight (with stand) | 5.6 kg |
| Dimensions (W x H x D) with stand | 515 x 430 x 220 mm |
| VESA Mount | 100 x 100 mm |
| Energy Star Certified | Yes (Energy Star 4.0) |
| Cleaning Instructions | Use a soft dry cloth; avoid liquid cleaners |
| Safety Features | Kensington lock slot, auto power-off |
| Spare Parts Availability | Contact Philips support for replacement parts |
Frequently Asked Questions - 220CW8FB PHILIPS
User questions about 220CW8FB PHILIPS
0 question about this device. Answer the ones you know or ask your own.
Ask a new question about this device
Download the instructions for your Monitor in PDF format for free! Find your manual 220CW8FB - PHILIPS and take your electronic device back in hand. On this page are published all the documents necessary for the use of your device. 220CW8FB by PHILIPS.
USER MANUAL 220CW8FB PHILIPS
Philips LCD Monitor Electronic User's Manual

Safety Precautions and Maintenance
FAQs
Troubleshooting
Regulatory Information
II Other Related Information
Safety and Troubleshooting Information
Safety precautions and maintenance

WARNING: Use of controls, adjustments or procedures other than those specified in this documentation may result in exposure to shock, electrical hazards and/or mechanical hazards.
Read and follow these instructions when connecting and using your computer monitor:
Operation:
- Keep the monitor out of direct sunlight and away from stoves or any other heat source.
- Remove any object that could fall into ventilation holes or prevent proper cooling of the monitors electronics.
- Do not block the ventilation holes on the cabinet.
- When positioning the monitor, make sure the power plug and outlet are easily accessible.
- If turning off the monitor by detaching the power cable or DC power cord, wait for 6 seconds before attaching the power cable or DC power cord for normal operation.
- Please use approved power cord provided by Philips all the time. If your power cord is missing, please contact with your local service center. (Please refer to Customer Care Consumer Information Center)
- Do not subject the LCD monitor to severe vibration or high impact conditions during operation.
- Do not knock or drop the monitor during operation or transportation.
Maintenance:
- To protect your display from possible damage, do not put excessive pressure on the LCD panel. When moving your monitor, grasp the frame to lift; do not lift the monitor by placing your hand or fingers on the LCD panel.
- Unplug the monitor if you are not going to use it for an extensive period of time.
- Unplug the monitor if you need to clean it with a slightly damp cloth. The screen may be wiped with a dry cloth when the power is off. However, never use organic solvent, such as, alcohol, or ammonia-based liquids to clean your monitor.
- To avoid the risk of shock or permanent damage to the set, do not expose the monitor to dust, rain, water, or excessive moisture environment.
- If your monitor gets wet, wipe it with dry cloth as soon as possible.
-
If foreign substance or water gets in your monitor, please turn the power off immediately and disconnect the power cord. Then, remove the foreign substance or water, and send it to the maintenance center.
-
Do not store or use the LCD monitor in locations exposed to heat, direct sunlight or extreme cold.
- In order to maintain the best performance of your monitor and use it for a longer lifetime, please use the monitor in a location that falls within the following temperature and humidity ranges.
Temperature: 0-40°C 32-95°F
Humidity: 20-80% RH - IMPORTANT: Always activate a screen saver program during your application. If a still image in high contrast remains on the screen for an extended period of time, it may leave an 'after-image' or 'ghost image' on front of the screen. This is a well-known phenomenon that is caused by the shortcomings inherent in LCD technology. In most cases, the afterimage will disappear gradually over a period of time after the power has been switched off. Be aware, that the afterimage symptom cannot be repaired and is not covered under warranty.
Service:
● The casing cover should be opened only by qualified service personnel.
- If there is any need for any document for repair or integration, please contact with your local service center. (please refer to the chapter of "Consumer Information Center")
- For transportation information, please refer to "Physical Specifications".
- Do not leave your monitor in a car/trunk under direct sun light.

Consult a service technician if the monitor does not operate normally, or you are not sure what procedure to take when the operating instructions given in this manual have been followed.
RETURN TO TOP OF THE PAGE
|| Safety and Troubleshooting
General FAQs
Screen Adjustments
□ Compatibility with Other Peripherals
LCD Panel Technology
☐ Ergonomics, Ecology and Safety Standards
Troubleshooting
II Regulatory Information
Other Related Information
FAQs (Frequently Asked Questions)
General FAQs
Q: When I install my monitor what should I do if the screen shows 'Cannot display this video mode'?
A: Recommended video mode for Philips 22": 1680x1050 @60Hz.
- Unplug all cables, then connect your PC to the monitor that you used previously.
- In the Windows Start Menu, select Settings/Control Panel. In the Control Panel Window, select the Display icon. Inside the Display Control Panel, select the 'Settings' tab. Under the setting tab, in box labeled 'desktop area', move the slider to 1680x1050 pixels (22").
- Open 'Advanced Properties' and set the Refresh Rate to 60Hz, then click OK.
- Restart your computer and repeat step 2 and 3 to verify that your PC is set at 1680x1050@60Hz (22").
- Shut down your computer, disconnect your old monitor and reconnect your Philips LCD monitor.
- Turn on your monitor and then turn on your PC.
Q: What does 'refresh rate' mean in connection with an LCD monitor?
A: The refresh rate is of much less relevance for LCD monitors. LCD monitors display a stable, flicker-free image at 60Hz. There is no visible difference between 85Hz and 60Hz.
Q: What are the .inf and .icm files on the CD-ROM? How do I install the drivers (.Inf and .icm)?
A: These are the driver files for your monitor. Follow the instructions in your user manual to install the drivers. Your computer may ask you for monitor drivers (.inf and . icm files) or a driver disk when you first install your monitor. Follow the instructions to insert the ( companion CD-ROM) included in this package. Monitor drivers (.inf and . icm files) will be installed automatically.
Q: How do I adjust the resolution?
A: Your video card/graphic driver and monitor together determine the available resolutions. You can select the desired resolution under Windows® Control Panel with the "Display properties".
Q: What if I get lost when I am making monitor adjustments?
A: Simply press the OK button, then select 'Reset' to recall all of the original factory settings.
Q: What is the Auto function?
A: The AUTO adjustment key restores the optimal screen position, phase and clock settings by pressing of a single button – without the need to navigate through OSD (On Screen Display) menus and control keys.
Note: Auto function is available in selected models only.
Q: My Monitor has no power (Power LED does not light up). What should I do?
A: Make sure the AC power cord is connected between the monitor and AC outlet, and click a key on keyboard/mouse to wake up the PC.
Q: Will the LCD monitor accept an interlaced signal under PC models?
A: No. If an Interlace signal is used, the screen displays both odd and even horizontal scanning lines at the same time, thus distorting the picture.
Q: What does the Refresh Rate mean for LCD?
A: Unlike CRT display technology, in which the speed of the electron beam is swept
from the top to the bottom of the screen determines flicker, an active matrix display uses an active element (TFT) to control each individual pixel and the refresh rate is therefore not really applicable to LCD technology.
Q: Will the LCD screen be resistant to scratches?
A: A protective coating is applied to the surface of the LCD, which is durable to a certain extent (approximately up to the hardness of a 2H pencil). In general, it is recommended that the panel surface is not subject to any excessive shocks or scratches.
Q: How should I clean the LCD surface?
A: For normal cleaning, use a clean, soft cloth. For extensive cleaning, please use isopropyl alcohol. Do not use other solvents such as ethyl alcohol, ethanol, acetone, hexane, etc.
Q: Can I change the color setting of my monitor?
A: Yes, you can change your color setting through OSD control as the following procedures,
- Press "OK" to show the OSD (On Screen Display) menu
- Press "Down Arrow" to select the option "Color" then press "OK" to enter color setting, there are three settings as below.
a. Color Temperature; The six settings are 5000K, 6500K, 7500K, 8200K, 9300K and 11500K. With settings in the 5000K range the panel appears 'warm,' with a red-white color tone, while a 11500K temperature yields 'cool, blue-white toning."
b. sRGB; this is a standard setting for ensuring correct exchange of colors between different device (e.g. digital cameras, monitors, printers, scanners, etc)
c. User Define; the user can choose his/her preference color setting by adjusting red, green blue color.
*A measurement of the color of light radiated by an object while it is being heated. This measurement is expressed in terms of absolute scale, (degrees Kelvin). Lower
Kevin temperatures such as 2004K are red; higher temperatures such as 9300K are blue. Neutral temperature is white, at 6504K.
Q: Can the Philips LCD Monitor be mounted on the wall?
A: Yes. Philips LCD monitors have this optional feature. For standard VESA mount holes on the rear cover allows the user to mount the Philips monitor on most of the VESA standard arms or accessories. We recommend to contact your Philips sales representative for more information.
RETURN TO TOP OF THE PAGE
Screen Adjustments
Q: When I install my monitor, how do I get the best performance from the monitor?
A: For best performance, make sure your display settings are set at 1680x1050@60Hz for 22". Note: You can check the current display settings by pressing the OSD OK button once. The current display mode is shown in OSD first page.
Q: How do LCDs compare to CRTs in terms of radiation?
A: Because LCDs do not use an electron gun, they do not generate the same amount of radiation at the screen surface.
RETURN TO TOP OF THE PAGE
Compatibility with other Peripherals
Q: Can I connect my LCD monitor to any PC, workstation or Mac?
A: Yes. All Philips LCD monitors are fully compatible with standard PCs, Macs and workstations. You may need a cable adapter to connect the monitor to your Mac system. Please contact your Philips sales representative for more information.
Q: Are Philips LCD monitors Plug-and-Play?
A: Yes, the monitors are Plug-and-Play compatible with Windows® 95, 98, 2000; XP and Vista.
Q: What is USB (Universal Serial Bus)?
A: Think of USB as a smart plug for PC peripherals. USB automatically determines resources (like driver software and bus bandwidth) required by peripherals. USB makes necessary resources available without user intervention. There are three main benefits of USB. USB eliminates "case anxiety," the fear of removing the computer case to install circuit board cards -- that often requires adjustment of complicated IRQ settings -- for add-on peripherals. USB does away with "port gridlock." Without USB, PCs are normally limited to one printer, two Com port devices (usually a mouse and modem), one Enhanced Parallel Port add-on (scanner or video camera, for example), and a joystick. More and more peripherals for multimedia computers come on the market every day. With USB, up to 127 devices can run simultaneously on one computer. USB permits "hot plug-in." No need to shut down, plug in, reboot and run set up to install peripherals. No need to go through the reverse process to unplug a device. Bottom line: USB transforms today's "Plug-and-Pray" into true Plug-and-Play!
Please refer to glossary for more information about USB.
Q: What is a USB hub?
A: A USB hub provides additional connections to the Universal Serial Bus. A hub's upstream port connects a hub to the host, usually a PC. Multiple downstream ports in a hub allows connection to another hub or device, such as a USB keyboard, camera or printer.
RETURN TO TOP OF THE PAGE
LCD Panel Technology
Q: What is a Liquid Crystal Display?
A: A Liquid Crystal Display (LCD) is an optical device that is commonly used to display ASCII characters and images on digital items such as watches, calculators, portable game consoles, etc. LCD is the technology used for displays in notebooks and other small computers. Like light-emitting diode and gas-plasma technologies, LCD allows displays to be much thinner than cathode ray tube (CRT) technology. LCD consumes much less power than LED and gas-displays because it works on the principle of blocking light rather than emitting it.
Q: What differentiates passive matrix LCDs from active matrix LCDs?
A: An LCD is made with either a passive matrix or an active matrix display grid. An active matrix has a transistor located at each pixel intersection, requiring less current to control the luminance of a pixel. For this reason, the current in an active matrix display can be switched on and off more frequently, improving the screen refresh time (your mouse pointer will appear to move more smoothly across the screen, for example). The passive matrix LCD has a grid of conductors with pixels located at each intersection in the grid.
Q: What are the advantages of TFT LCD compared with CRT?
A: In a CRT monitor, a gun shoots electrons and general light by colliding polarized electrons on fluorescent glass. Therefore, CRT monitors basically operate with an analog RGB signal. A TFT LCD monitor is a device that displays an input image by operating a liquid crystal panel. The TFT has a fundamentally different structure than a CRT: Each cell has an active matrix structure and independent active elements. A TFT LCD has two glass panels and the space between them is filled with liquid crystal. When each cell is connected with electrodes and impressed with voltage, the molecular structure of the liquid crystal is altered and controls the amount of inlet lighting to display images. A TFT LCD has several advantages over a CRT, since it can be very thin and no flickering occurs because it does not use the scanning method.
Q: Why is vertical frequency of 60Hz optimal for an LCD monitor?
A: Unlike a CDT monitor, the TFT LCD panel has a fixed resolution. For example, an XGA monitor has 1024x3 (R, G, B) x 768 pixels and a higher resolution may not be available without additional software processing. The panel is designed to optimize the display for a 65MHz dot clock, one of the standards for XGA displays. Since the vertical/horizontal frequency for this dot clock is 60Hz/48kHz, the optimum frequency for this monitor is 60Hz.
Q: What kind of wide-angle technology is available? How does it work?
A: The TFT LCD panel is an element that controls/displays the inlet of a backlight using the dual-refraction of a liquid crystal. Using the properly that the projection of inlet light refracts toward the major axis of the liquid element, it controls the direction of inlet light and displays it. Since the refraction ratio of inlet light on liquid crystal varies with the inlet angle of the light, the viewing angle of a TFT is much narrower than that of a CDT. Usually, the viewing angle refers to the point where the contrast ration is 10. Many ways to widen the viewing angle are currently being developed and the most common approach is to use a wide viewing angle film, which widens the viewing angle by varying the refraction ratio. IPS (In Plane Switching) or MVA (Multi Vertical Aligned) is also used to give a wider viewing angle.
Q: Why is there no flicker on an LCD Monitor?
A: Technically speaking, LCDs do flicker, but the cause of the phenomenon is different from that of a CRT monitor -- and it has no impact of the ease of viewing. Flickering in an LCD monitor relates to usually undetectable luminance caused by the difference between positive and negative voltage. On the other hand, CRT flickering that can irritate the human eye occurs when the on/off action of the fluorescent object becomes visible. Since the reaction speed of liquid crystal in an LCD panel is much slower, this troublesome form of flickering is not present in an LCD display.
Q: Why is an LCD monitor virtually low of Electro Magnetic Interference?
A: Unlike a CRT, an LCD monitor does not have key parts that generate Electro Magnetic Interference, especially magnetic fields. Also, since an LCD display utilizes relatively low power, its power supply is extremely quiet.
RETURN TO TOP OF THE PAGE
Ergonomics, Ecology and Safety Standards
Q: What is the CE mark?
A: The CE (Conformité Européenne) mark is required to be displayed on all regulated products offered for sale on the European market. This 'CE' mark means that a
product complies with the relevant European Directive. A European Directive is a European 'Law' that relates to health, safety, environment and consumer protection, much the same as the U.S. National Electrical Code and UL Standards.
Q: Does the LCD monitor conform to general safety standards?
A: Yes. Philips LCD monitors conform to the guidelines of MPR-II and TCO 99/03 standards for the control of radiation, electromagnetic waves, energy reduction, electrical safety in the work environment and recyclability. The specification page provides detailed data on safety standards
More information is provided in the Regulatory Information section.
Q: After I change new PC, I found this information on screen, How can I do?

A: Because you activate Theft Deterrence function in SmartControl II. Please contact IT manager or Philips Service Center.
RETURN TO TOP OF THE PAGE
Safety and
Troubleshooting
FAQs
Common Problems
Imaging Problems
Regulatory Information
Other Related Information
Troubleshooting
This page deals with problems that can be corrected by a user. If the problem still persists after you have tried these solutions, contact Philips customer service representative.
| Common Problems | |
| Having this problem Check these items | |
| No Picture(Power LED not lit) | Make sure the power cord is plugged into the power outlet and into the back of the monitor.First, ensure that the power button on the front of the monitor is in the OFF position, then press it to the ON position. |
| No Picture(Power LED is amber or yellow) | Make sure the computer is turned on.Make sure the signal cable is properly connected to your computer.Check to see if the monitor cable has bent pins.The Energy Saving feature may be activated |
| Screen saysATTENTIONCHECK CABLE CONNECTION | Make sure the monitor cable is properly connected to your computer. (Also refer to the Quick Set-Up Guide).Check to see if the monitor cable has bent pins.Make sure the computer is turned on. |
| AUTO button not working properly | The Auto Function is designed for use on standard Macintosh or IBM-compatible PCs running Microsoft Windows.It may not work properly if using nonstandard PC or video card. |
| Imaging Problems | |
| Display position is incorrect | Press the Auto button.Adjust the image position using the Phase/Clock of More Settings in OSD Main Controls. |
| Image vibrates on the screen | Check that the signal cable is properly connected to the graphics board or PC. |
Vertical flicker appears | Press the Auto button.Eliminate the vertical bars using the Phase/Clock of More Settings in OSD Main Controls. |
Horizontal flicker appears  | Press the Auto button.Eliminate the vertical bars using the Phase/Clock of More Settings in OSD Main Controls. |
| The screen is too bright or too dark | Adjust the contrast and brightness on On-Screen Display. (The backlight of the LCD monitor has a fixed life span. When the screen becomes dark or begins to flicker, please contact your sales representative). |
| An after-image appears | If an image remains on the screen for an extended period of time, it may be imprinted in the screen and leave an after-image. This usually disappears after a few hours |
| An after-image remains after the power has been turned off. | This is characteristic of liquid crystal and is not caused by a malfunction or deterioration of the liquid crystal. The after-image will disappear after a peroid of time. |
| Green, red, blue, dark, and white dots remains | The remaining dots are normal characteristic of the liquid crystal used in today's technology. |
For further assistance, refer to the Consumer Information Centers list and contact Philips customer service representative.
RETURN TO TOP OF THE PAGE
TCO'06 Information
☐ Recycling Information for Customers
Waste Electrical and Electronic
Equipment-WEEE
CE Declaration of Conformity
Energy Star Declaration
Federal Communications Commission (FCC) Notice (U.S. Only)
FCC Declaration of Conformity
Commission Federale de la Communication (FCC Declaration)
EN 55022 Compliance (Czech Republic Only)
MIC Notice (South Korea Only)
Polish Center for Testing and Certification Notice
North Europe (Nordic Countries) Information
Information for UK only
China RoHS
Safety Information
Troubleshooting
Other Related Information
Frequently Asked Questions (FAQs)
Regulatory Information
Model ID: 220CW8
Model No: HWC8220Q
TCO'06 Information

Congratulations!
The display you have just purchased carries the TCO'06 Displays label. This means that your display is designed, manufactured and tested according to some of the strictest quality and environmental requirements in the world. This makes for a high performance product, designed with the user in focus that also minimizes the impact on our natural environment.
Some of the features of the TCO'06 Display requirements.
Ergonomics
- Good visual ergonomics and image quality in order to improve the working environment for the user and to reduce sight and strain problems. Important parameters are luminance, contrast, resolution, reflectance, colour rendition and image stability.
Energy
- Energy-saving mode after a certain time-beneficial both for the user and the environment - Electrical safety
Emissions
• Electromagnetic fields
- Noise emissions
Ecology
- The product must be prepared for recycling and the manufacturer must have a certified environmental management system such as EMAS or ISO 14 000
- Restrictions on - chlorinated and brominated flame retardants and polymers - heavy metals such as cadmium, mercury and lead.
The requirements included in this label have been developed by TCO Development in co-operation with scientists, experts, users as well as manufacturers all over the world. Since the end of the 1980s TCO has been involved in influencing the development of IT equipment in a more user-friendly direction. Our labelling system started with displays in 1992 and is now requested by users and IT-manufacturers all over the world.
For more information, please visit
www.tcodevelopment.com
RETURN TO TOP OF THE PAGE
Recycling Information for Customers
Philips establishes technically and economically viable objectives to optimize the environmental performance of the organization's product, service and activities.
From the planning, design and production stages, Philips emphasizes the important of making products that can easily be recycled. At Phillips, end-of-life management primarily entails participation in national take-back initiatives and recycling programs whenever possible, preferably in cooperation with competitors.
There is currently a system of recycling up and running in the European countries, such as The Netherlands, Belgium, Norway, Sweden and Denmark.
In U.S.A., Philips Consumer Electronics North America has contributed funds for the Electronic Industries Alliance (EIA) Electronics Recycling Project and state recycling initiatives for end-of-life electronics products from household sources. In addition, the Northeast Recycling Council (NERC) - a multi-state non-profit organization focused on promoting recycling market development - plans to implement a recycling program.
In Asia Pacific, Taiwan, the products can be taken back by Environment Protection Administration (EPA) to follow the IT product recycling management process, detail can be found in web site www.epa.gov.tw
The monitor contains parts that could cause damage to the nature environment. Therefore, it is vital that the monitor is recycled at the end of its life cycle.
For help and service, please contact Consumers Information Center or F1rst Choice Contact Information Center in each country or the following team of Environmental specialist can help.
Mr. WY Chen- Environment manager
Philips Multimedia Flat Display
E-mail: w.y.chen@philips.com
Tel: +886 (0) 3 222 6791
Mr. Maarten ten Houten - Senior Environmental Consultant
Philips Consumer Electronics
E-mail: marten.ten.houten@philips.com
Tel: +31 (0) 40 27 33402
Mr. Delmer F. Teglas
Philips Consumer Electronics North America
E-mail: butch.teglas@philips.com
Tel: +1 865 521 4322
RETURN TO TOP OF THE PAGE
Waste Electrical and Electronic Equipment-WEEE
Attention users in European Union private households

This marking on the product or on its packaging illustrates that, under European Directive 2002/96/EG governing used electrical and electronic appliances, this product may not be disposed of with normal household waste. You are responsible for disposal of this equipment through a designated waste electrical and electronic equipment collection. To determine the locations for dropping off such waste electrical and electronic, contact your local government office, the waste disposal organization that serves your household or the store at which you purchased the product.
RETURN TO TOP OF THE PAGE
CE Declaration of Conformity
Philips Consumer Electronics declare under our responsibility that the product is in conformity with the following standards
- EN60950-1:2001 (Safety requirement of Information Technology Equipment)
- EN55022:1998 (Radio Disturbance requirement of Information Technology Equipment)
- EN55024:1998 (Immunity requirement of Information Technology Equipment)
- EN61000-3-2:2000 (Limits for Harmonic Current Emission)
- EN61000-3-3:1995 (Limitation of Voltage Fluctuation and Flicker)
following provisions of directives applicable - 73/23/EEC (Low Voltage Directive)
- 89/336/EEC (EMC Directive)
- 93/68/EEC (Amendment of EMC and Low Voltage Directive)
and is produced by a manufacturing organization on ISO9000 level.
The product also comply with the following standards
- ISO9241-3, ISO9241-7, ISO9241-8 (Ergonomic requirement for CRT Monitor)
- ISO13406-2 (Ergonomic requirement for Flat Panel Display)
- GS EK1-2000 (GS specification)
-prEN50279:1998 (Low Frequency Electric and Magnetic fields for Visual Display)
- MPR-II (MPR:1990:8/1990:10 Low Frequency Electric and Magnetic fields)
- TCO'99, TCO'03 (Requirement for Environment Labelling of Ergonomics, Energy, Ecology and Emission,
TCO: Swedish Confederation of Professional Employees) for TCO versions
RETURN TO TOP OF THE PAGE
Energy Star Declaration
This monitor is equipped with a function for saving energy which supports the VESA Display Power Management Signaling (DPMS) standard. This means that the monitor must be connected to a computer which supports VESA DPMS. Time settings are adjusted from the system unit by software.
VESA State LED Indicator Power Consumption
Normal operation ON (Active) Green <
50W (typ.)
Power Saving
Alternative 2
One step
OFF (Sleep) Amber < 1 W
Switch Off Off < 1 W

As an ENERGY STAR® Partner, PHILIPS has determined that this product meets the ENERGY STAR® guidelines for energy efficiency.

We recommend you switch off the monitor when it is not in use for a long time.
RETURN TO TOP OF THE PAGE
Federal Communications Commission (FCC) Notice (U.S. Only)

This equipment has been tested and found to comply with the limits for a Class B digital device, pursuant to Part 15 of the FCC Rules. These limits are designed to provide reasonable protection against harmful interference in a residential installation. This equipment generates, uses and can radiate radio frequency energy and, if not installed and used in accordance with the instructions, may cause harmful interference to radio communications. However, there is no guarantee that interference will not occur in a particular installation. If this equipment does cause harmful interference to radio or television reception, which can be determined by turning the equipment off and on, the user is encouraged to try to correct the interference by one or more of the following measures:
• Reorient or relocate the receiving antenna.
- Increase the separation between the equipment and receiver.
- Connect the equipment into an outlet on a circuit different from that to which the receiver is connected.
- Consult the dealer or an experienced radio/TV technician for help.

Changes or modifications not expressly approved by the party responsible for compliance could void the user's authority to operate the equipment.
Use only RF shielded cable that was supplied with the monitor when connecting this monitor to a computer device.
To prevent damage which may result in fire or shock hazard, do not expose this appliance to rain or excessive moisture.
THIS CLASS B DIGITAL APPARATUS MEETS ALL REQUIREMENTS OF THE CANADIAN INTERFERENCE-CAUSING EQUIPMENT REGULATIONS.
RETURN TO TOP OF THE PAGE
FCC Declaration of Conformity
Trade Name: Philips
Philips Consumer Electronics North America
Responsible Party: P.O. Box 671539
Manetta, GA 30000-0026 1.800 PHILIPB (744-5477)
1-888-PHILIPS (744-5477)
Declaration of Conformity for Products Marked with FCC Logo, United States Only
Trade Name Model Number

Tested To Comply
With FCC Standards
FOR HOME OR OFFICE USE
This device complies with Part 15 of the FCC Rules. Operation is subject to the following two conditions: (1) this device may not cause harmful interference, and (2) this device must accept any interference received, including interference that may cause undesired operation.
RETURN TO TOP OF THE PAGE
Commission Federale de la Communication (FCC Declaration)

EN 55022 Compliance (Czech Republic Only)
This device belongs to category B devices as described in EN 55022, unless it is specifically stated that it is a Class A device on the specification label. The following applies to devices in Class A of EN 55022 (radius of protection up to 30 meters). The user of the device is obliged to take all steps necessary to remove sources of interference to telecommunication or other devices.
MIC Notice (South Korea Only)
Class B Device
Please note that this device has been approved for non-business purposes and may be used in any environment, including residential areas.
RETURN TO TOP OF THE PAGE
Polish Center for Testing and Certification Notice
The equipment should draw power from a socket with an attached protection circuit (a three-prong socket). All equipment that works together (computer, monitor, printer, and so on) should have the same power supply source.
The phasing conductor of the room's electrical installation should have a reserve short-circuit protection device in the form of a fuse with a nominal value no larger than 16 amperes (A).
To completely switch off the equipment, the power supply cable must be removed from the power supply socket, which should be located near the equipment and easily accessible.
A protection mark "B" confirms that the equipment is in compliance with the protection usage requirements of standards PN-93/T-42107 and PN-89/E-06251.
North Europe (Nordic Countries) Information
Placering/Ventilation
WARNING:
FÖRSÄKRA DIG OM ATT HUVUDBRYTARE OCH UTTAG ÄR LÄTÄTKOMLIGA, NÄR DU STÄLLER DIN UTRUSTNING PÅPLATS.
Placering/Ventilation
ADVARSEL:
S∅RG VED PLACERINGEN FOR, AT NETLEDNINGENS STIK OG STIKKONTAKT ER NEMT TILGÆNGELIGE.
Paikka/Ilmankierto
VAROITUS:
SIJOITA LAITE SITEN, ETTÄ VERKKOJOHTO VOIDAN TARVITTAESSA HELPOSTI IRROTTAA PISTORASIASTA.
BSMI Notice (Taiwan Only)
符合乙類資訊產品之標準
RETURN TO TOP OF THE PAGE
Your new monitor contains materials that can be recycled and reused. Specialized companies can recycle your product to increase the amount of reusable materials and to minimize the amount to be disposed of.
Please find out about the local regulations on how to dispose of your old monitor from your local Philips dealer.
(For customers in Canada and U.S.A.)
This product may contain lead and/or mercury. Dispose of in accordance to local-state and federal regulations. For additional information on recycling contact www.eia.org (Consumer Education Initiative)
RETURN TO TOP OF THE PAGE
Information for UK only
WARNING - THIS APPLIANCE MUST BE GROUNDING.
Important:
This apparatus is supplied with an approved moulded 13A plug. To change a fuse in this type of plug proceed as follows:
- Remove fuse cover and fuse.
- Fit new fuse which should be a BS 1362 5A,A.S.T.A. or BSI approved type.
- Refit the fuse cover.
If the fitted plug is not suitable for your socket outlets, it should be cut off and an appropriate 3-pin plug fitted in its place.
If the mains plug contains a fuse, this should have a value of 5A. If a plug without a fuse is used, the fuse at the distribution board should not be greater than 5A.
Note: The severed plug must be destroyed to avoid a possible shock hazard should it be inserted into a 13A socket elsewhere.
How to connect a plug
The wires in the mains lead are coloured in accordance with the following code:
BLUE - "NEUTRAL" ("N")
BROWN - "LIVE" ("L")
GREEN & YELLOW - "GROUND" ("G")
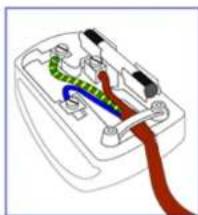
- The GREEN AND YELLOW wire must be connected to the terminal in the plug which is marked with the letter "G" or by the Ground symbol 1/2 or coloured GREEN or GREEN AND YELLOW.
- The BLUE wire must be connected to the terminal which is marked with the letter "N" or coloured BLACK.
- The BROWN wire must be connected to the terminal which marked with the letter "L" or coloured RED.
Before replacing the plug cover, make certain that the cord grip is clamped over the sheath of the lead - not simply over the three wires.
RETURN TO TOP OF THE PAGE
China RoHS
The People's Republic of China released a regulation called "Management Methods for Controlling Pollution by Electronic Information Products" or commonly referred to as China RoHS. All products including CRT and LCD monitor which are produced and sold for China market have to meet China RoHS request.
中国大陆RoHS
Safety Information: Electric, Magnetic and Electromagnetic Fields ("EMF")
- Philips Royal Electronics manufactures and sells many products targeted at consumers, which, like any electronic apparatus, in general have the ability to emit and receive electro magnetic signals.
- One of Philips' leading Business Principles is to take all necessary health and safety measures for our products, to comply with all applicable legal requirements and to stay well within the EMF standards applicable at the time of producing the products.
- Philips is committed to develop, produce and market products that cause no adverse health effects.
- Philips confirms that if its products are handled properly for their intended use, they are safe to use according to scientific evidence available today.
- Philips plays an active role in the development of international EMF and safety standards, enabling Philips to anticipate further developments in standardization for early integration in its products.
RETURN TO TOP OF THE PAGE
Safety and Troubleshooting
FAQs
Troubleshooting
☐ Regulatory Information
Information for Users in the U.S
Information for Users Outside the U.S
Other Related Information
Information for Users in the U. S.
For units set at 115 V :
Use a UL Listed Cord Set consisting of a minimum 18 AWG, Type SVT or SJT three conductor cord a maximum of 15-feet long and a parallel blade, grounding type attachment plug rated 15 A, 125 V.
For units set at 230 V:
Use a UL Listed Cord Set consisting of a minimum 18 AWG, Type SVT or SJT three conductor cord a maximum of 15-feet long and a tandem blade, grounding type attachment plug rated 15 A, 250 V.
Information for Users outside the U.S.
For units set at 230 V:
Use a Cord Set consisting of a minimum 18 AWG cord and grounding type attachment plug rated 15 A, 250 V. The Cord Set should have the appropriate safety approvals for the country in which the equipment will be installed and / or be marked HAR.
RETURN TO TOP OF THE PAGE
12 About This Guide
Notational Descriptions
About This Manual
About This Guide
This electronic user's guide is intended for anyone who uses the Philips LCD Monitor. It describes the LCD monitor's features, setup, operation and other important information. Its contents are identical to the information in our printed version.
It includes the following sections:
- Safety and Troubleshooting Information provides tips and solutions for common problems as well as other related information you may need.
- About This Electronic User's Manual gives an overview of information included, along with notation icon descriptions and other documentation for your reference.
- Product Information gives an overview of the monitor's features as well as the technical specifications for this monitor.
- Installing Your Monitor describes the initial setup process and gives an overview of how to use the monitor.
- On-Screen Display provides information on adjusting the settings on your monitor.
- Customer Care and Warranty contains a list of worldwide Philips Consumer Information Centers along with help desk phone numbers and information on the warranty applicable to your product.
• Glossary defines technical terms. - Download and Print Option transfers this entire manual to your hard drive for easy reference.
RETURN TO TOP OF THE PAGE
Notational Descriptions
The following subsections describe notational conventions used in this document.
Notes, Cautions and Warnings
Throughout this guide, blocks of text may be accompanied by an icon and printed in bold or italic type. These blocks contain notes, cautions or warnings. They are used as follows:

NOTE: This icon indicates important information and tips that help you make better use of your computer system.

CAUTION: This icon indicates information that tells you how to avoid either potential damage to hardware or loss of data.

WARNING: This icon indicates the potential for bodily harm and tells you how to avoid the problem.
Some warnings may appear in alternate formats and may not be accompanied by an icon. In such cases, the specific presentation of the warning is mandated by the relevant regulatory authority.
RETURN TO TOP OF THE PAGE
All rights reserved. Reproduction, copying, use, modification, hiring, renting, public performance, transmission and/or broadcasting in whole or in part is prohibited without written consent of Philips Electronics NV
Your LCD Monitor
Product Features
Smartimage
|| SmartContrast
SmartSaturte
SmartSharpness
Lead-free Product
¶ Technical Specifications
Resolution & Preset Modes
Philips Pixel Defect Policy
Automatic Power Saving
□ Physical Specification
Pin Assignment
Product Views
1 Physical Function
SmartManage & SmartControl
Product Information
Your LCD monitor
Congratulations on your purchase and welcome to Philips. To fully benefit from the support that Philips offers, register your product at. www.philips.com/welcome
Product Features
220CW8
• Outstanding front of screen performance
Big, wide screen: IM, write email, watch videos on one screen
SmartImage for an enhanced LCD viewing experience
SmartContrast: Optimized contrast for visual clarity
1 Optimize response time for different viewing requirements
DVI-D input and HDCP support (* DVI only available in selected countries)
- PerfectTune ensures top quality LCD display delivered to you
Empowered for Windows Vista
• Great convenience
SmartAccessory to personalize and organize your workspace
1 Hassle-free display performance tuning with SmartControl II
USB port for convenient peripheral connections
- Green design
- For your safety: Aerospace composite fire retardant case
TCO'06 compliance for a better multimedia experience
RETURN TO TOP OF THE PAGE
SmartImage
What is it?
SmartImage provides presets that optimize display for different types of content, dynamically adjusting brightness, contrast, color and sharpness in real time. Whether you're working with text applications, displaying images or watching a video, Philips SmartImage delivers great optimized LCD display performance.
Why do I need it?
You want a LCD display that delivers optimized display all your favorite types of content, SmartImage software dynamically adjust brightness, contrast, color and sharpness in real time to enhance your LCD viewing experience.
How does it work?
SmartImage – software based on Philips award-winning LightFrame™ technology – analyzes the content displayed on your screen. Based on a scenario you select, SmartImage dynamically enhances the contrast, color saturation and sharpness of images and video for ultimate display performance – all in real time with the press on a single button.
How to enable SmartImage?

- Press to 📋 launch the SmartImage on screen display;
- Keep press to toggle between Office Work, Image Viewing, Entertainment, Economy, and Off;
- The SmartImage on screen display will remain on screen for 5 seconds or you can also press "OK" to make confirmation.
- When SmartImage is enabled, the sRGB scheme is disabled automatically. To use sRGB you need to disable SmartImage with the button at the front bezel of your monitor.
Except using 📋 key to scroll down, you can also press ▼▲ buttons to choose and press "OK" to confirm selection and close the SmartImage OSD. There are five modes to be selected: Office Work, Image Viewing, Entertainment, Economy, and Off.
Smart Image
Office Work
Image Viewing
Entertainment
Economy
Off
- Office Work: Enhances text and dampens brightness to increase readability and reduce eye strain. This mode significantly enhances readability and productivity when you're working with spreadsheets, PDF files, scanned articles or other general office applications.
- Image Viewing: This profile combines color saturation, dynamic contrast and sharpness enhancement to display photos and other images with outstanding clarity in vibrant colors – all without artifacts and faded colors 2 . Image Viewing: This profile combines color saturation, dynamic contrast and sharpness enhancement to display photos and other images with outstanding clarity in vibrant colors – all without artifacts and faded colors.
- Entertainment: Ramped up luminance, deepened color saturation, dynamic contrast and razor sharpness displays every details in darker areas of your videos without color washout in brighter areas maintaining a dynamic natural values for the ultimate video display.
- Economy: Under this profile, brightness, contrast are adjusted and backlighting fine-tuned for just right display of everyday office applications and lower power consumption.
- Off: No optimization by SmartImage.
SmartResponse
What is it?
SmartResponse is exclusive Philips technology that adjusts response time to application requirements, delivering faster response time for gaming and videos or better color saturation for viewing photos and static images.
Why do I need it?
You want optimal display for every type of application: Static or steady image display without "noise" or color shifting as well as blurring and ghosting-free performance when viewing action movies or videos.
How does it work?
Select the video and gaming playback profile to ramp up response time for blur and ghosting-free display of fast-moving images in action movies or videos; choose the image viewing profile for optimal display of steady or static images without "noise" or color shifting when working with image viewing or other multipurpose applications.
RETURN TO TOP OF THE PAGE
SmartContrast
What is it?
Unique technology that dynamically analyzes displayed content and automatically optimizes a LCD monitor's contrast ratio for maximum visual clarity and viewing enjoyment, stepping up backlighting for clearer, crisper and brighter images or dimming backlighting for clear display of images on dark backgrounds.
Why do I need it?
You want the very best visual clarity and viewing comfort for every type of content. SmartContrast dynamically controls contrast and adjusts backlighting for clear, crisp, bright gaming and video images or displays clear, readable text for office work. By reducing your monitor's power consumption, you save on energy costs and extend the lifetime of your monitor.
How does it work?
When you active SmartContrast which will analysis the content you are displaying in real time to adjust colors and control backlight intensity. This function can obviously enhance contrast in dynamic for more entertainment fun when viewing videos or playing games.
RETURN TO TOP OF THE PAGE
SmartSaturate
What is it?
Smart technology that controls color saturation - the degree to which one on screen color is diluted by neighboring colors - to deliver rich and vibrant images for more entertainment fun when you are viewing videos.
Why do I need it?
You want rich, vibrant images for more entertainment fun when viewing photos or videos.
How does it work?
SmartSaturate dynamically controls color saturation – the degree to which on-screen color is diluted by neighboring colors – to deliver rich, vibrant display for more entertainment fun when you are viewing images or videos in your display's Entertainment mode and is turned off for top quality display of office application and in the Economy mode to reduce power consumption.
RETURN TO TOP OF THE PAGE
SmartSharpness
What is it?
Smart technology that enhances sharpness when you need it for ultimate display performance and more entertainment fun when you are viewing videos or photos.
Why do I need it?
You want the ultimate in sharpness for more entertainment fun when viewing photos or videos.
How does it work?
Smart technology enhances sharpness when you need it for ultimate display performance and more entertainment fun when you are viewing videos or photos in the Entertainment mode and is turned off for top quality display of office applications and in the Economy mode to reduce power consumptions.
RETURN TO TOP OF THE PAGE
Lead-free Product

Philips eliminated toxic substances like lead from its displays. Lead-free display helps protect your health and promotes environmentally sound recovery and disposal of waste from electrical and electronic equipment. Philips complies with the European Community stringent RoHS Directive mandating restrictions on hazardous substances in electrical and electronic equipment. With Philips, you can be confident that your display device does not harm the environment.
RETURN TO TOP OF THE PAGE
Technical Specifications*
LCD PANEL
| ☐ Type | TFT LCD |
| ☐ Screen size | 22" visual |
| ☐ Pixel Pitch | 0.282 x 0.282 mm |
| ☐ LCD Panel type | 1680x1050 pixelsR.G.B. vertical stripeAnti-glare polarizer, hard coated |
| Effective viewing area | 473.8 x296.1 mm |
| SCANNING | |
| Vertical refresh rate | 56 Hz-76 Hz |
| Horizontal Frequency | 30 kHz - 93 kHz |
| VIDEO | |
| Video dot rate | 165 MHz |
| Input impedance | |
| - Video | 75 ohm |
| -Sync | 2.2K ohm |
| Input signal levels | 0.7 Vpp |
| Sync input signal | Separate syncComposite syncSync on green |
| Sync polarities | Positive and negative |
* This data is subject to change without notice.
Resolution & Preset Modes
A. Maximum Resolution
- For 220CW8
1680x1050 at 60 Hz (analog input)
1680x1050 at 60 Hz (digital input) * selected countries
B. Recommended Resolution
- For 220CW8
1680x1050 at 60 Hz
18 factory preset modes:
| H. freq (kHz) | Resolution | V. freq (Hz) |
| 31.47 | 640*350 | 70 |
| 31.47 | 640*480 | 60 |
| 35 | 640*480 | 67 |
| 37.5 | 640*480 | 75 |
| 31.47 | 720*400 | 70 |
| 35.16 | 800*600 | 57 |
| 37.88 | 800*600 | 60 |
| 46.88 | 800*600 | 75 |
| 48.36 | 1024*768 | 60 |
| 60.02 | 1024*768 | 75 |
| 63.98 | 1280*1024 | 60 |
| 79.98 | 1280*1024 | 75 |
| 55.47 | 1440*900 | 60 |
| 55.94 | 1440*900 | 60 |
| 70.64 | 1440*900 | 75 |
| 65.29 | 1680*1050 | 60 |
| 64.67 | 1680*1050 | 60 |
| 66.59 | 1920*1080 | 60 (for DVI-D) |
RETURN TO TOP OF THE PAGE
Automatic Power Saving
If you have VESA DPMS compliance display card or software installed in your PC, the monitor can automatically reduce its power consumption when not in use. If an input from a keyboard, mouse or other input device is detected, the monitor will 'wake up' automatically. The following table shows the power consumption and signaling of this automatic power saving feature:
Power Management Definition
| VESA Mode Video H-sync V-sync Power Used | LED color | ||||
| Active | ON | Yes | Yes | < 50W (typ.) | Green |
| Sleep | OFF | No | No | < 1 W | Amber |
| Switch Off OFF | -- < 1W Off | ||||
This monitor is ENERGY STAR® compliant. As an ENERGY STAR® Partner, PHILIPS has determined that this product meets the ENERGY STAR® guidelines for energy efficiency.
RETURN TO TOP OF THE PAGE
Physical Specifications
| Dimension with Stand (WxHxD) | 513.8 x 416.2 x 213.6 mm |
| Weight | 5.0 KG |
| Tilt | -5°+2/-0 → + 20°+3/-0 |
| Power supply | 100 ~ 240 VAC, 50/60 Hz |
| Power consumption | <50W* (typ.) |
| Temperature | 0°C to 40°C (operating)-20°C to 60°C (storage) |
| Relative humidity | 20% to 80% |
| System MTBF | 50K hours (CCFL 40K hours) |
* This data is subject to change without notice.
1680x1050, standard size, contrast 50%, brightness max., 6500° K, full white pattern.
RETURN TO TOP OF THE PAGE
Pin Assignment
- The digital only connector contains 24 signal contacts organized in three rows of eight contacts. Signal pin assignments are listed in the following table:
Pin No.
Signal Assignment
Pin No.
Signal Assignment
Pin No.
Signal Assignment
| 1 | T.M.D.S. Data2- | 9 T.M.D.S. Data1- | 17 | T.M.D.S. Data0- | ||
| 2 T.M.D.S. Data2+ 10 T.M.D.S. Data1+ | 18 | T.M.D.S. Data0+ | ||||
| 3 T.M.D.S. Data2/4 Shield 11 T.M.D.S. Data1/3 Shield | 19 | T.M.D.S. Data0/5 Shield | ||||
| 4 No connect 12 No connect | 20 | No connect | ||||
| 5 No connect 13 No connect | 21 | No connect | ||||
| 6 DDC Clock 14 +5V Power | 22 | T.M.D.S. Clock Shield | ||||
| 7 DDC Data 15 Ground (for +5V) | 23 | T.M.D.S. Clock+ | ||||
| 8 No connect | 16 | Hot Plug Detect | 24 | T.M.D.S. Clock- | ||
Pin1

- The 15-pin D-sub connector (male) of the signal cable:

| Pin No. | Assignment | Pin No. | Assignment |
| 1 | Red video input | 9 | DDC + 5 V |
| 2 | Green video input/SOG | 10 | Logic ground |
| 3 | Blue video input | 11 | Ground |
| 4 | Sense (GND) | 12 | Serial data line (SDA) |
| 5 | Cable detect (GND) | 13 | H. Sync / H+V. Sync |
| 6 | Red video ground | 14 | V. Sync |
| 7 | Green video ground | 15 | Data clock line (SCL) |
| 8 | Blue video ground | ||
RETURN TO TOP OF THE PAGE
Product Views
Follow the links to see various views of the monitor and its components.
Front View Product Description
RETURN TO TOP OF THE PAGE
Physical Function
1) Tilt

RETURN TO TOP OF THE PAGE
Product Features
Technical Specifications
|| Resolution & Preset Modes
Automatic Power Saving
Physical Specification
II Pin Assignment
1 Product Views
Philips Pixel Defect Policy
Philips' Flat Panel Monitors Pixel Defect Policy
Philips strives to deliver the highest quality products. We use some of the industry's most advanced manufacturing processes and practice stringent quality control. However, pixel or sub pixel defects on the TFT LCD panels used in flat panel monitors are sometimes unavoidable. No manufacturer can guarantee that all panels will be free from pixel defects, but Philips guarantees that any monitor with an unacceptable number of defects will be repaired or replaced under warranty. This notice explains the different types of pixel defects and defines acceptable defect levels for each type. In order to qualify for repair or replacement under warranty, the number of pixel defects on a TFT LCD panel must exceed these acceptable levels. For example, no more than 0.0004% of the sub pixels on a 19" XGA monitor may be defective. Furthermore, Philips sets even higher quality standards for certain types or combinations of pixel defects that are more noticeable than others. This policy is valid worldwide.

Pixels and Sub pixels
A pixel, or picture element, is composed of three sub pixels in the primary colors of red, green and blue. Many pixels together form an image. When all sub pixels of a pixel are lit, the three colored sub pixels together appear as a single white pixel. When all are dark, the three colored sub pixels together appear as a single black pixel. Other combinations of lit and dark sub pixels appear as single pixels of other colors.
Types of Pixel Defects
Pixel and sub pixel defects appear on the screen in different ways. There are two categories of pixel
defects and several types of sub pixel defects within each category.
Bright Dot Defects Bright dot defects appear as pixels or sub pixels that are always lit or 'on'. That is, a bright dot is a sub-pixel that stands out on the screen when the monitor displays a dark pattern. There are the types of bright dot defects:

One lit red, green or blue sub pixel
Two adjacent lit sub pixels:
- Red + Blue = Purple
- Red + Green = Yellow
- Green + Blue = Cyan (Light Blue)
Three adjacent lit sub pixels (one white pixel)

A red or blue bright dot must be more than 50 percent brighter than neighboring dots while a green bright dot is 30 percent brighter than neighboring dots.
Black Dot Defects Black dot defects appear as pixels or sub pixels that are always dark or 'off'. That is, a dark dot is a sub-pixel that stands out on the screen when the monitor displays a light pattern. These are the types of black dot defects:

One dark sub pixel Two or three adjacent dark sub pixels
Proximity of Pixel Defects
Because pixel and sub pixels defects of the same type that are near to one another may be more noticeable, Philips also specifies tolerances for the proximity of pixel defects.
Pixel Defect Tolerances
In order to qualify for repair or replacement due to pixel defects during the warranty period, a TFT LCD panel in a Philips flat panel monitor must have pixel or sub pixel defects exceeding the tolerances listed in the following tables.
| BRIGHT DOT DEFECTS ACCEPTABLE LEVEL | |
| MODEL | 220CW8 |
| 1 lit subpixel 3 or fewer | |
| 2 adjacent lit subpixels 1 or fewer | |
| 3 adjacent lit subpixels (one white pixel) 0 | |
| Distance between two bright dot defects* >15mm | |
| Total bright dot defects of all types 3 or fewer |
| BLACK DOT DEFECTS ACCEPTABLE LEVEL | |
| MODEL | 220CW8 |
| 1 dark subpixel 5 or fewer | |
| 2 adjacent dark subpixels 2 or fewer | |
| 3 adjacent dark subpixels 1 | |
| Distance between two black dot defects* >15mm | |
| Total black dot defects of all types 5 or fewer |
| TOTAL DOT DEFECTS ACCEPTABLE LEVEL | |
| MODEL | 220CW8 |
| Total bright or black dot defects of all types 5 or fewer |
Note:
* 1 or 2 adjacent sub pixel defects = 1 dot defect
Your Philips monitor is ISO13406-2 Compliant
RETURN TO TOP OF THE PAGE
1 Product Information
Philips Pixel Defect Policy
SmartManage Features and Benefits
Philips SmartControl II
System support and requirement
1 Installation
Start to use
|| Q&A
SmartManage & SmartControl II (Selective Models)

Introduction
Philips SmartManage is an advanced solution for users, corporate/institution IT administrator in particular, to manage their Philips monitors as part of the asset management environment. The solution includes three essential components, Philips SmartManage Administrator, and Philips SmarControl and Agent.
If you are a small to middle business company, you may not need such professional software to do the asset
management. Thus, Philips provide you a compact version of SmartManage, SmartManage Lite. You can use
SmartManage Lite to manage your Philips Monitors via LAN. Please refer to below comparison chart and determine if which one suit for your environment best.
| Functions & Features Manage | SmartManagePC & Monitor | SmartManage LiteMonitor |
| Five key features of SmartManage | ||
| Security Management | ●SmartManage will indicate if display are moved from their assigned location by providing a warning message to a designated manager or e-mail account. Also the monitor moved out from Network will havewarning message on the screen and power off after 10 min. | ●(Lite version)IT Manager can tell the asset list to find out if there is display missing. Suit for small to mid-range company. Also optional feature of thelf deference which cannot display correctly without correct PIN number. |
| Power Saving Management | ●Remote switch unattended Display | ●Remote switch unattended Display |
| Remote Operation Management - Performance and setting | ●Remote adjust or reset Display seeing | ●Remote adjust or reset Display seeing |
| Asset tracking Management | ●Full sortable and report of data for IT manager to manage such as S/N, Resolution, Model name, Running hour; Asset information, Location, Dept and etc. | ●(Lite version)Compact information like S/N, Resolution, Model name and Running hour. |
| Instant Support | ●SMS or Instant Message for individual users or public broadcasting | ●(Lite version)Public broadcasting |
SmartManage Features and Benefits
The Philips SmartManage is a working console for IT management to gather monitors assets information, run asset report, control assets security, monitor assets security, and issue instant messages to monitor users. Philips SmartManage includes the following major features:
- Provides an additional security measure that helps corporate users safeguard their investment.
- Power saving feature that reduces utility costs and manpower required to turn monitors on or off.
- Provides an efficient means for adjusting monitor performance and settings.
- Built-in asset reports reduce audit/maintenance manpower, cycle time and costs.
A trial version of SmartManage can be downloaded from
http://www.altiris.com/philips
You can also download SmartManage Lite
http://www.portrait.com/dtune/phl/enu/index.html

SmartManage is a software dedicated to business environments. Personal users normally do not need to use SmartManage.
Philips SmartManage is a solution joint developed by Philips and Altiris Inc.
Philips SmartControl II and SmartManage Lite is a solution joint developed by Philips and Portrait Display, Inc.
Philips SmartControl II
SmartControl II is monitor-based software with an easy-to-use on-screen graphic interface that guides you through fine-tuning resolution, color calibration and other display settings including brightness, contrast, clock & phase, position, RGB, white point and - on models with onboard speakers - volume adjustments. Monitors install SmartControl II can also have the ability to be managed by SmartManage which can manage PCs and Monitors or by SmartManage Lite which can manage Monitors. (Please refer to SmartManage/SmartManage Lite chapter).
System support and requirement:
- Sytem support: 2000, XP, NT 4.0, XP 64 Edition, Vista 32/64. IE Support 6.0/7.0.
- Language support: English, Simplified Chinese, German, Spanish, French, Italian, Russian, Portuguese.
- Philips Monitor support DDC/CI Interface.
Installation:
1. Installer – Install Shield Welcome
- Next Button takes user to next Install pane.
- Cancel prompts user if they want to cancel installation.

SmartControl II Installer.exe

2. Installer – Install Shield Legal
- Choose "I accept" for installation process.
- Cancel prompts user if you want to cancel installation.

SmartControl II Installer.exe

3. Installer – Install Shield Program Files
- Check the box if you wants to install SmartManage Lite Asset Management services.
Personal user usually not need to active this function. Read SmartManage section in this manual before you choose SmartManage Lite function.

SmartControl II Installer.exe
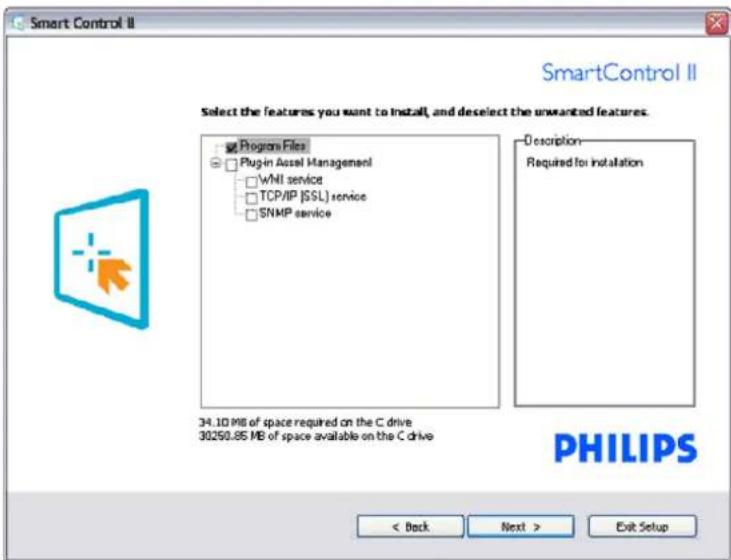
4. Installer – Installation Process
- Follow the instruction and complete the installation.
- You can launch after installation complete.
- If you want to launch later, you can either click the shortcut on desktop or toolbar.

SmartControl II Installer.asp


SmartControl II Installer.exe

PHILIPS

SmartControl II
2007 Royal Philips Electronics
Powered by Portrait
Portions utilize Microsoft Windows Media Technologies.
Copyright 1999-2002 Microsoft Corporation.
All Rights Reserved.
Copyright of Suppliers Acknowledged.
Start to use:
1. First launch – Wizard
- The first time after installation of SmartControl II, it will automatically go to Wizard for first time launch.
- The wizard will guide you through adjustment your monitor performance step by step.
- You can go to Plug-in menu to launch wizard later on as well.
- You can adjust more options without wizard by Standard pane.
| Wizard Analog Seguence Wizard Digital Seguence | |
| Resolution Resolution | |
| Focus | Contrast |
| Brightness Brightness | |
| Contrast White Point (Color Temp) | |
| Position File | |
| White Point (Color Temp) | |
| File | |

2. Start with Standard pane:
Adjust menu:
- Adjust Menu allow you to adjust Brightness, Contrast, Focus, Position and Resolution.
- You can follow the instruction and do the adjustment.
- Cancel prompts user if you want to cancel installation.
| Tab Heading Sub Menu Display in Analog Display in Digital | |||
| Adjust Brightness Yes Yes | |||
| Adjust | Contrast Yes | Yes | |
| Adjust Focus (Clock & Clock Phase) Yes No | |||
| Adjust Position Yes No | |||
| Adjust Resolution Yes Yes | |||

Color menu:
- Color Menu allow you to adjust RGB, Black Level, White Point, Color Calibration, and SmartImage (Please refer to SmartImage section).
- You can follow the instruction and do the adjustment.
• Refer to below table for sub-menu item base on your input.
Example for Color Calibration
| Tab Heading Sub Menu Display in Analog Display in Digital | ||
| Color RGB Yes Yes | ||
| Color Black Level Yes | Yes | |
| Color White Point Yes Yes | ||
| Color Color Calibration Yes Yes | ||
| Color Viewing Mode Yes Yes | ||


Optional Menu
- Option Menu let you to activate some features like AutoPivot, Preference, Input Selection and Audio Function.
- You can follow the instruction and do the adjustment.
- Refer to below table for sub-menu item base on your input.
| Tab Heading Sub | Menu Display in Analog | Display in Digital | |
| Options Auto Pivot Yes Yes | |||
| Options | Preferences Yes | Yes | |
| Options Input Yes Yes | |||
| Options Audio Yes Yes | |||


AutoPivot, Input and Audio function will only available and shown if the product supports those features.
Help Menu
- Help Menu will give you some information of Manual, Update, ID, System ID and version.
- If you ask for technical support. It will automatically generate a report for Philips supporting to understand your environment by click "Tech. Support".
- Refer to below table for sub-menu item base on your input.
| Tab Heading Sub Menu Display in Analog Display in Digital | |||
| Help User | Manual Yes Yes | ||
| Help | Update Yes | Yes | |
| Help Display ID Yes Yes | |||
| Help System ID Yes Yes | |||
| Help Version Yes Yes | |||
Example for support form after you click "Tech. Support"


Plug Ins Menu
Example for on line register theft Deterrence PIN
- Plug Ins Menu will allow you to have more add on features if applicable.
- PIP and Zoning functions will only support for the models with Video inputs.
- SmartManage Lite for Asset Management will only be supported if you activate it when installation. Personal user usually will not need this function.
- Please follow the screen instruction for Theft deterrence function. You need to have Internet access to register your PIN.
- We also suggest you to have at least 10 to 15 mins. time when you change different PC and enter your PIN.
- You can activate Wizard like the first launch.
| Tab Heading Sub Menu Display in Analog Display in Digital | |||
| Plug Ins PIP Yes Yes | |||
| Plug Ins | Zoning Yes | Yes | |
| Plug Ins Asset Management Yes Yes | |||
| Plug Ins Theft Deterrence Yes Yes | |||
| Plug Ins Wizard Yes Yes | |||
Example for Theft Deterrence


PIP, Zoning, Asset Management and Theft Deterrence will only available and shown if the product supports those features Theft Deterrence Philips Theft Deterrence minimizes theft or unauthorized relocation of your display. Theft Deterrence does not prevent the display from being stolen, but hinders the operation of the display once it is removed from the "Theft Deterrence enabled" host computer. To get started, you will need to register a personal identification number (PIN).
Example for Theft Deterrence

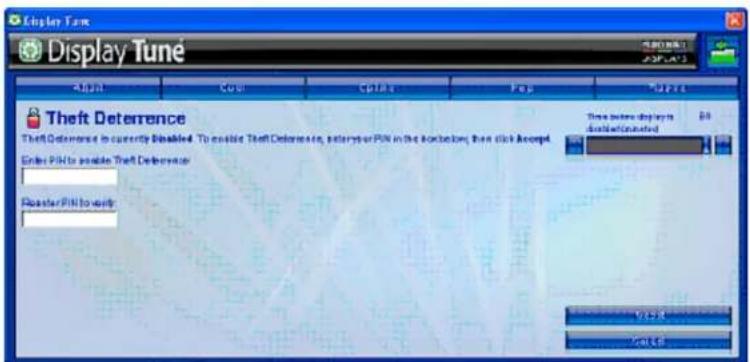
Example for on line register Theft Deterrence PIN
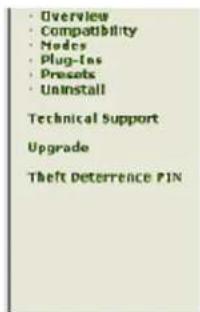
Theft Deterrence PIN
Portrait Displays' Theft Deterrence minimizes theft or unauthorized relocation of your display. Theft Deterrence does not prevent the display from being stolen, but hinders the operation of the display once it is removed from the 'Theft Deterrence enabled' host computer.
Please select from the following options.
Change your PIN.
Forgot your PIN?
Q&A
Q1. What is the difference between SmartManage, SmartControl?
A. SmartManage is a remote management/control software for IT managers to manage monitors across the network
SmartControl is a control panel extension, which helps users to adjust monitor performances and settings by a software interface, instead of the hardware buttons at the front bezel of the monitors.
Q2. I change the monitor on a PC to a different one and the SmartControl becomes un-usable, what do I do?
A. Restart your PC and see if SmartControl can work. Otherwise, you will need to remove and re-install SmartControl to ensure proper driver is installed.
Q3. The SmartControl functions well at the beginning, but it is not workable, what can I do?
A. If the following actions were executed, the monitor driver may need to be re-installed.
- Change video graphic adapter to another one
- Update video driver
• Activities on OS, such as service pack or patch - Run Windows Update and updated monitor and/or video driver
- Windows was booted with the monitor power off or disconnected.
To find out, please right click My Computer and click on Properties->Hardware->Device Manager.
If you see "Plug and Play Monitor" shows under Monitor, then you need to re-install. Simply remove SmartControl and re-install it.
Q4. After installing SmartControl, when clicking on SmartControl tab, nothing shows up after a while or a failure message shows, what happened?
A. It might be your graphic adaptor is not compatible with the SmartControl. If your graphic adaptor is one of the above mentioned brands, try to download the most updated graphic adaptor driver from corresponding companies! web site. Install the driver. Remove SmartControl, and re-install it once more.
If it is still not working, we are sorry that the graphic adaptor is not supported. Please pay attention to PhilipsL web site for any updated SmartControl driver available.
Q5. When I click on Product Information, only partial information is shown, what happened?
A. It might be your graphic card adaptor driver is not the most updated version which fully supporting DDC/CI interface. Please try to download the most updated graphic adaptor driver from corresponding companies! web site. Install the driver. Remove SmartControl, and re-install it once more.

Q6. I forgot my PIN for Theft Deterrence Function. How can I do?
A. Please contact IT manager or Philips Service Center.
Q7. In a monitor with the SmartImage feature, the sRGB scheme of color temperature function in SmartControl is not responding, why?
A. When SmartImage is enabled, the sRGB scheme is disabled automatically. To use sRGB, you need to disable SmartImage with the button at the front bezel of your monitor.
RETURN TO TOP OF THE PAGE
Front View Produt Description
Connecting to Your PC
The Base
SmartAccessory
Getting Started
Optimizing Performance
Installing Your LCD Monitor
Front View Product Description
![graph TD A["320CW"] --> B["SET"] A --> C["AUTO"] A --> D["INPUT"] A --> E["MENU"] A --> F["MODE"] B --> G["7"] C --> H["8"] D --> I["5"] E --> J["4"] F --> K["3"] G --> L["2"] H --> M["1"]](/content/2026/06/1278786/images/3fd3c03233668098f2c7f9e3d83da96e30ee646bbceb010c77601503e5b2a0ff.jpg)
1 To switch monitor's power On and Off
2 MENU/OK To access OSD menu
3 ▲▼ To adjust the OSD menu
4 To adjust brightness of the display
5 Input To change the signal input source.
6 AUTO/Automatically adjust the horizontal position, vertical position, phase and clock settings.
7 SmartImage: There are five modes to be selected: Office Work, Image Viewing, Entertainment, Economy, and Off.
RETURN TO TOP OF THE PAGE
Rear View
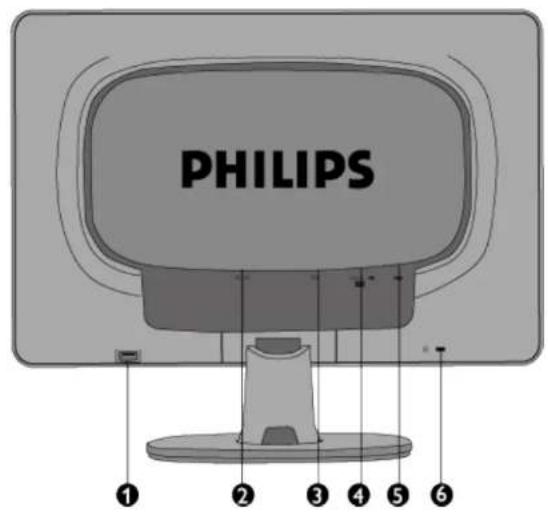
1 USB downstream port
2 AC power input
3 DVI-D input (Available for selected countries)
4 VGA input
5 USB upstream port
6 Kensington anti-thief lock
RETURN TO TOP OF THE PAGE
Optimizing Performance
- For best performance, ensure that your display settings are set at 1680x1050, 60Hz.

Note: You can check the current display settings by pressing the 'OK' button once. The current display mode is shown in OSD main controls called RESOLUTION.
RETURN TO TOP OF THE PAGE
Front View Product Description
□ Accessory Pack
Connecting to Your PC
Getting Started
Optimizing Performance
The base
Connecting to Your PC
Accessory Pack
Unpack all the parts.


USB cable
Power cord


VGA cable
EDFU pack
RETURN TO TOP OF THE PAGE
Connecting to Your PC
1) Connect the power cord to the back of the monitor firmly. (Philips has pre-connected VGA cable for the first installation.
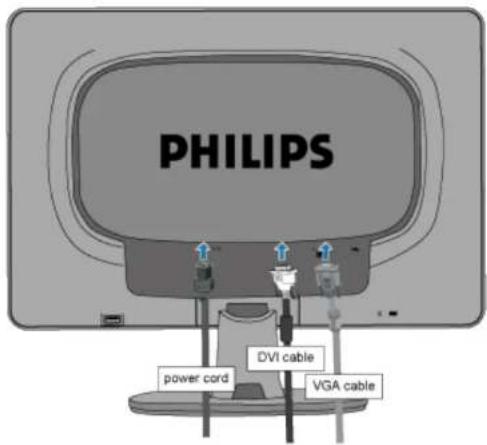

2) Connect to PC
(a) Turn off your computer and unplug its power cable.
(b) Connect the monitor signal cable to the video connector on the back of your computer.
(c) Plug the power cord of your computer and your monitor into a nearby outlet.
(d) Turn on your computer and monitor. If the monitor displays an image, installation is complete.
RETURN TO TOP OF THE PAGE
[ Front View Product Description
↑ Accessory Pack
「 Connecting to your PC
L Getting Started
L Optimizing Performance
[ Attach the Base
L Detach the Base
The Base
Attach and Detach the Base
Attach the Base
1) Place the base on flat surface, slide the monitor body onto the base.

2) Install cable cover as illustrated below.

Detach the Base
Detach
1) Remove the cable cover as illustrated below.

2) Place the monitor face on a safe surface, push down on the release button and pull the base away from the monitor body.

SmartAccessory
SmartAccessory
Accessory parts


Pen Holder

MP3/ Phone Holder
Caution

Do not attach/detech SmartAccessory onto/from monitor while the holder is still on the SmartClip
Install
Install SmartClip into the SmartAccessory groove on your monitor BEFORE attaching any holder

Install Smart Clip

To mount SmartClip on your monitor, first hook one side into the Smart Accessory groove, then snap in the other side.

Install Pen holder

After installing the Pen holder, use it to hold a pen or headphones
Uninstall
First detach any holder, then detach SmartClip

Detach the holder first
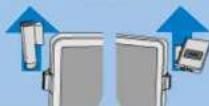
Decach one side of the Smart Clip and then the other

Detach the SmartClip


Install MP3/ Phone holder


Adjust the MP3/Phone holder to the position you wish and use it to hold your MP3 player or mobile phone.
SmartAccessory items (Smart Clip, Pen holder SmartAccessory, MP3/Phone holder SmartAccessory,) are no covered by Philips warranty.
Items on SmartAccessory holder should not exceed 300g.
RETURN TO TOP OF THE PAGE
Your LCD Monitor :
Front View Product Description
Setting Up and Connecting Your Monitor
□ Getting Started
Optimizing Performance
Getting Started
Getting Started
Use the information file (.inf) for Windows® 95/98/2000/Me/XP/Vista or later
The built-in VESA DDC2B feature in Philips Monitors supports Plug & Play requirements for Windows® 95/98/2000/Me/XP/Vista. This information file (.inf) should be installed in order that your Philips monitor can be enabled from the 'Monitor' dialog box in Windows® 95/98/2000/Me/XP/Vista and the Plug & Play application can be activated. The installation procedure based on Windows® '95 OEM Release 2, 98, 2000, Me, XP and Vista is specified as follows.
For Windows® 95
- Start Windows® '95
- Click on the 'Start' button, point to 'Settings', and then click on 'Control Panel'.
- Double click on the 'Display' Icon.
- Select the 'Settings' tab then click on 'Advanced...'.
- Select the 'Monitor' button, point to 'Change...' then click on 'Have Disk...'.
- Click on the 'Browse...' button, select the appropriate drive F: (CD-ROM Drive) then click on the 'OK' button.
- Click on the 'OK' button then select your monitor model and click on 'OK'.
- Click on the 'Close' button.
For Windows® 98
- Start Windows® 98
- Click on the 'Start' button, point to 'Settings', and then click on 'Control Panel'.
- Double click on the 'Display' Icon.
- Select the 'Settings' tab then click on 'Advanced...'.
- Select the 'Monitor' button, point to 'Change...' then click on 'Next'
- Select 'Display a list of all the drivers in a specific location, so you can choose the driver you want.' then click on 'Next' and then click on 'Have Disk...'.
- Click on the 'Browse...' button, select the appropriate drive F: (CD-ROM Drive) then click on the 'OK' button.
- Click on the 'OK' button then select your monitor model and click on the 'Next' button.
- Click on the 'Finish' button then the 'Close' button.
For Windows® 2000
-
Start Windows® 2000
-
Click on the 'Start' button, point to 'Settings', and then click on 'Control Panel'.
- Double click on the 'Display' Icon.
- Select the 'Settings' tab then click on 'Advanced...'.
- Select 'Monitor'
- If the 'Properties' button is inactive, it means your monitor is properly configured. Please stop installation.
- If the 'Properties' button is active. Click on 'Properties' button. Please follow the steps given below.
- Click on 'Driver' and then click on 'Update Driver...' then click on the 'Next' button.
- Select 'Display a list of the known drivers for this device so that I can choose a specific driver', then click on 'Next' and then click on 'Have disk...'.
- Click on the 'Browse...' button then select the appropriate drive F: (CD-ROM Drive).
- Click on the 'Open' button, then click on the 'OK' button.
- Select your monitor model and click on the 'Next' button.
- Click on the 'Finish' button then the 'Close' button.
If you can see the 'Digital Signature Not Found' window, click on the 'Yes' button.
For Windows® Me
- Start Windows® Me
- Click on the 'Start' button, point to 'Settings', and then click on 'Control Panel'.
- Double click on the 'Display' Icon.
- Select the 'Settings' tab then click on 'Advanced...'.
- Select the 'Monitor' button, then click on 'Change...' button.
- Select 'Specify the location of the driver(Advanced)' and click on the 'Next' button.
- Select 'Display a list of all the drivers in a specific location, so you can choose the driver you want', then click on 'Next' and then click on 'Have Disk...'.
- Click on the 'Browse...' button, select the appropriate drive F: (CD-ROM Drive) then click on the 'OK' button.
- Click on the 'OK' button, select your monitor model and click on the 'Next' button.
- Click on 'Finish' button then the 'Close' button.
For Windows® XP
- Start Windows® XP
- Click on the 'Start' button and then click on 'Control Panel'.
- Select and click on the category 'Printers and Other Hardware'
- Click on the 'Display' Item.
- Select the 'Settings' tab then click on the 'Advanced' button.
- Select 'Monitor' tab
- If the 'Properties' button is inactive, it means your monitor is properly configured. Please stop installation.
- If the 'Properties' button is active, click on 'Properties' button.
Please follow the steps below.
- Click on the 'Driver' tab and then click on 'Update Driver...' button.
- Select the 'Install from a list or specific location [advanced]' radio button and then click on the 'Next' button.
-
Select the 'Don't Search. I will choose the driver to install' radio button. Then click on the 'Next' button.
-
Click on the 'Have disk...' button, then click on the 'Browse...' button and then select the appropriate drive F: (CD-ROM Drive).
- Click on the 'Open' button, then click the 'OK' button.
- Select your monitor model and click on the 'Next' button.
- If you can see the 'has not passed Windows® Logo testing to verify its compatibility with Windows® XP' message, please click on the 'Continue Anyway' button.
- Click on the 'Finish' button then the 'Close' button.
- Click on the 'OK' button and then the 'OK' button again to close the Display_Properties dialog box.
If your Windows® 95/98/2000/Me/XP version is different or you need more detailed installation information, please refer to your Windows® 95/98/2000/Me/XP user's manual.
For Windows® Vista
- Start Windows® Vista
- Click the Start button; select and click on 'Control Panel'.
- Select and click on 'Hardware and Sound'
- Choose 'Device Manager' and Click on 'Update device drivers'.
- Select 'Monitor' and then right click on 'Generic PnP Monitor'.
- Click on 'Update Driver Software'.
- Select 'Browse my computer for driver software'.
- Click the 'Browse' button and choose the drive in which you've placed the disk. Example: (CD-ROM Drive:\Lcd\PC\drivers).
- Click the 'Next' button.
- Wait few minutes for installing the driver, and then click 'Close' button.
If your Windows® 95/98/2000/Me/XP/Vista version is different or you need more detailed installation information, please refer to your Windows® 95/98/2000/Me/XP/Vista user's manual.
RETURN TO TOP OF THE PAGE
☐ Description of the On-Screen Display
The OSD Tree
On-Screen Display
Description of the On Screen Display
What is the On-Screen Display?
On-Screen Display (OSD) is a feature in all Philips LCD monitors. It allows an end user to adjust screen performance or select functions of the monitors directly through an on-screen instruction window. A user friendly on screen display interface is shown as below:

Basic and simple instruction on the control keys.
In the OSD shown above users can press ▼▲ buttons at the front bezel of the monitor to move the cursor, OK to confirm the choice or change.
The OSD Tree
Below is an overall view of the structure of the On-Screen Display. You can use this as a reference when you want to work your way around the different adjustments later on.

Resolution notification
This monitor is designed for optimal performance at its native resolution, 1680X1050@60Hz. When the monitor is powered on at a different resolution, an alert is displayed on screen: Use 1680x1050@60Hz for best results.
Display of the native resolution alert can be switched off from Setup in the OSD (On Screen Display) menu.
RETURN TO TOP OF THE PAGE
Customer Care & Warranty
PLEASE SELECT YOUR COUNTRY/AREA TO REVIEW DETAILS OF YOUR WARRANTY COVERAGE
WESTERN EUROPE: Austria □ Belgium □ Denmark □ France □ Germany □ Greece □ Finland □ Ireland □ Italy □ Luxembourg □ the Netherlands □ Norway □ Portugal □ Sweden □ Switzerland □ Spain □ United Kingdom
EASTERN EUROPE: Czech Republic □ Hungary □ Poland □ Russia □ Slovakia □ Slovenia □ Turkey
LATIN AMERICA: Antilles □ Argentina □ Brasil □ Chile □ Colombia □ Mexico □ Paraguay □ Peru □ Uruguay □ Venezuela
NORTH AMERICA: Canada ▪ USA
PACIFIC: Australia □ New Zealand
ASIA: Bangladesh | China | Hong Kong | India | Indonesia | Japan | Korea | Malaysia | Pakistan | Philippines | Singapore | Taiwan | Thailand
AFRICA: Morocco | South Africa
MIDDLE EAST: Dubai ☐ Egypt
Your Philips F1rst Choice Warranty
Thank you for purchasing this Philips monitor.

All Philips monitors are designed and manufactured to high standards and deliver high-quality performance, ease of use and ease of installation. Should you encounter any difficulties while installing or using this product, please contact the Philips helpdesk directly to benefit from your Philips F1rst Choice Warranty. This three-year service warranty entitles you to a swap model on-site if your monitor turns out to be faulty or defective. Philips aims at a swap within 48 hours of your call being received.
What is covered?
The Philips F1rst Choice Warranty applies within Andorra, Austria, Belgium, Cyprus, Denmark, France, Germany, Greece, Finland, Ireland, Italy, Liechtenstein, Luxembourg, Monaco, the Netherlands, Norway, Portugal, Sweden, Switzerland, Spain and the United Kingdom and only for monitors originally designed, manufactured, approved and/or authorized for usage within these countries.
Warranty coverage begins as from the day you buy your monitor. For three years thereafter, your monitor will be swapped by at least an equivalent monitor in case of defects provided for under the warranty coverage.
The swap monitor remains yours and Philips keeps the defective/original monitor. For the swap monitor the warranty period remains equal to that of your original monitor, being 36 months as from the purchase date of your original monitor.
What is excluded?
The Philips F1rst Choice Warranty applies provided the product is handled properly for its intended use, in accordance with its operating instructions and upon presentation of the original invoice or cash receipt, indicating the date of purchase, dealer's name and model and production number of the product.
The Philips F1rst Choice Warranty may not apply if:
- The documents have been altered in any way or made illegible;
- The model or production number on the product has been altered, deleted, removed or made illegible;
- Repairs or product modifications and alterations have been executed by unauthorized service organizations or persons;
-
Damage is caused by accidents including but not limited to lightning, water or fire, misuse or neglect;
-
Reception problems caused by signal conditions or cable or antenna systems outside the unit;
- Defects caused by abuse or misuse of the monitor;
- Product requires modification or adaptation to enable it to comply with local or national technical standards, which apply in countries for which the product was not originally designed, manufactured, approved and/or authorized. Therefore always check whether a product can be used in a specific country.
- Note that products that are not originally designed, manufactured, approved and/or authorized for usage within the Philips F1rst Choice countries, do not apply to the Philips F1rst Choice Warranty. In these cases the Philips global warranty terms are valid.
Just a click away
In case of any problems, we advise you to read the operating instructions carefully or go to the www.philips.com/support website for additional support.
Just a phone call away
In order to avoid unnecessary inconvenience, we advise you to read the operating instructions carefully or go to the www.philips.com/support website for additional support before contacting the Philips helpdesk.
To solve your problem quickly, please prepare the following details before contacting the Philips helpdesk:
• Philips type number
• Philips serial number
● Purchase date (copy of purchase may be required)
• PC environment Processor:
286/386/486/Pentium Pro/Internal memory
Fax/Modem/Internet program?
- Other cards installed
Operating system (Windows, DOS, OS/2, Apple Macintosh)
Having the following information available will also help speed up the process:
- Your proof of purchase indicating: date of purchase, dealer name, model and product serial number.
- The full address to which the faulty monitor has to be collected and the swap model should be delivered.
Philips' customer help desks are located worldwide. Click here to access the F1rst Choice Contact Information.
Or you can reach us via:
Website: http://www.philips.com/support

F1rst Choice Contact Information
Country Code Telephone number Tariff
Austria +43 0810 000206 € 0.07
Belgium +32 078 250851 € 0.06
Denmark +45 3525 8761
Local call tariff
Finland
+358
09 2290 1908 Local call tariff
France +33 082161 1658 € 0.09
Germany
+49 01803 386 853
€ 0.09
Greece
+30 00800 3122 1223
Local call tariff
Ireland
+353
01 601 1161 Local call tariff
Italy
+39 840 320 041 € 0.08
Luxembourg
+352
26 84 30 00 Local call tariff
The Netherlands
+31
0900 0400 063
€ 0.10
Norway +47
2270 8250
Local call tariff
Portugal
+351
2 1359 1440 Local call tariff
Spain
+34 902 888 785 € 0.10
Sweden +46 08 632 0016 Local call tariff
Switzerland
+41 02 2310 2116 Local call tariff
United Kingdom
+44 0207 949 0069
Local call tariff
Your Guarantee in Central and Eastern Europe
Dear Customer,
Thank you for purchasing this Philips product, which has been designed and manufactured to the highest quality standards. If, unfortunately, something should go wrong with this product Philips guarantees free of charge labor and replacement parts during a period of 36 months from date of purchase.
What is covered?
This Philips Guarantee in Central and Eastern Europe applies within Czech Republic, Hungary, Slovakia, Slovenia, Poland, Russia and Turkey and only for monitors originally designed, manufactured, approved and/or authorized for usage within these countries.
Warranty coverage begins as from the day you buy your monitor. For 3 years thereafter, your monitor will be serviced in case of defects provided for under the warranty coverage.
What is excluded?
The Philips guarantee applies provided the product is handled properly for its intended use, in accordance with its operating instructions and upon presentation of the original invoice or cash receipt, indicating the date of purchase, dealer's name and model and production number of the product.
The Philips guarantee may not apply if:
- the documents have been altered in any way or made illegible;
- the model or production number on the product has been altered, deleted, removed or made illegible;
- repairs or product modifications and alterations have been executed by unauthorized service organizations or persons;
- damage is caused by accidents including but not limited to lightning, water or fire, misuse or neglect.
- Reception problems caused by signal conditions or cable or antenna systems outside the unit;
- Defects caused by abuse or misuse of the monitor;
- Product requires modification or adaptation to enable it to comply with local or national technical standards, which apply in countries for which the product was not originally designed, manufactured, approved and/or authorized. Therefore always check whether a product can be used in a specific country.
Please note that the product is not defective under this guarantee in the case where modifications
become necessary in order for the product to comply with local or national technical standards which apply in countries for which the product was not originally designed and/or manufactured. Therefore always check whether a product can be used in a specific country.
Just a click away
In case of any problems, we advise you to read the operating instructions carefully or go to the www.philips.com/support website for additional support.
Just a phone call away
In order to avoid unnecessary inconvenience, we advise you to read the operating instructions carefully before contacting our dealers or Information Centers
In case your Philips product is not working correctly or is defective, please contact your Philips dealer or directly the Philips Service and Consumer Information Centers
Website: http://www.philips.com/support
Consumer Information Centers
Antilles Argentina Australia Bangladesh Brasil Canada Chile China Colombia Belarus Bulgaria Croatia Czech Republic Estonia Dubai Hong Kong Hungary India Indonesia Korea Latvia Lithuania Malaysia Mexico Morocco New Zealand Pakistan Paraguay Peru Philippines Poland Romania Russia Serbia & Montenegro Singapore Slovakia Slovenia South Africa Taiwan Thailand Turkey Ukraine Uruguay Venezuela
Eastern Europe
BELARUS
Technical Center of JV IBA M. Bogdanovich str. 155 BY - 220040 Minsk Tel: +375 17 217 33 86
BULGARIA
LAN Service 140, Mimi Balkanska Str. Office center Translog 1540 Sofia, Bulgaria Tel: +359 2 960 2360 www.lan-service.bg
CZECH REPUBLIC
Shevchenko street 32
UA - 49030 Dnepropetrovsk
Tel: +380 562320045
www.csp-comel.com
Latin America
ANTILLES
Philips Antillana N.V.
Kaminda A.J.E. Kusters 4
Zeelandia, P.O. box 3523-3051
Willemstad, Curacao
Phone: (09)-4612799
Fax : (09)-4612772
ARGENTINA
Philips Antillana N.V.
Vedia 3892 Capital Federal
CP: 1430 Buenos Aires
Phone/Fax: (011)-4544 2047
BRASIL
Phone:(01)-8000 111001 (toll free)
Fax: (01)-619-4300/619-4104
MEXICO
Consumer Information Centre
Norte 45 No.669
Col. Industrial Vallejo
C.P.02300,-Mexico,D.F.
Phone: (05)-3687788 / 9180050462
Fax : (05)-7284272
PARAGUAY
Markham, Ontario L6C 2S3
Phone: (800) 479-6696
Pacific
AUSTRALIA
Philips Consumer Electronics
Consumer Care Center
Level 1, 65 Epping Rd
North Ryde NSW 2113
Phone: 1300 363 391
Fax: +61 2 9947 0063
NEW ZEALAND
Philips New Zealand Ltd.
Consumer Help Desk
2 Wagener Place, Mt.Albert
P.O. box 1041
Auckland
Phone: 0800 477 999 (toll free)
Fax:0800 288 588
Asia
BANGLADESH
Philips Service Centre
100 Kazi Nazrul Islam
Avenue Kawran Bazar C/A
Dhaka-1215
Phone: (02)-812909
Fax : (02)-813062
CHINA
SHANGHAI
Rm 1007, Hongyun Building, No. 501 Wuning road,
200063 Shanghai P.R. China
Phone: 4008 800 008
Fax: 21-52710058
HONG KONG
Philips Electronics Hong Kong Limited
Consumer Service
Unit A, 10/F. Park Sun Building
103-107 Wo Yi Hop Road
Kwai Chung, N.T.
Hong Kong
Phone: (852)26199663
Fax: (852)24815847
INDIA
Phone: 91-20-712 2048 ext: 2765
Fax: 91-20-712 1558
BOMBAY
Philips India
Customer Relation Centre
Bandbox House
254-D Dr. A Besant Road, Worli
Bombay 400 025
CALCUTTA
Customer Relation Centre
7 justice Chandra Madhab Road
Calcutta 700 020
MADRAS
Customer Relation Centre
3, Haddows Road
Madras 600 006
NEW DELHI
Customer Relation Centre
68, Shivaji Marg
New Dehli 110 015
INDONESIA
Philips Group of Companies in Indonesia
Consumer Information Centre
JI.Buncit Raya Kav. 99-100
12510 Jakarta
Phone: (021)-7940040 ext: 2100
Fax : (021)-794 7511 / 794 7539
KOREA
Philips Consumer Service
Jeong An Bldg. 112-2
Banpo-dong, Seocho-Ku
Seoul, Korea
Customer Careline: 080-600-6600
Phone: (02) 709-1200
Fax : (02) 595-9688
MALAYSIA
After Market Solutions Sdn Bhd,
Philips Authorised Service Center,
Lot 6, Jalan 225, Section 51A,
46100 Petaling Jaya,
Selangor Darul Ehsan,
Malaysia.
Phone: (603)-7954 9691/7956 3695
Fax: (603)-7954 8504
Customer Careline: 1800-880-180
PAKISTAN
Philips Consumer Service
Mubarak manzil,
39, Garden Road, Saddar,
Karachi-74400
Tel: (9221) 2737411-16
Fax: (9221) 2721167
E-mail: care@philips.com
Website: www.philips.com.pk
PHILIPPINES
PHILIPS ELECTRONICS & LIGHTING, INC.
Consumer Electronics
48F PBCOM tower
6795 Ayala Avenue cor VA Rufino St.
Salcedo Village
1227 Makati City, PHILS
Phone: (02)-888 0572, Domestic Toll Free: 1-800-10-PHILIPS or 1-800-10-744 5477
Fax: (02)-888 0571
SINGAPORE
Accord Customer Care Solutions Ltd
Authorized Philips Service Center
Consumer Service
620A Lorong 1 Toa Rayoh
Singapore 319762
Tel: +65 6882 3999
Fax: +65 6250 8037
TAIWAN
Philips Taiwan Ltd.
Consumer Information Centre
13F, No. 3-1 Yuan Qu St., Nan Gang Dist.,
Taipei 115, Taiwan
Phone: 0800-231-099
Fax : (02)-3789-2641
THAILAND
Philips Electronics (Thailand) Ltd.
26-28th floor, Thai Summit Tower
1768 New Petchburi Road
Khwaeng Bangkapi, Khet Huaykhwang
Bangkok10320 Thailand
Tel: (66)2-6528652
E-mail: cic Thai@philips.com
Africa
MOROCCO
Philips Electronique Maroc
304,BD Mohamed V
Casablanca
Phone: (02)-302992
Fax : (02)-303446
SOUTH AFRICA
PHILIPS SA (PTY) LTD
Customer Care Center
195 Main Road
Martindale, Johannesburg
P.O. box 58088
Newville 2114
Telephone: +27 (0) 11 471 5194
Fax: +27 (0) 11 471 5123
E-mail: customercare.za@philips.com
Middle East
DUBAI
Philips Middle East B.V.
Consumer Information Centre
P.O.Box 7785
DUBAI
Phone: (04)-335 3666
Fax : (04)-335 3999
Your International Guarantee
Dear Customer,
Thank you for purchasing this Philips product which has been designed and manufactured to the highest quality standards.
If, unfortunately, something should go wrong with this product Philips guarantees free of charge labor and replacement parts irrespective of the country where it is repaired during a period of 12 months from date of purchase. This international Philips guarantee complements the existing national guarantee obligations to you of dealers and Philips in the country of purchase and does not affect your statutory rights as a customer.
The Philips guarantee applies provided the product is handled properly for its intended use, in accordance with its operating instructions and upon presentation of the original invoice or cash receipt, indicating the date of purchase, dealer's name and model and production number of the product.
The Philips guarantee may not apply if:
- the documents have been altered in any way or made illegible;
- the model or production number on the product has been altered, deleted, removed or made illegible;
- repairs or product modifications and alterations have been executed by unauthorized service organizations or persons;
- damage is caused by accidents including but not limited to lightning, water or fire, misuse or neglect.
Please note that the product is not defective under this guarantee in the case where modifications become necessary in order for the product to comply with local or national technical standards which apply in countries for which the product was not originally designed and/or manufactured. Therefore always check whether a product can be used in a specific country.
In case your Philips product is not working correctly or is defective, please contact your Philips dealer. In the event you require service whilst in another country a dealer address can be given to you by the Philips Consumer Help Desk in that country, the telephone and fax number of which can be found in the relevant part of this booklet.
In order to avoid unnecessary inconvenience, we advise you to read the operating instructions carefully before contacting your dealer. If you have questions which your dealer cannot answer or any related question please contact the Philips Consumer Information Centers or via:
Website: http://www.philips.com

Your Philips F1rst Choice Warranty(USA)
Thank you for purchasing this Philips monitor.

All Philips monitors are designed and manufactured to high standards and deliver high-quality performance, ease of use and ease of installation. Should you encounter any difficulties while installing or using this product, please contact Philips directly to benefit from your Philips First Choice Warranty. This three-year service warranty entitles you to a swap model on-site within 48 hours of your call being received within the first year of purchase. If you have any problems with your monitor within the second or third year of purchase, we will repair it after it has been sent to the service provider at your expense and returned to you within five working days, free of charge.
LIMITED WARRANTY (Computer Monitor)
Click here to access the Warranty Registration Card.
Three Years Free Labor / Three Years Free Service on Parts / One Year Exchange*
*Product will be exchanged with a new or renewed to original specifications unit within two business days for the first year. This product must be shipped in at your expense for service during years two and three.
WHO IS COVERED?
You must have proof of purchase to receive warranty service. A sales receipt or other document showing that you purchased the product is considered proof of purchase. Attach it to this owner's manual and keep both nearby.
WHAT IS COVERED?
Warranty coverage begins the day you buy your product. For three years thereafter, all parts will be repaired or replaced, and labor is free. After three years from the day of purchase, you pay for the replacement or repair of all parts, and for all labor charges.
All parts, including repaired and replaced parts, are covered only for the original warranty period. When the warranty on the original product expires, the warranty on all replaced and repaired products and parts also expires.
WHAT IS EXCLUDED?
Your warranty does not cover:
- labor charges for installation or setup of the product, adjustment of customer controls on the product, and installation or repair of antenna systems outside of the product.
- product repair and/or part replacement because of misuse, accident, unauthorized repair or other cause not within the control of Philips Consumer Electronics.
- reception problems caused by signal conditions or cable or antenna systems outside the unit.
- a product that requires modification or adaptation to enable it to operate in any country other than the country for which it was designed, manufactured, approved and/or authorized, or repair of products damaged by these modifications.
- incidental or consequential damages resulting from the product. (Some states do not allow the exclusion of incidental or consequential damages, so the above exclusion may not apply to you. This includes, but is not limited to, prerecorded material, whether copyrighted or not copyrighted.)
- the model or production number on the product has been altered, deleted, removed or made illegible.
Where IS SERVICE AVAILABLE?
Warranty service is available in all countries where the product is officially distributed by Philips Consumer Electronics. In countries where Philips Consumer Electronics does not distribute the product, the local Philips service organization will attempt to provide service (although there may be a delay if the appropriate spare parts and technical manual(s) are not readily available).
Where CAN I GET MORE INFORMATION?
For more information, contact the Philips Customer Care Center by calling (877) 835-1838 (U.S.A. customers only) or (919) 573-7855.
Before Requesting Service...
Please check your owner's manual before requesting service. Adjustments of the controls discussed there may save you a service call.
TO GET WARRANTY SERVICE IN U.S.A., PUERTO RICO OR U.S. VIRGIN ISLANDS...
Contact the Philips Customer Care Center phone number listed below for product assistance and procedures for servicing:
Philips Customer Care Center
(877) 835-1838 or (919) 573-7855
(In U.S.A., Puerto Rico and U.S. Virgin Islands, all implied warranties, including implied warranties of merchantability and fitness for a particular purpose, are limited in duration to the duration of this express warranty. But, because some states do not allow limitations on how long an implied warranty may last, this limitation may not apply to you.)
TO GET WARRANTY SERVICE IN CANADA...
Please contact Philips at:
(800) 479-6696
Three years free parts and three years free labor will be provided at Philips Canada depot or any one of its authorized service centers.
(In Canada, this warranty is given in lieu of all other warranties. No other warranties are expressed or implied, including any implied warranties of merchantability or fitness for a particular purpose. Philips is not liable under any circumstances for any direct, indirect, special, incidental or consequential damages, howsoever incurred, even if notified of the possibility of such damages.)
REMEMBER... Please record the model and serial numbers found on the product below.
MODEL #
SERIAL #
This warranty gives you specific legal rights. You may have other rights which vary from state/province to state/province.
Before contacting Philips, please prepare the following details so we can solve your problem quickly.
• Philips type number
• Philips serial number
● Purchase date (copy of purchase may be required)
• PC environment Processor:
286/386/486/Pentium Pro/Internal memory
Operating system (Windows, DOS, OS/2, Apple Macintosh)
Fax/Modem/Internet program?
- Other cards installed
Having the following information available will also help speed up the process:
- Your proof of purchase indicating: date of purchase, dealer name, model and product serial number.
- The full address to which the swap model should be delivered.
Just a phone call away
Philips customer help desks are located worldwide. Within the U.S. you can contact Philips customer care Monday-Friday from 8:00 AM-9:00 PM Eastern Time (ET) and on Saturdays from 10:00 AM-5:00 PM ET hrs by using one of the contact phone numbers.
For more information on this and more great Philips products visit our website at:
Website: http://www.philips.com
Glossary
ABCDEFGHIJKLMNOPQRSTUVWXYZ
A
Active matrix
This is a kind of liquid crystal display structure in which switching transistors are attached to each pixel to control the on/off voltage. It produces a brighter and sharper display with a broader viewing angle than a passive matrix display. Also refer to TFT (thin film transistor).
Amorphous silicon (a-Si)
A semiconductor material that is used to make the thin film transistors (TFTs) layer of an active matrix LCD.
Aspect ratio
The width-to-height ratio of the active area of a display. In general, most monitors have an aspect ratio of 4:3. Wide monitors or TVs have an aspect ratio of 16:9 or 16:10.
B
Backlight
The light source for a transmissive LCD. There are two techniques used in nowadays LCD designs. Most TFT LCD panels use CCFLs (cold cathode fluorescent light) and a diffuser panel directly behind the liquid crystal layer. New technology using Light Emitting Diodes (LED) are still under development.
Brightness
The dimension of color that is referred to an achromatic scale, ranging from black to white, also called lightness or luminous reflectance. Because of confusion with saturation, the use of this term should be discouraged.
C
CCFL(cold cathode fluorescent light)
These are the fluorescent light tubes providing the light for the LCD module. These tubes are generally very thin, approximately 2 mm in diameter.
Chromaticity
That part of color specification, which does not involve illuminance. Chromaticity is two-dimensional and specified by pairs of numbers such as dominant wavelength and purity.
CIE (Commission International de l'Eclairage)
The International Commission on Illumination, the primary international organization concerned with color and color measurement.
Color temperature
A measurement of the color of light radiated by an object while it is being heated. This measurement is express in terms of absolute scale, (degrees Kelvin). Lower Kelvin temperatures such as 2400° K are red; higher temperatures such as 9300° K are blue. Neutral temperature is white, at 6504° K. Philips monitors generally offers 9300° K, 6500° K, and user define.
Contrast
The luminance variation between light and dark areas in an image.
Contrast ratio
The ratio of luminance between the brightest white pattern and the darkest black pattern.
RETURN TO TOP OF THE PAGE
D
D-SUB
A VGA Analog input connector. Your monitor comes with a D-Sub cable.
Digital Visual Interface (DVI)
The Digital Visual Interface (DVI) specification provides a high-speed digital connection for visual data types that is display technology independent. The interface is primarily focused at providing a connection between a computer and its display device. The DVI specification meets the needs of all segments of the PC industry (workstation, desktop, laptop, etc.) and will enable these different segments to unite around one monitor interface specification.
The DVI interface enables:
- Reduce signal loss and video noise in signal due to less signal conversion.
- Independent from display technology, and can be used on LCD, Plasma, LCOS, etc.
- Plug and play through hot plug detection, EDID and DDC2B.
- Digital and Analog support in a single connector (DVI-I only).
RETURN TO TOP OF THE PAGE
E
Energy Star Computers Program
An energy conservation program launched by the US Environmental Protection Agency (EPA),
promotes the manufacture and marketing of energy-efficient office automation equipment. Companies joining this program, must be willing to commit themselves to manufacture one or more products capable of going into a low -power state (< 30 W) either after a period of inactivity, or after a predetermined time selected by the user.
RETURN TO TOP OF THE PAGE
G
Gamma
Screen luminance as a function of video voltage approximately follows a mathematical power function of the input video signal, the exponent of which is called gamma.
Grayscale
An achromatic scale ranging from black through a series of successively lighter grays to white. Such a series may be made up of steps, which appear to be equally distant from one another. If the Analog/ Digital converter is 8 bit, then the monitor can display at most 28 = 256 levels. For a color monitor, R.G.B. each color had 256 levels. Thus, total color can display is 256 × 256 × 256 = 16.7 million.
H
Hue
The main attribute of a color that distinguishes it from other colors. For example, a color may have a green, yellow, or purple hue. Color defined as having hue are known as chromatic colors. White, black, and grays possess no hue.
|
IPS (In Plane Switching)
A technique of improving the viewing angle of an LCD where the liquid crystal molecules are switched in the plane of the LCD layer rather than vertical to it.
L
LCD (liquid crystal display)
A display composed of liquid crystal suspended between two transparent sheets. The display is composed thousands of pixels which can be turned on or off with electrical stimulation. Thus, colorful images/texts can be generated.
Liquid crystal
The compound found in liquid crystal displays. Liquid crystal reacts predictably when electrically stimulated. This makes it the ideal compound to turn LCD pixels "on" or "off." Liquid crystal is sometimes abbreviated as LC.
Luminance
A measure of the brightness or luminous intensity of light, usually expressed in units of Candelas per square meter (cd/m2) or foot Lamberts. 1 fL=3.426 cd/m2.
RETURN TO TOP OF THE PAGE
N
Nit
A unit of luminance equal to 1 cd/m2 or 0.292 ftL.
P
PerfecTune
PerfecTune is industry-leading, proprietary Philips testing and algorithm technology for display adjustment and fine tuning, an extensive process that ensures ultimate performance in compliance with a standard four times more stringent than Microsoft's already high Vista requirements from each and every monitor that leaves the factory—not just a few review samples. Only Philips goes to these lengths to deliver this exacting level of color accuracy and display quality in every new monitor.
Pixel
PICTure Element; the smallest element on a computerized CRT or LCD image, and hence a display.
Polarizer
A light filter which only allows light waves of a certain rotation through. Polarized material with perpendicular filtering is used in LCDs to enclose the liquid crystal. The liquid crystal is then used as the medium which twists the light waves 90° in order to allow the light to pass through or not.
R
Refresh rate
The number of times per second the screen is refreshed or redrawn. This number is usually stated in Hz (Hertz) or cycles per second. A rate of 60 Hz is equal to 60 toms per second.
s
SmartContrast
Unique technology that dynamically analyzes displayed content and automatically optimizes a LCD monitor's contrast ratio for maximum visual clarity and viewing enjoyment, stepping up backlighting for clearer, crisper and brighter images or dimming backlighting for clear display of images on dark backgrounds. For monitors with SmartContrast, contrast ratio achieves 3000:1, the highest available today in a desktop LCD monitor.
SmartControl II
SmartControl II is monitor-based software with an easy-to-use on-screen graphic interface that guides you through fine-tuning resolution, color calibration and other display settings including brightness, contrast, clock & phase, position, RGB, white point and - on models with onboard speakers - volume adjustments.
SmartImage
SmartImage provides presets that optimize display for different types of content, dynamically adjusting brightness, contrast, color and sharpness in real time. Whether you're working with text applications, displaying images or watching a video, Philips SmartImage delivers great optimized LCD display performance.
SmartResponse
SmartResponse is exclusive Philips technology that adjusts response time to application requirements, delivering faster response times for gaming and videos or better color saturation for viewing photos and static images.
SmartManage Lite
SmartManage Lite is a system for monitoring, managing and checking status of display devices designed to meet the specific needs of growing small and medium-size businesses that minimizes costs and maximizes IT staff efficiency by remotely controlling key display settings, providing status reports, compiling usage data, overseeing energy consumption and deterring thefts.
sRGB
sRGB is a standard for ensuring correct exchange of colors between different devices (e.g. digital cameras, monitors, printers, scanners, etc.)
Using a standard unified color space, sRGB will help represent pictures taken by an sRGB compatible device correctly on your sRGB enabled Philips monitors. In that way, the colors are calibrated and you can rely on the correctness of the colors shown on your screen.
Important with the use of sRGB is that the brightness and contrast of your monitor is fixed to a predefined setting as well as the color gamut. Therefore it is important to select the sRGB setting in the monitor's OSD.
To do so, open the OSD by pressing the OK button on the front of your monitor. Move the down button to go to Color and press OK again. Use the right button to go to sRGB. Then move the down button and press OK again to exit the OSD.
After this, please do not change the brightness or contrast setting of your monitor. If you change
Glossary
either of these, the monitor will exit the sRGB mode and go to a color temperature setting of 6500K.
Other:
USB plug: An upstream and a downstream USB plug is provide for user's convenience.
T
TFT(thin film transistor)
Usually made from amorphous silicon (a-Si) and used as a switch to a charge storage device located below each sub-pixel on an active matrix LCD.
U
USB or Universal Serial Bus
A smart plug for PC peripherals. USB automatically determines resources (like driver software and bus bandwidth) required by peripherals. USB makes necessary resources available without user intervention.
- USB eliminates "case anxiety" -- the fear of removing the computer case to install add-on peripherals. USB also eliminates adjustment of complicated IRQ settings when installing new peripherals.
- USB does away with "port gridlock." Without USB, PCs are normally limited to one printer, two Com port devices (usually a mouse and modem), one Enhanced Parallel Port add-on (scanner or video camera, for example) and a joystick. More and more peripherals for multimedia computers arrive on the market every day. With USB, up to 127 devices can run simultaneously on a computer.
- USB permits "hot plug-in." There's no need to shut down, plug in, reboot and run set-up to install peripherals. And no need to go through the reverse process to unplug a device.
In short, USB transforms today's "Plug-and-Pray" into true Plug-and-Play!
Hub
A Universal Serial Bus device that provides additional connections to the Universal Serial Bus.
Hubs are a key element in the plug-and-play architecture of USB. The Figure shows a typical hub. Hubs serve to simplify USB connectivity from the user's perspective providing low cost and complexity.
Hubs are wiring concentrators and enable the multiple attachment characteristics of USB. Attachment points are referred to as ports. Each hub converts a single attachment point into multiple attachment points. The architecture supports concatenation of multiple hubs.
The upstream port of a hub connects the hub towards the host. Each of the other downstream ports of a hub allows connection to another hub or function. Hubs can detect, attach and detach at each downstream port and enable the distribution of power to downstream devices. Each downstream port can be individually enabled and configured at either full or low speed. The hub isolates low speed ports from full speed signaling.
A hub consists of two portions: the Hub Controller and Hub Repeater. The repeater is a protocol-controlled switch between the upstream port and downstream ports. It also has hardware support for reset and suspend/resume signaling. The controller provides the interface registers to allow communication to/from the host. Hub specific status and control commands permit the host to configure a hub and to monitor and control its ports.
Device
A logical or physical entity that performs a function. The actual entity described depends on the context of the reference. At the lowest level, device may refer to a single hardware component, as in a memory device. At a higher level, it may refer to a collection of hardware components that perform a particular function, such as a Universal Serial Bus interface device. At an even higher level, device may refer to the function performed by an entity attached to the Universal Serial Bus; for example, a data/FAX modem device. Devices may be physical, electrical, addressable, and logical.

Downstream
The direction of data flow from the host or away from the host. A downstream port is the port on a hub electrically farthest from the host that generates downstream data traffic from the hub. Downstream ports receive upstream data traffic.
Upstream
The direction of data flow towards the host. An upstream port is the port on a device electrically closest to the host that generates upstream data traffic from the hub. Upstream ports receive downstream data traffic.
RETURN TO TOP OF THE PAGE
V
Vertical refresh rate
Expressed in Hz, it is the number of frames (complete pictures) written to the screen every second.
RETURN TO TOP OF THE PAGE
□ Installing your LCD monitor driver
☐ Download and Printing Instructions
Download and Print
Installing Your LCD monitor driver
System requirements:
- PC running Windows 95, Windows® 98, Windows® 2000, Windows® Me, Windows® XP, Windows® Vista or later
- Find your driver ".inf/.icm/.cat" at : /PC/drivers/
Read the "Readme.txt" file before installing.
This page provides an option to read the manual in .pdf format. PDF files can be downloaded into your hard disk, then viewed and printed with Acrobat Reader or through your browser.
If you do not have Adobe® Acrobat Reader installed, click on the link to install the application. Adobe® Acrobat Reader for PC / Adobe® Acrobat Reader for Apple Macintosh.
Download instructions:
To download the file:
- Click-and-hold your mouse over the icon below. (Windows® 95/98/2000/Me/XP/Vista users right-click)
Download

220CW8.pdf
- From the menu that appears, choose 'Save Link As...', 'Save Target As...' or 'Download Link to Disk'.
- Choose where you would like to save the file; click 'Save' (if prompted to save as either 'text' or 'source', choose 'source').
Printing instructions:
To print the manual:
With the manual file open, follow your printer's instructions and print the pages you need.
RETURN TO TOP OF THE PAGE
- SAFETY AND TROUBLESHOOTING INFORMATION
- SAFETY PRECAUTIONS AND MAINTENANCE
- OPERATION
- MAINTENANCE
- SERVICE
- FAQS (FREQUENTLY ASKED QUESTIONS)
- GENERAL FAQS
- Q: WILL THE LCD SCREEN BE RESISTANT TO SCRATCHES
- Q: HOW SHOULD I CLEAN THE LCD SURFACE
- Q: CAN I CHANGE THE COLOR SETTING OF MY MONITOR
- SCREEN ADJUSTMENTS
- Q: ARE PHILIPS LCD MONITORS PLUG-AND-PLAY
- Q: WHAT IS USB (UNIVERSAL SERIAL BUS)
- Q: WHAT IS A USB HUB
- Q: WHAT IS A LIQUID CRYSTAL DISPLAY
- Q: WHAT DIFFERENTIATES PASSIVE MATRIX LCDS FROM ACTIVE MATRIX LCDS
- Q: WHAT ARE THE ADVANTAGES OF TFT LCD COMPARED WITH CRT
- Q: WHY IS VERTICAL FREQUENCY OF 60HZ OPTIMAL FOR AN LCD MONITOR
- TROUBLESHOOTING
- REGULATORY INFORMATION
- TCO'06 INFORMATION
- CONGRATULATIONS
- ERGONOMICS
- ENERGY
- EMISSIONS
- ECOLOGY
- RETURN TO TOP OF THE PAGE
- RECYCLING INFORMATION FOR CUSTOMERS
- CE DECLARATION OF CONFORMITY
- ENERGY STAR DECLARATION
- FEDERAL COMMUNICATIONS COMMISSION (FCC) NOTICE (U.S. ONLY)
- FCC DECLARATION OF CONFORMITY
- COMMISSION FEDERALE DE LA COMMUNICATION (FCC DECLARATION)
- EN 55022 COMPLIANCE (CZECH REPUBLIC ONLY)
- MIC NOTICE (SOUTH KOREA ONLY)
- POLISH CENTER FOR TESTING AND CERTIFICATION NOTICE
- BSMI NOTICE (TAIWAN ONLY)
- WARNING - THIS APPLIANCE MUST BE GROUNDING
- HOW TO CONNECT A PLUG
- CHINA ROHS
- OTHER RELATED INFORMATION
- INFORMATION FOR USERS IN THE U. S
- INFORMATION FOR USERS OUTSIDE THE U.S
- ABOUT THIS MANUAL
- ABOUT THIS GUIDE
- NOTATIONAL DESCRIPTIONS
- PRODUCT INFORMATION
- YOUR LCD MONITOR
- PRODUCT FEATURES
- CW
- OUTSTANDING FRONT OF SCREEN PERFORMANCE
- GREAT CONVENIENCE
- GREEN DESIGN
- SMARTIMAGE
- WHAT IS IT
- WHY DO I NEED IT
- HOW DOES IT WORK
- HOW TO ENABLE SMARTIMAGE
- SMART IMAGE
- SMARTRESPONSE
- SMARTCONTRAST
- SMARTSATURATE
- SMARTSHARPNESS
- LEAD-FREE PRODUCT
- TECHNICAL SPECIFICATIONS
- RESOLUTION & PRESET MODES
- AUTOMATIC POWER SAVING
- PIN ASSIGNMENT
- PRODUCT VIEWS
- PHYSICAL FUNCTION
- PHILIPS PIXEL DEFECT POLICY
- PHILIPS' FLAT PANEL MONITORS PIXEL DEFECT POLICY
- PIXEL DEFECT TOLERANCES
- SMARTMANAGE & SMARTCONTROL II (SELECTIVE MODELS)
- INTRODUCTION
- SMARTMANAGE FEATURES AND BENEFITS
- PHILIPS SMARTCONTROL II
- SYSTEM SUPPORT AND REQUIREMENT
- INSTALLATION
- INSTALLER – INSTALL SHIELD WELCOME
- INSTALLER – INSTALL SHIELD LEGAL
- INSTALLER – INSTALL SHIELD PROGRAM FILES
- INSTALLER – INSTALLATION PROCESS
- PHILIPS
- SMARTCONTROL II
- START TO USE
- FIRST LAUNCH – WIZARD
- START WITH STANDARD PANE
- ADJUST MENU
- COLOR MENU
- OPTIONAL MENU
- THEFT DETERRENCE PIN
- Q&A
- INSTALLING YOUR LCD MONITOR
- FRONT VIEW PRODUCT DESCRIPTION
- CONNECTING TO YOUR PC
- ACCESSORY PACK
- THE BASE
- DETACH THE BASE
- SMARTACCESSORY
- CAUTION
- INSTALL
- UNINSTALL
- GETTING STARTED
- USE THE INFORMATION FILE (.INF) FOR WINDOWS® 95/98/2000/ME/XP/VISTA OR LATER
- FOR WINDOWS®
- FOR WINDOWS® ME
- FOR WINDOWS® XP
- FOR WINDOWS® VISTA
- ON-SCREEN DISPLAY
- DESCRIPTION OF THE ON SCREEN DISPLAY
- THE OSD TREE
- RESOLUTION NOTIFICATION
- CUSTOMER CARE & WARRANTY
- YOUR PHILIPS F1RST CHOICE WARRANTY
- WHAT IS COVERED
- WHAT IS EXCLUDED
- JUST A CLICK AWAY
- JUST A PHONE CALL AWAY
- F1RST CHOICE CONTACT INFORMATION
- YOUR GUARANTEE IN CENTRAL AND EASTERN EUROPE
- CONSUMER INFORMATION CENTERS
- EASTERN EUROPE
- BELARUS
- BULGARIA
- CZECH REPUBLIC
- LATIN AMERICA
- ANTILLES
- ARGENTINA
- BRASIL
- MEXICO
- PARAGUAY
- PACIFIC
- AUSTRALIA
- NEW ZEALAND
- ASIA
- BANGLADESH
- CHINA
- HONG KONG
- INDIA
- BOMBAY
- CALCUTTA
- MADRAS
- NEW DELHI
- INDONESIA
- KOREA
- MALAYSIA
- PAKISTAN
- PHILIPPINES
- SINGAPORE
- TAIWAN
- THAILAND
- AFRICA
- MOROCCO
- SOUTH AFRICA
- MIDDLE EAST
- YOUR INTERNATIONAL GUARANTEE
- YOUR PHILIPS F1RST CHOICE WARRANTY(USA)
- LIMITED WARRANTY (COMPUTER MONITOR)
- THREE YEARS FREE LABOR / THREE YEARS FREE SERVICE ON PARTS / ONE YEAR EXCHANGE
- WHO IS COVERED
- WHERE IS SERVICE AVAILABLE
- WHERE CAN I GET MORE INFORMATION
- BEFORE REQUESTING SERVICE
- TO GET WARRANTY SERVICE IN U.S.A., PUERTO RICO OR U.S. VIRGIN ISLANDS
- TO GET WARRANTY SERVICE IN CANADA
- GLOSSARY
- A
- ACTIVE MATRIX
- AMORPHOUS SILICON (A-SI)
- ASPECT RATIO
- B
- BACKLIGHT
- BRIGHTNESS
- C
- CCFL(COLD CATHODE FLUORESCENT LIGHT)
- CHROMATICITY
- CIE (COMMISSION INTERNATIONAL DE L'ECLAIRAGE)
- COLOR TEMPERATURE
- CONTRAST
- CONTRAST RATIO
- D
- D-SUB
- DIGITAL VISUAL INTERFACE (DVI)
- E
- ENERGY STAR COMPUTERS PROGRAM
- G
- GAMMA
- GRAYSCALE
- H
- HUE
- LCD (LIQUID CRYSTAL DISPLAY)
- LIQUID CRYSTAL
- LUMINANCE
- PERFECTUNE
- PIXEL
- POLARIZER
- R
- REFRESH RATE
- S
- SMARTMANAGE LITE
- SRGB
- T
- TFT(THIN FILM TRANSISTOR)
- U
- USB OR UNIVERSAL SERIAL BUS
- HUB
- DEVICE
- UPSTREAM
- V
- VERTICAL REFRESH RATE
- DOWNLOAD AND PRINT
- INSTALLING YOUR LCD MONITOR DRIVER
- DOWNLOAD INSTRUCTIONS
- PRINTING INSTRUCTIONS
Brand : PHILIPS
Model : 220CW8FB
Category : Monitor