
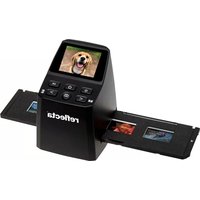
DigitDia 6000 - Scanner Reflecta - Free user manual and instructions
Find the device manual for free DigitDia 6000 Reflecta in PDF.


| Product Type | Slide Scanner |
| Power Adapter | High Power HPA-401234U3 or Linearity LAD-6019AB4 |
| Computer Connection | USB 2.0 |
| Operating Temperature Range | 50°F to 104°F (10°C to 40°C) |
| Operating Humidity Range | 15% to 76% relative humidity (non-condensing) |
| Supported Film Types | Positive (slides), Negative, Black & White |
| Color Depth | 8-bit or 16-bit |
| Default Scan Resolution | 1000 dpi |
| Magazine Compatibility | Compact Magazine 50, CS Magazine, Paximat S Magazine, Universal Magazine (DIN 108) |
| Included Software | CyberView X 5.0 driver, Application software (Adobe Photoshop Elements or similar) |
| Key Features | One Button Scan, Single Slide Scanning, Built-in Slide Viewer, Magic Touch, Digital Noise Reduction, Auto Exposure, Auto Balance, Auto Contrast, Multiple Scan Modes |
| Safety Compliance | FCC Class B |
| Warranty | 2 years (reduced to 1 year for commercial use or improper operation) |
Frequently Asked Questions - DigitDia 6000 Reflecta
User questions about DigitDia 6000 Reflecta
0 question about this device. Answer the ones you know or ask your own.
Ask a new question about this device
Download the instructions for your Scanner in PDF format for free! Find your manual DigitDia 6000 - Reflecta and take your electronic device back in hand. On this page are published all the documents necessary for the use of your device. DigitDia 6000 by Reflecta.
USER MANUAL DigitDia 6000 Reflecta
FEDERAL COMMUNICATIONS COMMISSION (FCC) STATEMENT
This Equipment has been tested and found to comply with the limits for a class B digital device, pursuant to Part 15 of the FCC rules. These limits are designed to provide reasonable protection against harmful interference in a residential installation. This equipment generates uses and can radiate radio frequency energy and, if not installed and used in accordance with the instructions, may cause harmful interference to radio communications. However, there is no guarantee that interference will not occur in a particular installation. If this equipment does cause harmful interference to radio or television reception, which can be determined by turning the equipment off and on, the user is encouraged to try to correct the interference by one or more of the following measures:
● Re-orient or relocate the receiving antenna.
- Increase the separation between the equipment and receiver.
- Connect the equipment into an outlet on a circuit different from which the receiver is connected to.
- Consult the dealer or an experienced radio/TV technician for help.
Warning :
Use only shielded signal cables to connect I/O devices to this equipment. You are cautioned that changes or modifications not expressly approved by the party responsible for compliance could void your authority to operate the equipment.
TABLE OF CONTENS
Getting Started 7 Quick Installation Guide (QIG) 11
Installing Software and Driver 11
Installing Hardware 12
Loading the slides into the Magazine 13
Loading the Magazine into the Scanner 15
Additional Features 18
One Button Scan 18
How to Scan Slides 23
STEP 1 - Aquire Driver 23
STEP 2- Select Film Type 23
STEP 3 - Optional Prescan 23
STEP 4 - Set Scan Settings 24
STEP 5 - Scan 25
STEP 6 - Exit 26
User Interface 29
I Main Window Area 30
II Preview Window Area 40
III Active Frame Setting Area 42
IV Thumbnail Panel Area 43
Technical Support 45
GETTING STARTED
Check the package content before getting started.
For Quick Installation please refer to Quick Installation Guide. (Ref. Pg. 11)

Important! Save the original box, receipt and packing material for future shipping needs.
Package Contents
- Slide Scanner.
- Magazine.
● Power Adapter [HIGH POWER HPA-401234U3 or LINEARITY LAD-6019AB4]
Warning! Using any other power adapter may severely damage the scanner and will void the product warranty.
Power Cord. - USB 2.0 Cable.
- CyberView X -MS Driver. (MS stands for Multiple Slide capability)
• Application software CD. - Printed User's Manual.
NOTE:
- Application software means the imaging software such as Adobe® Photoshop® Elements, this is subject to change without notice.
- The orange adapter on the transport arm and the arm itself are excluded from guarantee.
GENERAL GUIDANCE:
- Only use the supplied USB-Cable. Connect the computer to the scanner directly using the USB 2.0 cable.
- Do not use a Hub or extension cable. Only use the USB ports on the rear of desktop computers.
- If there are any other devices (multifunction device, printers, scanners, webcam) connected to the computer through USB disconnect them.
- A minimum of 1GB RAM (Windows) 1GB RAM (Mac) is required.
- When scanning Kodachrome or Black and white film disable Magic Touch.
7
| Operating Ambient Temperature Range50° to 104°F (10° to 40°C) |
| note: Do not turn on the scanner unless it is within this range. If the scanner has been stored or transported outside of this range, allow it to return to within this range before turning it on. |
| Operating Ambient Humidity Range 15% to 76% relative humidity (non-condensing) |
| note: If the scanner is stored or to be transported in cold temperature and then brought into a warm / humid environment condensation may occur. |
This device is designed solely for private use and is not intended for commercial or communal use. The warranty is reduced from 2 years to 1 year if errors or defects arising from inappropriate use, improper operation or stress occur.
QUICK INSTALLATION GUIDE (QIG)
INSTALLING SOFTWARE AND DRIVER
for PC (Windows) User

WINDOWS SYSTEMS INSTALLATION DURING DRIVER INSTALLATION A WARNING DIALOGUE BOX MAY APPEAR, IF THIS IS THE CASE PLEASE SELECT "INSTALL THIS DRIVER ANYWAYS".
Be sure to install the Application Software BEFORE installing the scanner driver CyberView X 5.0.
You may install the scanner driver directly if you have already installed TWAIN compliant application software in your computer. Mac users can use iPhoto for editing.
- Place the application software DVD into the DVD drive. If you have CD autoplay switched off then you will need to explore the DVD and double click the file "AutoPlay.exe" and follow the on-screen instructions to complete the installation.
- Place the CyberView X 5.0 CD into the drive which will autoplay. If you have autoplay switched off on the CD drive then you will need to explore the CD EXAMPLE: D:\Install\Drivers\Package\CVX_MS.exe and double click the file "CVX_MS.EXE" and follow the on-screen instructions to complete the installation.
Notice:
- In "Found New Hardware Wizard" window, select "Search automatically or Browse computer for driver software."
- In "Completing the Found New Hardware Wizard" window, click "Finish".
NOTE: Not all PC's will display the found new hardware window, some will install in the background
INSTALLING SOFTWARE AND DRIVER for Mac (OSX) User
Before Installing the Scanner Driver...
If you choose to use the provided application for image editing, install the application software (ex: Adobe® Photoshop® Elements) by inserting the application CD into the computer's CD/DVD drive. Follow the instructions that will be displayed in a window that opens automatically.
Installing Scanner Driver
a. Insert insert driver CD into the computer CD/DVD drive and explore the contents.
b. Double click the "CyberView X 5.0" icon to begin the installation process. Follow the onscreen prompts to complete the installation process.
NOTE: Make sure the scanner is NOT connected to the computer during the CyberView X 5.0 driver installation.
c. Restart computer once the installation process is complete.
Installing Hardware
a. Connect the slide scanner to a power source.
- Locate the power switch on the lower left side of the scanner. Make sure the scanner is TURNED OFF.
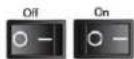
- Plug the AC adapter into an AC power source FIRST before plugging it into the scanner.
- Attach the USB cable to the computer using the standard USB adapter end. Attach the USB adapter end of the cable to back panel of the scanner.
b. Ensure the scanner does NOT have a slide magazine loaded, turn the scanner ON. The calibration cycle on the scanner will start automatically and will take several minutes to complete. A green light will flash while the calibration is in progress. The slide transport arm will move in and out of the scanner. MAKE SURE THERE IS ENOUGH ROOM IN FRONT OF THE SCANNER FOR THE SLIDE TRANSPORT ARM TO EXTEND FULLY, DO NOT PUSH THE ARM BACK DURING CALIBRATION.
Loading slide(s) into the magazine
General Recommendations:
- Cardboard based slides should be used with the Universal Magazine DIN 108.
● Glass framed slides that are attached to glass frames may cause complications due to the hard edges.
Compact Magazine
a. As illustrated below, turn the magazine with the embossed lettering "COMPACT MAGAZINE 50" and the white strip on the right facing towards the top.
b. Hold the slide right side up, facing forward so the image is NOT reversed. Rotate the slide as illustrated and Insert each slide, one at a time, into the magazine.
Warning: Load slides into the magazine properly and make sure the slide mounts are in good condition. Improperly inserted slides or slides with distorted/damaged slide mounts may cause the scanner to jam and potentially damage both the slide and the scanner.
Compact Magazine

Loading slide(s) into the magazine
CS Magazine
a. Locate the numbering sequence text on the CS slide magazine indicating the slide order. The numbers should be facing up and starting from the left.
b. Hold the slide right side up, facing forward so the image is NOT reversed. Rotate the slide as illustrated and Insert each slide, one at a time, into the magazine.
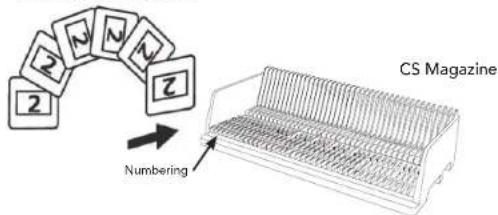
Loading slide(s) into the magazine
PaximatS Magazine
a. Locate the numbering sequence text on the top of the Paximat slide magazine indicating the slide order. The numbers should be facing up and starting from the left.
b. Hold the slide right side up, facing forward so the image is NOT reversed. Rotate the slide as illustrated below (180 deg) and Insert each slide, one at a time, into the magazine.

14
Loading slide(s) into the magazine
Universal Magazine
a. Locate the numbering sequence text on the top of the Universal slide magazine indicating the slide order. The numbers should be facing up and starting from the left.
b. Hold the slide right side up, facing forward so the image is NOT reversed. Rotate the slide as illustrated below (180 deg) and Insert each slide, one at a time, into the magazine.
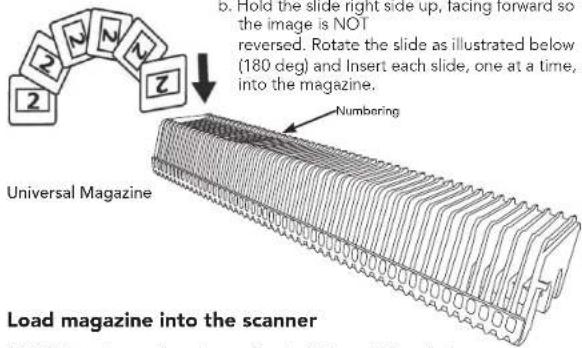
Load magazine into the scanner
NOTE: For all magazines (except for the Universal Magazine)
- Return the orange adapter to its original position at the grip of the slide transport arm after scanning.
● To release the adapter, gently press its outer tip.
a. Remove the cover from scanner exposing the slide magazine loading area.
b. Load the magazine into the scanner as illustrated below.
Note: Orientation of scanner in the diagrams is from the back of the unit. Take note of the magazine slide opening also facing towards the back of the scanner for correct orientation when loading into the scanner.
General Recommendations:
- Braun Paximat S (especially for cardboard frames and framed slides up to 1/16 inch thickness.
● Paximat Magazine for framed slides up to 1/8 inch thickness.
• CS Magazine for CS/CS2-framed slides.
15
Load the magazine into the scanner (Continued)
Compact Magazine
(embossed letters facing up and the white stripe near the front panel of the scanner).

CS Magazine
Slide order numbers printed on magazine facing towards the back of the scanner.
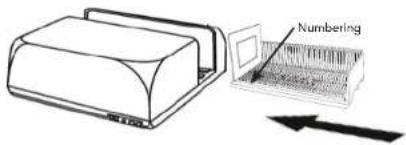
PaximatS Magazine
Slide order numbers printed on top of magazine on the right hand side towards the front of the scanner.
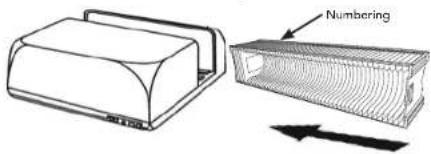
Universal Magazine
NOTE:
- Use only Universal Magazines with the DIN 108 label. Other magazines may result in problems and VOIDing the warranty.
- Pull out the slide transport arm fully.
- Gently press the orange adapter on the slide transport arm. Move the adapter on the slide transport arm to the front until it snaps in.
- Push the slide transport arm back into the scanner.
- Load the magazine from the back in the respective guiding rails of the magazine tunnel until it hits the slide transport arm.
Universal Magazine
Slide order numbers printed on top of magazine on the right hand side of magazine towards the front of the scanner when loading.

c. Place the slide magazine into the scanner from the left side until it touches the slide transport arm and the magazine "clicks" into place.

Additional features
Manual Control Panel
a. You can advance or reverse the slide by pressing the navigation button ☐ or ☐ and scan manually with the scan button ☐ enable one button scan function.
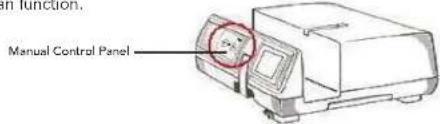
Please Note: When installing your new scanner onto a Windows system that already has another USB Flatbed scanner or All-in-one Scan/Copier/Printer device installed, it may be necessary for you to disconnect the other scanner from the USB port for the Film scanner to work properly.
One Button Scan
Open the CyberView X 5.0 driver program FIRST and press the scan button to scan the film or slide.
a. Open the CyberView X 5.0. (Ref. page 23 to acquire the CyberView X 5.0 driver program)
- Select the film type and resolution.
- Press the scan button (☐), the scanner software will automatically display a pop up setting window as below.
2-1. Select the Scan to directory, file format (TIF or JPG)
- Press the scanner button (☐) until you are requested to input the amount that you want to scan to file. Release the button then select the "OK" in the next window that appears on the screen.
3-1. If "To Host" is selected, the slide will be scanned, sending the data to the opened application software.
3-2. If "To File" is selected, the slide will be scanned, saving the data to the preset path.
18
b. Select "Start > Programs > CyberView X 5.0_MS" and select "CyberView X 5.0" to open the CyberView X 5.0 application
- Select the film type and resolution you want to scan.
1-1. Press the scan button and it will pop-up the "Save To File" settings window. Input the save to path, file name and file type. (Ref. Pg.11 to change the settings)
1-2. After setting up, click "OK" to scan the image to file.
1-3. Press the scan button until you are requested to input the qty. that you want to scan to file then release, then push the "OK" to get to the next setting window.
NOTE: If you do not open CyberViewX 5.0 FIRST, the scan button will not function.
c. Slide Viewer
The scanner has a built-in mini light panel which allows the slides to be manually previewed with a backlight before inserting into the tray for scanning.
Insert the slide into the slide viewer for previewing. The scanner has to be switched on. Gently press down on the top of the slide to engage the back light for viewing the slide.

19
d. Single Slide Scanning
- Load the empty magazine into the tunnel FIRST until it touches the slide transport arm completely. Slide the magazine forward to be sure that the transport arm is in the first slot of the magazine.
- Press the eject button [I] to make the slide holder open exposing the loaded slide.
- Place the slide as illustrated [I] into the slide holder and press the slide holder down [II].
- Open the CyberView X 5.0 driver program to scan the slide.
Attention! When using the single slide scanning function, please check the slide transport arm has been moved completely into the unit and the cover for magazine tunnel is taken off.

HOW TO SCAN SLIDES
STEP 1 – Acquire Driver
(For PC User)
Open CyberView X 5.0 from Start - All Programs -CyberView X 5.0
(For MAC User)
Open Macintosh Hard drive - Applications -CyberView X 5.0_MS -CyberView X 5.0
STEP 2 – Select Film Type
Select the film type to be scanned - Positive, Negative or B&W (Black and White).

STEP 3 - Optional Prescan
Select the "Prescan Current Frame" to prescan the slide currently loaded into the scanner or "Prescan..." to prescan slide or slides at specific positions in the magazine.


Pre-Scanning should be used to manually adjust color/edit settings for each slide before doing the final scan. It's possible to set different settings for each slide to be scanned.
23
STEP 4 – Set Scan Settings
a. Resolution
The default scanning resolution is 1000dpi, additional resolution options are listed below.
Notice: Higher scanning resolutions result in greater scanning time and hardisk space requirements.
b. Color Depth
Choose between 8 and 16bit. A higher color depth setting will result in a larger range of colors in the final scanned image.
Note: Color image file size of different resolutions and color depths:

STEP 5 - Scan
Choose "Scan Current Frame" to scan the slide loaded into the scanner or "Multi-Scan..." to input the number of slides to be scanned based on their location in the magazine.   Multi Scan to file - allows input of the number of the slide to scan, the destination, file format (TIF or JPG).  STEP 6 - Exit
All scanned images will be saved to the directory location set previously. The factory default locations are: Windows: C:\Users\YOUR NAME\Documents; MAC: Mac HD\Users\YOUR NAME\Pictures\Cyberview Images), Select "Scan > Exit" to close the driver. Scanned image files can be open/ edited with any image editing software.  NOTE: If using the supplied image editor, for help with this application see the users Help from within the application or browse the supplied DVD for the help documentation.  26 27  USER INTERFACE   English 29 There are four major parts of the CyberView X 5.0 user interface: 1. Main Window Area [Fixed Windows] II. Preview Window Area [Fixed Window] III. Active Frame Setting Area [Floating Window] IV. Thumbnail Panel Area [Floating Window] I. Main Window Area [Fixed Windows]| Scan | Preview | Image Adjustment | Window | Help |
| Prescan | ▶ | Prescan Current Frame | ||
| Scan | ▶ | Prescan 1 - 36 | ||
| Revert | Prescan 1 - 50 | |||
| Preference... | Prescan 1 - 80 | |||
| Exit | Prescan 1 - 100 | |||
| Prescan... | ||||
Menu Commands - Scan
a. Prescan 1. Prescan Current Frame: Pre-scan the existing slide. 2. Prescan 1 - 36 (1 - 50, 1 - 80, 1 - 100): Pre-scan the 1-36 (50, 80, 100) frames. 3. Prescan...Pre-scan the current slide or designate frame(s) you entered, possible input options are 1, 3, 5-12 for specific slides and/or ranges of slides.  b. Scan  1. Scan Current Frame > Scan the current slide. 2. Scan Selected to File... > Scan the selected slide(s) to a specified path. 3. Multi-Scan to File... > Scan slide(s) numbers and/or range. Set file path, file name, Index, start number, file type and jpeg quality.  3-1. Select Browse and choose the designated folder to save the scanned image to. 3-2. Enter the file name. 3-3. Trailing Index after Base File Name - Digits: Defines the length of the file name and numbering sequence up to 6 digits Example image1 or image000001. - Options: ◆ Use Film Index: Use the number assigned to the slide based on it's position in the cartridge. ◆ User Defined Start Number: Enter a specific start number. 3-4. Choose the file type, "TIF" or "JPG". (TIF uncompressed or JPG Compressed) 3-5. Choose image quality for JPEG. (Good, Better, or Best) c. Revert Discards all modifications and restores the image back to the original state. d. Preference Attribute setting windows.  1. Scan Settings 1-1. "Prescan Resolution" - Default pre-scan resolution. 1-2. "Using default real scan resolution" - Enables default scan resolution setting. 1-3. "Color Depth" - Default color depth while scanning. 1-4. "Scan Mode" – Default scan mode while scanning.  32 33 \# 2. Advanced Setting
2-1. "Auto Exposure" - Apply Auto Exposure adjustment to all of the scanned films. 2-2. "Auto Balance" - Apply Auto Gamma adjustment to all of the scanned films. 2-3. "Auto Contrast" - Apply Auto Contrast adjustment to all of the scanned films. 2-4. "Digital Noise Reduction" – Apply Digital Noise Reduction filter to all scanned films. 3. Default Scanning Area
Adjust the scanning size as well as adjust the "Scan Offset" setting to move the image position of slide. (ONLY AVAILABLE ON OLDER UNITS WITH DIGITAL ICE3™ TECHNOLOGY BUILT IN.)4. Magic Touch / Auto Color
4-1. Enable / disable Magic Touch and Auto Color adjustment to scans.e. Exit
Closes the CyberView X 5.0 user interface. There is a message pop-up "Would you like to apply current scan resolution to default?" click "Yes" to save, "No" to discard the current setting or "Cancel" to return to Cyber View X. Menu Commands - Preview
  1. Zoom In: Magnify image. 2. Zoom Out: Reduce image. 3. Rotate 90 Left: Turn the image 90^ counter clockwise. 4. Rotate 90 Right: Turn the image 90° clockwise. 5. Flip Horizontal: Flip the image horizontally. 6. Flip Vertical Flip the image vertically. a. Image Adjustment 1. Variations: Generates different views of image with options to make changes to highlights, midtones, etc. 2. Color Balance
To adjust the brightness, contrast, saturation, and color (CMY or RGB) of the image. Comparisons between before and after adjusted images are shown for reference.  Example: If a previewed image appears too dark, use the "Brightness" slider in the "Color Balance" window to adjust the image by selecting the slider in the center and moving it to the right. The image's "After" view becomes lighter. Select "OK" to accept the changes which will be sent to the scanning hardware. This can also be used to adjust each of the functions in "Color Balance" by contrast, saturation and specific color ranges of cyan, magenta and yellow.3. Curves and Levels
Adjust image settings by moving Curve and Levels settings. Comparison between before and after adjustment is displayed for reference.  Example: When the previewed image appears to be too dark, adjustments with the Input slider in the Curves and Levels window can be made to correct the image. Selecting the Gray slider in the center and moving it to the left will result in changes in the "After" view resulting in a lighter image. Once the adjusted image is acceptable select "OK" to send changes to the scanning hardware. The same method can also be used to adjust each color channel independently, using the channel drop down menu "RGB = All colors" R = Red, G = Green, and B = Blue.Menu Commands - Windows
1. Exposure Setting: To adjust the exposure time (R, G, B) press "Reset" to restore to the default setting. Menu Commands - Help
- User Manual: Opens the electronic version of this user's manual. - Update: Firmware: Upgrade the firmware version, select the path where the file of firmware has been saved. (These files may be downloaded from our website) - About: Displays system information (including operation system, CPU), product information (including product name, model name, hardware version, firmware version, software version, device information including interface and optical resolution).Function Bar Diagram
In order to optimize scanned image quality, please select your film type and brand from the toolbar:Negative
Positive (also known as Slide) Black and White   Prescan: Pre-scan the current film, press drop down ▼ for more options. Scan: Scan film, press drop down button for more options. Image Adjustment: Press drop down ▼button for more options. Output Preview: To display the output preview image. Backward One Frame: Moves film back one frame. Forward One Frame: Moves film forward one frame. Reload Magazine: Reset the frame number, the location number will be returned to 1. Set Current Position: Change the current slide position number in the magazine. Go to: A pop-up dialogue box will prompt to enter which frame to change to. Status line: Displays the RGB (Red, Green, Blue) values in the image on the lower right hand corner of the window. II. Preview Window Area [Fixed Windows]
Toolbar Diagram
Select scan area, more than one selection can be made at a time.  Zoom In: To magnify the image where the cursor is currently located. The image will be magnified with every click until the maximum multiple (1000%) is reached. Zoom Out: To reduce the size of the viewed image click the Zoom Out cursor to the desired area, the image will reduce by half with every click until the lowest multiple (25%) is reached. Rotate 90 Left: To rotate the image counter clockwise 90 degrees. Rotate 90 Right: To rotate the image clockwise 90 degrees. Flip Horizontal: To Flip the image 180 degrees horizontally. Flip Vertical: To Flip the image 180 degrees vertically. Revert: Discard all modifications and restores the image back to the original state in preview windows. ROC: Automatically restores original colors by analyzing the base image and applying corrections to the faded colors. (ONLY AVAILABLE ON OLDER UNITS WITH BUILT IN DIGITAL ICE3™ TECHNOLOGY.) GEM: Automatically enhances the clarity of a scanned film image while preserving its colors, gradations and sharpness. (ONLY AVAILABLE ON OLDER UNITS WITH BUILT IN DIGITAL ICE3™ TECHNOLOGY.) Note: GEM will only have obvious effect on 1800 dpi or above.Preview Window
Preview the image you pre-scan, you can select the measurement unit „in“-„cm“-„px” by clicking the upper-left corner. Status Line
In the lower left hand corner, the color level (RGB: red, green, blue) and coordinates of the location [ex: I] are displayed. The zoom scale, the current slide magazine location and how many areas selected to scan (2 or or higher indicates: Multiple scan areas on one slide [ex: II]). 1.  II. III. Active Frame Setting Area [Floating Windows]
A comprehensive advanced mode is available to allow for more user defined adjustments. Normal mode [ex: 1] to input the basic parameter to scan (including scan resolution, film size, color depth). Advanced mode [ex: II] to input the parameter of scan and output (including scan resolution, size, color depth and output resolution, size, scan mode). The "Active Frame Setting" only imitates in the current preview image, click "Apply to All" to set parameters in all previewed images, does not apply to direct scanning to file.   When scanning more than 6 frames (6 at a time are viewable in the thumbnail panel) you may scroll to view more by clicking on the right arrow button. The left / right arrow buttons allow you to scroll through pre-scanned images with ease.  To de-select frames you do not wish to scan click on the check mark box to remove selection.  42 43TECHNICAL SUPPORT
CyberView X 5.0
For information regarding the film scanner and CyberView X 5.0 driver, please visit www.reflecta.de.Bundled application software
For questions regarding bundled application software, you can refer to the HELP function on the application menu bar or visit the software company's website. \*\*This user manual has also been archived in the packaged CD.

- FEDERAL COMMUNICATIONS COMMISSION (FCC) STATEMENT
- Warning :
- TABLE OF CONTENS
- GETTING STARTED
- Package Contents
- NOTE:
- GENERAL GUIDANCE:
- QUICK INSTALLATION GUIDE (QIG)
- INSTALLING SOFTWARE AND DRIVER
- Notice:
- INSTALLING SOFTWARE AND DRIVER for Mac (OSX) User
- Installing Scanner Driver
- Installing Hardware
- Loading slide(s) into the magazine
- General Recommendations:
- Compact Magazine
- Load magazine into the scanner
- Load the magazine into the scanner (Continued)
- Universal Magazine
- Additional features
- One Button Scan
- HOW TO SCAN SLIDES
- STEP 1 – Acquire Driver
- STEP 2 – Select Film Type
- STEP 3 - Optional Prescan
- STEP 4 – Set Scan Settings
- STEP 5 - Scan
- STEP 6 - Exit
- Menu Commands - Scan
- Advanced Setting
- Default Scanning Area
- Magic Touch / Auto Color
- e. Exit
- Menu Commands - Preview
- Color Balance
- Curves and Levels
- Menu Commands - Windows
- Menu Commands - Help
- Function Bar Diagram
- Negative
- Preview Window Area [Fixed Windows]
- Toolbar Diagram
- Preview Window
- Status Line
- Active Frame Setting Area [Floating Windows]
- Thumbnail Panel Area [Floating Windows]
- TECHNICAL SUPPORT
- CyberView X 5.0
- Bundled application software
Brand : Reflecta
Model : DigitDia 6000
Category : Scanner