
Robust Collection HR2181 - Blender PHILIPS - Free user manual and instructions
Find the device manual for free Robust Collection HR2181 PHILIPS in PDF.


| Product Type | Blender |
| Brand | Philips |
| Model | Robust Collection HR2181 |
| Power | 600 W |
| Voltage | 220-240 V |
| Frequency | 50-60 Hz |
| Capacity | 1.5 L |
| Jar Material | Plastic (Tritan) |
| Blade Material | Stainless steel |
| Speed Settings | 2 speeds + pulse |
| Pulse Function | Yes |
| Ice Crushing | Yes |
| Dishwasher Safe Parts | Jar, lid |
| Non-Slip Feet | Yes |
| Cord Length | 1.0 m |
| Color | White/Black |
| Dimensions (HxWxD) | 38 x 16 x 16 cm |
| Weight | 1.5 kg |
| Safety Lock | Yes (lid lock) |
| Overheat Protection | Yes |
| Warranty | 2 years |
Frequently Asked Questions - Robust Collection HR2181 PHILIPS
User questions about Robust Collection HR2181 PHILIPS
0 question about this device. Answer the ones you know or ask your own.
Ask a new question about this device
Download the instructions for your Blender in PDF format for free! Find your manual Robust Collection HR2181 - PHILIPS and take your electronic device back in hand. On this page are published all the documents necessary for the use of your device. Robust Collection HR2181 by PHILIPS.
USER MANUAL Robust Collection HR2181 PHILIPS

User manual

PHILIPS
Philips Robust Collection
blender
ROBUST
COLLECTION
Congratulations on your purchase and welcome to Philips! To fully benefit from the support that Philips offers, register your product at www.philips.com/welcome.
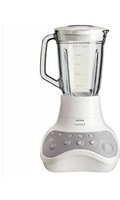
This blender has been developed to confidently handle a broad variety of ingredients and recipes in one go and to deliver a long-lasting performance. Its unique double-blade blending system and oval-shaped glass jar gives you a perfect end results in just seconds.
General description (Fig. 1)
A Graduated measuring cup
B Lid
C Glass blender jar with two integrated blade units
D Motor unit
E Pulse switch
F Speed selector
G Cord storage and power cord
H Storage box
Important
Read this user manual carefully before you use the appliance and save it for future reference.
General
Danger
- Never immerse the motor unit in water or any other liquid, nor rinse it under the tap. Use only a moist cloth to clean the motor unit.
Warning
- Check if the voltage indicated on the appliance corresponds to the local mains voltage before you connect the appliance.
- Only connect the appliance to an earthed wall socket.
-
Do not use the appliance if the plug, the mains cord or other parts are damaged.
-
If the mains cord is damaged, you must have it replaced by Philips, a service centre authorised by Philips or similarly qualified persons in order to avoid a hazard.
- This appliance is intended for household use only. If the appliance is used improperly or for professional or semi-professional purposes or if it is not used according to the instructions in the user manual, the guarantee becomes invalid and Philips refuses any liability for damage caused.
- This appliance is not intended for use by persons (including children) with reduced physical, sensory or mental capabilities, or lack of experience and knowledge, unless they have been given supervision or instruction concerning use of the appliance by a person responsible for their safety.
- Children should be supervised to ensure that they do not play with the appliance.
- Never let the appliance run unattended.
- Never reach into the jar with your fingers or an object (e.g. a spatula) while the blender is running.
- If the blades get stuck, switch off and unplug the appliance before you remove the ingredients that block the blades.
- Never use the blender jar to switch the appliance on and off.
- Do not touch the cutting edges of the blades when you clean the blender jar. The cutting edges are very sharp and you could easily cut your fingers on them.
Caution
- Always unplug the appliance before you assemble, disassemble or make adjustments to any of the parts.
- Never use any accessories or parts from other manufacturers or that Philips does not specifically recommend. If you use such accessories or parts, your guarantee becomes invalid.
- Do not exceed the maximum level indicated on the blender jar.
- To prevent spillage, do not put more than 1.5 litres of liquid in the blender jar, especially when you process at a high speed. Do not put more than 1.25 litres in the blender jar when you process hot liquids or ingredients that tend to foam.
- Never fill the blender jar with ingredients hotter than 80°C/175°F.
ENGLISH 7
- If food sticks to the wall of the blender jar, switch off the appliance and unplug it. Then use a spatula to remove the food from the wall.
- Always make sure the lid is assembled properly on the blender jar and the measuring cup is inserted properly in the lid before you switch on the appliance.
Electromagnetic fields (EMF)
This Philips appliance complies with all standards regarding electromagnetic fields (EMF). If handled properly and according to the instructions in this user manual, the appliance is safe to use based on scientific evidence available today.
Built-in safety lock
This feature ensures that you can only switch on the appliance if you have properly assembled the blender jar on the motor unit. If the blender jar is correctly assembled, the built-in safety lock will be unlocked.
Before first use
1 Thoroughly clean the parts that come into contact with food before you use the appliance for the first time (see chapter 'Cleaning').
2 For hygiene reasons, put fresh water in the blender jar and let the appliance run for 30 seconds. Then pour out the water.
Using the appliance
Speed control
Your blender is equipped with a speed selector and a pulse switch.
- The speed selector has 5 speeds, an AUTO position, a pulse-activation position P and an off position 0.
- If you want to use a speed between 1 and 5, turn the speed selector to the desired speed position. The power-on light lights up green (Fig. 2).
- When you turn the speed selector to the pulse-activation position P, the power-on light lights up green. (Fig. 3)
Pulse switch
Note: You can only use the pulse switch when the speed selector is in pulse-activation position P or when the speed selector is set to a speed between 1 and 4.
- Push the pulse switch to PULSE and hold it in this position when you want to process ingredients very briefly (Fig. 4).
When you push the pulse switch to PULSE and hold it in this position, the blender starts to operate at the highest speed.
As soon as you release the pulse switch, it jumps back to its original position.
When the blender was set to PULSE from the pulse-activation position P, it stops when you release the pulse switch. When the blender operated at a speed between 1 and 4 before you set it to PULSE, it starts to run at this speed again when you release the pulse switch.
Note: The pulse switch does not work when the speed selector is in the off position 0.
AUTO position
The AUTO position has a unique speed profile to easily process any recipe. The blender automatically increases its speed in 15 seconds to the maximum speed and then keeps running at this speed. Select the AUTO setting when processing smoothies or thick soups, when blending tomatoes or when dealing with other challenging jobs. It is recommended to use the AUTO position for small amounts to avoid splashing.
Blender
The blender is intended for pureeing and blending. With the blender you can prepare soups, sauces, milk shakes and batters. You can also use the blender to process vegetables and fruits.
Preparing the blender for use
1 Place the blender jar on the motor unit (Fig. 5).
You can only place the blender jar on the motor unit when the handle points to the right.
2 Put the plug in the wall socket.
ENGLISH8
Using the blender
1 Put the ingredients in the blender jar.
2 Place the lid on the blender jar (Fig. 6).
Push the lid down firmly to close it.
3 Insert the measuring cup into the opening in the lid (Fig. 7).
4 Turn the speed selector to select a speed.
Do not let the appliance run for more than 3 minutes at a time. If you have not finished processing after 3 minutes, switch off the appliance. Let the appliance cool down for one minute before you let the appliance run again.
5 Before you open the lid, set the speed selector to 0 to switch off the appliance.
After using the blender
1 Unplug the appliance.
2 Remove the lid with the measuring cup from the blender jar.
3 Remove the blender jar from the motor unit.
4 Always clean the removable parts immediately after use.
Tips
- Cut solid ingredients into smaller pieces before you put them in the blender jar.
- Do not process a large quantity of solid ingredients at the same time. In that case, process the ingredients in a series of small batches.
Measuring cup
You can use the measuring cup to measure ingredients.
Cleaning
Always clean the removable parts immediately after use.
Avoid touching the blades. The blades are very sharp.
1 Unplug the appliance.
2 Disassemble all removable parts before you clean them. (Fig. 8)
3 Clean all removable parts in the dishwasher or in warm water with some washing-up liquid.
All parts except the motor unit are dishwasher-proof.
4 Clean the motor unit with a moist cloth.
Never immerse the motor unit in water or any other liquid, nor rinse it under the tap.
Do not use abrasive cleaning agents, scourers, alcohol etc. to clean the motor unit.
Quick-cleaning the blender jar
1 Pour lukewarm water (500ml-700ml) and some washing-up liquid into the blender jar.
2 Place the lid on the blender jar and insert the measuring cup into the hole in the lid.
3 Plug in the appliance.
4 Put the blender jar on the motor unit.
5 Press the pulse button to switch on the appliance and hold it for a few seconds.
6 Release the pulse button and unplug the appliance.
7 Remove the blender jar from the motor unit, take off the lid and rinse the blender jar with clean water.
Storage
- To store the mains cord, wind it round the reel in the bottom of the appliance.
- You can store the appliance in the box in which it is sold. This box has been specially designed as a storage box (Fig. 9).
ENGLISH 9
Environment
- Do not throw away the appliance with the normal household waste at the end of its life, but hand it in at an official collection point for recycling. By doing this, you help to preserve the environment (Fig. 10).
Guarantee & service
Exceptional guarantee & service
You have bought a culinary tool for life and we want to ensure that you remain satisfied. We would like you to register your purchase, so that we can stay in contact with you and you can receive additional services and benefits from us. Register within 3 months of purchase to receive benefits including:
- 5 year product guarantee (and 15 year motor guarantee).
- Fresh ideas for recipes via e-mail
- Tips and tricks to use and maintain your Robust product
- All the latest news on Robust Collection
The only thing you need to do to register your new product is visit www.philips.com/kitchen or call your local Freephone Philips consumer care hotline (United Kingdom: 0800 331 60 15). If you have questions about your culinary tool (usage, maintenance, accessories etc) you can either consult our on line support at www.philips.com/kitchen or call your local hotline.
We have put all the maximum effort in developing, testing and designing this high quality product. However in the unfortunate case that your product needs repair, please call your local Philips consumer care hotline. They will help you with arranging any necessary repairs in a minimum time with maximum convenience - they can arrange a courier to come to your home to collect your product and bring it back when it is repaired. This way you can continue to enjoy your delicious homemade cooking.
Recipes
Chicken and vegetable dish for babies (6 portions)
When you prepare baby food, it is important to use fresh ingredients. Ingredients:
- 300g chicken breast
- 50g cooked rice
- 400g potatoes
- 200g green beans
- 450ml milk
1 Peel the potatoes and cut them into pieces of approximately 4x4cm.
2 Cut the chicken breast into chunks of approximately 4x4cm.
3 Roast the chunks of chicken until they are well done.
4 Cook the green beans and the potatoes for 20 minutes.
5 Warm the milk.
6 Put the cooked and still warm ingredients in the blender jar in the order mentioned above and mix them for 1 minute.
Note: Do not process more than the quantities mentioned above at the same time.
Note: Let the appliance cool down to room temperature before you process the next batch.
Frequently asked questions
This chapter lists the questions most frequently asked about the appliance. If you cannot find the answer to your question, contact the Consumer Care Centre in your country.
Question Answer
Can I clean all removable parts in the dishwasher?
Yes, all parts except the motor unit are dishwasher-proof.
The appliance does not work. What should I do?
Please check if you have plugged in the appliance. Also check if the blender jar is assembled properly and if the handle of the jar points to the right.
ENGLISH10
| Question | Answer |
| What does 'pulse' mean? | When you push the pulse switch to PULSE and hold it in this position, the appliance runs at its highest speed. As soon as you release the pulse switch, the switch jumps back to its original position. When the blender was set to PULSE from the pulse-activation position P, it stops when you release the pulse switch. When the blender operated at speed 1 to 4, it starts to run again at this speed when you release the pulse switch. The pulse switch gives you more control over the processing job and is also very useful when you want to process ingredients very briefly. |
| The pulse switch does not work. What should I do? | Check if the appliance is plugged in and the speed selector is in pulse-activation position P. You can also use the pulse switch when the speed selector is set to a speed between 1 and 4. The pulse switch does not work when the speed selector is set to the off position 0 or to speed 5. |
| What is the AUTO setting of the speed selector for? | When the speed selector is set to AUTO, the blender automatically speeds up to the maximum speed within 15 seconds and then keeps running at the maximum speed. |
| Can I pour boiling hot liquids into the blender jar? | No, let the liquids or ingredients cool down to 80°C/175°F to avoid damage to the blender jar. |
| Why does the motor produce an unpleasant smell during processing? | It is very common for a new appliance to give off an unpleasant smell or emit some smoke the first few times it is used. This phenomenon stops after you have used the appliance a number of times. The appliance may also give off an unpleasant smell or emit some smoke if it has been used too long. In that case, switch off the appliance and let it cool down for 60 minutes. |
| Question Answer | |
| The appliance stopped running because the blades are blocked. What should I do? | Switch off the appliance and unplug it. Then use a spatula to dislodge the ingredients that block the blades. If you were processing a large quantity, pour some of the ingredients out of the blender jar before you switch on the blender again. |
DEUTSCH 11
Einführung
- USER MANUAL
- PHILIPS
- ROBUST
- GENERAL DESCRIPTION (FIG. 1)
- IMPORTANT
- GENERAL
- DANGER
- WARNING
- CAUTION
- ENGLISH 7
- ELECTROMAGNETIC FIELDS (EMF)
- BUILT-IN SAFETY LOCK
- BEFORE FIRST USE
- USING THE APPLIANCE
- SPEED CONTROL
- PULSE SWITCH
- AUTO POSITION
- BLENDER
- PREPARING THE BLENDER FOR USE
- ENGLISH8
- USING THE BLENDER
- AFTER USING THE BLENDER
- TIPS
- MEASURING CUP
- CLEANING
- QUICK-CLEANING THE BLENDER JAR
- STORAGE
- ENGLISH 9
- ENVIRONMENT
- GUARANTEE & SERVICE
- EXCEPTIONAL GUARANTEE & SERVICE
- RECIPES
- CHICKEN AND VEGETABLE DISH FOR BABIES (6 PORTIONS)
- FREQUENTLY ASKED QUESTIONS
- QUESTION ANSWER
- ENGLISH10
- DEUTSCH 11
- EINFÜHRUNG
Brand : PHILIPS
Model : Robust Collection HR2181
Category : Blender