
Dual Shock 3 Controller - Game controller SONY - Free user manual and instructions
Find the device manual for free Dual Shock 3 Controller SONY in PDF.


| Product Type | Wireless Game Controller |
| Brand | Sony |
| Model | DualShock 3 (CECHZC2x series) |
| Platform | PlayStation 3 |
| Connectivity | Bluetooth 2.0 + mini-USB (wired mode) |
| Dimensions (W x H x D) | Approx. 160 x 97 x 55 mm (6.3 x 3.8 x 2.17 in) |
| Weight | Approx. 192 g (6.77 oz) |
| Power Source | Built-in lithium-ion rechargeable battery (3.7V, 570 mAh) |
| Battery Life | Up to 30 hours (varies with usage) |
| Charging Time | Approx. 2.5 hours via USB |
| Input Voltage | 5V DC (via USB) |
| Key Features | Pressure-sensitive face buttons, Sixaxis motion sensing, Dual Vibration motors |
| Buttons | PS button, Start, Select, L1/R1, L2/R2, L3/R3, Directional pad, Analog sticks, Action buttons (Triangle, Circle, Cross, Square) |
| Analog Sticks | 2 x 3D analog stick with L3/R3 click |
| Motion Sensing | Sixaxis (3-axis accelerometer + 3-axis gyroscope) |
| Vibration Feedback | Yes, dual rumble motors |
| Wireless Range | Up to 10 m (33 ft) line-of-sight |
| Compatibility | PS3 console, PC (requires driver or Steam) |
| Included Accessories | Controller, mini-USB cable (charge + play) |
| Maintenance & Cleaning | Wipe with a soft, dry cloth. Do not use solvents or abrasive cleaners. |
| Safety Warnings | Do not disassemble, immerse in water, or expose to extreme temperatures. Use only the specified charger. |
| Spare Parts / Repairability | Battery is replaceable by a professional; other parts not intended for user service. |
| Environmental | Dispose in accordance with local regulations for electronic waste. |
Frequently Asked Questions - Dual Shock 3 Controller SONY
User questions about Dual Shock 3 Controller SONY
0 question about this device. Answer the ones you know or ask your own.
Ask a new question about this device
Download the instructions for your Game controller in PDF format for free! Find your manual Dual Shock 3 Controller - SONY and take your electronic device back in hand. On this page are published all the documents necessary for the use of your device. Dual Shock 3 Controller by SONY.
USER MANUAL Dual Shock 3 Controller SONY
The PS3 ^TM system documentation includes the following:
- Safety and Support
Before using the product, carefully read this document first. It contains safety information related to use of the PS3 ^™ system, troubleshooting, specifications and other information.
• Quick Reference (this document)
This document contains information on setting up the PS3 ^™ system, preparing for use and basic hardware operations.
- User's Guide (http://manuals.playstation.net/document/)
This online document is accessed through the Internet and contains detailed information related to the use of the PS3 ^™ system software (page 27).
Check that you have all of the following items. If any items are missing, contact the appropriate PlayStation customer service helpline which can be found within every PlayStation, PlayStation2 and PLAYSTATION3 software manual.
□ PLAYSTATION3 system
☐ SIXAXISTM Wireless Controller
□ Printed materials
□ AC Power Cord
One of the following two cable types is supplied with the system. The plug configuration varies depending on the country or region.
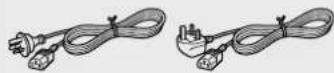
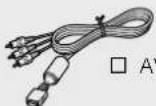
□ AV Cable
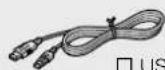
□USB Cable
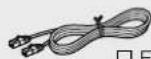
□ Ethernet Cable

☐ Euro-AV Connector Plug (supplied with the system sold in the UK only)

Friends
Chatting and exchanging messages

Network
Connecting to the Internet

Game
Playing games

Video
Playing video

Music
Playing music

Photo
Displaying images

Settings
Adjusting PS3 ^TM system settings

Users
Selecting users to log in to the PS3 ^TM system
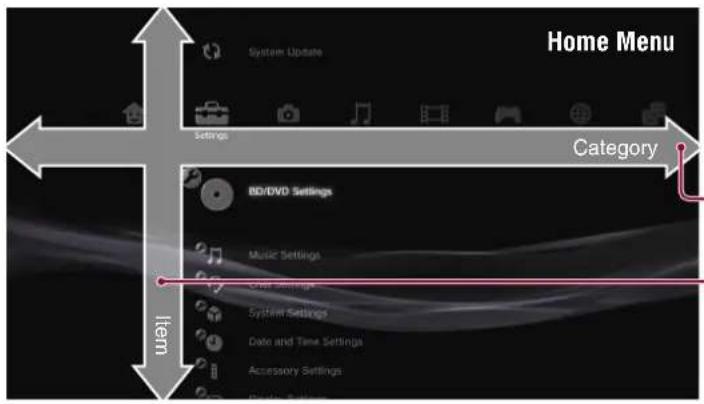
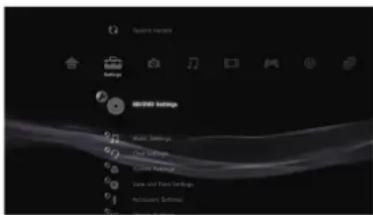
Using "XMB" (XrossMediaBar)
The PS3™ system includes a user interface called "XMB" (XrossMediaBar). The main screen for "XMB" is called the "Home Menu".
1 Select a category using the left or right button.
2 Select an item using the up or down button.
3 Press the ⬆ button to confirm the selected item.
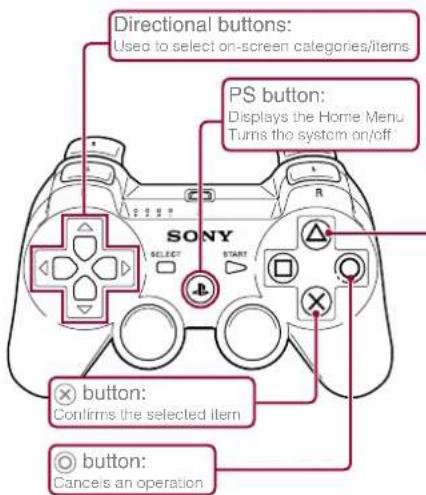
button: Displays the options menu/control panel
Selecting an icon and pressing the △button will display the options menu.
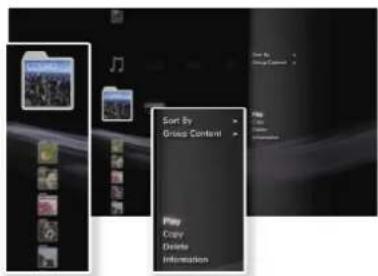
Icons Options menu
Pressing the button during content playback will display the control panel.

Control panel
01
Getting started
Part names
System front
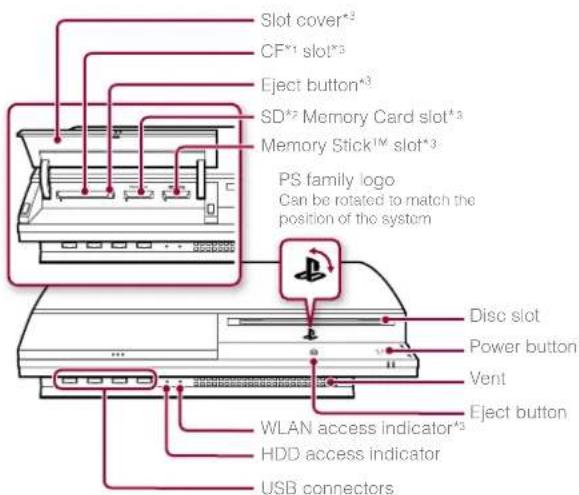
^1 CompactFlash ^® ^2 Secure Digital ^®3 On equipped models only

Caution
- Do not use the system in a closed cabinet or other locations where heat may build up. Doing so may cause the system to overheat and may lead to fire, injury or malfunction.
- If the system's internal temperature becomes elevated, the power indicator will flash alternately in red and green. In this case, turn off the system (•page 13) and leave it unused for a while. After the system cools down, move it to a location with good ventilation, and then resume use.
System rear

Hint
The system can be set in a horizontal or vertical position. Set as shown in the diagram at right when setting in the vertical position.
Notice
Do not place the system in an area subject to excessive dust or cigarette smoke. Dust build-up or cigarette smoke residue on the internal components (such as the lens) may cause the system to malfunction.

Getting started
Part names
SIXAXISTM Wireless Controller
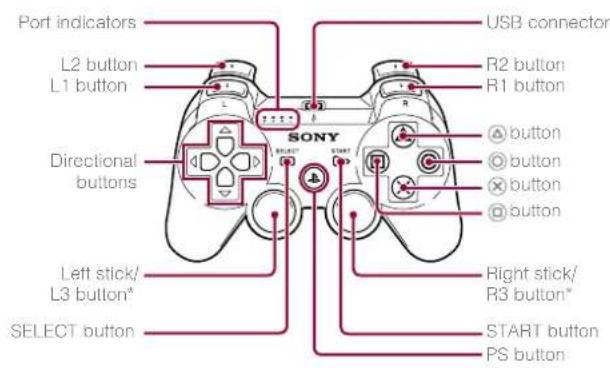
* The L3 and R3 buttons function when the sticks are pressed.
Hint
For details on the Wireless Controller, see 'Using the SIXAXISTM Wireless Controller' (page 14).
02
Getting started
Setting up the PS3 ^TM system
Procedure flow for setting up the system
Step 1: Connect to a TV. ••Page 6

Step 2: Connect digital audio devices. ••Page 9

Step 3: Connect the Ethernet Cable. Page 10

Step 4: Connect the AC Power Cord. Page 11

Step 5: Perform initial setup of the system software. ••Page 11
Step 1: Connect to a TV
Video output on the PS3 ^TM system
The PS3 ^™ system can output two types of resolution: HD and SD. Refer to the instruction manual for the TV in use to check which video mode is supported.
| HD (High Definition) | SD (Standard Definition) | ||||
| Video mode *1 | 1080p 1080i | 720p 576p 576i * | ? | ||
| Aspect ratio | 16:9 16:9 16:9 | 16:94:3 | 16:94:3 | ||
*1 This number indicates the number of scan lines. Note that "i" stands for "interlace" and "p" stands for "progressive". Using progressive results in high-quality video with minimal flickering.
^*2 The video output setting on the system will display as "Standard (PAL)".
Screens showing the difference in resolution

HD screen SD screen
Video output cable types
The resolution displayed on the TV varies depending on the input connectors on the TV and the type of cable in use. Select a cable to match the TV in use.
| Cable type Input connector on the TV Supported | video modes*1 | |||
| HDMI Cable(sold separately) |  | HDMI IN connector |  | 1080p / 1080i / 720p / 576p |
| Component AV Cable(sold separately) | 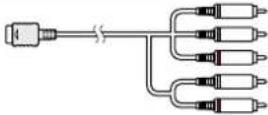 | Component VIDEO IN connector | 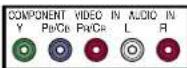 | 1080p / 1080i / 720p / 576p / 576i*2 |
| S VIDEO Cable(sold separately) |  | S VIDEO IN connector | 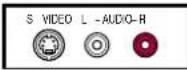 | 576i*2 |
| AV Cable(supplied) | 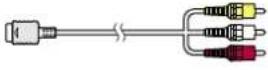 | VIDEO IN connector(composite) | 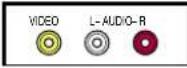 | 576i*2 |
| AV Cable(supplied)Euro-AV Connector Plug(supplied with the system sold in the UK only) | 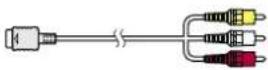 | Euro-AV connector(SCART) | 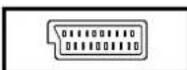 | 576i*2 |
*1 Depending on the type of TV or content to be played, some video modes may not be supported.
*2 The video output setting on the system will display as "Standard (PAL)".
Getting started
Setting up the PS3 ^TM system
Connection methods

Caution
- Do not plug the AC Power Cord for the system into an electrical outlet until you have made all other connections.
- The socket-outlet shall be installed near the equipment and shall be easily accessible.
Connecting to a TV using an HDMI Cable
Connect the system to the TV using an HDMI Cable (sold separately). An HDMI Cable can output both video and audio and enables you to enjoy digital-quality video and audio with minimal loss of picture quality.

flowchart
graph TD
    TV["TV"] -->|HDMI IN connector| HDMI1["+"]
    HDMI1 -->|HDMI Cable (sold separately)| HDMIOUT["+"]
    HDMIOUT -->|HDMI OUT connector| HDMIOUT_OUT["+"]
Connecting with other types of cables
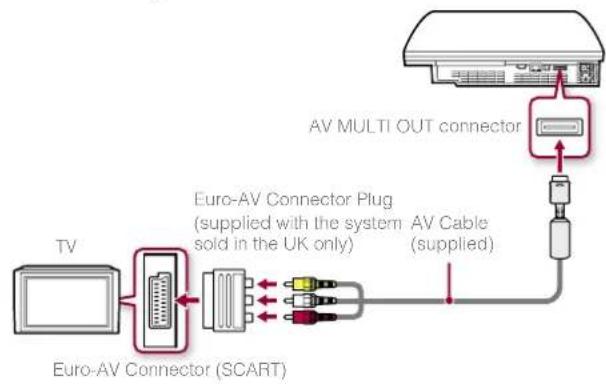
Connect cables other than the HDMI Cable to the AV MULTI OUT connector on the system.
flowchart
graph LR
    TV["TV"] -->|Euro-AV Connector (SCART)| Switch1["Switch"]
    Switch1 -->|Euro-AV Connector Plug (supplied with the system sold in the UK only)| Switch2["Switch"]
    Switch2 -->|AV Cable (supplied)| AVOUT["AV MULTI OUT connector"]
    AVOUT -->|Supply| External["External Device"]
Example: When using the supplied AV Cable
Hint
If you change the type of cable used to connect the system, the picture may not be displayed. If this happens, turn off the system and then turn it on again by touching the power button on the system front until it makes a small beep (about 5 seconds). The picture will be displayed at the system's default resolution.
Step 2: Connect digital audio devices
You can connect audio devices that support digital audio output, such as an AV receiver for home entertainment use.
Hint
When connecting a digital audio device to the system, go to Settings) → Sound Settings) "Audio Output Settings", and adjust the settings as necessary for the audio device.
Audio output on the PS3™ system
The supported channels may vary depending on the output connector to be used.
| PS3TM system output connectors | Channels that can be used for output | ||
| 2 Ch. 5.1 Ch. 7.1 Ch. | |||
| AV MULTI OUT connector | ○ - - | ||
| DIGITAL OUT (OPTICAL)connector ** | ○ ○ - | ||
| HDMI OUT connector | ○ ○ | ○ | *2*3 |
*1 Audio from a Super Audio CD cannot be output from the DIGITAL OUT (OPTICAL) connector.
* A device compatible with Linear PCM 7.1 Ch. is required to output 7.1 Ch. audio from the HDMI OUT connector.
*3 This system does not support output from the DTS-HD 7.1 Ch. DTS-HD 7.1 Ch audio is output from a 5.1 or lower channel.
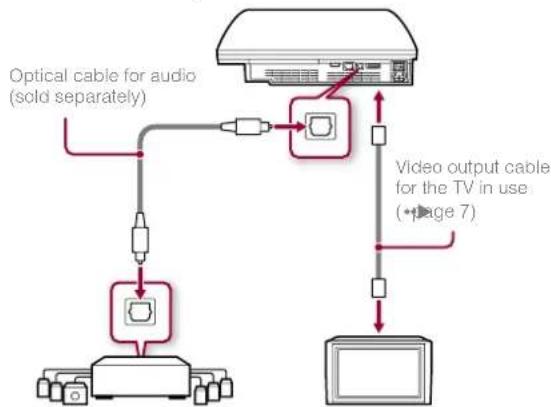
Connecting with an optical cable
The audio will be output from the optical cable. The picture will be output from the video output cable.
flowchart
graph TD
    A["Optical cable for audio (sold separately)"] --> B["Video output cable for the TV in use (•••••••••)"]
    B --> C["Video output cable for the TV in use (•••••••••)"]
    C --> D["Output cable"]
    style A fill:#f9f,stroke:#333
    style B fill:#ccf,stroke:#333
    style C fill:#cfc,stroke:#333
Digital audio device such as an AV receiver
Getting started
Setting up the PS3 ^TM system
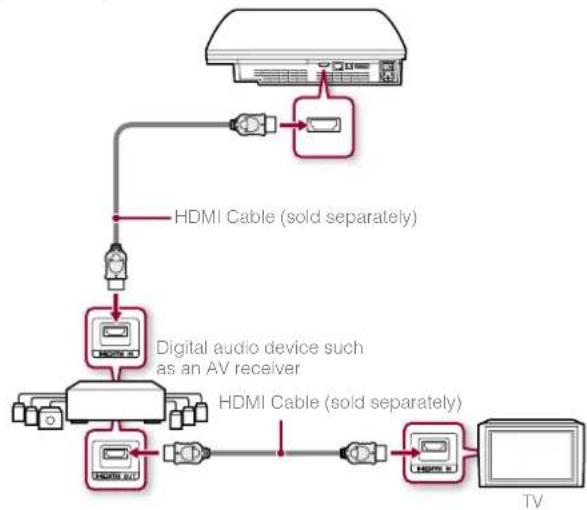
Connecting with an HDMI Cable
Both audio and video will be output from the HDMI Cable. You can output the TV picture via an audio device.
flowchart
graph TD
    A["TV"] --> B["Digital audio device such as an AV receiver"]
    B --> C["HDMI Cable (sold separately)"]
    C --> D["HDMI Cable (sold separately)"]
    D --> E["HDMA Cable (sold separately)"]
    E --> F["HDMA Cable (sold separately)"]
    F --> G["HDMA Cable (sold separately)"]
    G --> H["HDMA Cable (sold separately)"]
    H --> I["HDMA Cable (sold separately)"]
    I --> J["HDMA Cable (sold separately)"]
    J --> K["HDMA Cable (sold separately)"]
    K --> L["HDMA Cable (sold separately)"]
    L --> M["HDMA Cable (sold separately)"]
    M --> N["HDMA Cable (sold separately)"]
    N --> O["HDMA Cable (sold separately)"]
    O --> P["HDMA Cable (sold separately)"]
    P --> Q["HDMA Cable (sold separately)"]
    Q --> R["HDMA Cable (sold separately)"]
    R --> S["HDMA Cable (sold separately)"]
    S --> T["HDMA Cable (sold separately)"]
    T --> U["HDMA Cable (sold separately)"]
    U --> V["HDMA Cable (sold separately)"]
    V --> W["HDMA Cable (sold separately)"]
    W --> X["HDMA Cable (sold separately)"]
    X --> Y["HDMA Cable (sold separately)"]
    Y --> Z["HDMA Cable (sold separately)"]
    Z --> AA["HDMA Cable (sold separately)"]
    AA --> AB["HDMA Cable (sold separately)"]
    AB --> AC["HDMA Cable (sold separately)"]
    AC --> AD["HDMA Cable (sold separately)"]
    AD --> AE["HDMA Cable (sold separately)"]
    AE --> AF["HDMA Cable (sold separately)"]
    AF --> AG["HDMA Cable (sold separately)"]
    AG --> AH["HDMA Cable (sold separately)"]
    AH --> AI["HDMA Cable (sold separately)"]
    AI --> AJ["HDMA Cable (sold separately)"]
    AJ --> AK["HDMA Cable (sold separately)"]
    AK --> AL["HDMA Cable (sold separately)"]
    AL --> AM["HDMA Cable (sold separately)"]
    AM --> AN["HDMA Cable (sold separately)"]
    AN --> AO["HDMA Cable (sold separately)"]
    AO --> AP["HDMA Cable (sold separately)"]
    AP --> AQ["HDMA Cable (sold separately)"]
    AQ --> AR["HDMA Cable (sold separately)"]
    AR --> AS["HDMA Cable (sold separately)"]
    AS --> AT["HDMA Cable (sold separately)"]
    AT --> AU["HDMA Cable (sold separately)"]
    AU --> AV["HDMA Cable (sold separately)"]
    AV --> AW["HDMA Cable (sold separately)"]
Hints
- If your TV is not equipped with an HDMI input connector, use a video output cable of the correct type for your TV (page 7) to connect it to the PS3™ system directly.
- If a device is connected to the PS3 ^TM system via an HDMI Cable, do not turn off the device while the PS3 ^TM system is turned on (power indicator is lit green). Doing so may cause sound distortions or produce abnormal sounds.
Step 3: Connect the Ethernet Cable
Using an Ethernet Cable, you can connect the system to the Internet. For details on network settings, see 'Adjusting network settings' (page 22).

Caution
The system supports 10BASE-T, 100BASE-TX and 1000BASE-T networks. Do not connect a standard telephone line or other types of cords or cables that are not compatible with the system, as this may cause heat build-up, fire or malfunction.
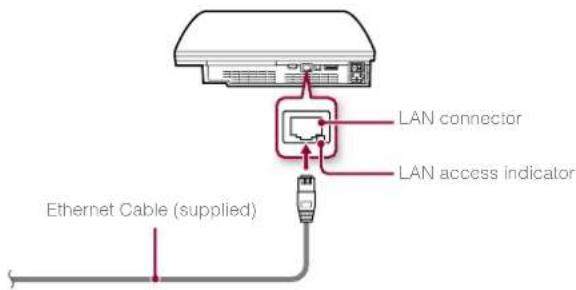
Hint
If using a PS3™ system that is equipped with the wireless LAN feature, you can connect to the Internet without using an Ethernet Cable. For details, see 'Using a wireless connection' (*page 23).
Step 4: Connect the AC Power Cord
Connect the AC Power Cord.

Caution
- Do not plug the AC Power Cord for the system into an electrical outlet until you have made all other connections.
- The socket-outlet shall be installed near the equipment and shall be easily accessible.

Step 5: Perform initial setup of the system software
After turning on the system, perform initial setup.
1 Turn on the TV.
2 Turn on the MAIN POWER switch.

The power indicator will turn solid red to indicate that the system has entered standby mode.
3 Touch the power button.
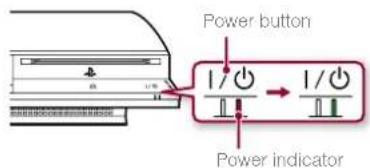
The power indicator turns green and the picture is displayed on the TV screen.
Getting started
Setting up the PS3 ^TM system
4 Connect the Wireless Controller to the system using a USB Cable.

5 Press the PS button on the controller.
The system will recognise the Wireless Controller. After it has recognised the controller, the initial setup screen will be displayed.
6 Perform initial setup.
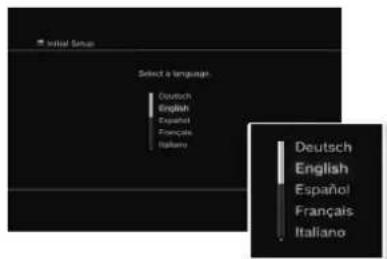
Follow the on-screen instructions to enter settings for system language, time zone, date and time and user name. After initial setup is completed, the Home Menu (•page 3) will be displayed on the TV screen.
Hints
- For details on entering text, see 'Using the on-screen keyboard' (page 29).
- Settings entered during initial setup can be changed under (Settings) or (Users). For details, refer to the online user's guide (→ page 27).
Adjusting video output settings
Depending on the connector and the type of cable used, video output settings may need to be adjusted to display HD resolution on the TV screen (•page 6).
Go to Settings) (Display Settings) "Video Output Settings" and follow the on-screen instructions to adjust the settings.
02 Basic operations
Turning the PS3 ^TM system on and off
Using a SIXAXISTM Wireless Controller
Press the PS button.

Turning off the system
Press and hold down the PS button for two seconds or longer. When the message "Turn off the system." is displayed on the screen, select it and then press the ⬆ button.
Hint
Before using a Wireless Controller you must first pair it with the system (•page 14).
Using the system button
1 Touch the power button.

Power indicator status
| Solid green | System turned on |
| Flashing green | System turning off |
| Solid red | System off (in standby mode) |
| Off | MAIN POWER switch off |
2 Press the PS button of the Wireless Controller.
A controller number is assigned.
Turning off the system
Touch the power button for two seconds or longer.
Notice
Check that the system is in standby mode (power indicator red) before turning it off using the MAIN POWER switch on the system rear. If you turn off the system using the MAIN POWER switch when it is not in standby mode, it may cause malfunction or damage to the system.
04
Basic operations
Using the SIXAXISTM Wireless Controller
Preparing for use
To use a Wireless Controller, you must first register or "pair" the controller with the PS3 ^TM system and assign a number to the controller.
Step 1: Pair the system and the controller.
- When using for the first time
- When using with a different PS3 ^TM system

Step 2: Assign a controller number.
Every time the system is turned on
Step 1: Pair the system and the controller
When using the controller for the first time or when using with a different PS3 ^™ system, you must first pair the devices. If you turn on the system and connect the controller using a USB Cable, the pairing will be completed automatically.

Step 2: Assign a controller number
Each time you turn on the system, a number must be assigned to the controller.
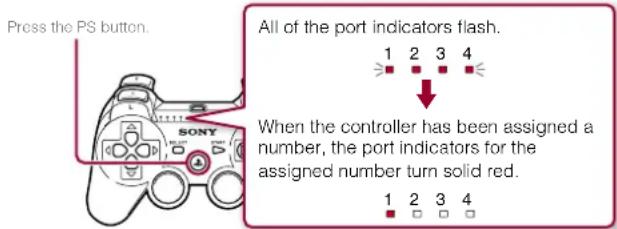
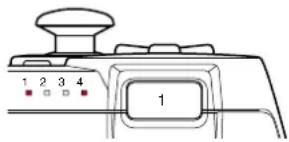
You can connect up to 7 controllers at one time. The controller number is shown by the number above the port indicators. For numbers 5-7, add the numbers of the lit indicators.
Example: Controller number 5 has been assigned.
Hints
- Pairing and assigning controller numbers can only be done when the system is turned on (when the power indicator is lit solid green).
- When a paired controller is used with another PS3™ system, the pairing with the original system is cleared. Pair the controller with the system again if the controller has been used with another system.
- If the controller or the system is turned off, the port indicators on the controller will turn off and the assigned number will be cleared.
Using the controller wirelessly
If you disconnect the USB Cable, you can use the controller wirelessly. To use it wirelessly, the controller's battery must be charged.
Hint
The USB Cable can be connected or disconnected while the controller and the system are turned on.
Charging the controller
With the system turned on (power indicator is lit green), connect the controller to the system using a USB Cable. The port indicators of the controller flash slowly and charging begins. When charging has completed, the port indicators stop flashing.
Hints
• The controller can be used while charging.
- Charge in an environment where the temperature range is between 10°C - 30°C. Charging may not be as effective when performed in other environments.
Battery charge level
If you press and hold down the PS button for more than two seconds, you can check the battery charge level on the screen.
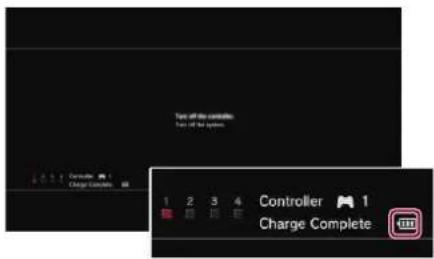
| The battery has plenty of charge. | |
| The battery has started losing its charge. | |
| The battery charge level is low. | |
| The battery has no charge. The port indicators of the controller flash rapidly. Charge the controller. |
Hint
Depending on the environment or the conditions of use, the remaining charge level may not display correctly and the battery duration may vary.
05
Basic operations
Playing content
Blu-ray Disc (BD)/DVD/CD
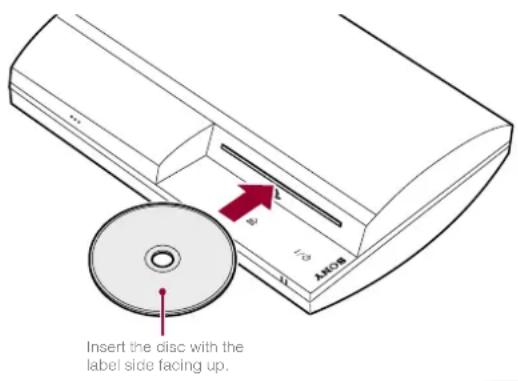
1 Insert the disc.
An icon is displayed in the Home Menu.
2 Select the icon, and then press the button.
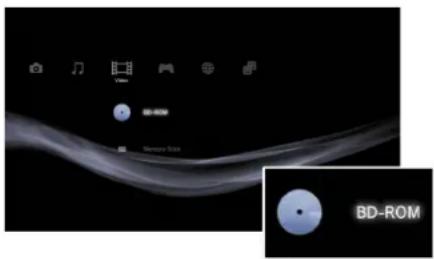
Playback begins.
Depending on the disc, a list of playable content may be displayed.
Ejecting a disc
Stop playback, and then touch the eject button.
Hint
For instructions on how to quit games, see "Playing games" (page 19).
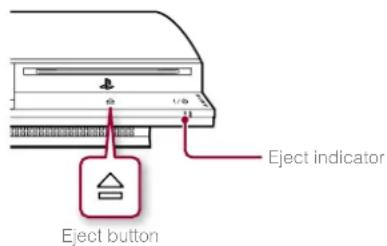
Memory Stick™/SD Memory Card/CompactFlash® (equipped models only)
1 Insert the storage media.
An icon is displayed in the Home Menu.
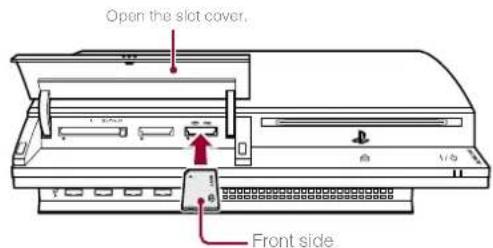
Example: When inserting a Memory Stick™
2 Select the icon, and then press the button.
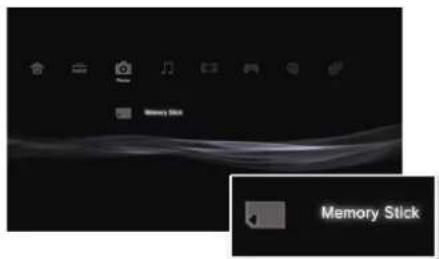
A list of playable content is displayed.
Hint
When using a Memory Stick Duo™/miniSD™ card with the PS3™ system, you can insert the media without using an adaptor.
Ejecting media
Check that the access indicator is not flashing, and then eject.
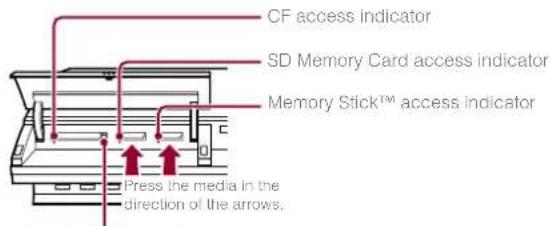
Press the CF eject button.
Notice
When the access indicator is flashing, data is being saved, loaded or deleted. When the access indicator is flashing, do not remove the storage media or turn off the system.
Basic operations
Playing content
USB devices
You can connect external devices, such as devices that are compatible with USB Mass Storage Class using a USB Cable. Devices can be connected while the system is turned on. Refer also to the instructions supplied with the external device to be connected.
1 Connect the USB device.
An icon is displayed in the Home Menu.
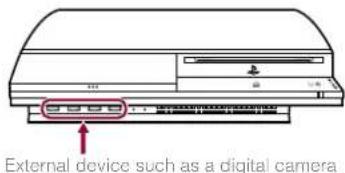
2 Select the icon, and then press the button.
A list of playable content is displayed.
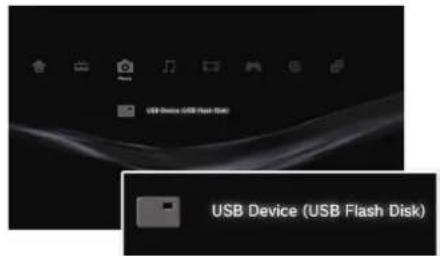
Notices
- Do not remove USB devices or turn off the system while data is being saved, loaded or deleted. Doing so may cause data loss or corruption.
- When using a USB flash drive with a write-protect switch, do not operate the switch when the device is connected to the PS3™ system. Doing so may cause data loss or corruption.
File formats that can be played or viewed
File formats that can be played or viewed on this system include ATRAC, MP3, AAC, JPEG and MPEG-4. For the latest information, refer to the online user's guide (•page 27).
Hints
- Only files that are playable or viewable on the PS3™ system are displayed in the column for the compatible category (Example: Image data is displayed in the Photo category).
- Depending on the storage media, only a subset of the folders on the media may be displayed. If you select "Display All" from the options menu (page 3), all folders saved on the media will be displayed.
Notice
You should where possible make periodic back-ups of data stored on the hard disk drive as a precaution against possible loss or corruption. If for any reason software or data loss or corruption occurs, it is not possible to restore or repair the software or data. Note that SCEE will not be liable for any loss or corruption of data, files or software.
06
Game
Playing games
Starting/quitting a game
Starting a game
Insert a disc, select the icon, and then press the Ⓧbutton.
Quitting a game
During gameplay, press and hold down the PS button of the Wireless Controller for at least 2 seconds. Then select "Quit Game" from the screen that is displayed.
When you start or quit PlayStation®2 format software, the assigned controller number is cleared. Follow the steps listed below to assign a controller number.
• After starting a game: Press the PS button when content from the game software is displayed on the screen.
• After quitting a game: Press the PS button when the Home Menu is displayed on the screen.
Certain PlayStation®2 format software titles may not perform properly on this system. Visit faq.eu.playstation.com/bc for the latest information regarding compatible titles.
Hint
To save PlayStation® 2/PlayStation® format software data, you must create internal memory cards (••• page 20).
Controller settings
You can adjust controller settings during gameplay. Press the PS button for at least 2 seconds, and then select a settings item from the screen that is displayed.
Switching analog mode
When playing PlayStation®2/PlayStation® format software, you can change the mode of the controller. Switch to the mode supported by the software. With some software, the mode is switched automatically.
Changing controller numbers
You can change the number assigned to a controller. When the controller port for use is specified by the software, change to the supported controller number.*
*You cannot assign controller port 2-D using the PS3™ system.
Hint
You can check the currently assigned controller number by pressing the PS button for at least 2 seconds.
Saved data for PS3™ format software
Saved data for PS3™ format software is saved on the system's hard disk. The data is displayed under (same) (Sa Data Utility).
Game
Playing games
Saved data for PlayStation®2/PlayStation® format software
To save data from PlayStation®2/PlayStation® format software, you must create internal memory cards on the hard disk and assign the cards to slots.
Step 1: Create an internal memory card.
Create an internal memory card within the hard disk as a replacement for the Memory Card (8MB) (for PlayStation®2) or Memory Card.

• Memory Card (8MB) (for PlayStation _4 2)
- Memory Card
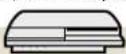

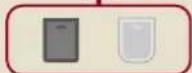
Internal memory card (PS2)

Internal memory card (PS)
Step 2: Assign a slot.
Insert the internal memory card in the internal slot on the hard disk instead of a MEMORY CARD slot on the PlayStation®2 or PlayStation® console.
MEMORY CARD slots
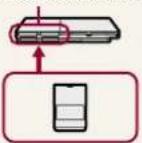


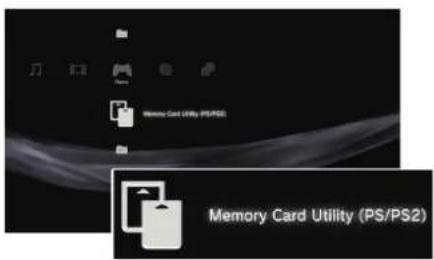
Step 1: Create an internal memory card
1 Select 📁 (Memory Card Utility (PS/PS2)) under 🎨 (Game) in the Home Menu, and then press the Ⓧ button.
2 Select ☐ ^+ (New Internal Memory Card), and then press the ✗ button.
Follow the on-screen instructions to create the internal memory card.
Internal memory card types
| Type Data type that can be saved | |
| Internal memory card (PS2) | Saved data from PlayStation® format software (Saved data from PlayStation® format software cannot be saved.) |
| Internal memory card (PS) | Saved data from PlayStation® format software |
Step 2: Assign a slot
1 Select Memory Card Utility (PS/PS2) under (Cone) in the Home Menu, and then press the button.
2 Select the internal memory card that you want to use, and then press the Ⓐ button.
Assign a slot.
Hints
- Depending on the software, slots may be preassigned. For details, refer to the instructions supplied with the software.
- You can assign slots during gameplay. Press the PS button of the Wireless Controller for at least 2 seconds, and then select "Assign Slots" from the screen that is displayed.
Using saved data on a Memory Card (8MB) (for PlayStation®2) or a Memory Card
To use saved data on a Memory Card (8MB) (for PlayStation _6 2) or a Memory Card, you must copy the data to an internal memory card within the hard disk. You must use a Memory Card Adaptor (sold separately) to copy the data.
1 Select Memory Card Utility (PS/PS2)) under (Home) in the Home Menu, and then press the button.
2 Connect the Memory Card Adaptor to the system.
3 Insert the memory card that you want to copy in the adaptor.
The icon for (Memory Card (PS)) or (Memory Card (PS2)) is displayed.
4 Select the icon, and then press the button.
Follow the on-screen instructions to copy the data.
Hints
- Depending on the type, saved data from a Memory Card (8MB) (for PlayStation ^® 2) or a Memory Card is copied to an internal memory card as shown below.
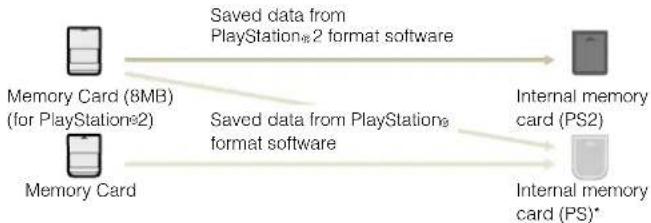
flowchart
graph LR
    A["Memory Card (8MB)<br>(for PlayStation®2)"] -->|Saved data from PlayStation®2 format software| B["Internal memory card (PS2)"]
    C["Memory Card"] -->|Saved data from PlayStation® format software| D["Internal memory card (PS)*"]
* If the amount of saved data to copy is large, the system will automatically create multiple internal memory cards (PS).
- You cannot copy data saved on the hard disk to a Memory Card (8MB) (for PlayStation2) or a Memory Card.
07
Network
Adjusting network settings
Using a wired connection
The following instructions explain how to connect to the Internet using an Ethernet Cable.
Example of a wired network configuration
The network configuration and connection method may vary depending on the equipment in use and the network environment.

Hint
A router is a device that enables multiple devices to be connected to one Internet line. A router is necessary if a PC and the PS3 ^TM system will be connected to the Internet at the same time.
Preparing the required items
The following items are required for a wired connection to the Internet.
- Subscription to an Internet service provider (ISP)
- A network device, such as a DSL modem or router
- Ethernet Cable (supplied)
Setting up the Internet connection
When making a wired connection to the Internet, usually you do not need to adjust any of the default settings. If you cannot use the default settings to connect, follow the instructions below to adjust the settings.

Select (Network Settings) under (Settings) in the Home Menu, and then press the button.

Select "Internet Connection Settings", and then press the Ⓕ button.
When a message stating that the Internet connection will be terminated is displayed, select "Yes", and then press the 📄 button.

Select "Wired Connection", and then press the right button.
4 Select "Easy" or "Custom" and adjust settings as necessary.
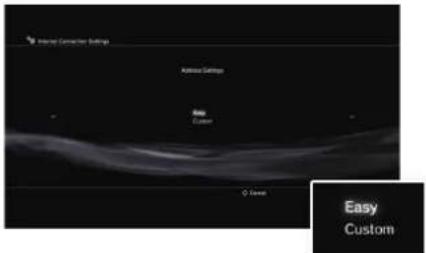
Follow the on-screen instructions to adjust the required settings.
| Easy | Basic settings are set automatically. |
| Custom | You can manually enter detailed settings information. For information on settings, refer to the instructions supplied by the Internet service provider or with the network device. |
For detailed information on network settings, refer to the online user's guide ( page 27).
Using a wireless connection (wireless LAN feature-equipped models only)
The following instructions explain how to connect to the Internet using a wireless connection.
Example of a wireless network configuration
The network configuration and connection method may vary depending on the equipment in use and the network environment.

flowchart
graph TD
    A["Network device such as a DSL or cable modem"] --> B["Router"]
    B --> C["Access point"]
    C --> D["PC"]
    style A fill:#f9f,stroke:#333
    style B fill:#ccf,stroke:#333
    style C fill:#cfc,stroke:#333
    style D fill:#fcc,stroke:#333
Hint
An access point is a device that enables network connectivity without using a physical cable.
Network
Adjusting network settings
Preparing the required items
The following items are required to set up the system to connect wirelessly to the Internet.
- Subscription to an Internet service provider (ISP)
- A network device, such as a DSL modem or router
- An access point*
- Settings information for the access point (SSID, WEP key, WPA key)
*Not necessary if using a wireless router with built-in wireless functionality
Hints
- When connecting to the Internet wirelessly, signal interference may occur depending on the usage condition of the wireless network devices. If Internet data transfer speed is decreased or the Wireless Controller does not function properly, use an Ethernet Cable to establish a wired connection.
- Depending on the access point in use, you may need the MAC address for your system when connecting to the Internet. You can find the MAC address for the system by going to Settings) (System Settings) 'System Information'.
Setting up the Internet connection
When connecting wirelessly to the Internet, you must first adjust network settings.
Network settings may vary depending on the type of access point and the network environment. The following instructions explain the most common network configuration.
1 Select (Network Settings) under (Settings) in the Home Menu, and then press the ⏻ button.
2 Select "Internet Connection Settings", and then press the ✗ button.
When a message stating that the Internet connection will be terminated is displayed, select "Yes", and then press the Ⓧbutton.
3 Select "Wireless", and then press the right button.
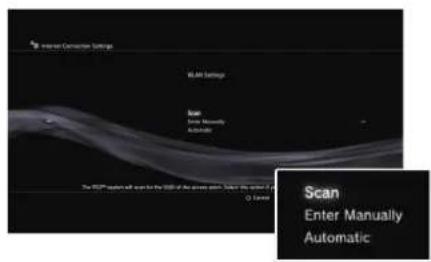
4 Select "Scan", and then press the right button.
The system will search for access points within range and display them as a list.
Hint
In some regions, you may select Automatic Setup by Access Point. When using an access point that supports automatic setup, select "Automatic" and follow the on-screen instructions. The required settings will be completed automatically. For information on access points that support automatic setup, contact the access point manufacturers.
5 Select the access point that you want to use, and then press the Ⓞbutton.
An SSID is a code or a name that is assigned to the access point. If you do not know which SSID to use or if the SSID is not displayed, contact the person who set up or maintains the access point.
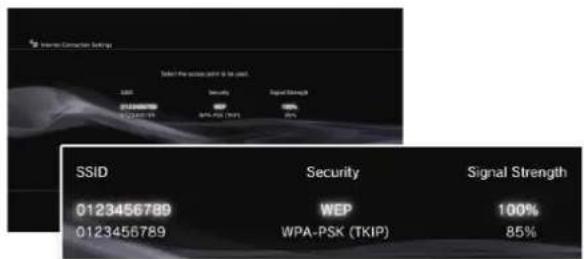
6 Confirm the SSID for the access point, and then press the right button.
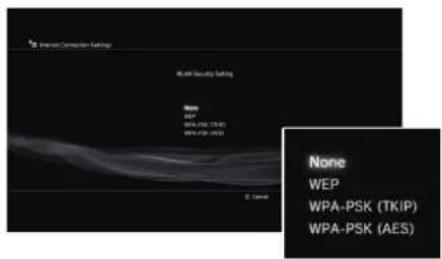
7 Select the security settings as necessary, and then press the right button.
Security settings vary depending on the access point in use. To determine which settings to use, contact the person who set up or maintains the access point.
8 Enter the encryption key, and then press the right button.
The encryption key field will display an asterisk (*) for each character you enter. If you do not know the key, contact the person who set up or maintains the access point.
Network
Adjusting network settings
9 Select "Easy" or "Custom" and adjust settings as necessary.
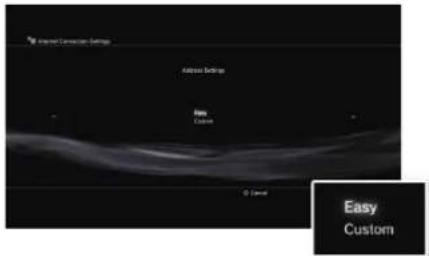
Follow the on-screen instructions to adjust the required settings.
| Easy | Basic settings are set automatically. |
| Custom | You can manually enter detailed settings information. For information on settings, refer to the instructions supplied by the Internet service provider or with the network device. |
For detailed information on network settings, refer to the online user's guide ( page 27).
08
Network
Connecting to the Internet
If network settings are already completed, the PS3 ^™ system will automatically connect to the Internet when the system is turned on. The connection will remain active as long as the system is on.
Using the Internet browser
1 Select (Internet Browser) under (Network) in the Home Menu, and then press the button.
The Internet browser opens. A busy icon is displayed while the page is loading.

Basic operations of the Internet browser
| Directional buttons | Move the pointer to a link |
| Right stick | Scroll in the desired direction |
| L1 button | Go back to the previous page |
| START button | Enter an address |
| ⚠ button | Switch between displaying and not displaying the menu |
Viewing the user's guide
You can use the Internet browser to view the online user's guide for the PS3™ system. Select ? (Online Instruction Manuals) under 📄 (Network) in the Home Menu, and then press the Ⓧ button.
PLAYSTATION3 system user's guide
http://manuals.playstation.net/document/ The guide can also be viewed using your PC's Web browser.
Creating a PLAYSTATION® Network account
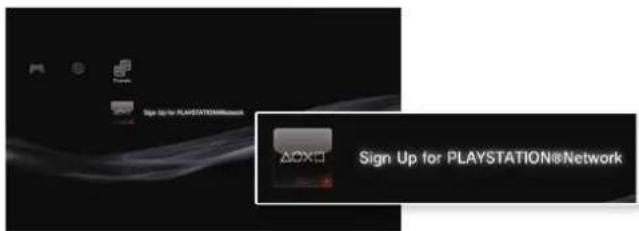
By creating a PLAYSTATION Network account, you can enjoy chatting under Friends) or use the PS3™ system's online network service and other features. Go to Friends), select (Sign Up for PLAYSTATION Network), and then press the Button. The screen for creating an account will be displayed.
Hints
- An Internet connection is required to create an account.
- PLAYSTATION Network service content may vary depending on the region.
09
Updates
PS3 ^TM system updates
By updating the PS3 ^TM system software, you can add features and/or security patches. Frequently update your system to use the latest version of the system software.
For the latest information on updates, visit http://eu.playstation.com/ps3.
Use the update data to overwrite the existing system software.

The system software is updated.
Notices
- During an update, do not turn off the system or remove media. If an update is cancelled before completion, the system software may become damaged, and the system may require servicing or exchange.
- During an update, the power button on the system front is inactive.
- Depending on the content, you may not be able to play without first updating the system software.
- After you have updated the system software, you cannot go back to an earlier version.
Update methods
You can perform an update in any of the ways described below.
Network update
You can update by downloading the update data from the Internet. The latest update is automatically downloaded.
Select Settings) (System Update) "Update via Internet".
Update using storage media
You can update using the update data saved on a Memory Stick ^™ or other media.
Select Settings) (System Update) "Update via Storage Media".
Hint
Update data can also be contained in some game discs.
Checking the system software version
You can check system version information by selecting Settings) → (System Settings) "System Information". The current version is displayed in the System Software field.
10
Keyboard
Using the on-screen keyboard
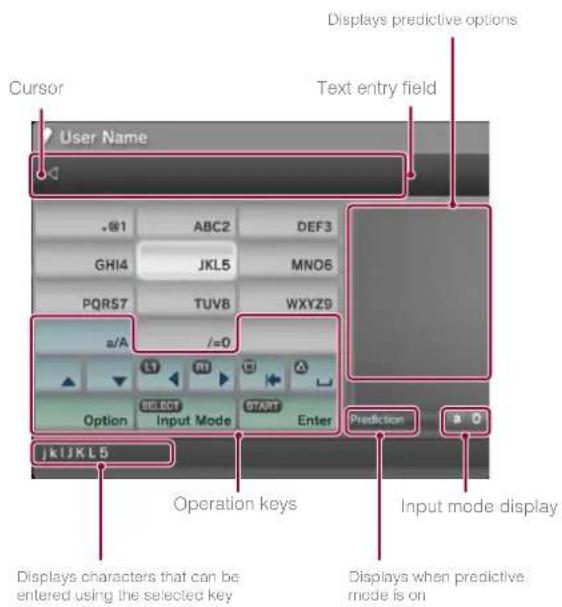
List of keys
Keys that are displayed vary depending on the input mode and other conditions.
| Keys Explanation | |
| Inserts a line break | |
| Moves the cursor | |
| Deletes the character to the left of the cursor | |
| Inserts a space | |
| Option | Displays the options menu |
| Input Mode | Switches the input mode |
| Enter | Confirms characters that have been typed but not entered, and exits the keyboard |
Keyboard
Using the on-screen keyboard
Entering characters
Using predictive mode, you can enter the first few letters of the word, which will bring up a list of commonly used words that start with these letters. You can then use the directional buttons to select the word that you want. After you have finished entering text, select the *Enter* key to exit the keyboard.
Hint
You can also use the single tap text entry method. Use the "Options" key to switch the text entry method. When using single tap, words that can be created using combinations made from one letter (or number) on each selected key are displayed as candidate terms. For example, if you select the "DEF3" key, words beginning with d, e, f or 3 are listed in the candidate terms window on the right side of the on-screen keyboard. If there are no candidate terms, the symbol "> is displayed.
Input mode types
Input mode types depend on the system language selected.
| Input mode display Input mode | Examples of characters you can enter | |
| a 0 | English a b c d e 1 2 3 4 5 | |
| a 0 | ABCÀ é í ó ç ñ 1 2 3 4 5 | |
| 0 | 123 1 2 3 4 5 | |
| URL | URL .com/ .net/ html gif | |
Hint
The languages you can use for text entry are the supported system languages. You can set the system language by going to Settings) (System Settings) ▪System Language'.
Example: If "System Language" is set to "Français", you can enter text in French.
Using a USB keyboard
You can enter characters using a USB keyboard (sold separately). While the text entry screen is displayed, if any key on the connected USB keyboard is pressed, the text entry screen will enable you to use the USB keyboard.
Hint
You cannot use the predictive mode when using a USB keyboard.

natural_image
Abstract grayscale image with a curved white line against a dark gray background, no text or symbols present.
SONY

COMPUTER ENTERTAINMENT
www.playstation.com
• "PlayStation", "PLAYSTATION", and "XXXX" are registered trademarks of Sony Computer Entertainment Inc. Also, "PS3" and "SIXAXIS" are trademarks of the same company. "XMB" and "xross media bar" are trademarks of Sony Corporation and Sony Computer Entertainment Inc.
"SONY" and "A" are registered trademarks of Sony Corporation. Also, "Memory Stick", "Memory Stick Duo", "A" and "ATRAC" are registered trademarks or trademarks of the same company.
'Blu-ray Disc' is a trademark.
HDMI, the HDMI logo and High-Definition Multimedia Interface are trademarks or registered trademarks of HDMI Licensing, LLC.
Sony Computer Entertainment Inc. is an authorised licensee of the CompactFlash _4 registered trademark.
All other trademarks are the properties of their respective owners.
Images shown in this document may vary from the images on your PS3 ^TM system, depending on the system software version in use.
- Friends
- Network
- Game
- Video
- Music
- Photo
- Settings
- Users
- Using "XMB" (XrossMediaBar)
- button: Displays the options menu/control panel
- 01
- Getting started
- Part names
- Caution
- Hint
- Notice
- 02
- Setting up the PS3 TM system
- Step 1: Connect to a TV
- Video output on the PS3 TM system
- Screens showing the difference in resolution
- Video output cable types
- Connection methods
- Connecting to a TV using an HDMI Cable
- Connecting with other types of cables
- Step 2: Connect digital audio devices
- Audio output on the PS3™ system
- Connecting with an optical cable
- Connecting with an HDMI Cable
- Hints
- Step 3: Connect the Ethernet Cable
- Step 4: Connect the AC Power Cord
- Step 5: Perform initial setup of the system software
- Adjusting video output settings
- Basic operations
- Turning the PS3 TM system on and off
- Using a SIXAXISTM Wireless Controller
- Turning off the system
- Using the system button
- Press the PS button of the Wireless Controller.
- 04
- Basic operations
- Using the SIXAXISTM Wireless Controller
- Preparing for use
- Step 1: Pair the system and the controller
- Step 2: Assign a controller number
- Using the controller wirelessly
- Charging the controller
- Battery charge level
- 05
- Playing content
- Blu-ray Disc (BD)/DVD/CD
- Insert the disc.
- Select the icon, and then press the button.
- Ejecting a disc
- Memory Stick™/SD Memory Card/CompactFlash® (equipped models only)
- Insert the storage media.
- Ejecting media
- USB devices
- Connect the USB device.
- Notices
- File formats that can be played or viewed
- 06
- Playing games
- Starting/quitting a game
- Starting a game
- Quitting a game
- Controller settings
- Switching analog mode
- Changing controller numbers
- Saved data for PS3™ format software
- Saved data for PlayStation®2/PlayStation® format software
- Step 1: Create an internal memory card
- Step 2: Assign a slot
- Using saved data on a Memory Card (8MB) (for PlayStation®2) or a Memory Card
- Select the icon, and then press the button.
- 07
- Adjusting network settings
- Using a wired connection
- Example of a wired network configuration
- Preparing the required items
- Setting up the Internet connection
- Select "Easy" or "Custom" and adjust settings as necessary.
- Using a wireless connection (wireless LAN feature-equipped models only)
- Example of a wireless network configuration
- Select the access point that you want to use, and then press the Ⓞbutton.
- Confirm the SSID for the access point, and then press the right button.
- Select the security settings as necessary, and then press the right button.
- Enter the encryption key, and then press the right button.
- Select "Easy" or "Custom" and adjust settings as necessary.
- 08
- Connecting to the Internet
- Using the Internet browser
- Select (Internet Browser) under (Network) in the Home Menu, and then press the button.
- Viewing the user's guide
- PLAYSTATION3 system user's guide
- Creating a PLAYSTATION® Network account
- 09
- Updates
- PS3 TM system updates
- Update methods
- Network update
- Update using storage media
- Checking the system software version
- 10
- Keyboard
- Using the on-screen keyboard
- List of keys
- Entering characters
- Input mode types
- Using a USB keyboard
Brand : SONY
Model : Dual Shock 3 Controller
Category : Game controller