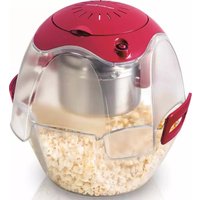
Party Popper 73310 - Popcorn machine HAMILTON BEACH - Free user manual and instructions
Find the device manual for free Party Popper 73310 HAMILTON BEACH in PDF.


| Product Type | Electric Popcorn Machine |
| Brand | Hamilton Beach |
| Model | Party Popper 73310 |
| Dimensions (L x W x H) | Approximately 30 x 20 x 20 cm |
| Weight | Approximately 2 kg |
| Power | 120 V, 60 Hz, 1200 W |
| Corn Capacity | Up to 120 g of corn per batch |
| Bowl Capacity | Approximately 4 liters |
| Main Functions | Hot air popping, automatic shut-off |
| Material | Plastic and aluminum |
| Safety | Automatic shut-off, cool-touch handle |
| Maintenance and Cleaning | Removable bowl and lid, hand washable |
| Spare Parts and Repairability | Available on request from the manufacturer |
| General Information | Indoor use only, do not immerse |
Frequently Asked Questions - Party Popper 73310 HAMILTON BEACH
User questions about Party Popper 73310 HAMILTON BEACH
0 question about this device. Answer the ones you know or ask your own.
Ask a new question about this device
Download the instructions for your Popcorn machine in PDF format for free! Find your manual Party Popper 73310 - HAMILTON BEACH and take your electronic device back in hand. On this page are published all the documents necessary for the use of your device. Party Popper 73310 by HAMILTON BEACH.
USER MANUAL Party Popper 73310 HAMILTON BEACH
Visit www.hamiltonbeach.com for our complete line of products and Use and Care Guides – as well as delicious recipes, tips, and to register your product online!
Questions? Please call us – our friendly associates are ready to help. USA: 1.800.851.8900
natural_image
Close-up of a transparent plastic air fryer with granular contents inside (no visible text or symbols)When using electrical appliances, basic safety precautions should always be followed to reduce the risk of fire, electric shock, and/or injury to persons, including the following:
- Read all instructions.
- This appliance is not intended for use by persons (including children) with reduced physical, sensory, or mental capabilities, or lack of experience and knowledge, unless they are closely supervised and instructed concerning use of the appliance by a person responsible for their safety.
- Close supervision is necessary when any appliance is used by or near children. Children should be supervised to ensure that they do not play with the appliance.
- Do not touch hot surfaces. Use handles or knobs.
- To protect against electrical shock, do not immerse cord, plug, or popper top in water or other liquid.
- Unplug from outlet when not in use and before cleaning. Allow to cool before putting on or taking off parts and before cleaning.
-
Do not operate any appliance with a damaged cord or plug or after the appliance malfunctions or is dropped or damaged in any manner. Call our toll-free customer service number for information on examination, repair, or adjustment.
-
The use of attachments not recommended or sold by the appliance manufacturer may cause fire, electric shock, or injury.
- Do not use outdoors.
- Do not let cord hang over edge of table or counter or touch hot surfaces, including stove.
- Do not place on or near a hot gas or electric burner, or in a heated oven.
- To disconnect, turn control to OFF (O) and then remove the plug from the wall outlet.
- Do not use appliance for other than intended use.
- Extreme caution must be used when moving an appliance containing hot oil or other hot liquids.
- A popper that is plugged into an outlet should not be left unattended. This popper will not shut off automatically. To avoid overheating, add corn and oil before operating.
- Extreme caution must be used when unloading popcorn.
SAVE THESE INSTRUCTIONS!
Other Consumer Safety Information
This appliance is intended for household use only.
WARNING! Shock Hazard: This appliance has a polarized plug (one wide blade) that reduces the risk of electric shock. The plug fits only one way into a polarized outlet. Do not defeat the safety purpose of the plug by modifying the plug in any way or by using an adapter. If the plug does not fit fully into the outlet, reverse the plug. If it still does not fit, have an electrician replace the outlet.
2
The length of the cord used on this appliance was selected to reduce the hazards of becoming tangled in or tripping over a longer cord. If a longer cord is necessary, an approved extension cord may be used. The electrical rating of the extension cord must be equal to or greater than the rating of the appliance. Care must be taken to arrange the extension cord so that it will not drape over the countertop or tabletop where it can be pulled on by children or accidentally tripped over.
Parts and Features
BEFORE FIRST USE: Follow "Care and Cleaning" on page 6.
*To order parts:
US: 1.800.851.8900
www.hamiltonbeach.com
Canada: 1.800.267.2826
Mexico: 01 800 71 16 100
Serving Bowl


Measuring Chart
| KERNELS (CUPS) | OIL (TBSP) | YIELD (CUPS) |
| 1/4 | 1 | 6 - 8 |
| 1/2 | 1.5 | 11 - 15 |
| 3/4 | 2 | 17 - 20 |
| 1 | 3 | 22 - 24 |
How to Assemble for Popping

natural_image
Anatomical illustration of a human pelvic region with a black arrow indicating a specific area (no text or labels present)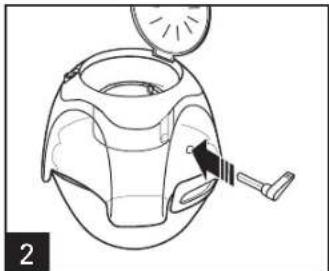
natural_image
Line drawing of a mechanical device with a handle and internal components, no text or symbols presentPlace popper top on serving bowl. Insert dump handle into side of popper top. Push until you feel it snap into place.
How to Make Popcorn
NOTE: The amounts listed on some grocery store popcorn packages call for more oil than is necessary in this unit.
natural_image
Illustration of a food preparation step showing pouring liquid into two bowls with spoons (no text or symbols)
natural_image
Illustration of a cooking step showing a pan with a lid and a blade, no text or symbols present
natural_image
Line drawing of a helmet with a sunburst pattern on top (no text or symbols)
natural_image
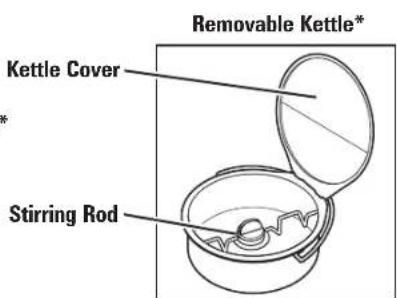
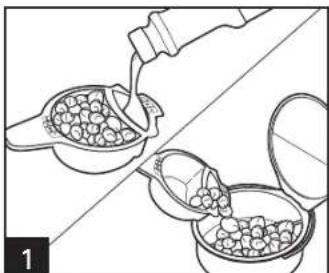
Pure mechanical component diagram without any text, numbers, or symbolsMeasure oil and popcorn kernels in measuring cup. Refer to chart on page 7 for oil and kernel recommendations. Pour ingredients evenly into kettle. Close kettle cover. Lower kettle into kettle base with lift tab facing front of popper. Push kettle handle down toward back of popper to latch kettle handle in place. The kettle latches are located at the left and right sides of kettle base. Make sure kettle handle is securely fixed under latches.
How to Make Popcorn (cont.)

natural_image
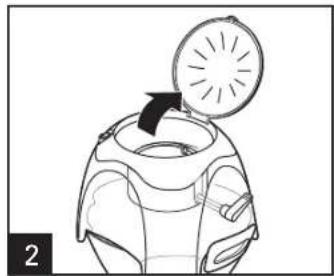
Line drawing of a helmet with a black arrow indicating direction (no text or symbols)Lower loading lid and snap to close.
natural_image
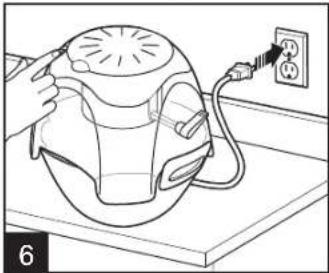
Line drawing of a hooded device with an electrical outlet connected to it (no text or symbols)Plug in. Turn unit ON (I).
natural_image
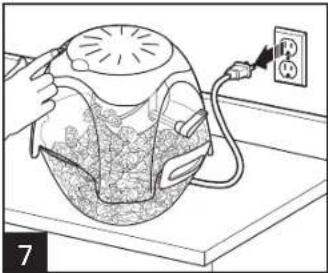
Illustration of a hand holding a device with a power outlet connected to a wall-mounted electrical outlet (no text or symbols present)When popping slows down to a few pops at a time, turn unit OFF (O). Unplug.

natural_image
Line drawing of a hand holding a small object through a bowl-shaped container filled with granular material (no text or symbols)Dump popcorn out of kettle by rotating the dump lever towards front of unit.
natural_image
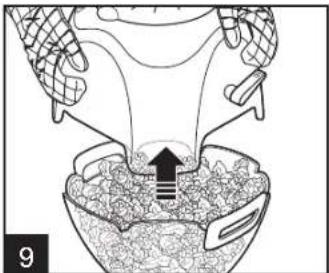
Diagram of a biological or mechanical process showing a container with granular material and directional arrows, no readable text or symbols present.WARNING Burn Hazard:
Escaping steam, kettle, and kettle cover are hot. Use oven mitts.
Carefully remove popper top by its sides and set aside to cool.

natural_image
Line drawing of a hand pouring liquid into a bowl filled with granular material (no text or symbols)Drizzle melted butter and seasonings over popcorn in serving bowl, if desired.
NOTES:
- If popping a second batch of popcorn: Leave kettle latched in kettle base. Carefully lift tab with oven mitt to fold kettle cover back to fill with oil and popcorn kernels. Repeat steps 5–10.
- Allow Party Popper to cool completely after popping three consecutive batches of popcorn. Otherwise, popping time and unpopped kernels will increase.
Care and Cleaning

natural_image
Diagram showing a cable being inserted into an electrical socket (no text or symbols present)Allow unit to cool completely before cleaning.
natural_image
Line drawing of a device with a circular component and arrow indicating rotation (no text or symbols)Open loading lid to a 90-degree angle.
WARNING Electrical Shock Hazard.
Disconnect power before cleaning. Do not immerse popper top or cord in any liquid.

natural_image
Illustration of a hand holding a circular object over a device, divided by a diagonal line (no text or symbols)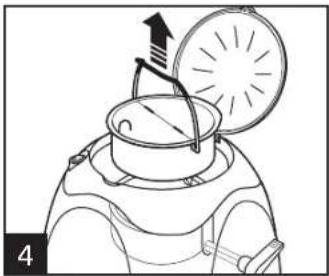
natural_image
Diagram of a compass tool interacting with a circular dial (no text or symbols present)Hold dump handle to keep kettle level. While holding dump handle, lift kettle handle until it is in the upright position. Lift kettle handle to remove kettle.

natural_image
Line drawing of a hand pouring liquid into a container (no text or symbols)Wipe inside and outside with a damp cloth.
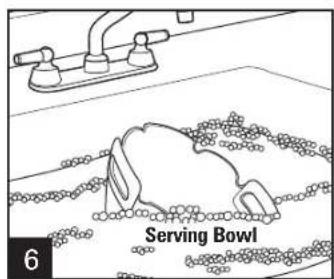
Wash serving bowl in warm, soapy water. Rinse and dry.


Pull dump handle straight out of popper top and place it and measuring cup inside kettle. Invert serving bowl over popper top to store.
Servings Chart (all yields approximate)
AMOUNT OF POPCORN AMOUNT OF OIL APPROXIMATE YIELD
1/4 cup unpopped 1 Tablespoon Approximately 6 to 8 cups popped
1/2 cup unpopped 1 1/2 Tablespoons Approximately 11 to 15 cups popped
3/4 cup unpopped 2 Tablespoons Approximately 17 to 20 cups popped
1 cup unpopped 3 Tablespoons Approximately 22 to 24 cups popped
NOTE: Popcorn types and brands vary in freshness and moisture content. Popped amounts of corn may vary slightly from the chart and some unpopped kernels may remain after popping has stopped.
Recipes
Topping Ideas
Sweet – cinnamon sugar, chocolate shavings, ice cream sauces/syrups, pie spices, powdered sugar
Savory – red pepper flakes, Parmesan cheese, garlic powder, herb seasoning, dressing mix, chili powder, barbecue rub, taco seasoning
Parmesan Italian Popcorn
1/2 cup (118 ml) grated Parmesan cheese
1 teaspoon (5 ml) garlic salt
1 teaspoon (5 ml) dried oregano
1/2 teaspoon (2.5 ml) dried basil
1/4 cup (59 ml) butter, melted
24 cups (5.7 L) popped popcorn
Directions:
-
In small bowl, combine cheese, garlic salt, oregano, and basil.
-
Drizzle butter over popcorn in serving bowl. Sprinkle with cheese mixture.
-
Toss until popcorn is well-coated.
Serves: 24
Sweet and Salty Cinnamon Popcorn
1/4 cup (59 ml) sugar
1 teaspoon (5 ml) ground cinnamon
1 teaspoon (5 ml) salt
1/4 cup (59 ml) butter, melted
24 cups (5.7 L) popped popcorn
Directions:
-
In small bowl, combine sugar, cinnamon, and salt.
-
Drizzle butter over popcorn in serving bowl. Sprinkle with sugar mixture.
-
Toss until popcorn is well-coated.
Serves: 24
Recipes (cont.)
Cheese and Bacon Popcorn
1/2 cup (118 ml) bacon pieces
1/4 cup (59 ml) powdered cheese
24 cups (5.7 L) popped popcorn
1/4 cup (59 ml) butter, melted
Directions:
-
In a medium bowl, combine bacon and cheese.
-
Drizzle butter over popcorn in serving bowl.
-
Sprinkle bacon mixture over popcorn; toss until well-coated.
Serves: 24
Buffalo Popcorn
1/4 cup (59 ml) butter
2 teaspoons (10 ml) hot wing sauce
24 cups (5.7 L) popped popcorn
2 Tablespoons (30 ml) powdered ranch dressing
Directions:
-
In a medium microwave-safe bowl, add butter. Microwave on HIGH power until melted.
-
Drizzle butter mixture over popcorn in serving bowl.
-
Sprinkle popcorn with ranch dressing; toss until well-coated.
Serves: 24
Herbed Onion Popcorn
2 Tablespoons (30 ml) dried parsley flakes
2 Tablespoons (30 ml) dried minced onion
2 teaspoons (10 ml) dried rosemary leaves
1 teaspoon (5 ml) salt
1/2 teaspoon (2.5 ml) dried thyme
24 (5.7 L) cups popped popcorn
1/4 cup (59 ml) butter, melted
Directions:
-
In a small bowl, combine parsley, onion, rosemary, salt, and thyme.
-
Drizzle butter over popcorn in serving bowl. Sprinkle with parsley mixture.
-
Toss until popcorn is well-coated.
Serves: 10–12
8
Notes
Limited Warranty
This warranty applies to products purchased and used in the U.S. and Canada. This is the only express warranty for this product and is in lieu of any other warranty or condition.
This product is warranted to be free from defects in material and workmanship for a period of five (5) years from the date of original purchase in Canada and one (1) year from the date of original purchase in the U.S. During this period, your exclusive remedy is repair or replacement of this product or any component found to be defective, at our option; however, you are responsible for all costs associated with returning the product to us and our returning a product or component under this warranty to you. If the product or component is no longer available, we will replace with a similar one of equal or greater value.
This warranty does not cover glass, filters, wear from normal use, use not in conformity with the printed directions, or damage to the product resulting from accident, alteration, abuse, or misuse. This warranty extends only to the original consumer purchaser or gift recipient. Keep the original sales receipt, as proof of purchase is required to make a warranty claim. This warranty is void if the product is used for other than single-family household use or subjected to any voltage and waveform other than as specified on the rating label (e.g., 120V \~ 60 Hz).
We exclude all claims for special, incidental, and consequential damages caused by breach of express or implied warranty. All liability is limited to the amount of the purchase price. Every implied warranty, including any statutory warranty or condition of merchantability or fitness for a particular purpose, is disclaimed except to the extent prohibited by law, in which case such warranty or condition is limited to the duration of this written warranty. This warranty gives you specific legal rights. You may have other legal rights that vary depending on where you live. Some states or provinces do not allow limitations on implied warranties or special, incidental, or consequential damages, so the foregoing limitations may not apply to you.
To make a warranty claim, do not return this appliance to the store. Please call 1.800.851.8900 in the U.S. or 1.800.267.2826 in Canada or visit hamiltonbeach.com in the U.S. or hamiltonbeach.ca in Canada. For faster service, locate the model, type, and series numbers on your appliance.
PRÉCAUTIONS IMPORTANTES
natural_image
Simple line drawing of a mechanical component with a tool, no text or symbols presentMesure pour huile
natural_image
Anatomical illustration of a human pelvic region with a black arrow indicating a specific area (no text or labels present)
natural_image
Line drawing of a device with a handle and internal components, no text or symbols presentnatural_image
Illustration of a food preparation step showing pouring liquid into two bowls with beans, separated by a diagonal line (no text or symbols)
natural_image
Diagram of a mechanical device with a handle and circular component, no text or symbols present
natural_image
Line drawing of a mechanical component with a circular head and internal structure (no text or symbols)
natural_image
Pure mechanical diagram showing a lever and bracket without any text, numbers, or symbolsnatural_image
Line drawing of a helmet with a black arrow pointing to the head area (no text or symbols)natural_image
Line drawing of a hand holding a device next to an electrical outlet (no text or symbols)natural_image
Illustration of a hand holding a container with liquid, connected to an electrical outlet (no text or symbols)natural_image
Line drawing of a hand using a tool to insert or mark a textured surface around a circular object (no text or symbols)NOTES:
natural_image
Diagram of a robotic arm interacting with a bowl containing granular material, showing force vectors (no text or symbols)AVERTISSEMENT
Risque de brûlure.
natural_image
Line drawing of a hand pouring liquid into a bowl filled with granular material (no text or symbols)natural_image
Diagram showing a cable being inserted into an electrical socket (no text or symbols present)natural_image
Line drawing of a mechanical device with a circular component and an arrow indicating direction (no text or symbols)natural_image
Line drawing of a hand pouring liquid into a container (no text or symbols)natural_image
Illustration of a hand holding a circular object with a sunburst effect, divided by a diagonal line (no text or symbols)natural_image
Diagram of a device with a lid and arrow indicating motion, no text or symbols presentSuggestions de garniture
natural_image
Simple line drawing of a hand holding a small object, no text or symbols presentMedidor de Aceite
natural_image
Simple line drawing of a closed container with an open lid and internal components, no text or symbols present.natural_image
Anatomical illustration of a human pelvic region with a black arrow indicating a specific area (no text or labels present)
natural_image
Line drawing of a mechanical device with a handle and internal components (no text or symbols)natural_image
Illustration of a food preparation step showing pouring milk into two bowls with beans, separated by a diagonal line (no text or symbols)
natural_image
Diagram of a cooking pot with a lid and handle, showing a pan and lid with a knife (no text or symbols)
natural_image
Line drawing of a helmet with a sunburst pattern on top (no text or symbols)
natural_image
Pure mechanical diagram showing a lever mechanism without any text or symbolsnatural_image
Line drawing of a helmet with a black arrow indicating clockwise motion (no text or symbols)natural_image
Line drawing of a hand holding a hooded device connected to an electrical outlet (no text or symbols)natural_image
Illustration of a hand holding a spray bottle with an electrical outlet connected to it (no text or symbols)natural_image
Illustration of a hand pouring liquid into a container with granular material inside a bowl (no text or symbols)NOTAS:
natural_image
Diagram of a biological or mechanical process showing a container with internal structures and directional arrows (no text or symbols)natural_image
Line drawing of a hand pouring liquid into a bowl filled with granular material (no text or symbols)natural_image
Diagram showing a cable being inserted into an electrical socket (no text or symbols present)natural_image
Line drawing of a mechanical device with a circular component and an arrow indicating rotation (no text or symbols)natural_image
Illustration of a hand holding a circular object above a device, with no visible text or symbols
natural_image
Diagram of a mechanical device with a rotating dial and an arrow indicating motion (no text or symbols)natural_image
Line drawing of a hand pouring liquid into a container (no text or symbols)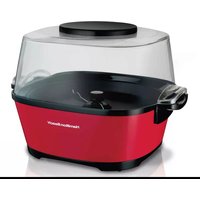

- SAVE THESE INSTRUCTIONS!
- Other Consumer Safety Information
- This appliance is intended for household use only.
- Parts and Features
- How to Assemble for Popping
- How to Make Popcorn
- How to Make Popcorn (cont.)
- NOTES:
- Care and Cleaning
- WARNING Electrical Shock Hazard.
- Servings Chart (all yields approximate)
- AMOUNT OF POPCORN AMOUNT OF OIL APPROXIMATE YIELD
- Recipes
- Topping Ideas
- Parmesan Italian Popcorn
- Sweet and Salty Cinnamon Popcorn
- Recipes (cont.)
- Cheese and Bacon Popcorn
- Buffalo Popcorn
- Herbed Onion Popcorn
- Notes
- Limited Warranty
- PRÉCAUTIONS IMPORTANTES
- AVERTISSEMENT
- Risque de brûlure.
- Suggestions de garniture
- NOTAS:
Brand : HAMILTON BEACH
Model : Party Popper 73310
Category : Popcorn machine