
MiWand 2 Wi-Fi - Scanner AVISION - Free user manual and instructions
Find the device manual for free MiWand 2 Wi-Fi AVISION in PDF.


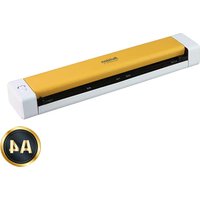
| Manufacturer | Avision |
| Model | MiWand 2 Wi-Fi |
| Product Type | Handheld Scanner |
| Scanning Method | Contact Image Sensor (CIS) |
| Optical Resolution | Up to 300 dpi |
| Scan Speed | Color: 8 seconds per A4 (300 dpi) B&W: 4 seconds per A4 (300 dpi) |
| Scan Size | Max width: 216 mm (8.5 inches) Max length: 2540 mm (100 inches) via continuous scanning |
| Color Depth | 24-bit color, 8-bit grayscale |
| Output Formats | JPEG, PNG, BMP, TIFF, PDF |
| Connectivity | Wi-Fi 802.11 b/g/n, USB 2.0 (for charging and file transfer) |
| Storage | microSD card slot (up to 32 GB, not included) |
| Internal Memory | Approximately 250 scans (at 300 dpi, color A4) |
| Display | 2.0-inch TFT color screen |
| Battery | Rechargeable Li-ion 3.7V, 1500 mAh |
| Battery Life | Up to 200 scans (at 300 dpi, color A4) |
| Power Supply | USB 5V, 1A (charger not included) |
| Dimensions (L x W x H) | 255 x 30 x 30 mm (10.0 x 1.2 x 1.2 in) |
| Weight | 200 g (7.05 oz) |
| Operating Temperature | 5°C to 35°C (41°F to 95°F) |
| Supported Operating Systems | iOS, Android, Windows, macOS (via Wi-Fi or USB) |
| Software Included | Avision Scanner App (iOS/Android), Avision Scan Manager (Windows/macOS) |
| Supported Media | Paper, photos, receipts, business cards, plastic cards (up to 1 mm thick) |
| Maintenance | Clean the glass and rollers with a soft, lint-free cloth. Do not use abrasive cleaners. |
| Safety Warnings | Do not expose to water or high humidity. Use only specified charger. Do not disassemble. |
| Spare Parts & Repairability | Battery replacement by authorized service center. No user-replaceable parts. |
| Package Contents | MiWand 2 Wi-Fi scanner, USB cable, quick start guide, carrying case, cleaning cloth |
Frequently Asked Questions - MiWand 2 Wi-Fi AVISION
User questions about MiWand 2 Wi-Fi AVISION
0 question about this device. Answer the ones you know or ask your own.
Ask a new question about this device
Download the instructions for your Scanner in PDF format for free! Find your manual MiWand 2 Wi-Fi - AVISION and take your electronic device back in hand. On this page are published all the documents necessary for the use of your device. MiWand 2 Wi-Fi by AVISION.
USER MANUAL MiWand 2 Wi-Fi AVISION
Regulatory model: HF-1116B
Avision Inc.
Trademarks
Microsoft is a U.S. registered trademark of Microsoft Corporation.
Windows, Windows XP, Windows Vista, and Windows 7 are either registered trademarks or trademarks of Microsoft Corporation in the United States and/or other countries.
IBM, IBM PC are registered trademarks of International Business Machines Corp.
Other brands and product names herein are trademarks or registered trademarks of their respective holders.
Copyright
All rights reserved. No part of this publication may be reproduced, transmitted, transcribed, stored in a retrieval system, or translated into any language or computer language, in any form or by any means, electronic, mechanical, magnetic, optical, chemical, manual, or otherwise, without the prior written permission of Avision Inc.
Material scanned by this product may be protected by governmental laws and other regulations, such as copyright laws, the customer is solely responsible for complying with all such laws and regulations.
Warranty
The information contained in this document is subject to change without notice.
Avision makes no warranty of any kind with regard to this material, including, but not limited to, the implied warranties of fitness for a particular purpose.
Avision shall not be liable for errors contained herein or for incidental or consequential damages in connection with the furnishing, performance, or use of this material.
Disposal of Waste Equipment by Users in Private Union

This symbol on the product or on its packaging indicates that the product can not be disposed of with your other household waste. Instead it should be sent to appropriate facilities for recovery and recycling in an effort to protect human health and the environment. Fore more information about where you can drop off your waste equipment for recycling, please contact your local city office, your household waste disposal service or the shop where you purchased the product.
FCC Radio Frequency Interference Statement
This product has been tested and found to comply with the limits for a class B digital device, pursuant to Part 15 of the FCC rules. Operation is subject to the following two conditions: (1) this device may not cause harmful interference, and (2) this device must accept any interference received, including interference that may cause undesired operation. The FCC Class B limits are designed to provide reasonable protection against harmful interference in a residential installation. This equipment generates, uses, and can radiate radio frequency energy and, if not installed and used in accordance with the instructions, may cause harmful interference to radio communications. However, there is no guarantee that interference will not occur in a particular installation. If this equipment does cause harmful interference to radio or television reception, which can be determined by turning the equipment off and on, the user is encouraged to try to correct the interference by one or more of the following measures:
■ Reorient or relocate the receiving antenna.
■ Increase the separation between the equipment and receiver.
■ Connect the equipment into an outlet on a circuit different from that to which the receiver is connected.
- Consult your point of purchase or service representative for additional suggestions.
CE
European Union Regulatory Notice
Products bearing the CE marking comply with the following EU Directives:
• Low Voltage Directive 2006/95/EC
• EMC Directive 2004/108/EC
CE compliance of this product is valid if powered with the correct CE-marked AC adapter provided by Avision.
* This machine is certified as Class 1 LED product. This means that this machine does not produce hazardous laser radiation.
Table of Contents
1. Overview 1-1
1.1 Introduction.... 1-1
1.2 Package Contents 1-1
1.3 Top View 1-2
1.4 Rear View 1-3
1.5 Bottom View 1-3
1.6 Scanner Indicator Light 1-4
2. Installation 2-1
2.1 Precautions.... 2-1
2.2 Install the Batteries 2-1
2.3 Install micro SD Card 2-2
3. Operation.... 3-1
3.1 Suitable and Unsuitable Original Types 3-1
3.2 Turn on the Scanner 3-1
3.3 Choose Your Desired Scan Settings 3-1
3.4 Start Wand Scanning (Hand-Held) 3-2
3.5 Preview Scanned Images on the LCD Screen 3-2
3.6 View or Download the Scanned Images (Windows) 3-4
3.6.1 Computer System Requirements for USB Connection 3-5
3.6.2 After Successful Connection 3-5
3.7 View or Download Images with iPad 3-6
3.8 Customize Your Scan Settings 3-7
3.8.1 Resolution 3-7
3.8.2 Color Mode 3-7
3.8.3 Save Format 3-8
3.8.4 LCD Off 3-8
3.8.5 Power Saving 3-9
3.8.6 Anti-mirror (wand scans only) 3-10
3.8.7 Card Format 3-11
3.8.8 Calibration (as needed only) 3-11
3.8.9 Factory Default 3-12
3.8.10 About 3-12
4. Presto! PageManager 4-1
4.1 Feature 4-1
4.2 Minimum System Requirements 4-1
4.3 Install Presto! PageManager 4-2
4.4 Start the Software 4-3
4.5 Use Optical Character Recognition (OCR) 4-4
4.6 Use Image-Enhancement Tools 4-6
4.7 Use the Annotation Tool.... 4-8
4.8 Remove Presto! PageManager 4-10
5. Maintenance.... 5-1
5.1 Calibrate the Scanner 5-1
5.2 Clean the Rollers and Glass....5-2
6. Troubleshooting 6-1
6.1 Error Messages....6-1
6.2 Frequently asked questions and answers....6-2
6.3 Technical Service 6-4
7. Specifications.... 7-1
1. Overview
1.1 Introduction
Congratulations on your purchase of the portable handheld scanner. With this scanner, you can scan and store your photos or documents directly to a micro SD™ card without any computer. Simply turn on the scanner, press the Power/Scan button to start and slide the scanner on the surface of your document and press the Power/Scan button again to stop. The scanned image is stored into your micro SD card.
What is best, the scanner allows you to preview your scanned images with a built-in color LCD display to confirm the document you have just captured.
Before you install and operate the product, please take a few minutes to read through this manual. It provides proper instructions for you to install, operate and maintain the product. The following figure indicates the package contents. Please check all the items against your checklist. If you do not receive all the items, please contact your authorized local dealer immediately.
1.2 Package Contents

Handheld scanner
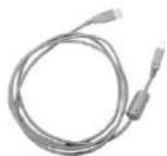
USB
Cable

microSD Card
(includes
software and
User's
Manual)
Accessories:
- Quick Guide
- Cleaning Cloth
- A battery charger and 2 pieces of AA rechargeable batteries
- Calibration Card
Note:
Retain the scanner box and packing materials in case you may use them for shipping purposes.
1.3 Top View
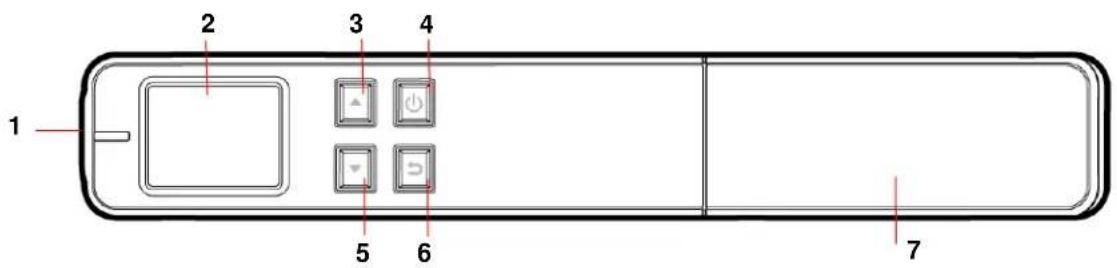
| Item | Name Description | |
| 1 | System indicator light | Indicates the operating/warning status of the scanner. |
| 2 | LCD display | Displays preview pictures and settings menus. |
| 3 | Up arrow | Enters Menu screen from [Scan Ready] screen%.Navigate “backward” through images and menu options. |
| 4 | Power/ Scan button | Press to turn on the scanner.Press to start or end a scan.Accept option choice in Menu and Preview options.Press and hold for 3 seconds to turn off the scanner. |
| 5 | Down arrow | Enters Display mode from [Scan Ready] screen%.Navigate “forward” through images and menu options. |
| 6 | Back arrow | Return to previous screens or exists from Display mode or Menu option. |
| 7 | Battery compartment | Slide to remove the cover. |
1.4 Rear View

| Item Name Description | ||
| 1 USB port | Used to plug the mini end of the USB cable to connect to PC for power charging or images transferring. | |
| 2 | Memory card slot | Used to insert a memory card. |
1.5 Bottom View

| Item | Name Description |
| 1 | Sensor rollersThe rollers are sensors and should only be rolled in one direction. Do NOT roll back and forth while scanning, except during calibration. |
| 2 Glass | While rolling scanner over a document, the optical sensor in the glass reads and scans the image. |
1.6 Scanner Indicator Light
Scanner Indicator Light

| Status Indication | |
| Off | Scanner is off or scanner is on and ready for use |
| Orange briefly | Powering on for initialization |
| Green, steadily on | Scanning in progress in 300 dpi |
| Orange, steadily on | Scanning in progress in 600 dpi |
| Green or Orange flashing | Processing scanned image |
| Red, flashing No SD card, SD card full, card error, no scan performed after initiating wand scan mode, or low battery | |
2. Installation
2.1 Precautions
- Keep the product out of direct sunlight. Direct exposure to the sun or excessive heat may cause damage to the unit.
- Do not install the product in a humid or dusty place.
- Place the product securely on an even, flat surface. Tilted or uneven surfaces may cause mechanical or paper-feeding problems.
- Retain the product box and packing materials for shipping purposes.
2.2 Install the Batteries
- Push and remove the battery cover on the scanner.

- Insert 2x AA batteries into the battery compartment. Make sure the batteries are inserted with the correct polarity. (note correct + - direction)

- Insert the battery cover.

* The scanner comes with a battery charger and 2 pieces of AA rechargeable batteries to let you reuse batteries. Please follow these steps to recharge the rechargeable batteries:
- Insert 2 rechargeable batteries into the battery charger. Make sure the batteries are inserted with the correct polarity. (note correct + - direction)
- Plug the battery charger into an electrical outlet. A green LED light appears on the charger while the batteries are charged. Note every time the batteries must be charged for 7 hours.
- When charging is complete, unplug charger and remove batteries to prevent overcharging and cause damage to the batteries.
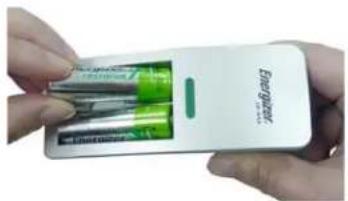
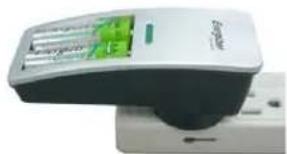
Note:
- The LED light on the charger does not turn off when charging is complete. It turns off only when the safety time (18 hours) expires.
- The scanner does not recharge the rechargeable batteries.
- The scanner can only run on 2x AA alkaline batteries or 2 NiMH rechargeable batteries.
2.3 Install micro SD Card
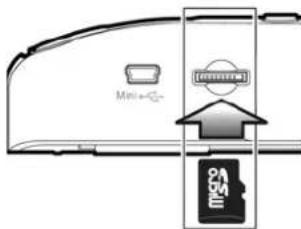
You must install a micro SD TM card to the SD slot of the scanner to store your images. Gently press in until the SD card is latched.
Note:
- The scanner only accepts micro SD card in FAT16 or FAT32 format. NTFS and other file formats are not supported.
• Always insert a micro SD card before calibrating and scanning.
3. Operation
3.1 Suitable and Unsuitable Original Types
Suitable for Wand Scanning
The scanner used as a wand scanner without the feeder dock is designed to obtain the best scanning results with photo and document up to 8.5" x 14" size.
3.2 Turn on the Scanner
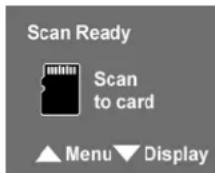
Press ⬆ to turn on the scanner. The LED will be flashing and then extinguished. The [Scanner Ready] screen will be displayed as illustrated.
Press 📋 again for about 3 seconds to turn off the scanner. The scanner will be automatically shut off if it is left idle for 3 minutes.
3.3 Choose Your Desired Scan Settings
- On the [Scanner Ready] screen, press ▲ to enter the Menu mode.
- A list of menu options is displayed. The options include Resolution, Color Mode, Save Format, LCD Off, and so on.
- Press ▼ to focus on your desired option such as Save Format, and then press ⏻ to select it.
- Press ☑ to focus on your desired item such as PDF, and then press ⏻ to select it.
- Press ↩ to exit.
![graph TD A["Scan Ready"] --> B["Scan to card"] B --> C["Menu ▼ Display"] C --> D["Resolution"] D --> E["Color Mode"] E --> F["Save Format"] F --> G["LCD Off"] G --> H["Enter"]](/content/2026/06/1275331/images/d8ba8b2167d73602c1f4f00db50f61fa0f3a6905ba1d3dc8dd14cf72e1b96350.jpg)
Choices of key Menu options:
Resolution: *300 dpi/600 dpi, Color Mode: *Color/B&W, File Format: *JPEG/PDF, LCD Off: *45 sec/90 sec/2 min. (*: Default settings)
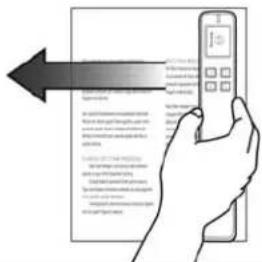
3.4 Start Wand Scanning (Hand-Held)
- Place your document on a flat surface.
- Press ⏻ to start a scan.
- Hold the scanner and glide the scanner gently over the surface of the page as illustrated.
- Press ⏻ to stop the scan.
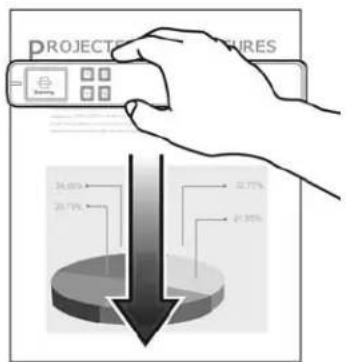
* By default, the Preview mode is on allowing you to view the scanned images for 2 seconds immediately after scanning (available for JPEG file format only).
Note:
-
Refer to the following list for a proper scan speed (based on an A4-size paper): 0.6 second (B&W, 300 dpi)/1.6 second (Color, 300 dpi); 2.4 seconds (B&W, 600 dpi)/6.5(Color, 600 dpi)
-
If you hold the scanner vertically and scan your original from right to left, your image will be rotated 90° left. Please use the included software application, NewSoft PageManager or other image-editing software application to rotate the scanned image correctly.
3.5 Preview Scanned Images on the LCD Screen
You can quickly and easily preview your JPEG images on the LCD screen immediately after a scan, or at any other time. You can also view all images individually or as a slideshow.
2.4.1 Set Preview Mode
By default, the Preview mode is on allowing you to view the scanned images for 2 seconds immediately after scanning (available for JPEG file format only). Two options appear on the screen with the image allowing you to press ▲ to Save (default) or press ▼ to Delete the image immediately.
When Preview mode is off, the JPG scanned image is saved immediately without displaying a preview.
* Scans performed with Preview mode off use less battery power, so you can expect more scans with Preview mode off.
Follow these steps to disable the Preview mode:
- With the Scan Ready Scan to card Mem Display
- Press ▼ to focus on Preview, and then press ⏻ to select it.
- Press ▼ to focus on Off, and then press ⏻ to select it.
- Press ↻ to exit.
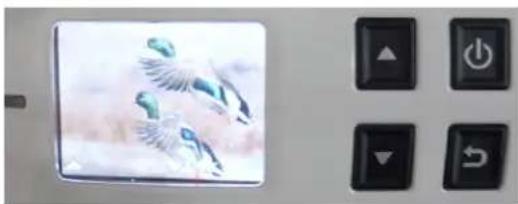
The Preview Screen
View Scanned JPEG images as Slideshow
-
With the screen displayed, press ▼ to enter the Display mode.
-
The slideshow automatically begins and displays the images in the alphanumeric order they are stored on the SD card.
-
To pause the slideshow, press ⓘ; to restart the slideshow press ⏻ again.
-
Press ☑ at any time to exit the slideshow.
View Scanned JPEG images Individually
- With the □ Scan to card screen displayed, press ▼ to enter the Display mode.
- The slideshow automatically begins and displays the images in the alphanumeric order they are stored on the SD card.
- Press ▲/▽ to view previous or next image.
- Press ☑ to exit the Display mode and return to the Scan Ready screen.
3.6 View or Download the Scanned Images (Windows)
- To view or download your scanned images, you can either remove the micro SD card and connect it to a card reader, or connect the scanner to your computer via the supplied USB cable (be sure to turn on your scanner).
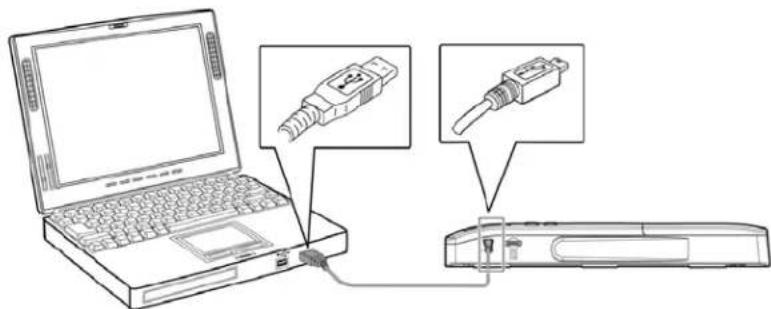
* When the scanner and your computer is connected successfully, all tasks are
interrupted and the USB connection screen

is display.
Warning:
It is recommended to download the scanned images by removing the memory card from the scanner and then inserting the memory card to your computer instead of connecting the scanner directly to your computer with the USB cable since this may require a lot of battery power.
-
Your computer should recognize the card or the scanner as a Removable Disk.
-
Click the Removable Disk and you will find a folder of "DCIM" is created and all the PDF files will be stored in the subfolder of "200DOC" and the JPEG files in the subfolder of "100PHOTO". File name starts from IMG_0001.pdf or IMG_0001.jpg.
Each scanned image is given a file name with the prefix IMG_ followed by a 4-digit sequential number in the order the images are stored. For example, IMG_0001.jpg, IMG_0002.jpg, IMG_0001.pdf, IMG_0002.pdf, etc.
JPG files are stored in a sub folder titled DCIM\100PHOTO. The folder stores 9999 photo files, and then automatically creates another sub folder titled 101PHOTO, and so on to 199PHOTO.
PDF files are stored in a sub folder titled DCIM\200DOC. The folder stores 9999 document files, and then automatically creates another sub folder titled 201DOC, and so on to 299DOC.
3.6.1 Computer System Requirements for USB Connection
Operating system: Windows XP, Windows Vista, Windows 7
Mac 10.5 or above (Mac is used only for data transferring)
USB port: USB 2.0 / USB 1.1
3.6.2 After Successful Connection
When the scanner connects with the PC, an additional drive is listed in the Explorer window titled Removable Disk [drive letter], or the personalized title you may have previously assigned to your microSD card.
3.6.2.1 Safely Disconnect Scanner/ micro SD Card From PC
- On the Windows System Tray, click the hardware removal icon.
- Click the "Safely remove USB mass Storage device" message with the corresponding Drive.
- When the "Safe to Remove Hardware" message appears, you can safely remove the scanner's USB cable.
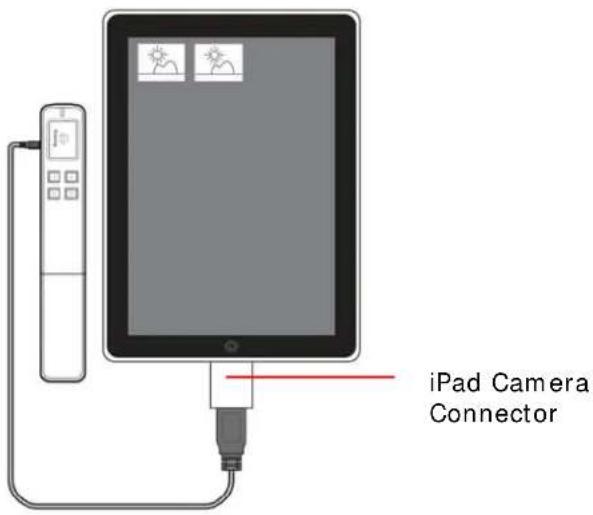
3.7 View or Download Images with iPad
- Plug the iPad Camera Connector (not included) to iPad dock connector. Plug the mini USB connector of the supplied USB cable to the Mini USB port of your scanner and plug the USB connector of the supplied USB cable to iPad Camera Connector.
- The scanned images in the micro SD card of your scanner will be displayed in iPad in 3 seconds.
- Choose "Import All" to load the scanned images to the album of your iPad.
3.8 Customize Your Scan Settings
You can customize scanner settings to fit different document types through the Menu screen.
3.8.1 Resolution
The scan resolution is measured in dpi (dots per inch). The higher the resolution, the more details the scanned image will be displayed. However, a higher resolution may require more disk space stored in the SD card.
The scanner offers two resolution modes, 300 (default, normal) or 600 dpi (high quality).
Follow these steps to select your desired resolution:
- With the
screen displayed, press ▲ to enter the Menu mode. - Press ⏻ to select Resolution.
- Press ▼ to focus on your desired resolution, and then press ⏻ to select it.
- Press ↩ to exit.
3.8.2 Color Mode
The scanner offers two color modes for your scanned image. Color (default, fits for photos) and Black and White (fits for text document).
Follow these steps to select your desired color mode:
- With the
screen displayed, press ▲ to enter the Menu mode. - Press ▼ to scroll to Color Mode, and then press ⏻ to select it.
- Press ▼ to focus on your desired mode, and then press ⏻ to select it.
- Press ↩ to exit.
3.8.3 Save Format
The scanner offers two types of file formats for your scanned image. JPEG (default, fits for photos) and PDF (fits for text document).
Follow these steps to select your desired file format:
- With the Screen displayed, press △ to enter the Menu mode.
- Press ▼ to scroll to Save Format, and then press ⏻ to select it.
- Press ▼ to focus on your desired format, and then press ⏻ to select it.
- Press ↩ to exit.
3.8.4 LCD Off
To let the scanner enter power saving mode, the scanner provides option to turn off the LCD screen after idle for a specified time without turning off the power. The choice includes 45 seconds (default), 90 seconds, and 3 minutes.
To turn the LCD screen back on, simply press any button.
Follow these steps to change the setting:
- With the Screen displayed, press △ to enter the Menu mode.
- Press ▼ to scroll to LCD Off, and then press ⏻ to select it.
- Press ▼ to focus on your desired setting, and then press ⏻ to select it.
- Press ↩ to exit.
3.8.5 Power Saving
To conserve power, the scanner automatically shuts off after left idle for a specified time (90 seconds, 3 minutes, or 5 minutes).
Follow these steps to change the time setting:
- With the
screen displayed, press ▲ to enter the Menu mode. - Press ▼ to scroll to Power Saving, and then press ⏻ to select it.
- Press ▼ to focus on your desired setting, and then press ⏻ to select it.
- Press ↩ to exit.
3.8.6 Anti-mirror (wand scans only)
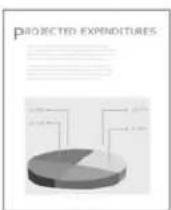
When the [Anti-mirror] feature is turned on (default), the scanner allows you to scan an original either from top-to-bottom or from bottom-to-top. In either way, you can obtain a correct scanned image. (The scanner automatically detects your scanning direction and if you scan your original from bottom-to-top, the scanned image will be automatically flipped and rotated upside-down.) When [Anti-mirror] is turned off, if you scan your original from bottom-to-top, your scanned image will be upside-down and mirrored (the right side and left side of your image will be reversed.)
* This feature is only available when using the scanner as a hand-held wand scanner.
| Original Scanning direction (Anti-Mirror: on) The Scanned Image | |||
 | 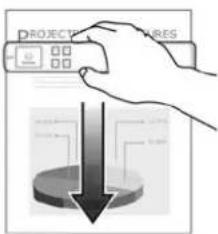 Or Or 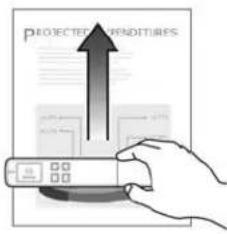 | 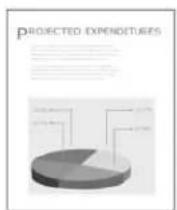 | |
| Top-to-bottom | Bottom-to-top | ||
Follow these steps to turn Anti-Mirror off:
- With the screen displayed, press △ to enter the Menu mode.
- Press ▼ to scroll to Anti-Mirror, and then press ⏻ to select it.
- Press ▼ to focus on your desired setting, and then press ⏻ to select it.
- Press ↩ to exit.
3.8.7 Card Format
Warning!: If you reformat your memory card, all existing files on the card will be deleted.
To format your SD card:
- With the Scan to card screen displayed, press ▲ to enter the Menu mode.
- Press ▼ to scroll to Card Format, and then press 🔊 to select it.
- Press ⏻ to select Yes.
- To confirm, press ▲.
- After successful format, the Menu screen is displayed.
- Press ↩ to exit.
3.8.8 Calibration (as needed only)
If the scanned image has vertical lines or discolorations, the scanner may need to calibrating in order for the Contact Image Sensor (CIS) to resume its color & sharpness precision. For calibration instructions, see the "Calibrate the Scanner" section.
* Do not calibrate the scanner unless it is necessary to correct scanned image problems.
3.8.9 Factory Default
At any time, you can reset all menu settings back to the factory defaults.
To reset to defaults:
- With the □ Scan to card screen displayed, press ▲ to enter the Menu mode.
- Press ▼ to scroll to Factory Default, and then press ⏻ to select it.
- Press ⏻ to select YES.
- To confirm, press ▲.
- After a successful reset, the scanner automatically shuts off. Press ⏻ to turn the scanner back on.
- Press ↩ to exit.
3.8.10 About
The About option lists the current Firmware and Calibration versions.
You may need this information if you contact our Customer Support.
Follow these steps to view the About information:
- With the Scan to card screen displayed, press ▲ to enter the Menu mode.
- Press ▼ to scroll to About, and then press ⏻ to select it.
- Press ⏻ to focus on desired mode, and then press ⏻ to select it.
- Press ↩ to exit.
4. Presto! PageManager
Fast, fun, and efficient -- Presto! PageManager makes it easy to scan, share, and organize your photos and documents. Presto! PageManager helps you not only to convert piles of papers into organized, digitized files, but also to view, edit, send, and back up files in many formats. Presto! Wrapper removes file sharing problems by creating a self-executable file that can be put on a storage disk, attached to e-mail, or downloaded from the Internet.
4.1 Feature
- Share files by converting them to portable file formats like PDF (Portable DocumentFormat), XPS (XML Pager Specification), and Presto! Wrapper, an executable file.
- Import from and export to a Lotus Notes 5.0 database.
- Scan double-sided and send images to your favorite programs with just a click.
- Easily organize files just like Windows Explorer.
- View files without opening other applications with PageManager document and image viewers.
- PageManager document and image viewers let you view files without opening other applications.
- Preview audio or video files in Thumbnail view.
- Easily stack related image and document files -- even with different file formats.
- Get text out of an image with reliable and accurate OCR (Optical Character Recognition).
• Full-text search with adjustable Fuzzy logic. - Easy to find backup files, annotations, title, author, and memo information with the efficient search function.
- Add annotations without affecting the original file with handy annotation tools, such as text, stamp, highlighter, freehand line, straight line, sticky note, and bookmark.
- Enhance images with a set of image tools such as crop, rotate, flip, invert color, auto enhancement, brightness and contrast, color adjustment, and remove noise.
4.2 Minimum System Requirements
- Pentium II 266 MHz or higher processor-based PCs
• Microsoft Windows XP Pro SP3 +, Windows Vista, Windows 7
• 200 MB (installation requirements of available hard disk space) - 64 MB memory
• Microsoft Internet Explorer 7.0 or higher
Recommended Requirements:
- 256-color SVGA or higher graphics card
• 128 MB of memory - TWAIN or WIA compatible digital camera or scanner
- Outlook, Outlook Express, Netscape Mail, Microsoft Mail, cc: Mail, or other e-mail Software
4.3 Install Presto! PageManager
- Insert the microSD card containing" Presto! PageManager " software into the microSD slot on the scanner.
- Start the scanner.
- Connect the scanner to your computer (mini USB connector into the mini USB slot of the scanner) via the USB cable.
- In the Windows Explorer window, find the microSD card drive.
- Double-click the folder, Software> PM7, and then double-click "Setup.exe".
- Follow the onscreen instructions to complete the software installation.
Note:
- When starting the software in the first time, you first need to start the scanner and connect the scanner to your computer; otherwise errors will occur.
- If you have turned on an anti-virus software, turn off the anti-virus software.
- If you want to reinstall the software, Import Old Data (transferring old data) will obtain the previous version of the information on the Presto! PageManager, including annotations and the stored files.
4.4 Start the Software
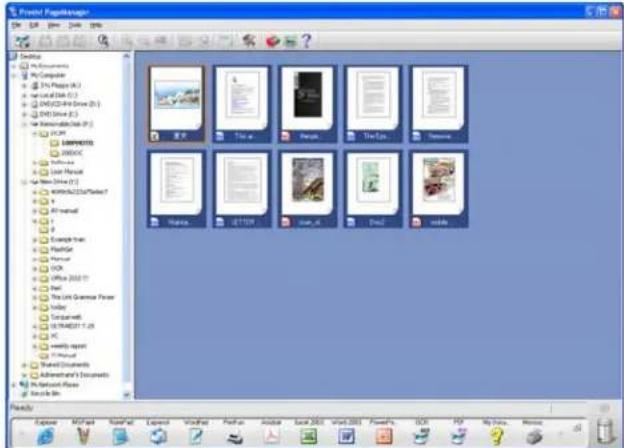
- Click the Presto! PageManager icon on the desktop or click Start>All Programs>Presto!PageManager.
- Presto! PageManager window will open.
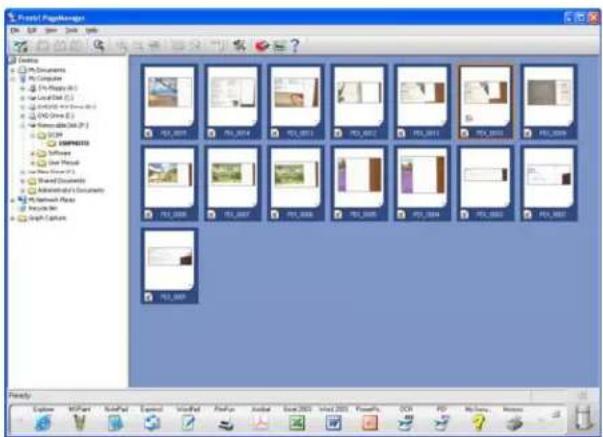
- In the left pane, locate the scanner drive. Please find the removable drive (drive letter).
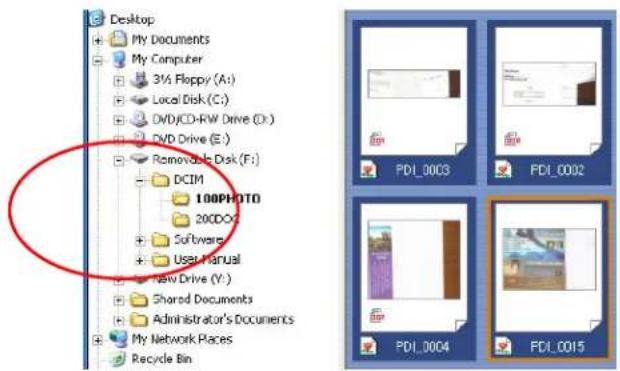
- Click DCIM\100PHOTO or DCIM\200DOC to view the scanned image.
- Double-click on an image to open it from the Presto! PageManager.
4.5 Use Optical Character Recognition (OCR)
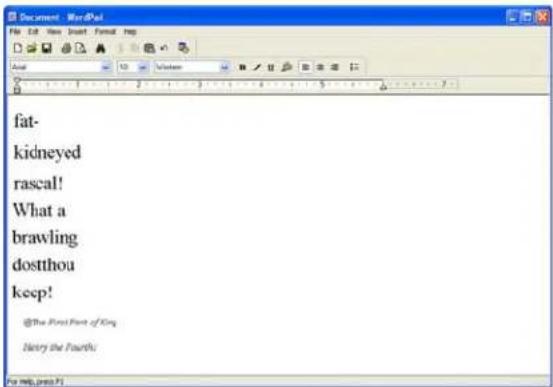
The OCR function can convert scanned text images into editable text.
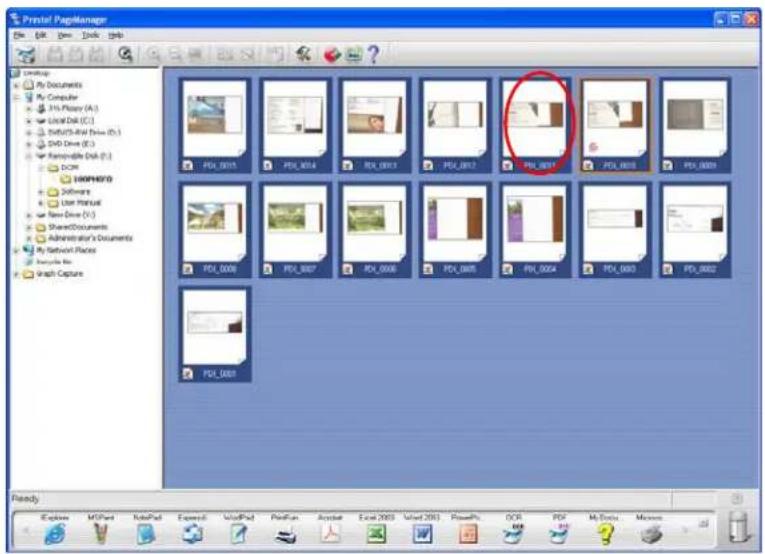
- In the tree view window, select a document thumbnail.

-
Please click the OCR icon ( ) on the main toolbar.
-
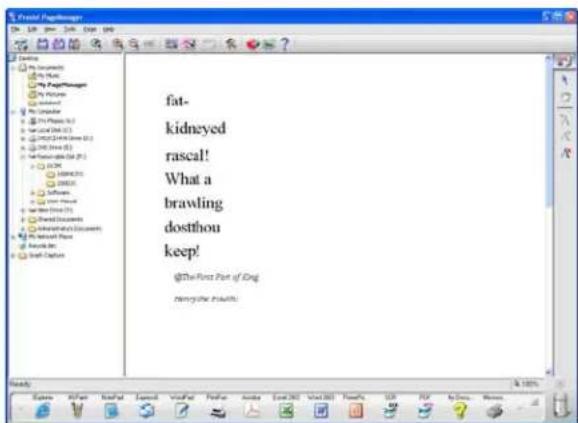
The document will be converted, and then the text in this image will be recognized as editable text and displayed on the screen.
-
Click any text you want to edit.
-
When the proof is complete, click the "Save As" button ( ), select a path, and enter a file name to save the modified file.
-
Text File: Save only the recognized text.
- Rich-Text Format file: Save the images and text of the original layout.
HTML file: Save the images and text of the original layout as a JPEG format.
Or
- In the tree view window, select a document thumbnail.
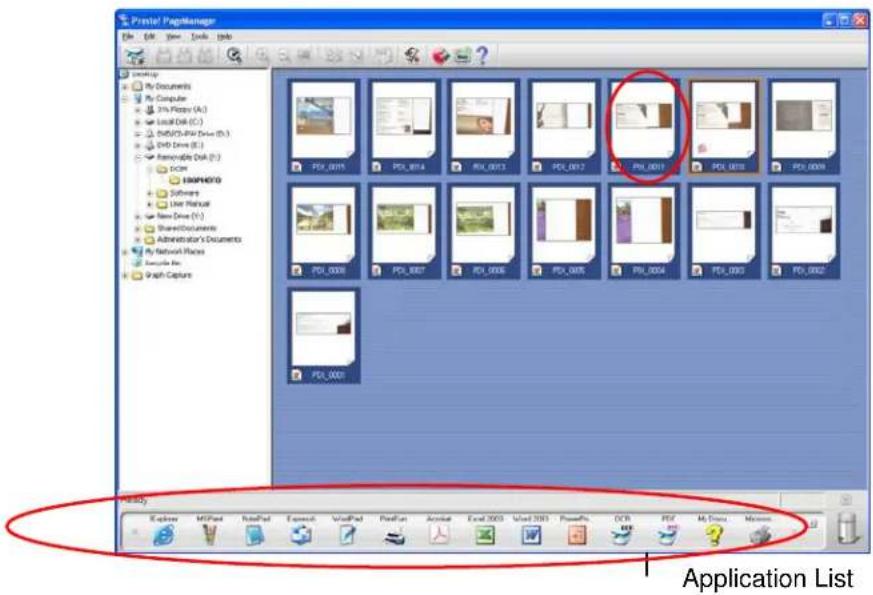
- On the application toolbar, select and click the application to which you want to send, such as WordPad ( ).
- The document will be automatically recognized as text, then the application will be opened, and at the same time the recognized text will be displayed on the screen.
4.6 Use Image-Enhancement Tools
The image-enhancement tool allows you to adjust brightness, contrast, color of your scanned image, and remove noise to improve your image quality.
- In the tree view window, double-click an image thumbnail to open it from the view window.
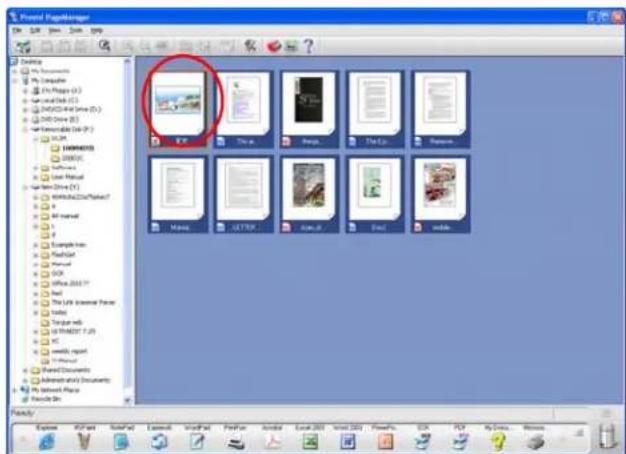
- The image annotation toolbar appears on the right-hand side of the screen.
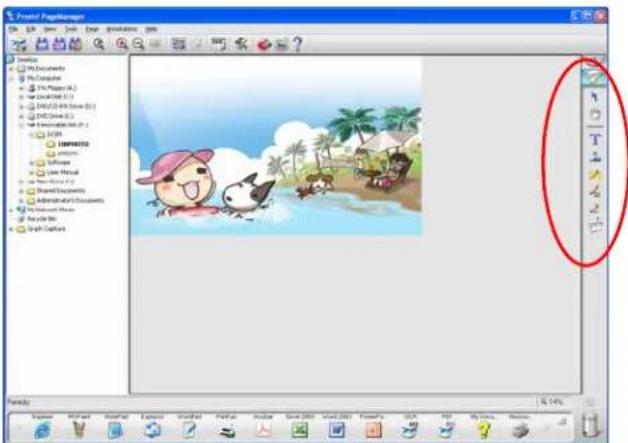
- Click the small image-repairing icon at the top, and the Image repair toolbar appears on the screen.
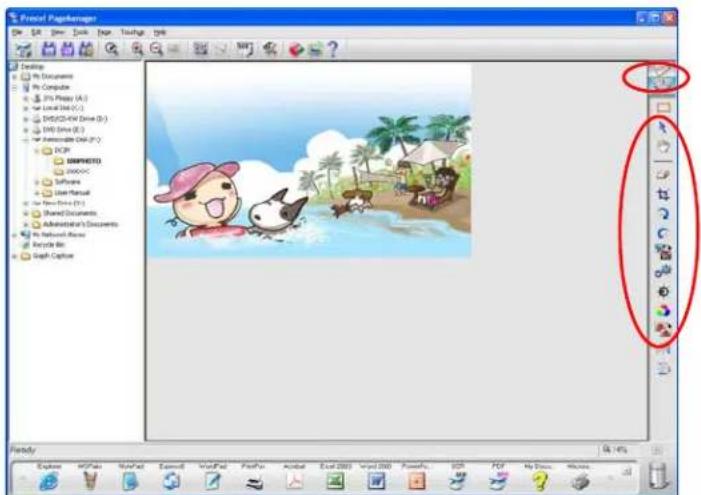
Summary of the image-enhancement tool
| Image enhancement Icon | Name Description | |
 | Image repair toolbar | Show all image-repairing tools |
 | Select Image Select some area of an image | |
 | Move Move an image up/down or left/right | |
 | Eraser Erase part of an image | |
 | Crop Crop part of the image | |
 | Rotate selected image right 90 degrees | Rotate the image 90 degrees to the right |
 | Rotate selected image left 90 degrees | Rotate the image 90 degrees to the left |
 | Invert Color Invert the brightness and color of an image, letting each pixel of that image be its own complementary color. | |
 | Automatic image enhancement | Automatically enhance image quality |
 | Contrast and brightness adjustment | Adjust the contrast and brightness of an image |
 | Color Adjustment Adjust the color balance of an image |
 | Remove noise Remove noise in an image |
 | Flip selected image horizontally |
 | Flip selected image vertically |
- Select an appropriate tool, and then click your image to perform the function of the tool.
- When repairing is done, click the "Save As" button (☐) to select a path and enter a file name to save the modified file.
4.7 Use the Annotation Tool
Annotation by entering text/lines or adding the seal and using the fluorescent pen makes it possible for the document or picture to be more visible and clearer.
The annotation function applies for text and image files.
- In the tree view window, double-click an image or text thumbnail to open it from the view window.
- At this point, the annotation toolbar appears on the right side of the screen.
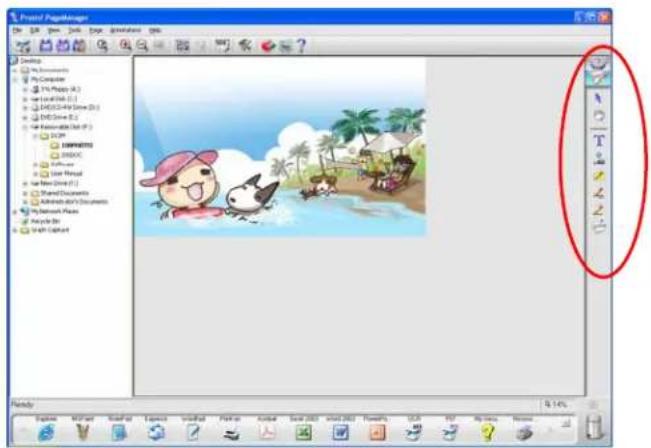
-
Move the cursor to each tool's icon, then click the right button, and an option menu pops up to let you define the properties of the tool such as font, color, or line style.
-
Click a tool to select it, and then click your image to perform the function of the tool.
Summary of the annotation tool
| Annotation icon | Name Description | |
 | Annotation tool | Show all annotation tools |
 | Select Annotation | Select an image annotation object, moving it around or changing its size |
 | Move Move an image up/down or left/right | |
 | Text Enter or edit the text on an image | |
 | Stamp Stamp an image | |
 | Highlighter Use the highlighter to mark a focus on an image | |
 | Freehand Line | Draw any line on an image |
 | Straight line | Add a straight line on an image |
 | Sticky Add a note on an image | |
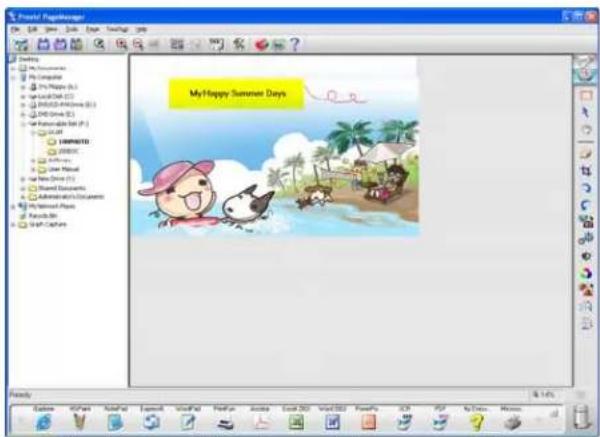
The image file after adding annotations
- When the annotation process is complete, click the "Save As" button ( ), select the path, and enter the file name to save the modified file.
Text annotation toolbar
- Not until you open the .doc, .rtf, or .txt file in the view window will the text annotation toolbar be displayed.
- If you want to know various tool descriptions of the image or text annotation toolbar, please click the Help function key ( ? ).
4.8 Remove Presto! PageManager
- Click Start>All Programs>Presto! PageManager >Remove Presto! PageManager Or
- Click Start>Control Panel>Add or Remove Programs>Presto! PageManager.
- Follow the onscreen instructions to remove the application.
Note:
For more details on using the application, please click the Help function key ( ? ) to view the user manual of the application software.
5. Maintenance
5.1 Calibrate the Scanner
Calibrate only if the scanned image looks fuzzy, the color looks abnormal (e.g., darker than normal), after 8K+ scanned, or the scanner has been stored without use for a long time. The calibration process resets the Contact Image Sensor to resume its color and sharpness precision.
To calibrate the scanner, complete the following steps:
- Make sure the battery is fully charged and a memory card is inserted.
- Remove the calibration sheet from its plastic cover and lay it on a flat surface with the printed side UP.
- Place the scanner on the white area of the calibration sheet, at the top of the white area.
* Make sure the sheet is clean (i.e. no debris or colored objects).
-
With the screen displayed, press ▲ to enter the Menu mode.
-
Press ▼ to scroll to Calibration, and then press ⏻ to select it.
-
Press ⏻ to select YES.
-
The scanner enters Calibration mode. Slowly slide the scanner down over ONLY the white area of the calibration sheet.
-
The scanner completes the calibration sequence and automatically powers off.
-
Carefully place the calibration sheet back into the plastic cover and store it in a safe place for future use.
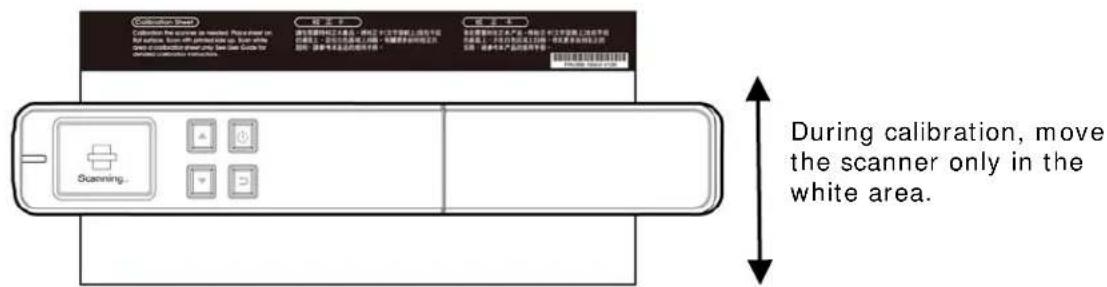
Warning:
- Do not interrupt the calibration sequence or try to shut off the device while it is calibrating. If you stop the calibration before it has completed, a calibration error may occur. As a result, when you next power up the unit, an error message may be displayed, and you will have to power off the unit and repeat the instructions in this section.
- Keep the calibration sheet from dust and debris. Any dirt may make the calibration chart invalid or impact the calibration result.
- Use only the included calibration sheet to calibrate the scanner.
5.2 Clean the Rollers and Glass
It is recommended to clean the scanner approximately every 200 scans or if vertical lines or stripes appear on the scanned image.
Use only the recommended or supplied tool to clean the scanner.
To clean the rollers and glass:
- Turn the scanner over to reveal the rollers and glass.
- Wipe the rollers and the glass with the included cleaning cloth as illustrated.
- Wipe the scanner with a dry and clean lint-free cloth.

Wand Scanner
Note:
- Adding some isopropyl alcohol (95%) on the cleaning cloth is more efficient when cleaning the rollers.
- Do not use any solvents or corrosive liquid (i.e., alcohol, kerosene, etc.) to clean any part of the scanner, otherwise the plastic material will be permanently damaged.
- Make sure the surface of the document or photo doesn't have any paper clips, etc. or this could damage the scanner glass lens.
6. Troubleshooting
6.1 Error Messages
If there is error during scanning, the LED light will be flashing in red color and error message will be displayed. Refer to the following table to clear the error conditions.
| Error Message Root Cause/ Code Purpose How to restore | ||
| Insert Memory Card | 1. No memory card inserted.2. Card not recognized. | 1. Insert a memory card.2. Try a different card. |
| Card Full | Card is full; can't save scanned image to inserted memory card | Free more space or insert a new micro SDTM card. |
| Low battery Battery power getting low. | Replace batteries (or recharge if using rechargeable batteries). | |
| No image scanned | 1. No scan data detected.2. Scanner time out. | Wait until message disappears. |
| Format Fails | 1. Memory card not recognized.2. File system is not FAT16/FAT32 | Use a different card. |
| Calibration Fails Internal check failed and found calibration data error | Recalibrate the scanner (see the “Calibrate Scanner” section. | |
| Scanned speed too fast | Images look distorted. Moving wand scanner over original too fast. | Move the scanner over the original slower, and if necessary, rescan the original. |
* Warning:
- If "low battery" is indicated on the LCD display, it is recommended to replace the batteries to prevent possible incomplete scanned images or other operational problems.
- If 2 AA Alkaline batteries have been used, when battery power is low you may obtain incomplete scanned images or encounter operational problems before "low batteries" is indicated on the LCD display.
6.2 Frequently asked questions and answers
| Q: | Why does not my scanner turn on? |
| A: | The scanner may not be engaged with the feeder dock correctly.The batteries may not enough power or may not be inserted correctly. |
| Q: | The image can not be saved into the memory card while scanning? |
| A: | Make sure you have a microSDTM card inserted correctly, and that it has adequate space |
| Q: | Why doesn't my computer recognize my scanner when it's connected via USB cable? |
| A: | Make sure the cable connection is correct and secure. Restart the computer if necessary. |
| Q: | Why do all the images I scan have the same date when saved on the memory card? |
| A: | The device does not have an internal “clock” to keep real time, so the date & time attributes are always a fixed date & time assigned during production, not current date & time. |
| Q: | Why are my scanned images distorted? |
| A: | You may be scanning too fast; scan again at a lower speed. |
| Q: | How can I tell if the scanner is scanning at 300 dpi or 600 dpi? |
| A: | The scan indicator light indicates the selected resolution: Green=300 dpi, Orange=600 dpi |
| Q: | Why there are strange lines on the scanned document? |
| A: | Please check the following:Are there scratches on the original or is the original clean?Remove any stains or dust from the original before scanning.Clean the rollers and glass with the included cleaning cloth.(Refer to the section “Cleaning the Rollers and Glass)) |
| Q: | Will the scanner recharge my rechargeable batteries? |
| A: | No, the scanner does NOT recharge rechargeable batteries. You must use your own battery charging device. |
| Q: | Should the scanner feel warm to the touch? |
| A: | It is normal for the scanner to emit a small amount of heat after prolonged use. However, if there are strange odors coming from the scanner or the scanner feels a little bit hot to the touch, turn the scanner off immediately. |
6.3 Technical Service
Before contact Avision, please prepare the following information:
- Scanner serial & revision number (located on the bottom of the scanner);
- Hardware configuration (e.g., your host CPU type, RAM size, free disk space, display card, interface card);
Headquarter
Avision Inc.
No. 20, Creation Road I, Science-Based Industrial Park,
Hsinchu 300, Taiwan, ROC
TEL: +886 (3) 578-2388
FAX: +886 (3) 577-7017
E-MAIL: service@avision.com.tw
Web Site: http://www.avision.com.tw
US and Canada Area
Avision Labs, Inc.
6815 Mowry Ave., Newark CA 94560, USA
TEL: +1 (510) 739-2369
FAX: +1 (510) 739-6060
E-MAIL: support@avision-labs.com
Web Site: http://www.avision.com
China Area
Hongcai Technology Limited
7A, No.1010, Kaixuan Road, Shanghai 200052 P.R.C.
TEL :+86-21-62816680
Specifications are subject to change without notice.
| Item Description | |
| Image Technology: Contact Image Sensor (CIS) | |
| Scanner Display 1.8" TFT LCD screen | |
| Memory: 16MB | |
| Max. Document Size: 8" x 14" (216 x 355 mm) | |
| Auto power off: 3 minutes | |
| Output File Format: JPEG/PDF | |
| Resolution: 300 dpi /600 dpi | |
| Interface: USB 2.0 | |
| Power: Wand Scanner | 2x AA Alkaline or 2 NiMH rechargeable Warning: Never mix battery types as this could cause damage or fire. The scanner does not recharge rechargeable batteries. |
| Net Weight: | Wand Scanner: 250 g Wand Scanner with batteries: 298 g |
| Dimensions: (WxLxH) | Wand Scanner: 41 x 258 x 36 (mm) |
| Operating Environment | Temperature: 5°C ~ 35°C (59°F~95°F) Humidity: 20%~85% RH |
| Storage Environment | Temperature: -20°C ~ -60°C Humidity: 20%~85% RH |
- TRADEMARKS
- COPYRIGHT
- WARRANTY
- DISPOSAL OF WASTE EQUIPMENT BY USERS IN PRIVATE UNION
- FCC RADIO FREQUENCY INTERFERENCE STATEMENT
- CE
- EUROPEAN UNION REGULATORY NOTICE
- TABLE OF CONTENTS
- OVERVIEW 1-1
- INSTALLATION 2-1
- OPERATION.... 3-1
- PRESTO! PAGEMANAGER 4-1
- MAINTENANCE.... 5-1
- TROUBLESHOOTING 6-1
- SPECIFICATIONS.... 7-1
- OVERVIEW
- 1.1 INTRODUCTION
- 1.2 PACKAGE CONTENTS
- ACCESSORIES
- NOTE
- 1.3 TOP VIEW
- 1.4 REAR VIEW
- 1.5 BOTTOM VIEW
- 1.6 SCANNER INDICATOR LIGHT
- INSTALLATION
- 2.1 PRECAUTIONS
- 2.2 INSTALL THE BATTERIES
- 2.3 INSTALL MICRO SD CARD
- OPERATION
- 3.1 SUITABLE AND UNSUITABLE ORIGINAL TYPES
- SUITABLE FOR WAND SCANNING
- 3.2 TURN ON THE SCANNER
- 3.3 CHOOSE YOUR DESIRED SCAN SETTINGS
- CHOICES OF KEY MENU OPTIONS
- 3.4 START WAND SCANNING (HAND-HELD)
- 3.5 PREVIEW SCANNED IMAGES ON THE LCD SCREEN
- 2.4.1 SET PREVIEW MODE
- VIEW SCANNED JPEG IMAGES AS SLIDESHOW
- VIEW SCANNED JPEG IMAGES INDIVIDUALLY
- 3.6 VIEW OR DOWNLOAD THE SCANNED IMAGES (WINDOWS)
- WARNING
- 3.6.1 COMPUTER SYSTEM REQUIREMENTS FOR USB CONNECTION
- 3.6.2 AFTER SUCCESSFUL CONNECTION
- 3.6.2.1 SAFELY DISCONNECT SCANNER/ MICRO SD CARD FROM PC
- 3.7 VIEW OR DOWNLOAD IMAGES WITH IPAD
- 3.8 CUSTOMIZE YOUR SCAN SETTINGS
- 3.8.1 RESOLUTION
- 3.8.2 COLOR MODE
- 3.8.3 SAVE FORMAT
- 3.8.4 LCD OFF
- 3.8.5 POWER SAVING
- 3.8.6 ANTI-MIRROR (WAND SCANS ONLY)
- 3.8.7 CARD FORMAT
- 3.8.8 CALIBRATION (AS NEEDED ONLY)
- 3.8.9 FACTORY DEFAULT
- 3.8.10 ABOUT
- PRESTO! PAGEMANAGER
- 4.1 FEATURE
- 4.2 MINIMUM SYSTEM REQUIREMENTS
- RECOMMENDED REQUIREMENTS
- 4.3 INSTALL PRESTO! PAGEMANAGER
- 4.4 START THE SOFTWARE
- 4.5 USE OPTICAL CHARACTER RECOGNITION (OCR)
- OR
- 4.6 USE IMAGE-ENHANCEMENT TOOLS
- 4.7 USE THE ANNOTATION TOOL
- TEXT ANNOTATION TOOLBAR
- 4.8 REMOVE PRESTO! PAGEMANAGER
- MAINTENANCE
- 5.1 CALIBRATE THE SCANNER
- 5.2 CLEAN THE ROLLERS AND GLASS
- TROUBLESHOOTING
- 6.1 ERROR MESSAGES
- 6.2 FREQUENTLY ASKED QUESTIONS AND ANSWERS
- 6.3 TECHNICAL SERVICE
- HEADQUARTER
- AVISION INC
- US AND CANADA AREA
- AVISION LABS, INC
- CHINA AREA
- HONGCAI TECHNOLOGY LIMITED
Brand : AVISION
Model : MiWand 2 Wi-Fi
Category : Scanner