
IR2115 - Iron BLACK & DECKER - Free user manual and instructions
Find the device manual for free IR2115 BLACK & DECKER in PDF.


| Product type | Steam iron |
| Brand | Black & Decker |
| Model | IR2115 |
| Power supply | 220-240 V, 50-60 Hz |
| Power | 2000 W |
| Water tank capacity | 300 ml |
| Soleplate material | Ceramic soleplate |
| Cord length | 1.8 m |
| Weight | 1.2 kg |
| Dimensions (L x W x H) | 28 x 12 x 15 cm |
| Steam function | Yes, adjustable steam flow |
| Spray function | Yes |
| Anti-calc system | Built-in |
| Automatic shut-off | Yes, after 8 minutes inactivity |
| Cleaning | Use a damp cloth for the soleplate; empty the tank after use |
| Safety | Automatic shut-off, safety thermostat |
| Spare parts | Tank seal, steam pin (references available on the manufacturer's website) |
| Warranty | 2 years |
| General information | Use demineralized water to prevent limescale deposits |
Frequently Asked Questions - IR2115 BLACK & DECKER
User questions about IR2115 BLACK & DECKER
0 question about this device. Answer the ones you know or ask your own.
Ask a new question about this device
Download the instructions for your Iron in PDF format for free! Find your manual IR2115 - BLACK & DECKER and take your electronic device back in hand. On this page are published all the documents necessary for the use of your device. IR2115 by BLACK & DECKER.
USER MANUAL IR2115 BLACK & DECKER
Should you have any questions or concerns with your new product, please call our Customer Service Line at 1-800-231-9786 (US and Canada). Please do not return to the store.
IMPORTANT SAFETY INSTRUCTIONS
When using your iron, basic safety precautions should always be followed, including the following:
- READ ALL INSTRUCTIONS BEFORE USING.
- Only use iron for intended use.
- To avoid the risk of electric shock, do not immerse the iron in water or other liquids.
- Always turn the iron to MIN setting before plugging in or unplugging from the outlet. Never pull on the cord to disconnect from the electrical outlet; instead grasp plug and pull to disconnect.
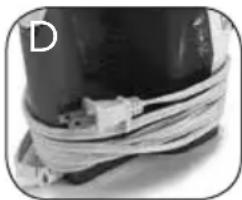
- Do not allow cord to touch hot surfaces. Let iron cool completely before putting away. Loop cord loosely around iron heel and clip the cord together with the provided plug clip when storing.
- Always disconnect iron from electric outlet before filling with or emptying water, cleaning, and when not in use.
- Do not operate the iron if it has been dropped, if there are visible signs of damage to the iron or its cord, or if it's leaking. To avoid the risk of electric shock, do not dissemble the iron; take it to a qualified service person for examination and repair, or call the appropriate toll-free number on the cover of this manual. Incorrect reassembly can cause risk of electric shock when the iron is used.
-
Close supervision is necessary for any appliance being used by or near children. Do not leave iron unattended when plugged in or on an ironing board.
-
Burns can occur from touching hot metal parts, hot water, or steam. Use caution when you turn the iron upside down - there may be hot water in the reservoir. Avoid rapid movement of iron to minimize hot water spillage.
- The iron must be used and rested on a stable surface.
- When placing the iron on its stand, ensure that the surface on which the stand is placed is stable.
- This appliance is not intended for use by persons (including children) with reduced physical, sensory, or mental capabilities, or lack of experience and knowledge, unless they have been given supervision or instruction concerning use of the appliance by a person responsible for their safety.
• Children should be supervised to ensure that they do not play with the appliance.
SPECIAL INSTRUCTIONS
- To avoid circuit overload, do not operate another high wattage appliance on the same circuit.
- If an extension cord is absolutely necessary, a minimum 10-ampere cord should be used. Cords rated for less amperage can result in a risk of fire or electrical shock due to overheating. Care should be taken to arrange the cord so that it cannot be pulled or tripped over.
SAVE THESE INSTRUCTIONS.
This product is for household use only.
POLARIZED PLUG
This appliance has a polarized plug (one blade is wider than the other). To reduce the risk of electric shock, this plug is intended to fit into a polarized outlet only one way. If the plug does not fit fully into the outlet, reverse the plug. If it still does not fit, contact a qualified electrician. Do not attempt to modify the plug in any way.
TAMPER-RESISTANT SCREW
Warning: This appliance is equipped with a tamper-resistant screw to prevent removal of the outer cover. To reduce the risk of fire or electrical shock, do not attempt to remove the outer cover. There are no user-serviceable parts inside. Repair should be done only by authorized service personnel.
Note: If the power supply cord is damaged, in order to avoid a hazard, it should be replaced by qualified personnel or in Latin America by an authorized service center.
GETTING TO KNOW YOUR VITESSA™ IRON

-
Soleplate
-
Spray nozzle
-
Water-fill cover
-
SmartSteam ^TM dial
-
Spray mist button
-
Burst of steam button


-
Power/auto shut-off light
-
Auto-Clean™ button
-
Dual position cord
-
Water tank
-
Heel rest
Product may vary slightly from what is illustrated.
HOW TO USE
This product is for household use only.
GETTING STARTED
- Remove all labels, tags and stickers attached to the body, cord, or soleplate of the iron.
- Remove and save literature.
FILLING THE WATER TANK
- With the iron on a flat surface, with the soleplate down or tilted at 45^ angle, open the water-fill cover. (A)
- Using a clean measuring cup, pour water into opening until water reaches the "MAX" level mark on the side of the water tank. Do not overfill. Close the water-fill cover securely.

natural_image
Close-up of a mechanical component with a curved arrow indicating direction (no visible text or symbols)Tip: This iron is designed to use normal tap water. If your water is very hard, you can use a mixture of 50% tap water and 50% distilled water to avoid build-up. It is not recommended to use water with perfumes or scented additives.
- Stand the iron on the heel rest.
- To refill at any time during the ironing process, unplug the iron and follow the above procedure.
USING YOUR IRON
- Plug the iron into an outlet. The red Power/auto shut-off light will illuminate on the handle, indicating that the iron is heating.
- Read the manufacturer's fabric label for clothing care recommendations to help select the correct temperature setting.
Tip: Since it takes an iron longer to cool down than heat up, organizing your clothing from Low to High temperature can cut down your ironing time.
- Select the temperature and steam level on the iron by turning the SmartSteam™ dial until you've reached the desired setting. A fabric guide is printed on the water tank for easy reference.
- Allow the iron about 2 minutes to heat up to the desired temperature.
Tip: To dry iron on low heat use SmartSteam™ settings 1-3, or for high heat simply empty the water tank and follow the normal directions. If emptying the tank, once preheated you may need to press the Burst of Steam button a few times to fully empty the water tank.
-
Iron as long as needed. Note that if the iron is left inactive, the 3-Way Auto Shut off Safety feature will activate. Please see Additional Features section for more details.
-
When finished ironing, turn the dial to the MIN setting and unplug from the outlet.
-
Stand the iron on its heel rest and allow it to completely cool off before storing.
SETTING GUIDE
For best results it's recommended to use the manufacturer's garment tags for heat and steam instructions. When in doubt, always start at the low heat setting.
| Setting number | Setting name Setting | Description | Icons |
| -- Do not | Iron |  | |
| 1 Synthetic | Low Heat and | No Steam |  or or  |
| 2 Nylon and Silk Low Heat and | No Steam |  or or  | |
| 3 Polyester | Medium Heat and No Steam |  or or  | |
| 4 | Blend Medium Heat and Light Steam |  | |
| 5 | Wool | High Heat and Medium Steam |  |
| 6 | Cotton and Linen | High Heat and High Steam |  |
ADDITIONAL FEATURES
Even Steam Soleplate Design

Your Vitessa™ Advanced Steam Iron features our Even Steam soleplate design. This soleplate was engineered to provide a more even flow of steam from heel to tip, enabling you to quickly tame wrinkles anywhere on your garment. (B)

natural_image
Cross-sectional diagram of a biological structure with an arrow pointing to a specific region (no text or labels)SmartSteam™ Technology
This technology gives you the control of both soleplate heat and steam level in one dial. On traditional irons the controls are separated, making it difficult to know what settings are right for each fabric. These simple controls take the guesswork out of ironing and ensure optimal results every time. (C)

Burst of Steam
Press the burst of steam button to generate additional steam. For best performance, leave several seconds between bursts. This feature works on settings 4-6 on the SmartSteam™ dial.
Spray Mist

Press the Spray Mist button to generate a light spray of water. Spray Mist is used to dampen tough wrinkles while dry or steam ironing. This setting works at any SmartSteam™ dial setting. Do not spray silk.
3-way Auto Shut-Off
The iron will automatically switch to Auto Shut-Off mode and stop heating after being left inactive for 30 seconds on the soleplate or side, and 8 minutes on the heel rest. When the iron is in Auto Shut-Off mode, the red light on the handle will blink. Simply move the iron to resume ironing and the soleplate will automatically heat to selected temperature.
Vertical Steaming
Skip the ironing board and use your iron like a garment steamer for small touch-ups. This can also be used for curtains or drapes.
-
Start by following the instruction 1-4 in the "Using your Iron" section to heat the iron.
-
Once the iron is preheated, place your garment on a hanger and hang it in a location that would not be impacted by the steam
Tip: Shower rods in your bathroom are a great location.
-
Hold the garment tight from the base or side (being careful to keep your hand away from the steam) and hold the iron in the other hand.
-
Place the heated soleplate about an inch away from the fabric and press the Burst of Steam button on the handle. Allow a few seconds between bursts to avoid water dripping.
Tip: If water dripping occurs, that means the soleplate isn't hot enough to create steam. Just allow the iron a minute to reheat and then resume steaming.
-
When finished steaming, turn the dial to the MIN setting and unplug from the outlet.
-
Stand iron on its heel rest and allow it to completely cool off before storing.
CLEANING AND CARE
This product contains no user serviceable parts. Refer to qualified service personnel.
CLEANING OUTSIDE SURFACES
- Make sure the iron is unplugged and has completely cooled.
- Wipe the soleplate and outer surface with a soft, damp cloth. Water and small amounts of gentle household soaps, such as dishwashing liquid, can be used. Never use heavy-duty cleaners, vinegar or abrasive scouring pads that may scratch or discolor the iron.
- After the iron has been thoroughly dried, turn the iron back on and lightly steam over an old cloth. This will help remove any reside left in the steam holes.
- When finished cleaning, turn iron off and allow time to cool before storing.
AUTO-CLEAN™ SYSTEM
Use this feature to keep the iron free of build-up. For optimal results over time, it is recommended that you clean your iron every 2-4 weeks. Homes with harder water should clean their iron more often, every 1-2 weeks.
- Fill the water tank well below the MAX fill line. Plug in the iron.
- Select the Wool Fabric setting (Number 5) on the SmartSteam™ dial and stand the iron on its heel while it preheats.
- Allow the iron to heat to desired temperature for about 2 minutes, then turn the dial to the MIN setting and unplug from the outlet.
- Hold iron over a sink with the soleplate facing down. Press the AutoClean™ button. Be careful, as hot water and steam will come out of the vents.
- Continue to hold the button down until all of the water has emptied. If necessary, slightly tilt the iron from side-to-side and front-to-back to aid the process.
- When finished, release the AutoClean™ button and place the iron on its heel rest. Allow the iron to completely cool before storing.
STORING YOUR IRON
-
Check that the iron is on the MIN setting, unplugged and completely cool.
-
Empty the water tank by opening the water fill door and turning the iron upside down over a sink.
-
Wrap the cord loosely around the heel of the iron and use the clip on the plug to clip the end of the cord to the wrapped cord. (D)
-
Always store the iron vertically on its heel to prevent water leaking from the soleplate.
natural_image
Close-up of a black cylindrical object wrapped in white cables, no visible text or symbolsIRONING TIPS AND TRICKS
- This iron is designed to use normal tap water. If your water is very hard, you can use a mixture of 50% tap water and 50% distilled water to avoid build-up. It is not recommended to use water with perfumes or scented additives.
- Since it takes an iron longer to cool down than heat up, organizing your clothing from Low to High temperature can cut down your ironing time.
- Whenever temperature settings are changed, allow the iron to stand a minute or two to allow heat up or cool down. Test garment by pressing a small hidden area to make sure temperature of iron is correct.
- Whenever ironing a garment with mixed fabrics, read the garment's tag for detailed directions or select the fabric setting for the most delicate fabric. For example, when ironing a shirt that is 65% cotton and 35% polyester, use the polyester setting.
- If you're unsure of the fabric's content, test a small area (on the inside seam or hem) before you proceed to iron the entire garment or cloth.
- If water dripping occurs, this means that the soleplate isn't hot enough to create steam. Just allow the iron a minute to reheat and then resume ironing.
• To prevent iron marks on your fabric, iron the fabric inside out.
- Putting on your clothes right after ironing can actually create wrinkles. Always allow your clothing to cool for about 5 minutes after ironing to set the press.
- Did you know that you can use your iron like a garment steamer for touch-ups? See the vertical steaming section for more details.
- Did you know you should be cleaning your iron at least once a month? See the Auto-Clean™ section for more details.
TROUBLESHOOTING
| ProblemCauseSolution | ||
| The iron is plugged in, but the soleplate is not heating. | Power supply issue. Check that the plug is properly inserted into the outlet or try plugging the iron into a different outlet. | |
| Not enough steam or no steam is coming out of the iron. | SmartSteamTM setting selected is too low. Lower heat levels are not intended to have steam. | Turn the SmartSteamTM Dial to settings 4-6 to iron with steam. |
| Not enough water in the water tank. | Follow the instructions under the “filling the water tank” section and fill to Max level marker. | |
| Iron is not preheated. If the iron isn’t fully preheated to the desired setting, the anti-drip feature will prevent the iron from creating steam. Allow the iron additional time to heat. | ||
| Discolored water is coming through the holes and staining the fabric | Residue build-up in the soleplate cavity or in the soleplate holes. | Empty the water tank after each use and use the Auto-CleanTM function to clean your iron regularly. |
| Use of descaling agents, perfumed or scented additives. | Use the Auto-CleanTM function to clean your iron and refrain from using descaling agents, perfumed or scented additives. | |
| Use of Starch. Always clean your soleplate after using starch and use the Auto-CleanTM function to clean your iron regularly. | ||
| Pure distilled water or softened water is being used. | Use only untreated tap water or a mix of half tap and half distilled water. Use the Auto-CleanTM function to clean your iron regularly. | |
| Iron is leaking or spitting Overuse of the Burst of Steam button. | Allow more time between bursts of steam for the iron to get back to desired temperature. | |
| The lower temperature settings are not meant to steam. Either turn the SmartSteamTM dial to settings 4-6 or use spray mist instead for additional moisture. | ||
NEED HELP?
For service, repair or any questions regarding your appliance, please call our Customer Service Line at 1-800-231-9786. Please DO NOT return the product to the place of purchase. Also, please DO NOT mail product back to manufacturer, nor bring it to a service center. You may also want to consult the website listed on the cover of this pamphlet.
Warranty Information
(Applies only in the United States and Canada)
What does it cover?
- Any defect in material or workmanship provided; however, Spectrum Brands' liability will not exceed the purchase price of product.
For how long?
- Two years from the date of original purchase with proof of such purchase.
What will we do to help you?
- Provide you with a reasonably similar replacement product that is either new or factory refurbished.
How do you get service?
- Save your receipt as proof of date of sale.
- Visit the online service website at www.prodprotect.com/applica, or call toll-free 1-800-231-9786, for general warranty service.
- If you need parts or accessories, please call 1-800-738-0245.
What does your warranty not cover?
- Damage from commercial use
- Damage from misuse, abuse or neglect
- Products that have been modified in any way
- Products used or serviced outside the country of purchase
- Glass parts and other accessory items that are packed with the unit
- Shipping and handling costs associated with the replacement of the unit
- Consequential or incidental damages (Please note, however, that some states do not allow the exclusion or limitation of consequential or incidental damages, so this limitation may not apply to you.)
How does state law relate to this warranty?
- This warranty gives you specific legal rights. You may also have other rights that vary from state to state or province to province.
natural_image
Close-up of a mechanical component with a curved arrow indicating rotation (no text or symbols)natural_image
Cross-sectional diagram of a biological structure with an arrow pointing to a specific region (no text or labels)natural_image
Close-up of a coiled cable with connectors, no visible text or symbolsCol. Centro, Cuauhtemoc,
México, D.F.
Tel. 01 800 714 2503
Nicaragua
LRM ELECTRONICA
Managua - Sinsa Altamira 1.5
kilómetros al norte
Nicaragua
Tel. (505) 2270-2684
Panamá
Supermarcas
City Market Nivel Plaza Local 153
Diagonal Hotel Melia,
Caracas
Tel. (582) 324-0969
www.applicaservice.com
servicio@applicamail.com
RÈGLES DE SÉCURITÉ IMPORTANTES
natural_image
Close-up of a mechanical component with a curved arrow indicating direction (no text or symbols)natural_image
Cross-sectional diagram of a biological structure with an arrow pointing to a specific region (no text or labels)Technologie SmartStream™
natural_image
Close-up of a coiled cable or wire wrapped in black plastic, no visible text or symbolsTRUCS ET CONSEILS DE REPASSAGE
En Chile, Household Products Chile Ltda
BLACK+DECKER and the BLACK+DECKER logo are trademarks of
The Black & Decker Corporation and are used under license. All rights reserved.
Made and Printed in People's Republic of China.
natural_image
Stack of colorful fabric sheets in a blue plastic basket with perforated windows (no text or symbols visible)- IMPORTANT SAFETY INSTRUCTIONS
- SPECIAL INSTRUCTIONS
- SAVE THESE INSTRUCTIONS.
- POLARIZED PLUG
- TAMPER-RESISTANT SCREW
- GETTING TO KNOW YOUR VITESSA™ IRON
- HOW TO USE
- GETTING STARTED
- FILLING THE WATER TANK
- USING YOUR IRON
- SETTING GUIDE
- ADDITIONAL FEATURES
- Even Steam Soleplate Design
- SmartSteam™ Technology
- Burst of Steam
- Spray Mist
- 3-way Auto Shut-Off
- Vertical Steaming
- CLEANING AND CARE
- CLEANING OUTSIDE SURFACES
- AUTO-CLEAN™ SYSTEM
- STORING YOUR IRON
- IRONING TIPS AND TRICKS
- NEED HELP?
- Warranty Information
- (Applies only in the United States and Canada)
- What does it cover?
- For how long?
- What will we do to help you?
- How do you get service?
- What does your warranty not cover?
- How does state law relate to this warranty?
- Nicaragua
- Panamá
- RÈGLES DE SÉCURITÉ IMPORTANTES
- Technologie SmartStream™
- TRUCS ET CONSEILS DE REPASSAGE
Brand : BLACK & DECKER
Model : IR2115
Category : Iron