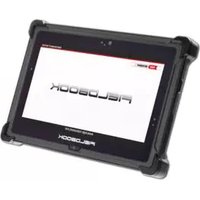
Fieldbook E1 - Tablet Logic - Free user manual and instructions
Find the device manual for free Fieldbook E1 Logic in PDF.


| Product Type | Rugged Tablet |
| Brand | Logic |
| Model | Fieldbook E1 |
| Operating System | Android 10 |
| Display Size | 8 inches |
| Display Resolution | 1280 x 800 pixels |
| Processor | Quad-core 1.5 GHz |
| RAM | 3 GB |
| Internal Storage | 32 GB eMMC |
| Expandable Storage | microSD up to 128 GB |
| Battery Capacity | 6000 mAh Li-ion |
| Battery Life | Up to 10 hours |
| Dimensions | 270 x 180 x 15 mm |
| Weight | 600 g |
| IP Rating | IP65 (dust and water resistant) |
| Drop Resistance | Up to 1.2 m |
| Cameras | Rear 8 MP, Front 2 MP |
| Connectivity | Wi-Fi 802.11 a/b/g/n/ac, Bluetooth 4.2, GPS |
| Ports | USB Type-C, 3.5 mm audio, micro HDMI |
| Sensors | Accelerometer, light sensor |
| Care and Cleaning | Wipe with a soft, dry cloth; avoid liquids |
| Safety | Do not disassemble, keep away from heat sources |
| Spare Parts and Repairability | Contact authorized service center |
Frequently Asked Questions - Fieldbook E1 Logic
User questions about Fieldbook E1 Logic
0 question about this device. Answer the ones you know or ask your own.
Ask a new question about this device
Download the instructions for your Tablet in PDF format for free! Find your manual Fieldbook E1 - Logic and take your electronic device back in hand. On this page are published all the documents necessary for the use of your device. Fieldbook E1 by Logic.
USER MANUAL Fieldbook E1 Logic
natural_image
Black hard tablet with visible 'PIELOSOOK' branding on screen (no other text or symbols)User's Guide
Safety Information
- Please read these safety instructions carefully.
- Please keep this User's Guide for later reference.
- Please disconnect this device from the power source before cleaning. Do not use liquid or detergent for cleaning. Use a moist sheet or cloth for cleaning.
- Make sure the device is connected to a power source with the correct voltage, frequency, and ampere.
- All cautions and warnings on the equipment should be noted.
- Never pour any liquid into opening to prevent fire or electrical shock.
- Never open the device. Only qualified service personnel should open the device to prevent damage or personal injury.
- Get the equipment checked by a service personnel in any of these cases:
a. Liquid has penetrated the device.
b. The device has been exposed to moisture.
c. The equipment has not worked well or you cannot get it to work according to User's Guide.
d. The device was dropped and damaged, and there are obvious signs of breakage.
-
Caution on the use of the battery: Use only the battery recommended by the manufacturer or the same type of battery installed by the manufacturer. Incorrect battery may cause explosion or fire hazard. Recycle or discard used batteries according to the manufacturer's instruction or your local authorities.
-
The device uses nonvolatile memory that requires a battery to retain system information when power is removed. The 3V lithium battery is onboard the system. Battery life depends on the amount of time the computer is powered on. If the computer does not display the correct time and date, replace the battery.
IMPORTANT: Loss of BIOS settings occurs when the battery is removed. BIOS settings must be reconfigured whenever the battery is replaced.
WARNING: A risk of fire and chemical burn exists if the battery is not handled properly. Do not disassemble, crush, puncture, or short external contacts, or expose the battery to temperatures higher than 60 °C (140 °F). Do not dispose of a used battery in water or fire.
CAUTION: There is a danger of explosion if the battery is incorrectly replaced. Replace only with same or equivalent type recommended by the manufacturer. Discard used batteries according to the manufacturer's instructions.
FCC Compliance Statement
This equipment has been tested and found to comply with the limits for a class B digital device, pursuant to part 15 of the FCC Rules. These limits are designed to provide reasonable protection against harmful interference in a residential installation.
This equipment generates, uses, and can radiate radio frequency energy and, if not installed and used in accordance with the instructions, may cause harmful interference to radio communications. However, there is no guarantee that interference will not occur in a particular installation. If this equipment does cause harmful interference to radio or television reception, which can be determined by turning the equipment off and on, the user is encouraged to try to correct the interference by one or more of the following measures:
➢ Reorient or relocate the receiving antenna.
➢ Increase the separation between the equipment and receiver.
➢ Connect the equipment into an outlet on a circuit different from that to which the receiver is connected.
Consult the dealer or an experienced radio/TV technician for help.
FCC Caution: Any changes or modifications not expressly approved by the party responsible for compliance could void the user's authority to operate this equipment.
FCC RF Radiation Exposure Statement:
- This transmitter has demonstrated co-location compliance requirements with Wi-Fi, Bluetooth and RFID Modules. This transmitter must not be co-located or operating in conjunction with any other antenna or transmitter.
- This equipment complies with FCC RF radiation exposure limits set forth for an uncontrolled environment. This device was tested for typical hand held operations with the device contacted directly to the human body to the back side of the tablet. To maintain compliance with FCC RF exposure compliance requirements, avoid direct contact to the transmitting antenna during transmitting.
Europe – EU Declaration of Conformity
This device complies with the essential requirements of the R&TTE Directive 1999/5/EC and EMC directive 2004/108/EC. The following test methods have been applied in order to prove presumption of conformity with the essential requirements of the R&TTE Directive 1999/5/EC and EMC directive 2004/108/EC:
EN 55022: 2006 +A1: 2007
EN 61000-3-2: 2006
EN 61000-3-3: 1995 + A1 : 2001 + A2 : 2005
EN 55024: 1998 + A1: 2001 + A2: 2003
• IEC 61000-4-2: 2008;
• IEC 61000-4-3: 2006 + A1:2007;
• IEC 61000-4-4: 2004;
• IEC 61000-4-5: 2005;
• IEC 61000-4-6: 2003 + A1: 2004 +A2: 2006;
• IEC 61000-4-8: 1993 +A1: 2000;
• IEC 61000-4-11: 2004
EN 60950-1:2001
Safety of information technology equipment
EN 300 328 V1.7.1: 2006
EN 301 489-17 V2.1.1: 2009 and EN 301 489-1 V1.8.1: 2008
EN 62311: 2008
This device is a 2.4GHz wideband transmission system (transceiver), intended for use in all EU member states and EFTA countries under the following conditions and/or with the following restrictions:
In Italy, the end-user should apply for a license at the national spectrum authorities in order to obtain authorization to use the device for setting up outdoor radio links and/or for supplying public access to telecommunications and/or network services.
This device may not be used for setting up outdoor radio links in France and in some areas the RF output power may be limited to 10mW EIRP in the frequency range of 2454 – 2483.5MHz. For detailed information the end-user should contact the national spectrum authority in France.
Table of Contents
CHAPTER 1. GENERAL INFORMATION......11
1.1. INTRODUCTION.... 11
1.2. SPECIFICATIONS....12
1.2.1. Main System 13
1.2.2. Interfaces 14
1.2.3. Control buttons.... 14
1.2.4. Power supply.... 15
1.2.5. Environment.... 15
1.2.6. Material ...... 16
1.2.7. Certifications 16
1.2.8. Optional: Internal Module 17
1.3. PACKAGE CONTENTS ...... 19
CHAPTER 2. SYSTEM SETUP....20
2.1. EXPLORING YOUR FIELDBOOK E1 20
2.1.1. Front View....21
2.1.2. Rear View....23
2.1.3. Left View 25
2.1.4. Right View....27
2.1.5. Bottom View....29
2.2. PREPARING FOR INSTALLATION 30
2.2.1. Switch ON the Main Battery 30
2.2.2. Connecting a power supply....31
Fieldbook AC Adapter....32
2.2.3. Insert a SIM Card.... 34
2.2.4. Insert a Micro SD Card.... 36
2.2.5. Restore Factory Settings.... 38
2.2.6. Turn On the Device 39
2.3. ANDROID SETTINGS....40
2.3.1. Setting Up for the First Time 40
2.3.2. Finger Gestures 40
2.3.3. Home Screens 41
2.4. CONNECT THE FIELDBOOK E1 TO OTHER DEVICES...... 42
2.4.1. Connecting a USB Device.... 42
2.4.2. Connecting an HD Display 44
2.4.3. Connecting a Headphone 46
CHAPTER 3. FIELDCONTROL....48
3.1. INTRODUCTION....48
3.2. FIELDCONTROL OVERVIEW 49
3.2.1. Launching FieldControl 49
3.2.2. Field Control Main Page.... 50
3.3. MAIN PAGE FUNCTION CONTROLS 53
3.3.1. Brightness 53
3.3.2. Volume 54
3.3.3. Auto-Rotation 54
3.3.4. Profile Selection 55
3.3.5. Radio control settings.... 56
Airplane Mode 56
WiFi/WWAN/Bluetooth/GPS....56
3.4. ADMINISTRATOR MENU 58
3.4.1. Accessing the Administrator Menu....58
3.4.2. Resetting the Password 59
3.5. ADMINISTRATOR SETTINGS 60
3.5.1. Profile Settings....61
NOTES ON THE AIRPLANE MODE....63
User Permissions....63
3.5.2. Security Settings 63
Setting or Changing the Password....64
3.5.3. Other Settings 65
Installing Updates....66
3.6. KEY MAPPING 67
3.6.1. Default Function Key Assignments 68
3.6.2. Modifying Function Key Assignments 69
3.7. SAVE REQUEST PAGE 71
CHAPTER 4. SPECIAL FUNCTIONS....72
4.1. BARCODE SCANNER 72
4.2. RFID SCANNER....73
CHAPTER 5. CONNECTING TO THE INTERNET ...... 74
5.1. WWAN....74
5.2. Wi-Fi 75
CHAPTER 6. MAINTENANCE....76
6.1. MAINTAINING THE BATTERY 76
6.2. MAINTAINING THE LCD DISPLAY 77
6.3. CLEANING THE FIELDBOOK E1 77
CHAPTER 7. TROUBLESHOOTING....78
Chapter 1. General Information
1.1. Introduction
The Fieldbook E1 is a rugged tablet based on the TI ^® OMAP platform (OMAP4460). This high-performance tablet features a bright 10.1" LED-backlit LCD display and runs on Google ^® Android ^® operating system.
The Fieldbook E1 has been engineered and tested to meet military (MIL-STD810G) and industrial (IP65) standards. The following features make it exceptionally rugged, durable and ideal for the rigors of field work:
▶ Android 4.2 operating system
Complies with the highest rugged standards in the market
• IP65: water- and dust-proof
- MIL-STD-810G: temperature, thermal shocks, relative humidity, vibration, drop, altitude, salt fog
- 6-feet drop resistance
▶ Fully integrated communication
• WLAN 802.11 a/b/g/n
- Bluetooth V4.0,
- Optional WWAN LTE module
Dual camera
• 1.2 MP FF front camera for HD video conferencing
• 5 MP AF rear camera with LED flash
▶ Free programmable physical buttons
FieldControl dashboard software
1.2. Specifications
The Fieldbook E1 is a flexible, multi-functional ultra-slim rugged tablet. The following specifications can be applied in diverse operational environments and implemented in multi-faceted applications.
1.2.1. Main System
| Operating System | Android^TM 4.2.2 |
| CPU | TI® OMAP Platform (OMAP4460 dual-core, 1.5GHz) |
| System Memory | 1GB LPDDRII memory |
| Storage | 1 x 64GB Flash eMMC |
| LCD Panel | 10.1” WXGA (1366x768)LED backlightFieldViewTM Pro technology (sunlight readable) |
| Touch Panel | Two-point capacitive touch screen |
| Audio | 1 x High-quality speaker (1W) |
| 1 x Internal microphone (on front bezel) | |
| Communication | Wi-Fi IEEE 802.11 a/b/g/nBluetooth 4.0Built-in GPS |
| Webcam | Front: 1.2 MP cameraRear: 5 MP auto-focus camera with LED flash |
1.2.2. Interfaces
| External | 1 x Micro USB OTG |
| 1 x Audio combo jack | |
| 1 x Micro HDMI slot | |
| 1 x Micro SD slot | |
| 1 x Micro SIM slot (optional) | |
| 1 x Docking connector | |
| 3 x Pass-through connectors | |
| 1 x DC jack |
1.2.3. Control buttons
| Buttons | 1 x Power button1 x Battery on/off switch3 x Programmable function buttons1 x Button for secundar functions |
1.2.4. Power supply
| Adapter | AC to DC, 12VDC@2.1A, 25WAC 90V ~ 243V, 47~63Hz input |
| Battery | Internal lithium polymer battery, 10000mAh(minimum: 9600mAh), 3.7V |
1.2.5. Environment
| Operating Temperature | -20°C to +60°C (MIL-STD-810G Method 501.5 and 502.5) |
| Storage Temperature | -30°C to +70°C (MIL-STD-810G Method 501.5 and 502.5) |
| Humidity | 5-95% without condensation (MIL-STD-810G Method 507.5) |
| Drop | 6-ft drops to Plywood (MIL-STD-810G Method 516.6 Procedure IV) |
| Vibration | Operating: SSD (MIL-STD-810G Method 514.6 Procedure I) |
| Mechanical Shock | Operating: 40g (peak), 11ms, sawtooth |
| Water/Dust Resistance | IP65 equivalent |
1.2.6. Material
| Chassis | Rugged Tablet Form Factor |
| Enclosure | PC/ABS Plastic, PC/ABS and TPU Double Injection with Protective Rubber Grips Set |
| Dimensions(W x H x D mm) | 277.5 x 179.7 x 22.4mm (without rubber corner bumper)283.5x185.7x22~28mm (with rubber corner bumper) |
| Weight | Approximate 1.075kg (with internal battery) |
1.2.7. Certifications
| EMI | FCC part 15 Class B(CE (EN55022 / EN55024) |
| Safety | UL (EN60950), CB (IEC60950) |
| RF(Wi-Fi+Bluetooth+GPS+RFID) | FCC part 15 subpart C |
1.2.8. Optional: Internal Module
| Sierra MC7710 or MC7750 or MC7700 | |
| Protocol | LTE/HSPA+ (MC7700/7710)LTE/EV-DO (MC7750) |
| Frequency | 1. LTE:• 700(B17)/AWS (MC7700)• 800/900/1800/2100/2600 MHz (MC7710)• 700(B13) MHz (MC7750)2. WCDMA:• 850/1900/2100 MHz (MC7700)• 900/2100 MHz (MC7710)3. CDMA 1xRTT/EV-DO Rev A:• 800/1900 MHz (MC7750)4. GSM/GPRS/EDGE:• 850/900/1800/1900 MHz (MC7700)• 900/1800/1900 MHz (MC7710)UMTS/HSUPA/HSDPA850/900/1800/2100MHz |
| Barcode Scanner | |
| Decoded Mode | 1. 1D Symbologies : EAN/UPC, RSS, Code 39, Code 128, UCC/EAN 128, ISBN, ISBT, Interleaved, Matrix, Industrial and Standard 2 of 5, Codabar, Code 93/93i, Code 11, MSI, Plessey, Telepen, postal codes.2. 2D Symbologies: Data Matrix, PDF417, Micro PDF 417, Maxicode, QR, Aztec, EAN.UCC composite. |
1.3. Package Contents

natural_image
Front view of a black tablet device labeled 'PIELOBOOK' with no visible text or symbols on the screen or body.Fieldbook E1 Rugged Tablet

natural_image
Line drawing of a connected electrical device with cable and connector (no text or symbols)AC adapter
natural_image
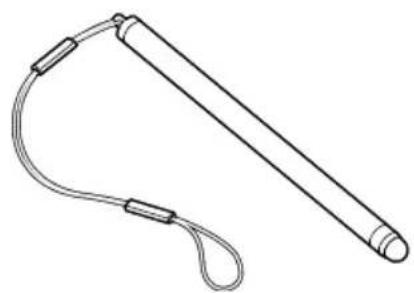
Line drawing of a cylindrical object with attached cable and loop (no text or symbols)Stylus
Chapter 2. System Setup
2.1. Exploring your Fieldbook E1
Before starting to set up the Fieldbook E1, familiarize yourself with the controls, connectors and I/O ports, which are illustrated in the figures below. When placed upright, the front panel of the Fieldbook E1 appears as shown in below.
2.1.1. Front View

Fieldbook E1 Front View
| Item | Description |
| 1. 1.2 MP camera | For capturing photos and videos and for video conferencing. |
| 2. Digital microphone | For capturing sound and voice |
| 3. Home button | Opens the Home screen. |
| 4. Protective rubber | Protects the system from impacts on the corners |
| 5. Power indicator | Indicates the current power status |
| 6. WiFi indicator | Indicates the current WiFi connection status |
| Power LED Definitions | |
| Green | The battery is fully charged. |
| Amber(Blinking at 1Hz) | Battery capacity is less than 15%. |
| Amber(Blinking at 3Hz) | Battery capacity is less than 8%. |
| Red | Battery is charging and not yet full. |
2.1.2. Rear View

Fieldbook E1 Rear View
| Item | Description |
| 1. 1D/2D barcode scanner | Scans barcodes |
| 2. 5MP camera | For capturing photos and videos |
| 3. Speaker | For sound output |
| 4. Stylus cord hooks | Secures the stylus cord. Choose the location depending on whether you are left-handed or right-handed. |
| 5. Stylus | For entering information or selecting items on the screen. |
2.1.3. Left View
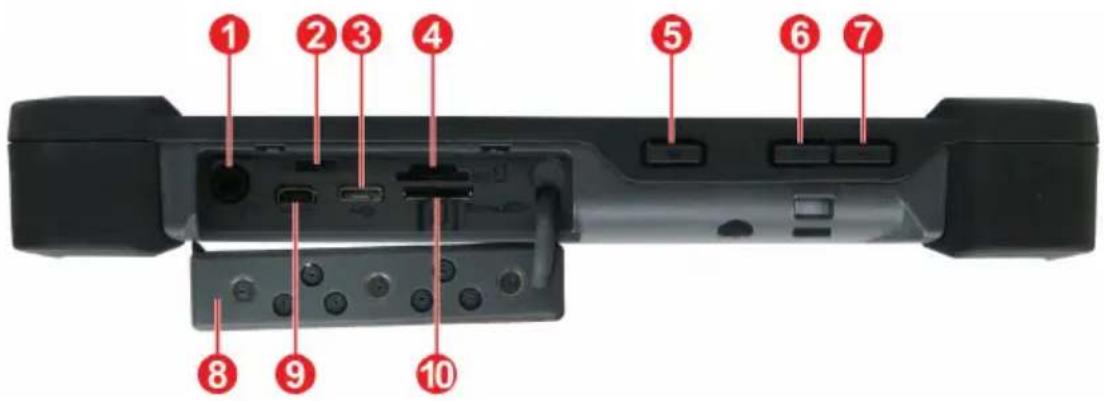
Fieldbook E1 Left View
| Item | Description |
| 1. 3.5mm headphone jack | Connects an external 3.5mm 4-conductor TRRS (stereo-plus-mic) headphone |
| 2. Battery on/off switch | Enables/disables battery power |
| 3. Micro USB OTG port | Connects USB devices like mouse, keyboard, and others to the device |
| 4. SIM card slot | Requires a micro SIM card |
| 5. Power button | Turns the device on/off. Resumes the device from standby mode |
| 6. Volume up button | Increases the volume |
| 7. Volume down button | Decreases the volume |
| 8. I/O ports door | Covers the I/O ports |
| 9. Micro HDMI jack | Supports Full HD video output through a micro HDMI cable |
| 10. Micro SD slot | Supports a Micro SD HD/XD storage card up to 64GB |
2.1.4. Right View

Fieldbook E1 Right View
| Item | Description |
| 1. DC-jack | Connects the device to an power adapter to supply continuous power during use and battery recharging. |
| 2. Programmable function buttons F1, F2, F3 | Allow you to assign specific functions to a button. The table below shows the default key assignments. |
| 3. Secondary function button | Activates / deactivates the secondary function of the F1-F3 buttons |
| Key | Action F-off | Action F-on | Double Click | Long Click |
| F1 | Launch FIELD.. | Enable/disabl.. | n/a | n/a |
| F2 | Launch Camera | Barcode trigger | n/a | n/a |
| F3 | Auto-rotate en.. | Activate/deact.. | n/a | n/a |
| Home | Home | Home | Launch Intern.. | Settings |
Key Mapping
2.1.5. Bottom View

natural_image
Back panel of a black electronic device showing ports and connectors (no visible text or symbols)Fieldbook E1 Bottom View
| Item | Description |
| 1. Docking connector | Provides signals for active dockings |
2.2. Preparing for Installation
The Fieldbook E1 is designed and pre-configured for easy setup and use. This section describes the installation steps you should follow to get the system running as quickly as possible.
2.2.1. Switch ON the Main Battery
The internal battery is switched off during transit in order to completely cut off power to the device.
To switch on the main battery:
- Open the I/O ports door.
- Slide the battery switch to ON using a thin object like a small screw driver

natural_image
Close-up of a device's rear panel showing ports and connectors, with a red arrow pointing to a highlighted component (no text or symbols visible)Turning ON the battery
2.2.2. Connecting a power supply
The AC adapter provides power to the system and charges the internal battery at the same time. The AC adapter has an auto-switching design that can connect to any 100VAC \~ 240VAC power outlet.
To connect the tablet to a power outlet:
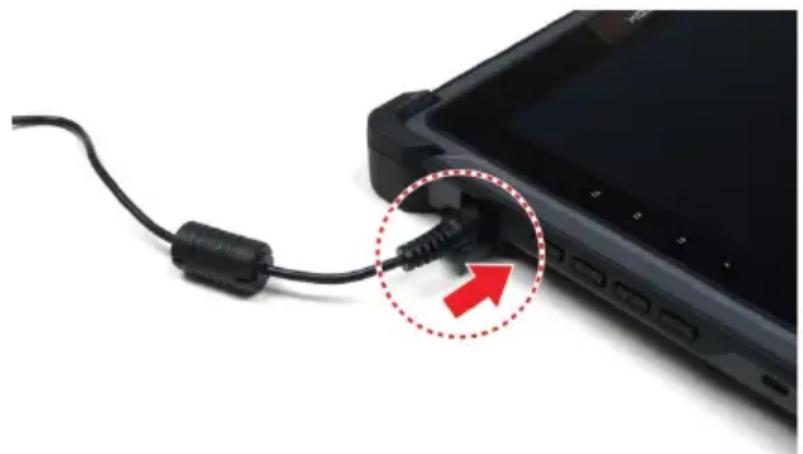
- Plug the AC adapter connector to the DC-jack socket.
natural_image
Close-up of a black USB cable inserted into a laptop, with a red arrow highlighting the cable's connector (no text or symbols visible)Plugging in the AC Adapter Connector
- Plug the power cord to the AC adapter.
- Plug the other end of the power cord to a live wall outlet. The Power LED on the front panel lights up.
NOTE: Make sure to use only the AC adapter and power cord that came with the device, or one that is recommended and approved by the manufacturer.
WARNING: Make sure the socket and any extension cord(s) you use can support the total current load of all the connected devices.
WARNING: Before cleaning the system, make sure it is disconnected from any external power source.
Fieldbook AC Adapter
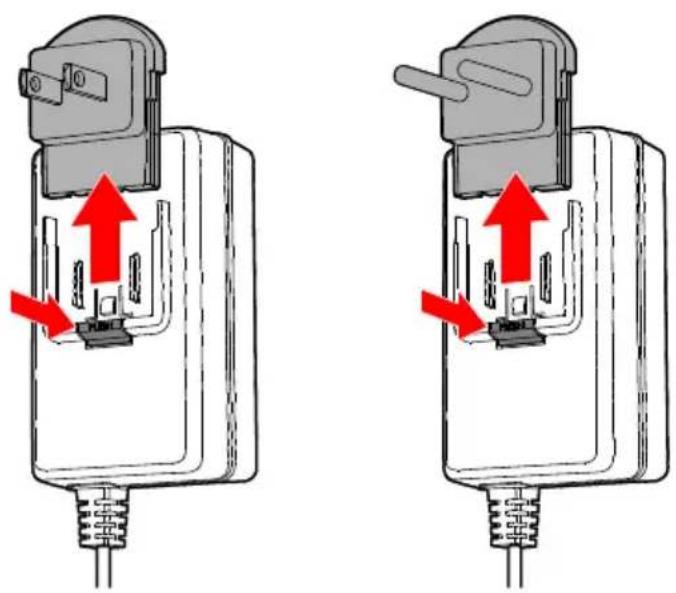
The Fieldbook AC adapter comes with two types of detachable plugs: a NEMA power plug with two flat parallel blades, and a CEE power plug with two round pins.
To remove a power plug:
- Press the release button.
- Slide out the power plug to remove.
natural_image
Two identical diagrams of a mechanical device with red arrows indicating upward movement or force, no text or symbols present.Removing a Power Plug
To insert a power plug:
- Align the power plug sides to the slot on the AC adapter.
- Slide the power plug all the way into the slot. You will hear a "click" to indicate that the power plug is locked in place.

natural_image
Two identical diagrams of a mechanical switch or plug assembly with red arrows indicating downward motion (no text or symbols present)Inserting a Power Plug
2.2.3. Insert a SIM Card
The SIM card stores your phone number, your contact's information, and saved messages.
NOTE: Internet access may incur fees. Contact your service provider for details.
NOTE: This device requires a micro SIM card.
WARNING: Remove all power from the device before installing or removing the SIM card.
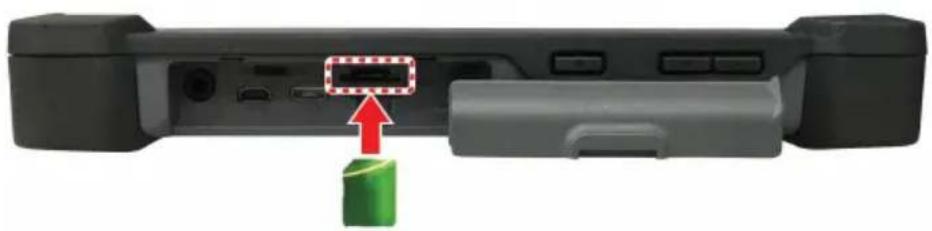
To insert a SIM card:
- Open the I/O ports door.
- Insert the SIM card into the SIM card slot with the cut-off corner going in first, and the gold contacts facing down.
- Push the SIM card all the way until it is flush into the SIM card slot.
natural_image
Back view of a handheld electronic device showing ports and a green control panel with an arrow pointing to it (no text or symbols visible)Inserting a SIM Card
To remove a SIM card:
- Open the I/O ports door.
- Gently push the SIM card. The SIM card is slightly ejected from the SIM card slot.
- Remove the SIM card.
2.2.4. Insert a Micro SD Card
Use a micro SD card to store photos, music, videos and other files.
WARNING: Remove all power from the device before installing or removing a micro SD card.
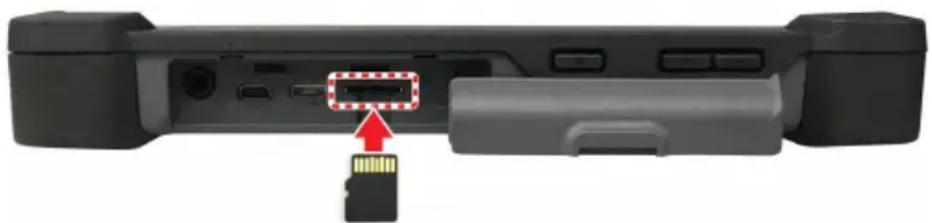
To insert a micro SD card:
- Open the I/O ports door.
- Insert the micro SD card into the micro SD card slot with the gold contacts facing up.
- Push the micro SD card all the way until it is flush into the micro SD card slot.
natural_image
Back view of a handheld electronic device showing internal components and a red arrow pointing to a specific connector (no text or symbols visible)Inserting a micro SD Card
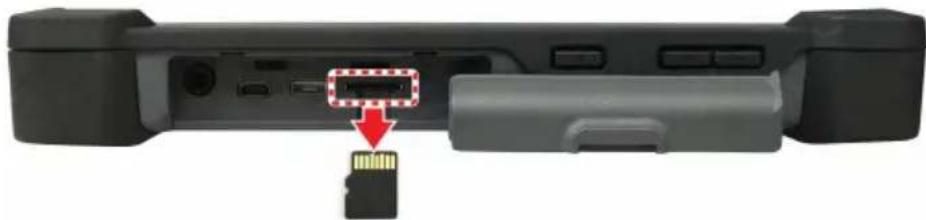
To remove a micro SD card:
- Open the I/O ports door.
- Gently push the micro SD card. The micro SD is slightly ejected from the slot.
- Remove the micro SD card.
natural_image
Back view of a handheld electronic device showing internal components and a small card slot inserted (no text or symbols visible)Removing a micro SD Card
2.2.5. Restore Factory Settings
Restore the device to factory settings before using it. You may also restore factory settings if the device encounters a persistent problem, or if you want to pass the device to someone else.
CAUTION: Restoring the device to factory settings deletes data and user-configured settings. Make sure to perform a backup before proceeding.
To restore factory settings:
- Turn off the device.
- Press and hold the Volume Down button, and then press the Power button. Wait until the Android System Recovery Screen is displayed.
- Press the Volume Down button to select wipe data/factory reset.
- To confirm, press and hold the Power button until the screen turns blank.
2.2.6. Turn On the Device
To turn the device on:
Press the Power button until the home screen is displayed.

natural_image
Back view of a black electronic device with a highlighted rectangular component (no visible text or symbols)Turning on the Device
To turn the device off:
- Press the Power button until the power off prompt shows.
- Tap OK to turn off the device, or tap Cancel to keep the device turned on.
2.3. Android Settings
2.3.1. Setting Up for the First Time
The first time you turn on the device, you will be asked to set up your Android system. Follow onscreen instructions to select the language you want to use, enable location-based services, choose how you want to connect to the Internet, and more.
NOTE: Internet and location-based services may incur fees. Contact your mobile operator or service provider for details.
2.3.2. Finger Gestures
The Fieldbook E1 features a multi-touch display for easy input and control through finger gestures.
| Item | Description |
| 1. Tap | To select apps or input data using the virtual keyboard. |
| 2. Tap and hold | To drag icons or widgets, or to open available options for some items. |
| 3. Swipe | To scroll the screen vertically or horizontally. |
| 4. Flick | To swipe vertically, but in quicker, lighter strokes to go through a list or browse a long screen. |
| 5. Pinch | To use two fingers to zoom in or out of the screen. |
2.3.3. Home Screens
Choose from five home screens to personalize your Android experience. From the main home screen, swipe to the left or right to choose another home screen and add your favorite widgets, apps, and folders.
Tap return to the main home screen, or press the Home button.
2.4. Connect the Fieldbook E1 to Other Devices
2.4.1. Connecting a USB Device
Fieldbook E1 comes with a micro USB On The Go (OTG) port, so you can connect other USB devices to it using a micro USB cable.
NOTE: The Fieldbook E1 does not come with a micro USB cable.
To connect a micro USB device:
- Open the I/O ports door.
- Connect the micro USB cable to the micro USB port on the Fieldbook E1.
- Connect the other end of the micro USB cable to the USB device you want to connect.

natural_image
Back view of a handheld device showing internal components and a red arrow pointing to a connector (no text or symbols visible)Connecting a micro USB Cable
To remove a USB device:
CAUTION: If you are removing a storage device, make sure it is safe to disconnect it from the Fieldbook E1 to prevent data loss or damage.
- Open the I/O ports door.
- Unplug the micro USB cable from the micro USB port on the Fieldbook E1.
- Unplug the other end of the micro USB cable from the USB device you connected.

natural_image
Close-up of a black USB cable connector with a red arrow pointing to the cable outlet (no text or symbols visible)Unplugging a micro USB Cable
2.4.2. Connecting an HD Display
The micro HDMI port connects the Fieldbook E1 to a high-definition display for up to 1080p video output.
NOTE: The Fieldbook E1 does not come with a micro HDMI cable.
To connect an HD display:
- Open the I/O ports door.
- Connect the micro HDMI cable to the micro HDMI port on the Fieldbook E1.
- Connect the other end of the micro HDMI cable to the HD display you want to connect.

natural_image
Back view of a handheld electronic device showing internal components and a cable connector (no text or symbols visible)Connecting a micro HDMI Cable
To remove an HD display:
- Open the I/O ports door.
- Unplug the micro HDMI cable from the micro HDMI port on the Fieldbook E1.
- Unplug the other end of the micro HDMI cable from the other USB device.

natural_image
Close-up of a black Sony computer interface with a USB cable inserted, showing ports and connectors (no text or symbols visible)Unplugging a micro HDMI Cable
2.4.3. Connecting a Headphone
The audio jack connects the Fieldbook E1 to a headphone.
NOTE: The Fieldbook E1 does not come with a headphone.
To connect a headphone:
- Open the I/O ports door.
- Connect the headphone connector to the audio jack on the Fieldbook E1.

natural_image
Back view of a black electronic device showing a cable inserted into the port, with a red square highlighting a component (no text or symbols visible)Connecting a Headphone
To remove a headphone:
-
Open the I/O ports door.
-
Unplug the headphone connector from the audio jack on the Fieldbook E1.

natural_image
Back view of a handheld electronic device showing a connector with a red square button and a gold-colored cable inserted (no text or symbols visible)Removing a Headphone
Chapter 3. FieldControl
3.1. Introduction
FieldControl for Fieldbook E1 provides an overview of device settings, such as:
Battery
Brightness
Volume
Wi-Fi, WWAN, Bluetooth and GPS
▶ Key mapping for programmable buttons
NOTE: Only users with administrator privileges will be able to modify the device settings.
3.2. FieldControl Overview
3.2.1. Launching FieldControl
To launch FieldControl:
- On the Home screen, tap

The All Apps screen opens.
- Tap

NOTE: FieldControl can also be launched with a programmable hard button after the administrator sets the key map.
The FieldControl language will automatically change with the language chosen in Android. If the selected OS language is not offered by the FieldControl, it is set automatically to English.
Furthermore, the admin should be able to change manually the language. Please see Key Mapping for details.
3.2.2. Field Control Main Page
The FieldControl main page may be viewed in Portrait or Landscape mode.
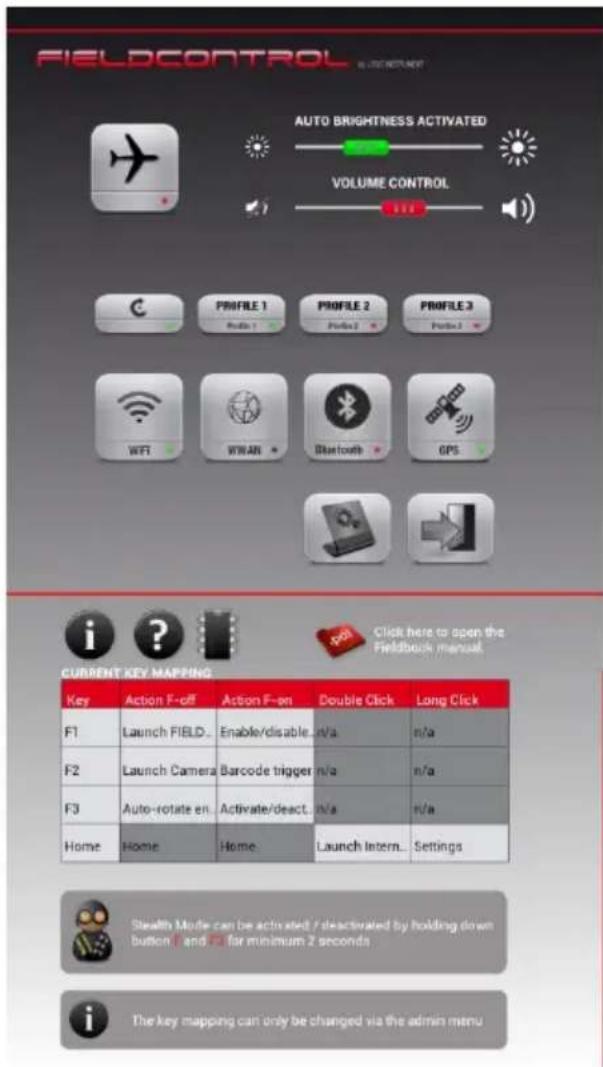
FieldControl E1 Main Page Portrait Mode

FieldControl E1 Main Page Landscape Mode
The FieldControl main page is divided into two sections.
The left section shows the following function controls:
Brightness
Volume
Rotation
Radio functions: Airplane, Wi-Fi, WWAN, Bluetooth, GPS
Profiles
Administrator Settings
Exit
The right section provides easy access to key information. Tap an icon to display its contents.
| Icon | Description |
 | Shows information on the following:The current key mapping for the programmable function keys.How to activate/deactivate Stealth mode.How to change the key mapping.A link to the Fieldbook E1 manual. Tap  to open the manual.NOTE: Acrobat Reader is required to view the PDF file. If it is not installed, you will be prompted to download it from Adobe Acrobat Reader download page. to open the manual.NOTE: Acrobat Reader is required to view the PDF file. If it is not installed, you will be prompted to download it from Adobe Acrobat Reader download page. |
 | Shows Help information on how to enable and disable the functions found on the left section of the FieldControl screen. |
 | Shows information on the following:Device name, device number, Android version, FieldControl version, Manufacturer, and an email address for service support.Battery status. |
3.3. Main Page Function Controls
3.3.1. Brightness
You can manually adjust the brightness of the display, or enable AUTO BRIGHTNESS to use the factory default setting.
To enable/disable AUTO BRIGHTNESS:
Tap the controller (the button on the slider) to toggle auto and manual controls.
Green – indicates that AUTO BRIGHTNESS is enabled.
Red – indicates that you can set the brightness level manually.

AUTO BRIGHTNESS Enabled
To adjust the brightness manually:
- Make sure that AUTO BRIGHTNESS is disabled.
- Slide the controller to the left or right, according to your desired level.
3.3.2. Volume
To adjust the volume:
Slide the controller to the left or right, according to your desired level.

Adjusting the Volume
3.3.3. Auto-Rotation
Tap this icon to activate or deactivate auto-rotation. A green dot appears at the bottom right corner of the icon to indicate that this function is activated. A red dot indicates that this function is deactivated.
3.3.4. Profile Selection
A profile consists of personalized settings. You can select from three profiles. When you run FieldControl for the first time, all profiles are in their default settings, and PROFILE 1 is activated.
| Default Profile Settings | |
| Profile Title | Profile1 (others will be Profile2, Profile3) |
| Airplane | OFF |
| WiFi | ON |
| WWAN | OFF |
| Bluetooth | OFF |
| GPS | ON (if installed) |
| WiFi Lock Status | UNLOCKED |
| WWAN Lock Status | UNLOCKED |
| Bluetooth Lock Status | UNLOCKED |
| GPS Lock Status | UNLOCKED (if installed) |
| F1 | Launch FieldControl |
| F2 | Launch Camera |
| F3 | Activate/Deactivate Auto-Rotation |
| F-F1 | Enable/Disable RFID NFC |
| F-F2 | Start the barcode scanner |
| F-F3 | Turn Airplane mode on/off |
| Double Click-Home | Launch the Internet browser |
| Long Click-Home | Settings |
3.3.5. Radio control settings
Airplane Mode

Tap to activate/deactivate. When Airplane mode is activated, all wireless features of the device are turned off. When disabling Airplane mode, you will be prompted to confirm if you really want to continue.
CAUTION: Some airlines prohibit the use of mobile devices, even on Airplane mode. Make sure to comply with airline regulations.
WiFi/WWAN/Bluetooth/GPS

Tap to activate WiFi. When WiFi is activated, the LED indicator on the front panel turns blue.

Tap to activate WWAN (if available).

Tap to activate Bluetooth.

Tap to activate GPS.
CAUTION: If Airplane mode is activated, you will be prompted to confirm if you want to disable Airplane mode. When you tap other radio functions like WWAN (if available), Bluetooth, and WiFi are automatically activated.

NOTE: Internet access may incur fees. Contact your service provider for details.
3.4. Administrator Menu
Go to the Administrator Menu to change default device settings, rename profiles, set an administrator password, and change the mapping of programmable function keys.
NOTE: No password is required the first time FieldControl is used.
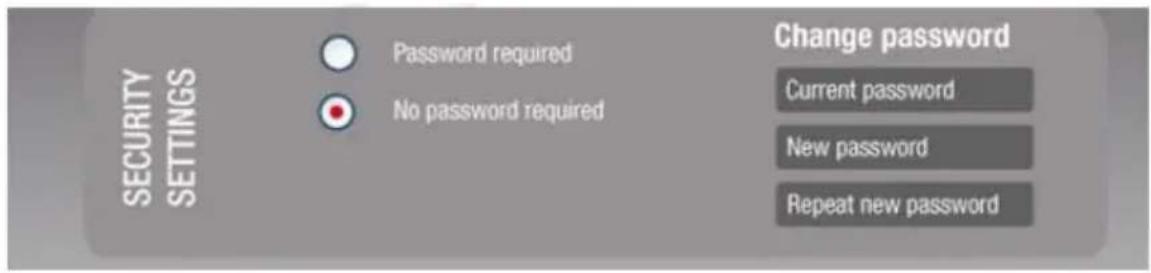
Default Security Setting
For subsequent uses, the administrator may set a password to prevent users from modifying settings. Contact your system administrator if you need to access the Administrator Menu page.
3.4.1. Accessing the Administrator Menu
To access the Administrator Menu:

- From the FieldControl main page, tap
- If the Administrator Menu is password-protected, you will be prompted to key in the password.
NOTE: If you do not have the password, contact your system administrator if you think you should have access to the Administrator Menu.
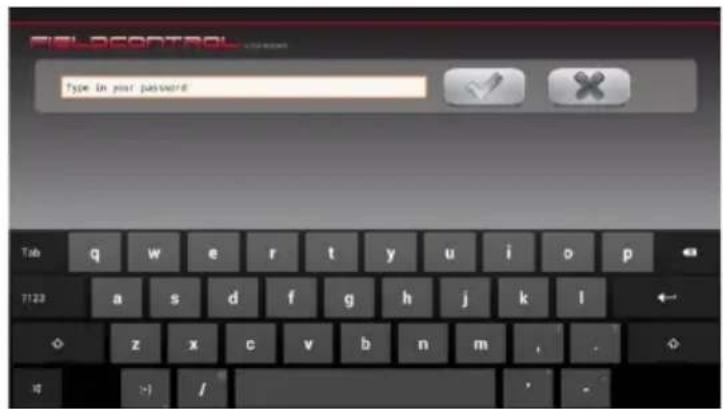
Key in the Administrator Password
-
Tap the space for entering the password. The virtual keyboard is displayed.
-
Key in the password. The password is encrypted as you type, and the password field will only display asterisks (***** ) so the password will no longer be visible.
-
Tap OK to confirm. If login is successful, you will be directed to the Administrator Menu. If login is unsuccessful, the wrong password message displays and the screen goes back to the password input screen.
-
Tap Cancel to go back to the FieldControl Main Page.
3.4.2. Resetting the Password
If the administrator loses or forgets the password, FieldControl allows a password reset using the maintenance password "FCFBE1logic".
CAUTION: The maintenance password cannot be changed. Use it only if the administrator password cannot be retrieved.
3.5. Administrator Settings
This Administrator Menu is divided into two sections. You will find Administrator Settings on the left side.
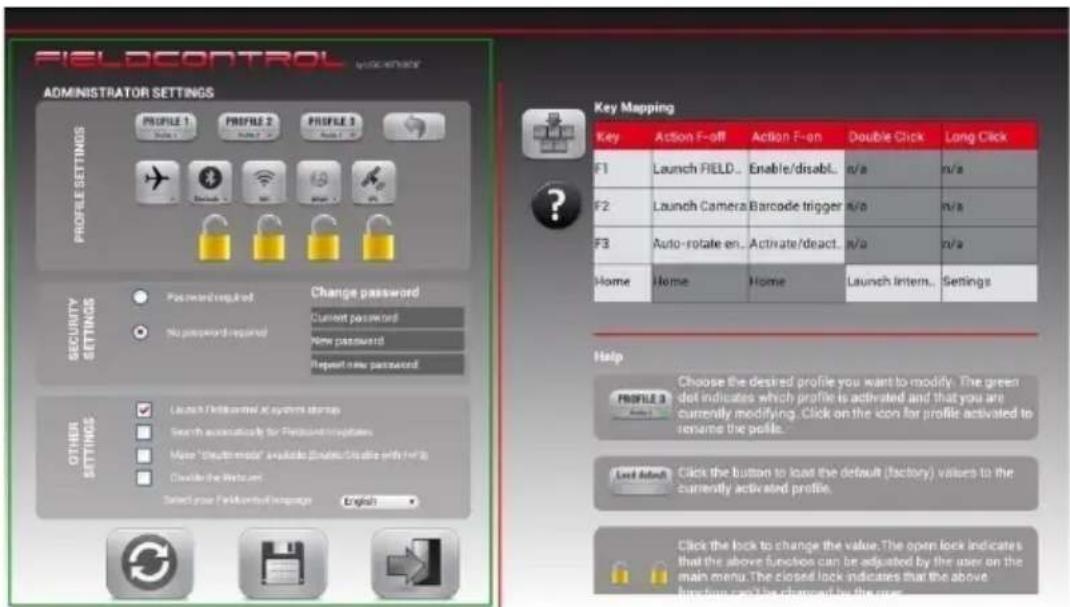
Administrator Settings
3.5.1. Profile Settings
FieldControl provides three profiles for the administrator to set different operating environments. A profile should include a profile title, configurations for the radio functions (Airplane mode, Bluetooth, WiFi, WWAN, and GPS), and the lock status of each radio function. You may modify default factory values if you have administrator privileges.
To modify profile settings:
- Tap the profile you want to modify. A green dot appears at the bottom right corner of the icon.

Choosing a Profile to Modify
- Tap the profile again to rename it. You will be prompted to enter the new name.

Renaming a Profile
-
Tap ☑ to confirm or ✗ to cancel.
-
Tap the functions you want to activate or deactivate.
- Tap the lock icons to lock/unlock your setting.
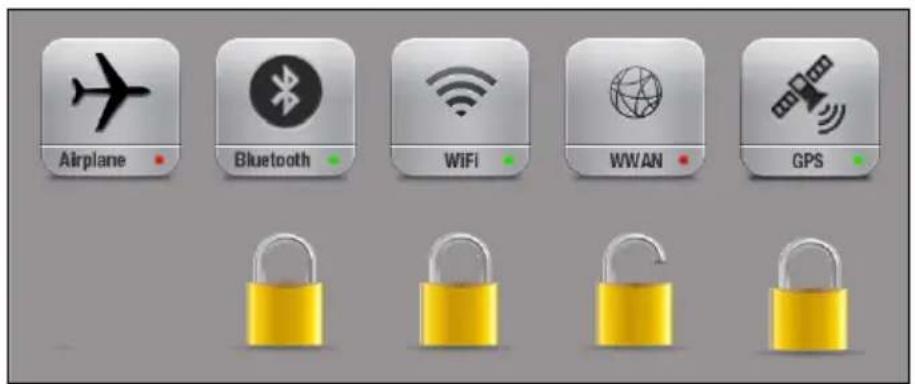
Activating/Deactivating Radio Functions
NOTE: A green dot at the bottom right corner of the icon means that the radio function is activated. A red dot means it is deactivated.
NOTE: If the option is not installed on the device (e.g., GPS or WWAN), you will see a black dot instead of a green or red dot,
NOTE: If a function is locked by the administrator, you will see a blue dot next to the green or red dot.
- Tap to keep the new settings for the profile.
- Tap to load the default values for the profile. The changes you made will be lost.
- Tap to go back to the FieldControl main page.
NOTES ON THE AIRPLANE MODE
While Airplane mode is activated, all other radio functions are disabled, regardless of their lock status. The administrator cannot make changes to the other radio functions until Airplane mode is disabled.
If Airplane mode is deactivated, the administrator can change the settings and lock status of the other radio functions.
User Permissions
The user can modify settings for a particular function on the FieldControl main page, depending on the lock status set by the administrator.

This means that the user can change settings on the FieldControl main page.

This means that the user cannot change settings on the FieldControl main page.
3.5.2. Security Settings
Entering the Administrator Menu depends on Security Settings made in this section.

Security Settings
The following options are available:
➢ Password required – A password to enter the Administrator Menu is required. Set or change the password using the password fields on the right.
NOTE: No password is required the first time FieldControl is used.
No password required – Password protection is disabled.
Setting or Changing the Password
- To set the password for the first time, type "admin" at the prompt, then

- To change the password, type the current password or maintenance password, the new password, and then retype the new password. Tap
to apply new password.
NOTE: If the repeated password is not the same as the new password, you will be prompted to type it again.
3.5.3. Other Settings

Launch Fieldcontrol at System startup

Search automatically for Fieldcontrol updates

Make „Stealth mode“ available on this computer. (Enable/Disable with F+F3)

Check to disable the webcom

Select your Filedcontrol language
English
Other Settings
| Other Settings | |
| 1. Launch FieldControl at system startup | Directs you to FieldControl when your device starts up. |
| 2. Search automatically for FieldControl updates | Notifies you when a new update is available.NOTE: Requires Internet connection. |
| 3. Make “Stealth mode” available (Enable/Disable with F+F3) | Allows you to press F+F3 hard keys to enable or disable “Stealth mode”.NOTE: Press for at least 2 seconds. |
| 4. Disable the Webcam | Disables the camera.NOTE: If this option is checked, you cannot use the assigned hard key to launch the camera. |
| 5. Select your FieldControl language | Sets the language to use for FieldControl.NOTE: The choice may be different from the language you set in the Android OS. |
Installing Updates
If the "Search automatically for FieldControl Updates" option is checked,
FieldControl will check the remote server for the latest version.
If the current version installed is the latest, FieldControl will pass this check.
If the current version installed is older, a message prompts the user to confirm updating to the new version.
If the user clicks Yes, the browser opens to the download page.
If the user clicks No, the update will not proceed.
3.6. Key Mapping
This section allows you to assign functions to the programmable function keys. Key Mapping settings are found on the right section of the Administrator Menu.
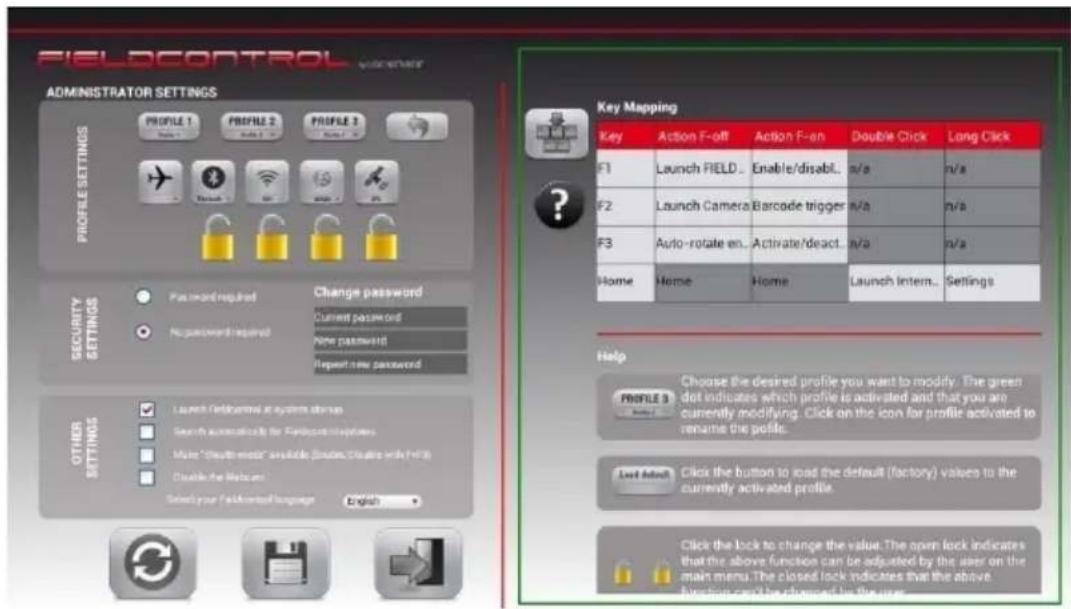
Key Mapping
Tap

to modify default function key assignments.
Tap

ew Help information.
3.6.1. Default Function Key Assignments
The table below shows the default function key assignments.
| Key | Action F-off | Action F-on | Double Click | Long Click |
| F1 | Launch FIELD.. | Enable/disabl.. | n/a | n/a |
| F2 | Launch Camera | Barcode trigger | n/a | n/a |
| F3 | Auto-rotate en.. | Activate/deact.. | n/a | n/a |
| Home | Home | Home | Launch Intern.. | Settings |
Default Assignments
NOTE: Double Click - the interval between clicks is 0.3 second.
Long Click - the button should be pressed for at least 2 seconds.
3.6.2. Modifying Function Key Assignments
To modify the default function key assignments:
- Tap

-
Tap an item corresponding to a function key. (For example, “Launch Camera” for F2.)
-
From the list that displays, select a new function for the function key.
-
Tap

to confirm, or

to cancel.
NOTE: Items in gray cells cannot be modified.
Below is the list of all functions available for key mapping:
▶ Back (Android)
▶ Settings (Android)
Launch FIELDCONTROL
▶ Brightness up
▶ Brightness down
Launch Camera
Barcode trigger
▶ Enable/disable RFID NFC
➢ Launch defined program by the user
▶ Activate/deactivate airplane mode
▶ Task manager
▶ Voice control input
Launch "About Tablet"
Launch Calendar
Launch Internet browser
▶ Launch email application
▶ Auto-rotate enable/disabled
When Stealth mode is set, the system requires the following conditions:
▶ Deactivate all radios signals.
▶ Set the brightness to zero.
Set the volume to zero
➢ Deactivate the touch panel to avoid wrong manipulations.
▶ Switch off all LEDs.
Lock all single-button functions except the Stealth mode switch button.
Lock the Power button until Stealth mode is turned off.
3.7. Save Request Page
If the administrator taps page displays:

without saving changes, the following

Save Request Page
You can do any of the following:
Tap OK to exit without saving.
Tap Cancel to go back to the most recent page viewed or modified.
Tap Save to save all changes and go back to the FieldControl main page.
Chapter 4. Special Functions
4.1. Barcode Scanner
Use the barcode scanner to look up information on products and services.
To use the barcode scanner:
- Press the assigned function key to launch the barcode scanner.
NOTE: Key mapping is found in the FieldControl main page. The default assignment for the barcode scanner is F+F1.
- Align the line onscreen to the middle area of the barcode you want to scan.
4.2. RFID Scanner
The device is equipped with a radio frequency identification (RFID) scanner for automatic identification and tracking of tags attached to objects with electronically stored information.

natural_image
Top-down view of a black laptop back panel showing illuminated display and control buttons (no readable text or symbols)RFID Scanner
Chapter 5. Connecting to the Internet
5.1. WWAN
If your device is equipped with a WWAN module, you can access the Internet using mobile cellular technology.
NOTE: Make sure your 3G-enabled SIM card is inserted and you have a data plan. Check with your mobile operator.
To connect to the Internet via WWAN:
- On the Home screen, tap 📄. The All Apps screen is displayed.

- Tap
- Under WIRELESS & NETWORKS, tap More, then tap Mobile Networks.
- Tap the check box next to Data Enabled to enable data access over the mobile network.
5.2. Wi-Fi
You can access the Internet by connecting to a wireless network via an access point or “hot spot.”
To connect to a wireless network:
- On the Home screen, tap 📄. The All Apps screen is displayed.

-
Tap
-
Under WIRELESS & NETWORKS, tap the Wi-Fi On/Off switch to turn Wi-Fi on. The Wi-Fi LED indicator on the front panel turns on.
-
Tap Wi-Fi. A list of available Wi-Fi networks will be displayed.
-
Tap the Wi-Fi network you want to connect to.
-
Enter the network key or password if required.
-
Tap Connect. The Wi-Fi icon appears on the Status Bar if connection is successful. The icon shows the approximate signal strength.
Chapter 6. Maintenance
Your Fieldbook E1 needs occasional cleaning to prolong its life. Please read this section carefully to ensure proper care of Fieldbook E1. When it is necessary to clean it, use a soft, lint-free cloth, slightly dampened with a mild detergent solution. You may also use any commercially available computer cleaning kit.
CAUTION: Never use petroleum-based solvents or harsh detergents to clean the system. Also never spray any liquids directly on the device case or screen.
6.1. Maintaining the Battery
Do not expose the battery to heat or moisture. Do not place the battery in water or in a fire.
Do not subject the battery to strong impact, such as a blow from a hammer, stepping on it, or dropping it.
Do not puncture or disassemble the battery.
Do not attempt to open or service the battery.
➢ Replace only with batteries designed specifically for this product.
Keep the battery out of children's reach.
➢ Dispose of used batteries according to local regulations.
6.2. Maintaining the LCD Display
If the display screen has become smeared or dusty, clean the screen by applying a mild glass cleaner to a soft, clean, lint-free cloth, and then gently wipe the glass. Clean the LCD display only with a soft cloth dampened with denatured alcohol or a proprietary LCD screen cleaner.
Do not scratch the surface of the screen with any hard objects.
Do not spray or apply liquid directly on the screen, or allow excess liquid to drip down inside the device.
Do not use liquid or aerosol cleaners on the screen, as these will discolor the finish and damage the screen.
Do not place anything, such as food and drink, on the screen at any time to prevent damage to the screen.
Do not use paper towels to clean the display screen. Paper can scratch its matte surface.
6.3. Cleaning the Fieldbook E1
CAUTION: Turn off the Fieldbook E1 and unplug the power adapter before cleaning the Fieldbook E1.
Wipe the screen and exterior with a soft, damp cloth moistened only with water.
Chapter 7. Troubleshooting
Refer to this resource page for useful information about the Android 4.2 operating system loaded in your tablet.
Q1 How do I change the home screen wallpaper?
To change the wallpaper, tap and hold your finger on the Home Screen to open your wallpaper options. Choose your wallpaper from the three options that may be available:
- Gallery – allows you to set one of your own pictures as the wallpaper. Tap Gallery and select your preferred picture. You can crop the part of the picture you want to use as the wallpaper. Then, tap Crop to set the picture as your background.
- Live Wallpapers – provides you with a set of animated backgrounds. Tap Live Wallpapers and select the live wallpaper you wish to use. Next, tap Set wallpaper to set the live wallpaper as your background.
- Wallpapers – a collection of pre-installed wallpapers. Tap Wallpapers and select the one you prefer. Next, tap Set wallpaper to set the picture as your background.
Q2 How do I add and remove apps, widgets, shortcuts and folders to the home screen?
You can add and group your apps and shortcuts logically using home screen folders, just by dragging app icon onto a particular folder. Also, in All Apps launcher, you can simply drag an app to get information about it or immediately uninstall it, or disable a pre-installed application.
You can drag apps, shortcuts, folders, and other priority items in or out of the favorites tray for instant access from any home screen. You can also remove them by dragging the item unto the delete icon.
Q3 How do I transfer contacts from my old SIM to FieldBook E1?
Just insert your old SIM card into the SIM card slot of FieldBook E1, and then copy all contacts information using Import from SIM Card function:
Contacts >> Menu >> Import/Export >> Import from SIM card
Your SIM card contacts will now be saved in to your phone's memory
Q4 How do I unlock the screen?
Android Face Unlock is a new screen-lock option that lets you unlock your device by using face recognition. Use the
front-facing camera to register a face profile during setup in order to use during the unlock process. Just hold your device in front of you (face) to unlock.
Q5 What are other ways to lock the screen?
Use a PIN (Personal Identification Number) or screen lock pattern.
Q6 What if I forget my screen lock pattern or password?
Contact your system administrator to reset your password or use the facial recognition technology of the device to unlock the device.
NOTE: Facial recognition is only possible is you have registered a profile during setup.
Q7 How can I access the Internet through my PC or someone else's mobile device?
By tethering to a smart phone, you can use its data service to connect to the internet.
To wireless tether your smart phone, first you will need to create the wireless hotspot the tablet will connect to. Please follow the method recommended by the manufacturer of your smart phone or wireless carrier.
Once the mobile hotspot has been created and your device Wi-Fi is enabled, tap Wi-Fi settings to search for the wireless hotspot you created previously.
Choose hotspot you created and, if necessary, enter the password if you have chosen to use one. After a few seconds, you should be able to access the internet through your smart phone's data connection.
NOTE: This only works if your smart phone is capable of creating a wireless hotspot. Please check with your wireless carrier to see if tethering is an available option. Extra charges from your carrier may apply if you use this feature.
Q8 How do I shut down applications running in the background on Android Fieldbook E1?
You can dismiss individual apps running in the background from the Recent Apps list with a swipe of your finger. To dismiss or end apps running in the background follow the steps below:
- Tap on the Recent Apps icon in the lower-left corner of the screen.
- From the Recent Apps list, you can swipe your finger over the app or apps you wish to end. You can also tap and hold your finger over the app, then tap Remove from list.
- To exit from the Recent Apps list you can tap the down arrow in the lower-left corner or tap your screen outside of the apps list.
Q9 How do I remove the browser history on my FieldBook E1?
Internet browsers store a list of all the sites you visit called history. If you wish to delete browser history on your Android tablet, use the following steps:
- Open the internet browser and tap the menu button in the upper-right corner of the screen.
- Tap Settings and next tap Privacy & Security. On this page you can select which information to delete:
Clear Cache – removes temporary stored files, such as images.
Clear History – removes the list of visited sites.
Clear all cookie data – removes information on your account and preferences for a specific website.
Clear form data – removes information you entered in web forms.
- Tap the item you wish to remove, and tap Ok to confirm.
Q10 How can I explore files on my FieldBook E1 Android tablet?
Although the Android operating system does not come with a native file managing application, there are many on Google Play that will allow you to better manage the space on your tablet's internal memory or SD card. Some examples of free file managers found on Google Play are:
- File Explorer
- ASTRO File Manager
• X-plore File Manager
NOTE: Google Play may not be available in all countries and regions. You will need to activate a Google account before you can use Google Play. The first time you access Google Play, you must read and accept the Terms of Service.
Q11 How do I backup my settings and applications on my FieldBook E1 Android tablet?
Google's Android operating system makes it easy to automatically sync your account with their servers. To ensure that your personalized settings and applications are backed up please follow these steps:
- Open the Settings application.
- Click Privacy on the left menu.
- Ensure that both Back up my data and Automatic restore are selected.
- If you ever have to do a factory reset on your device your settings will be automatically applied once you sign back into your Google account.
NOTE: You may have to reinstall applications from Google Play but your settings for the application will be saved and applied. You will not have to re-purchase any paid applications.
Q 12 Can I transfer files from a micro SD card to a PC?
To transfer files from an SD card to a PC, remove the micro SD card from your tablet and insert the micro SD card in a card reader or USB adapter to access the files on the SD card from your computer.
Q13 How do I improve a weak signal to my wireless network?
When the signal strength is low, your wireless connection may become unreliable, slow or erratic. Wireless networks can be hindered by objects in between the antenna of the router or access point, and the wireless adapter in your computer.
To improve the signal strength, reduce the distance between the devices, and have a minimal amount of physical objects such as walls or ceilings, in between.
You may also correct the interference by re-orienting or relocating the receiving antenna. Another way is to connect the equipment into an outlet on a circuit different from that of the connected receiver.
Q14 Can I connect my FieldBook E1 to a Windows PC via a USB cable?
Yes, just open the I/O ports door, then plug-in a micro USB cable at the micro USB On The Go (OTG) port of FieldBook E1 to connect it to a Windows PC.
Make sure that the other end of the cable is properly connected to your PC.
NOTE: The FieldBook E1 does not come with a micro USB cable.
Q15 How do I reset the hardware and software to factory defaults of FieldBook E1?
You can reset the hardware software back to factory default configurations and have a fresh start. To do this, you can use the following method:
- Turn off the device.
- Press and hold the Volume Down button and Power button simultaneously.
- Wait until the Android System Recovery Screen is displayed.
- Press the Volume Down button to select wipe data/factory reset.
- To confirm, press and hold the Power button until the screen turns blank.
NOTE: This process will erase all of your personal information, all stored contacts, configurations and any programs you have installed on your tablet. Make sure to perform a backup before proceeding.
Q16 My FieldBook E1 does not display correct time and date even after adjusting the settings. How can I fix this?
Replace the 3V lithium battery with a new one. The device uses a battery to retain system information.
NOTE: Loss of BIOS settings occurs when the battery is removed. BIOS settings must be reconfigured whenever the battery is replaced.
Q17 How do I perform updates with my FieldBook E1?
Check Search automatically for FieldControl Updates option so that the FieldControl checks the remote server for the latest version.
If the current version installed is older, a message will prompt for you confirmation to update to the new version, click Yes.
A browser redirects you to the update download page.
Q18 How do I transfer files to another device using Bluetooth?
You may transfer files using by ensuring Bluetooth is on/enabled for both devices and that these devices are properly paired if they have Bluetooth connection passwords set. After that follow these steps:
- Locate the file you wish to transfer.
-
Click on the Share icon and choose Bluetooth transfer.
-
Choose the device name from the list of Bluetooth devices.
- Click the Next button.
- The devices may signal a notification alert, which lets you know that a file transfer is taking place.
- Touch the Accept button.
- The device will prompt a message once transfer is complete.
NOTE: You won't see the device listed if Bluetooth is turned off.
Q19 What can I do if my tablet does not power on?
If your FieldBook E1 does not power on, try the following to resolve the issue:
- Ensure that the power cord and/or AC adapter are plugged into the computer and that the connection is solid and not loose fitting.
- Verify that the power cord is plugged into the AC adapter completely.
- If the power cord or AC adapter is plugged into a surge protector, verify that the surge protector is powered on.
- Attempt to use a different electrical outlet.
Q20 How do I change the language on my FieldBook E1?
Your Android tablet has the option to change the display language. Follow the steps below to change your display language:
- Locate and tap the Settings icon.
- Tap the Language & Input option.
- Locate and choose the language you would like to use.
- User's Guide
- Safety Information
- FCC Compliance Statement
- FCC RF Radiation Exposure Statement:
- Europe – EU Declaration of Conformity
- Table of Contents
- CHAPTER 1. GENERAL INFORMATION......11
- CHAPTER 2. SYSTEM SETUP....20
- CHAPTER 3. FIELDCONTROL....48
- CHAPTER 4. SPECIAL FUNCTIONS....72
- CHAPTER 5. CONNECTING TO THE INTERNET ...... 74
- CHAPTER 6. MAINTENANCE....76
- CHAPTER 7. TROUBLESHOOTING....78
- Chapter 1. General Information
- Introduction
- Specifications
- Main System
- Interfaces
- Control buttons
- Power supply
- Environment
- Optional: Internal Module
- Package Contents
- Chapter 2. System Setup
- Exploring your Fieldbook E1
- Front View
- Rear View
- Left View
- Right View
- Bottom View
- Preparing for Installation
- Switch ON the Main Battery
- Connecting a power supply
- Fieldbook AC Adapter
- Insert a SIM Card
- Insert a Micro SD Card
- Restore Factory Settings
- Turn On the Device
- Turning on the Device
- Android Settings
- Setting Up for the First Time
- Finger Gestures
- Home Screens
- Connect the Fieldbook E1 to Other Devices
- Connecting a USB Device
- Connecting an HD Display
- Connecting a Headphone
- Chapter 3. FieldControl
- Introduction
- FieldControl Overview
- Launching FieldControl
- Field Control Main Page
- Main Page Function Controls
- Brightness
- AUTO BRIGHTNESS Enabled
- Volume
- Auto-Rotation
- Profile Selection
- Radio control settings
- Airplane Mode
- WiFi/WWAN/Bluetooth/GPS
- Administrator Menu
- Accessing the Administrator Menu
- Resetting the Password
- Administrator Settings
- Profile Settings
- NOTES ON THE AIRPLANE MODE
- User Permissions
- Security Settings
- Security Settings
- Setting or Changing the Password
- Other Settings
- Installing Updates
- Key Mapping
- Default Function Key Assignments
- Default Assignments
- Modifying Function Key Assignments
- Save Request Page
- Chapter 4. Special Functions
- Barcode Scanner
- RFID Scanner
- Chapter 5. Connecting to the Internet
- WWAN
- Wi-Fi
- Chapter 6. Maintenance
- Maintaining the Battery
- Maintaining the LCD Display
- Cleaning the Fieldbook E1
- Chapter 7. Troubleshooting
- Q1 How do I change the home screen wallpaper?
- Q2 How do I add and remove apps, widgets, shortcuts and folders to the home screen?
- Q3 How do I transfer contacts from my old SIM to FieldBook E1?
- Contacts >> Menu >> Import/Export >> Import from SIM card
- Q4 How do I unlock the screen?
- Q5 What are other ways to lock the screen?
- Q6 What if I forget my screen lock pattern or password?
- Q7 How can I access the Internet through my PC or someone else's mobile device?
- Q8 How do I shut down applications running in the background on Android Fieldbook E1?
- Q9 How do I remove the browser history on my FieldBook E1?
- Q10 How can I explore files on my FieldBook E1 Android tablet?
- Q11 How do I backup my settings and applications on my FieldBook E1 Android tablet?
- Q 12 Can I transfer files from a micro SD card to a PC?
- Q13 How do I improve a weak signal to my wireless network?
- Q14 Can I connect my FieldBook E1 to a Windows PC via a USB cable?
- Q15 How do I reset the hardware and software to factory defaults of FieldBook E1?
- Q16 My FieldBook E1 does not display correct time and date even after adjusting the settings. How can I fix this?
- Q17 How do I perform updates with my FieldBook E1?
- Q18 How do I transfer files to another device using Bluetooth?
- Q19 What can I do if my tablet does not power on?
- Q20 How do I change the language on my FieldBook E1?
Brand : Logic
Model : Fieldbook E1
Category : Tablet