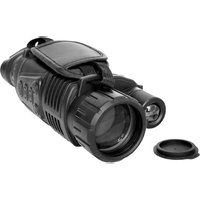
NVI-500 - Camcorder DENVER - Free user manual and instructions
Find the device manual for free NVI-500 DENVER in PDF.


| Product Type | Camcorder |
| Brand | Denver |
| Model | NVI-500 |
| Dimensions (approx.) | 100 x 60 x 30 mm |
| Weight | 150 g |
| Power Supply | Rechargeable lithium-ion battery, USB charging |
| Video Resolution | Full HD 1080p |
| Photo Resolution | 16 Megapixels (interpolated) |
| Zoom | 8x digital zoom |
| Storage | SD/SDHC card slot (up to 32GB) |
| Display | 2.7" LCD screen |
| Main Functions | Video recording, photo capture, playback, self-timer, night mode |
| Connectivity | USB 2.0, HDMI |
| Maintenance | Clean lens with soft cloth; keep away from dust and moisture |
| Safety | Not waterproof; avoid extreme temperatures; do not disassemble |
| Spare Parts / Repairability | Battery, charger, USB cable, AC adapter available |
| Included Accessories | USB cable, AV cable, user manual, carrying case |
| General Information | Compatible with Windows and Mac; supports multiple languages |
Frequently Asked Questions - NVI-500 DENVER
User questions about NVI-500 DENVER
0 question about this device. Answer the ones you know or ask your own.
Ask a new question about this device
Download the instructions for your Camcorder in PDF format for free! Find your manual NVI-500 - DENVER and take your electronic device back in hand. On this page are published all the documents necessary for the use of your device. NVI-500 by DENVER.
USER MANUAL NVI-500 DENVER
Operating Instructions 7
Battery Installation ········7
Power On 8
Power Off 8
Scenery Observation 9
Brightness Adjustment ······10
Photo Shooting 13
Playback 14
Video Shooting 16
ENG-1
Contents
Monitors Connection ········17
PCs Connection 17
Auto Power Off 17
Power management 18
Basic Parameters 19
Configuration Standard 21
Operating Environment and Announcements ····22
ENG-2
DENVER NVI-500
Introduction

natural_image
Line drawing of a digital surveillance camera with lens, aperture, and control buttons (no text or symbols)- It is a night vision monocular which can be used to observe objects in the dark and low light situation. Two lighting modes are available to use. The viewing distance in the low light environment will be at infinity, 200 meters viewing distance in the dark environment.
● Easy to exchange data with other instruments, having USB, AV OUT and DC IN sockets.
ENG-3
DENVER NVI-500
Operating Hints
- It can be used normally in the day or night, owning the photo shooting, video shooting, playback and other functions. 5X fixed zoom and 8X digital zoom.
- It is the best auxiliary tool of extending human's visual senses.
【Operating Hints】
- It is a night vision monocular which can be used to observe objects in the dark and low light situation. Two lighting modes are available to use.
● It is suitable to use in full dark environment.
● Turn the auxiliary light on to observe the objects when it works in the dark situation. Adjusting the brightness by the distance of the objects. CCD is used in this viewer. If there is any light resource existed, the auxiliary light could not be turned on, please adjust the focal distance only to get the sharp image of objects.
● Work time: 1 hour under auxiliary light mode; 1.5 hour without using auxiliary light mode.
ENG-4
Components Introduction

1 - Objective Cover
2 - Objective Focusing Wheel
3 - High Beam Light
4 - Socket Door
5 - DC 5V
6 - USB2.0
7 - Video/Audio Output Connector
8 - Tripod Receptacle
9 - Battery Cover
10 - Diopter Ring
11 - Eyecup
ENG-5
Components Introduction

12 - Hand Grip Strap
13 - Up
14 - Down
15- Functions(for photos shooting, video shooting and playback)
16 - Auxiliary Lighting/Brightness Adjustment
17 - POWER/FUNCTION
18 - Diopter Dial
ENG-6
DENVER NVI-500
Operating Instructions
● Turn the battery cover down; insert one battery correctly (note the negative electrodes

natural_image
Technical line drawing of a vintage camera with lens and frame (no text or symbols)bottomed) and turn the cover back. Turn the viewer on, the screen could be lighten up if the battery installed correctly. Otherwise, please reinstall the battery again or tighten the cover again.
【Announcements】
Ensure the model of battery should be correct; Ensure the electric quantity should be full enough; Pay attention to + and – of the battery.
ENG-7
DENVER NVI-500
Operating Instructions
【Power On】
● Take the objective cover down.
● Long press#19 for 3 seconds to lighten screen up, observing from Eyecup(#11),
if the screen has been lighten up and icons have been shown normally, the viewer could be used then
- Icons Instructions:
1 Battery
2 Images Size
3 Current Mode: Photo Shooting Mode
4 SD card in
● The Observing (Photo Shooting) Mode is available to use after the startup.
【Power Off】
- In any mode, long press #17 for 3 seconds to turn it off.
ENG-8

Operating Instructions
● Take the objective cover down, observing the screen from eyecup#11.
1. Adjust the diopter ring #10 until to get the sharp images
2. Adjust the objective focusing wheel #2 to make the images to be sharpest and easy to observe then.
● Automatic fine-tuning control of display brightness could be operated by Viewer.
● Digital zoom could be realized by pressing #13 and #14 ranged at 1x to 8x.
- If the environment is light enough, turn the auxiliary light off to save the power. On the contrary, please turn the auxiliary light on to get the sharpest image to observe
● Otherwise, please turn the auxiliary light on.
【Announcements】
Don't block the light resource.
ENG-9
Operating Instructions
- In the observing mode, press #16.
- Enter the menu of brightness adjustment. Just as the screen showed, the number after "Bright" means the current brightness index.
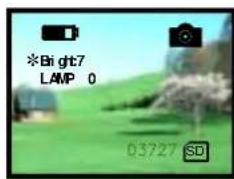
Brightness Adjustment
- Press #15 to heighten the index and #16 to lower it. 9 means the highest brightness of display. The index ranged at 1 to 9, 9 means the brightest index.
In the observing mode, press #16 twice to enter the high beam adjustment menu.
The screen will be just as the picture showed.
The index of LAMP shows the intensity of auxiliary light.
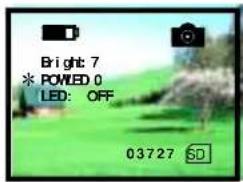
High Beam Adjustment
ENG-10
DENVER NVI-500
Operating Instructions
- Press UP#14, DOWN #15, the high beam will be changed ranged at 0 to 9(9-highest, 0-off).
- When the high beam function is opened, the menu is exited, LAMP shows on the screen will be flickered.
DENVER NVI-500
Operating Instructions
【Announcements】
On any mode above, the menu will be disappeared and went back to observing (photo shooting) mode if there is any operation within 8 seconds.
Please turn the auxiliary light off if you don't use it to save the battery.
ENG-11
ENG-12
Operating Instructions
【Photo Shooting】
● Enter the observing mode automatically after the viewer turned on and in this mode, you could take the pictures of the scenery.

Icons Instructions:
1 Battery
2 Images Size
3 Current Mode: Photo Shooting Mode
4 SD card in
- press #17 to shoot a photo and the photo will be saved automatically in the SD card.
- The image size is based on the surplus capacity of SD card. The minute difference is available between the actual image size.
ENG-13
Operating Instructions
【Playback】
- In the Observing (Shooting) mode, press #15 to enter the Playback function.
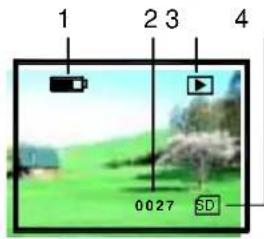
Photos Playback
- Icons
Instructions(photo):
- Battery
- The serial number
- Playback mode
- SD card in
- Icons Instructions(video):
- Battery
- Date
- Timecounting
- Current serial No.
- Playback Mode
- Video Playback Mode
- VGA Video Format
- SD card in

Video Playback
ENG-14
DENVER NVI-500
Operating Instructions
- In the playback mode, press#13 and #14 to view the photos and videos. The playback order is based on the shooting mode.
- Identify photos and videos and it will be entered different menus automatically.
- In the video playback mode, press#17 to start the video and press again to stop it.
ENG-15
DENVER NVI-500
Operating Instructions
【Video Shooting】
- In the observing mode, press video shooting mode.
1 2 3 4
17 twice to enter the
Icons Instructions:
- Battery
- Timing
- Video Shooting
- SD card in

Video Shooting
- Press #17 to start video shooting.
● The video could be saved in SD card automatically. - The video size is based on the surplus capacity of SD card. The minute difference is available between the actual video size.
ENG16
Operating Instructions
□ Connect monitor to video Output Interface.
☐ Long press #15 for 3 seconds to switch the display on the screen of external monitor.
【PCs Connection】
☐ The viewer is equipped with USB2.0 interface.
☐ The PC could identify the viewer automatically and read the content in the SD card.
☐ The battery could be charged by connection of PCs.
【Auto Power Off】
☐ The viewer will be turned off if there is not any operation within 3 minutes except in video shooting and playback mode.

ENG-17
Power Management
☐ Model: 16340, Lithium battery 750mAh, 3.7V。
☐ Please ensure the battery should be charged 10 hours to make it works best in the first time.
【External Power】
□ Plug the DC IN 5V in.
The viewer could work for long time and won't be powered off automatically.
☐ The viewer could be charged when the external power connected well.
【Announcements】
The standard mobile charging source couldn't be used for this viewer. The battery of viewer is in the state of charging when it is connected to PCs.
ENG-18
DENVER NVI-500
Basic Parameters
【Basic Parameters】
| Type Items Index | ||
| Optical Performance | Magnification 5 | |
| Dimension of Objectives | 40mm | |
| Field of View 5° x3.75° | ||
| The Range of Ocular Adjustment | ± 0.6 | |
| Observing Distance(Low Light Environment) | 2m~∞ | |
| Observing Distance(Full Dark Environment) | ~200m | |
ENG-19
DENVER NVI-500
Basic Parameters
| Power | Voltage 3.7V DC | |
| Replaceable Battery | Rechargeable Lithium Battery (750mAh) | |
| Charging Source | 5.0V/2A Adapter | |
| Other | Measurement (L ×W×H) | 200 x 86 x 56 mm |
| Weight 400g | ||
ENG-20
【Operating Environment and Announcements】
☐ The viewer should be kept in the soft pouch. Operating temperature ranged at -5\~40°C. Relative humidity is 80%.
☐ In order to avoid the wetness and mildew, please keep it in the clear and dry environment. Avoiding the great pressure and solar radiation also please.
□ When the image jitter happens or the LCD couldn't be lightened up, please charge the battery in time.
□ Blow away the dusts before wipe the optical surface. If the viewer won't be used for a long time, please keep charge the battery occasionally to avoid the effectiveness lose.
ALL RIGHTS RESERVED, COPYRIGHT DENVER ELECTRONICS A/S
DENVER®
www.denver-electronics.com

Electric and electronic equipment and included batteries contains materials, components and substances that can be hazardous to your health and the environment, if the waste material (discarded electric and electronic equipment and batteries) is not handled correctly
ENG-21
Electric and electronic equipment and batteries is marked with the crossed out trash can symbol, seen below. This symbol signifies that electric and electronic equipment and batteries should not be disposed of with other household waste, but should be disposed of separately.
As the end user it is important that you submit your used batteries to the appropriate and designated facility. In this manner you make sure that the batteries are recycled in accordance with legislature and will not harm the environment.
All cities have established collection points, where electric and electronic equipment and batteries can either be submitted free of charge at recycling stations and other collection sites, or be collected from the households. Additional information is available at the technical department of your city.
Imported by:
DENVER ELECTRONICS A/S
Stavneagervej 22
DK-8250 Egaa
Denmark
www.facebook.com/denverelectronics

- Contents
- Introduction
- Operating Hints
- 【Operating Hints】
- Components Introduction
- DENVER NVI-500
- Operating Instructions
- 【Announcements】
- 【Power On】
- 【Power Off】
- 【Photo Shooting】
- 【Playback】
- 【Video Shooting】
- twice to enter the
- 【PCs Connection】
- 【Auto Power Off】
- Power Management
- 【External Power】
- Basic Parameters
- 【Operating Environment and Announcements】
Brand : DENVER
Model : NVI-500
Category : Camcorder