
BTC511 - Water dispenser CURTIS - Free user manual and instructions
Find the device manual for free BTC511 CURTIS in PDF.


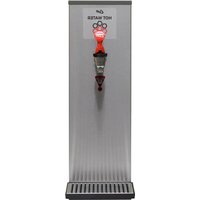
| Product type | Water dispenser |
| Brand | Curtis |
| Model | BTC511 |
| Dimensions (L x D x H) | 30 x 35 x 95 cm |
| Net weight | 12 kg |
| Power supply | 220-240 V ~ 50/60 Hz |
| Nominal power | 550 W |
| Standby energy consumption | 0.5 W |
| Water tank capacity | 5 L |
| Hot water temperature | 85-95 °C |
| Cold water temperature | 5-15 °C |
| Main functions | Hot water, cold water, room temperature water distribution |
| Bottle type | Standard removable bottle (compatible with 18.9 L) |
| Housing material | Stainless steel and ABS plastic |
| Maintenance and cleaning | Clean the tank regularly with a damp cloth and descale every 3 months |
| Safety | Double thermal protection, child lock on hot water tap |
| Spare parts and repairability | Available: faucets, tank, thermostat, bottle gasket |
| Repairability index | 7.5 / 10 |
| Warranty | 2 years |
| Package contents | Water dispenser, cup holder, drip tray, user manual |
Frequently Asked Questions - BTC511 CURTIS
User questions about BTC511 CURTIS
0 question about this device. Answer the ones you know or ask your own.
Ask a new question about this device
Download the instructions for your Water dispenser in PDF format for free! Find your manual BTC511 - CURTIS and take your electronic device back in hand. On this page are published all the documents necessary for the use of your device. BTC511 by CURTIS.
USER MANUAL BTC511 CURTIS
INSTRUCTION MANUAL
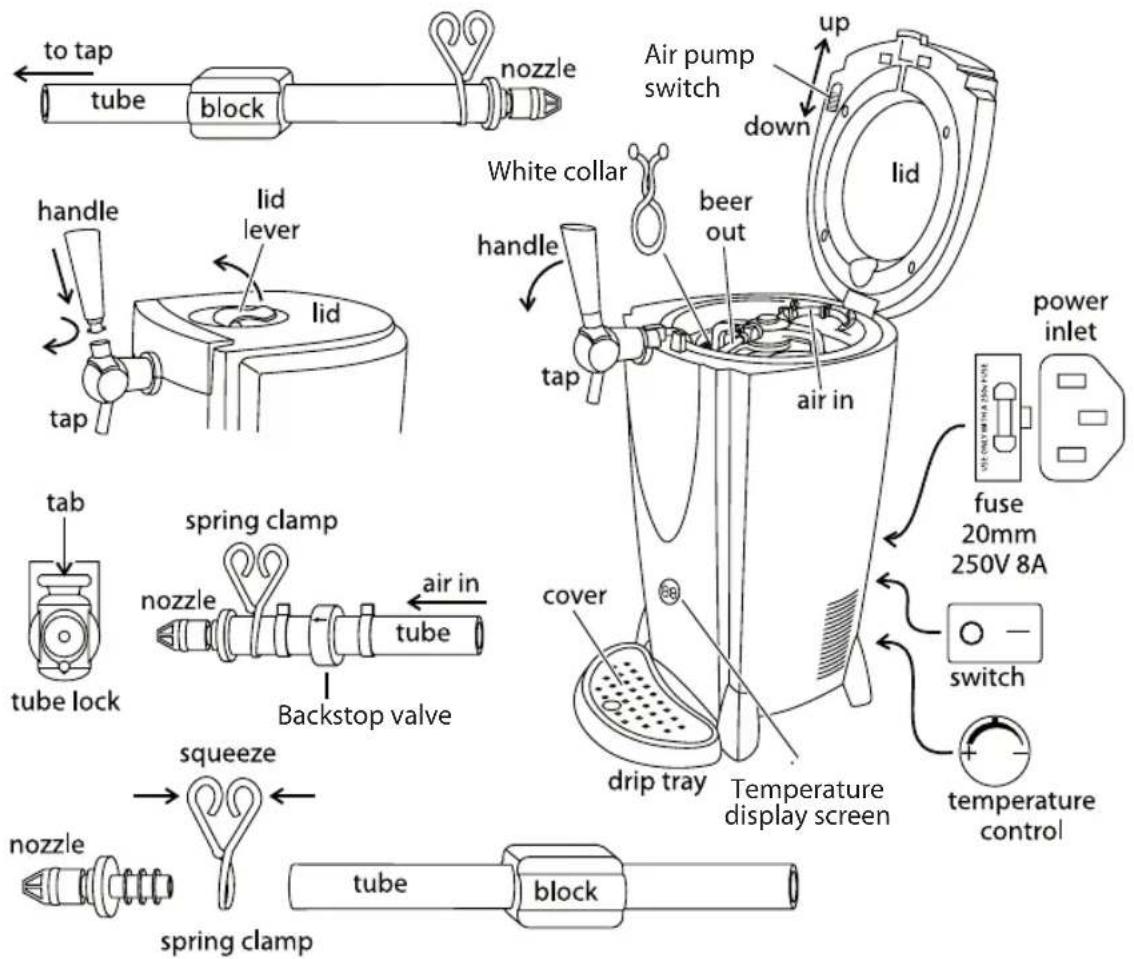
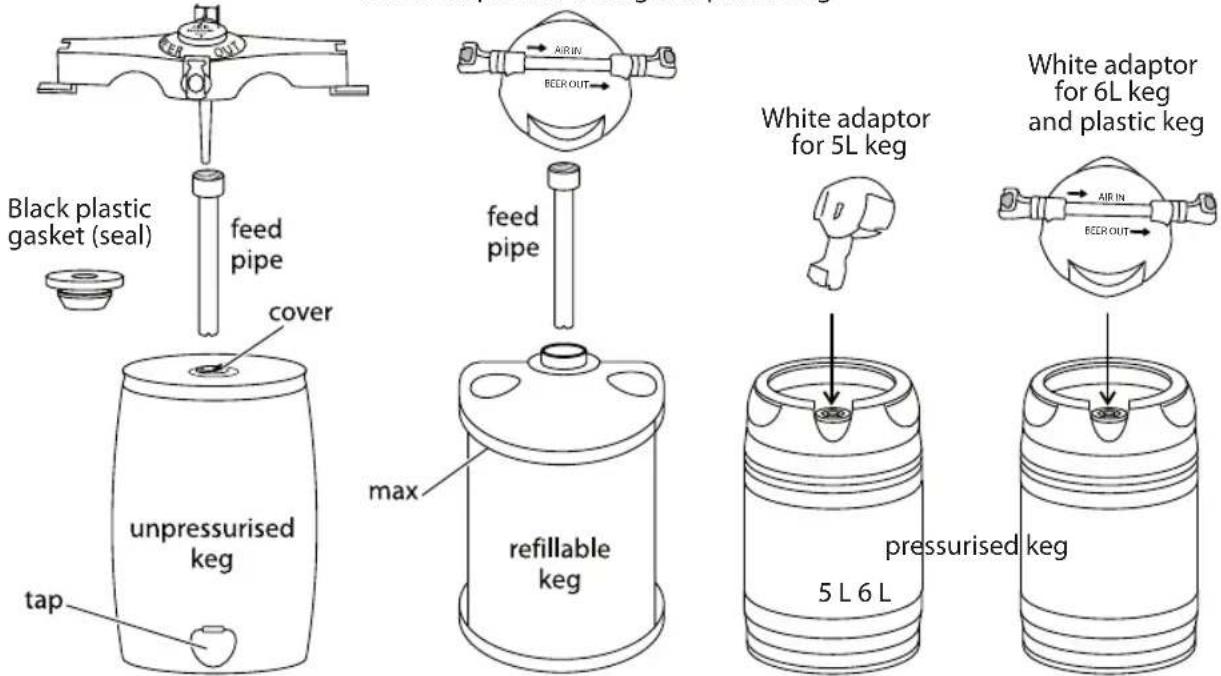
Yellow adaptor for 5L keg
White adaptor for 6L keg and plastic keg
Read the instructions and keep them safe. If you pass the appliance on, remember to pay on the instructions and warning notice too as these are important to ensuring correct use of the product. Remove all packaging, but keep it until you know the appliance won
Warning
- Do not let the vents to the rear of the appliance become blocked.
- Do not put anything into the appliance other than the kegs specified in these instructions.
Model BTC511:
- The refrigerant is inflammable and may cause eye irritation. If the appliance is damage
a) do not operate switches (on or off) in the room
b) open the windows and air the room
c) evacuate the room
d) seek medical attention in the event of eye irritation and inform the medical attendant that the refrigerant is R134a (isobutane)
Important precautions
Follow basic safety precautions, including the following:
1 This appliance must only be used by or under the supervision of a responsible adult.
Use and store the appliance out of the reach of children.
2 This appliance is not a toy. Do not let children play with it.
3 Keep the appliance upright at all times.
4 ModelBTQ5 refrigeration unit. If it is put on its side, for any reason, you must stand it upright for at least 3 hours before switching it on, otherwise the compressor will be damaged.
5 Do not immerse the appliance in any liquid and do not use it in a bathroom, near water or outdoors.
6 Do not place the appliance in a wet or damp environment and keep it out of direct sunlight. The room temperature should not exceed 30° C.
7 All parts coming into contact with the beverage must be cleaned before use, before replacing the container with another, and after use.
a) before use, to ensure that there are no contaminants left after storage,
b) before replacing the beverage contained, to prevent contaminants building up within the system, and
c) after use, to ensure that there are no contaminants left on the appliance before it is stored away.
8 The appliance and the beverage container are both heavy. Take great care when lifting them.
9 Do not lift or move the appliance with a keg fitted.
10 Do not lift the beverage machine by the handle or the power cable. Always lift the machine by its base.
11 Do not cool kegs in a freezer. As with glass bottles, kegs may explode when frozen.
12 Route the power cable so that it doesn't overhang and cannot be tripped over or become caught on anything.
13 Keep the appliance and the cable away from hotplates, hobs and burners.
14 Unplug the appliance when not in use and allow to cool down fully before cleaning or moving.
15 Do not use the appliance for any purpose other than those outlined in these instructions.
16 This appliance must not be used with an external timer or remote control system.
17 Do not use the appliance with any connector other than the one supplied.
18 The appliance must only be connected to an earthed power socket.
19 Do not use the appliance if it is dropped or damaged or if it malfunctions or leaks.
20 If the connector or cable is damaged it must be replaced with parts supplied by the manufacturer or their approved service agent.
Domestic use only
Preparation
1 Chill the keg thoroughly before use. If the keg is not cold enough, too much froth will form when you serve the beer.
2 Store the keg in a cool place.
3 The keg must be at or below room temperature before putting it into the appliance.
4 Check the use-by date before putting a keg into the appliance. Do not use the keg if the use-by date has passed.
5 The keg can be pre-cooled in two ways:
- inside the beverage machine. Kegs will take around 15 hours with model 14463-56 and 2 hours with model BTG51 correct temperature. Place your keg at the centre of the appliance without attaching the tubes and move the pump slide (located under the lid) to AIR OFF (slide to the bottom). Close the lid of the machine. Plug the connector into the machine's power socket and press the switch to the rear of the appliance. Adjust the temperature.
- in the refrigerator. Kegs will take around 10 hours to cool depending on the cooling capacity of your refrigerator.
Warning: Do not chill kegs in a freezer. As with glass bottles, kegs may explode when frozen.
Tip: Keep a keg in the refrigerator in advance so you always have a chilled keg available. We would also recommend that you switch the appliance on an hour before using it to give it time to cool down properly.
6 The keg must not be shaken. If it is shaken, leave it to rest for 4 hours before using it or the pressure will result in excessive frothing.
N.B.: Do not shake or drop kegs. Do not expose them to sunlight or to temperatures greater than 30° C and do not pierce or burn, even after use.
7 Clean the appliance and attachments thoroughly. Refer to the "care & maintenance" section".
8 Position the appliance on a level, dry, clean and heat-resistant surface at least 75cm above floor level.
9 Leave a clear space of at least 5cm all around the appliance.
10 Do not use the beverage machine outdoors, particularly when temperatures exceed 30° C.
11 Centre the drip tray under the front of the appliance.
12 Put a plastic mat underneath the appliance to protect the work surface from scratches and drips.
13 Have a bucket and towel handy in case of frothing or spillage and wear old clothes that you don't mind getting beer on.
CO 2 cartridge
Your beverage machine can be operated without a CO 2 cartridge, however some models can use CO 2 when preparing your favourite drinks to improve their quality. Adding CO 2 results in the formation of bubbles in the beer and better frothing.
CO 2 cartridges can be obtained from our after-sales service only in France on 0820 200 275. Customers in Belgium can obtain then from their local electrical goods store – 320g CO 2 cartridge.
One cartridge can be used for several kegs of beer.
A set of accessories used to connect the cartridge to the appliance are provided with your beverage machine.
Positioning and connecting the CO 2 cartridge
Ensure that the tap is closed before screwing the pressure gauge on to the CO2 cartridge.
Insert the whole piece – cartridge and pressure gauge – into the black plastic shell.
Position the shell, using the hook located at its base, to the rear of the machine, in the opening in the casing of the appliance.
Using the socket connection on the tap connect the cartridge to the metal outlet to the rear of the machine near the lid.
Using the CO 2 cartridge:
The air pump must not be used whilst the CO2 cartridge is in use. In this case, the cartridge will provide the pressure required for the beverage to flow.
We would recommend that you set the pressure between 1.5 bars and 2 bars using the pressure gauge located on the cartridge. The outlet must only be opened once the keg has been completely connected to the machine.
N.B. The tube coming from the adaptor fastened to the keg must be connected to the metal 'CO2' tube.
The WHITE adaptor is compatible with 5L pressurised kegs.
- Before putting the keg in the machine, connect the WHITE adaptor to the outlet tube by locking the outlet tube valve onto the WHITE adaptor.
- Open the lid of the machine using the lever located in the middle of the lid.
Next, install the outlet tube connected to the WHITE adaptor by lowering the handle of the tap and inserting the tube into the opening located at the back. The tube must reach the outlet of the tap and the clamp (black rectangle) must automatically lock to hold the tube in place.
Check that the clamp is correctly positioned in the designated space.
If the tube protrudes past the tap, simply cut the overhanging tube to the required length.
- Put the keg in the appliance and firmly fasten the WHITE adaptor to the keg.
- The beverage outlet tube must form a continuation of the handle so as not to interfere with the closing of the lid. To ensure that this is the case, place the tube in the white plastic collar located at the top of the vat. The collar will now hold the outlet tube onto the shaft of the tap, thus preventing it from being crushed when the lid is closed.
- Move the pump slide (located under the lid) to AIR OFF (slide to the bottom). The pump does not need to be sending out air as the keg is already pressurised.
The air pump is not required for pressurised kegs as they provide their own pressure for pouring.
- Rinse and wipe up any traces of spillage thoroughly.
- Close the lid of the machine.
- Plug the connector into the machine's power socket and press the switch to the rear of the appliance.
- Adjust the temperature.
The temperature display on the front of the machine will indicate the temperature inside the machine on the outer wall of the keg.
The cooling temperature can be adjusted by turning the temperature regulation button clockwise to reduce (-) or anti-clockwise to increase (+) the temperature.
You will then need to allow some time for the content of the keg to reach the temperature indicated on the display, which is why it is recommended that you perform this operation before serving the first beverage from the keg.
5L UNPRESSURISED KEGS
The YELLOW adaptor is compatible with 5L unpressurised kegs.
- Check that there is a translucent gasket (seal) on the rigid yellow tube.
- Screw the rigid yellow tube onto the YELLOW adaptor.
- Pass the flexible black ring provided around the rigid tube and bring the ring up from
the bottom of the rigid tube to meet the YELLOW adaptor.
- You will need to decompress the keg, removing any pressure from inside it, before putting it into the appliance.
N.B.: always check the instructions on how to eliminate excess gas on the keg itself. It is essential that the keg be kept upright and not shaken for several hours before use.
Otherwise, an excessive amount of froth will form when the keg is tapped.
a. Depressurise the keg.
- Place the 5L keg on a table.
- Pull out the built-in tap on the keg (located in the lower front part of the keg) and half-fill a glass.
b. Ventilate the keg
- Remove the plastic plug from the keg (located on top of the keg) to allow air into the keg.
- Using pliers, remove the ring from around the cap. Make sure that you have sufficient space to slide the rigid tube into the keg.
-
Insert the end of the rigid yellow tube into the hole on top of the keg and push the tube in until the flexible black ring clips tightly into the hole on top of the keg. The ends of the YELLOW adaptor will clip onto the ends of the keg.
-
Put the keg into the machine.
-
Wipe up any spillage.
-
Install the outlet tube by lowering the handle of the tap and inserting the tube into the opening located at the back. The tube must reach the outlet of the tap and the clamp (black rectangle) must automatically lock to hold the tube in place.
Check that the clamp is correctly positioned in the designated space.
-
Connect the outlet tube with the YELLOW adaptor to the 'BEVERAGE OUT' nozzle of the YELLOW adaptor.
-
Attach the air inlet tube to one of the metal 'air' or 'CO2' connectors located in front of the lid hinge.
The air pump is required for unpressurised kegs. Unpressurised kegs have a small amount of internal pressure which must be released. They are then pressurised by the air pump or the CO2 cartridge.
Should you wish to use the air pump on the machine:
- Locate the flexible air or CO2 inlet tube.
N.B.: The flexible air or CO2 inlet tube is equipped with a 'backstop valve'. The red arrow on the valve, indicating the direction of connection, must be directed towards the YELLOW adaptor. In the event of poor connection, the beverage will leak into the pump, resulting in the machine having to be returned to our technical department for examination and repair at your expense.
- Place the flexible tube over the metal 'AIR' nozzle and fasten the retaining spring over the top of it to ensure the connection is perfectly airtight.
- Connect the yellow valve of the flexible tube to the 'AIR IN' nozzle of the YELLOW adaptor. The red arrow on the flexible tube must be positioned to face the YELLOW adaptor.
- Move the pump slide to AIR ON (slide to the top). The pump will send air through the keg to ensure the correct level of pressure.
Should you wish to use the system with a CO2 cartridge:
- Locate the flexible air or CO2 inlet tube.
N.B.: The flexible air or CO2 inlet tube is equipped with a 'backstop valve'. The red arrow on the valve, indicating the direction of connection, must be directed towards the YELLOW adaptor. In the event of poor connection, the beverage will leak into the pump, resulting in the machine having to be returned to our technical department for examination and repair at your expense.
- Place the flexible tube over the metal 'CO2' nozzle and fasten the retaining spring over the top of it to ensure the connection is perfectly airtight.
- Connect the yellow valve of the flexible tube to the 'AIR IN' nozzle of the YELLOW adaptor. The red arrow on the flexible tube must be positioned to face the YELLOW adaptor.
- Move the pump slide to AIR OFF (slide to the bottom). The pump does not need to be sending out air as the pressure will be provided by the cartridge.
For information on attaching the CO2 cartridge see the paragraph on 'Positioning and connecting the CO2 cartridge'.
- Check that the tubes are not bent before closing the lid of the machine. If this is the case, gently rotate the keg to undo any kinks in the tubes. The beverage outlet tube must form a continuation of the handle so as not to interfere with the closing of the lid. To ensure that this is the case, place the tube in the white plastic collar located at the top of the vat. The collar will now hold the outlet tube onto the shaft of the tap, thus preventing it from being crushed when the lid is closed.
- Rinse and wipe up any traces of spillage thoroughly.
- Close the lid of the machine.
- Plug the connector into the machine's power socket and press the switch to the rear of the appliance.
- Adjust the temperature.
The temperature display on the front of the machine will indicate the temperature inside the machine on the outer wall of the keg.
The cooling temperature can be adjusted by turning the temperature regulation button clockwise to reduce (-) or anti-clockwise to increase (+) the temperature.
You will then need to allow some time for the content of the keg to reach the temperature indicated on the display, which is why it is recommended that you perform this operation before serving the first beverage from the keg.
The WHITE adaptor for 6L kegs and plastic kegs is compatible with the plastic keg.
- Remove the cap from the plastic keg and fill with the beverage of your choice.
- To avoid blockages and possible damage to the tap mechanism:
a) Do not fill with milk or any liquid containing milk.
b) Do not fill with any thick or sticky liquids.
c) Do not fill with any liquids containing fruit flesh or other particles.
d) Do not fill above the 'maximum' level marked around the body of the keg.
- When filling the keg with a carbonated beverage such as beer it is preferable to use the entire keg in one go. Otherwise, the beverage is likely to go flat.
- Locate the WHITE adaptor and the white rigid tube. Check that the connection valves on the tubes are disconnected from each end of the adaptor. If this is not the case, remove them by pressing the metal tab.
- Insert the large neck of the white rigid tube into the pocket under the WHITE adaptor.
- Insert the WHITE adaptor and the white rigid tube into the plastic keg and press the centre of the WHITE adaptor to firmly clip the adaptor onto the keg.
- Next, install the outlet tube by lowering the handle of the tap and inserting the tube into the opening located at the back. The tube must reach the outlet of the tap and the clamp (black rectangle) must automatically lock to hold the tube in place. Check that the clamp is correctly positioned in the designated space.
- Connect the outlet tube with the WHITE adaptor to the 'BEER OUT' nozzle.
- Attach the air or CO2 inlet tube to one of the metal 'air' or 'CO2' connectors located in front of the lid hinge.
Should you wish to use the air pump on the machine:
- Locate the flexible air or CO2 inlet tube.
N.B.: The flexible air or CO2 inlet tube is equipped with a 'backstop valve'. The red arrow on the valve, indicating the direction of connection, must be directed towards the WHITE adaptor. In the event of poor connection, the beverage will leak into the pump, resulting in the machine having to be returned to our technical department for examination and repair at your expense.
- Place the flexible tube over the metal 'AIR' nozzle and fasten the retaining spring over the top of it to ensure the connection is perfectly airtight.
- Connect the flexible tube to the 'AIR IN' nozzle of the WHITE adaptor. The red arrow on the flexible tube must be positioned to face the WHITE adaptor.
- Move the pump slide to AIR ON (slide to the top). The pump will send air through the keg to ensure the correct level of pressure.
Should you wish to use the system with a CO2 cartridge:
- Locate the flexible air or CO2 inlet tube.
N.B.: The flexible air or CO2 inlet tube is equipped with a 'backstop valve'. The red arrow on the valve, indicating the direction of connection, must be directed towards the WHITE adaptor. In the event of poor connection, the beverage will leak into the pump, resulting in the machine having to be returned to our technical department for examination and repair at your expense.
- Place the flexible tube over the metal 'CO2' nozzle and fasten the retaining spring over the top of it to ensure the connection is perfectly airtight.
- Connect the flexible tube to the 'AIR IN' nozzle of the WHITE adaptor. The red arrow on the flexible tube must be positioned to face the WHITE adaptor.
- Move the pump slide to AIR OFF (slide to the bottom). The pump does not need to be sending out air as the pressure will be provided by the cartridge.
For information on attaching the CO2 cartridge see the paragraph on 'Positioning and connecting the CO2 cartridge'.
- Check that the tubes are not bent before closing the lid of the machine. If this is the case, gently rotate the keg to undo any kinks in the tubes. The beverage outlet tube must form a continuation of the handle so as not to interfere with the closing of the lid. To ensure that this is the case, place the tube in the white plastic collar located at the top of the vat. The collar will now hold the outlet tube onto the shaft of the tap, thus preventing it from being crushed when the lid is closed.
- Rinse and wipe up any traces of spillage thoroughly.
- Close the lid of the machine.
- Plug the connector into the machine's power socket and press the switch to the rear of the appliance.
- Adjust the temperature. The temperature display on the front of the machine will indicate the temperature inside the machine on the outer wall of the keg.
The cooling temperature can be adjusted by turning the temperature regulation button clockwise to reduce (-) or anti-clockwise to increase (+) the temperature.
You will then need to allow some time for the content of the keg to reach the temperature indicated on the display, which is why it is recommended that you perform this operation before serving the first beverage from the keg.
FITTING A 6L PRESSURISED BEER KEG
The WHITE adaptor for 6L kegs and plastic kegs is compatible with 6L pressurised kegs.
1 Locate the WHITE adaptor. Check that the connection valves on the tubes are disconnected from each end of the adaptor. If this is not the case, remove them by pressing the metal tab.
2 Attach the WHITE adaptor to the keg before putting the keg in the machine by pressing the centre of the adaptor and pushing the adaptor on to the top of the keg as firmly as possible.
Check that the adaptor is firmly connected to the keg before continuing.
3 Install the outlet tube by lowering the handle of the tap and inserting the tube into the opening located at the back. The tube must reach the outlet of the tap and the clamp (black rectangle) must automatically lock to hold the tube in place.
Check that the clamp is correctly positioned in the designated space.
4 Fasten the outlet tube onto the end of one of the connection valves.
5 Position the connection valve connected to the outlet tube onto the 'BEER OUT' nozzle of the WHITE adaptor.
6 Attach the air or CO2 inlet tube to one of the metal 'air' or 'CO2' connectors located in front of the lid hinge.
Should you wish to use the air pump on the machine:
- Locate the flexible air or CO2 inlet tube.
N.B.: The flexible air or CO2 inlet tube is equipped with a 'backstop valve'. The red arrow on the valve, indicating the direction of connection, must be directed towards the WHITE adaptor. In the event of poor connection, the beverage will leak into the pump, resulting in the machine having to be returned to our technical department for examination and repair at your expense.
- Place the flexible tube over the metal 'AIR' nozzle and fasten the retaining spring over the top of it to ensure the connection is perfectly airtight.
- Connect the flexible tube to the 'AIR IN' nozzle of the WHITE adaptor. The red arrow on the flexible tube must be positioned to face the WHITE adaptor.
- Move the pump slide to AIR ON (slide to the top). The pump will send air through the keg to ensure the correct level of pressure.
Should you wish to use the system with a CO2 cartridge:
- Locate the flexible air or CO2 inlet tube.
N.B.: The flexible air or CO2 inlet tube is equipped with a 'backstop valve'. The red arrow on the valve, indicating the direction of connection, must be directed towards the WHITE adaptor. In the event of poor connection, the beverage will leak into the pump, resulting in the machine having to be returned to our technical department for examination and repair at your expense.
- Place the flexible tube over the metal 'CO2' nozzle and fasten the retaining spring over the top of it to ensure the connection is perfectly airtight.
- Connect the flexible tube to the 'AIR IN' nozzle of the WHITE adaptor. The red arrow on the flexible tube must be positioned to face the WHITE adaptor.
- Move the pump slide to AIR OFF (slide to the bottom). The pump does not need to be sending out air as the pressure will be provided by the cartridge.
For information on attaching the CO2 cartridge see the paragraph on 'Positioning and connecting the CO2 cartridge'.
- Check that the tubes are not bent before closing the lid of the machine. If this is the case, gently rotate the keg to undo any kinks in the tubes. The beverage outlet tube must form a continuation of the handle so as not to interfere with the closing of the lid. To ensure that this is the case, place the tube in the white plastic collar located at the top of the vat. The collar will now hold the outlet tube onto the shaft of the tap, thus preventing it from being crushed when the lid is closed.
- Rinse and wipe up any traces of spillage thoroughly.
- Close the lid of the machine.
- Plug the connector into the machine's power socket and press the switch to the rear of the appliance.
- Adjust the temperature.
The temperature display on the front of the machine will indicate the temperature inside the machine on the outer wall of the keg.
The cooling temperature can be adjusted by turning the temperature regulation button clockwise to reduce (-) or anti-clockwise to increase (+) the temperature.
You will then need to allow some time for the content of the keg to reach the temperature indicated on the display, which is why it is recommended that you perform this operation before serving the first beverage from the keg.
If the keg is empty
If you are only getting froth or air out of the tap this will generally mean that the keg is empty.
You may disconnect a partially-used keg but this is not advisable as it can be a very messy task.
Replacing a keg
- Flick the switch at the rear of the machine to 0.
- Place a glass under the tap and ensure that there is no more liquid coming from it.
- Open the lid by raising the lever.
To remove the WHITE 5L adaptor from a pressurised keg:
- Squeeze the sides of the nozzle, taking care not to damage the attachments.
- Lift the adaptor from the keg and hold the adaptor above the level of the tap.
- Pull the handle of the tap fully forwards (45°) to empty the tap and the tube.
- Keep the handle of the tap in the forwards position and remove the outlet tube positioned in the tap to the rear.
- Remove the keg from the appliance by lifting it out of the machine.
To remove the YELLOW adaptor from a pressurised keg:
- If you are using the air pump, move the pump slide to AIR OFF (slide to the bottom).
-
If you are using the CO2 cartridge system, close the CO2 inlet by turning the tap on the pressure gauge.
-
Disconnect the flexible air or CO2 inlet tube from the adaptor by pressing the metal tab and removing the valve.
- Disconnect the outlet tube from the adaptor by pressing the metal tab and removing the valve.
- Pull the handle of the tap fully forwards (45°) to empty the tap and the tube.
- Keep the handle of the tap in the forwards position and remove the outlet tube positioned in the tap to the rear.
- Squeeze the sides of the YELLOW adaptor to disconnect it from the keg.
- Remove the adaptor from the keg.
- Remove the keg from the appliance by lifting it out of the machine.
To remove the WHITE adaptor for 6L kegs and plastic kegs from a 6L keg or plastic keg :
- If you are using the air pump, move the pump slide to AIR OFF (slide to the bottom).
- If you are using the CO2 cartridge system, close the CO2 inlet by turning the tap on the pressure gauge.
- Disconnect the flexible air or CO2 inlet tube from the adaptor by pressing the metal tab and removing the valve.
- Disconnect the outlet tube from the adaptor by pressing the metal tab and removing the valve.
- Pull the handle of the tap fully forwards (45°) to empty the tap and the tube.
- Keep the handle of the tap in the forwards position and remove the outlet tube positioned in the tap to the rear.
- Squeeze the two side buttons on the adaptor to disconnect it from the keg.
- Remove the adaptor from the keg.
- Remove the keg from the appliance by lifting it out of the machine.
Pouring a glass of beer
Pouring the ideal beer starts with a cold, clean glass. Rinse the glass under cold water before filling it with beer. Hold the glass at a slight angle under the tap and pull the tap handle fully forward (45°). If it is not fully open an excessive amount of froth will form. Once the glass is 3/4 full, gradually bring it into the upright position as you pour. Move the glass away from the tap to increase the froth produced or nearer to the tap to finish filling the glass without increasing the amount of froth. Return the tap to the upright position.
Do not immerse the end of the tap in the liquid inside the glass as this is unhygienic.
At first, the liquid may splutter as air is driven through the system, but the flow will soon become even.
Keep an eye on the drip tray and empty and rinse it at regular intervals during use.
Care and maintenance
Clean your beverage machine after use, when fitting a new keg and at regular intervals. The machine, tubes, adaptors and accessories must be kept clean in order to optimise the quality of the beer or other beverage and prevent odours.
- Flick the switch at the rear of the machine to 0.
- Unplug the appliance.
- Wipe the outer surface using a damp cloth and a few drops of washing-up liquid if necessary.
- Clean the front of the tap using a damp cloth.
- Clean the cooling chamber of the machine using a damp cloth or sponge. Never fill the cooling chamber as this will damage the appliance and never use aggressive detergents.
- Clean the outlet tube, removing it from the tap by lowering the handle and pulling gently. Rinse the outlet tube in warm soapy water, rinse and dry.
- Clean the connection valves and tubes. IMPORTANT: all accessories must be disassembled and cleaned with the utmost care. Any beer, wine or fruit juice residue may ferment in the connections and result in beverage contamination.
a) Squeeze a spring clamp to loosen it.
b) Slide it along the tube, away from the connection valve.
c) Separate the connection valve from the tube.
d) Wash removable parts in warm soapy water, and squeeze and roll the ends of the tubes between two fingers to clean inside them, rinse and dry.
e) Reconnect the tube and the connection valve using spring clamps.
f) Squeeze a spring clamp to loosen it.
g) Slide it along the tube, over the end of the valve.
8 Do not put any parts of the appliance in the dishwasher.
9 Do not immerse the appliance in water or any other liquid.
10 Do not use aggressive detergents such as vinegar, acid products, solvents or spirits to clean your machine.
N.B.: To clean the WHITE adaptor for 6L kegs and plastic kegs properly connect the inlet and outlet tubes to the adaptor. Under the tap, flush water through the end of each tube in turn to thoroughly rinse the inside of the adaptor. The water should flow freely out of the holes in the middle of the adaptor.
To avoid environmental and health problems due to hazardous substances in electrical and electronic goods, appliances marked with this symbol mustn't be disposed of with unsorted municipal waste, but recovered, reused, or recycled.

More Than Cool TM
BTC511

MANUEL D'INSTRUCTION
- WARNING
- MODEL BTC511
- IMPORTANT PRECAUTIONS
- DOMESTIC USE ONLY
- PREPARATION
- CO 2 CARTRIDGE
- POSITIONING AND CONNECTING THE CO 2 CARTRIDGE
- USING THE CO 2 CARTRIDGE
- THE WHITE ADAPTOR IS COMPATIBLE WITH 5L PRESSURISED KEGS
- 5L UNPRESSURISED KEGS
- THE YELLOW ADAPTOR IS COMPATIBLE WITH 5L UNPRESSURISED KEGS
- SHOULD YOU WISH TO USE THE AIR PUMP ON THE MACHINE
- SHOULD YOU WISH TO USE THE SYSTEM WITH A CO2 CARTRIDGE
- THE WHITE ADAPTOR FOR 6L KEGS AND PLASTIC KEGS IS COMPATIBLE WITH THE PLASTIC KEG
- FITTING A 6L PRESSURISED BEER KEG
- THE WHITE ADAPTOR FOR 6L KEGS AND PLASTIC KEGS IS COMPATIBLE WITH 6L PRESSURISED KEGS
- IF THE KEG IS EMPTY
- REPLACING A KEG
- TO REMOVE THE WHITE 5L ADAPTOR FROM A PRESSURISED KEG
- TO REMOVE THE YELLOW ADAPTOR FROM A PRESSURISED KEG
- TO REMOVE THE WHITE ADAPTOR FOR 6L KEGS AND PLASTIC KEGS FROM A 6L KEG OR PLASTIC KEG
- POURING A GLASS OF BEER
- CARE AND MAINTENANCE
Brand : CURTIS
Model : BTC511
Category : Water dispenser