
Norelco QC5560 - Eyelash curler PHILIPS - Free user manual and instructions
Find the device manual for free Norelco QC5560 PHILIPS in PDF.


| Type of product | Eyelash curler |
| Brand | Philips |
| Model | Norelco QC5560 |
| Power source | Rechargeable lithium-ion battery |
| Charging time | 1 hour for full charge |
| Usage time | Up to 30 minutes per charge |
| Heating element | Ceramic for even heat distribution |
| Temperature setting | Fixed optimal temperature (approx. 65°C) |
| Safety features | Automatic shut-off after 5 minutes |
| Material | Plastic body with silicone pad |
| Dimensions | 15 cm x 3 cm x 3 cm |
| Weight | 50 g |
| Color | Black/Silver |
| Included accessories | Charging cable, cleaning brush, storage pouch |
| Functions | Heats up quickly, curved design for natural curl, gentle on lashes |
| Maintenance | Clean with dry cloth after use; do not use water |
| Water resistance | Not waterproof, for dry use only |
| LED indicator | Shows charging status and power on |
| Warranty | 2 years |
| Reparability | Not user-serviceable; contact Philips support |
Frequently Asked Questions - Norelco QC5560 PHILIPS
User questions about Norelco QC5560 PHILIPS
0 question about this device. Answer the ones you know or ask your own.
Ask a new question about this device
Download the instructions for your Eyelash curler in PDF format for free! Find your manual Norelco QC5560 - PHILIPS and take your electronic device back in hand. On this page are published all the documents necessary for the use of your device. Norelco QC5560 by PHILIPS.
USER MANUAL Norelco QC5560 PHILIPS
natural_image
Black Philips Headgroom brand hairpin with textured design (no visible text or symbols beyond branding)フィリップスヘアーカッター
品番
QC5560
取 扱 說 明 書
保証書付
natural_image
Line drawing of a mechanical component with ribbed texture and a curved handle (no text or symbols)コーム

クリーニングブラシ
natural_image
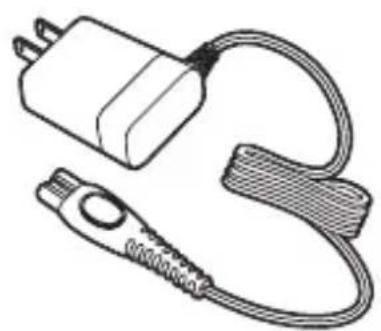
Line drawing of a small electrical plug with a coiled cable and terminal connector (no text or symbols)電源アダプタ(
HQ8505)
natural_image
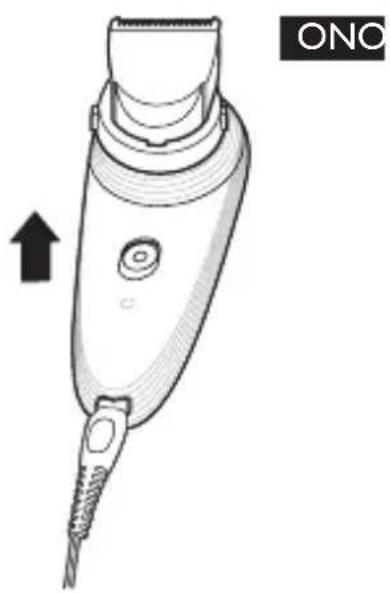
Line drawing of a hairbrush with a black downward arrow indicating compression (no text or symbols)3 スイッチをONにします。
natural_image
Line drawing of a hairbrush with an ONO mark and an arrow indicating direction (no text or symbols on the brush itself)natural_image
Close-up of a hairdryer tip with a black arrow pointing to the tip area (no text or symbols visible)基本的な使い方
電源スイッチのON/OFF
コームの使い方
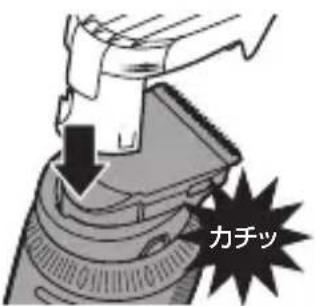
コームの取り付け
コームを本体に差し込みます。
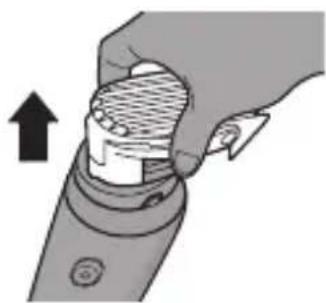
コームの取り外し
コームを本体から真上に引き抜きます。
natural_image
Hand holding a device with a textured cover and an upward arrow indicating action (no text or symbols)
注意
natural_image
Line drawing of a pair of hairbrushes with no text or symbols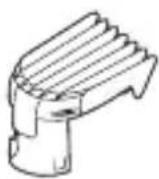
コーム
本体/
ヘアートリミングヘッド
[準備する]
natural_image
Illustration of a person's head with a comb and arrows indicating hair direction (no text or symbols)![PHILIPS Norelco QC5560 - [準備する] - 1](/content/2026/06/1270724/images/ae83a11c83d28812d84da2db9fdeacb26a8712ca069ea76c0576f02373110916.jpg)
注意
natural_image
Illustration of a person using a hairbrush to clean teeth, with an upward arrow and pencil icon (no text or symbols)natural_image
Hand holding a handheld device with a textured surface and an upward arrow indicating action (no text or symbols)natural_image
Illustration of a person applying a product to their head (no text or symbols visible)natural_image
Side profile illustration of a person's neck and shoulder with a downward arrow indicating pressure or movement (no text or symbols)natural_image
Illustration of three hand tools with arrows indicating movement or force (no text or symbols)刃の交換
製品を 廃棄するとき
natural_image
Technical line drawing of a cable and plug assembly (no text or symbols)
Introduction
Congratulations on your purchase and welcome to Philips! To fully benefit from the support that Philips offers, register your product at www.philips.com/welcome.
Your new Philips hair clipper with new ergonomic design and 180° adjustable cutting element allows you to clip your own hair easily. You can move the clipper over all areas of your head as easily as running your fingers through your hair. To enjoy using the hair clipper, we advise you to read the following information.
General description (Fig. 1)
1 Cutting element
2 Swivel head
3 Length setting adjustment ring
4 On/off slide
5 Comb attachment
6 Length setting indicator
7 Adapter
8 Cleaning brush
Important
Read this important information booklet carefully before you use the appliance and save it for future reference.
Danger
Keep the appliance and the adapter dry. -
Warning
This appliance is not intended for use by persons - (including children) with reduced physical, sensory or mental capabilities, or lack of experience and knowledge, unless they have been given
supervision or instruction concerning use of the appliance by a person responsible for their safety. Keep the appliance and its cord out of the reach - of children.
Do not use the appliance or the adapter if it is - damaged.
Do not use the appliance, the adapter or any - other part if it is damaged, as this may cause injury. Always replace a damaged adapter or part with one of the original type.
Caution
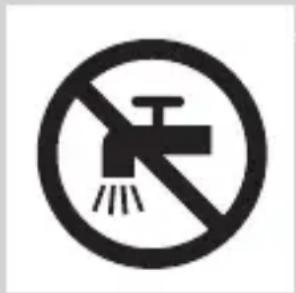
- This appliance is not washable. Never immerse the appliance in water, nor rinse it under the tap.
Only use the adapter and accessories supplied. - Use and store the appliance at a temperature - between 5°C and 35°C.
This appliance is only intended for clipping head - hair. Do not use it for any other purpose.
If the appliance is subjected to a major change - in temperature, pressure or humidity, let it acclimatise for 30 minutes before you use it.
Compliance with standards
This Philips appliance complies with all standards - regarding electromagnetic fields (EMF). If handled properly and according to the instructions in this user manual, the appliances are safe to use based on scientific evidence available today.
Using the appliance
Make sure your hair is clean and dry. Do not use the appliance on freshly washed hair.
Preparing for hair clipping

natural_image
Illustration of a person's head with a comb and eye (no text or symbols)1 Comb your hair with a styling comb in the direction of hair growth.
Clipping with comb attachment

natural_image
Diagram showing a mechanical component with a downward arrow indicating force or motion (no text or symbols present)1 Put the small plug in the appliance and put the adapter in the wall socket.
2 Attach the comb attachment to the swivel head ('click').
Make sure that the comb attachment locks into position properly.
natural_image
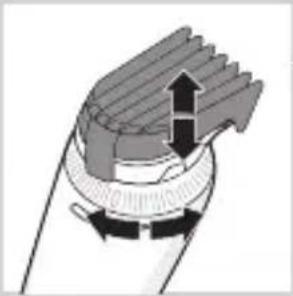
Diagram of a mechanical component with directional arrows indicating motion or force (no text or symbols)3 Turn the length setting adjustment ring to set the comb attachment to the desired setting (1-7).
The arrowhead on the appliance indicates which setting you have selected.

Note: The length settings are indicated on the comb attachment.
Tip: Use different settings to create a natural and smooth transition between the various hair lengths from your neckline to the top of your head.
Do not turn the length setting adjustment ring beyond the highest setting.
4 Turn the swivel head to the position that is most comfortable for your arm when you clip the different parts of your head.


natural_image
Diagram of a mechanical device with a coiled spring and handle (no text or symbols)
natural_image
Illustration of a person neck with hands near the ear (no text or symbols)Using the swivel head
- From its starting position of 0° (pointing forwards), you can turn the swivel head 45° or 90° to the left or right. This enables you to adjust the position of the cutting element to the part of your head that you are clipping. This makes it much easier to clip your own hair.
- To set the cutting element to the desired position, turn the swivel head ('click').
Note: Always adjust the position of the cutting element by turning the swivel head. Do not turn the swivel head by holding the cutting element or the comb attachment.
Note: Do not turn the swivel head more than 90^ to the left or right.
- The swivel head allows you to hold and use the appliance like a styling comb.
Push the on/off slide upwards to switch on the appliance.
Move the clipper through the hair slowly.
Regularly remove cut hair from the comb attachment.
If a lot of hair has accumulated in the comb attachment, remove the comb attachment from the appliance and blow and/or shake the hair out of it. When you remove the comb attachment, the selected setting does not change.
Tips
We advise you to start clipping at the highest - setting of the comb attachment and to reduce the setting gradually.
To clip most effectively, move the appliance against the hair growth direction.
ENGLISH

natural_image
Four-panel illustration showing a person performing a hand gesture, with no visible text or symbols.- Since all hair does not grow in the same direction, you need to move the appliance in different directions (upwards, downwards and across).
Make sure that the flat part of the comb - attachment is always fully in contact with the scalp to obtain an even result
Write down the settings you use to create a - certain hairstyle as a reminder for future clipping sessions.
Contouring without comb attachment
You can use the appliance without comb attachment to clip your hair very close to the skin (0.5mm) or to contour the neckline and the area around the ears.
Be careful when you clip without comb attachment because the cutting element removes every hair it touches.
natural_image
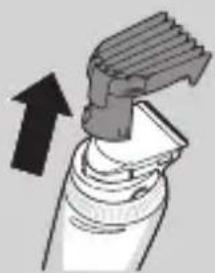
Illustration of a hairdryer with an upward arrow indicating hair removal (no text or symbols)1 Pull the comb attachment off the swivel head.
Never pull at the flexible top of the comb attachment. Always pull at the bottom part.
2 Comb the hair ends over the ears before you start to contour the hairline.
3 Push the on/off slide upwards to switch on the appliance.
4 When you shape the contours around the ears, tilt the appliance in such a way that only one edge of the cutting element touches the hair ends.

natural_image
Illustration of a person applying a hair product to their ear (no text or symbols visible)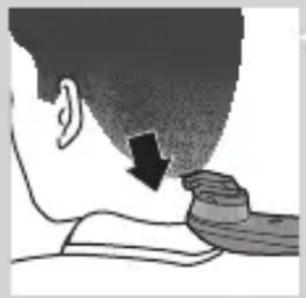
natural_image
Side profile illustration of a person neck with a downward arrow indicating pressure or movement (no text or symbols)5 To contour the neckline and the sideburns, turn the appliance and make downward strokes.
Note: Move the appliance slowly and smoothly. Just follow the natural hairline.
6 Adjust the position of the swivel head to make contouring easier.
Cleaning and maintenance
Clean the appliance every time you have used it with the cleaning brush supplied.
Never rinse the appliance with water.
Never use compressed air, scouring pads, abrasive cleaning agents or aggressive liquids such as petrol, acetone or ethereal oils to clean the appliance.
Be careful that the cutting element or comb attachment does not fall on the floor.
Cleaning the cutting element and comb attachment

natural_image
Illustration of a hand holding a small object with an upward arrow, no text or symbols present1 Switch off the appliance and disconnect it from the mains.
2 Remove the comb attachment.
3 Clean the comb attachment with the cleaning brush supplied.
ENGLISH


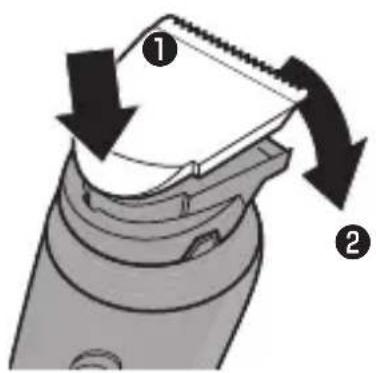
4 Pull the front of the cutting element upwards (1) and remove the cutting element from the appliance (2).
5 Clean the cutting element with the cleaning brush supplied.
6 Clean the inside of the appliance with the cleaning brush supplied.
7 Insert the lug of the cutting element into the slot (1) and push the cutting element back onto the swivel head (2).
Storage
1 Switch off the appliance and disconnect it from the mains.
2 Store the appliance in a safe and dry place.
Replacement
Only replace a worn or damaged cutting element with an original Philips cutting element, available from authorised Philips service centres.
Environment
natural_image
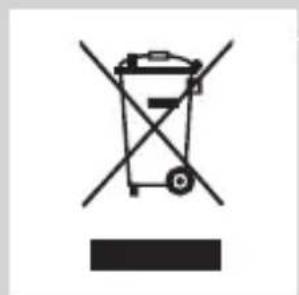
Symbol of a trash bin crossed with no visible text or labels- Do not throw away the appliance with the normal household waste at the end of its life, but hand it in at an official collection point for recycling. By doing this, you help to preserve the environment.
Guarantee and service
If you need service or information or if you have a problem, please visit the Philips website at www.
philips.com/support or contact the Philips
Consumer Care Centre in your country. You find its phone number in the worldwide guarantee leaflet. If there is no Consumer Care Centre in your country, go to your local Philips dealer.
故障かな? と思ったら
故障かな?と思ったら、お調べください。
だんだん切れ味が悪くなった
▶刃が損傷または摩耗していませんか?
- 取 扱 說 明 書
- 基本的な使い方
- 電源スイッチのON/OFF
- コームの使い方
- コームの取り付け
- コームの取り外し
- 注意
- [準備する]
- 刃の交換
- 製品を 廃棄するとき
- Introduction
- General description (Fig. 1)
- Important
- Danger
- Warning
- Caution
- Compliance with standards
- Using the appliance
- Preparing for hair clipping
- Clipping with comb attachment
- Using the swivel head
- Tips
- ENGLISH
- Contouring without comb attachment
- Cleaning and maintenance
- Cleaning the cutting element and comb attachment
- Storage
- Replacement
- Environment
- Guarantee and service
- philips.com/support or contact the Philips
- 故障かな? と思ったら
- だんだん切れ味が悪くなった
- ▶刃が損傷または摩耗していませんか?
Brand : PHILIPS
Model : Norelco QC5560
Category : Eyelash curler