
BlackBerry 9800 - Smartphone T-Mobile - Free user manual and instructions
Find the device manual for free BlackBerry 9800 T-Mobile in PDF.


| Type de produit | Smartphone |
| Brand | T-Mobile (OEM: BlackBerry) |
| Model | BlackBerry 9800 (Torch) |
| Dimensions | 111 x 62 x 14.6 mm |
| Weight | 161 g |
| Display | 3.2-inch TFT color touchscreen, 480x360 pixels |
| Keyboard | Full QWERTY slide-out keyboard |
| Operating System | BlackBerry OS 6.0 |
| Processor | 624 MHz Marvell PXA930 |
| RAM | 512 MB |
| Internal Storage | 4 GB (2.8 GB user available), microSD expandable up to 32 GB |
| Battery | Lithium-Ion 1300 mAh, removable (model F-S1) |
| Talk Time | Up to 5.5 hours (3G) |
| Standby Time | Up to 17 days |
| Main Camera | 5 MP autofocus with LED flash, 2592x1944 pixels, video 480p@30fps |
| Front Camera | None |
| Connectivity | Wi-Fi 802.11b/g/n, Bluetooth 2.1+EDR, USB 2.0, GPS |
| Network | GSM/EDGE/UMTS/HSDPA (2G/3G) |
| SIM Card | Mini-SIM |
| Sensors | Accelerometer, proximity, light |
| Audio | 3.5 mm headphone jack, speakerphone, noise cancellation |
| Special Functions | BlackBerry Messenger (BBM), Push email, Trackpad navigation |
| Cleaning Instructions | Wipe with a soft, dry cloth. Avoid liquids and abrasive materials. |
| Safety Warnings | Do not disassemble; avoid extreme temperatures; use only approved chargers. |
| Repairability | Battery and SIM are user-replaceable. Other parts require specialized tools. |
Frequently Asked Questions - BlackBerry 9800 T-Mobile
User questions about BlackBerry 9800 T-Mobile
0 question about this device. Answer the ones you know or ask your own.
Ask a new question about this device
Download the instructions for your Smartphone in PDF format for free! Find your manual BlackBerry 9800 - T-Mobile and take your electronic device back in hand. On this page are published all the documents necessary for the use of your device. BlackBerry 9800 by T-Mobile.
USER MANUAL BlackBerry 9800 T-Mobile
BlackBerry Torch 9800 Smartphone
User Guide
Version: 6.0

natural_image
Abstract geometric design with blue shapes on white background (no text or symbols)To find the latest user guides, visit www.blackberry.com/docs/smartphones.
Contents
Quick Help....9
Top 10....9
Getting to know your smartphone.... 13
Tips.... 29
Make it yours.... 34
Shortcuts 42
Phone shortcuts.... 42
Message shortcuts.... 42
File and attachment shortcuts.... 43
Typing shortcuts for the slide-out keyboard.... 44
Media shortcuts.... 45
Emergency calls.... 52
Volume.... 52
Voice mail.... 53
Speed dial.... 54
Call waiting, call forwarding, and call blocking.... 55
Fixed dialing and smart dialing.... 57
Conference calls.... 59
Call logs.... 60
Multiple phone numbers.... 62
Phone options.... 63
Phone shortcuts.... 65
Troubleshooting: Phone.... 66
Voice commands.... 68
Perform an action using a voice command.... 68
Available voice commands.... 68
Change the language for voice commands.... 69
Turn off choice lists for voice commands.... 69
Change the options for voice prompts.... 69
Improve voice recognition....70
Troubleshooting: Voice dialing.... 70
Messages.... 71
Email....71
PIN messages.... 87
Text messages.... 91
Security options for messages....99
Attachments.... 101
S/MIME-protected messages.... 103
IBM Lotus Notes native encrypted messages.... 109
PGP protected messages.... 110
Message shortcuts.... 115
File and attachment shortcuts.... 116
Troubleshooting: Messages.... 117
Files.... 123
File basics.... 123
Managing files and attachments.... 125
File and attachment shortcuts.... 128
Troubleshooting: Attachments.... 129
Media.... 130
Music.... 130
Podcasts.... 133
Videos.... 135
Video camera.... 136
Camera.... 138
Pictures.... 140
Voice notes.... 142
Ring tones.... 143
Media storage.... 145
Transferring and downloading media files.... 148
Supported audio and video file formats.... 150
Media shortcuts.... 150
Troubleshooting: Media.... 151
Ring tones, sounds, and alerts.... 154
About ring tones, sounds, and alerts.... 154
Change your ring tone, notifiers, or reminders.... 154
Add a custom profile.... 155
Add a contact alert.... 155
Silence your device.... 155
Flashing LED 156
Change alarm notification options.... 156
Turn on event sounds.... 157
Troubleshooting: Ring tones, sounds, and alerts.... 157
Browser 158
Browser basics.... 158
Browser bookmarks.... 161
RSS feeds.... 162
Conference call meetings.... 173
Synchronizing calendar.... 175
Calendar options.... 177
Calendar shortcuts.... 178
Troubleshooting: Calendar.... 179
Contacts.... 181
Contact basics.... 181
Customizing contacts.... 182
Synchronizing contacts.... 184
Personal distribution lists.... 186
Multiple contact lists.... 187
Contact list options.... 187
Troubleshooting: Contacts.... 188
Clock 190
Set the date and time.... 190
Change what appears on the screen when your device is charging.... 190
Change the clock face.... 190
Display a second time zone on the clock.... 191
Turn on the alarm.... 191
Silence the alarm.... 191
Change alarm notification options.... 191
Turn on bedside clock mode.... 192
Set options for bedside clock mode.... 192
Use the stopwatch.... 192
Use the timer.... 192
Change timer notification options.... 193
Troubleshooting: Clock.... 193
Tasks and memos.... 194
Create a task or memo.... 194
Send a task or memo.... 194
Change or delete a task or memo.... 194
Change the status of a task.... 194
Hide completed tasks.... 195
Show tasks in the calendar.... 195
Synchronizing tasks and memos.... 195
About categories.... 197
Categorize a contact, task, or memo.... 197
Create a category for contacts, tasks, or memos.... 197
Turn off the prompt that appears before you delete items.... 198
Typing.... 199
Typing basics.... 199
Typing input methods.... 200
Typing options.... 202
Spelling checker.... 203
Custom dictionary.... 204
AutoText 205
Typing shortcuts for the slide-out keyboard.... 206
Troubleshooting: Typing.... 207
Keyboard.... 208
Assign an application to a Convenience key.... 208
Change the default currency symbol.... 208
Set the cursor speed.... 208
Turn on key tones.... 208
Set the trackpad sensitivity.... 209
Turn off trackpad sounds.... 209
Troubleshooting: Keyboard.... 209
Language 210
About typing input languages.... 210
Change the language.... 210
Use a shortcut for switching typing input languages when you are typing.... 210
Add a display language.... 211
Delete a language.... 211
Troubleshooting: Language.... 211
Screen display.... 212
Set options for backlighting.... 212
Use a picture as your device wallpaper.... 212
Change the display font.... 212
Organizing applications on the Home screen.... 213
Add a message that appears when your device is locked.... 214
Set the touch screen sensitivity.... 214
Use grayscale or reverse contrast for the screen display.... 214
Turn on flashing LED notification for wireless coverage 214
Themes.... 215
Troubleshooting: Display.... 215
GPS technology.... 217
About GPS technology.... 217
Turn on GPS technology.... 217
Set the GPS receiver that you use to track your movement.... 217
Get your GPS location.... 218
Prevent others from tracking your location.... 218
Turn off location aiding.... 218
Troubleshooting: GPS technology.... 219
Maps.... 220
Map basics.... 220
Map options.... 223
Map shortcuts.... 223
Troubleshooting: Maps.... 224
Applications.... 225
About multitasking.... 225
Keep an application running in the background and switch to another application.... 225
Close an application so that it is not running in the background.... 225
About adding applications.... 226
About social networking applications.... 227
About instant messaging applications.... 227
Require your device password before adding an application.... 227
Delete an application.... 228
View properties for an application.... 228
View the size of an application database.... 228
Troubleshooting: Applications.... 228
BlackBerry Device Software 229
About updating the BlackBerry Device Software.... 229
Update the BlackBerry Device Software over the wireless network.... 230
Return to or delete the previous version of the BlackBerry Device Software.... 230
Update the BlackBerry Device Software from a web site.... 230
Update the BlackBerry Device Software using the BlackBerry Desktop Software.... 231
Troubleshooting: BlackBerry Device Software.... 231
Manage Connections.... 233
Manage Connections basics.... 233
Mobile network 235
Wi-Fi technology.... 239
Bluetooth technology.... 245
Power and battery 253
Turn off your device.... 253
Set your device to turn on and turn off automatically.... 253
Reset the device.... 253
Check the battery power level.... 253
Tips: Extending battery life.... 253
Memory and media cards.... 255
About media cards.... 255
Supported media cards.... 255
View the amount of available storage space on your device.... 255
Turn off media card support.... 255
Repair files stored on your media card or on your device.... 255
About compression.... 256
About file encryption 256
Turn on encryption.... 256
Tips: Freeing and conserving storage space.... 257
Troubleshooting: Storage and media cards.... 258
Search 259
Search for an item.... 259
Set the types of items that are included in searches.... 259
Search for messages.... 259
Message search criteria.... 260
Do more with your message search results.... 260
Search for text in a message, in a file, or on a web page.... 261
View, change, or delete a saved search.... 261
Search for a contact in your organization's address book.... 261
Search shortcuts.... 262
SIM card.... 263
About the SIM card phone book.... 263
Add a contact to your SIM card.... 263
Copy contacts from your SIM card to your contact list.... 263
Copy a contact from your contact list to your SIM card.... 263
Change or delete a SIM card contact.... 264
Store text messages on your SIM card.... 264
Change the display name for a phone number.... 264
About SIM card security.... 264
Protect your SIM card with a PIN code.... 265
Change the SIM card PIN code.... 265
Security 266
Security basics.... 266
Password keeper.... 268
Encryption 270
Memory cleaning.... 272
Certificates.... 273
PGP keys.... 280
Certificate servers.... 285
Key store.... 287
Smart cards.... 289
VPN settings.... 292
Verify security software manually.... 293
Third-party application control.... 294
Troubleshooting: Security 297
Service books and diagnostic reports.... 298
Accept, delete, or restore a service book.... 298
Run a diagnostic report.... 298
View, submit, or delete a diagnostic report.... 298
Set a default recipient for diagnostic reports.... 299
I cannot run or submit a diagnostic report.... 299
View the version number of the BlackBerry Device Software on your device.... 299
Synchronization.... 300
About synchronization.... 300
Reconcile email over the wireless network.... 300
Delete email on your device and in your email application on your computer.... 301
Synchronize organizer data over the wireless network.... 301
About synchronization conflicts.... 301
Manage email reconciliation conflicts.... 302
Manage data synchronization conflicts.... 302
About backing up and restoring device data.... 302
Empty the deleted items folder on your computer from your device.... 303
Troubleshooting: Synchronization.... 303
Accessibility options.... 305
About accessibility options.... 305
Screen accessibility options.... 305
Audio and phone accessibility options.... 306
Typing accessibility options.... 308
Calculator 310
Use the calculator.... 310
Convert a measurement.... 310
BrickBreaker 311
About BrickBreaker.... 311
BrickBreaker capsules.... 311
BrickBreaker scoring.... 312
Play BrickBreaker.... 312
Adjust the volume.... 312
Set the paddle speed.... 313
Word Mole game.... 314
Word Mole game basics.... 314
Single-player games.... 315
Multiplayer games.... 316
Troubleshooting: Word Mole 317
Glossary 318
Legal notice.... 323
Quick Help
Top 10
BlackBerry ^® device users have spoken! Here are the top 10 things they want to know how to do on their devices.
Set up an email address
- On the Home screen, click the Setup icon.
- In the Setup section, click the Email Accounts icon.
- Follow the screens to set up your email address. When your email address is set up correctly, you receive a confirmation message. To view and manage your email messages, on the Home screen, click the Messages icon.
Note: In some cases, you might see the following options. If so, select one of the options.
- Internet Mail Account: Use this option to associate your BlackBerry® device with one or more existing email accounts (for example, Windows Live™ Hotmail®) or to create a new email address for your device.
- Enterprise Account: If your administrator gave you an enterprise activation password, use this option to associate your device with your work email account using the BlackBerry® Enterprise Server.
If you are trying to set up a Internet email account (for example, Windows Live™ Hotmail®) or a new email address for your device, and do not see this option, contact your administrator or wireless service provider.
Related topics
Change options for your personal email account, 79
Change your ring tone, notifiers, or reminders
In addition to changing the tone, you can also change options for volume, LED, vibration, and notification during calls.
- On the Home screen, click the Sound and Alert Profiles icon.
-
Click Change Sounds and Alerts > Sounds for Selected Profile.
-
To change your ring tone, click Phone.
-
To change notifiers or reminders, click to expand a section. Click an option.
-
In the Ring Tone, Notifier Tone, or Reminder Tone field, do one of the following:
-
Click a tone.
- To use a song that is on your BlackBerry® device or on a media card, click All Music. Find and click a song.
- To use a voice note that you recorded, click All Voice Notes. Find and click a voice note.
-
To use a preloaded alert, click All Alerts. Find and click an alert.
-
Press the ☐ key > Save.
Related topics
I cannot change the number of times that my device rings, 67
Find or hide an application icon
Depending on your theme, you might not be able to hide some application icons.
On the Home screen or in a folder, do any of the following:
• To see all your application icons, press the key > All.
- To hide an application icon, highlight the icon. Press the key > Hide.
- To show all hidden application icons, press the key > Show All.
- To stop hiding an application icon, highlight the icon. Press the 📄 key > Hide. A check mark should not appear beside the Hide field.
Related topics
My display changed, 215
About adding applications
Depending on your wireless service provider and region, you might have the option to add or update applications using the BlackBerry App World™ storefront, the BlackBerry® Desktop Software, or the Application Center. You might also be able to download applications from a web page (try visiting mobile.blackberry.com from your BlackBerry device), or from an application offered by your wireless service provider.
Additional terms and conditions might apply to software and services made available through the BlackBerry App World™ storefront, the BlackBerry Desktop Software, or the Application Center. Data charges might apply when you add or use an application over the wireless network. For more information, contact your wireless service provider.
BlackBerry App World
If you have BlackBerry App World on your device, you can search for and download games, social networking applications, personal productivity applications, and much more. Using an existing PayPal® account, you can buy and download items over the wireless network to your device.
To download BlackBerry App World, visit www.blackberryappworld.com.
For more information about managing applications using BlackBerry App World, click the BlackBerry App World icon. Press the key > Help.
BlackBerry Desktop Software
If you have the BlackBerry Desktop Software installed on your computer, you can connect your device to your computer to add, update, remove, or restore applications. You can also add applications to your device that you have downloaded to your computer, without having to use the wireless network.
To download the BlackBerry Desktop Software, visit www.blackberry.com/desktop.
For more information about managing applications using the BlackBerry Desktop Software, see the Help in the BlackBerry Desktop Software.
Application Center
If you have the Application Center on your device, you can add, update, or return to the previous version of a select number of applications that are hosted by your wireless service provider. Depending on your wireless service provider, this feature might not be available.
For more information about managing applications using the Application Center, click the Application Center icon. Press the key > Help.
Add or change your signature
Depending on your wireless service plan, this feature might not be supported.
- On the Home screen, click the Messages icon.
-
Press the key > Options.
-
For a work email account, click Email Preferences. If the Message Services field appears, change this field to the appropriate email account. If the Use Auto Signature check box is not selected, select it. In the field that appears, place your cursor.
-
For a personal email account, click Email Account Management. Click an email account. Click Edit.
-
Type a signature.
-
Press the ☐ key > Save.
Your signature is added to your email after you send it.
Use a picture as your device wallpaper
- On the Home screen, click the Media icon > Pictures icon.
- Browse to a picture.
- Press the ☐ key > Set As Wallpaper.
Related topics
My display changed, 215
Supported audio and video file formats
Depending on your BlackBerry® device model and wireless service provider, some media file formats might not be supported.
| Type | File format |
| Audio | • AAC |
| • AMR | |
| • FLAC | |
| • MP3 | |
| • M4A | |
| • OGG | |
| Type File format | |
| WMA | |
| WAV | |
| Video | 3GP |
| AVI | |
| ASF | |
| MP4 | |
| MOV | |
| WMV | |
For information about codecs and recommended video and audio file formats for your device, visit www.blackberry.com/docs/smartphones and click Multimedia > Media Types Supported on BlackBerry Smartphones.
Transfer a file from your computer to your device using your device as a USB memory drive
You must use the BlackBerry® Desktop Software to manage and preserve the information or the encryption that is associated with your media files when you transfer files between your BlackBerry device and your computer.
- Connect your device to your computer using a USB cable.
-
Do one of the following:
-
If you want to transfer most types of files, in the dialog box that appears on your device, select the USB option.
-
If you want to transfer media files that are protected with DRM, in the dialog box that appears on your device, select the media transfer option.
-
If necessary, type a password. Your device appears as a drive on your computer.
- Drag a file from a location on your computer to a folder on your device.
To view the transferred file on your device, disconnect your device from your computer and find the file.
Related topics
Transfer your media files from your computer to your device using BlackBerry Desktop Software, 38
Open, close, or switch between tabs
Do one of the following:
- To open a new tab, in the browser, press the ☐ key > Tabs. Click the New Tab icon.
• To open a new tab for a link on a web page, highlight the link. Press the ☐ key > Open Link in New Tab. - To switch between tabs, in the browser, press the key > Tabs. Click a tab.
- To close a tab, in the browser, press the key > Tabs. Highlight a tab. Click the ico
Reconcile email over the wireless network
You can set the Wireless Reconcile option for each email address that is associated with your BlackBerry ^® device.
- On the Home screen, click the Messages icon.
- Press the ☐ key > Options > Email Reconciliation.
- If the Message Services field appears, set this field to the appropriate email account.
- Select the Wireless Reconcile check box.
- Press the ☐ key > Save.
If your device is associated with a Microsoft® Outlook® email account, you must use the synchronization tool of the BlackBerry® Desktop Software to reconcile email in personal folders. For more information, see the Help in the BlackBerry Desktop Software.
Getting to know your smartphone
Find out about apps and indicators, and what the keys do on your BlackBerry® smartphone.
Home

Important keys
Front keys
| Key | Name Actions | |
| Trackpad | Slide your finger to move around the screen.Press (click) to select an item. | |
| Key Name Actions | ||
| Press and hold to open a pop-up menu. | ||
 | Menu | Open a menu.Select a highlighted menu item.Press and hold to switch applications quickly. |
 | Escape | Return to the previous screen.Close the menu. |
 | Send | Make a call.Answer a call. |
 | End/Power | End a call.Return to the Home screen.Press and hold to turn on or turn off your BlackBerry® device. |
Top keys
| Key Name Actions | ||
 | Power/Lock | Lock or unlock the screen.Press and hold to turn on or turn off your device. |
| Mute | Mute a call.Mute the volume. | |
Side keys
| Key | Name Actions | |
| [YYBX] | Volume | Change the volume.Press and hold to play the next or previous media file.Before you take a picture or record a video, press to zoom in or out. |
 | Convenience key | Take a picture.You can also customize this key. |
Keyboard
| Key | Name Actions |
| Shift Capitalize letters. | |
| Alt Type the alternate character on a key. | |
| Key Name Actions | |
| sym | Symbol Open the symbol list. |
| del | Backspace/Delete Delete the previous character or a selected item. |
| Enter Select an item. | |
| Speakerphone Turn on or turn off the speakerphone during a call. | |
About the slider and keyboard
The slider enables you to use your BlackBerry ^® device when it is open or closed. For example, when the slider is closed, you can use the touch screen keyboard to type short responses to messages. When the slider is open, the slide-out keyboard is available for you to type longer messages, access keyboard shortcuts, and type while you view a full screen of content. You can also open the slider to answer a call and to turn on backlighting.
You can use the touch screen keyboard in either portrait or landscape view. If you open the slider when the touch screen keyboard is displayed, the touch screen keyboard disappears and the device displays screens in portrait view. Videos are displayed according to your device's orientation.
Select commands using toolbars and pop-up menus
Several menu commands are also available on the screen to help you to perform common actions quickly.
Toolbars
Toolbars are available in most applications, and appear at the bottom of the screen. You can use the toolbar in the Messages application, for example, to quickly search your messages, compose an email, or open or delete the highlighted message.
- To see a description for a toolbar icon, touch and hold the icon.
- To select the command, tap the icon.
Pop-up menus
Pop-up menus are available in most applications, and appear in the center of the screen. You can use the pop-up menu when you are viewing a message, for example, to file, forward, or reply to the message.
- To open a pop-up menu, touch and hold an item on the screen or press and hold the trackpad.
- To select a command, tap the icon or click the trackpad.
- To see additional commands, tap the Full Menu icon.
Tips: Doing things quickly
For full instructions, click the links under Related information at the bottom.
| Use the Quick Access area to access popular options Highlight and click an area at the top of the Home screen to access options such as changing your ring tone, setting the alarm, viewing notifications, and turning on or off network connections. | |
| See all the apps and folders on the Home screen, or minimize your view and view the wallpaper | On the navigation bar, click All. |
| Switch to another app | Press and hold the Key. Click an app.Note: The other app might still be running in the background. |
| Open an app with a convenience key Press a convenience key on the side of your device. Note: You can customize which app a convenience key opens. | |
| Use toolbars Toolbars are available in most applications, and appear at the bottom of the screen. For example, you can click icons on the toolbar in the message list to quickly search the message list, compose an email, and open or delete the selected message. To see a description for a toolbar icon, touch and hold the icon, or highlight the icon and press and hold the trackpad. | |
| Use pop-up menus Pop-up menus provide common available actions, and appear in the center of the screen. For example, you can use the pop-up menu in a message to file, forward, or reply to the message. To open a pop-up menu, touch and hold the screen or press and hold the trackpad. To select a command, tap the icon or click the trackpad. | |
| Switch to the Favorites, Media, Downloads, and Frequent views | On the Home screen, highlight All on the navigation bar and slide your finger on the trackpad right or left. |
| Add an app to the Favorites view Highlight an app on the Home screen or in a folder. Press the Key > Mark as Favorite. | |
| Change options for the Home screen such as the wallpaper | On the Home screen, press the Key > Options. |
Related topics
Keep an application running in the background and switch to another application, 225
Assign an application to a Convenience key, 208
Change what happens when you type on the Home screen, 36
Applications
Get started with some of these great applications.

Messages
Send emails, PIN messages, and more.

Text Messages
Send text messages.

Browser
Browse websites.

Media
See saved pictures, play songs, and more.

Camera (if supported)
Take pictures.

Instant Messaging
Chat with friends or colleagues.

Options
Set your device options. You can find more options in each application menu.

Manage Connections
Set up wireless connections, such as a Bluetooth ^® connection.

Help
Find the user guide here or click Help in a menu.
To show or hide an icon, highlight the icon using the trackpad. Press the ☐ key > Show All or Hide.
Status indicators
Home screen

new notification alarm set


unopened message count BlackBerry® Messer


calendar reminder count social feeds


missed call count sending or receiving data


Wi-Fi ^® turned on roaming

Messages
| Home screen | ||
| unopened opened | ||
| text message sent message | ✓ | |
| attachment message is sending | ||
| high priority message not sent | × | |
| draft meeting invite | ||
| Phone | ||
| [AHH] | missed call received call | [BWHK] |
| [YZTK] | placed call voice mail message | [ZZDS] |
Tips: Managing indicators
Indicators tell you that there is something new or updated, such as a new message, voice message, or feed, or they inform you of the status of something, such as the battery or network connection. Indicators often appear on app icons, new content within apps, and at the top of the Home screen.
| Remove the new item indicator | Open each item that has this indicator. For example, to remove it from the Messages icon, click the icon. |
| Remove the unopened message indicator | In the Messages app, do one or more of the following:Open all of your messages by clicking on them. If you cannot find all of your unopened messages in your inbox, look in your messages folders.Mark a message as opened. Highlight a message. Press thekey > Mark Opened.Mark all messages that are prior to a date as opened.Highlight a date field. Press thekey > Mark Prior Opened. |
| Identify an indicator | You might be able to identify an indicator by seeing the icon of the application that the indicator refers to. To see a complete list of applications on your device and their icons, on the Home screen or in a folder, click theOptions icon. ClickDevice > Application Management. |
- For a complete list of BlackBerry® indicators, visit www.blackberry.com/docs/smartphones. Click your device model, and then click the Icons and Indicators guide.
Phone

Contacts
Add a contact Tap New Contact. To add a contact from a recent call in your call history, touch and hold the phone number and tap Add to Contacts.
Open the touch screen keyboard

Search contacts
Tap the search bar to open the touch screen keyboard
Pop-up menu
Touch and hold a contact to open a pop-up menu of common actions. To open the full menu, tap the Full Menu icon or press the Menu key.
Browser
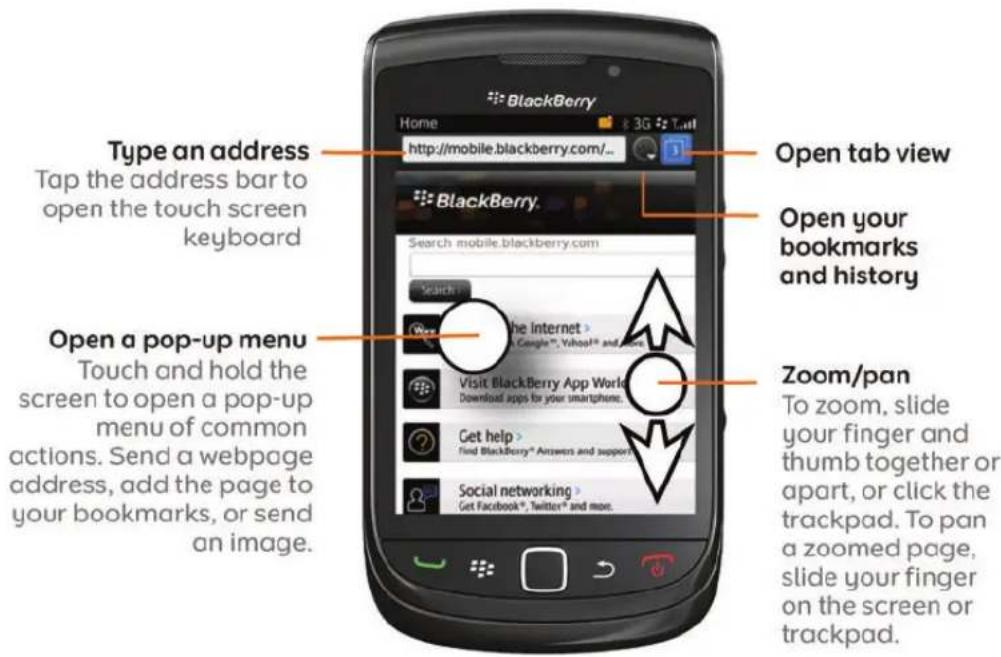
Tab view
To see the tabs you have open, slide your finger on the screen or trackpad. To open a tab, tap the thumbnail or click the trackpad.

Camera

Pictures

Messages

Open a message
Click the trackpad to open the highlighted message, or tap a message on the screen.
Cut, copy, and paste
![Select text Touch the beginning and end of the text. You can select text to cut and copy from many applications and paste it into text fields. From: Stephen Burke RE: Helpful Information Aug 6, 2010 2:23 PM Slider enables you to use your BlackBerry® when this is open or closed. For example, the slider is closed, you can use the touch on keyboard to type short responses to messages. [T] an the slider is open, the slide-out Keyboard is available for you to type longer messages, access keyboard shortcuts, and type while you view a full screen of content. You can also open the slider to answer a call and to turn on blacklighting. You can use the touch screen keyboard in either portrait or landscape view. If you can use the slider when the touch screen keyboard is closed, the touch screen keyboard disappeared, then the device displays screens in portrait-view. Videos are displayed according to your device's orientation. Open the pop-up menu Touch and hold the screen, or press and hold the trackpad Move the cursor Touch the cursor frame and slide your finger Cancel selection Cut Copy](/content/2026/06/1269723/images/3cd53e5901e4464b1cf42582e386706913a46dc8f178e40749c2c58a08e9df01.jpg)
Type text

Feature availability
The following items affect the availability of features on your BlackBerry® device. The features discussed are meant as examples, and are not inclusive of every feature that might or might not be available on your device.
| Device model Features such as GPS, the camera and video camera, and network connection options are dependent on your device model. To find feature specifications for your device model, visit www.blackberry.com/go/devices. | |
| Wireless service plan You must purchase or change your wireless service plan through your wireless service provider.A wireless service plan with phone or voice is required for you to use the phone application and to send and receive text messages.A wireless service plan with data is required for you to use the browser service and instant messaging applications, and to send and receive email messages and PIN messages.For more information about your plan, contact your wireless service provider. | |
| BlackBerry Internet Service and BlackBerry Enterprise Server | Once you have a data plan, you must set up your email address or third-party instant messaging account in order to send and receive email messages, use third-party instant messaging applications, and use some browser options.If you are an individual user, when you set up your email address or instant messaging account, you are associating it with the BlackBerry® Internet Service.If you are a corporate user, your administrator sets up your email account by associating it with a BlackBerry® Enterprise Server. Your administrator might set options that determine the features and settings that are available on your device. To view the IT policies that have been set by your administrator, on the Home screen or in a folder, click the Options icon. Click Security > Security Status Information > View IT Policy. |
| Wireless service provider Features such as text messaging, location-based services, and some phone features are dependent on your wireless service provider's offerings. For more information, contact your wireless service provider. | |
| Wireless network The wireless network that your device is connected to might affect the availability of some features. Depending on your wireless service provider and available roaming options, | |
different wireless networks are available. Some wireless networks do not support features such as call blocking, call forwarding, or cell broadcasting. For more information, contact your wireless service provider.
Related topics
BlackBerry Device Software, 229
Find more information, 41
Check what wireless networks your device connects to, 233
Tips
Save time and maximize your efficiency with these quick tips.
Tips: Finding apps
| Look in a folder on your Home screen | Some apps are located in folders on your Home screen. Click a folder to see what apps are inside. |
| Make all hidden apps visible on the Home screen | On the Home screen, press thekey> Show All. To unhide the app, highlight it and then click Hide to clear the check mark. If Show All does not appear in the menu, there are no apps hidden from view. |
| Search for an app On the Home screen, start typing the application name. | |
| Verify that the app is installed | On the Home screen or in a folder, click the Options icon. Click Device > Application Management. If the app is listed, it is installed on your BlackBerry® device. |
Tips: Doing things quickly
For full instructions, click the links under Related information at the bottom.
Use the Quick Access area to access popular options
Highlight and click an area at the top of the Home screen to access options such as changing your ring tone, setting the alarm, viewing notifications, and turning on or off network connections.
| See all the apps and folders on the Home screen, or minimize your view and view the wallpaper | On the navigation bar, click All. |
| Switch to another app | Press and hold thekey. Click an app.Note: The other app might still be running in the background. |
| Open an app with a convenience key Press a convenience key on the side of your device. | Note: You can customize which app a convenience key opens. |
| Use toolbars Toolbars are available in most applications, and appear at thebottom of the screen. For example, you can click icons on the toolbar in the message list to quickly search the message list, compose an email, and open or delete the selected message.To see a description for a toolbar icon, touch and hold the icon, or highlight the icon and press and hold the trackpad. | |
| Use pop-up menus Pop-up menus provide common available actions, and appearin the center of the screen. For example, you can use the pop-up menu in a message to file, forward, or reply to the message.To open a pop-up menu, touch and hold the screen or press and hold the trackpad. To select a command, tap the icon or click the trackpad. | |
| Switch to theFavorites, Media, Downloads, and Frequent views | On the Home screen, highlightAllon the navigation bar and slide your finger on the trackpad right or left. |
| Add an app to the Favoritesview Highlight an app on the Home screen or in a folder. Press thekey > Mark as Favorite. | |
| Change options for the Home screen such as the wallpaper | On the Home screen, press thekey > Options. |
Related topics
Keep an application running in the background and switch to another application, 225
Assign an application to a Convenience key, 208
Change what happens when you type on the Home screen, 36
Tips: Managing indicators
Indicators tell you that there is something new or updated, such as a new message, voice message, or feed, or they inform you of the status of something, such as the battery or network connection. Indicators often appear on app icons, new content within apps, and at the top of the Home screen.
| Remove the new item indicator | Open each item that has this indicator. For example, to remove it from the Messages icon, click the icon. |
| Remove the unopened message indicator | In the Messages app, do one or more of the following:Open all of your messages by clicking on them. If you cannot find all of your unopened messages in your inbox, look in your messages folders.Mark a message as opened. Highlight a message. Press thekey > Mark Opened.Mark all messages that are prior to a date as opened. Highlight a date field. Press thekey > Mark Prior Opened. |
| Identify an indicator | You might be able to identify an indicator by seeing the icon of the application that the indicator refers to. To see a complete list of applications on your device and their icons, on the Home screen or in a folder, click theOptionsicon. ClickDevice > Application Management.For a complete list of BlackBerry® indicators, visitwww.blackberry.com/docs/smartphones. Click your device model, and then click the Icons and Indicators guide. |
Tips: Extending battery life
For full instructions, click the links under Related information at the bottom.
| Set your BlackBerry® device to turn on and turn off automatically. | On the Home screen or in a folder, click the Options icon. Click Device > Auto On/Off. |
| You can set your device to turn off while you aren't using it for an extended period, like when you sleep. Data you receive when the device is turned off automatically updates when the device turns on. | |
| Set backlighting to remain on for a shorter period of time, and lower its brightness | On the Home screen or in a folder, click the Options icon. Click Display > Screen Display. |
| Turn off network connections you aren't using On the Home screen, click the connections area at the top of the screen, or click the Manage Connections icon. Click a network connection to clear the check box. | |
| Close apps when you are finished with them. | In an app, press the Rey > Close. |
| When you switch from one app to another, some apps, such as the Browser app or the Music app, run in the background, which uses battery power. | |
| Switch your vibrating notifications to sound notifications or LED notifications, lower the volume of your sound notifications, or select a shorter ring tone | On the Home screen, click theSound and Alert Profilesicon.ClickChange Sounds and Alerts. |
| Delete the original text from a reply message | When you are replying to a message, press theDelete Original Text. |
| If your device has a camera flash, turn off the flash | On the Home screen, click theCameraicon. Click the flash icon at the bottom of the screen until theflash offindicator appears. |
| Keep your battery connections clean. Keeping the battery clean extends the life of your battery. | Every few months, use a cotton swab or dry cloth to clean the metal contacts on the battery and the device. |
Related topics
Set your device to turn on and turn off automatically, 253
Set options for backlighting, 212
Turn on or turn off a network connection, 234
Change your ring tone, notifiers, or reminders, 9
Delete the original text from a reply message, 73
Tips: Freeing and conserving storage space
Try to maintain at least 400 KB of available application storage on your BlackBerry ^® device. If you find that your device processes are unusually slow, try freeing storage space by deleting files that you don't need. Changing options for email messages, calendar entries, and media files might help you conserve storage space.
For full instructions, click the links under Related information at the bottom.
| Check how much free storage space you have | On the Home screen or in a folder, click the Options icon. Click Device > Storage. |
| Delete unneeded files | On the Home screen or in a folder, click the Files icon. Find and highlight a file. Press thekey> Delete. |
| Delete browsing history and clear the cache | On the Home screen, click the Browser icon. Press thekey> Options. Go to the Clear Browsing Data section. |
| Reduce the amount of time that your device stores email messages and calendar entries | On the Home screen, click the Messages icon or Calendar icon. Press thekey> Options. |
| Stop storing sent messages on your device | On the Home screen, click the Messages icon. Press thekey> Options > Email Preferences. |
| Receive only the first section of long email messages, and choose whether to download more | On the Home screen, click theMessagesicon. Press thekey >Options>Message Display and Actions. |
| Store files on a media card instead of the device Your BlackBerry device supports media card sizes up to 32 GB. Only microSD media cards are supported. | |
| Reduce the size of pictures you take | On the Home screen, click theCameraicon. Press thekey>Options. |
Research In Motion recommends that you regularly create and save a backup file on your computer, especially before you update any software. Maintaining an up-to-date backup file on your computer might allow you to recover device data if your device is lost, stolen, or corrupted by an unforeseen issue.
Related topics
View the amount of available storage space on your device, 255
Move, rename, or delete a file, 125
Delete browsing information, 165
Set how long your device stores messages, 81
Change how long your device stores calendar entries, 178
Stop storing messages sent from your computer on your device, 82
Stop storing messages sent from your device on your computer, 82
Receive only the first section of long email messages, 80
Change the size of pictures that you take, 138
The application memory on my device is low, 258
Tips: Keeping your information safe
You can take some simple steps to help prevent the information on your BlackBerry® device from being compromised, such as avoiding leaving your device unattended.
Research In Motion recommends that you regularly create and save a backup file on your computer, especially before you update any software. Maintaining an up-to-date backup file on your computer might allow you to recover device data if your device is lost, stolen, or corrupted by an unforeseen issue.
For full instructions, click the links under Related information at the bottom.
| Set a password | On the Home screen or in a folder, click the Options icon. Click Security > Password. |
| Encrypt contacts and files | On the Home screen or in a folder, click the Options icon. Click Security > Encryption. |
| Back up your device data Use the backup tool in the BlackBerry® Desktop Software to back up your device data. To download the BlackBerry Desktop Software, from your computer, visit www.blackberry.com/desktop and select the appropriate option for your computer. | |
Related topics
Set a device password, 266
Turn on encryption, 146
Tips: Updating your software
Updated BlackBerry ^® Device Software and BlackBerry ^® Desktop Software are released periodically, and you might be able to update the software from either your computer or your smartphone. Research In Motion recommends that you regularly create and save a backup file on your computer, especially before you update any software. Maintaining an up-to-date backup file on your computer might allow you to recover device data if your device is lost, stolen, or corrupted by an unforeseen issue.
For full instructions, click the links under Related information at the bottom.
| Check to see if there is updated BlackBerry Device Software that you can download over the network | Depending on your device model, this feature might not be supported. On the Home screen or in a folder, click the Options icon. ClickDevice >Software Updates. |
| Update your BlackBerry Device Software from your computer | Connect your device to your computer and on your computer, visit:www.blackberry.com/software. Click on BlackBerry Device Software and follow the links to update your software. |
| Set your BlackBerry Desktop Software to check for updates automatically | For instructions, see the Help in BlackBerry Desktop Software. |
| Update your BlackBerry Desktop Software Visit www.blackberry.com/desktopsoftware. | |
Related topics
BlackBerry Device Software, 229
Visit the Setup application
The Setup application helps you learn about navigation and typing, change options to personalize your BlackBerry ^® device, and set up network connections, such as Bluetooth ^® connections. You can also set up email addresses and social networking accounts. The Setup application should appear automatically the first time that you turn on your device.
- If the Setup application does not appear automatically, on the Home screen or in a folder, click the Setup icon.
- Click a section to change options or to complete a short series of prompts that help you set the options.
Make it yours
Make your BlackBerry ^® smartphone your own by getting apps, transferring your files, and personalizing your settings.
Your Home screen
Switch themes
- On the Home screen or in a folder, click the Options icon.
- Click Display > Screen Display.
- In the Theme section, click a theme.
- Click Activate.
To delete a theme, click the theme. Click Delete.
Related topics
My display changed, 215
Use a picture as your device wallpaper
- On the Home screen, click the Media icon > Pictures icon.
- Browse to a picture.
- Press the key > Set As Wallpaper.
Related topics
My display changed, 215
Move an application icon
- On the Home screen or in an application folder, highlight an application icon.
- Press the Menu key.
-
Perform one of the following actions:
-
To move the application icon to a different location on the Home screen to the new location. Click the trackpad.
- To move the application icon into an application folder, click Move to folder. Click an application folder.
- To move the application icon out of an application folder, click Move to folder. Click Home or an application folder.
Add, change, or delete a folder on the Home screen
On the Home screen, do one of the following:
- To add a folder, press the ☐key > Add Folder. Type a name for the folder. To change the folder icon style, click the folder icon. Click a folder icon style. Click Add.
- To change a folder, highlight a folder. Press the ☐ key > Edit Folder. Change the folder name or folder icon style. Click Save.
- To delete a folder, highlight a folder. Press the ☐ key > Delete.
Find or hide an application icon
Depending on your theme, you might not be able to hide some application icons.
On the Home screen or in a folder, do any of the following:
• To see all your application icons, press the ☐ key > All.
- To hide an application icon, highlight the icon. Press the key > Hide.
- To show all hidden application icons, press the key > Show All.
- To stop hiding an application icon, highlight the icon. Press the 📋 key > Hide. A check mark should not appear beside the Hide field.
Related topics
My display changed, 215
Add a shortcut to your Home screen or Favorites view
You can add a shortcut to give yourself quick access to items such as frequently used websites, contacts, or apps.
Browse to a website, or highlight the item you want to create a shortcut for.
- To add a shortcut on the Home screen, press the ☐ key > Add to Home Screen.
- To add a shortcut to your Favorites view, press the key > Mark as Favorite.
Set the number of icons that appear on the Home screen
- On the Home screen or in a folder, click the Options icon.
- Click Accessibility.
- Change the Grid Layout field.
- Press the ☐ key > Save.
Change what happens when you type on the Home screen
Depending on your typing input language, you might not be able to use shortcut keys to open applications.
-
On the Home screen, press the key > Options.
-
To search your BlackBerry® device or the Internet when you type on the Home screen, change the Launch by Typing field to Universal Search.
-
To open applications when you press shortcut keys, change the Launch by Typing field to Application Shortcuts.
-
Press the ☐ key > Save.
Add a message that appears when your device is locked
- On the Home screen or in a folder, click the Options icon.
- Click Display > Message on Lock Screen.
- Type the text that you want to appear on the screen when your device is locked.
- Press the ☐ key > Save.
Get apps, music, ring tones, pictures, and videos
About adding applications
Depending on your wireless service provider and region, you might have the option to add or update applications using the BlackBerry App World™ storefront, the BlackBerry® Desktop Software, or the Application Center. You might also be able to download applications from a web page (try visiting mobile.blackberry.com from your BlackBerry device), or from an application offered by your wireless service provider.
Additional terms and conditions might apply to software and services made available through the BlackBerry App World™ storefront, the BlackBerry Desktop Software, or the Application Center. Data charges might apply when you add or use an application over the wireless network. For more information, contact your wireless service provider.
BlackBerry App World
If you have BlackBerry App World on your device, you can search for and download games, social networking applications, personal productivity applications, and much more. Using an existing PayPal® account, you can buy and download items over the wireless network to your device.
To download BlackBerry App World, visit www.blackberryappworld.com.
For more information about managing applications using BlackBerry App World, click the BlackBerry App World icon. Press the key > Help.
BlackBerry Desktop Software
If you have the BlackBerry Desktop Software installed on your computer, you can connect your device to your computer to add, update, remove, or restore applications. You can also add applications to your device that you have downloaded to your computer, without having to use the wireless network.
To download the BlackBerry Desktop Software, visit www.blackberry.com/desktop.
For more information about managing applications using the BlackBerry Desktop Software, see the Help in the BlackBerry Desktop Software.
Application Center
If you have the Application Center on your device, you can add, update, or return to the previous version of a select number of applications that are hosted by your wireless service provider. Depending on your wireless service provider, this feature might not be available.
For more information about managing applications using the Application Center, click the Application Center icon. Press the key > Help.
Transfer a file from your computer to your device using your device as a USB memory drive
You must use the BlackBerry® Desktop Software to manage and preserve the information or the encryption that is associated with your media files when you transfer files between your BlackBerry device and your computer.
- Connect your device to your computer using a USB cable.
-
Do one of the following:
-
If you want to transfer most types of files, in the dialog box that appears on your device, select the USB option.
-
If you want to transfer media files that are protected with DRM, in the dialog box that appears on your device, select the media transfer option.
-
If necessary, type a password. Your device appears as a drive on your computer.
- Drag a file from a location on your computer to a folder on your device.
To view the transferred file on your device, disconnect your device from your computer and find the file.
Related topics
Transfer your media files from your computer to your device using BlackBerry Desktop Software, 38
Transfer your media files from your computer to your device using BlackBerry Desktop Software
With the BlackBerry® Desktop Software, you can synchronize media files, including iTunes playlists and Windows Media® Player playlists, to your BlackBerry device. To download the BlackBerry Desktop Software, from your computer, visit www.blackberry.com/desktop and select the appropriate option for your computer.
- Connect your device to your computer.
- On your device, in the dialog box that appears, select any of the file transfer options.
- On your computer, open the BlackBerry Desktop Software.
- Click the media transfer option that best suits what you want to do.
For more information about synchronizing media files, see the Help in the BlackBerry Desktop Software.
Related topics
Transfer a file from your computer to your device using your device as a USB memory drive, 12
Calls and sound profiles
Change the default volume for calls
You can increase or decrease the default volume for calls. The higher you set the volume percentage, the louder the volume is.
- From the Home screen, press the ∪ key.
- Press the key > Options > In-call Settings.
- Change the Default Call Volume field.
- Press the key > Save.
Change your ring tone, notifiers, or reminders
In addition to changing the tone, you can also change options for volume, LED, vibration, and notification during calls.
- On the Home screen, click the Sound and Alert Profiles icon.
-
Click Change Sounds and Alerts > Sounds for Selected Profile.
-
To change your ring tone, click Phone.
-
To change notifiers or reminders, click to expand a section. Click an option.
-
In the Ring Tone, Notifier Tone, or Reminder Tone field, do one of the following:
-
Click a tone.
- To use a song that is on your BlackBerry® device or on a media card, click All Music. Find and click a song.
- To use a voice note that you recorded, click All Voice Notes. Find and click a voice note.
-
To use a preloaded alert, click All Alerts. Find and click an alert.
-
Press the ☐ key > Save.
Related topics
I cannot change the number of times that my device rings, 67
Add a contact alert
You can create contact alerts that allow you to customize ring tones and alerts for calls and messages from specific contacts or groups of contacts. When you receive a call or message from the contact, your BlackBerry® device uses the assigned ring tone or alert, even if you select the Silent profile or Vibrate Only profile. If you do not want to be notified with the assigned ring tone or alert, you can select the All Alerts Off profile.
- On the Home screen, click the Sound and Alert Profiles icon.
- Click Change Sounds and Alerts > Sounds for Contacts > Add Contact Alert.
- In the Name field, type the name of the contact alert.
- In the Contacts field, type the name of the contact.
- Click a contact.
- Change the ring tone and alert information for calls and messages.
- Press the ☐ key > Save.
To delete a contact alert, highlight the contact alert that you want to delete. Press the ☐ key > Delete.
Set up speed dial for a contact
- From the Home screen, press the Send key.
- Press the ☐ key > View > Speed Dial List.
- In the Speed Dial Numbers list, click an unassigned key.
- Click a contact.
- If necessary, click a phone number for the contact.
To make a call using speed dial, from the Phone application, the Home screen, a message, or a message list, press and hold the key that you assigned to the contact.
Add a contact picture for caller ID
- On the Home screen, click the Contacts icon.
- Highlight a contact.
- Press the ☐ key > Edit.
- Press the Key > Add Picture.
- Find, highlight, and click a picture.
- Press the ☐ key > Crop & Save.
-
Press the Key > Save.
-
If necessary, move the crop box to the portion of the picture that you want to use.
Related topics
My contact pictures keep changing, 188
Typing and trackpad
Set the cursor speed
- On the Home screen or in a folder, click the Options icon.
- Click Typing and Input > Keyboard.
- Change the Key Rate field.
- Press the ☐ key > Save.
Set the trackpad sensitivity
You can set how the trackpad responds to your touch. A high sensitivity level requires less pressure than a lower sensitivity level.
-
On the Home screen or in a folder, click the Options icon.
-
Click Typing and Input > Trackpad Sensitivity.
-
Change the Horizontal Sensitivity field and Vertical Sensitivity field.
-
Press the ☐ key > Save.
Change your typing style
You can change how your BlackBerry ^® device recognizes what you type by selecting a typing style.
-
On the Home screen or in a folder, click the Options icon.
-
Click Typing and Input > Typing.
-
For a keyboard, do one of the following:
-
To turn off all typing assistance, change the Style field to Direct.
- To set your device to suggest word predictions as you type, change the Style field to Predictive.
- To set your device to type the first letter on a key when you press a key once and type the second letter on the key when you press the key twice, change the Style field to Multitap. The Portrait Keyboard Type field must be set to Reduced in Options > Typing and Input > Keyboard, to have this option.
- To set your device to suggest spelling corrections as you type, change the Style field to Corrective.
- Press the key > Save.
Find more information
- Help on your device: Find step-by-step instructions in the user guide for your BlackBerry® device. Click Help on the Home screen or in an application menu.
- www.discoverblackberry.com: Find software, applications, and accessories for your device.
- Your wireless service provider web site: Find information about your wireless network or wireless service plan.
- www.blackberry.com/go/declarationofconformity: View the Declaration of Conformity made under Directive 1999/5/EC (HG nr.88/2003).
Shortcuts
Depending on the typing input language that you are using, some shortcuts might not be available.
Phone shortcuts
Depending on the typing input language that you are using, some shortcuts might not be available.
| Change your ring tone | From the Home screen, press thekey. Press thekeyphoneRing Tones. |
| Check your voice mail Press and hold 1. | |
| Send an incoming call to voice mail when your BlackBerry® device is inserted in a holster | Press and hold theVolume Downkey on the right side of your device. |
| Set up speed dial for a contact From the Home screen or in the phone application, press and hold the key that you would like to assign speed dial to. | |
| Add an extension to a phone number | Press theAltkey and X. Type the extension number. |
| Type a letter in a phone number field Press theAltkey and the letter key. | |
| Insert a plus sign (+) when typing a phone number Press O | |
| Turn on or turn off the speakerphone during a call Press thekey on the keyboard. | |
| Stop listening to a call with a wireless headset Press thekey on the keyboard. | |
| Change the active phone number | From the Home screen, press thekey. Click your phone number at the top of the screen. Click a phone number. |
Message shortcuts
Depending on the typing input language that you are using, some shortcuts might not be available.
In a message
| Reply to a message | Press R |
| Reply to all in an email or a PIN message Press L | |
| Forward a message Press F | |
| File an email message Press I | |
| View or hide the email address of a contact | Highlight the contact in the To or From field. Press Q. |
| Move to the last cursor position after you close and reopen a received email or PIN message | Press G |
| Move to the next message Press N | |
| Move to the previous message Press P |
In your message inbox
| Open a message Press the key. |
| Compose a message from a message inbox Press C |
| Mark a message as opened or unopened Press the Alt key and U. |
| Add a flag to a message Press W |
| View all flagged messages Press the Alt key and F. |
| View received messages and received call logs Press the Alt key and I. |
| View sent messages Press the Alt key and O. |
| View voice mail messages Press the Alt key and V. |
| View text messages Press the Alt key and S. |
| View call logs Press the Alt key and P. |
| View all your messages Press the key. |
Move around your message inbox
| Move up a screen | Press the Shift key and the Space key. |
| Move down a screen Press the Space key. | |
| Move to the top of a message inbox Press T | |
| Move to the bottom of a message inbox | Press B |
| Move to the next unopened item | Press U |
| Move to the next related message | Press J |
| Move to the previous related message | Press K |
File and attachment shortcuts
Depending on the typing input language that you are using, some shortcuts might not be available.
Search for text in a file or an attachment Press F
Move to the last cursor position after closing and reopening a Press G file or an attachment
In a spreadsheet
| Move to a specific cell Press G |
| View the content of a cell Press the Space key |
| Switch worksheets Press V. Highlight a worksheet. Press the Enter key. |
| View or hide columns or rows Press H |
In a presentation
| Switch presentation views Press M | |
| Move to the next slide when viewing a presentation in slide view | Press N |
| Move to the previous slide when viewing a presentation in slide view | Press P |
| Move to the last cursor position after closing and reopening a presentation that you were viewing in text view or in text and slide view | Press G |
Typing shortcuts for the slide-out keyboard
Depending on the typing input language that you are using, some shortcuts might not be available.
| Insert a period Press the Space key twice. The next letter is capitalized. | |
| Insert an at sign (@) or a period (.) in an email address field Press the Space key. | |
| Capitalize a letter Press and hold the letter key until the capitalized letter appears. | |
| Turn on CAP lock | Press the Alt key and the Right Shift key. To turn off CAP lock, press the Left Shift key or Right Shift key. |
| Type a symbol Press the Symbol key. Type the letter that appears below the symbol. | |
| Type the alternate character on a key Press the Alt key and the character key. | |
| Type an accented or special character Press and hold the letter key and, on the trackpad, slide your finger left or right. For example, to type ü, press and hold U and slide your finger left until ü appears. Release the letter key when the accented or special character appears. | |
| Type a number in a text field Press and hold the Alt key and press the number key. | |
| Type a number in a number field Press a number key. You do not need to press the Alt key. | |
| Turn on NUM lock | Press the Alt key and the Left Shift key. To turn off NUM lock, press the Left Shift key or Right Shift key. |
| Highlight a line of text | Press the Left Shift key or Right Shift key and, on the trackpad, slide your finger up or down. |
| Highlight text character by character | Press the Left Shift key or Right Shift key and, on the trackpad, slide your finger left or right. |
| Cut highlighted text | Press the Left Shift key or Right Shift key and the Backspace/Delete key. |
| Copy highlighted text Press the Alt key and click the trackpad. | |
| Paste text Press the Left Shift key or Right Shift key and click the trackpad. | |
Media shortcuts
Depending on the typing input language that you are using, some shortcuts might not be available.
Audio and video files
| Pause an audio or video file | Press the play on the top of your BlackBerry® device. |
| Resume playing an audio or video file | Press the play. |
| Play the next song Press and hold the Volume Up key on the right side of your device. | |
| Play the previous song | Press and hold the Volume Down key on the right side of your device. |
| Turn on the audio boost feature if you are using a headset | When you are playing an audio or video file, press the Volume Up key until you reach the highest volume setting, and then press the Volume Up key again four times quickly. |
Pictures
| Zoom in Press 1 |
| Zoom out Press 0 |
| Pan up Press 2 |
| Pan down Press 8 |
| Pan right Press 6 |
| Pan left Press 4 |
| Rotate Press L |
Camera and video camera
Zoom in before you take a picture or record a video Press the Volume Up key. Zoom out before you take a picture or record a video Press the Volume Down key. Take a picture Press the Convenience key on the right side of your device.
Browser shortcuts
To use browser shortcuts, you might need to turn on shortcuts in the browser options. Depending on the typing input language that you are using, some shortcuts might not be available.
| Insert a period (.) in the web address field | Press the Space key. |
| Insert a slash mark (/) in the web address field | Press the Shift key and the Space key. |
| Stop loading a web page Press the Escape key. | |
| Close the browser Press and hold the Escape key. | |
On a web page
| Quickly switch between tabs | Press W |
| Zoom in to a web page Press I | |
| Zoom out from a web page Press O | |
| Go to the start page | Press G |
| Return to the home page | Press H |
| Open the bookmark list | Press K |
| Add a bookmark | Press A |
| View a list of web pages that you have visited recently | Press Y |
| Refresh a web page Press R | |
| Find text on a web page | Press F. To find the next instance of the text, press V. |
| Open the browser options Press S |
Move around a web page
Move up a screen Press the Shift key and the Space key.
Move down a screen Press the Space key.
Move to the top of a web page Press T
Move to the bottom of a web page Press B
Calendar shortcuts
Depending on the typing input language that you are using, some shortcuts might not be available.
For shortcuts to work in Day view, press the ☐ key > Options. Click Calendar Display and Actions. Clear the Enable Quick Entry check box.
Schedule an appointment Press C
Change to Agenda view Press A
Change to Day view Press D
Change to Week view Press W
Change to Month view Press M
Move to the next week, month, or day in Agenda view Press the Space key.
Move to the previous week, month, or day in Agenda view Press the Shift key and the Space key.
Move to the current date Press T
Move to a specific date Press G
Search shortcuts
Depending on the typing input language that you are using, some shortcuts might not be available.
Search for an item on your BlackBerry ^® device Start typing on the Home screen.
Search for a contact in a list of contacts Type part or all of a contact name, or type initials separated by a space.
Search for text in a message Press S
Search for text in a file or an attachment Press F
Search for text on a web page Press F
Search for text in a presentation Press F
Note: You can change what happens when you type on the Home screen.
To search for text in a presentation, you must view the presentation in text view or in text and slide view.
Map shortcuts
Depending on the typing input language that you are using, some shortcuts might not be available.
Zoom in to a map Press I
Zoom out from a map Press 0
Move to the next direction on a route Press N
Move to the previous direction on a route Press P
Troubleshooting: Shortcuts
I cannot use a shortcut
Depending on the typing input language that you are using, some shortcuts might not be available.
Try changing the typing input language.
Related topics
Change the language, 210
Phone
Phone basics
Find your phone number
Do one of the following:
- To view your active phone number, from the Home screen, press the key. Highlight the area at the top of the screen, above the tabs.
- If you have multiple phone numbers associated with your BlackBerry® device, to view a list of your phone numbers, from the Home screen, press the key. Click the area at the top of the screen, above the tabs. If your wireless service plan supports text messaging, the first phone number in the list is the phone number that you use to send and receive text messages.
Related topics
About multiple phone numbers, 62
My phone number appears as Unknown in the Phone application, 66
Make a call
-
Do one of the following:
-
If your BlackBerry® device is unlocked, press the √ key.
-
If your device is locked and you do not want to unlock it, press the Key > Place Call.
-
Type a phone number or contact name.
- Press the ∪ key.
To end the call, press the key.
Related topics
Add a pause or a wait to a phone number, 181
Available voice commands, 68
Turn on dialing from the Lock screen, 63
I cannot make or receive calls, 66
Answer a call
Press the ∪ key.
To end a call, press the key.
Related topics
Change your ring tone, notifiers, or reminders, 9
I cannot make or receive calls, 66
Answer a second call
Depending on your wireless service provider and wireless network, this feature might not be supported.
During a call, press the key.
- To answer the incoming call and place the current call on hold, click Answer - Hold Current.
- To answer the incoming call and end the current call, click Answer - Drop Current.
To return to the first call, press the key > Swap or Flash.
Change your ring tone, notifiers, or reminders
In addition to changing the tone, you can also change options for volume, LED, vibration, and notification during calls.
- On the Home screen, click the Sound and Alert Profiles icon.
- Click Change Sounds and Alerts > Sounds for Selected Profile.
- To change your ring tone, click Phone.
- To change notifiers or reminders, click to expand a section. Click an option.
-
In the Ring Tone, Notifier Tone, or Reminder Tone field, do one of the following:
-
Click a tone.
- To use a song that is on your BlackBerry® device or on a media card, click All Music. Find and click a song.
- To use a voice note that you recorded, click All Voice Notes. Find and click a voice note.
-
To use a preloaded alert, click All Alerts. Find and click an alert.
-
Press the ☐ key > Save.
Related topics
I cannot change the number of times that my device rings, 67
Mute a call
During a call, press the 🎯 on the top of your device.
To turn off mute, press the 🎨y again.
Place a call on hold
If your BlackBerry ^® device is connected to a CDMA network, you cannot place a call on hold.
During a call, press the key > Hold.
To resume a call, press the Key > Resume.
Turn on the speakerphone
CAUTION: Do not hold the BlackBerry® device near your ear while you use the speakerphone. Hearing damage can occur. For more information, see the Safety and Product Information booklet for your device.
During a call, press the 🔊key on the keyboard.
To turn off the speakerphone, press the ▶key again.
Related topics
Bluetooth technology, 245
Dial an extension
- Press the X key.
- Type the extension number.
Dial using numbers or letters
When you type a letter in a phone number, your BlackBerry ^® device dials the number that is associated with the letter on a conventional phone keypad.
- To type a number, press a number key.
- To type a letter, press and hold the Alt key. Press the letter key.
Switch applications during a call
During a call, press the ☐ key > Switch Application.
Note: If you switch to a different application and you want to end the call, press the key.
About using a headset
You can purchase an optional headset to use with your BlackBerry ^® device.
If you use a headset, you can use a headset button to answer or end a call, or to turn on or turn off mute during a call. Depending on your device model, you might be able to use a headset button to make a call using a voice command.
Depending on your headset, you might also be able to use a headset button to pause, resume, skip, or adjust the volume of audio or video files.
For more information about using the headset, see the documentation that came with your headset.
Emergency calls
About emergency calls and Emergency Callback Mode
If you are outside of a wireless coverage area and the SOS wireless coverage indicator appears at the top of the screen, you can call only emergency numbers. Your BlackBerry ^® device is designed to allow emergency calls even when your device is locked. Depending on your device model and the wireless network that your device is connected to, your device is also designed to allow emergency calls when the SIM card is not inserted. If the connection to the wireless network is turned off when you initiate an emergency call, your device is designed to connect to the wireless network automatically. You can make emergency calls by typing only official emergency access numbers (for example, 911 or 112).
Note: You should not rely on any wireless device for essential communications, including medical emergencies. Emergency numbers may vary by location and emergency calls may be blocked or impeded by network, environmental, or interference issues.
If your device is connected to a CDMA network, when you end an emergency call, your device enters Emergency Callback Mode. This mode allows the operator to call you back or find your approximate location. Depending on your wireless service provider, Emergency Callback Mode is active for 5 minutes or until you make a non-emergency call. In Emergency Callback Mode, you cannot send and receive messages or browse web pages.
If your device supports GPS and you make an emergency call, an emergency operator might be able to use GPS technology to find your approximate location.
Make an emergency call
Do one of the following:
- If your screen or BlackBerry® device is unlocked, from the Home screen, press the √ key. Type the emergency number. Press the √ key.
- If your device is locked, press the key > Emergency. Press the key.
- If your screen is locked, press the 🔊 key on the top of your device. Press the 🔊 key. Type the emergency number. Press the 🔊 key.
Volume
Adjust the volume
- To increase the volume, press the Volume Up key on the right side of your BlackBerry® device.
- To decrease the volume, press the Volume Down key on the right side of your device.
• To mute the volume, press the 'my' on the top of your device. To turn off mute, press the 'key again'. If you press the 'my' during a call, your device mutes the call so that you can hear others on the call, but they cannot hear you.
Related topics
Mute a call, 50
Amplify the volume using the audio boost feature, 132
Improve sound quality for media files, 132
Change the default volume for calls
You can increase or decrease the default volume for calls. The higher you set the volume percentage, the louder the volume is.
- From the Home screen, press the ∪ key.
- Press the Key > Options > In-call Settings.
- Change the Default Call Volume field.
- Press the Key > Save.
Improve sound quality during a call
You cannot change sound quality when you are using a Bluetooth ^® enabled headset.
- During a call, press the key > Enhance Call Audio.
- Select a bass or treble option.
Improve sound quality for all calls
You cannot change sound quality when you are using a Bluetooth® enabled headset.
- From the Home screen, press the √ key.
- Press the ☐ key > Options > Enhanced Audio.
- Change the Phone Call Audio field or Headset Call Audio field.
- Press the ☐ key > Save.
Voice mail
About your voice mail greeting and voice mail password
Depending on your wireless service provider, the method for changing your voice mail greeting or voice mail password might differ. You should be able to access the options for changing your voice mail greeting or voice mail password when you check your voice mail. For more information, contact your wireless service provider.
Check your voice mail
Depending on your theme, you might be able to check your voice mail from the Home screen.
- From the Home screen, press the key.
- Press the Key > Call Voice Mail.
Related topics
I cannot check my voice mail, 66
Change the voice mail access number and password
If a voice mail access number is not already set on your BlackBerry ^® device, you can type the access number for a different voice mail system.
Note: If you change the voice mail password on your device, you must also call your voice mail system to change the password there. Otherwise, the password for your voice mail is not updated in your voice mail system.
- From the Home screen, press the Send key.
- Press the ☐ key > Options > Voice Mail.
- Type a voice mail access number and a password.
- Press the key > Save.
Related topics
I cannot check my voice mail, 66
Change how many times your device rings before the call goes to voice mail
To change how many times your BlackBerry ^® device rings before the call is forwarded to voice mail, you must call your wireless service provider's voice mail system. Each wireless service provider has a different voice mail system. For more information, contact your wireless service provider.
- Call your wireless service provider's voice mail system.
- Listen to your options and follow the audible prompts.
Related topics
I cannot change the number of times that my device rings, 67
Speed dial
Set up speed dial for a contact
-
From the Home screen, press the Send key.
-
Press the Key > View > Speed Dial List.
- In the Speed Dial Numbers list, click an unassigned key.
- Click a contact.
- If necessary, click a phone number for the contact.
To make a call using speed dial, from the Phone application, the Home screen, a message, or a message list, press and hold the key that you assigned to the contact.
Change the contact that is assigned to a speed dial key
- From the Home screen, press the key.
- Press the ☐ key > View > Speed Dial List.
- Highlight a contact or phone number.
-
Press the ☐ key.
-
To change the contact that is assigned to a speed dial key, click Edit. Click a new contact.
- To assign the contact to a different speed dial key, click Move. In the Speed Dial Numbers list, click a new speed dial key.
- To delete the contact from the Speed Dial Numbers list, click Delete.
Call waiting, call forwarding, and call blocking
Turn on call waiting
To perform this task, your wireless service provider must set up your SIM card or BlackBerry® device for this service.
- From the Home screen, press the key.
- Press the key > Options > Call Waiting.
- Select the Enabled check box.
- Press the key > Save.
To turn off call waiting, clear the Enabled check box.
About call forwarding
Depending on your wireless service provider, one or more call forwarding phone numbers might already be available on your SIM card or BlackBerry ^® device. You might not be able to change or delete these phone numbers or add new ones.
For more information, contact your wireless service provider.
Forward calls
To perform this task, your wireless service provider must set up your SIM card or BlackBerry ^® device for this service.
- From the Home screen, press the key.
-
Press the KEY > Options > Call Forwarding.
-
To forward all calls to a call forwarding number, change the Forward Calls field to Always. Change the Forward All Calls field to a call forwarding number.
-
To forward unanswered calls only, change the Forward Calls field to Conditional. Change the If Busy, If No Reply, and If Not Reachable fields to a call forwarding number.
-
Press the ☐ key > Save.
Your call forwarding settings apply to all subsequent incoming calls, until you change your settings again.
To stop forwarding calls, change the Forward Calls field to Never.
Add, change, or delete a call forwarding number
To perform this task, your wireless service provider must set up your SIM card or BlackBerry® device for this service.
- From the Home screen, press the Send key.
- Press the ☐ key > Options > Call Forwarding.
-
Press the Key.
-
To add a call forwarding number, click New Number. Type a phone number. Press the ↕ key on the keyboard.
- To change a call forwarding number, click Edit Numbers. Highlight a phone number. Press the ☐ key > Edit. Change the phone number. Press the ↕ key on the keyboard.
-
To delete a call forwarding number, click Edit Numbers. Click a phone number. Click Delete.
-
Press the key > Close.
About call blocking
The blocked calling feature allows you to block all incoming calls or block incoming calls only when roaming. You can also block all outgoing calls and all outgoing international calls, or you can block outgoing international calls only when roaming.
To use the blocked calling feature, your BlackBerry ^® device must use a SIM card, and your wireless service provider must set up your SIM card for this service and provide you with a call blocking password. Depending on your wireless service provider and wireless network, this feature might not be supported.
Block calls
To perform this task, your BlackBerry ^® device must use a SIM card, and your wireless service provider must set up your SIM card for this service and provide you with a call blocking password.
- From the Home screen, press the key.
- Press the KEY > Options > Call Barring.
- Highlight a call blocking option.
- Press the key > Enable.
- Type your call blocking password.
To stop blocking calls, highlight a call blocking option. Press the key > Disable.
Change the call blocking password
- From the Home screen, press the key.
- Press the Key > Options > Call Barring.
- Press the KEY > Change Password.
Fixed dialing and smart dialing
Depending on your wireless service provider and wireless network, this feature might not be supported.
About fixed dialing
If you turn on fixed dialing, you can only make calls to contacts that appear in your fixed dialing list and to official emergency access numbers (for example, 911 or 112).
If your wireless service plan includes text messaging, you can also send text messages to contacts that appear in your fixed dialing list.
To use fixed dialing, your wireless service provider must set up your SIM card for this service and provide you with a SIM card PIN2 code. Depending on your wireless service provider and wireless network, this feature might not be supported.
Turn on fixed dialing
To perform this task, your BlackBerry ^® device must use a SIM card, and your wireless service provider must set up your SIM card for this service and provide you with a SIM card PIN2 code.
- From the Home screen, press the √ key.
- Press the key > Options > FDN Phone List.
- Press the key > Enable FDN Mode.
- Type your PIN2 code.
- Press the key on the keyboard.
To turn off fixed dialing, press the ☐ key > Disable FDN Mode.
Related topics
I cannot make or receive calls, 66
Add, change, or delete a contact in your fixed dialing list
To perform this task, your wireless service provider must set up your SIM card for this service and provide you with a SIM card PIN2 code.
- From the Home screen, press the Send key.
-
Press the key > Options > FDN Phone List.
-
To add a contact, press the ☐ key > New. Type your PIN2 code. Press the ☐ key. Type a name and phone number.
- To change a contact, press the key > Edit. Change the contact information.
-
To delete a contact, highlight a contact. Press the key > Delete.
-
Press the key > Save.
About smart dialing
With the smart-dialing feature, you can set a default country code and area code for phone numbers so that you do not have to dial a country code and area code each time that you make a call, unless the country code or area code are different from the default codes that you set. Some country codes are not supported by the smart-dialing feature.
In the smart-dialing options, you can also specify the main phone number for an organization that you call frequently so that you can quickly call a contact in that organization by dialing only the extension for the contact. If you add contacts from that organization to your contact list, when you add their phone numbers, you can type only the extensions instead of typing out the main phone number for the organization.
Related topics
I cannot make or receive calls, 66
Set the default country code and area code
- From the Home screen, press the √ key.
- Press the ☐ key > Options > Smart Dialing.
- Set the Country Code and Area Code fields.
- If necessary, set the Local Country Code field and International Dialing Digits field.
- In the National Number Length field, set the default length for phone numbers in your country.
- Press the ☐ key > Save.
Note: When you determine the default length for phone numbers, include your area code and local number, but do not include your country code or the National Direct Dialing prefix.
Set options for dialing extensions
-
From the Home screen, press the key.
-
Press the Key > Options > Smart Dialing.
- In the Number field, type the main phone number for an organization.
- In the Wait For field, set how long your BlackBerry ^® device waits before dialing an extension.
- In the Extension Length field, set the default length for extensions.
- Press the ☐ key > Save.
Conference calls
About conference calls
You can create two types of conference calls with your BlackBerry® device. If your organization or a conferencing service has provided you with a conference call bridge number, you can create conference call meetings in the calendar on your device or computer. Conference call meetings allow participants who have a BlackBerry device to enter the conference call meeting with a one-touch Join Now option, if this feature is supported on their device, so that they do not have to dial the conference call bridge number and access codes. If you do not have a conference call bridge number, you can create a conference call by calling other contacts and joining the calls together.
Make a conference call
Depending on your wireless service provider or your wireless service plan, this feature might not be supported.
If your BlackBerry ^® device is connected to a CDMA network, you cannot join more than two contacts to a conference call.
- During a call, press the ☐key > Add Participant.
- Type a phone number or highlight a contact.
- Press the key.
- During the new call, press the key to join your first contact to the conference call.
- To join another contact to the call, repeat steps 1 to 4.
Related topics
Place a call on hold, 50
Create a phone number link for a conference call
- Type a phone number for the conference call bridge.
- Type X and the access code.
Speak privately with a contact during a conference call
You can perform this task only if you make a conference call by joining calls together, and not if you create a conference call meeting in the calendar.
- During a conference call, press the KEY > Split Call.
- Click a contact.
To return to the conference call, press the key > Join.
Disconnect a contact from a conference call
You can perform this task only if you make a conference call by joining calls together, and not if you create a conference call meeting in the calendar.
- During a conference call, press the ☐ key > Drop Call.
- Click a contact.
Leave a conference call
You can perform this task only if you make a conference call by joining calls together, and not if you create a conference call meeting in the calendar.
If you make a conference call, you can leave the conference call and the call continues without you. Depending on your wireless service provider, this feature might not be supported.
During a conference call, press the ☐ key > Transfer or Flash
Call logs
About call logs
Call logs appear in the phone application and show the status of recent calls by showing either a missed call indicator, placed call indicator or received call indicator. A call log also includes the date of the call, the phone number, and the estimated duration of the call. For more information about the exact duration of a call, contact your wireless service provider.
The phone list view option allows you to sort how call logs appear in the phone application. Depending on how you set your call logging options, you can also view call logs in the messages application. Depending on your theme, when you miss a call, a missed call indicator might also appear at the top of the Home screen.
You can also add notes to call logs or send call logs as email messages. Unless you delete a call log, it is stored on your BlackBerry ^® device for 30 days.
Send a call log
- From the Home screen, press the key.
- Click the call log icon.
-
Highlight a call log.
-
Press the Key > View > History.
- Press the key > Forward.
Delete call logs
- From the Home screen, press the key.
- Click the Call Log icon.
-
Do one of the following:
-
To delete a single call log, highlight a call log.
-
To delete a range of call logs, highlight a call log. Press and hold the Shift key. On the trackpad, slide your finger up or down. Release the Shift key.
-
Press the ☐ key > Delete.
Add, change, or delete call log notes
-
From the Home screen, press the key.
-
Click the call log icon.
-
Highlight a call log.
-
Press the Key > View > History.
-
Click a call log.
-
Press the key.
-
To add notes, click Add Notes. Type call notes.
- To change notes, click Edit Notes. Change the call notes.
-
To delete notes, click Edit Notes. Press the key > Clear Field.
-
Press the Key > Save.
View call logs in the Messages application
-
From the Home screen, press the key.
-
Press the key > Options > Call Logs and Lists.
-
To show recent and missed calls in the Messages application, select the All Calls option.
- To hide call logs in the Messages application, select the None option.
Multiple phone numbers
About multiple phone numbers
When you have multiple phone numbers associated with your BlackBerry ^® device, you can switch the phone number that you use as your active phone number. You have multiple phone numbers associated with your device if one of the following situations applies:
- Your device uses a SIM card and your SIM card supports more than one phone number.
- Your wireless service provider has set up your device to support more than one phone number.
- Your wireless service provider has provided you with a phone number, and your organization has provided you with a BlackBerry® MVS Client phone number.
If your SIM card supports more than one phone number, you can make calls using your active phone number only, but you receive calls to all phone numbers. If you are already on a call, you receive calls to your active phone number only, and any calls that you receive to your other phone numbers receive a busy signal or are sent to voice mail.
If your wireless service provider has set up your device to support more than one phone number, you can make calls and receive calls using your active phone number only. Any calls that you receive to your other phone numbers receive a busy signal or are sent to voice mail.
If your wireless service provider has provided you with a phone number, and your organization has provided you with a BlackBerry MVS Client phone number, you can make calls using your active phone number only, but you receive calls to all phone numbers. If you are already on a call, you can receive calls to all phone numbers.
If your wireless service plan supports text messaging, the first phone number that appears in the drop-down list at the top of the screen in the phone application is the phone number that you use to send and receive text messages.
You can change call waiting, call forwarding, and voice mail options for each phone number associated with your device.
Switch the active phone number
- From the Home screen, press the ∪ key.
- Click the area at the top of the screen, above the tabs.
- Click the phone number that you want to set as the active phone number.
Related topics
My phone number appears as Unknown in the Phone application, 66
I cannot make or receive calls, 66
Phone options
Turn on dialing from the Lock screen
- On the Home screen or in a folder, click the Options icon.
- Click Security > Password.
- Select the Allow Outgoing Calls While Locked check box.
- Press the ☐ key > Save.
Sort phone numbers or contacts on the Phone screen
- From the Home screen, press the key.
- Press the key > Options > Call Logs and Lists.
- To sort phone numbers or contacts by frequency of use, change the Phone List View field to Most Used.
-
To sort contacts alphabetically by contact name, change the Phone List View field to Name.
• To sort phone numbers or contacts by most recent use, change the Phone List View field to Most Recent. -
Press the ☐ key > Save.
Hide or display your phone number when you make calls
Your wireless network can override the option that you choose.
-
From the Home screen, press the key.
-
Press the KEY > Options > In-call Settings.
• To hide your phone number when you make calls, change the Restrict My Identity field to Always.
• To display your phone number when you make calls, change the Restrict My Identity field to Never.
- To allow your wireless network to decide whether to hide or display your phone number, change the Restrict My Identity field to Network Determined.
- Press the ☐ key > Save.
Turn off the prompt that appears before you delete items
You can turn off the prompt that appears before you delete messages, call logs, contacts, calendar entries, tasks, memos, or passwords.
-
On the Home screen, click the application icon for an application that prompts you before you delete items.
-
Press the key > Options.
-
If necessary, click General Options.
-
Clear the Confirm Delete check box.
-
Press the Key > Save.
Change how you answer or end calls with the holster or the slider
- From the Home screen, press the key.
-
Press the Key > Options > In-call Settings.
-
To answer calls automatically when you remove your BlackBerry® device from the holster or when you open the slider, change the Auto Answer Calls field to Out of Holster, Slide Open, or Both.
- To stop answering calls automatically when you remove your device from the holster or when you open the slider, change the Auto Answer Calls field to Never.
- To end calls automatically when you insert your device in the holster or when you close the slider, change the Auto End Calls field to Into Holster, Slide Close, or Both.
-
To stop ending calls automatically when you insert your device in the holster or when you close the slider, change the Auto End Calls field to Never.
-
Press the ☐ key > Save.
Reset a call timer
A call timer provides the estimated duration of calls. For more information about the exact duration of a call, contact your wireless service provider.
- From the Home screen, press the ∪ key.
- Press the ☐ key > Status > Last Call or Total Calls > Clear Timer.
- Press the key > Save.
About hearing aid mode
In hearing aid mode, or telecoil mode, the magnetic signal of your BlackBerry ^® device is modified to an appropriate level and frequency response to be picked up by hearing aids that are equipped with telecoils.
Turn on hearing aid mode
- From the Home screen, press the ∪ key.
- Press the Key > Options > Hearing Aid Mode.
- Change the Mode Enabled field to Telecoil.
- Press the Key > Save.
The H-T telecoil indicator appears at the top of the Home screen.
About TTY support
When you turn on TTY support and you connect your BlackBerry ^® device to a TTY device that operates at 45.45 bits per second, you can make calls to and receive calls from TTY devices. Your BlackBerry device is designed to convert received calls to text that you can read on your TTY device.
If your TTY device is designed for use with a 2.5-mm headset jack, you must use an adapter accessory to connect your TTY device to your BlackBerry device. To get an adapter accessory that Research In Motion has approved for use with your BlackBerry device, visit www.shopblackberry.com.
Turn on TTY support
- From the Home screen, press the key.
- Press the ☐ key > Options > TTY.
- Change the TTY Mode field to Yes.
- Press the key > Save.
A TTY indicator appears in the connections area at the top of the Home screen.
To turn off TTY support, change the TTY Mode field to No.
Phone shortcuts
Depending on the typing input language that you are using, some shortcuts might not be available.
| Change your ring tone | From the Home screen, press thekey. Press thekeyphoneRing Tones. |
| Check your voice mail Press and hold 1. | |
| Send an incoming call to voice mail when your BlackBerry® device is inserted in a holster | Press and hold theVolume Downkey on the right side of your device. |
| Set up speed dial for a contact From the Home screen or in the phone application, press and hold the key that you would like to assign speed dial to. | |
| Add an extension to a phone number | Press theAltkey and X. Type the extension number. |
| Type a letter in a phone number field Press theAltkey and the letter key. | |
| Insert a plus sign (+) when typing a phone number Press O | |
| Turn on or turn off the speakerphone during a call Press thekey on the keyboard. | |
| Stop listening to a call with a wireless headset Press thekey on the keyboard. | |
| Change the active phone number | From the Home screen, press thekey. Click your phone number at the top of the screen. Click a phone number. |
Troubleshooting: Phone
I cannot make or receive calls
Try performing the following actions:
- Verify that your BlackBerry® device is connected to the wireless network.
- Verify that your wireless service plan includes phone or voice services.
- If you cannot make calls and fixed dialing is turned on, verify that the phone number for your contact appears in your fixed dialing list or turn off fixed dialing.
- If you have traveled to another country and you have not changed your smart-dialing options, dial the full phone number, including the country code and area code, for your contact.
- If you are not receiving calls, verify that call blocking and call forwarding are turned off.
- Your device or your SIM card might support more than one phone number, even if you only have one phone number. Verify that your phone number is set as your active phone number.
- If you have more than one phone number associated with your device, verify that the phone number that you want to make calls from and receive calls to is set as your active phone number.
Related topics
Fixed dialing and smart dialing, 57
Call waiting, call forwarding, and call blocking, 55
Switch the active phone number, 62
My phone number appears as Unknown in the Phone application
If your BlackBerry ^® device uses a SIM card, try changing the phone number on your SIM card to change how your phone number appears in the Phone application.
- On the Home screen or in a folder, click the Options icon.
- Click Device > Advanced System Settings > SIM Card.
- Highlight the phone number.
- Press the ☐ key > Edit SIM Phone Number.
- Type your phone number.
- Click OK.
I cannot check my voice mail
Try performing the following actions:
- If you have more than one phone number associated with your BlackBerry® device and you are trying to check your voice mail using a shortcut key, your device calls the voice mail access number for your active phone number. Check the voice mail for your alternate phone number.
- You need a voice mail access number to check your voice mail. To obtain a voice mail access number, contact your wireless service provider or administrator.
Related topics
Switch the active phone number, 62
I cannot make calls using a voice command
Try performing the following actions:
- Verify that your BlackBerry® device is connected to the wireless network.
- If you are using a Bluetooth® enabled device, such as a handsfree car kit or wireless headset, verify that the Bluetooth enabled device supports this feature and that you have paired the Bluetooth enabled device with your BlackBerry device.
- Verify that your screen is unlocked.
- Verify that the language that you use to say voice commands is the same as the voice dialing language that you have set in the language options. Certain languages might not be supported.
Related topics
Bluetooth technology, 245
Change the language for voice commands, 69
I cannot change the number of times that my device rings
Depending on your wireless service provider, you might not be able to choose the length of time that your BlackBerry ^® device rings before the call is picked up by voice mail. For more information, contact your wireless service provider.
Some features are not available on my device
The availability of certain features on your BlackBerry ^® device might be affected by items such as your device model and wireless service plan.
Depending on your messaging service plan, some features or options might not be available in the message options on the Email Preferences screen.
If your email account uses a BlackBerry® Enterprise Server, your organization might not have set up some features or might prevent you from using some features or options. If your administrator has set an option for you, a red lock indicator appears beside the option field.
For more information about the features that are available on your device, contact your wireless service provider or administrator, or visit www.blackberry.com/go/devices.
Related topics
Feature availability, 27
Voice commands
Perform an action using a voice command
- On the Home screen or in a folder, click the Voice Dialing icon.
- After the beep, say a voice command.
Related topics
I cannot make calls using a voice command, 67
Available voice commands
"Call "
Say this voice command to make a call. To perform this task with a Bluetooth® enabled device, such as a handsfree car kit or wireless headset, the paired Bluetooth enabled device must support this feature and you must turn on Bluetooth technology. You cannot make calls to emergency numbers using voice commands.
"Call "
Say this voice command to call a specific phone number for a contact that is in your contact list. For example, if the contact has a work phone number and a mobile phone number, you can say "Call
"Call extension "
Say this voice command to dial an extension. To perform this task, you must set options for dialing extensions. You can dial extensions only within your company.
"Check my phone number"
If you have multiple phone numbers associated with your BlackBerry ^® device, say this voice command to check your active phone number.
"Check signal strength"
Say this voice command to check your wireless coverage level.
"Check network"
Say this voice command to check the wireless network that your device is connected to.
"Check battery"
Say this voice command to check the battery power level.
"Repeat"
Say this voice command to have the last voice prompt repeated to you.
"Cancel"
Say this voice command to close the voice dialing application.
Related topics
Set options for dialing extensions, 58
Change the language for voice commands
When you change the language for voice commands, you change the language for voice prompts and the language that you use to make a voice command.
- On the Home screen or in a folder, click the Options icon.
- Click Typing & Input > Language and Text Input.
- Change the Voice Dialing Language field.
- Press the Key > Save.
Related topics
My device does not recognize names or numbers in voice commands, 70
Turn off choice lists for voice commands
If your BlackBerry ^® device identifies more than one possible match to a voice command, your device presents you with a list of possible matches, or a choice list. You can turn off choice lists so that your device always selects the best match and dials the phone number automatically.
- On the Home screen or in a folder, click the Options icon.
- Click Call Management > Voice Dialing.
- Set the Choice Lists field to Always Off.
- Press the ☐ key > Save.
Change the options for voice prompts
After you say a voice command, voice prompts might prompt you for further information or clarification, or voice prompts might read out instructions that appear on the screen.
-
On the Home screen or in a folder, click the Options icon.
-
Click Call Management > Voice Dialing.
-
To turn off voice prompts, change the Audio Prompts field to No Prompts.
- To turn on voice prompts, change the Audio Prompts field to Basic Prompts.
-
To turn on voice prompts and to have the voice prompts read out instructions that appear on the screen, change the Audio Prompts field to Detailed Prompts.
-
Press the ☐ key > Save.
Improve voice recognition
You can improve voice recognition by completing a short series of prompts that ask you to say specific numbers and words.
- On the Home screen or in a folder, click the Options icon.
- Click Call Management > Voice Dialing.
- In the Voice Adaptation section, click Start.
- Complete the instructions on the screen.
Troubleshooting: Voice dialing
I cannot make calls using a voice command
Try performing the following actions:
- Verify that your BlackBerry® device is connected to the wireless network.
- If you are using a Bluetooth® enabled device, such as a handsfree car kit or wireless headset, verify that the Bluetooth enabled device supports this feature and that you have paired the Bluetooth enabled device with your BlackBerry device.
- Verify that your screen is unlocked.
- Verify that the language that you use to say voice commands is the same as the voice dialing language that you have set in the language options. Certain languages might not be supported.
Related topics
Bluetooth technology, 245
Change the language for voice commands, 69
My device does not recognize names or numbers in voice commands
Try performing the following actions:
- Say the first name and the last name of your contact.
- Improve voice recognition of numbers.
Related topics
Improve voice recognition, 70
Messages
Set up an email address
- On the Home screen, click the Setup icon.
- In the Setup section, click the Email Accounts icon.
- Follow the screens to set up your email address. When your email address is set up correctly, you receive a confirmation message. To view and manage your email messages, on the Home screen, click the Messages icon.
Note: In some cases, you might see the following options. If so, select one of the options.
- Internet Mail Account: Use this option to associate your BlackBerry® device with one or more existing email accounts (for example, Windows Live™ Hotmail®) or to create a new email address for your device.
- Enterprise Account: If your administrator gave you an enterprise activation password, use this option to associate your device with your work email account using the BlackBerry® Enterprise Server.
If you are trying to set up a Internet email account (for example, Windows Live™ Hotmail®) or a new email address for your device, and do not see this option, contact your administrator or wireless service provider.
Related topics
Change options for your personal email account, 79
Composing and sending email
Send an email
- On the Home screen, click the Messages icon.
- Press the ☐ key > Compose Email.
- In the To field, type an email address or a contact name.
- Type a message.
- Press the Key > Send.
Related topics
Search for a contact in your organization's address book, 182
Personal distribution lists, 186
I cannot send messages, 117
Resend a message
You cannot change a text message before you resend it.
In a sent message, press the ☐ key.
- To change the message, click Edit. Change the message. Press the ☐ key > Send.
- To change the recipients, click Edit. Highlight a contact. Press the ☐ key > Change Address. Click a new contact.
Press the key > Send.
- To resend the message without changing it, click Resend.
Related topics
I cannot send messages, 117
Reply to or forward an email or PIN message
In a message, press the key.
- To reply to a message, click Reply or Reply to All.
- To forward a message, click Forward or Forward As.
Related topics
I cannot send messages, 117
Check spelling
You can check spelling in messages, calendar entries, tasks, or memos that you create.
- Press the ☐ key > Check Spelling.
- Do any of the following:
- To accept the suggested spelling, click a word in the list that appears.
- To ignore the suggested spelling, press the ⬆ key.
- To ignore all instances of the suggested spelling, press the Key > Ignore All.
- To add the word to the custom dictionary, press the ☐ key > Add To Dictionary.
- To stop checking spelling, press the key > Cancel Spell Check.
Save a draft of a message
When you are composing a message, press the key > Save Draft.
Attach a file to an email
To attach a file that is saved on your organization's network, your email account must use a BlackBerry® Enterprise Server that supports this feature. For more information, contact your administrator.
When you are composing an email, press the ☐ key > Attach > File.
- To attach a file that is saved on your BlackBerry device or media card, find and click the file.
- To attach a file that is saved on your organization's network, press the ☐ key > Go To. Find and click the file. If necessary, type the credentials that you use to connect to your organization's network.
Attach a contact to a message
You can attach a contact to an email, a PIN message, or a text message.
-
When you are composing a message, press the ☐ key > Attach > Contact.
-
Find and highlight a contact.
-
Press the key > Continue.
Related topics
I cannot attach a file to a text message, 121
Add or change your signature
Depending on your wireless service plan, this feature might not be supported.
- On the Home screen, click the Messages icon.
- Press the ☐ key > Options.
- For a work email account, click Email Preferences. If the Message Services field appears, change this field to the appropriate email account. If the Use Auto Signature check box is not selected, select it. In the field that appears, place your cursor. - For a personal email account, click Email Account Management. Click an email account. Click Edit.
-
Type a signature.
-
Press the key > Save.
Your signature is added to your email after you send it.
Change the email address that you use to send messages or meeting invitations
- On the Home screen or in a folder, click the Options icon.
- Click Device > Advanced System Settings > Default Services.
- Change the Messaging (CMIME) field or the Calendar (CICAL) field.
- Press the ☐ key > Save.
Delete the disclaimer from an email
If your email account uses a BlackBerry® Enterprise Server that supports this feature, the BlackBerry Enterprise Server might add a disclaimer to your email after you send it.
When you are composing an email, press the ☐ key > Remove Disclaimer.
To add the disclaimer again, press the Key > Add Disclaimer.
Delete the original text from a reply message
When you are replying to a message, press the ☐ key > Delete Original Text.
Set the importance level for a message
You can set the importance level for an email, a PIN message, or a text message.
- When you are composing a message, press the key > Options.
- Change the Importance field.
- Press the key > Save.
Blind carbon copy a contact
You can blind carbon copy a contact in an email or a PIN message.
When you are composing an email or a PIN message, press the key > Add Bcc.
Stop a message from sending
You can stop a message from sending only if a clock icon appears beside the message.
- On the Home screen, click the Messages icon.
- Highlight the message.
- Press the key > Delete.
Viewing and replying to email
About email account icons
Depending on your wireless service plan or administrator, you might be able to associate your BlackBerry® device with a work email account and one or more personal email accounts. If you associate your device with more than one email account, multiple email account icons might appear on your device, in addition to the main Messages icon. For more information about associating your device with more than one email account, visit www.blackberry.com/docs/smartphones and click the link under Email Setup.
Depending on your theme, a separate icon might appear for text messages.
Search for text in a message, in a file, or on a web page
To search for text in a presentation, you must view the presentation in text view or in text and slide view.
- In a message, in a file, in an attachment, or on a web page, press the ☐ key > Find or Find on Page.
- Type the text.
- Press the Enter key.
To search for the next instance of the text, press the ☐ key > Find Next.
View email in plain text format
-
On the Home screen, click the Messages icon.
-
Press the Key > Options > Email Preferences.
- If the Message Services field appears, set this field to the appropriate email account.
- Clear the Enable HTML Email check box.
- Press the key > Send.
View an address instead of a display name
In a message, press the Key > Show Address.
To view the display name again, press the key > Show Name.
Mark a message as opened or unopened
On the Home screen, click the Messages icon.
- To mark a message as opened or unopened, highlight the message. Press the ☐key > Mark Opened or Mark Unopened.
- To mark all messages that are prior to a specific date as opened, highlight a date field. Press the ☐key > Mark Prior Opened.
Save a message
- On the Home screen, click the Messages icon.
- Highlight a message.
- Press the key > Save.
Delete messages
On the Home screen, click the Messages icon.
- To delete a message, highlight the message. Press the ☐ key > Delete.
- To delete a range of messages, highlight a message. Press and hold the Shift key. On the trackpad, slide your finger up or down. Release the Shift key. Press the □key > Delete Messages.
- To delete all messages prior to a certain date, highlight a date field. Press the ☐key > Delete Prior > Delete.
Note: Email that you delete using the Delete Prior menu item is not deleted from the email application on your computer during email reconciliation.
About flags
You can add flags to email that you receive or send as a reminder to you or the recipients to follow up with the messages. You can use flags of different colors, add follow-up notes, and set due dates so that your BlackBerry® device reminds you to return to the email.
If wireless email reconciliation is turned on and your email account uses a BlackBerry® Enterprise Server that supports flags, changes that you make to flags on your device should be reflected in the email application on your computer. Likewise, changes that you make to flags in the email application on your computer should be reflected on your device.
If wireless email reconciliation is turned off, you can still manage flags for email on your device.
Add, change, or remove a flag
When you are composing or viewing an email, press the ☐ key.
- To add a flag, click Flag for Follow Up. Set the flag properties. Press the ☐ key > Save.
- To change a flag, click Flag Properties. Change the flag properties. Press the ☐key > Save.
- To remove a flag, click Clear Flag.
Note: If you make changes to a flag in an email that you sent, the changes are reflected only on your BlackBerry® device and are not sent to the recipient.
Change how a message inbox displays messages
- On the Home screen, click the Messages icon.
- Press the ☐ key > Options > Message Display and Actions.
- To change the order of the subject line and sender, change the Display Order field.
- To change how messages are separated, change the Separators field.
- To change how many messages can fit on the screen, change the Display Message Header On field.
- Press the key > Save.
Group email by subject
- On the Home screen, click the Messages icon.
- Press the ☐ key > Options > Message Display and Actions.
- Change the Display Style field to Group by Subject.
- Press the key > Save.
To stop grouping email by subject, change the Display Style field to Single Messages.
Use color to differentiate work messages from other messages
To perform this task, your work email account must use a BlackBerry® Enterprise Server that supports this feature. For more information, contact your administrator.
- On the Home screen or in a folder, click the Options icon.
- Click Display > Message Categorization.
- In the Message Outline Colors section, do any of the following:
- To set an outline color for email that is sent to your BlackBerry device through a BlackBerry Enterprise Server, change the Enterprise Messages field.
- To set an outline color for your other messages, change the Other Messages field.
- Press the key > Save.
Note: PIN messages might use the outline color that you have set for your work email. For more information, contact your administrator.
Hide sent messages from the message inbox
- On the Home screen, click the Messages icon.
- Press the key > Options > Message Display and Actions.
- Select the Hide Sent Messages check box.
- Press the key > Save.
Hide messages from the Messages application
You can prevent messages from specific email accounts from appearing in the Messages application. You can also set a separate icon to appear on the Home screen for text messages. Depending on your theme, a separate icon might already appear by default.
- On the Home screen, click the Messages icon.
-
Press the key > Options > Inbox Management.
-
To hide messages from specific email accounts, in the Email Accounts section, clear the check box beside one or more email accounts.
-
To hide text messages, in the Other Message Types section, clear the Text Messages check box.
-
Press the Rxy > Save.
Filing email
About synchronization of email folders:
You can add, change, or delete email folders in the email application on your computer or in the Messages application on your BlackBerry ^® device.
If wireless email reconciliation is turned on and your email account uses a BlackBerry® Enterprise Server that supports this feature, changes that you make to email folders are synchronized over the wireless network.
If wireless email reconciliation is turned off or is not available for your device, you can make folder changes in the email application on your computer and then reconcile the changes to your device using the email settings tool of the BlackBerry® Desktop Software. For more information about email reconciliation, see the Help in the BlackBerry Desktop Software.
Related topics
Reconcile email over the wireless network, 13
File an email:
To perform this task, your work email account must use a BlackBerry ^® Enterprise Server that supports this feature. For more information, contact your administrator.
- On the Home screen, click the Messages icon.
-
Highlight an email.
-
Press the Key > File.
- Highlight a folder.
- Press the Key > File.
Related topics
Reconcile email over the wireless network, 13
I cannot file email, 119
Add, move, rename, or delete an email folder :
To perform this task, your work email account must use a BlackBerry® Enterprise Server that supports this feature. For more information, contact your administrator.
- On the Home screen, click the Messages icon.
- Press the ☐ key > View Folder.
- Highlight a folder.
-
Press the key.
-
To add a folder, click Add Folder.
- To move a folder, click Move Folder. Click the new location.
- To rename a folder, click Rename Folder.
- To delete a folder, click Delete Folder.
Forward messages from a specific email folder to your device:
To perform this task, your work email account must use a BlackBerry ^® Enterprise Server that supports this feature. For more information, contact your administrator.
- On the Home screen, click the Messages icon.
- Press the Key > Options > Email Preferences.
- If the Message Services field appears, set this field to the appropriate email account.
- Press the Key > Folder Redirection.
- Select the check box beside an email folder.
- Press the Key > Save.
Note: If you click the Select All menu item, all email, including email that appears in the sent items folder in the email application on your computer, appears on your BlackBerry device.
Related topics
Stop storing messages sent from your computer on your device, 82
Hide filed email from the message inbox:
- On the Home screen, click the Messages icon.
- Press the key > Options > Message Display and Actions.
- Select the Hide Filed Messages check box.
- Press the key > Save.
View filed messages:
- On the Home screen, click the Messages icon.
-
Press the Key > View Folder.
-
Click a folder.
Email options
Set an out-of-office reply
To perform this task, your work email account must use a BlackBerry® Enterprise Server that supports this feature. For more information, contact your administrator.
- On the Home screen, click the Messages icon.
- Press the ☐ key > Options > Email Preferences.
- If the Message Services field appears, set this field to the appropriate email account.
- Select the Use Out Of Office Reply check box.
- In the field that appears, type a reply.
- If you use IBM® Lotus Notes®, in the Until field, set the date on which the out-of-office reply should turn off.
- Press the ☐ key > Save.
To turn off the out-of-office reply, clear the Use Out Of Office Reply check box.
Change options for your personal email account
Depending on your wireless service provider, you might not be able to change some options for your personal email account.
You can change options for each personal email account that you added to your BlackBerry ^® device. You can create email filters, synchronize your contacts, change your signature or display name, and more.
- On the Home screen, click the Messages icon.
- Press the key > Options > Email Account Management.
- Click the email account that you want to change options for.
For more information about personal email accounts, visit www.blackberry.com/docs/smartphones and click the link under Email Setup Manuals.
Turn on or turn off read receipts
Depending on your wireless service provider or administrator, you might not be able to perform this task, or some of the options might not appear.
- On the Home screen, click the Messages icon.
- Press the ☐ key > Options > Email Preferences.
- If the Message Services field appears, set this field to the appropriate email account.
- To set whether your BlackBerry ^® device sends a read receipt or delivery receipt when a sender requests it, change the Send Read Receipts field.
- Press the key > Save.
Stop loading pictures in HTML email messages
By default, your BlackBerry ^® device automatically downloads and displays inline pictures that are embedded in HTML email messages.
- On the Home screen, click the Messages icon.
- Press the Key > Options > Email Preferences.
- If the Message Services field appears, set this field to the appropriate email account.
- Clear the Download Images Automatically check box.
- Press the ☐ key > Save.
To view pictures in an HTML email message, press the ☐ key > Get Images.
Turn off the prompt that appears before downloading external pictures in HTML email messages
Some HTML email messages contain links to external pictures on the Internet. By default, your BlackBerry ^® device prompts you before downloading external pictures.
- On the Home screen, click the Messages icon.
- Press the ☐ key > Options > Email Preferences.
- If the Message Services field appears, set this field to the appropriate email account.
- Clear the Confirm External Image Download check box.
- Press the ☐ key > Save.
Receive only the first section of long email messages
- On the Home screen, click the Messages icon.
- Press the key > Options > Message Display and Actions.
- Clear the Auto More check box.
- Press the key > Save.
To download more of an email, press the key > More or More All.
Open a new message automatically when you remove your device from your holster
- On the Home screen, click the Messages icon.
- Press the ☐ key > Options > Message Display and Actions.
- Change the Auto Open Newest Message After Removing Device From Holster field.
- Press the Key > Save.
Hide the new or unopened message indicator
- On the Home screen, click the Messages icon.
-
Press the ☐ key > Options > Message Display and Actions.
-
To hide the new message indicator, clear the Display New Message Indicator check box.
-
To hide the unopened message indicator, change the Display Message Count field to None.
-
Press the key > Save.
Stop displaying recent contacts in email address fields
By default, when you type the first few characters of a contact name or an email address in a To, Cc, or Bcc field, your BlackBerry ^® device displays the email addresses of recent contacts who are not in your contact list.
- On the Home screen, click the Messages icon.
- Press the key > Options > Message Display and Actions.
- Clear the Show Recent Contacts When Composing Email check box.
- Press the key > Save.
Turn off the prompt that appears before you delete a message
- On the Home screen, click the Messages icon.
- Press the ☐ key > Options > Message Display and Actions.
- Clear the Confirm Delete check box.
- Press the key > Save.
Turn off the prompt that appears when you mark messages as opened
- On the Home screen, click the Messages icon.
- Press the ☐ key > Options > Message Display and Actions.
- Clear the Confirm Mark Prior Opened check box.
- Press the key > Save.
View call logs in the Messages application
- From the Home screen, press the √ key.
- Press the ☐ key > Options > Call Logs and Lists.
- To show recent and missed calls in the Messages application, select the All Calls option.
- To hide call logs in the Messages application, select the None option.
Storing and forwarding email
Set how long your device stores messages:
- On the Home screen, click the Messages icon.
- Press the ☐ key > Options > Message Display and Actions.
- Change the Days To Keep Messages field.
- Press the key > Save.
Related topics
Some messages no longer appear on my device, 119
Stop storing messages sent from your computer on your device:
To perform this task, your work email account must use a BlackBerry® Enterprise Server that supports this feature. For more information, contact your administrator.
- On the Home screen, click the Messages icon.
- Press the Key > Options > Email Preferences.
- If the Message Services field appears, set this field to the appropriate email account.
- Press the key > Folder Redirection.
- Clear the check box beside the Sent Items folder.
- Press the ☐ key > Save.
Stop storing messages sent from your device on your computer:
To perform this task, your work email account must use a BlackBerry® Enterprise Server that supports this feature. For more information, contact your administrator.
- On the Home screen, click the Messages icon.
- Press the ☐ key > Options > Email Preferences.
- If the Message Services field appears, set this field to the appropriate email account.
- Clear the Save Copy In Sent Folder check box.
- Press the ☐ key > Save.
Stop forwarding email to your device:
To perform this task, your work email account must use a BlackBerry® Enterprise Server that supports this feature. For more information, contact your administrator.
- On the Home screen, click the Messages icon.
- Press the ☐ key > Options > Email Preferences.
- If the Message Services field appears, set this field to the appropriate email account.
- Clear the Send Email to Handheld check box.
- Press the Key > Save.
To forward email to your BlackBerry device again, select the Send Email to Handheld check box.
Email filters
About email filters
You can create email filters to specify which email is forwarded to your BlackBerry® device and which remains in the email application on your computer.
Email filters are applied to email based on the order in which they appear in your list of email filters. If you create multiple email filters that could apply to the same email, you must decide which one should be applied first by placing that filter higher in the list.
Create an email filter
To perform this task, your work email account must use a BlackBerry® Enterprise Server that supports this feature. For more information, contact your administrator.
For information about completing this task for a personal email account that you have on your BlackBerry device (such as Google Mail™ or Windows Live™ Hotmail®), visit www.blackberry.com/docs/smartphones and click the link under Email Setup.
- On the Home screen, click the Messages icon.
- Press the ☐ key > Options > Email Filters.
- Press the ☐ key > New.
- Type a name for the email filter.
- Set the email filter options.
- Press the key > Save.
Create an email filter based on a contact or subject
- On the Home screen, click the Messages icon.
- Highlight an email.
- Press the ☐ key > Filter by > Sender or Subject.
- Type a name for the email filter.
- Set the email filter options.
- Press the key > Save.
Options for email filters
| Option | Description |
| From Specify one or more contacts or email addresses that the email | |
| filter should search for in the From field of your email. Separate multiple contacts or email addresses with a semicolon (;). To specify that the email filter should search for all contacts or email addresses that contain specific text, type the text and use an asterisk (*) as a wildcard character to represent the rest of the contact or email address. | |
| Sent to Specify one or more contacts or email addresses that the email | |
| filter should search for in the Sent To field of your email. Separate multiple contacts or email addresses with a semicolon (;). To specify that the email filter should search for | |
| Option Description | |
| all contacts or email addresses that contain specific text, type the text and use an asterisk (*) as a wildcard character to represent the rest of the contact or email address. | |
| Subject Specify the text that the email filter should search for in the Subject field of your email. | |
| Message Specify the text that the email filter should search for in the body of your email. | |
| Sent directly to me Set whether the email filter applies to email that includes your email address in the To field. | |
| Cc to me Set whether the email filter applies to email that includes your email address in the CC field. | |
| Bcc to me Set whether the email filter applies to email that includes your email address in the BCC field. | |
| Importance Set the importance level of email that the email filter applies to. | |
| Sensitivity Set the sensitivity level of email that the email filter applies to. | |
| Action Set whether email that the email filter applies to is forwarded to your BlackBerry® device. If email is forwarded, specify whether it is forwarded with high importance or with the email header only. | |
Turn on an email filter
- On the Home screen, click the Messages icon.
- Press the ☐ key > Options > Email Filters.
- Select the check box beside an email filter.
- Press the key > Save.
Change, prioritize, or delete an email filter
- On the Home screen, click the Messages icon.
- Press the key > Options > Email Filters.
- Highlight an email filter.
-
Press the Key.
-
To change an email filter, click Edit. Change the options for the email filter. Press the ☐ key > Save.
- To prioritize an email filter, click Move. Click the new location.
- To delete an email filter, click Delete.
Synchronizing email
About synchronization
The wireless data synchronization feature is designed to synchronize organizer data (contacts, calendar entries, tasks, and memos) between a subscriber's BlackBerry® smartphone and the email application on their computer over the wireless network.
The wireless email reconciliation feature is designed to reconcile email between the subscriber's smartphone and the email application on their computer over the wireless network. When a subscriber files or deletes email messages on their smartphone, these email message should be filed or deleted in their email application. Likewise, any changes that they make to email message in the email application on their computer should be reflected on the smartphone.
In rare cases, if a smartphone does not recognize fields in a contact, calendar entry, or email account, some data or email cannot be synchronized or reconciled.
If wireless data synchronization or wireless email reconciliation is not available on the smartphone or if the subscriber turned off these features, the subscriber can use the synchronization tool of the BlackBerry® Desktop Software to synchronize their organizer data and email. For more information, see the Help in the BlackBerry Desktop Software.
Research In Motion recommends that you regularly create and save a backup file on your computer, especially before you update any software. Maintaining an up-to-date backup file on your computer might allow you to recover device data if your device is lost, stolen, or corrupted by an unforeseen issue.
Reconcile email over the wireless network
You can set the Wireless Reconcile option for each email address that is associated with your BlackBerry ^® device.
- On the Home screen, click the Messages icon.
- Press the Key > Options > Email Reconciliation.
- If the Message Services field appears, set this field to the appropriate email account.
- Select the Wireless Reconcile check box.
- Press the ☐ key > Save.
If your device is associated with a Microsoft ^® Outlook ^® email account, you must use the synchronization tool of the BlackBerry ^® Desktop Software to reconcile email in personal folders. For more information, see the Help in the BlackBerry Desktop Software.
Delete email on your device and in your email application on your computer
You can set the Delete On option for each email address that is associated with your BlackBerry ^® device.
- On the Home screen, click the Messages icon.
- Press the ☐ key > Options > Email Reconciliation.
- If the Message Services field appears, set this field to the appropriate email account.
- Change the Delete On field to Mailbox & Handheld.
5. Press the Key > Save.
It takes a short period of time for email to be deleted over the wireless network.
Related topics
Delete messages, 75
Empty the deleted items folder on your computer from your device
To perform this task, your work email account must use a BlackBerry® Enterprise Server that supports this feature. For more information, contact your administrator.
- On the Home screen, click the Messages icon.
- Press the ☐ key > Options > Email Reconciliation.
- If the Message Services field appears, set this field to the appropriate email account.
- Press the Key >Purge Deleted Items.
About synchronization conflicts
A synchronization conflict occurs when you change the same email or organizer data item on your BlackBerry ^® device and in the email application on your computer.
If you reconcile your email using wireless email reconciliation, on your device, you can set whether the email on your device or the email on your computer takes precedence when an email reconciliation conflict occurs.
If you synchronize your organizer data using wireless data synchronization, the organizer data on your computer takes precedence over the organizer data on your device when a data synchronization conflict occurs.
Research In Motion recommends that you regularly create and save a backup file on your computer, especially before you update any software. Maintaining an up-to-date backup file on your computer might allow you to recover device data if your device is lost, stolen, or corrupted by an unforeseen issue.
Related topics
Synchronize organizer data over the wireless network, 175
Some characters in calendar entries do not appear correctly after synchronization, 179
Manage email reconciliation conflicts
You can set the On Conflicts option for each email address that is associated with your BlackBerry ^® device.
- On the Home screen, click the Messages icon.
- Press the ☐ key > Options > Email Reconciliation.
- If the Message Services field appears, set this field to the appropriate email account.
- Change the On Conflicts field.
- Press the key > Save.
PIN messages
About PIN messages
A PIN uniquely identifies BlackBerry ^® devices and BlackBerry enabled devices on the wireless network. If you have a contact who uses a BlackBerry device or a BlackBerry enabled device and you know that contact's PIN, you can send them PIN messages. PIN messages are not routed through your email account.
When your PIN message is delivered to the recipient, in a message inbox, a D appears with a check mark beside the PIN message.
Find your PIN
Do one of the following:
- On the Home screen or in a folder, click the Options icon. Click Device > Device and Status Information.
- In a message, type mypin followed by a space.
Composing and sending PIN messages
Compose and send a PIN message
- On the Home screen, click the Messages icon.
- Press the ☐ key > Compose Other > Compose PIN.
-
In the To field, do one of the following:
-
Type a PIN. Press the key on the keyboard.
-
If you have a PIN saved for a contact that is in your contact list, type the contact name. Press the key on the keyboard.
-
Type a message.
-
Press the ☐ key > Send.
Related topics
Personal distribution lists, 186
I cannot send messages, 117
I cannot send messages, 117
Resend a message
You cannot change a text message before you resend it.
In a sent message, press the ☐ key.
- To change the message, click Edit. Change the message. Press the ☐ key > Send.
- To change the recipients, click Edit. Highlight a contact. Press the ☐ key > Change Address. Click a new contact. Press the Key > Send.
- To resend the message without changing it, click Resend.
Related topics
I cannot send messages, 117
Reply to or forward an email or PIN message
In a message, press the ☐ key.
- To reply to a message, click Reply or Reply to All.
- To forward a message, click Forward or Forward As.
Related topics
I cannot send messages, 117
Check spelling
You can check spelling in messages, calendar entries, tasks, or memos that you create.
- Press the Key > Check Spelling.
- Do any of the following:
- To accept the suggested spelling, click a word in the list that appears.
- To ignore the suggested spelling, press the → key.
- To ignore all instances of the suggested spelling, press the key > Ignore All.
- To add the word to the custom dictionary, press the Key > Add To Dictionary.
- To stop checking spelling, press the ☐ key > Cancel Spell Check.
Save a draft of a message
When you are composing a message, press the key > Save Draft.
Attach a contact to a message
You can attach a contact to an email, a PIN message, or a text message.
- When you are composing a message, press the ☐ key > Attach > Contact.
- Find and highlight a contact.
- Press the key > Continue.
Related topics
I cannot attach a file to a text message, 121
Set an importance level for received PIN messages
- On the Home screen, click the Messages icon.
-
Press the ☐ key > Options > Message Display and Actions.
-
Select the Display PIN Messages in Red check box.
- Press the key > Save.
Blind carbon copy a contact
You can blind carbon copy a contact in an email or a PIN message.
When you are composing an email or a PIN message, press the ☐ key > Add Bcc.
Create a link for a PIN
You can create a link for a PIN in a message, calendar entry, task, or memo. If you click the link, you can send a PIN message. When you are typing text, type pin: and the PIN.
Stop a message from sending
You can stop a message from sending only if a clock icon appears beside the message.
- On the Home screen, click the Messages icon.
- Highlight the message.
- Press the key > Delete.
Viewing and replying to PIN messages
Search for text in a message, in a file, or on a web page
To search for text in a presentation, you must view the presentation in text view or in text and slide view.
- In a message, in a file, in an attachment, or on a web page, press the key > Find or Find on Page.
- Type the text.
- Press the Enter key.
To search for the next instance of the text, press the key > Find Next.
View an address instead of a display name
In a message, press the ☐ key > Show Address.
To view the display name again, press the key > Show Name.
View filed messages
- On the Home screen, click the Messages icon.
- Press the ☐ key > View Folder.
- Click a folder.
Save a message
- On the Home screen, click the Messages icon.
- Highlight a message.
- Press the ☐ key > Save.
Delete messages
On the Home screen, click the Messages icon.
- To delete a message, highlight the message. Press the key > Delete.
- To delete a range of messages, highlight a message. Press and hold the Shift key. On the trackpad, slide your finger up or down. Release the Shift key. Press the □key > Delete Messages.
- To delete all messages prior to a certain date, highlight a date field. Press the ☐ key > Delete Prior > Delete.
Note: Email that you delete using the Delete Prior menu item is not deleted from the email application on your computer during email reconciliation.
Change how a message inbox displays messages
- On the Home screen, click the Messages icon.
- Press the ☐ key > Options > Message Display and Actions.
- To change the order of the subject line and sender, change the Display Order field.
- To change how messages are separated, change the Separators field.
- To change how many messages can fit on the screen, change the Display Message Header On field.
- Press the Key > Save.
Hide sent messages from the message inbox
- On the Home screen, click the Messages icon.
- Press the ☐ key > Options > Message Display and Actions.
- Select the Hide Sent Messages check box.
- Press the Key > Save.
PIN message options
Set how long your device stores messages
- On the Home screen, click the Messages icon.
- Press the ☐ key > Options > Message Display and Actions.
- Change the Days To Keep Messages field.
- Press the key > Save.
Related topics
Some messages no longer appear on my device, 119
Open a new message automatically when you remove your device from your holster
- On the Home screen, click the Messages icon.
- Press the ☐ key > Options > Message Display and Actions.
- Change the Auto Open Newest Message After Removing Device From Holster field.
- Press the key > Save.
Hide the new or unopened message indicator
- On the Home screen, click the Messages icon.
-
Press the key > Options > Message Display and Actions.
-
To hide the new message indicator, clear the Display New Message Indicator check box.
-
To hide the unopened message indicator, change the Display Message Count field to None.
-
Press the key > Save.
Turn off the prompt that appears before you delete a message
- On the Home screen, click the Messages icon.
- Press the Key > Options > Message Display and Actions.
- Clear the Confirm Delete check box.
- Press the key > Save.
Turn off the prompt that appears when you mark messages as opened
- On the Home screen, click the Messages icon.
- Press the Key > Options > Message Display and Actions.
- Clear the Confirm Mark Prior Opened check box.
- Press the key > Save.
Text messages
About text messages
To send and receive text messages, your wireless service provider must set up your wireless service plan for text messaging. Depending on your wireless service provider, this feature might not be supported.
Depending on the typing input language that you use to type your text messages, your messages might display to your recipients differently than you expect.
Depending on your wireless service provider, you might also be able to send and receive the following media files in text messages: .jpg, .gif, .wbmp, .midi, .vcf (vCard®), .ics (iCalendar), .avi, .mpg, or .mov.
If you have more than one phone number associated with your BlackBerry ^® device, your device sends text messages using the first phone number that appears in the My Number field in the Phone application.
Composing and sending text messages
Send a text message
The number of recipients that you can send a text message to depends on your wireless service provider.
- On the Home screen, click the Text Messages icon.
- Press the KEY > Compose Text Message.
-
In the To field, do one of the following:
-
Type a contact name.
- Press the ☐ key > Choose Contact. Click a contact.
- Type a phone number that can receive text messages (including the country code and area code). For languages with non-Latin characters, press the Alt key to type numbers. Press the key on the keyboard.
-
If your BlackBerry® device is connected to a CDMA network, you can type an email address.
-
Type a message.
-
Press the key on the keyboard.
Related topics
Personal distribution lists, 186
I cannot send messages, 117
I cannot send messages, 117
Resend a message
You cannot change a text message before you resend it.
In a sent message, press the key.
- To change the message, click Edit. Change the message. Press the ☐ key > Send.
- To change the recipients, click Edit. Highlight a contact. Press the ☐ key > Change Address. Click a new contact. Press the ☐ key > Send.
- To resend the message without changing it, click Resend.
Related topics
I cannot send messages, 117
Set whether pressing the Enter key sends text messages
You can stop your text messages from being sent each time that you press the ↗, which might prevent you from accidentally sending a message if you plan to include several lines of text.
- On the Home screen, click the Text Messages icon.
- Press the Key > Options > Text Messaging.
-
In the General Text Messaging Options section, clear the Press Enter Key to Send check box.
-
Press the Key > Save.
Forward a text message
You cannot forward text messages that contain content that is copyright protected.
In a message, press the ☐ key > Forward or Forward As.
Attach a file to a text message
- When you are composing a text message, press the key > Attach.
-
Click one of the following menu items:
-
Picture
- Video
- Location
- Audio
- Voice Note
- Contact
-
Appointment
-
Click a media file.
Related topics
I cannot attach a file to a text message, 121
Set the importance level for text messages that you send
Depending on your wireless service provider, this option might not appear.
- On the Home screen, click the Text Messages icon.
- Press the Key > Options > Text Messaging.
- In the MMS section, in the Message Filtering section, change the Importance field.
- Press the key > Save.
Request delivery notification or read notification for a text message
- On the Home screen, click the Text Messages icon.
- Press the ☐ key > Options > Text Messaging.
- In the MMS section, do one of the following:
• To receive notification when the message is delivered to the recipient, select the Confirm Delivery check box.
- To receive notification when the recipient opens the message, select the Confirm Read check box.
- Press the key > Save.
Stop a message from sending
You can stop a message from sending only if a clock icon appears beside the message.
-
On the Home screen, click the Messages icon.
-
Highlight the message.
- Press the key > Delete.
Viewing and replying to text messages
Search for text in a message, in a file, or on a web page
To search for text in a presentation, you must view the presentation in text view or in text and slide view.
- In a message, in a file, in an attachment, or on a web page, press the ☐ key > Find or Find on Page.
- Type the text.
- Press the Enter key.
To search for the next instance of the text, press the ☐ key > Find Next.
View filed messages
- On the Home screen, click the Messages icon.
- Press the Key > View Folder.
- Click a folder.
Delete messages
On the Home screen, click the Messages icon.
- To delete a message, highlight the message. Press the key > Delete.
- To delete a range of messages, highlight a message. Press and hold the Shift key. On the trackpad, slide your finger up or down. Release the Shift key. Press the Key > Delete Messages.
- To delete all messages prior to a certain date, highlight a date field. Press the ☐ key > Delete Prior > Delete.
Note: Email that you delete using the Delete Prior menu item is not deleted from the email application on your computer during email reconciliation.
Delete the history from a text message
Do one of the following:
- To delete an individual message from the history, highlight the message. Press the ☐ key > Delete Message.
- To delete all the messages from the history and keep the chat open, when you are replying to a message, press the key > Clear Conversation.
- To delete all the messages from the history and close the chat, in your list of text messages, highlight a message. Press the key > Delete.
Save a media file from a text message
-
In a text message, open an attachment.
-
Press the key.
- Click Save
. - Click Save.
Save a vCard contact attachment from a message
If you receive a vCard ^® contact attachment in a message, you can save it so that the contact information is added to your contact list.
- In a message, highlight a vCard contact attachment.
- Press the ☐ key > View Attachment.
- Press the key.
-
Click one of the following items:
-
Add to Contacts
- Update Contact
Related topics
A message, attachment, or Google Mail conversation is cut short or doesn't appear, 119
Add an appointment to your calendar from a text message
- In a text message, highlight an iCalendar attachment.
- Press the key > View Appointment.
- Press the ☐ key > Add To Calendar.
Change how your text messages look
- On the Home screen, click the Text Messages icon.
- Press the ☐ key > Options > Text Messaging.
- In the General Text Messaging Options section, change the Conversation Style field.
- Press the Key > Save.
Show names in the history of text messages
- On the Home screen, click the Text Messages icon.
- Press the ☐ key > Options > Text Messaging.
- In the General Text Messaging Options section, select the Show Names check box.
- If you want to change your display name, beside the Display Name field, type a name. This name appears only in the history of your text messages, and not in messages that you send.
- Press the key > Save.
Change how a message inbox displays messages
- On the Home screen, click the Messages icon.
-
Press the Key > Options > Message Display and Actions.
-
To change the order of the subject line and sender, change the Display Order field.
- To change how messages are separated, change the Separators field.
-
To change how many messages can fit on the screen, change the Display Message Header On field.
-
Press the key > Save.
Options for text messages
Stop receiving text messages when roaming
- On the Home screen, click the Text Messages icon.
- Press the key > Options > Text Messaging.
- In the MMS section, set the Multimedia Reception field and Automatic Retrieval field to Home Only.
- Press the ☐ key > Save.
Block text messages
- On the Home screen, click the Text Messages icon.
- Press the key > Options > Text Messaging.
- In the MMS section, in the Message Filtering section, select the Reject Anonymous Messages check box or Reject Advertisements check box.
- Press the key > Save.
Store text messages on your SIM card
Depending on your wireless service provider and wireless network, this feature might not be supported.
If your BlackBerry ^® device uses a SIM card and you set your SIM card to store text messages, your text messages still appear in the Messages application.
- On the Home screen, click the Messages icon.
- Press the ☐ key > Options > Text Messaging.
- Change the Leave Messages On SIM Card field to Yes.
- Press the key > Save.
To stop storing text messages on your SIM card, change the Leave Messages On SIM Card field to No. If you change this field to No, your text messages are deleted from your SIM card.
Set how long your device stores messages
- On the Home screen, click the Messages icon.
- Press the key > Options > Message Display and Actions.
- Change the Days To Keep Messages field.
- Press the key > Save.
Related topics
Some messages no longer appear on my device, 119
Turn off AutoText for text messages
- On the Home screen, click the Text Messages icon.
- Press the ☐ key > Options.
- In the SMS Text section, select the Disable AutoText check box.
- Press the key > Save.
Set how long your service center attempts to send text messages
If you send a text message and it cannot be delivered immediately, your service center tries to send the text message for the number of times that is set in the Retries field. Depending on your wireless service provider, this option might not appear.
- On the Home screen, click the Text Messages icon.
- Press the key > Options > Text Messaging.
- In the SMS Text section, change the Retries field.
- Press the key > Save.
Set a wireless network type for sending text messages
Depending on your wireless service provider and wireless network, this feature might not be supported.
- On the Home screen, click the Text Messages icon.
- Press the ☐ key > Options > Text Messaging.
-
In the SMS Text section, do one of the following:
-
To use only one network type to send text messages, change the Network To Send Over field to Circuit Switched or Packet Switched.
-
To use either network type to send text messages, which might be beneficial when roaming, change the Network To Send Over field to Circuit Switched Preferred or Packet Switched Preferred.
-
Press the ☐ key > Save.
Open a new message automatically when you remove your device from your holster
- On the Home screen, click the Messages icon.
- Press the ☐ key > Options > Message Display and Actions.
- Change the Auto Open Newest Message After Removing Device From Holster field.
- Press the key > Save.
Hide the new or unopened message indicator
- On the Home screen, click the Messages icon.
-
Press the key > Options > Message Display and Actions.
-
To hide the new message indicator, clear the Display New Message Indicator check box.
-
To hide the unopened message indicator, change the Display Message Count field to None.
-
Press the key > Save.
Turn off the prompt that appears before you delete a message
- On the Home screen, click the Messages icon.
- Press the KEY > Options > Message Display and Actions.
- Clear the Confirm Delete check box.
- Press the Key > Save.
Turn off the prompt that appears when you mark messages as opened
- On the Home screen, click the Messages icon.
- Press the Key > Options > Message Display and Actions.
- Clear the Confirm Mark Prior Opened check box.
- Press the ☐ key > Save.
Cell broadcasting
About cell broadcasting
Cell broadcasting is designed to enable wireless service providers to use SMS text messaging to send information to all BlackBerry ^® devices in a specific geographical area simultaneously. You can receive cell broadcast messages that contain a specific type of information by subscribing to a cell broadcast channel that provides that type of information. Different cell broadcast channels send different cell broadcast messages. For example, one cell broadcast channel might send regular weather forecasts while another might send traffic reports.
Turn on cell broadcasting
To perform this task, your BlackBerry ^® device must use a SIM card, and your wireless service provider must set up your SIM card with a cell broadcast channel or provide you with the ID for a cell broadcast channel.
Depending on your wireless service provider and the wireless network that your device is connected to, this feature might not be supported.
- On the Home screen or in a folder, click the Options icon.
- Click Device > Advanced System Settings > Cell Broadcast Settings.
-
Select the Cell Broadcasting Service check box.
-
If one or more cell broadcast channels appear on the screen, select the check box beside the channel.
-
If no cell broadcast channels appear on the screen, highlight the Empty field. Press the ☐key > Add Channel. Type the channel ID and a nickname. Click OK.
-
Select the check box beside a language.
-
Press the ☐ key > Save.
To turn off cell broadcasting, clear the Cell Broadcasting Service check box. Before you turn off cell broadcasting, verify that your wireless service provider does not use cell broadcasting to manage services, such as preferred rates, based on your location.
Related topics
I cannot turn on cell broadcasting, 120
Stop receiving messages from a cell broadcast channel
Verify that your wireless service provider does not use the cell broadcast channel to manage services, such as preferred rates, based on your location.
- On the Home screen or in a folder, click the Options icon.
- Click Device > Advanced System Settings > Cell Broadcast Settings.
- In the Channels section, highlight a cell broadcast channel.
- Press the ☐ key.
- To stop receiving messages from the cell broadcast channel, click Disable.
- To delete the cell broadcast channel, click Delete Channel.
Rename a cell broadcast channel
- On the Home screen or in a folder, click the Options icon.
- Click Device > Advanced System Settings > Cell Broadcast Settings.
- In the Channels section, highlight a cell broadcast channel.
- Press the key > Set Nickname.
- Type a name for the cell broadcast channel.
- Click OK.
- Press the ☐ key > Save.
Security options for messages
Block incoming messages
If your email account uses a BlackBerry® Enterprise Server, you might not be able to block or unblock PIN messages from contacts within your organization, from contacts outside of your organization, or both. For more information, contact your administrator.
- On the Home screen or in a folder, click the Options icon.
- Click Security > Firewall.
- Select the check box beside one or more message types.
- Press the ☐ key > Save.
Note: Even though you do not receive blocked messages on your BlackBerry device, blocked messages might contribute to data usage in your wireless service plan. You can stop email messages from being forwarded to your device without contributing to data usage by turning off email message forwarding or by using email message filters.
Allow messages from contacts in your contact list or allowed sender list
- On the Home screen or in a folder, click the Options icon.
- Click Security > Firewall.
- Select the Contacts check box or Specific Addresses, Phone Numbers, or PINs check box.
- Press the ☐ key > Save.
Add a contact to your allowed sender list
- On the Home screen or in a folder, click the Options icon.
- Click Security > Firewall.
- In the General section, if the Enable check box is not selected, select it.
- In the Block Incoming Messages section, select one or more message types.
-
In the Exceptions section, select the Specific Addresses, Phone Numbers, or PINs check box.
-
Click Add.
-
Press the ☐ key.
-
Click one of the following menu items:
-
Add Email Address
- Add Phone Number
-
Add PIN
-
In the Enter new exception dialog box, type the contact information.
-
Press the key on the keyboard.
-
Press the Key > Save.
Reset a blocked message counter
- On the Home screen or in a folder, click the Options icon.
- Click Security > Firewall.
- Highlight a message type.
- Press the ☐ key > Reset Count or Reset All Counts.
Attachments
About files and attachments
You can view and download attachments and save them to the BlackBerry® device memory or on a media card. If your email account uses a BlackBerry® Enterprise Server that supports accessing files on your organization's network, you can preview files from your organization's network and save the files to your device or attach them directly to email messages without downloading them. You can use the Files application to view a list of all the files that are saved on your device. You can also rename, move, and delete files on your organization's network from your device.
To change attachments or files that you download, you can use third-party editing applications, such as Documents To Go ^® , that are designed for use on BlackBerry devices.
Open a file or an attachment
To perform this task, your email account must use the BlackBerry® Internet Service or a BlackBerry® Enterprise Server that supports this feature. For more information, contact your wireless service provider or administrator.
- In a message, meeting invitation, or calendar entry, press the key.
- If necessary, click Retrieve Attachment Information.
- Click Open Attachment.
- If necessary, on the Attachments screen, click an attachment.
- If necessary, in the dialog box, select an option.
Related topics
I cannot turn on cell broadcasting, 120
Save a file or an attachment
To perform this task, your email account must use the BlackBerry® Internet Service or a BlackBerry® Enterprise Server that supports this feature. For more information, contact your wireless service provider or administrator.
-
In a message, in a calendar entry, or on a web page, do one of the following:
-
If there is only one attachment in a message or calendar entry, press the ☐ key.
- If there are multiple attachments in a message or calendar entry, highlight an attachment. Press the key.
-
If you are downloading a file from a web page, press the key.
-
Click Download Attachment or Download File.
-
Highlight the folder that you want to save the file or attachment in.
- Press the ☐ key > Select Here.
To stop downloading an attachment, in a message, highlight an attachment that you are downloading. Press the key > Cancel Download.
Send a file as an attachment
To perform this task, your email account must use the BlackBerry® Internet Service or a BlackBerry® Enterprise Server that supports this feature. For more information, contact your wireless service provider or administrator.
- On the Home screen or in a folder, click the Media icon or Files icon.
- Find and highlight a file.
- Press the ☐ key > Send.
- Click a message type.
Related topics
I cannot attach a file to a text message, 121
Open a link in a file or an attachment
Some files might contain links to embedded content, such as tables, pictures, footnotes, text boxes, or comments.
- In a file, highlight a link.
- Press the ☐ key > Get Link or Retrieve.
To return to the file, press the key.
Set font options for a file or an attachment
- In a file or an attachment, press the key > Options.
- Change the font fields.
- Press the ☐ key > Save.
View properties for a file
You can view the size, author, publication date, and other properties of a file.
- On the Home screen or in a folder, click the Media icon or Files icon.
- Find and highlight a file.
- Press the ☐ key > Properties.
vCard contact attachments
About vCard contact attachments
vCard® contact attachments (.vcf files) contain information for a specific contact. When you add a vCard contact attachment to an email message, recipients of your email message can view your contact information or add it to the contact list on their BlackBerry® device. When you open an email message that contains a vCard contact attachment, a book icon appears at the end of the message with the name of the attached contact.
Save a vCard contact attachment from a message
If you receive a vCard® contact attachment in a message, you can save it so that the contact information is added to your contact list.
- In a message, highlight a vCard contact attachment.
- Press the ☐ key > View Attachment.
- Press the key.
-
Click one of the following items:
-
Add to Contacts
- Update Contact
Related topics
A message, attachment, or Google Mail conversation is cut short or doesn't appear, 119
S/MIME-protected messages
S/MIME-protected message basics
About signing and encrypting messages
If your email account uses a BlackBerry® Enterprise Server that supports this feature, you can digitally sign or encrypt messages to add another level of security to email and PIN messages that you send from your BlackBerry device. Digital signatures are designed to help recipients verify the authenticity and integrity of messages that you send. When you digitally sign a message using your private key, recipients use your public key to verify that the message is from you and that the message has not been changed.
Encryption is designed to keep messages confidential. When you encrypt a message, your device uses the recipient's public key to encrypt the message. Recipients use their private key to decrypt the message.
To send an encrypted PIN message, you must have a PIN and an email address for the contact in your contact list. Your device uses the email address in your contact list to locate a PGP ^® key or certificate for the contact.
Sign or encrypt a message
You can sign or encrypt email and PIN messages.
- When you are composing a message, change the Encoding field.
- If necessary, change the Classification field.
Related topics
Some signing and encryption options are not available on my device, 109
Encrypt a message with a pass phrase
Your BlackBerry ^® device can encrypt email and PIN messages using a pass phrase shared between the sender and recipient.
- In an unsent message, set the Encoding field to Encrypt or Sign and Encrypt.
- Press the ☐ key > Options.
- Select the Use Password-Based Encryption check box.
- In the Allowed Content Ciphers section, select the check box beside one or more allowed content ciphers.
- If you are signing the message, in the Signing Options section, select a certificate.
- Press the Key > Save.
- Type your message.
- Press the ☐ key > Send.
- Type a pass phrase to encrypt the message.
- Confirm the pass phrase.
- Click OK.
Using a secure method, let the recipient know what the pass phrase is.
Attach a certificate to a message
You can attach a certificate to email and PIN messages.
- When composing a message, press the ☐ key > Attach > Certificate.
- Highlight a certificate.
- Press the key > Continue.
Download the certificate used to sign or encrypt a message
If a certificate is not included in a received message or is not already stored in the key store on your BlackBerry ^® device, you can download the certificate.
- In a message, highlight the encryption indicator or a digital signature indicator.
- Press the ☐ key > Fetch Sender's Certificate.
Add a certificate from a message
- In a message, highlight a digital signature indicator.
- Press the ☐ key > Import Sender's certificate.
Add a certificate from an attachment
- In a message, click the certificate attachment.
- Click Retrieve Certificate Attachment.
- Click the certificate.
- Click Import Certificate.
Attachment indicators in S/MIME-protected messages
| Indicator Description | |
| The message includes a certificate attachment. | |
| The message includes multiple certificate attachments. | |
| The message includes a certificate server attachment. | |
Add connection information for a certificate server from a message
- In a message, highlight the certificate server indicator.
- Press the Key > Import Server.
View the certificate used to sign or encrypt a message
- In a message, highlight the encryption status indicator or a digital signature indicator.
- Press the ☐ key > Display Sender's Certificate or Display Encryption Certificate.
View encryption information for a weakly encrypted message
- In a weakly encrypted message, highlight the encryption status indicator.
- Press the ☐ key > Encryption Details.
S/MIME-protected message status
Digital signature indicators for S/MIME-protected messages
| Indicator | Description |
| Your BlackBerry® device verified the digital signature. | |
| Your device cannot verify the digital signature. | |
| Your device requires more data to verify the digital signature. | |
| Indicator Description | |
| Your device trusts the certificate chain. | |
| The sender's email address does not match the email address of the certificate subject, or the sender's certificate is revoked, is not trusted, cannot be verified, or is not on your device. | |
| The certificate is weak, the certificate status is not current, or your device requires more data to verify the trust status of the certificate. | |
| The sender's certificate is expired. | |
Encryption status indicators
Your administrator sets whether messages that you receive are considered to be strong or weak.
| Indicator Description | |
| The message is strongly encrypted. | |
| The message is weakly encrypted. | |
S/MIME-protected message options
Change your signing or encryption certificate
Your BlackBerry ^® device uses your encryption certificate to encrypt messages in the Sent Items folder and includes your encryption certificate in messages that you send so that recipients can encrypt their reply messages.
- On the Home screen or in a folder, click the Options icon.
- Click Security > S/MIME.
- In the Signing Options section or the Encryption Options section, change the Certificate field.
- Press the ☐ key > Save.
Related topics
Some signing and encryption options are not available on my device, 109
Change options for downloading attachments in encrypted messages
- On the Home screen or in a folder, click the Options icon.
- Click Security > S/MIME.
- To download attachments in encrypted messages automatically, change the Allow encrypted attachment viewing and retrieve encrypted attachment information field to Automatically.
- To download attachments in encrypted messages manually, change the Allow encrypted attachment viewing and retrieve encrypted attachment information field to Manually.
-
To prevent your BlackBerry® device from downloading attachments in encrypted messages, change the Allow encrypted attachment viewing and retrieve encrypted attachment information field to Never.
-
Press the Key > OK.
Change the default signing and encryption option
Your BlackBerry ^® device is designed to use the default signing and encryption option when you send a message to a contact that you have not sent a message to or received a message from previously. If you have sent a message to or received a message from the contact previously, your device tries to use the signing and encryption option that was used for the last message.
- On the Home screen or in a folder, click the Options icon.
- Click Security > S/MIME or PGP.
- Change the Default Encoding field.
- Press the key > Save.
Related topics
Some signing and encryption options are not available on my device, 109
About message classifications
If your BlackBerry ^® device is associated with an email account that uses a BlackBerry ^® Enterprise Server that supports this feature and your administrator turns on message classifications, the BlackBerry Enterprise Server applies a minimum set of security actions to each message that you compose, forward, or reply to, based on the classification that you assign to the message. Your administrator specifies the message classifications that you can use.
If you receive a message that uses message classifications, you can view the abbreviation for the classification in the subject line of the message and the full description for the classification in the body of the message. You can also view the abbreviation and full description for the classification for a sent message in the sent items folder.
Change the default message classification
To perform this task, your email account must use a BlackBerry® Enterprise Server that supports this feature and your administrator must turn on message classifications.
Your BlackBerry device is designed to use the default message classification when you send a message to a contact that you have not sent a message to or received a message from previously. If you have sent a message to or received a message from the contact previously, your device tries to use the message classification that was used for the last message.
- On the Home screen or in a folder, click the Options icon.
- Click Device > Advanced System Settings > Default Services.
- Change the Default Encoding field.
- Press the ☐ key > Save.
Change the size of S/MIME indicators in messages
- On the Home screen or in a folder, click the Options icon.
- Click Security > S/MIME.
- Change the Message Viewer Icons field.
- Press the ☐ key > Save.
Change the encryption algorithms for S/MIME-protected messages
If a message has multiple recipients, your BlackBerry ^® device uses the first selected encryption algorithm in the list that all recipients are known to support.
- On the Home screen or in a folder, click the Options icon.
- Click Security > S/MIME.
- Select the check box beside one or more encryption algorithms.
- Press the ☐ key > Save.
Request delivery notification for signed S/MIME-protected messages
- On the Home screen or in a folder, click the Options icon.
- Click Security > S/MIME.
- Select the Request S/MIME Receipts check box.
- Press the ☐ key > Save.
Turn off the prompt that appears before an S/MIME-protected message is truncated
- On the Home screen or in a folder, click the Options icon.
- Click Security > S/MIME.
- Change the Message truncation mode field to Send Anyway or More All and Send.
- Press the ☐ key > Save.
To turn on the prompt again, change the Message truncation mode field to Prompt User.
Turn off the prompt that appears when you use an S/MIME certificate that is not recommended for use
- On the Home screen or in a folder, click the Options icon.
- Click Security > S/MIME.
- Clear the Warn about problems with my certificates check box.
- Press the Key > Save.
To turn on the prompt again, select the Warn about problems with my certificates check box.
S/MIME-protected message troubleshooting
Some signing and encryption options are not available on my device
Try performing the following actions:
- Verify that the email account that you are using supports all signing and encryption options.
- If you use message classifications, verify that the message classification supports the signing or encryption options that you want. Try using a different message classification.
I cannot open an attachment in an encrypted message
The attachment information might not be available on the BlackBerry® Enterprise Server, your administrator might have set options to prevent you from opening attachments in encrypted messages, or you might have received the message from an email account that does not support attachments in encrypted messages.
You cannot open an attachment in a PGP ^® protected message that was encrypted using the OpenPGP format by an IBM ^® Lotus Notes ^® client working with PGP ^® Desktop Professional or that was encrypted by the PGP ^® Universal Server.
IBM Lotus Notes native encrypted messages
About IBM Lotus Notes native encrypted messages
If your email account uses a BlackBerry® Enterprise Server that supports this feature, you can read messages on your BlackBerry device that are sent using IBM® Lotus Notes® native encryption. You might also be able to send, forward, or reply to messages using IBM Lotus Notes native encryption.
Before you can send or receive IBM Lotus Notes native encrypted messages, you must import your IBM Lotus Notes ID file using Lotus® iNotes® (previously known as IBM® Lotus® Domino® Web Access) or using the BlackBerry® Desktop Software. For more information about importing your IBM Lotus Notes ID file using the BlackBerry Desktop Software, see the Help in the BlackBerry Desktop Software. When you send or receive IBM Lotus Notes native encrypted messages, you might be prompted to type your IBM Lotus Notes ID password.
Prerequisites: IBM Lotus Notes native encryption
- Your BlackBerry ^ device must be associated with an email account that uses a BlackBerry ^ Enterprise Server for IBM ^ Lotus ^ Domino ^ .
- Your computer must be running IBM® Lotus Notes® 7.0 or later with an email account on an IBM Lotus Domino server 7.0 or later.
- You must import your IBM Lotus Notes ID file using Lotus® iNotes® (previously known as IBM® Lotus® Domino® Web Access), or using the BlackBerry® Desktop Software.
Encrypt a message using IBM Lotus Notes native encryption
- When composing, forwarding or replying to a message, change the Encoding field to Lotus Notes Encryption.
- If you are prompted, type your IBM ^® Lotus Notes ^® ID password.
PGP protected messages
PGP protected message basics
About signing and encrypting messages
If your email account uses a BlackBerry® Enterprise Server that supports this feature, you can digitally sign or encrypt messages to add another level of security to email and PIN messages that you send from your BlackBerry device. Digital signatures are designed to help recipients verify the authenticity and integrity of messages that you send. When you digitally sign a message using your private key, recipients use your public key to verify that the message is from you and that the message has not been changed.
Encryption is designed to keep messages confidential. When you encrypt a message, your device uses the recipient's public key to encrypt the message. Recipients use their private key to decrypt the message.
To send an encrypted PIN message, you must have a PIN and an email address for the contact in your contact list. Your device uses the email address in your contact list to locate a PGP ^® key or certificate for the contact.
Sign or encrypt a message
You can sign or encrypt email and PIN messages.
- When you are composing a message, change the Encoding field.
- If necessary, change the Classification field.
Related topics
Some signing and encryption options are not available on my device, 109
Encrypt a PGP protected message with a pass phrase
By default, your BlackBerry ^® device uses your PGP ^® key to encrypt messages.
- When composing a message, change the Encoding field to one that uses encryption.
- Press the ☐ key > Options.
- Change the Use Conventional Encryption field to Yes.
- Press the key > Save.
Using a secure method, let the recipient know what the pass phrase is.
Attach a PGP key to a message
You can attach a PGP ^® key to email messages and PIN messages.
- When composing a message, press the key > Attach > PGP Keys.
- Highlight a PGP key.
- Press the key > Continue.
Download the PGP key used to sign or encrypt a message
If a PGP® key is not included in a received message or is not already stored in the key store on your BlackBerry® device, you can download the PGP key. If you use the PGP® Universal Server, you might not be able to download the sender's PGP key, or your device might download the sender's PGP key from the PGP Universal Server automatically.
- In a message, highlight the encryption status indicator or a digital signature indicator.
- Press the key > Fetch Sender's PGP key.
Add a PGP key from a message
If you use the PGP® Universal Server, you might not be able to add PGP keys from messages.
- In a message, highlight a digital signature indicator.
- Press the key > Import PGP Key.
Add a PGP key from an attachment
If you use the PGP® Universal Server, you might not be able to add PGP keys from attachments.
- In a message, click the PGP key attachment.
- Click Retrieve PGP Attachment.
- Click the PGP key.
- Click Import PGP Key.
Related topics
I cannot open an attachment in an encrypted message, 109
Attachment indicators in PGP protected messages
| Indicator | Description |
| The message includes a PGP® key attachment. | |
| The message includes multiple PGP key attachments. | |
| The message includes a certificate server attachment. |
Add connection information for a certificate server from a message
- In a message, highlight the certificate server indicator.
- Press the Key > Import Server.
View the PGP key used to sign or encrypt a message
-
In a message, highlight the encryption status indicator or a digital signature indicator.
-
Press the ☐ key > Display Sender's PGP Key or Display Encryption PGP Key.
PGP protected message status
Encryption status indicators
Your administrator sets whether messages that you receive are considered to be strong or weak.
| Indicator Description | |
| The message is strongly encrypted. | |
| The message is weakly encrypted. | |
Digital signature indicators for PGP protected messages
| Indicator | Description |
| Your BlackBerry® device verified the digital signature. | |
| Your device cannot verify the digital signature. | |
| Your device requires more data to verify the digital signature. | |
| Your device trusts the sender’s PGP® key. | |
| The sender’s email address does not match the email address in the key, or the sender’s PGP key is revoked, is not trusted, cannot be verified, or is not on your device. | |
| The key status is not current, or your device requires more data to verify the trust status of the key. | |
| The sender’s PGP key is expired. |
PGP protected message options
Change your signing and encryption key
Your BlackBerry ^® device uses your PGP ^® key to encrypt messages in the Sent Items folder and includes your PGP public key in messages that you send so that recipients can encrypt their reply messages.
- On the Home screen or in a folder, click the Options icon.
- Click Security > PGP.
- Change the Default Key field.
- Press the ☐ key > Save.
Related topics
Some signing and encryption options are not available on my device, 109
Change options for downloading attachments in encrypted messages
- On the Home screen or in a folder, click the Options icon.
- Click Security > PGP.
-
Do one of the following:
-
To download attachments in encrypted messages automatically, change the Allow encrypted attachment viewing and retrieve encrypted attachment information field to Automatically.
- To download attachments in encrypted messages manually, change the Allow encrypted attachment viewing and retrieve encrypted attachment information field to Manually.
-
To prevent your BlackBerry® device from downloading attachments in encrypted messages, change the Allow encrypted attachment viewing and retrieve encrypted attachment information field to Never.
-
Press the key > OK.
Change the default signing and encryption option
Your BlackBerry ^® device is designed to use the default signing and encryption option when you send a message to a contact that you have not sent a message to or received a message from previously. If you have sent a message to or received a message from the contact previously, your device tries to use the signing and encryption option that was used for the last message.
- On the Home screen or in a folder, click the Options icon.
- Click Security > S/MIME or PGP.
- Change the Default Encoding field.
- Press the ☐ key > Save.
Related topics
Some signing and encryption options are not available on my device, 109
About message classifications
If your BlackBerry ^® device is associated with an email account that uses a BlackBerry ^® Enterprise Server that supports this feature and your administrator turns on message classifications, the BlackBerry Enterprise Server applies a minimum set of security actions to each message that you compose, forward, or reply to, based on the classification that you assign to the message. Your administrator specifies the message classifications that you can use.
If you receive a message that uses message classifications, you can view the abbreviation for the classification in the subject line of the message and the full description for the classification in the body of the message. You can also view the abbreviation and full description for the classification for a sent message in the sent items folder.
Change the default message classification
To perform this task, your email account must use a BlackBerry ^® Enterprise Server that supports this feature and your administrator must turn on message classifications.
Your BlackBerry device is designed to use the default message classification when you send a message to a contact that you have not sent a message to or received a message from previously. If you have sent a message to or received a message from the contact previously, your device tries to use the message classification that was used for the last message.
- On the Home screen or in a folder, click the Options icon.
- Click Device > Advanced System Settings > Default Services.
- Change the Default Encoding field.
- Press the ☐ key > Save.
Change the size of PGP indicators in messages
- On the Home screen or in a folder, click the Options icon.
- Click Security > PGP.
- Change the Message Viewer Icons field.
- Press the ☐ key > Save.
Change the encryption algorithms for PGP protected messages
If a message has multiple recipients, your BlackBerry ^® device uses the first selected encryption algorithm in the list that all recipients are known to support.
- On the Home screen or in a folder, click the Options icon.
- Click Security > PGP.
- Select the check box beside one or more encryption algorithms.
- Press the ☐ key > Save.
Turn off the prompt that appears before a PGP protected message is truncated
- On the Home screen or in a folder, click the Options icon.
- Click Security > PGP.
- Change the Message truncation mode field to Send Anyway or More All And Send.
4. Press the Key > Save.
To turn on the prompt again, change the Message truncation mode field to Prompt User.
Turn off the prompt that appears when you use a PGP key that is not recommended for use
- On the Home screen or in a folder, click the Options icon.
- Click Security > PGP.
- Clear the Warn about problems with my PGP keys check box.
- Press the ☐ key > Save.
To turn on the prompt again, select the Warn about problems with my PGP keys check box.
Troubleshooting: PGP protected messages
Some signing and encryption options are not available on my device
Try performing the following actions:
- Verify that the email account that you are using supports all signing and encryption options.
- If you use message classifications, verify that the message classification supports the signing or encryption options that you want. Try using a different message classification.
I cannot open an attachment in an encrypted message
The attachment information might not be available on the BlackBerry® Enterprise Server, your administrator might have set options to prevent you from opening attachments in encrypted messages, or you might have received the message from an email account that does not support attachments in encrypted messages.
You cannot open an attachment in a PGP ^® protected message that was encrypted using the OpenPGP format by an IBM ^® Lotus Notes ^® client working with PGP ^® Desktop Professional or that was encrypted by the PGP ^® Universal Server.
Message shortcuts
Depending on the typing input language that you are using, some shortcuts might not be available.
In a message
| Reply to a message | Press R |
| Reply to all in an email or a PIN message Press L | |
| Forward a message Press F | |
| File an email message Press I | |
| View or hide the email address of a contact | Highlight the contact in the To or From field. Press Q. |
| Move to the last cursor position after you close and reopen a received email or PIN message | Press G |
| Move to the next message Press N | |
| Move to the previous message Press P |
In your message inbox
| Open a message Press the key. |
| Compose a message from a message inbox Press C |
| Mark a message as opened or unopened Press the Alt key and U. |
| Add a flag to a message Press W |
| View all flagged messages Press the Alt key and F. |
| View received messages and received call logs Press the Alt key and I. |
| View sent messages Press the Alt key and O. |
| View voice mail messages Press the Alt key and V. |
| View text messages Press the Alt key and S. |
| View call logs Press the Alt key and P. |
| View all your messages Press the key. |
Move around your message inbox
| Move up a screen | Press the Shift key and the Space key. |
| Move down a screen Press the Space key. | |
| Move to the top of a message inbox Press T | |
| Move to the bottom of a message inbox | Press B |
| Move to the next unopened item | Press U |
| Move to the next related message | Press J |
| Move to the previous related message | Press K |
File and attachment shortcuts
Depending on the typing input language that you are using, some shortcuts might not be available.
Search for text in a file or an attachment Press F
Move to the last cursor position after closing and reopening a Press G file or an attachment
In a spreadsheet
| Move to a specific cell Press G |
| View the content of a cell Press the Space key |
| Switch worksheets Press V. Highlight a worksheet. Press the Enter key. |
| View or hide columns or rows Press H |
In a presentation
| Switch presentation views Press M | |
| Move to the next slide when viewing a presentation in slide view | Press N |
| Move to the previous slide when viewing a presentation in slide view | Press P |
| Move to the last cursor position after closing and reopening a presentation that you were viewing in text view or in text and slide view | Press G |
Troubleshooting: Messages
I cannot send messages
Try the following actions:
- Verify that your BlackBerry® device is connected to the wireless network.
- If the menu item for sending a message does not appear, verify that you have added an email address, a PIN, or a phone number for your contact.
- If you created an email address or added an existing email address to your device using the email setup screen in the Setup application, verify that you have received an activation message on your device from the BlackBerry® Internet Service. If you have not received an activation message (the message might take a short period of time to arrive), in the Setup application, open the email setup screen to send a service book to your device.
- If you have not received a registration message from the wireless network, register your device. On the Home screen or in a folder, click the Options icon. Click Advanced Options > Host Routing Table. Press the ☐ key > Register Now.
- Generate an encryption key.
- Verify that data service is turned on.
- Resend the message.
Related topics
Turn on or turn off a network connection, 234
Wireless coverage indicators, 233
Change or delete a contact, 182
Generate an encryption key, 271
Turn on or turn off data service or set roaming options, 234
Resend a message, 71
I am not receiving messages
Try the following actions:
- Verify that your BlackBerry® device is connected to the wireless network. If you are not in a wireless coverage area, you should receive messages when you return to a wireless coverage area.
- Reset your device. Connect to the network and try again.
- If you created an email address or added an existing email address to your device using the email setup screen in the Setup application, verify that you have received an activation message on your device from the BlackBerry® Internet Service. If you have not received an activation message (the message might take a short period of time to arrive), in the Setup application, open the email setup screen to send a service book to your device.
- If you have not received a registration message from the wireless network, register your device. On the Home screen or in a folder, click the Options icon. Click Advanced Options > Host Routing Table. Press the ☐key > Register Now.
- Verify that data service is turned on.
- If you use email filters, verify that the options for email filters are set correctly.
- Verify that email forwarding is turned on and that you have selected all the email folders, including your inbox folder, that you want to receive email from.
- Verify that your device is not blocking messages. For more information, contact your administrator.
Related topics
Turn on or turn off a network connection, 234
Wireless coverage indicators, 233
Turn on or turn off data service or set roaming options, 234
Options for email filters, 83
Change, prioritize, or delete an email filter, 84
Forward messages from a specific email folder to your device, 78
I am not receiving email from personal folders on my computer
If your BlackBerry ^® device is associated with a Microsoft ^® Outlook ^® email account, you must use the synchronization tool of the BlackBerry ^® Desktop Software to reconcile email in personal folders. For more information, see the Help in the BlackBerry Desktop Software.
I cannot file email
Try the following actions:
- Verify that wireless email reconciliation is turned on.
- If your email folders do not appear on your BlackBerry® device, reconcile your email using the email settings tool of the BlackBerry® Desktop Software. For more information, see the Help in the BlackBerry Desktop Software.
Related topics
Reconcile email over the wireless network, 13
I cannot send text messages
Depending on your wireless service plan, this feature might not be supported.
Try the following actions:
- Verify that your BlackBerry® device is connected to the wireless network. If you are not in a wireless coverage area, your device should send the messages when you return to a wireless coverage area.
- Verify that fixed dialing is turned off.
Related topics
Turn on or turn off a network connection, 234
I am not receiving text messages
Depending on your wireless service plan, this feature might not be supported.
Verify that your BlackBerry ^® device is connected to the wireless network. If you are not in a wireless coverage area, you should receive messages when you return to a wireless coverage area.
Some messages no longer appear on my device
If the application storage on your BlackBerry ^® device is full or you have more than 65,000 email messages, PIN messages, and text messages, your device deletes the oldest messages from a message list. Your device does not delete saved messages.
If wireless email reconciliation is turned on and, in the message options, the Delete On field is set to Mailbox & Handheld, email that you delete in the email application on your computer is also deleted from your device.
A message, attachment, or Google Mail conversation is cut short or doesn't appear
Try the following actions:
- Wait for a short period of time. Your BlackBerry® device receives long messages and attachments in sections.
- If "More available" appears at the end of the message or attachment, press the ☐ key > More or More All.
- If part of a Google Mail™ conversation doesn't appear, press the 📄 key > More of Conversation.
- If you're downloading an attachment, cancel the download and wait for a short period of time. Try downloading the attachment again.
Related topics
Receive only the first section of long email messages, 80
HTML email messages do not appear correctly
Try the following actions:
- Wait for a short period of time. Your BlackBerry® device receives long messages and attachments in sections.
• Try downloading external pictures. Press the ☐ key > Get Images. - Try viewing your message in plain text. Press the key > Get Plain Text.
Related topics
View email in plain text format, 74
Some email folders appear dimmed
If you cannot forward email from an email folder, the check box beside the folder appears dimmed.
Try the following actions:
- Wait for a few seconds. The email folders might become available after a short period of time.
- Turn off wireless email reconciliation, and then turn it on again.
Related topics
Reconcile email over the wireless network, 13
Email filters are not working correctly
Try the following actions:
- Verify that your email filters are turned on.
- Verify that your email filters appear in the order that you want your BlackBerry® device to apply them to email.
Related topics
Email filters, 82
I cannot turn on cell broadcasting
If your BlackBerry ^® device uses a SIM card, your SIM card might not support the display languages that you have selected for cell broadcast messages.
Clear the check box beside all languages that your SIM card does not support.
I cannot attach a file to a text message
Depending on your wireless service provider, if you attach a video, you might not be able to attach another file or create a slide show.
Try the following actions:
- Verify that the file is a .vcf (vCard®) file, an .ics (iCalendar) file, or a media file (for example, a .jpg file, .gif file, or .midi file).
- Verify that the file is not copyright protected.
- If templates are available for your BlackBerry® device, use a blank template to compose your text message.
I cannot use a shortcut to view one type of message in a message inbox
If you switch BlackBerry ^® devices and you restore device data from your previous device to your current device, the message inbox shortcuts for your previous device replace the message inbox shortcuts for your current device.
To view the shortcuts for viewing one type of message in a message inbox, view your list of saved searches.
Some features are not available on my device
The availability of certain features on your BlackBerry ^® device might be affected by items such as your device model and wireless service plan.
Depending on your messaging service plan, some features or options might not be available in the message options on the Email Preferences screen.
If your email account uses a BlackBerry® Enterprise Server, your organization might not have set up some features or might prevent you from using some features or options. If your administrator has set an option for you, a red lock indicator appears beside the option field.
For more information about the features that are available on your device, contact your wireless service provider or administrator, or visit www.blackberry.com/go/devices.
Related topics
Feature availability, 27
A skipped content bar appears in a document
More content is available for you to download to your BlackBerry ^® device.
- To download the content, click the skipped content bar.
- Click More.
A question mark appears on a slide
A question mark appears on a slide if your BlackBerry ^® device has not downloaded the slide.
- To download the slide, highlight the slide.
- Press the key > Retrieve.
The number of new or unopened messages is different than I expect
The number of new or unopened messages includes saved messages and filed messages.
If you have set your BlackBerry ^® device to hide filed messages and you receive a new message from an email folder in the email application on your computer other than your inbox, your device files the message.
Related topics
View filed messages, 78
Hide messages from the Messages application, 77
Hide filed email from the message inbox, 78
Files
File basics
About files and attachments
You can view and download attachments and save them to the BlackBerry® device memory or on a media card. If your email account uses a BlackBerry® Enterprise Server that supports accessing files on your organization's network, you can preview files from your organization's network and save the files to your device or attach them directly to email messages without downloading them. You can use the Files application to view a list of all the files that are saved on your device. You can also rename, move, and delete files on your organization's network from your device.
To change attachments or files that you download, you can use third-party editing applications, such as Documents To Go ^® , that are designed for use on BlackBerry devices.
Open a file or an attachment
To perform this task, your email account must use the BlackBerry® Internet Service or a BlackBerry® Enterprise Server that supports this feature. For more information, contact your wireless service provider or administrator.
- In a message, meeting invitation, or calendar entry, press the key.
- If necessary, click Retrieve Attachment Information.
- Click Open Attachment.
- If necessary, on the Attachments screen, click an attachment.
- If necessary, in the dialog box, select an option.
Related topics
I cannot turn on cell broadcasting, 120
Save a file or an attachment
To perform this task, your email account must use the BlackBerry® Internet Service or a BlackBerry® Enterprise Server that supports this feature. For more information, contact your wireless service provider or administrator.
-
In a message, in a calendar entry, or on a web page, do one of the following:
-
If there is only one attachment in a message or calendar entry, press the ☐ key.
- If there are multiple attachments in a message or calendar entry, highlight an attachment. Press the key.
-
If you are downloading a file from a web page, press the key.
-
Click Download Attachment or Download File.
- Highlight the folder that you want to save the file or attachment in.
- Press the ☐ key > Select Here.
To stop downloading an attachment, in a message, highlight an attachment that you are downloading. Press the key > Cancel Download.
Search for a file that is saved on your device
- On the Home screen, click the Media icon.
- Press the ☐ key > Explore.
- Navigate to the file.
To view the file, click the file. Depending on the file type, the file might not appear in its original format.
Related topics
About files and attachments, 101
Search for a file that is saved on your organization's network, 124
Search for a file that is saved on your organization's network
To perform this task, your work email account must use a BlackBerry® Enterprise Server that supports this feature. For more information, contact your administrator.
-
On the Home screen or in a folder, click the Files icon.
-
In the Go To field, type the path for the file.
-
If necessary, type the credentials that you use to connect to your organization's network.
To view the file, click the file. Depending on the file type, the file might not appear in its original format.
Related topics
About files and attachments, 101
Search for a file that is saved on your device, 124
Save a file from your organization's network to your device
To perform this task, your work email account must use a BlackBerry® Enterprise Server that supports this feature. For more information, contact your administrator.
When you save a file from your organization's network to your BlackBerry device, the file is saved in its original format.
- On the Home screen or in a folder, click the Files icon.
- Find and highlight a file.
- Press the Key > Copy.
- Navigate to a location.
- Click a folder.
- Press the key > Paste.
Related topics
Search for a file that is saved on your organization's network, 124
Send a file as an attachment, 102
Send a file as an attachment
To perform this task, your email account must use the BlackBerry® Internet Service or a BlackBerry® Enterprise Server that supports this feature. For more information, contact your wireless service provider or administrator.
- On the Home screen or in a folder, click the Media icon or Files icon.
- Find and highlight a file.
- Press the ☐ key > Send.
- Click a message type.
Related topics
I cannot attach a file to a text message, 121
Open a link in a file or an attachment
Some files might contain links to embedded content, such as tables, pictures, footnotes, text boxes, or comments.
- In a file, highlight a link.
- Press the key > Get Link or Retrieve.
To return to the file, press the key.
Set font options for a file or an attachment
- In a file or an attachment, press the key > Options.
- Change the font fields.
- Press the key > Save.
Managing files and attachments
View properties for a file
You can view the size, author, publication date, and other properties of a file.
- On the Home screen or in a folder, click the Media icon or Files icon.
- Find and highlight a file.
- Press the ☐ key > Properties.
Move, rename, or delete a file
- On the Home screen or in a folder, click the Media icon or Files icon.
- Find and highlight a file.
-
Press the key.
-
To move a file, click Cut. Navigate to a location. Click Paste.
- To rename a file, click Rename. Type a name for the file. Click Save.
- To delete a file, click Delete.
Open a password-protected .pdf file
To perform this task, your email account must use the BlackBerry® Internet Service or a BlackBerry® Enterprise Server that supports this feature. For more information, contact your wireless service provider or administrator.
- In a .pdf file, when the "Password protected document" message appears, press the key.
- Press the ☐ key > Password.
- Type the password.
- Press the key on the keyboard.
- Press the key > Retrieve > Yes.
View tracked changes in a document
In a document, press the ☐ key > Show Changes.
To hide tracked changes, press the ☐ key > Hide Changes.
View the table of contents in a document
Depending on the document type, you might not be able to view the table of contents.
In a document, press the key > Table of Contents.
To move to a specific heading, click a heading. Click Jump.
Move around a spreadsheet
In a spreadsheet, press the key.
- To move to a specific cell, click Go to Cell. Type the cell co-ordinates. Press the ↕ key on the keyboard.
- To switch worksheets, click Next Sheet or Prev Sheet.
- To view a list of worksheets, click Table of Contents.
- To move to a specific worksheet, click Table of Contents. Click a worksheet. Click View.
View the content of a cell
In a spreadsheet, click a spreadsheet cell.
Change the size of a column
In a spreadsheet, do one of the following:
- To change the size of a column, click the column label. Click a size.
- To view all the text in a column, click the column label. Click Fit.
- To change the size of all the columns in the spreadsheet, click the unmarked column label in the upper-left corner of the spreadsheet. Click a size.
- To change the column size for all spreadsheets, press the ☐ key > Options. Change the Column Width field. Press the key > Save.
Set display options for a spreadsheet
-
In a spreadsheet, press the ☐ key > Options.
-
To view the gridlines in the spreadsheet, change the Show Gridlines field to Yes.
-
To label spreadsheet rows with numbers and columns with letters, change the Display Labels field to Yes.
-
Press the key > Save.
Move around pages in a multipage .tif file
In a multipage .tif file, press the key.
- To view a list of pages in a multipage .tif file, click Table of Contents.
- To move to a specific page in a multipage .tif file, click Table of Contents. Click a page. Click View.
- To switch pages in a multipage .tif file, click Next Page or Prev Page.
Switch presentation views
In a presentation, press the ☐ key.
- To view text only, click View Text.
- To view text and slides, click View Both.
To view the presentation in its original format, click View Slides.
Switch slides
In a presentation, press the ☐ key > Next Slide or Prev Slide.
Rotate or zoom in to or out from a slide
When viewing a presentation in slide view, press the key.
- To rotate a slide, click Rotate.
- To zoom in to or zoom out from a slide, click Zoom In or Zoom Out.
- To zoom back to the original slide size, press the Key > Fit to Screen.
Save a slide
- When viewing a presentation in slide view, press the key > Save Slide.
- Type a name for the file.
- Click Save.
File and attachment shortcuts
Depending on the typing input language that you are using, some shortcuts might not be available.
Search for text in a file or an attachment Press F
Move to the last cursor position after closing and reopening a Press G file or an attachment
In a spreadsheet
Move to a specific cell Press G
View the content of a cell Press the Space key
Switch worksheets Press V. Highlight a worksheet. Press the Enter key.
View or hide columns or rows Press H
In a presentation
Switch presentation views Press M
Move to the next slide when viewing a presentation in slide Press N view
Move to the previous slide when viewing a presentation in slide view Press P
Move to the last cursor position after closing and reopening a presentation that you were viewing in text view or in text and slide view Press G
Troubleshooting: Attachments
A skipped content bar appears in a document
More content is available for you to download to your BlackBerry ^® device.
- To download the content, click the skipped content bar.
- Click More.
A message, attachment, or Google Mail conversation is cut short or doesn't appear
Try the following actions:
- Wait for a short period of time. Your BlackBerry® device receives long messages and attachments in sections.
- If "More available" appears at the end of the message or attachment, press the ☐ key > More or More All.
- If part of a Google Mail™ conversation doesn't appear, press the 📄 key > More of Conversation.
- If you're downloading an attachment, cancel the download and wait for a short period of time. Try downloading the attachment again.
Related topics
Receive only the first section of long email messages, 80
A question mark appears on a slide
A question mark appears on a slide if your BlackBerry ^® device has not downloaded the slide.
-
To download the slide, highlight the slide.
-
Press the key > Retrieve.
Media
Music
Play a media file
- On the Home screen, click the Media icon.
- Click a media type.
- If necessary, click a category.
- Click a media file.
-
If the media controls don't appear at the bottom of the screen, click the trackpad.
-
To play a media file, click the ▶ icon.
- To pause a media file, click the icon.
- To stop a media file, click the ■on.
- To move to the next media file, click the icon.
- To move to the previous media file or the beginning of the media file that is currently playing, click the icon.
- To fast-forward or rewind a media file, click the progress bar. On the trackpad, slide your finger to the right or left. Click the progress bar again.
Shuffle or repeat songs
- On the Home screen, click the Media icon > Music icon.
-
Do one of the following:
-
To shuffle and play all of your songs, click Shuffle Songs.
- To shuffle all the songs by an artist, or in an album, genre, or playlist, find and highlight one of these categories. Press the Key > Shuffle.
- To repeat the song, playlist, album, or artist that is currently playing, press the ____ key > Repeat > Current Song, Playlist, Album, or Artist.
To stop shuffling songs, press the ☐ key > Shuffle. To stop repeating songs, press the ☐ key > Repeat > Off.
Related topics
Change the order of songs in a playlist, 131
Playlists
Create a standard or an automatic playlist
You create a standard playlist by manually adding songs that are on your BlackBerry ^® device memory or media card. You create an automatic playlist by specifying criteria for artists, albums, or genres of music. The songs that meet all of the criteria are automatically added to the playlist.
- On the Home screen, click the Media icon > Music icon.
-
Click Playlists > New Playlist.
-
To create a standard playlist, click Standard Playlist. Type a name for the playlist. Click Add Songs. Click a song.
-
To create an automatic playlist, click Automatic Playlist. Type a name for the playlist. Click the plus sign (+) to add criteria for artists, albums, or genres.
-
Press the ☐ key > Save.
Add the song that is playing to a playlist
- When playing a song, press the key > Add To Playlist.
- Click a playlist.
Change the order of songs in a playlist
- On the Home screen, click the Media icon > Music icon.
- Click Playlists.
- Click a standard playlist.
- Highlight a song.
- Press the key > Move.
- Click the new location.
- Press the ☐ key > Save.
Related topics
Shuffle or repeat songs, 130
Delete a song from a playlist
- On the Home screen, click the Media icon > Music icon.
- Click Playlists.
- Click a standard playlist.
- Highlight a song.
- Press the ☐ key > Remove > OK.
- Press the key > Save.
Rename or delete a playlist
- On the Home screen, click the Media icon > Music icon.
- Click Playlists.
- Highlight a playlist.
-
Press the ☐ key.
-
To rename the playlist, click Rename. Type a name for the playlist. Click OK.
- To delete the playlist, click Delete.
Adjust the volume
- To increase the volume, press the Volume Up key on the right side of your BlackBerry® device.
- To decrease the volume, press the Volume Down key on the right side of your device.
• To mute the volume, press the key on the top of your device. To turn off mute, press the key again. If you press the key during a call, your device mutes the call so that you can hear others on the call, but they cannot hear you.
Related topics
Mute a call, 50
Amplify the volume using the audio boost feature, 132
Improve sound quality for media files, 132
Amplify the volume using the audio boost feature
The audio boost feature allows you to amplify the volume more than the normal volume settings allow for songs, ring tones, and videos.
- On the Home screen, click the Media icon.
- Press the ☐ key > Media Options.
- Select the Audio Boost check box.
- Read the warning on the screen and if you want to proceed, click Yes.
- Press the Key > Save.
Improve sound quality for media files
Depending on your BlackBerry ^® device model, this feature might not be supported. To improve sound quality for media files, you must be using stereo headphones with your device.
- On the Home screen, click the Media icon.
- Press the key > Media Options.
- Change the Headset Music EQ field.
- Press the key > Save.
Rename, move, copy, or delete an audio file or a video file
You can rename only media files that you added.
- On the Home screen, click the Media icon.
- Press the ☐ key > Explore.
- Find and highlight an audio file or a video file.
-
Press the key.
-
To rename the file, click Rename. Type a name for the file. Click Save.
- To move or copy the file to another location, click Cut or Copy. Find the location that you want to move or copy the file to. Press the 📋 key > Paste.
- To delete the file, click Delete.
View properties for a media file
- On the Home screen, click the Media icon.
- Click a media type.
- If necessary, click a category.
- Highlight a media file.
- Press the ☐ key > Properties.
Change the amount of time before the media player screen closes
If you pause or stop a media file for a certain period of time, the media player screen closes to optimize the performance of your BlackBerry ^® device.
- On the Home screen, click the Media icon.
- Press the key > Media Options.
- Change the Close Media Player When Inactive field.
Podcasts
Play a media file
- On the Home screen, click the Media icon.
- Click a media type.
- If necessary, click a category.
- Click a media file.
-
If the media controls don't appear at the bottom of the screen, click the trackpad.
-
To play a media file, click the ▶on.
-
To pause a media file, click the icon.
-
To stop a media file, click the ■ on.
- To move to the next media file, click the ▶on.
- To move to the previous media file or the beginning of the media file that is currently playing, click the 📄n.
- To fast-forward or rewind a media file, click the progress bar. On the trackpad, slide your finger to the right or left. Click the progress bar again.
Adjust the volume
- To increase the volume, press the Volume Up key on the right side of your BlackBerry® device.
- To decrease the volume, press the Volume Down key on the right side of your device.
• To mute the volume, press the 📄 key on the top of your device. To turn off mute, press the 📄 again. If you press the 📄y during a call, your device mutes the call so that you can hear others on the call, but they cannot hear you.
Related topics
Mute a call, 50
Amplify the volume using the audio boost feature, 132
Improve sound quality for media files, 132
Amplify the volume using the audio boost feature
The audio boost feature allows you to amplify the volume more than the normal volume settings allow for songs, ring tones, and videos.
- On the Home screen, click the Media icon.
- Press the key > Media Options.
- Select the Audio Boost check box.
- Read the warning on the screen and if you want to proceed, click Yes.
- Press the ☐ key > Save.
Improve sound quality for media files
Depending on your BlackBerry ^® device model, this feature might not be supported. To improve sound quality for media files, you must be using stereo headphones with your device.
- On the Home screen, click the Media icon.
- Press the ☐ key > Media Options.
- Change the Headset Music EQ field.
- Press the key > Save.
Videos
Play a media file
- On the Home screen, click the Media icon.
- Click a media type.
- If necessary, click a category.
- Click a media file.
-
If the media controls don't appear at the bottom of the screen, click the trackpad.
-
To play a media file, click the ▶ icon.
- To pause a media file, click the icon.
- To stop a media file, click the ■ on.
- To move to the next media file, click the ▶dn.
- To move to the previous media file or the beginning of the media file that is currently playing, click the icon.
- To fast-forward or rewind a media file, click the progress bar. On the trackpad, slide your finger to the right or left. Click the progress bar again.
Keep backlighting on when you play a video
By default, the backlighting is designed to turn off after a period of time to conserve battery power.
- On the Home screen, click the Media icon.
- Press the key > Media Options.
- Clear the Turn Off Auto Backlighting check box.
- Press the key > Save.
Display closed captions in videos
You can turn on closed captioning so that text displays on the screen when you play video files that support closed captioning.
- On the Home screen, click the Media icon.
- Press the key > Options.
- Select the Display Closed Captions check box.
- If necessary, change the Appearance field, Position field, and Font Scale field.
- Press the key > Save.
Adjust the volume
- To increase the volume, press the Volume Up key on the right side of your BlackBerry® device.
- To decrease the volume, press the Volume Down key on the right side of your device.
• To mute the volume, press the 'my' on the top of your device. To turn off mute, press the 'key again'. If you press the 'my' during a call, your device mutes the call so that you can hear others on the call, but they cannot hear you.
Related topics
Mute a call, 50
Amplify the volume using the audio boost feature, 132
Improve sound quality for media files, 132
Improve sound quality for media files
Depending on your BlackBerry ^® device model, this feature might not be supported. To improve sound quality for media files, you must be using stereo headphones with your device.
- On the Home screen, click the Media icon.
- Press the ☐ key > Media Options.
- Change the Headset Music EQ field.
- Press the key > Save.
Amplify the volume using the audio boost feature
The audio boost feature allows you to amplify the volume more than the normal volume settings allow for songs, ring tones, and videos.
- On the Home screen, click the Media icon.
- Press the ☐ key > Media Options.
- Select the Audio Boost check box.
- Read the warning on the screen and if you want to proceed, click Yes.
- Press the ☐ key > Save.
Change the amount of time before the media player screen closes
If you pause or stop a media file for a certain period of time, the media player screen closes to optimize the performance of your BlackBerry ^® device.
- On the Home screen, click the Media icon.
- Press the key > Media Options.
- Change the Close Media Player When Inactive field.
Video camera
Depending on your BlackBerry ^® device model, the camera or video camera might not be supported or some camera or video camera features might not be available.
Record a video
To perform this task, you might need to have a media card inserted in your BlackBerry ^® device.
- On the Home screen, click the Media icon > Video Camera icon.
- To start recording, click the record icon.
- To pause recording, click the pause icon.
Note: The approximate amount of storage space available for saving videos appears on the lower part of the screen when video recording is paused.
Related topics
Take a picture, 138
Turn on video lighting
In low lighting conditions, the video light can improve the quality of videos that you record.
- On the Home screen, click the Media icon > Video Camera icon.
- Press the ☐ key > Options.
- Change the Video Light field to On.
- Press the key > Save.
Change the video size and format
The larger the video, the more storage space the video requires.
- On the Home screen, click the Media icon > Video Camera icon.
- Press the ☐ key > Options.
- Change the Video Format field.
- Press the Key > Save.
Related topics
View properties for a media file, 133
Change the location for storing videos that you take
- On the Home screen, click the Media icon > Video Camera icon.
- Press the ☐ key > Options.
- Change the Folder field.
- Press the Key > Save.
Camera
Depending on your BlackBerry ^® device model, the camera or video camera might not be supported or some camera or video camera features might not be available.
Take a picture
- On the Home screen, click the Camera icon.
- If you have turned on digital zoom, on the trackpad, slide your finger up or down to zoom in or out.
- Press the Right Convenience key.
The picture is saved to the Camera Pictures folder in the Pictures application. To open the picture, click the picture preview at the bottom of the screen.
Related topics
Record a video, 137
Change the flash setting for pictures that you take
- On the Home screen, click the Camera icon.
- To switch between flash settings, click the flash icon at the bottom of the screen.
When you close the camera, the flash setting is saved.
Change the camera scene mode
You can change the scene mode in the camera to optimize the settings for different environments. Descriptions of the scene modes are available on the camera.
- On the Home screen, click the Camera icon.
- To change the camera scene mode, click the scene mode icon at the bottom of the screen.
- Select a scene mode.
When you close the camera, the scene mode is saved.
Change the size of pictures that you take
The larger the picture is, the more storage space the picture requires.
- On the Home screen, click the Camera icon.
- Press the Key > Options.
- Change the Image Size field.
- Press the Key > Save.
Related topics
View properties for a media file, 133
Geotag pictures that you take
The geotag option in the camera records the geographical information of the location in which you take a picture.
-
On the Home screen, click the Camera icon.
-
Click the geotag icon at the bottom of the screen.
The geotag information can be viewed in the properties of the picture file.
Change the autofocus setting
- On the Home screen, click the Camera icon.
-
Press the key > Auto Focus.
-
For still subjects, click Single Shot.
- For moving subjects, click Continuous.
- To turn off autofocus, click Off.
Turn off digital zoom for the camera
- On the Home screen, click the Camera icon.
- Press the Key > Options.
- Clear the Digital Zoom check box.
- Press the key > Save.
Change the review duration of the pictures that you take
You can set how long a picture remains on the screen after you take it, or turn off that option so that you can take another picture immediately.
- On the Home screen, click the Camera icon.
-
Press the key > Options.
-
To change the review duration, change the Picture Review field to a time.
-
To set the picture to remain on the screen after you take it until you press the → key, change the Picture Review field to Hold.
• To prevent the picture from remaining on the screen after you take it, change the Picture Review field to Off. -
Press the ☐ key > Save.
Change when the camera warns you about the number of pictures remaining
A warning appears notifying you when the amount of storage for pictures drops below a certain number. You can see the number of remaining pictures in the Storage section of the Options screen.
- On the Home screen, click the Camera icon.
- Press the ☐ key > Options.
- Change the Warn when pictures remaining drops to field.
- Press the ☐ key > Save.
Change the location for storing pictures that you take
- On the Home screen, click the Camera icon.
- Press the Key > Options.
- Change the Store Pictures field.
- Press the Key > Save.
Pictures
Zoom, pan, or rotate a picture
In a picture, do one of the following:
- To zoom in to the picture, click the trackpad.
• To zoom out from the picture, press the key. - To pan the picture, when you are zoomed into it, slide your finger on the trackpad in any direction.
• To rotate the picture, press the key > Rotate.
Save a picture from a text message or a web page
You can save picture files, such as .jpg, .png, .gif, or .bmp files, to the BlackBerry® device memory or a media card.
- Open a picture attachment in a text message or highlight a picture on a web page.
- Press the ☐ key > Save Image > Save.
Use a picture as your device wallpaper
- On the Home screen, click the Media icon > Pictures icon.
- Browse to a picture.
- Press the Key > Set As Wallpaper.
Related topics
My display changed, 215
View pictures as a slide show
A slide show displays all the pictures in a category or folder in sequence.
1. On the Home screen, click the Media icon > Pictures icon.
2. Click a category.
3. Highlight a picture.
4. Press the ☐ key > View Slide Show.
To close the slide show, press the ↻ key.
Change the number of seconds between slides in a slide show
- On the Home screen, click the Media icon.
- Press the ☐ key > Media Options.
- Change the Slide Show Interval field.
- Press the key > Save.
View pictures in list view or thumbnail view
- On the Home screen, click the Media icon > Pictures icon.
- Click a category.
- Press the key > View List or View Thumbnail.
Create a picture folder
- On the Home screen, click the Media icon > Pictures icon.
- Press the ☐ key > New Folder.
- If necessary, change the location that the folder is created in.
- Type a name for the folder.
- Click OK.
Import pictures to the Pictures application
Importing pictures from other folders on your BlackBerry ^® device or media card into the Pictures application allows you to have access to your pictures, while maintaining your existing folder structures and file locations.
- On the Home screen, click the Media icon > Pictures icon.
- Press the □key > Import Pictures. Folders that contain pictures that are not saved in the Picture Library folder or Camera Pictures folder appear.
- Select the check boxes beside the folders that you want to import.
4. Click Import Pictures.
To delete the folders from the Pictures application, highlight the folder. Press the ☐key > Remove From Library. The folders that you imported remain in their original location, but are deleted from the Pictures application.
To permanently delete the folders from both the Pictures application and from the device memory or media card, including any files that are not pictures and that are not visible in the folders in the Pictures application, highlight the folder. Press the key > Delete. The folders that you imported are deleted from their locations on your device memory or media card.
Find a picture that you took with the camera
Pictures that you take with the camera are saved to the Camera Pictures folder in the Pictures application. If you have filed your pictures in other folders, they will no longer appear in the Camera Pictures folder.
- On the Home screen, click the Media icon > Pictures icon.
- Click the Camera Pictures folder.
Voice notes
Record a voice note
- On the Home screen, click the Media icon > Voice Notes Recorder icon.
- Click the record icon.
- Do any of the following:
- To pause recording, click the pause icon. To resume recording, click the record icon.
- To stop recording, click the pause icon. Click the stop icon.
Note: When you stop recording a voice note, the voice note is automatically saved.
Play a media file
- On the Home screen, click the Media icon.
- Click a media type.
- If necessary, click a category.
- Click a media file.
-
If the media controls don't appear at the bottom of the screen, click the trackpad.
-
To play a media file, click the ▶ icon.
- To pause a media file, click the icon.
- To stop a media file, click the ■on.
- To move to the next media file, click the icon.
- To move to the previous media file or the beginning of the media file that is currently playing, click the icon.
- To fast-forward or rewind a media file, click the progress bar. On the trackpad, slide your finger to the right or left. Click the progress bar again.
Adjust the volume
- To increase the volume, press the Volume Up key on the right side of your BlackBerry® device.
- To decrease the volume, press the Volume Down key on the right side of your device.
• To mute the volume, press the 📄 key on the top of your device. To turn off mute, press the 📄 again. If you press the 📄y during a call, your device mutes the call so that you can hear others on the call, but they cannot hear you.
Related topics
Mute a call, 50
Amplify the volume using the audio boost feature, 132
Improve sound quality for media files, 132
Amplify the volume using the audio boost feature
The audio boost feature allows you to amplify the volume more than the normal volume settings allow for songs, ring tones, and videos.
- On the Home screen, click the Media icon.
- Press the key > Media Options.
- Select the Audio Boost check box.
- Read the warning on the screen and if you want to proceed, click Yes.
- Press the ☐ key > Save.
Improve sound quality for media files
Depending on your BlackBerry ^® device model, this feature might not be supported. To improve sound quality for media files, you must be using stereo headphones with your device.
-
On the Home screen, click the Media icon.
-
Press the key > Media Options.
-
Change the Headset Music EQ field.
-
Press the key > Save.
Ring tones
Change your ring tone, notifiers, or reminders
In addition to changing the tone, you can also change options for volume, LED, vibration, and notification during calls.
-
On the Home screen, click the Sound and Alert Profiles icon.
-
Click Change Sounds and Alerts > Sounds for Selected Profile.
-
To change your ring tone, click Phone.
-
To change notifiers or reminders, click to expand a section. Click an option.
-
In the Ring Tone, Notifier Tone, or Reminder Tone field, do one of the following:
-
Click a tone.
- To use a preloaded alert, click All Alerts. Find and click an alert.
- To use a song that is on your BlackBerry® device or on a media card, click All Music. Find and click a song.
- To use a voice note that you recorded, click All Voice Notes. Find and click a voice note.
- Press the ☐ key > Save.
Related topics
I cannot change the number of times that my device rings, 67
Play a media file
- On the Home screen, click the Media icon.
- Click a media type.
- If necessary, click a category.
- Click a media file.
- If the media controls don't appear at the bottom of the screen, click the trackpad.
• To play a media file, click the ▶on.
- To pause a media file, click the ||icon.
- To stop a media file, click the ■ on.
- To move to the next media file, click the ▶on.
- To move to the previous media file or the beginning of the media file that is currently playing, click the icon.
- To fast-forward or rewind a media file, click the progress bar. On the trackpad, slide your finger to the right or left. Click the progress bar again.
Adjust the volume
- To increase the volume, press the Volume Up key on the right side of your BlackBerry® device.
- To decrease the volume, press the Volume Down key on the right side of your device.
• To mute the volume, press the I buy on the top of your device. To turn off mute, press the key again. If you press the I buy during a call, your device mutes the call so that you can hear others on the call, but they cannot hear you.
Related topics
Mute a call, 50
Amplify the volume using the audio boost feature, 132
Improve sound quality for media files, 132
Improve sound quality for media files
Depending on your BlackBerry ^® device model, this feature might not be supported. To improve sound quality for media files, you must be using stereo headphones with your device.
- On the Home screen, click the Media icon.
- Press the ☐ key > Media Options.
- Change the Headset Music EQ field.
- Press the key > Save.
Media storage
Storage and media cards
Supported media cards
Your BlackBerry ^® device supports media card sizes up to 32 GB. Only microSD media cards are supported.
Repair files stored on your media card or on your device
CAUTION: If you run the repair feature on your BlackBerry® device, your device might delete files that have errors from your media card or on your device.
- On the Home screen or in a folder, click the Options icon.
- Click Device > Storage.
- Press the ☐ key > Repair.
- Complete the instructions on the screen.
If your media card is still not repaired after you run the repair feature, you might want to try formatting it.
View the amount of memory used by media files
- On the Home screen, click the Media icon.
- Press the Menu key.
- Click Memory Use.
Change the amount of memory available for media files
To optimize the performance of your BlackBerry ^® device, you can change the amount of memory that your device allocates for media files.
Depending on your BlackBerry ^® device model, this feature might not be supported.
-
On the Home screen, click the Media icon.
-
Press the Menu key.
- Click Options.
-
Perform any of the following actions:
-
To change the maximum amount of device memory available for all media files, change the Device Memory Limit field.
• To change the minimum amount of device memory available for pictures, change the Reserved Pictures Memory field. -
Press the Menu key.
-
Click Save.
Related topics
View properties for a media file, 133
Turn off media card support
When you turn off media card support, your BlackBerry ^® device cannot access the files that are on your media card.
- On the Home screen or in a folder, click the Options icon.
- Click Device.
- Click Storage.
- Clear the Media Card Support check box.
- Press the ☐ key > Save.
About compression
Compression is designed to reduce the size of your BlackBerry ^® device data while maintaining the integrity of that data. When compression is turned on, your device compresses all device data, including messages, contacts, calendar entries, tasks, and memos. You should keep compression turned on.
If both compression and encryption are turned on, your device compresses device data before encrypting it.
About file encryption
File encryption is designed to protect files that you store on your BlackBerry ^® device and on a media card that can be inserted in your device. You can encrypt the files on your device and on your media card using an encryption key that your device generates, your device password, or both.
If you encrypt the files using an encryption key that your device generates, you can only access the files on your media card when the media card is inserted in your device. If you encrypt the files using your device password, you can access the files on your media card in any device that you insert your media card into, as long as you know the password for the device.
Turn on encryption
To encrypt data on your BlackBerry ^® device, you must have set a password for your device.
Depending on the amount of storage space available for storing files on your device, you might not be able to encrypt files on your device.
- On the Home screen or in a folder, click the Options icon.
-
Click Security > Encryption.
-
To encrypt data on your device, in the Device Memory section, select the Encrypt check box.
-
To encrypt files that are stored on a media card and on your device, select the Media Card check box and do one of the following:
-
To encrypt files using an encryption key that your device generates, change the Mode field to Device Key.
- To encrypt files using your device password, change the Mode field to Device Password.
-
To encrypt files using an encryption key and your device password, change the Mode field to Device Password & Device Key.
-
To also encrypt media files such as pictures, songs, and videos, select the Include Media Files check box.
-
Press the ☐ key > Save.
To stop encrypting data on your device, clear the Device Memory check box. To stop encrypting files, clear the Media Card check box.
Picture folders
Create a picture folder
- On the Home screen, click the Media icon > Pictures icon.
- Press the ☐ key > New Folder.
- If necessary, change the location that the folder is created in.
- Type a name for the folder.
- Click OK.
Import pictures to the Pictures application
Importing pictures from other folders on your BlackBerry ^® device or media card into the Pictures application allows you to have access to your pictures, while maintaining your existing folder structures and file locations.
- On the Home screen, click the Media icon > Pictures icon.
- Press the ☐ key > Import Pictures. Folders that contain pictures that are not saved in the Picture Library folder or Camera Pictures folder appear.
- Select the check boxes beside the folders that you want to import.
- Click Import Pictures.
To delete the folders from the Pictures application, highlight the folder. Press the ☐ key > Remove From Library. The folders that you imported remain in their original location, but are deleted from the Pictures application.
To permanently delete the folders from both the Pictures application and from the device memory or media card, including any files that are not pictures and that are not visible in the folders in the Pictures application, highlight the folder. Press the key > Delete. The folders that you imported are deleted from their locations on your device memory or media card.
Find a picture that you took with the camera
Pictures that you take with the camera are saved to the Camera Pictures folder in the Pictures application. If you have filed your pictures in other folders, they will no longer appear in the Camera Pictures folder.
- On the Home screen, click the Media icon > Pictures icon.
- Click the Camera Pictures folder.
Transferring and downloading media files
About transferring and synchronizing media files
You can connect your BlackBerry ^® device to your computer to transfer and synchronize files between your device and computer using a USB cable, or you can use Bluetooth ^® technology to send media files to or receive media files from a Bluetooth enabled device.
The USB option in the dialog box that appears when you connect your device to your computer with a USB cable allows you to drag most files from a folder on your computer to a folder on your device or media card. The media option in the dialog box allows you to transfer media files that are protected with DRM to and from your device. Both options allow you to use the BlackBerry® Desktop Software to transfer files to and from your device.
If you want to manage and preserve the information or the encryption that is associated with your media files when you transfer files between your device and your computer, use the media option in the BlackBerry Desktop Software. To download the BlackBerry Desktop Software, from your computer, visit www.blackberry.com/desktop and select the appropriate option for your computer.
Transfer a file from your computer to your device using your device as a USB memory drive
You must use the BlackBerry ^® Desktop Software to manage and preserve the information or the encryption that is associated with your media files when you transfer files between your BlackBerry device and your computer.
- Connect your device to your computer using a USB cable.
-
Do one of the following:
-
If you want to transfer most types of files, in the dialog box that appears on your device, select the USB option.
-
If you want to transfer media files that are protected with DRM, in the dialog box that appears on your device, select the media transfer option.
-
If necessary, type a password. Your device appears as a drive on your computer.
- Drag a file from a location on your computer to a folder on your device.
To view the transferred file on your device, disconnect your device from your computer and find the file.
Related topics
Transfer your media files from your computer to your device using BlackBerry Desktop Software, 38
Transfer your media files from your computer to your device using BlackBerry Desktop Software
With the BlackBerry® Desktop Software, you can synchronize media files, including iTunes playlists and Windows Media® Player playlists, to your BlackBerry device. To download the BlackBerry Desktop Software, from your computer, visit www.blackberry.com/desktop and select the appropriate option for your computer.
- Connect your device to your computer.
- On your device, in the dialog box that appears, select any of the file transfer options.
- On your computer, open the BlackBerry Desktop Software.
- Click the media transfer option that best suits what you want to do.
For more information about synchronizing media files, see the Help in the BlackBerry Desktop Software.
Related topics
Transfer a file from your computer to your device using your device as a USB memory drive, 12
Send a media file
You can send your pictures and videos to applications that you have installed such as Facebook ^® for BlackBerry ^® devices, and YouTube ^® for BlackBerry devices. You can send only media files that you have added.
- On the Home screen, click the Media icon.
- Click a media type.
- If necessary, click a category.
-
Highlight a media file.
-
Press the ☐ key.
-
To send a picture or video, click Send. Click a message type or an application.
-
To send an audio file, click the send option for a message type.
-
If necessary, turn on Bluetooth® technology and choose a device or pair with a device.
Receive a media file using Bluetooth technology
To perform this task, you must turn on Bluetooth® technology.
When a media file is sent to your BlackBerry ^® device using Bluetooth technology, a dialog box appears on the screen.
- In the dialog box that appears on your device, click Yes.
- In the drop-down list, click a location to save the file in.
- Click Save.
Related topics
Turn on Bluetooth technology, 246
Supported audio and video file formats
Depending on your BlackBerry ^® device model and wireless service provider, some media file formats might not be supported.
| Type File format | |
| Audio | • AAC |
| • AMR | |
| • FLAC | |
| • MP3 | |
| • M4A | |
| • OGG | |
| • WMA | |
| • WAV | |
| Video | • 3GP |
| • AVI | |
| • ASF | |
| • MP4 | |
| • MOV | |
| • WMV | |
For information about codecs and recommended video and audio file formats for your device, visit www.blackberry.com/docs/smartphones and click Multimedia > Media Types Supported on BlackBerry Smartphones.
Media shortcuts
Depending on the typing input language that you are using, some shortcuts might not be available.
Audio and video files
| Pause an audio or video file | Press the play on the top of your BlackBerry® device. |
| Resume playing an audio or video file | Press the play. |
| Play the next song Press and hold the Volume Up key on the right side of your device. | |
| Play the previous song | Press and hold the Volume Down key on the right side of your device. |
| Turn on the audio boost feature if you are using a headset | When you are playing an audio or video file, press the Volume Up key until you reach the highest volume setting, and then press the Volume Up key again four times quickly. |
Pictures
| Zoom in Press 1 |
| Zoom out Press 0 |
| Pan up Press 2 |
| Pan down Press 8 |
| Pan right Press 6 |
| Pan left Press 4 |
| Rotate Press L |
Camera and video camera
| Zoom in before you take a picture or record a video Press the Volume Up key. |
| Zoom out before you take a picture or record a video Press the Volume Down key. |
| Take a picture Press the Convenience key on the right side of your device. |
Troubleshooting: Media
My device is not using the correct ring tone or wallpaper
If you are using a ring tone or wallpaper picture that you encrypted in the device memory or on the media card using your BlackBerry ^® device password and you reset your device, unlock your device.
Related topics
Lock your device, 267
Some pictures that I take are blurry
In low lighting conditions, the camera might compensate for the lack of exposure by using a slower shutter speed. If you move the camera before the shutter clicks, the picture might be blurry. If the camera is using a slower shutter speed, an exclamation point indicator appears at the bottom of the screen.
Depending on your BlackBerry ^® device model, you might be able to decrease the blurriness in pictures that is caused by slight movements of the camera by turning on image stabilization in the camera options.
The flash dims or turns off
If the camera has a flash, and the battery power level drops below 20 percent, the flash dims to conserve battery power. In cold temperatures, when the battery power level drops below 20 percent, the flash might turn off.
Some features are not available on my device
The availability of certain features on your BlackBerry ^® device might be affected by items such as your device model and wireless service plan.
Depending on your messaging service plan, some features or options might not be available in the message options on the Email Preferences screen.
If your email account uses a BlackBerry® Enterprise Server, your organization might not have set up some features or might prevent you from using some features or options. If your administrator has set an option for you, a red lock indicator appears beside the option field.
For more information about the features that are available on your device, contact your wireless service provider or administrator, or visit www.blackberry.com/go/devices.
Related topics
Feature availability, 27
I cannot save media files
Your BlackBerry ^® device memory or media card might not have enough available memory to store media files.
Try the following actions:
- If you are trying to save a media file to your device memory, delete old data or messages from your device.
- If you are trying to save a media file on your media card, delete old media files.
- In the camera options, verify that the Image Size field is not set to Large. Large pictures use more memory than smaller pictures.
Related topics
Delete messages, 75
Move, rename, or delete a file, 125
I cannot open media files
Try one of the following:
- If you are trying to open a media file on your BlackBerry® device and your device is connected to your computer, disconnect your device from your computer.
- If you are trying to open a media file on your computer using your device as a USB drive, verify that you have closed the media transfer options in the BlackBerry® Desktop Software.
- If you encrypted the media files on your media card using an encryption key that your BlackBerry device generated and you are trying to open an encrypted media file on your computer or a device other than the BlackBerry device that you used to encrypt the file, insert the media card into the BlackBerry device that you used to encrypt the file. On the Home screen or in a folder, click the Options icon. Click Security > Encryption. In the Media Card section, change the Mode field to Device Password.
Related topics
About file encryption, 146
My device does not recognize my media card
Try one of the following actions:
- Verify that your media card is inserted in your BlackBerry® device correctly. For more information about inserting a media card into your device, see the printed documentation that came with your device.
- In your media card options, if there is a message to format your media card, disconnect your device from your computer. Format your media card.
CAUTION: Formatting your media card will delete all the files from it.
Related topics
Repair files stored on your media card or on your device, 145
I cannot find podcasts
Podcast content that is marked as explicit content does not appear in the Podcast application if you do not have the Show Explicit Content option turned on.
The media player screen closes
If you pause or stop a media file for a certain period of time, the media player screen closes to optimize the performance of your BlackBerry® device. In the media options, you can stop the media player screen from closing or change the amount of time before the media player screen closes.
Related topics
Change the amount of time before the media player screen closes, 133
Ring tones, sounds, and alerts
About ring tones, sounds, and alerts
The profile that you select in the Sound and Alert Profiles application defines how your BlackBerry® device alerts you of phone calls, messages, reminders, and browser content.
Your device has a Normal profile and five other preloaded profiles: Loud, Medium, Vibrate Only, Silent, and Phone Calls Only. You can change the tones in any preloaded profile to an audio file that is stored in your device memory or on a media card, or you can create additional profiles. The All Alerts Off profile cannot be changed.
By default, some of the settings in the preloaded profiles are based on the settings in the Normal profile. For example, when you change the ring tone in the Normal profile, the ring tone in the Loud profile, Medium profile, and Phone Calls Only profile is automatically updated. If you do not want specific settings for a preloaded profile to update automatically when you change the corresponding setting in the Normal profile, you can manually change the settings in that preloaded profile.
You can create contact alerts, which alert you when particular contacts call you or send you a message. Contact alerts are always turned on, and do not turn off unless you select the All Alerts Off profile. For example, even if you select the Silent profile or Vibrate Only profile, audible contact alerts remain audible until you select the All Alerts Off profile.
Change your ring tone, notifiers, or reminders
In addition to changing the tone, you can also change options for volume, LED, vibration, and notification during calls.
- On the Home screen, click the Sound and Alert Profiles icon.
- Click Change Sounds and Alerts > Sounds for Selected Profile.
• To change your ring tone, click Phone.
- To change notifiers or reminders, click to expand a section. Click an option.
-
In the Ring Tone, Notifier Tone, or Reminder Tone field, do one of the following:
-
Click a tone.
- To use a song that is on your BlackBerry® device or on a media card, click All Music. Find and click a song.
- To use a voice note that you recorded, click All Voice Notes. Find and click a voice note.
-
To use a preloaded alert, click All Alerts. Find and click an alert.
-
Press the ☐ key > Save.
Related topics
I cannot change the number of times that my device rings, 67
Add a custom profile
You can create additional profiles.
- On the Home screen, click the Sound and Alert Profiles icon.
- Click Change Sounds and Alerts > Profile Management > Add Custom Profile.
- In the Name field, type a name for the profile.
- Click the item that you want to change.
- Change the ring tone, notifier, or reminder information.
- Press the ☐ key > Save.
To delete a custom profile, highlight the profile. Press the ☐ key > Delete.
Add a contact alert
You can create contact alerts that allow you to customize ring tones and alerts for calls and messages from specific contacts or groups of contacts. When you receive a call or message from the contact, your BlackBerry® device uses the assigned ring tone or alert, even if you select the Silent profile or Vibrate Only profile. If you do not want to be notified with the assigned ring tone or alert, you can select the All Alerts Off profile.
- On the Home screen, click the Sound and Alert Profiles icon.
- Click Change Sounds and Alerts > Sounds for Contacts > Add Contact Alert.
- In the Name field, type the name of the contact alert.
- In the Contacts field, type the name of the contact.
- Click a contact.
- Change the ring tone and alert information for calls and messages.
- Press the key > Save.
To delete a contact alert, highlight the contact alert that you want to delete. Press the ☐key > Delete.
Silence your device
- On the Home screen, click the Sound and Alert Profiles icon.
- Do one of the following:
- To receive flashing LED alerts only, click Silent.
- To receive vibrate alerts only, click Vibrate Only.
- To turn off all alerts, including contact alerts, click All Alerts Off.
When a ring tone, reminder, or alert sounds, if available, press the 📂 key on the top of your BlackBerry® device. You can also open or close the slider to silence a reminder or alert.
Related topics
Silence the alarm, 191
Flashing LED
The LED on the top of your BlackBerry ^® device flashes different colors to indicate different statuses.
| Flashing LED color Description | |
| Green You are in a wireless coverage area. You can turn on or turnoff this notification. | |
| Blue Your device is connected to a Bluetooth® enabled device. Youcan turn on or turn off this notification. | |
| Red A new message has arrived and your selected profile is set tonotify you using the flashing LED. If you are using your device with a smart card, your device is accessing data on the smart card. | |
| Amber The battery power level for your device is low, or your deviceis turned off and is charging. You cannot turn off thenotification for the low battery power level. The notification for charging turns off when you turn on your device. |
Related topics
Turn off Bluetooth connection notification, 250
Turn on flashing LED notification for wireless coverage, 214
Change alarm notification options
- On the Home screen or in the Applications folder, click the Clock icon.
- Press the key > Options.
- In the Alarm section, change the Alarm Tone field, Volume field, Snooze Time field, and Vibration field.
- Press the key > Save.
Turn on event sounds
Event sounds alert you when you turn on or turn off your BlackBerry ^® device, when the battery power level is full or low, and when you connect or disconnect a USB cable or accessory to or from your device.
- On the Home screen or in a folder, click the Options icon.
- Click Accessibility.
- Select the Event Sounds check box.
- Press the ☐ key > Save.
Troubleshooting: Ring tones, sounds, and alerts
My device is ringing or vibrating more times than expected
For calls, the number of times that your BlackBerry ^® device vibrates is not determined by the number of vibrations that you set in your sound profile, and there is no setting for the number of rings if you do not subscribe to voice mail. Your device vibrates or rings until the caller or the wireless network ends the connection.
My device is not ringing or vibrating when I receive a call or message
Try the following actions:
- On the Home screen, click the Sound and Alert Profiles icon. Verify that your profile is not set to All Alerts Off or Silent.
- If you have created contact alerts, on the Home screen, click the Sound and Alert Profiles icon. Click Change Sounds and Alerts > Sounds for Contacts. Click a contact alert. Click Phone or Messages. Verify that the Volume field is not set to Silent and that the Vibration field is not set to Off.
Browser
Browser basics
Browsing web pages
Visit a web page or search the Internet
Depending on your wireless service provider, multiple browsers might appear on your BlackBerry ^® device. For more information about the charges associated with using each browser, contact your wireless service provider.
- On the Home screen, click the Browser icon.
- In the field at the top of the page, type a web address or search terms.
- Press the key on the keyboard.
To stop loading a web page, press the key > Stop.
Related topics
No browser is available on my device, 169
About tabbed browsing
With tabbed browsing, you can open multiple web pages on your BlackBerry ^® device at the same time. You can quickly switch between tabs that are open, open a new tab without closing another, or close the current tab without closing the entire browser. If you open a link that is in a message, calendar entry, or memo, the link automatically opens in a new tab.
The more tabs that you have open, the more memory your device uses.
Related topics
Open, close, or switch between tabs, 12
I cannot open a new tab, 169
Open, close, or switch between tabs
Do one of the following:
- To open a new tab, in the browser, press the ☐ key > Tabs. Click the New Tab icon.
- To open a new tab for a link on a web page, highlight the link. Press the 🎨 key > Open Link in New Tab.
- To switch between tabs, in the browser, press the ☐ key > Tabs. Click a tab.
• To close a tab, in the browser, press the Key > Tabs. Highlight a tab. Click the ico
Zoom in to or out from a webpage
On a webpage, press the key > Zoom.
- To zoom in, on the trackpad, slide your finger up.
- To zoom out, on the trackpad, slide your finger down.
To turn off zoom mode, press the key.
Move back or forward a web page
- On a web page, press the Menu key.
- Click Back or Forward.
Refresh a web page
- On a web page, press the Menu key.
- Click Refresh.
Search for text in a message, in a file, or on a web page
To search for text in a presentation, you must view the presentation in text view or in text and slide view.
- In a message, in a file, in an attachment, or on a web page, press the ☐ key > Find or Find on Page.
- Type the text.
- Press the Enter key.
To search for the next instance of the text, press the ☐ key > Find Next.
View a list of web pages that you visited recently
- On the Home screen, click the Browser icon.
- Press the Key > History.
Return to the home page
- On a web page, press the Menu key.
- Click Home.
Close the browser
- On a web page, press the Menu key.
- Click Close.
Create a shortcut icon for a web page on the Home screen
On a web page, press the ☐ key > Add to Home Screen.
Turn on browser shortcuts
- On the Home screen, click the Browser icon.
- Press the ☐ key > Options.
- In the General section, select the Enable Keyboard Shortcuts check box.
- Press the key > Save.
Viewing, copying, and forwarding addresses
View the address for a web page
On a web page, press the ☐ key > Page Properties.
Copy an address for a web page, link, or picture
Do any of the following:
- To copy an address for a web page, press the key > Copy Page Address.
- To copy an address for a link, pause on or highlight a link. Press the Key > Copy Link.
- To copy an address for a picture, pause on or highlight a picture. Press the ☐ key > Copy Image Link.
To paste the address, press the ☐ key > Paste.
Send a web address
-
On the Home screen, click the Browser icon.
-
To send a web address for a web page that is in your bookmark list or browser history, highlight a web page.
-
To send a different web address, browse to a web page.
-
Press the ☐ key > Send Link or Send Page Address.
-
Click a message type.
To return to the browser after you send the message, press the key.
Send a link or picture from a web page
- On a web page, pause on or highlight a link or picture.
- Press the ☐ key > Send Link or Send Image Link.
- Click a message type.
To return to the browser after you send the message, press the key.
Viewing pictures and playing media files
Play a media file on a web page
- On a web page, click a media file.
- Click Open.
Related topics
Supported audio and video file formats, 11
I cannot play a song or video on a web page, 169
View a full picture on a web page
- On a web page, highlight or pause on a picture.
- Press the ☐ key > Full Image.
To zoom in to or out from the picture, press the ☐ key > Zoom In or Zoom Out.
To return the picture to its original size, press the key > Zoom 1:1.
Browser bookmarks
About bookmarks for web pages
You can add bookmarks for web pages that you visit frequently. When you add a bookmark, you can set whether you want the browser to check the web page for updates periodically. Bookmarks for web pages that have been updated since the last time you visited them appear in italic.
Add a bookmark for a web page
- On a web page, press the Key > Add to Bookmarks.
- In the Title field, type a name for the bookmark.
- In the Folder field, click the folder that you want the bookmark to appear in.
- Click Add.
If you visit the web page offline, the browser displays the content that was current the last time that you viewed the web page online.
Change or delete a bookmark for a web page
-
On the Home screen, click the Browser icon.
-
Press the Key > Bookmarks.
- Highlight a bookmark.
- Press the key.
- To change a bookmark, click Edit Bookmark. Change the bookmark. Click Accept.
- To delete a bookmark, click Delete Bookmark.
Send a bookmark for a web page
- On the Home screen, click the Browser icon.
- Press the ☐ key > Bookmarks.
- Highlight a bookmark.
- Press the key > Send Link.
- Click a message type.
To return to the browser after you send the message, press the → key.
File a bookmark for a web page
- On the Home screen, click the Browser icon.
- Press the ☐ key > Bookmarks.
- Highlight a bookmark.
- Press the Key > Move.
- Click the new location.
Add, rename, or delete a bookmark folder for web pages
- On the Home screen, click the Browser icon.
- Press the ☐ key > Bookmarks.
- Highlight a bookmark folder.
-
Press the key.
-
To add a bookmark folder, click Add Subfolder.
- To rename a bookmark folder, click Rename Folder. Type a new name for the folder. Press the Enter key.
- To delete a bookmark folder, click Delete Folder.
RSS feeds
For more information about using RSS feeds on your BlackBerry® device, on the Home screen or in a folder, click the Social Feeds icon. Press the Key > Help.
About RSS feeds
You can add RSS feeds to your BlackBerry ^® device so that you receive updates on your favorite blogs and web sites. You can add RSS feeds directly from a web page or by using the Social Feeds application. With the Social Feeds application, you can stay up-to-date with your social networks and view your RSS feeds in one location.
Add an RSS feed from the browser
- In the browser, on a web page with an RSS feed, press the Menu key.
- Click Subscribe to RSS Feed.
- Select the check box beside each feed that you want to add.
- Click Subscribe.
- Click OK.
Browser options
Change your home page or start page
- On the Home screen, click the Browser icon.
- Press the ☐ key > Options.
- In the General section, do one of the following:
- To change the home page, in the Home Page field, type a web address.
-
To use your home page as the start page when you first open the browser, change the Start Page field to Home Page.
-
Press the key > Save.
Turn off JavaScript support
JavaScript is used on some web pages to provide interactive features, such as menus and sounds. If you do not want the browser to provide JavaScript features, you can turn off JavaScript support.
- On the Home screen, click the Browser icon.
- Press the key > Options.
- In the Web Content section, clear the Enable JavaScript check box.
- Press the key > Save.
Stop loading images or playing embedded media files on web pages
- On the Home screen, click the Browser icon.
- Press the key > Options.
-
In the Web Content section, do one of the following:
-
To stop loading images on web pages, clear the Load Images check box.
-
To stop playing embedded media files on web pages, clear the Enable Embedded Media Files check box.
-
Press the key > Save.
Stop blocking pop-ups on web pages
- On the Home screen, click the Browser icon.
- Press the key > Options.
- In the Web Content section, clear the Block Popups check box.
Change the font size for text on web pages
- On the Home screen, click the Browser icon.
- Press the ☐ key > Options.
- In the Web Content section, change the Font Size field.
- Press the key > Save.
Set the character encoding for all web pages
By default, your BlackBerry ^® device uses the optimal character encoding for a web page.
- From the Home screen, click the Browser icon.
- Press the ☐ key > Options.
- In the Web Content section, change the Default text encoding field.
- Press the Key > Save.
Receive a prompt before you close the browser or stream media from the Internet
- On the Home screen, click the Browser icon.
- Press the ☐ key > Options.
-
In the General section, below Prompt Before, do one of the following:
-
To receive a prompt confirming that you want to close the browser when you have multiple tabs open, select the Closing Tabs on Exit check box.
- To receive a prompt confirming that you want to close the browser after you press the → key, select the Closing Browser on Escape check box.
-
To receive a prompt before your BlackBerry® device uses your wireless service provider's browser portal to stream media from the Internet, select the Switching to Carrier Network for Streaming Media check box.
-
Press the ☐ key > Save.
Related topics
I receive a prompt to switch networks when I stream a song or video, 169
Delete browsing information
Your BlackBerry ^® device saves some information in your browser to improve your browsing experience. You can delete password information, browser history, cookies, content that has been pushed to your device, and the browser cache.
- On the Home screen, click the Browser icon.
- Press the ☐ key > Options.
- In the Privacy and Security section, below Clear Browsing Data, select the check boxes beside the types of browsing information that you want to delete.
- Click Clear Now.
Turn off cookies in the browser
- On the Home screen, click the Browser icon.
- Press the ☐ key > Options.
- In the Privacy & Security section, clear the Accept Cookies check box.
- Press the key > Save.
Turn on geolocation in the browser
If you turn on geolocation in the browser, some websites might be able to determine your approximate location.
- On the Home screen, click the Browser icon.
- Press the ☐ key > Options.
- In the Privacy & Security section, select the Enable Geolocation check box.
- Press the key > Save.
When you visit a website that requests your location, a dialog box appears. If you select the Don't ask again for this website check box, the website and the permissions that you set for it are saved in Geolocation Permissions in your browser options.
Browser security
About TLS
The BlackBerry® Browser configuration is designed to use TLS or SSL to encrypt data that your device sends or receives over the Internet through the BlackBerry® Enterprise Server. Communication between your device and the BlackBerry Enterprise Server is encrypted using Triple DES. Communication between the BlackBerry Enterprise Server and content servers is encrypted using SSL or TLS. To increase security, you can set up TLS for HTTP connections between your device and the BlackBerry Enterprise Server and use Triple DES encryption for all other communication between your device and the BlackBerry Enterprise Server.
TLS options
| Option Description |
| Permit SSL 3.0 Specify whether your browser accepts SSL connections. If you do not select this option, your browser allows only TLS connections. |
| Encryption Strength Specify whether your browser only accepts and sends data that is encrypted using 128-bit encryption. To accept and send only data that is encrypted using 128-bit encryption, change this field to Strong Only. To accept and send data that is encrypted using 128-bit encryption or 56-bit encryption, change this field to Allow Weak. |
| Digest Strength Specify whether your browser accepts data with weak digest algorithms or accepts only data with strong digest algorithms. The stronger the digest algorithm is, the more secure your browsing experience is. To accept data with weak digest algorithms, change this field to Allow Weak. To accept only data with strong digest algorithms, change this field to Strong Only. To be prompted to accept data with weak digest algorithms, change this field to Prompt. Depending on the options that your administrator sets, you might not be able to change this option. |
Manage browser security
- On the Home screen or in a folder, click the Options icon.
- Click Security > Advanced Security Settings > TLS.
- Set the security options.
- Press the ☐ key > Save.
Add a trusted content server
If your email account uses a BlackBerry® Enterprise Server, you can add content servers to your list of trusted content servers to accelerate the authentication process when you are authenticating with a content server.
- On the Home screen or in a folder, click the Options icon.
- Click Security > Advanced Security Settings > TLS.
- Highlight the Trust Hosts field.
- Press the key > Add Host.
- Type the web address for the content server.
- Click OK.
- Press the key > Save.
Add or change a web site that is associated with a certificate
To access some web sites, you might need to provide an authentication certificate. After you provide a certificate to a web site, the web site and the associated certificate are automatically added to the Host/Certificate Mappings list in your TLS options. You can manually add or change a web site that is associated with a certificate.
- On the Home screen or in a folder, click the Options icon.
-
Click Security > Advanced Security Settings > TLS.
-
To manually associate a web site with a certificate, highlight the Host/Certificate Mappings field. Press the ☐ key > Add Host. In the Host Name field, type the web site name. In the Certificate field, select the certificate that is associated with the web site. Click OK.
-
To change a web site that is associated with a certificate, in the Host/Certificate Mappings list, highlight an item. Press the key > Edit. Change the certificate. Click OK.
-
Press the ☐ key > Save.
Browser push
About browser push
Browser push is designed to push information from a web application to your BlackBerry® device as the information becomes available. For example, you can receive updates for weather reports, stock quotes, or breaking news. When your device receives an update, a new browser push message might appear in the messages application or an icon on the Home screen might change to indicate that new information is available. The web application might also push updated information to your browser cache without notifying you. If information is pushed to your browser cache, the information is available on your device even when your device is not connected to the wireless network. Web applications that use browser push automatically push updates to your device, unless you turn off browser push.
Your device supports different types of browser push messages. Service loading messages and service indication messages include updated information. Other browser push messages include messages that appear in your browser cache.
| Option | Description |
| Process MDS Set whether your BlackBerry® device accepts browser push messages from the BlackBerry® Enterprise Server or the BlackBerry® Internet Service. | |
| MDS Hosts Set whether your device accepts push messages from all BlackBerry Enterprise Server instances or BlackBerry Internet Services. | |
| Process SMSC Set whether your device accepts push messages that are SMS-based. | |
| Option Description | |
| SMSC Hosts Set which SMSC hosts your device accepts browser push messages from. To accept browser push messages from a specific SMSC host, type the phone number for the SMSC host. | |
| Process IP Set whether your device accepts browser push messages that web applications send through a WAP gateway. | |
| IP Hosts Set which WAP gateways your device accepts browser push messages from. To accept browser push messages from a specific IP host, type the IP address for the WAP gateway. | |
Turn off browser push
- On the Home screen or in a folder, click the Options icon.
- Click Device > Advanced System Settings > Browser Push.
- Clear the Enable Push check box.
- Press the Key > Save.
Browser shortcuts
To use browser shortcuts, you might need to turn on shortcuts in the browser options. Depending on the typing input language that you are using, some shortcuts might not be available.
| Insert a period (.) in the web address field Press the Space key. |
| Insert a slash mark (/) in the web address field Press the Shift key and the Space key. |
| Stop loading a web page Press the Escape key. |
| Close the browser Press and hold the Escape key. |
On a web page
| Quickly switch between tabs | Press W |
| Zoom in to a web page Press I | |
| Zoom out from a web page Press O | |
| Go to the start page Press G | |
| Return to the home page Press H | |
| Open the bookmark list Press K | |
| Add a bookmark Press A | |
| View a list of web pages that you have visited recently | Press Y |
Refresh a web page Press R
Find text on a web page
Press F. To find the next instance of the text, press V.
Open the browser options Press S
Move around a web page
Move up a screen Press the Shift key and the Space key.
Move down a screen Press the Space key.
Move to the top of a web page Press T
Move to the bottom of a web page Press B
Troubleshooting: Browser
No browser is available on my device
Depending on your wireless service plan, this feature might not be supported.
Verify that your BlackBerry ^® device is connected to the wireless network.
I cannot play a song or video on a web page
Your BlackBerry ^® device might not support the size or file format of the song or video file.
I receive a prompt to switch networks when I stream a song or video
If you receive a prompt to switch networks, you cannot stream songs or videos with the Internet connection that you are using. If you switch networks, extra fees might apply. For more information, contact your wireless service provider or administrator.
To stop receiving this prompt, in the browser, press the ☐key > Options. In the General section, below Prompt Before, clear the Switching to Carrier Network for Streaming Media check box.
I cannot open a new tab
You might not have enough available memory on your BlackBerry ^® device. Try completing the following actions:
- Close a tab that you do not need.
- Close other applications that do not need to be open.
Related topics
Close an application so that it is not running in the background, 225
Open, close, or switch between tabs, 12
Calendar
Calendar basics
Switch calendar views
You can view your appointments and meetings in one of four calendar views. Day view, Week view, and Month view display all your appointments and meetings for the selected time period. Agenda view displays all your scheduled appointments, meetings, and free time in a list.
- On the Home screen, click the Calendar icon.
- Press the ☐ key > View.
- Click a view.
Go to a specific date in the calendar
- On the Home screen, click the Calendar icon.
- Press the ☐ key.
- To move to a specific date, click Go To Date.
- To move to the current date, click Go To Today.
Schedule a meeting or an appointment
To invite participants to a meeting, your work email account must use a BlackBerry® Enterprise Server that supports this feature.
-
On the Home screen, click the Calendar icon.
-
Press the Key > New Appointment.
-
Type the meeting or appointment information.
- To invite a participant to a meeting, press the ☐ key > Invite Attendee. Click a participant.
- Do one of the following:
- To send the meeting invitation to the participants that you invited, press the Key > Send.
- To save an appointment, press the key > Save.
Related topics
Turn off your device, 253
Turn off your device, 253
I cannot schedule appointments that span multiple days, 179
I cannot set some fields when scheduling appointments, 179
Set an alarm in the calendar
You can set an alarm in the calendar to go off at scheduled days and times. Scheduling alarms in the calendar does not change your regular alarm in the Clock application. Because the alarm tone settings are shared by the alarms in the Calendar and the Clock application, changes to the alarm tone settings will affect the alarms in both applications.
- On the Home screen, click the Calendar icon.
- Press the ☐ key > New Alarm.
- Type the alarm information.
- If you want the alarm to recur, change the Recurrence field.
- Press the ☐ key > Save.
Switch calendars
If your BlackBerry ^® device is associated with multiple email accounts, you might have multiple calendars on your device. If you have multiple calendars on your device, you can schedule and manage appointments and meetings in each calendar. For more information, contact your wireless service provider.
- On the Home screen, click the Calendar icon.
- Press the Key > Select Calendar.
- Click a calendar.
Meetings
Schedule a meeting or an appointment
To invite participants to a meeting, your work email account must use a BlackBerry® Enterprise Server that supports this feature.
-
On the Home screen, click the Calendar icon.
-
Press the ☐ key > New Appointment.
-
Type the meeting or appointment information.
- To invite a participant to a meeting, press the ☐ key > Invite Attendee. Click a participant.
- Do one of the following:
- To send the meeting invitation to the participants that you invited, press the 📄 key > Send.
- To save an appointment, press the key > Save.
Related topics
Turn off your device, 253
Turn off your device, 253
I cannot schedule appointments that span multiple days, 179
I cannot set some fields when scheduling appointments, 179
Delete an appointment, meeting, or alarm
- On the Home screen, click the Calendar icon.
- Highlight an appointment, meeting, or alarm.
- Press the ☐ key > Delete.
Respond to a meeting invitation
- In a meeting invitation, press the key.
- Click Accept, Tentative, or Decline.
- If you declined a delegated meeting invitation, do one of the following:
- To decline the meeting, click Decline.
• To delegate the meeting back to the sender so that the sender can re-delegate it, click Delegate.
-
Do one of the following:
-
To send the response without adding comments, click Send Response.
- To add a comment to your response, click Add Comments. Type a comment. Press the 📋 key > Send.
Note: If you delete a meeting invitation from the Messages application before you accept or decline it, the meeting is deleted from the email application on your computer.
View your calendar when responding to a meeting
In a meeting invitation, press the Key > View Calendar.
To return to the meeting invitation, press the key.
Check availability of meeting participants
To perform this task, your work email account must use a BlackBerry® Enterprise Server that supports this feature. For more information, contact your administrator.
You can only check availability of meeting participants in your organization.
In a meeting or meeting invitation, below the list of meeting participants, click View Availability.
- If you are the meeting organizer, to select the next time that all meeting participants are available, click Next Available Time.
- To view a list of the statuses that are associated with the colored bars on the screen (for example, busy or tentative), press the Key > Show Legend.
Change the list of participants for a meeting
To perform this task, you must be the meeting organizer.
- In a meeting, in the Accepted or Declined field, highlight a contact.
- Press the key.
- Click Invite Attendee, Change Attendee, or Remove Attendee.
- Press the ☐ key > Save.
Forward a meeting invitation
To perform this task, your email account must use the BlackBerry® Internet Service or a BlackBerry® Enterprise Server that supports this feature. For more information, contact your wireless service provider or administrator.
If you do not have the option to forward a meeting invitation, you might be able to delegate a meeting invitation instead.
In a meeting or a meeting invitation, press the ☐ key > Forward.
Note: If you forward a meeting invitation on behalf of the meeting organizer, only the meeting organizer receives the recipient's response.
Delegate a meeting invitation
To perform this task, you must be using IBM® Lotus Notes® and your email account must be associated with a BlackBerry® Enterprise Server that supports this feature.
If you do not have the option to delegate a meeting invitation, you might be able to forward meeting invitations instead. You might not have the option to delegate a meeting invitation if the meeting organizer has turned off meeting delegation.
- In a meeting invitation, press the key > Delegate.
-
Click a contact.
-
To send the response without adding comments, click Send Response.
- To add a comment to your response, click Add Comments. Type a comment. Press the 📄 key > Send.
Send an email message to all meeting participants
In a meeting, meeting invitation, or meeting response, press the ☐ key > Email All Attendees.
Conference call meetings
About conference calls
You can create two types of conference calls with your BlackBerry® device. If your organization or a conferencing service has provided you with a conference call bridge number, you can create conference call meetings in the calendar on your device or computer. Conference call meetings allow participants who have a BlackBerry device to enter the conference call meeting with
a one-touch Join Now option, if this feature is supported on their device, so that they do not have to dial the conference call bridge number and access codes. If you do not have a conference call bridge number, you can create a conference call by calling other contacts and joining the calls together.
Create a conference call meeting from your device
To perform this task, you must be the meeting organizer. If you are not the meeting organizer, you can create a conference call meeting on behalf of another person from your computer.
- In a meeting, select the Conference call check box.
- Type the information for the conference call.
- Press the ☐ key > Save.
Create a conference call meeting from your computer
To perform this task, you must be the meeting organizer or be creating the meeting on behalf of the meeting organizer. For information about creating meetings on behalf of another person, see the documentation for the email application on your computer.
You can create a conference call meeting from your computer that your BlackBerry® device recognizes. When the conference call meeting starts, participants who have a BlackBerry device can enter the conference call meeting with the Join Now option, if their device supports this feature.
- In the meeting notes, or in the meeting location field, type CCP: and the participant conference call bridge number. Do not include spaces.
- Type a lowercase x. Do not include spaces before or after the x.
- Type the participant access code. Type a space after the participant access code.
- Type CCM: and the moderator conference call bridge number. Do not include spaces.
- Type a lowercase x. Do not include spaces before or after the x.
- Type the moderator access code. Type a space after the moderator access code.
Example
If the participant and moderator conference call bridge number is 1-800-555-5555, the moderator access code is 55555#, and the participant access code is 55551#, type CCP:18005555555x55555# CCM:18005555555x55551#, followed by a space.
Enter a conference call meeting
Do one of the following:
• In a meeting notification, click Join Now.
- In the calendar, highlight the meeting. Press the key > Join Now.
Related topics
I cannot enter a conference call with the Join Now option, 179
Save your conference call information
You can save your conference call information so that it is added to the conference call fields automatically when you create a conference call meeting from your BlackBerry® device.
- On the Home screen, click the Calendar icon.
- Press the ☐ key > Options > Conference Calling.
- Type your conference call information.
- Press the key > Save.
Synchronizing calendar
About synchronization
The wireless data synchronization feature is designed to synchronize organizer data (contacts, calendar entries, tasks, and memos) between a subscriber's BlackBerry® smartphone and the email application on their computer over the wireless network.
The wireless email reconciliation feature is designed to reconcile email between the subscriber's smartphone and the email application on their computer over the wireless network. When a subscriber files or deletes email messages on their smartphone, these email message should be filed or deleted in their email application. Likewise, any changes that they make to email message in the email application on their computer should be reflected on the smartphone.
In rare cases, if a smartphone does not recognize fields in a contact, calendar entry, or email account, some data or email cannot be synchronized or reconciled.
If wireless data synchronization or wireless email reconciliation is not available on the smartphone or if the subscriber turned off these features, the subscriber can use the synchronization tool of the BlackBerry® Desktop Software to synchronize their organizer data and email. For more information, see the Help in the BlackBerry Desktop Software.
Research In Motion recommends that you regularly create and save a backup file on your computer, especially before you update any software. Maintaining an up-to-date backup file on your computer might allow you to recover device data if your device is lost, stolen, or corrupted by an unforeseen issue.
Synchronize organizer data over the wireless network
Research In Motion recommends that you regularly create and save a backup file on your computer, especially before you update any software. Maintaining an up-to-date backup file on your computer might allow you to recover device data if your device is lost, stolen, or corrupted by an unforeseen issue.
- In the Contacts application, Calendar application, Tasks application, or MemoPad, press the ☐ key > Options.
- If necessary, click a calendar or contact list.
- Select the Wireless Synchronization check box.
4. Press the Key > Save.
If you use the BlackBerry® Internet Service, you must use the synchronization tool of the BlackBerry® Desktop Software to synchronize calendar data. For more information, see the Help in the BlackBerry Desktop Software.
Related topics
Some characters in calendar entries do not appear correctly after synchronization, 179
About synchronization conflicts, 86
About backing up and restoring device data
If you have installed the BlackBerry® Desktop Software on your computer, you can back up and restore most of your BlackBerry device data, including messages, organizer data, fonts, saved searches, and browser bookmarks using the backup and restore tool of the BlackBerry Desktop Software. For more information, see the Help in the BlackBerry Desktop Software.
If your email account uses a BlackBerry® Enterprise Server, you might be able to restore synchronized organizer data to your device over the wireless network. To restore synchronized organizer data over the wireless network, you must have an activation password. For more information, contact your administrator.
Research In Motion recommends that you regularly create and save a backup file on your computer, especially before you update any software. Maintaining an up-to-date backup file on your computer might allow you to recover device data if your device is lost, stolen, or corrupted by an unforeseen issue.
About synchronization conflicts
A synchronization conflict occurs when you change the same email or organizer data item on your BlackBerry ^® device and in the email application on your computer.
If you reconcile your email using wireless email reconciliation, on your device, you can set whether the email on your device or the email on your computer takes precedence when an email reconciliation conflict occurs.
If you synchronize your organizer data using wireless data synchronization, the organizer data on your computer takes precedence over the organizer data on your device when a data synchronization conflict occurs.
Research In Motion recommends that you regularly create and save a backup file on your computer, especially before you update any software. Maintaining an up-to-date backup file on your computer might allow you to recover device data if your device is lost, stolen, or corrupted by an unforeseen issue.
Related topics
Synchronize organizer data over the wireless network, 175
Some characters in calendar entries do not appear correctly after synchronization, 179
Manage data synchronization conflicts
You can change how conflicts that occur during organizer data synchronization are resolved by turning off wireless data synchronization, changing conflict resolution options, and synchronizing organizer data using the synchronization tool of the BlackBerry® Desktop Software. For more information about managing conflicts that occur during organizer data synchronization, see the Help in the BlackBerry Desktop Software.
Calendar options
Change how the calendar is displayed
- On the Home screen, click the Calendar icon.
-
Press the key > Options > Calendar Display and Actions.
-
To change the default view, change the Initial View field.
• To change the start and end time for days, change the Start Of Day field and End Of Day fields.
• To change the day that displays as the first day of the week in Week view, change the First Day Of Week field. -
To hide free time in Agenda view, clear the Show Free Time in Agenda View check box.
-
Press the key > Save.
Change options for reminders
- On the Home screen, click the Calendar icon.
-
Press the KEY > Options > Calendar Display and Actions.
-
To change the snooze time for reminders, change the Snooze field.
-
To change the default reminder time for calendar entries, change the Default Reminder field.
-
Press the key > Save.
Related topics
Turn off your device, 253
Change options for multiple calendars
- On the Home screen, click the Calendar icon.
- Press the Key > Options.
- Click a calendar.
• To change the color that is used for appointments from the calendar, change the Appointment Color field.
- To set whether the calendar reminds you of appointments, select or clear the Display Reminders check box.
- Press the key > Save.
Change the default calendar
Changing the default calendar changes the email address that meeting invites are sent from.
- On the Home screen or in a folder, click the Options icon.
- Click Device > Advanced System Settings > Default Services.
- Change the Calendar (CICAL) field.
- Press the ☐ key > Save.
Change how long your device stores calendar entries
- On the Home screen, click the Calendar icon.
- Press the Key > Options > Calendar Display and Actions.
- Change the Keep Appointments field.
- Press the key > Save.
Your BlackBerry ^® device deletes calendar entries that are older than the number of days that you set.
Show tasks in the calendar
- On the Home screen, click the Calendar icon.
- Press the Key > Options > Calendar Display and Actions.
- Select the Show Tasks check box.
- Press the Key > Save.
Calendar shortcuts
Depending on the typing input language that you are using, some shortcuts might not be available.
For shortcuts to work in Day view, press the ☐ key > Options. Click Calendar Display and Actions. Clear the Enable Quick Entry check box.
| Schedule an appointment | Press C |
| Change to Agenda view Press A | |
| Change to Day view Press D | |
| Change to Week view Press W | |
| Change to Month view Press M | |
| Move to the next week, month, or day in Agenda view Press the Space key. | |
| Move to the previous week, month, or day in Agenda view | Press the Shift key and the Space key. |
Move to the current date Press T
Move to a specific date Press G
Troubleshooting: Calendar
I cannot schedule appointments that span multiple days
If you use IBM ^® Lotus Notes ^® , you cannot schedule appointments that span multiple days.
Related topics
Schedule a meeting or an appointment, 170
I cannot set some fields when scheduling appointments
If you use IBM ^® Lotus Notes ^® , you can only change the Subject, Location, Reminder, and Notes fields and the Mark as Private check box when you change a recurring appointment or meeting.
Related topics
Schedule a meeting or an appointment, 170
Some characters in calendar entries do not appear correctly after synchronization
If you schedule appointments or meetings on your BlackBerry ^® device that contain special characters or accents, your computer might not support these characters.
On your computer, verify that you are using the correct default code page and that the correct font support is installed on your computer. For more information, see the documentation for the operating system on your computer.
Research In Motion recommends that you regularly create and save a backup file on your computer, especially before you update any software. Maintaining an up-to-date backup file on your computer might allow you to recover device data if your device is lost, stolen, or corrupted by an unforeseen issue.
Related topics
Synchronize organizer data over the wireless network, 175
About synchronization conflicts, 86
I cannot enter a conference call with the Join Now option
The Join Now option might not appear in the meeting notification if the meeting organizer is not using a BlackBerry ^® device that supports the Join Now feature or if the meeting organizer did not enter the conference call information correctly. If the Join Now option appears and your device is connected to a CDMA network, you might need to change your smart dialing options so that you can enter the conference call using the Join Now option.
Try the following actions:
- If the Join Now option does not appear, to enter the conference call, in the meeting or meeting invitation, click the conference call bridge number and access code that appear in either the Location field or the Notes section.
- If the Join Now option appears and your device is connected to a CDMA network, try increasing the default time that your device waits before dialing an extension. From the Home screen, press the 📊 key. Press the 🔗 key > Options > Smart Dialing. In the To access extensions in all other corporations section, change the Wait For field to the highest value. Try entering the conference call with the Join Now option again.
Related topics
Enter a conference call meeting, 174
Contacts
Contact basics
Add a contact
- To add a contact using the Contacts application, on the Home screen, click the Contacts icon. At the top of the screen, click New Contact. Type the contact information. Press the key > Save.
- To add a contact from a message, call log, or web page, highlight the contact name, number, or email address. Press the ☐key > Add to contacts. If necessary, add contact information. Press the ☐key > Save.
Create a custom contact field
Custom contact fields can store information that you want to remember about a contact, for example, you might want to add a custom contact field named Sports team or Favorite color. If you create a custom field for a contact, the field appears for all your contacts.
- When you are adding or changing a contact, in the Custom Fields section, click Add Custom Field.
- Click a field.
- Press the key > Change Field Name.
- To change the name of the field, place the cursor in the field. Press the ☐ key > Change Field Name. Type a name for the field. Press the ↕ key on the keyboard.
- Type the information that you want to add to the custom field.
- Press the key > Save.
You can synchronize contact fields that you customize on your BlackBerry ^® device with the email application on your computer. For more information about synchronizing contact fields, see the Help in the BlackBerry ^® Desktop Software.
Related topics
Contact list field data is not appearing on my computer, 188
Add a pause or a wait to a phone number
Use a pause or a wait to separate additional numbers, for example a password or extension, from a main phone number. After dialing the main phone number, your BlackBerry ^® device either pauses before dialing the additional numbers (pause) or prompts you to type them (wait).
- After you type the main part of a phone number in a phone number field, press the Key.
- Click Add Pause or Add Wait.
- Type the additional numbers.
- Press the ☐ key > Save.
Change or delete a contact
- On the Home screen, click the Contacts icon.
- Highlight a contact.
- Press the ☐ key.
- To edit the information for the contact, click Edit. Change the contact information. Press the ☐ key > Save.
- To delete a contact, click Delete.
Search for a contact in your organization's address book
To perform this task, your work email account must use a BlackBerry® Enterprise Server that supports this feature. For more information, contact your administrator.
- On the Home screen, click the Contacts icon.
- Press the key > Lookup.
- Type part or all of a contact name.
- Press the key on the keyboard.
-
Press the key.
-
To add a contact to your contact list, click Add to Contacts.
- To add all the contacts, click Add All to Contacts.
- To view information for a contact, click View.
- To delete a contact from the contact lookup results, click Delete.
- To delete the contact lookup results, click Delete Lookup.
- To start a new contact lookup, click Lookup.
Customizing contacts
Add a contact picture for caller ID
- On the Home screen, click the Contacts icon.
- Highlight a contact.
- Press the ☐ key > Edit.
- Press the key > Add Picture.
- Find, highlight, and click a picture.
- If necessary, move the crop box to the portion of the picture that you want to use.
- Press the key > Crop & Save.
- Press the key > Save.
Related topics
My contact pictures keep changing, 188
Change or delete a contact picture
- On the Home screen, click the Contacts icon.
- Highlight a contact.
- Press the ☐ key > Edit.
- Highlight the contact picture.
- To change the contact picture, press the ☐ key > Replace Picture. Highlight a picture. Press the ☐ key > Select.
• To delete the contact picture, press the Delete Picture. - Press the key > Save.
Related topics
My contact pictures keep changing, 188
About categories
You can create categories to group your contacts, tasks, and memos. You can also narrow the contacts, tasks, and memos that appear based on categories.
Category names are not case sensitive. More than one category can apply to a contact, task, or memo. If you use IBM ^® Lotus Notes ^® , you can apply more than one category to a task on your BlackBerry ^® device, but only one category synchronizes with the task in Lotus Notes.
Categories are shared between the contact list, the task list, and the memo list and changes that you make in one application are made in all applications.
Categorize a contact, task, or memo
- When you are creating or changing a contact, task, or memo, press the key > Categories.
- Select the check box beside a category.
- Press the key > Save.
To remove a category from a contact, task, or memo, clear the check box beside the category.
Create a category for contacts, tasks, or memos
You can create categories to organize items in the Contacts application, Tasks application, and MemoPad.
- On the Home screen or in the Applications folder, click the Contacts icon, Tasks icon, or MemoPad icon.
- Press the key > Filter.
- Press the key > New.
- Type a name for the category.
- Press the key on the keyboard.
To delete a category, highlight the category. Press the key > Delete.
Synchronizing contacts
About synchronization
The wireless data synchronization feature is designed to synchronize organizer data (contacts, calendar entries, tasks, and memos) between a subscriber's BlackBerry® smartphone and the email application on their computer over the wireless network.
The wireless email reconciliation feature is designed to reconcile email between the subscriber's smartphone and the email application on their computer over the wireless network. When a subscriber files or deletes email messages on their smartphone, these email message should be filed or deleted in their email application. Likewise, any changes that they make to email message in the email application on their computer should be reflected on the smartphone.
In rare cases, if a smartphone does not recognize fields in a contact, calendar entry, or email account, some data or email cannot be synchronized or reconciled.
If wireless data synchronization or wireless email reconciliation is not available on the smartphone or if the subscriber turned off these features, the subscriber can use the synchronization tool of the BlackBerry® Desktop Software to synchronize their organizer data and email. For more information, see the Help in the BlackBerry Desktop Software.
Research In Motion recommends that you regularly create and save a backup file on your computer, especially before you update any software. Maintaining an up-to-date backup file on your computer might allow you to recover device data if your device is lost, stolen, or corrupted by an unforeseen issue.
Synchronize organizer data over the wireless network
Research In Motion recommends that you regularly create and save a backup file on your computer, especially before you update any software. Maintaining an up-to-date backup file on your computer might allow you to recover device data if your device is lost, stolen, or corrupted by an unforeseen issue.
- In the Contacts application, Calendar application, Tasks application, or MemoPad, press the ☐ key > Options.
- If necessary, click a calendar or contact list.
- Select the Wireless Synchronization check box.
- Press the Key > Save.
If you use the BlackBerry® Internet Service, you must use the synchronization tool of the BlackBerry® Desktop Software to synchronize calendar data. For more information, see the Help in the BlackBerry Desktop Software.
Related topics
Some characters in calendar entries do not appear correctly after synchronization, 179
About synchronization conflicts, 86
About backing up and restoring device data
If you have installed the BlackBerry® Desktop Software on your computer, you can back up and restore most of your BlackBerry device data, including messages, organizer data, fonts, saved searches, and browser bookmarks using the backup and restore tool of the BlackBerry Desktop Software. For more information, see the Help in the BlackBerry Desktop Software.
If your email account uses a BlackBerry® Enterprise Server, you might be able to restore synchronized organizer data to your device over the wireless network. To restore synchronized organizer data over the wireless network, you must have an activation password. For more information, contact your administrator.
Research In Motion recommends that you regularly create and save a backup file on your computer, especially before you update any software. Maintaining an up-to-date backup file on your computer might allow you to recover device data if your device is lost, stolen, or corrupted by an unforeseen issue.
About synchronization conflicts
A synchronization conflict occurs when you change the same email or organizer data item on your BlackBerry ^® device and in the email application on your computer.
If you reconcile your email using wireless email reconciliation, on your device, you can set whether the email on your device or the email on your computer takes precedence when an email reconciliation conflict occurs.
If you synchronize your organizer data using wireless data synchronization, the organizer data on your computer takes precedence over the organizer data on your device when a data synchronization conflict occurs.
Research In Motion recommends that you regularly create and save a backup file on your computer, especially before you update any software. Maintaining an up-to-date backup file on your computer might allow you to recover device data if your device is lost, stolen, or corrupted by an unforeseen issue.
Related topics
Synchronize organizer data over the wireless network, 175
Some characters in calendar entries do not appear correctly after synchronization, 179
Manage data synchronization conflicts
You can change how conflicts that occur during organizer data synchronization are resolved by turning off wireless data synchronization, changing conflict resolution options, and synchronizing organizer data using the synchronization tool of the BlackBerry® Desktop Software. For more information about managing conflicts that occur during organizer data synchronization, see the Help in the BlackBerry Desktop Software.
Personal distribution lists
Create a personal distribution list
You can use personal distribution lists when you send email messages, PIN messages, or text messages. Personal distribution lists that you create on your BlackBerry ^® device do not appear in the email application on your computer.
- On the Home screen, click the Contacts icon.
- Press the ☐ key > New Group.
- Type a name for the personal distribution list.
- Press the key > Add Member.
- Click a contact.
- To add another contact, repeat steps 4 to 5.
- Press the key > Save Group.
Change or delete a personal distribution list
- On the Home screen, click the Contacts icon.
- Highlight a personal distribution list.
- Press the ☐ key.
- To change a personal distribution list, click Edit Group. Click a contact. Click Add Member, Change Member, or Delete Member. Press the ☐ key > Save Group.
- To delete a personal distribution list, click Delete Group > Delete.
Note: When you delete a contact from a personal distribution list, the contact remains in your contact list.
Multiple contact lists
About multiple contact lists
If your BlackBerry ^® device is associated with multiple email accounts, you might have contacts from each email account on your device. For example, if your device is associated with a work email account and a personal email account, you might be able to view your work contact list and your personal contact list on your device. For more information, contact your wireless service provider.
View a different contact list
- On the Home screen, click the Contacts icon.
- Press the ☐ key > Select Contacts.
- Click a contact list.
Change the default contact list
- On the Home screen or in a folder, click the Options icon.
- Click Device > Advanced System Settings > Default Services.
- Change the Contact List (SYNC) field.
- Press the key > Save.
Contact list options
Turn off the prompt that appears before you delete items
You can turn off the prompt that appears before you delete messages, call logs, contacts, calendar entries, tasks, memos, or passwords.
- On the Home screen, click the application icon for an application that prompts you before you delete items.
- Press the ☐ key > Options.
- If necessary, click General Options.
- Clear the Confirm Delete check box.
- Press the ☐ key > Save.
Change the display options for contacts
You can change how your contacts appear in all applications, including the phone, message list, contact list, and calendar.
- On the Home screen or in a folder, click the Options icon.
- Click Typing & Input > Language.
- Change the Global Name Display field.
- Press the ☐ key > Save.
View the number of contacts stored on your device
- On the Home screen, click the Contacts icon.
- Press the Key > Options.
- Click a contact list.
The Number of Entries field displays the number of contacts that are stored in the contact list.
Sort contacts or tasks
- On the Home screen or in the Applications folder, click the Contacts icon or Tasks icon.
- Press the Key > Options.
- If necessary, click General Options.
- Change the Sort By field.
- Press the ☐ key > Save.
Troubleshooting: Contacts
Contact list field data is not appearing on my computer
You can only synchronize the data in a custom contact list field with a text field in the email application on your computer. For example, you cannot add a contact's birthday to a custom contact list field on your BlackBerry ^® device and synchronize it with the email application on your computer, because the birthday field is a date field in the email application on your computer.
Related topics
Create a custom contact field, 181
My contact pictures keep changing
The contact pictures in applications (for example, in the contacts application), might change if you set more than one application on your BlackBerry ^® device to replace contact pictures. Depending on how often or how many of your contact pictures are being replaced by other applications, you might experience increased data charges.
To stop contact pictures from changing, you must change the options in each application that is replacing your contact pictures.
Related topics
Add a contact picture for caller ID, 40
Change or delete a contact picture, 183
Clock
Set the date and time
- On the Home screen or in the Applications folder, click the Clock icon.
-
Press the ☐ key > Set Time.
-
To get the date and time from the wireless network automatically, change the Update Time field to Automatic. Note that you must be connected to the wireless network.
-
To set the date and time manually, change the Update Time field to Manual. Click the Set Time or Set Date field. Change the time or date. Click Ok.
-
Do any of the following:
• To receive a prompt when your device detects a new time zone, change the Auto Update Time Zone field to Prompt.
- To have your device update the time zone automatically when it detects a new time zone, change the Auto Update Time Zone field to On.
- Press the key > Save.
Related topics
The time on my device is incorrect, 193
Change what appears on the screen when your device is charging
- On the Home screen or in the Applications folder, click the Clock icon.
- Press the key > Options.
- Change the When Charging field.
- Press the key > Save.
Change the clock face
You can set a different clock face for the clock, stopwatch and timer.
- On the Home screen or in the Applications folder, click the Clock icon.
- Press the key > Options.
- Change the Clock Face field, Stopwatch Face field or Timer Face field.
- Press the key > Save.
Display a second time zone on the clock
You can show two times zones on the clock. For example, if you travel to a different time zone, you can display the time in your current location and the time in your home time zone.
- On the Home screen or in the Applications folder, click the Clock icon.
- Press the ☐ key > Options.
- Change the Home Time Zone field.
- Press the ☐ key > Save.
Related topics
The time on my device is incorrect, 193
Turn on the alarm
- On the Home screen or in the Applications folder, click the Clock icon.
- Press the ☐ key > Set Alarm.
- On the trackpad, slide your finger up or down to highlight On or Weekdays.
- Click the trackpad.
At the top of the Home screen, a clock indicator appears.
To set additional alarms or to set alarms for certain days of the week, you can schedule alarms through the Calendar application.
Related topics
Turn off your device, 253
Silence the alarm
- If snooze is not turned on, click Dismiss.
- If snooze is turned on, click Snooze.
Change alarm notification options
- On the Home screen or in the Applications folder, click the Clock icon.
- Press the key > Options.
- In the Alarm section, change the Alarm Tone field, Volume field, Snooze Time field, and Vibration field.
- Press the key > Save.
Turn on bedside clock mode
You can set options for bedside clock mode so that you can view the clock without being interrupted by incoming calls or messages.
- On the Home screen or in the Applications folder, click the Clock icon.
- Press the ☐ key > Enter Bedside Mode.
To turn off bedside clock mode, press the key.
Set options for bedside clock mode
- On the Home screen or in the Applications folder, click the Clock icon.
-
Press the key > Options.
-
In the Bedside Mode section, do any of the following:
• To receive a flashing LED notification when bedside clock mode is turned on, clear the Disable LED check box.
- To turn off the connection to the wireless network, so that your device does not receive phone calls or messages when bedside clock mode is turned on, select the Disable Radio check box.
- To turn off screen dimming when bedside clock mode is turned on, clear the Dim Screen check box.
- Press the key > Save.
Use the stopwatch
- On the Home screen or in the Applications folder, click the Clock icon.
-
Press the ☐ key > Stopwatch.
-
Click the start/stop icon.
-
To record lap times, click the lap icon.
- To stop timing, click the start/stop icon again.
- To send the results in a message, press the key > Send Results. Click a message type.
Use the timer
- On the Home screen or in the Applications folder, click the Clock icon.
- Press the key > Timer.
- Press the key > Set Timer.
- Set the time.
5. Click OK.
- To start or stop the timer, click the start/stop icon.
- To reset the timer, click the reset icon.
The timer continues to count down after you exit the Clock application.
Change timer notification options
- On the Home screen or in the Applications folder, click the Clock icon.
- Press the ☐ key > Options.
- In the Countdown Timer section, change the Timer Tone, Volume, or Vibration fields.
- Press the key > Save.
Troubleshooting: Clock
The time on my device is incorrect
- On the Home screen or in the Applications folder, click the Clock icon.
- Press the key > Set Time.
- Try one of the following actions:
- If the Set Time field is set to Automatic, press the Update Time.
• If you have traveled to a different time zone, set the Time Zone field to display the correct time zone.
- If you are in a region that has recently made changes to daylight saving time or has switched to a different time zone, you might need to update the time zone data on your BlackBerry® device. To update the time zone data, press the key > Get Time Zone Updates. For this feature to be supported, your wireless service plan must include data services (such as email messages or browser service). If your email account uses a BlackBerry® Enterprise Server, you might not be able to update your time zone data. For more information, contact your administrator.
Related topics
Set the date and time, 190
Display a second time zone on the clock, 191
Tasks and memos
Create a task or memo
You can create tasks in the Tasks application or Calendar application, and you can make any of your tasks visible in the calendar.
-
On the Home screen, click the Calendar icon, or in the Applications folder, click the Tasks icon or MemoPad icon.
-
To create a task in the Calendar application, press the ☐ key > New Task. Type the task title and fill in the details, such as the due date and recurrence.
- To create a task in the Tasks application, click Add Task. Type the task title and fill in the details, such as the due date and recurrence.
-
To create a memo, click New Memo. Type a title and the memo.
-
Press the key > Save.
Send a task or memo
- On the Home screen or in the Applications folder, click the Tasks icon or MemoPad icon.
- Highlight a task or memo.
- Press the key > Forward As.
- Click a message type.
Change or delete a task or memo
On the Home screen or in the Applications folder, click the Tasks icon or MemoPad icon.
- To change the task or memo, click it. Change the task or memo information. Press the ☐ key > Save.
- To delete the task or memo, highlight it. Press the Key > Delete.
Change the status of a task
- On the Home screen or in the Applications folder, click the Tasks icon.
- Highlight a task.
-
Press the key.
-
To mark the task as complete, click Mark Completed.
- To mark the task as deferred, in progress, or waiting, click Open. Change the Status field. Press the ☐ key > Save.
Hide completed tasks
- On the Home screen or in the Applications folder, click the Tasks icon.
- Press the ☐ key > Hide Completed.
Show tasks in the calendar
- On the Home screen, click the Calendar icon.
- Press the ☐ key > Options > Calendar Display and Actions.
- Select the Show Tasks check box.
- Press the key > Save.
Synchronizing tasks and memos
About synchronization
The wireless data synchronization feature is designed to synchronize organizer data (contacts, calendar entries, tasks, and memos) between a subscriber's BlackBerry® smartphone and the email application on their computer over the wireless network.
The wireless email reconciliation feature is designed to reconcile email between the subscriber's smartphone and the email application on their computer over the wireless network. When a subscriber files or deletes email messages on their smartphone, these email message should be filed or deleted in their email application. Likewise, any changes that they make to email message in the email application on their computer should be reflected on the smartphone.
In rare cases, if a smartphone does not recognize fields in a contact, calendar entry, or email account, some data or email cannot be synchronized or reconciled.
If wireless data synchronization or wireless email reconciliation is not available on the smartphone or if the subscriber turned off these features, the subscriber can use the synchronization tool of the BlackBerry® Desktop Software to synchronize their organizer data and email. For more information, see the Help in the BlackBerry Desktop Software.
Research In Motion recommends that you regularly create and save a backup file on your computer, especially before you update any software. Maintaining an up-to-date backup file on your computer might allow you to recover device data if your device is lost, stolen, or corrupted by an unforeseen issue.
Synchronize organizer data over the wireless network
Research In Motion recommends that you regularly create and save a backup file on your computer, especially before you update any software. Maintaining an up-to-date backup file on your computer might allow you to recover device data if your device is lost, stolen, or corrupted by an unforeseen issue.
- In the Contacts application, Calendar application, Tasks application, or MemoPad, press the ☐ key > Options.
- If necessary, click a calendar or contact list.
- Select the Wireless Synchronization check box.
- Press the ☐ key > Save.
If you use the BlackBerry® Internet Service, you must use the synchronization tool of the BlackBerry® Desktop Software to synchronize calendar data. For more information, see the Help in the BlackBerry Desktop Software.
Related topics
Some characters in calendar entries do not appear correctly after synchronization, 179
About synchronization conflicts, 86
About backing up and restoring device data
If you have installed the BlackBerry® Desktop Software on your computer, you can back up and restore most of your BlackBerry device data, including messages, organizer data, fonts, saved searches, and browser bookmarks using the backup and restore tool of the BlackBerry Desktop Software. For more information, see the Help in the BlackBerry Desktop Software.
If your email account uses a BlackBerry® Enterprise Server, you might be able to restore synchronized organizer data to your device over the wireless network. To restore synchronized organizer data over the wireless network, you must have an activation password. For more information, contact your administrator.
Research In Motion recommends that you regularly create and save a backup file on your computer, especially before you update any software. Maintaining an up-to-date backup file on your computer might allow you to recover device data if your device is lost, stolen, or corrupted by an unforeseen issue.
About synchronization conflicts
A synchronization conflict occurs when you change the same email or organizer data item on your BlackBerry ^® device and in the email application on your computer.
If you reconcile your email using wireless email reconciliation, on your device, you can set whether the email on your device or the email on your computer takes precedence when an email reconciliation conflict occurs.
If you synchronize your organizer data using wireless data synchronization, the organizer data on your computer takes precedence over the organizer data on your device when a data synchronization conflict occurs.
Research In Motion recommends that you regularly create and save a backup file on your computer, especially before you update any software. Maintaining an up-to-date backup file on your computer might allow you to recover device data if your device is lost, stolen, or corrupted by an unforeseen issue.
Related topics
Synchronize organizer data over the wireless network, 175
Some characters in calendar entries do not appear correctly after synchronization, 179
Manage data synchronization conflicts
You can change how conflicts that occur during organizer data synchronization are resolved by turning off wireless data synchronization, changing conflict resolution options, and synchronizing organizer data using the synchronization tool of the BlackBerry® Desktop Software. For more information about managing conflicts that occur during organizer data synchronization, see the Help in the BlackBerry Desktop Software.
About categories
You can create categories to group your contacts, tasks, and memos. You can also narrow the contacts, tasks, and memos that appear based on categories.
Category names are not case sensitive. More than one category can apply to a contact, task, or memo. If you use IBM® Lotus Notes®, you can apply more than one category to a task on your BlackBerry® device, but only one category synchronizes with the task in Lotus Notes.
Categories are shared between the contact list, the task list, and the memo list and changes that you make in one application are made in all applications.
Categorize a contact, task, or memo
- When you are creating or changing a contact, task, or memo, press the ☐ key > Categories.
- Select the check box beside a category.
- Press the key > Save.
To remove a category from a contact, task, or memo, clear the check box beside the category.
Create a category for contacts, tasks, or memos
You can create categories to organize items in the Contacts application, Tasks application, and MemoPad.
- On the Home screen or in the Applications folder, click the Contacts icon, Tasks icon, or MemoPad icon.
- Press the key > Filter.
- Press the Key > New.
- Type a name for the category.
- Press the key on the keyboard.
To delete a category, highlight the category. Press the key > Delete.
Turn off the prompt that appears before you delete items
You can turn off the prompt that appears before you delete messages, call logs, contacts, calendar entries, tasks, memos, or passwords.
- On the Home screen, click the application icon for an application that prompts you before you delete items.
- Press the key > Options.
- If necessary, click General Options.
- Clear the Confirm Delete check box.
- Press the ☐ key > Save.
Typing
Typing basics
Highlight, cut, copy, or paste text
To perform this task, you must use the slide-out keyboard.
-
Press and hold the key and click the trackpad.
-
To highlight text character by character, on the trackpad, slide your finger left or right.
-
To highlight text line by line, on the trackpad, slide your finger up or down.
-
Press the ☐ key.
-
To cut the highlighted text, click Cut.
-
To copy the highlighted text, click Copy.
-
Place the cursor where you want to insert the cut or copied text.
-
Press the key > Paste.
Type a symbol
Do any of the following:
- If you are using the slide-out keyboard, press the Symbol key. Press the letter key that appears below the symbol.
- If you are using your BlackBerry® device in portrait view with the SureType® input method, press the Symbol key. To see more symbols, press the Symbol key again. Click a symbol.
- If you are using your device in portrait view with the multi-tap keyboard, press a key once to type the first symbol on the key, twice to type the second symbol on the key, or three times to type the third symbol on the key. To view a list of symbols that do not appear on the keyboard, press the Symbol key.
- If you are using your device in landscape view or in portrait view with the full keyboard, press the Symbol key. Click a symbol.
Type an accent or special character
Press and hold a letter key on the keyboard and, on the trackpad, slide your finger left or right until the accented or special character appears.
Clear text from a field
In a field that you typed text into, press the ☐ key > Clear Field.
Type text using the predictive input method
When you are typing text, perform any of the following actions:
- To select the highlighted suggestion and start typing a new word, press the Enter key.
- To select the highlighted suggestion and continue typing the same word, click the word.
- To ignore the suggestions, keep typing.
Typing input methods
Switch typing input methods when you are typing
To perform this task, you must be using your BlackBerry ^® device in portrait view with the touch screen keyboard.
You can switch between the SureType keyboard, the multi-tap keyboard, and the full keyboard.
When you are typing, press the ☐ key > Enable
Change options for typing input methods
- On the Home screen or in a folder, click the Options icon.
- Click Typing and Input > Typing.
- For a keyboard, click Advanced Style Options.
- Change the options.
- Press the ☐ key > Save.
Change your typing style
You can change how your BlackBerry ^® device recognizes what you type by selecting a typing style.
- On the Home screen or in a folder, click the Options icon.
- Click Typing and Input > Typing.
- For a keyboard, do one of the following:
- To turn off all typing assistance, change the Style field to Direct.
- To set your device to suggest word predictions as you type, change the Style field to Predictive.
- To set your device to type the first letter on a key when you press a key once and type the second letter on the key when you press the key twice, change the Style field to Multitap. The Portrait Keyboard Type field must be set to Reduced in Options > Typing and Input > Keyboard, to have this option.
- To set your device to suggest spelling corrections as you type, change the Style field to Corrective.
- Press the key > Save.
SureType technology and multi-tap input methods
About typing using different keyboard styles
When you need to type, your BlackBerry ^® device displays one of three keyboard styles automatically, based on the field that you type in and the orientation of your device.
If you are using your device in portrait view, you can switch between the SureType® keyboard, multi-tap keyboard, and full keyboard, and you can set one of these keyboard styles to be your default. If you are using your device in landscape view, you can type using the full keyboard.
About SureType technology and multi-tap
You can type on your BlackBerry® device using the SureType® input method or multi-tap input method.
SureType technology combines a traditional phone-style key layout with a familiar computer-style letter layout that is designed to provide a quick and comfortable typing and dialing experience.
SureType technology is designed to predict words as you type them. When you use SureType technology, you press the letter key for each letter in a word only once until the word appears in a list that appears on the screen. When you use multi-tap, you press a letter key once to type the first letter on the key and twice to type the second letter.
SureType technology is the default typing input method for most fields. Multi-tap is the default typing input method for phone number and password fields.
Type text using SureType technology
To perform this task, you must be using your BlackBerry® device in portrait view with the touch screen keyboard.
-
Press the letter key once for each letter in a word.
-
Do any of the following:
-
To select a word from the list that appears when you type and start typing a new word, highlight the word. Press the key on the keyboard.
- To select an item from the list that appears when you type and continue typing the same word, click the item.
- To change a letter in a word that you are typing, highlight the letter. Click the alternate letter that appears on the screen.
- To change a letter in a word after you finish typing the word, click the word. Highlight the letter. Click the alternate letter that appears on the screen.
For example, to type run, you would press the R key once, the U key once, and so on until run appears in the list. You would then highlight run and press the key.
Type text using multi-tap
To perform this task, you must be using your BlackBerry ^® device in portrait view.
Do any of the following:
- To type the first letter on a key, press the letter key once.
- To type the second letter on a key, press the letter key twice.
- To type the third letter on a key, press the letter key three times.
- To type the fourth letter on a key, press the letter key four times.
For example, to type run, you would press the R key three times, the U key twice, and the N key twice.
Find more information about typing in other languages
You can learn to type in other languages such as Chinese and Thai by reading the Typing Guides that are available online. Visit www.blackberry.com/go/docs and search for the Typing Guide in your language.
Typing options
Change the default currency symbol
- On the Home screen or in a folder, click the Options icon.
- Click Typing and Input > Keyboard.
- Change the Currency Key field.
- Press the ☐ key > Save.
Stop displaying contacts in the list that appears when you type
- On the Home screen or in a folder, click the Options icon.
- Click Typing and Input > Typing.
- For a keyboard, click Advanced Style Options.
- Clear the Names check box.
- Press the ☐ key > Save.
Turn on key tones
- On the Home screen or in a folder, click the Options icon.
- Click Typing and Input > Keyboard.
- Select the Key Tone check box.
- Press the key > Save.
Turn off trackpad sounds
- On the Home screen or in a folder, click the Options icon.
-
Click Typing and Input > Trackpad Sensitivity.
-
Clear the Audible Roll check box.
- Press the key > Save.
To turn on trackpad sounds again, select the Audible Roll check box.
Set the trackpad sensitivity
You can set how the trackpad responds to your touch. A high sensitivity level requires less pressure than a lower sensitivity level.
- On the Home screen or in a folder, click the Options icon.
- Click Typing and Input > Trackpad Sensitivity.
- Change the Horizontal Sensitivity field and Vertical Sensitivity field.
- Press the ☐ key > Save.
Set the cursor speed
- On the Home screen or in a folder, click the Options icon.
- Click Typing and Input > Keyboard.
- Change the Key Rate field.
- Press the Key > Save.
Spelling checker
You can check spelling if your input language is set to Afrikaans, Arabic, Catalan, Czech, Danish, Dutch, English, French, German, Greek, Hungarian, Italian, Norwegian, Portuguese, Russian, Spanish, Swedish, or Turkish.
Check spelling
You can check spelling in messages, calendar entries, tasks, or memos that you create.
- Press the ☐ key > Check Spelling.
-
Do any of the following:
-
To accept the suggested spelling, click a word in the list that appears.
• To ignore the suggested spelling, press the key. - To ignore all instances of the suggested spelling, press the Key > Ignore All.
- To add the word to the custom dictionary, press the key > Add To Dictionary.
- To stop checking spelling, press the key > Cancel Spell Check.
Change options for checking spelling
You can change the type and length of words that the spelling checker includes when checking spelling. For example, you might not want the spelling checker to include acronyms or one-letter words. You can also set your BlackBerry ^® device to check spelling automatically before you send an email message.
- On the Home screen or in a folder, click the Options icon.
- Click Typing and Input > Spell Check.
- Change one or more options.
- Press the ☐ key > Save.
Stop displaying spelling suggestions in the list that appears when you type
By default, if you start typing a letter combination that your BlackBerry ^® device does not recognize, spelling suggestions appear in bold in the list that appears when you type.
- Click Typing and Input > Typing.
- For a keyboard, click Advanced Style Options.
- Clear the Spelling check box.
- Press the Key > Save.
Custom dictionary
About the custom dictionary
You can add words to the custom dictionary so that your BlackBerry ^® device recognizes the word when you check spelling. Because SureType ^® technology uses the same dictionary, if you are using the SureType input method, words that you add to your custom dictionary are displayed in the list that appears when you type.
Add, change, or delete a word in the custom dictionary
- On the Home screen or in a folder, click the Options icon.
- Click Typing and Input > Custom Dictionary.
- To add a word to the custom dictionary, press the ☐ key > New. Type a word or letter combination. Press the ↕ key on the keyboard.
- To change a word in the custom dictionary, press the ☐ key > New. Change the word. Press the ↕ key on the keyboard.
- To delete a word from the custom dictionary, highlight the word. Press the ☐ key > Delete.
Stop adding items to the custom dictionary automatically
- On the Home screen or in a folder, click the Options icon.
- Click Typing and Input > Typing.
- For a keyboard, click Advanced Style Options.
- Clear the Typing check box.
- Change the Email field to Off.
- Press the ☐ key > Save.
AutoText
About AutoText
AutoText is designed to replace specific text that you type with preloaded AutoText entries. If you type text that can be replaced with an AutoText entry, the text changes after you press the Space key.
Your BlackBerry ^® device has built-in AutoText entries that correct common mistakes. For example, AutoText changes hte to the. You can create AutoText entries for your common typing mistakes or for abbreviations. For example, you might create an AutoText entry that replaces ttyl with talk to you later.
Create an AutoText entry
- On the Home screen or in a folder, click the Options icon.
- Click Typing and Input > Word Substitution.
- Press the Key > New.
-
In the Replace field, type the text to replace.
-
In the With field, do one of the following:
-
Type replacement text.
-
To insert a macro (for example, the current date or time), press the ☐ key > Insert Macro.
-
Do one of the following:
• To capitalize the entry exactly as you typed it, change the Using field to Specified Case.
• To capitalize the entry according to the context, change the Using field to SmartCase.
-
In the Language field, change the language.
-
Press the key > Save.
Change or delete an AutoText entry
- On the Home screen or in a folder, click the Options icon.
- Click Typing and Input > Word Substitution.
3. Highlight an AutoText entry.
4. Press the Key.
• To change the AutoText entry, click Edit. Change the entry. Press the ☐ key > Save.
- To delete the AutoText entry, click Delete.
Undo an AutoText change
If the AutoText feature changes a word that you do not want to change, you can undo the change.
To undo an AutoText change when you are typing, press the key twice.
Typing shortcuts for the slide-out keyboard
Depending on the typing input language that you are using, some shortcuts might not be available.
| Insert a period Press the Space key twice. The next letter is capitalized. | |
| Insert an at sign (@) or a period (.) in an email address field Press the Space key. | |
| Capitalize a letter Press and hold the letter key until the capitalized letter appears. | |
| Turn on CAP lock | Press the Alt key and the Right Shift key. To turn off CAP lock, press the Left Shift key or Right Shift key. |
| Type a symbol Press the Symbol key. Type the letter that appears below the symbol. | |
| Type the alternate character on a key Press the Alt key and the character key. | |
| Type an accented or special character Press and hold the letter key and, on the trackpad, slide your finger left or right. For example, to type ü, press and hold U and slide your finger left until ü appears. Release the letter key when the accented or special character appears. | |
| Type a number in a text field Press and hold the Alt key and press the number key. | |
| Type a number in a number field Press a number key. You do not need to press the Alt key. | |
| Turn on NUM lock | Press the Alt key and the Left Shift key. To turn off NUM lock, press the Left Shift key or Right Shift key. |
| Highlight a line of text | Press the Left Shift key or Right Shift key and, on the trackpad, slide your finger up or down. |
| Highlight text character by character | Press the Left Shift key or Right Shift key and, on the trackpad, slide your finger left or right. |
| Cut highlighted text | Press the Left Shift key or Right Shift key and the Backspace/Delete key. |
Copy highlighted text Press the Alt key and click the trackpad.
Paste text Press the Left Shift key or Right Shift key and click the
trackpad.
Troubleshooting: Typing
SureType technology does not recognize a word
Use the list that appears when you type to help you build words that SureType® technology does not recognize. Press the letter key for the first letter in the word once. Highlight a letter in the list. Press the letter key for the next letter in the word once. Highlight a letter combination. Click the trackpad. Continue typing the word.
I cannot check spelling
You can check only the spelling of text that you type. You can check spelling in English, Afrikaans, Arabic, Catalan, Czech, Danish, Dutch, French, German, Greek, Hebrew, Hungarian, Italian, Norwegian, Polish, Portuguese, Romanian, Russian, Spanish, Swedish, and Turkish.
Keyboard
Assign an application to a Convenience key
Your BlackBerry ^® device has one or more Convenience keys on the side of the device. Depending on your theme, you might not be able to change the application that is assigned to a Convenience key.
- On the Home screen or in a folder, click the Options icon.
- Click Device > Convenience Keys.
- Change the Convenience Key Opens field.
- Press the ☐ key > Save.
Change the default currency symbol
- On the Home screen or in a folder, click the Options icon.
- Click Typing and Input > Keyboard.
- Change the Currency Key field.
- Press the key > Save.
Set the cursor speed
- On the Home screen or in a folder, click the Options icon.
- Click Typing and Input > Keyboard.
- Change the Key Rate field.
- Press the key > Save.
Turn on key tones
- On the Home screen or in a folder, click the Options icon.
- Click Typing and Input > Keyboard.
- Select the Key Tone check box.
- Press the Key > Save.
Set the trackpad sensitivity
You can set how the trackpad responds to your touch. A high sensitivity level requires less pressure than a lower sensitivity level.
- On the Home screen or in a folder, click the Options icon.
- Click Typing and Input > Trackpad Sensitivity.
- Change the Horizontal Sensitivity field and Vertical Sensitivity field.
- Press the ☐ key > Save.
Turn off trackpad sounds
- On the Home screen or in a folder, click the Options icon.
- Click Typing and Input > Trackpad Sensitivity.
- Clear the Audible Roll check box.
- Press the key > Save.
To turn on trackpad sounds again, select the Audible Roll check box.
Troubleshooting: Keyboard
No application opens when I press a Convenience key
Try the following:
- If you have not done so, assign an application to the key.
- Verify that you did not delete the application that you assigned to the key.
Language
About typing input languages
You can set a typing input language to use when you type. The typing input language can be different from the display language. When you set a typing input language, AutoText and other typing options change to the selected language. For example, you might use your BlackBerry® device in French, but type messages in English.
Change the language
- On the Home screen or in a folder, click the Options icon.
-
Click Typing and Input > Language.
-
To change the display language, change the Display Language field.
- To change the typing language, change the Typing Language field.
-
To change the language for voice commands, change the Voice Dialing field.
-
Press the ☐ key > Save.
Use a shortcut for switching typing input languages when you are typing
- On the Home screen or in a folder, click the Options icon.
-
Click Typing and Input > Language.
-
To switch the typing input language by holding the Alt key and pressing the Enter key, change the Shortcut Keys field to Alt-Enter.
-
To switch the typing input language by holding the Shift key and pressing the Space key, change the Shortcut Keys field to Shift-Space.
-
Press the ☐ key > Save.
To turn off the shortcut for switching typing input languages, change the Shortcut Keys field to None.
Add a display language
You can use the BlackBerry® Desktop Software to add a display language to your BlackBerry device. To download the BlackBerry Desktop Software, from your computer, visit www.blackberry.com/desktop and select the appropriate option for your computer.
Connect your device to your computer and open the BlackBerry Desktop Software.
For more information about adding applications and display languages, see the Help in the BlackBerry Desktop Software.
Delete a language
You can delete languages that you do not use to increase the amount of space available.
- On the Home screen or in a folder, click the Setup icon.
- Click Languages > Language Removal.
- Select the languages you want to keep.
- Click Update.
Any languages that you do not select are deleted from your BlackBerry ^® device.
Troubleshooting: Language
Some characters do not appear correctly on my device
The BlackBerry ^® Enterprise Server or BlackBerry ^® Internet Service that is associated with your BlackBerry ^® device might not support the characters. For more information, contact your wireless service provider or administrator.
Screen display
Set options for backlighting
- On the Home screen or in a folder, click the Options icon.
- Click Display > Screen Display.
-
Do any of the following:
-
To change the brightness of the backlight for the screen, change the Backlight Brightness field.
- To change the length of time that the backlight stays on when you are not touching your BlackBerry® device, change the Backlight Timeout field.
-
To stop the backlight from adjusting to lighting conditions, clear the Automatically Dim Backlight check box.
-
Press the ☐ key > Save.
Related topics
The screen turns off, 216
Use a picture as your device wallpaper
- On the Home screen, click the Media icon > Pictures icon.
- Browse to a picture.
- Press the ☐ key > Set As Wallpaper.
Related topics
My display changed, 215
Change the display font
- On the Home screen or in a folder, click the Options icon.
- Click Display > Screen Display.
- Change the font fields.
- Press the key > Save.
Organizing applications on the Home screen
About organizing application icons
Application icons can appear on the Home screen or in folders on the Home screen. If you cannot see all your application icons, they might be hidden. You can make all your application icons visible on the Home screen or in folders by selecting Show All from the Home screen menu.
You can reorder application icons to change which icons appear first on the Home screen. You can also create and delete folders, change the folder icon style for folders that you create, and move application icons into folders and out of folders.
Find or hide an application icon
Depending on your theme, you might not be able to hide some application icons.
On the Home screen or in a folder, do any of the following:
• To see all your application icons, press the key > All.
- To hide an application icon, highlight the icon. Press the key > Hide.
- To show all hidden application icons, press the key > Show All.
- To stop hiding an application icon, highlight the icon. Press the 📁 key > Hide. A check mark should not appear beside the Hide field.
Related topics
My display changed, 215
Add, change, or delete a folder on the Home screen
On the Home screen, do one of the following:
- To add a folder, press the ☐key > Add Folder. Type a name for the folder. To change the folder icon style, click the folder icon. Click a folder icon style. Click Add.
- To change a folder, highlight a folder. Press the ☐ key > Edit Folder. Change the folder name or folder icon style. Click Save.
- To delete a folder, highlight a folder. Press the ☐ key > Delete.
Move an application icon
- On the Home screen or in an application folder, highlight an application icon.
- Press the Menu key.
- Perform one of the following actions:
- To move the application icon to a different location on the Home screen, click Move. On the trackpad, slide your finger to the new location. Click the trackpad.
- To move the application icon into an application folder, click Move to folder. Click an application folder.
- To move the application icon out of an application folder, click Move to folder. Click Home or an application folder.
Add a message that appears when your device is locked
- On the Home screen or in a folder, click the Options icon.
- Click Display > Message on Lock Screen.
- Type the text that you want to appear on the screen when your device is locked.
- Press the ☐ key > Save.
Set the touch screen sensitivity
You can set how sensitive the screen is to your touch.
- On the Home screen or in a folder, click the Options icon.
-
Click Typing and Input > Touchscreen Sensitivity.
-
If you want the screen to respond faster when you tap it, change the Tap Interval field to a lower number.
- If you want the screen to respond faster when you touch and hold it, for example, when you touch and hold the screen to open a pop-up menu, change the Hover Period field to a lower number.
-
If you want the screen to be more responsive when you slide your finger quickly, change the Swipe Sensitivity field to a lower number.
-
Press the key > Save.
Use grayscale or reverse contrast for the screen display
- On the Home screen or in a folder, click the Options icon.
-
Click Accessibility.
-
To use grayscale for the screen display, change the Color Contrast field to Greyscale.
• To use reverse contrast for the screen display, change the Color Contrast field to Reverse Contrast. -
Press the ☐ key > Save.
Turn on flashing LED notification for wireless coverage
- On the Home screen or in a folder, click the Options icon.
- Click Display > Screen Display.
- Select the LED Coverage Indicator check box.
4. Press the Key > Save.
When your BlackBerry ^® device is connected to the wireless network, the LED light flashes green.
To turn off the wireless coverage notification, clear the LED Coverage Indicator check box.
Themes
About themes
Depending on your wireless service provider, you might be able to set a theme on your BlackBerry® device that changes how items such as applications, indicators, words, and icons appear. Themes might be preloaded on your device, or you might be able to download themes that are in .cod file format.
Switch themes
- On the Home screen or in a folder, click the Options icon.
- Click Display > Screen Display.
- In the Theme section, click a theme.
- Click Activate.
To delete a theme, click the theme. Click Delete.
Related topics
My display changed, 215
Troubleshooting: Display
My display changed
Depending on your theme, display options such as icons, fonts, and your Home screen background, might change when you switch themes.
Related topics
Use a picture as your device wallpaper, 11
Find or hide an application icon, 10
Switch themes, 35
No application opens when I press a Convenience key
Try the following:
- If you have not done so, assign an application to the key.
- Verify that you did not delete the application that you assigned to the key.
The screen turns off
When you do not use your BlackBerry ^® device for a period of time, the screen turns off to conserve battery power. You can change the length of time that the backlight stays on when you are not touching your device.
To turn on the screen, click the trackpad or press a key.
Related topics
Set options for backlighting, 212
GPS technology
Depending on your wireless service provider, this feature might not be supported.
About GPS technology
Depending on your wireless service provider, this feature might not be supported.
You can use GPS technology on your BlackBerry ^® device to get your GPS location and to use location-based applications and location-based services. Location-based applications can use your GPS location to provide you with information such as driving directions.
If your device does not have an internal GPS receiver or your wireless service provider does not support location-based services and you want to use GPS technology, you can pair your BlackBerry device with a Bluetooth® enabled GPS receiver. For more information, contact your wireless service provider.
If your device is connected to a CDMA network and you make an emergency call or your device is in Emergency Callback Mode, an emergency operator might be able to use GPS technology to estimate your location.
Note: In an emergency, always provide the emergency operator with as much information as possible. Emergency operators might not be able to estimate your location using only GPS technology.
Turn on GPS technology
Depending on your BlackBerry ^® device model and wireless network, this feature might not be supported.
Note: The GPS options that appear on your device might differ slightly from the options that appear in this task.
- On the Home screen or in a folder, click the Options icon.
- Click Device > Location Settings.
- Change the Location Services field to Location On.
- Press the ☐ key > Save.
To turn off GPS technology, change the Location Services field to Location Off.
Set the GPS receiver that you use to track your movement
To perform this task, if you don't have an internal GPS receiver, you must pair your BlackBerry® device with a Bluetooth® enabled GPS receiver.
- On the Home screen or in a folder, click the Options icon.
- Click Device > Location Settings.
-
Change the GPS Data Source field.
-
Press the Key > Save.
Get your GPS location
Depending on your wireless service provider and wireless network, this feature might not be supported. To perform this task, you must pair your BlackBerry ^® device with a Bluetooth ^® enabled GPS receiver, if your device does not have an internal GPS receiver.
- On the Home screen or in a folder, click the Options icon.
- Click Device > Location Settings.
- Press the ☐ key > Refresh GPS.
The longitude and latitude coordinates for your current location appear.
Prevent others from tracking your location
If your email account uses a BlackBerry® Enterprise Server, your administrator might be able to track the location of your BlackBerry device. For more information, contact your administrator.
- On the Home screen or in a folder, click the Options icon.
- Click Device > Location Settings.
- Change the Location Services field to Location Off.
- Press the Key > Save.
Turn off location aiding
Depending on your wireless service provider and wireless network, this feature might not be supported. By default, location aiding is turned on to improve the performance of GPS technology. When location aiding is turned on, your BlackBerry® device connects to a central server periodically, which can increase your data service charges. To avoid these charges, you can turn off location aiding, but it might take longer for your device to get your GPS location. For more information, contact your wireless service provider.
- On the Home screen or in a folder, click the Options icon.
-
Click Device > Location Settings.
-
To turn off location aiding, change the Location Aiding field to Disabled.
-
To turn off location aiding when roaming, change the Location Aiding field to Disabled While Roaming.
-
Press the key > Save.
Troubleshooting: GPS technology
I cannot use GPS technology
Try performing the following actions:
- If you are outdoors, move away from buildings and expose your device to open sky.
- If you are indoors, move close to a window.
- If you have paired your BlackBerry® device with a Bluetooth® enabled GPS receiver, verify that the Bluetooth enabled GPS receiver is turned on.
- If you are using GPS technology for the first time, wait a short period of time for your device to get your GPS location.
Maps
Map basics
View a location on a map
- On the Home screen, click the Maps icon.
- On a map, press the ☐ key > Find Location.
-
Do one of the following:
-
To search for a point of interest such as a business or landmark, in the drop-down at the top right of the screen, click Business. Type the information for the point of interest in the Business field. Highlight the point of interest.
- To view a new location, in the drop-down at the top right of the screen, click Location. Type an address in the Location field. Highlight the location.
- To view a location for a contact, type the contact name in the Location field or the Business field. Highlight the contact information.
-
To view a bookmarked location, highlight the location in the bottom section of the screen.
-
Press the ☐ key > View on Map
If you are viewing a location other than your current location, to get directions to this location from your current location, press the ☐key > Navigate to Here. Your device must have an internal GPS receiver or be paired with a Bluetooth enabled GPS receiver to perform this task.
View an address on a map using a link
When your BlackBerry ^® device recognizes an address in certain applications, such as instant messaging applications or the MemoPad, your device underlines the address.
- Highlight an underlined address.
- Press the key > View on Map.
Send a location
You can send a location as a message, for example, in an email message or instant message. The message that you send includes a link to the location so that the recipient can view the location on a map.
- On a map, press the ☐ key > Send Location.
- Click a message type.
Get directions
- On the Home screen, click the Maps icon.
-
Press the ☐ key > Get Directions.
-
Do one of the following to specify a starting location:
-
To specify your current location, if your BlackBerry® device has an internal GPS receiver or is paired with a Bluetooth® enabled GPS receiver, set the Start field to My Location.
- To specify the location that you are currently viewing on a map, set the Start field to Use center of map. If you are viewing a bookmarked location, click Use focused location.
- To specify a new location by selecting the location on a map, set the Start field to Select from map. Click the location on the map.
- To specify a point of interest, such as a business or a landmark, set the Start field to Find Location. In the drop-down list at the top right of the screen, click Business. In the Search field, type the information for the point of interest. Press the key on the keyboard. Click a point of interest.
• To specify a contact's address, set the Start field to Find Location. Start typing the contact's name. Click the contact. - To specify a new location by typing the address, set the Start field to Find location. In the drop-down list at the top right of the screen, click Location. In the Search field, type the address. Press the ↕ key on the keyboard. Click the location.
-
To specify a bookmarked location, set the Start field to Find location. In the bottom pane, click a bookmarked location.
-
Repeat step 3 to specify an ending location.
- To change the route options, click Route Options. Select or clear the check box beside one or more route options. Click OK.
- Click Search.
Pan a map
To pan a map, your BlackBerry ^® device must be in pan mode and not zoom mode. The mode that your device is in is displayed at the top of the map.
- If your device is in zoom mode, click the trackpad to switch to pan mode.
- On the trackpad, slide your finger in any direction.
Zoom in to or out from a map
To zoom in to or out from a map, your BlackBerry ^® device must be in zoom mode and not pan mode. The mode that your device is in is displayed at the top of the map.
On a map, do one of the following:
- To zoom in, if your device is not already in zoom mode, click the trackpad. Slide your finger up on the trackpad.
- To zoom out, if your device is not already in zoom mode, click the trackpad. Slide your finger down on the trackpad.
- To zoom to a point in a route, press the ☐ key > Zoom To Point.
View a list of points of interest near a location
You can search for points of interest such as businesses or landmarks. For example, you might search for coffee shops near your current location.
- On a map, press the ☐ key > Find Location.
- Type the point of interest information.
- Press the key on the keyboard.
View contact information for a point of interest
Points of interest are displayed on maps as location markers.
- On a map or in a list of points of interest, highlight a point of interest.
- Press the ☐ key > Display Details.
Clear a map
When you clear a map, any route information displayed on the map no longer appears.
On a map, press the key > Clear Map.
Add a bookmark for a location or route
- On the Home screen, click the Maps icon.
- On a map, press the ☐ key > Add As Favorite > OK.
Rename a bookmark for a location or route
- On the Home screen, click the Maps icon.
- Press the key > Favorites.
- Highlight a bookmark.
- Press the key > Rename.
- Type a new name.
- Click OK.
Delete a bookmark for a location or route
- On the Home screen, click the Maps icon.
- On a map, press the ☐ key > Favorites.
- Highlight a bookmark.
- Press the Key > Delete.
Map options
Keep backlighting on when you track your movement
By default, backlighting turns off automatically after a specified time to conserve battery power. You can change map options so that backlighting remains on when you track your movement unless the battery power level drops below a specified percentage.
- On a map, press the key > Options.
- Change the Backlight Timeout When field.
- Press the key > Save.
Related topics
Set options for backlighting, 212
Set the GPS receiver that you use to track your movement
To perform this task, if you don't have an internal GPS receiver, you must pair your BlackBerry® device with a Bluetooth® enabled GPS receiver.
- On the Home screen or in a folder, click the Options icon.
- Click Device > Location Settings.
- Change the GPS Data Source field.
- Press the key > Save.
Map shortcuts
Depending on the typing input language that you are using, some shortcuts might not be available.
| Zoom in to a map | Press I |
| Zoom out from a map Press O | |
| Move to the next direction on a route Press N | |
| Move to the previous direction on a route Press P |
Troubleshooting: Maps
Some features are not available on my device
The availability of certain features on your BlackBerry ^® device might be affected by items such as your device model and wireless service plan.
Depending on your messaging service plan, some features or options might not be available in the message options on the Email Preferences screen.
If your email account uses a BlackBerry® Enterprise Server, your organization might not have set up some features or might prevent you from using some features or options. If your administrator has set an option for you, a red lock indicator appears beside the option field.
For more information about the features that are available on your device, contact your wireless service provider or administrator, or visit www.blackberry.com/go/devices.
Related topics
Feature availability, 27
Applications
About multitasking
Your BlackBerry ^® device supports multitasking, which allows you to run more than one application at a time. During a call, for example, you might want to switch to the calendar application to view your appointments or switch to the contacts application to look up a contact. While you are playing a song, you might want to switch to the messages application to reply to a message.
There are also shortcuts for most applications that can help you to perform common tasks quickly.
Note: The more applications that you have running, the more memory and battery power your device uses. To optimize the performance of your device, try to close applications when you are finished with them.
Related topics
Keep an application running in the background and switch to another application, 225
Close an application so that it is not running in the background, 225
Keep an application running in the background and switch to another application
- To switch to another application, press and hold the ☐ key until the application switcher appears. Click an application icon. If the application icon that you want does not appear, click the Home screen icon and navigate to the application icon that you are looking for.
• To return to the Home screen if you are not on a call, press the key. - To return to the Home screen if you are on call, press and hold the key until the application switcher appears. Click the Home screen icon.
Note: If you press the 🔒 key while you are on a call, you will end the call even if you have switched to another application.
Related topics
Close an application so that it is not running in the background, 225
Close an application so that it is not running in the background
To optimize the performance of your BlackBerry ^® device, try to close applications when you are finished with them.
In an application, do one of the following actions:
- Press the key > Close.
- Press the key. If necessary, continue to press the key until the Home screen appears.
Related topics
Keep an application running in the background and switch to another application, 225
About adding applications
Depending on your wireless service provider and region, you might have the option to add or update applications using the BlackBerry App World™ storefront, the BlackBerry® Desktop Software, or the Application Center. You might also be able to download applications from a web page (try visiting mobile.blackberry.com from your BlackBerry device), or from an application offered by your wireless service provider.
Additional terms and conditions might apply to software and services made available through the BlackBerry App World™ storefront, the BlackBerry Desktop Software, or the Application Center. Data charges might apply when you add or use an application over the wireless network. For more information, contact your wireless service provider.
BlackBerry App World
If you have BlackBerry App World on your device, you can search for and download games, social networking applications, personal productivity applications, and much more. Using an existing PayPal® account, you can buy and download items over the wireless network to your device.
To download BlackBerry App World, visit www.blackberryappworld.com.
For more information about managing applications using BlackBerry App World, click the BlackBerry App World icon. Press the key > Help.
BlackBerry Desktop Software
If you have the BlackBerry Desktop Software installed on your computer, you can connect your device to your computer to add, update, remove, or restore applications. You can also add applications to your device that you have downloaded to your computer, without having to use the wireless network.
To download the BlackBerry Desktop Software, visit www.blackberry.com/desktop.
For more information about managing applications using the BlackBerry Desktop Software, see the Help in the BlackBerry Desktop Software.
Application Center
If you have the Application Center on your device, you can add, update, or return to the previous version of a select number of applications that are hosted by your wireless service provider. Depending on your wireless service provider, this feature might not be available.
For more information about managing applications using the Application Center, click the Application Center icon. Press the key > Help.
About social networking applications
You can use social networking applications on your BlackBerry ^® device to stay connected with your social networking contacts. Depending on the social networking application, you might be able to send messages, share pictures, change your status, and more.
You can download social networking applications for your BlackBerry device from the BlackBerry App World™ storefront. You must have a wireless service data plan to use these applications. Depending on your wireless service provider or organization, some applications or features might not be supported.
For more information about social networking applications, visit www.blackberry.com/support. If you need help using a social networking application, you can find answers in the application by pressing the Menu key and clicking Help on your device.
About instant messaging applications
You can download instant messaging applications for your BlackBerry ^® device from the BlackBerry App World ^™ storefront. By default, your BlackBerry device comes with BlackBerry ^® Messenger. You can use BlackBerry Messenger to chat with people who have a BlackBerry device by sending and receiving messages and files. You can also change your status and display picture. With the BlackBerry ^® Groups feature of BlackBerry Messenger, you can share pictures, lists, appointments, and more.
You must have a wireless service data plan to use these applications. Depending on your wireless service provider or organization, some applications or features might not be supported.
For more information about BlackBerry Messenger and other instant messaging applications, visit www.blackberry.com/support. If you need help using an instant messaging application, you can find answers in the application by pressing the Menu key and clicking Help on your device.
Require your device password before adding an application
To perform this task, you must have set a BlackBerry ^® device password.
- On the Home screen or in a folder, click the Options icon.
- Click Security > Password.
- Change the Prompt on application install field to Yes.
- Press the key > Send.
Delete an application
If your email account uses a BlackBerry ^® Enterprise Server, your organization might not permit you to delete some applications. For more information, contact your administrator.
- On the Home screen or in a folder, highlight an application icon.
- Press the ☐ key > Delete.
View properties for an application
- On the Home screen or in a folder, click the Options icon.
- Click Device > Application Management.
- Click an application.
View the size of an application database
- On the Home screen or in a folder, click the Options icon.
- Click Device > Status.
- Press the ☐ key > Database Sizes.
Troubleshooting: Applications
I cannot add, update, or return to the previous version of an application
If your email account uses a BlackBerry ^® Enterprise Server, your organization might not permit you to add or update device applications. For more information, contact your administrator.
Try the following actions:
- Verify that your BlackBerry® device is connected to the wireless network.
- Verify that your device has enough memory to add or update the application.
BlackBerry Device Software
About updating the BlackBerry Device Software
You might want to update your BlackBerry® Device Software for one of the following reasons:
• to access new applications and features
• to resolve a technical issue
- your wireless service provider requires you to update the BlackBerry Device Software
You might be able to update your BlackBerry Device Software over the wireless network, from a web site, or using the BlackBerry® Desktop Software.
The duration of the update process can range from 15 minutes to 2 hours, depending on the type of update, the amount of device data, and the number of applications on your BlackBerry device. You cannot use your device or make emergency calls when the update is in progress. Do not remove the battery while the update is in progress.
Over the wireless network
You can update your BlackBerry Device Software over the wireless network if a Wireless Update icon appears on the Home screen of your device. You can also check for updates manually through the device options. The available update might be a complete software update, or a partial software update only. If the available update is a complete software update, your device data is backed up on your device and restored during the installation process. Depending on the options that your wireless service provider or administrator sets, you might not be able to update the BlackBerry Device Software over the wireless network. Depending on your wireless service provider, extra fees might apply when you download the update to your device.
From a web site
If your email account uses the BlackBerry® Internet Service or a BlackBerry® Enterprise Server that supports this feature, you can update your BlackBerry Device Software by connecting your device to your computer and visiting the update web site at www.blackberry.com.
Using the BlackBerry Desktop Software
If you have the BlackBerry Desktop Software installed on your computer, you can update your BlackBerry Device Software from your computer. For more information about updating the BlackBerry Device Software from your computer, see the Help in the BlackBerry Desktop Software.
Research In Motion recommends that you regularly create and save a backup file on your computer, especially before you update any software. Maintaining an up-to-date backup file on your computer might allow you to recover device data if your device is lost, stolen, or corrupted by an unforeseen issue.
Update the BlackBerry Device Software over the wireless network
Depending on the options that your wireless service provider or administrator sets, you might not be able to perform this task. Depending on your wireless service provider, you might not be able to perform this task at certain times of the day, when there is a greater volume of network traffic.
You can use your BlackBerry ^® device when you download the BlackBerry ^® Device Software but not when you install the software. You have the option to schedule the update to occur at a specific time.
Research In Motion recommends that you regularly create and save a backup file on your computer, especially before you update any software. Maintaining an up-to-date backup file on your computer might allow you to recover device data if your device is lost, stolen, or corrupted by an unforeseen issue.
- On the Home screen, click the Wireless Update icon. If you do not have the Wireless Update icon, on the Home screen, click the Options icon. Click Device > Software Updates.
- Complete the instructions on the screen.
Note: During the installation process, your device might reset or display a white screen. If encryption is turned on, you might need to type your password at various times during the installation process.
Return to or delete the previous version of the BlackBerry Device Software
Depending on the options that your wireless service provider or administrator sets, you might not be able to perform this task.
-
On the Home screen or in a folder, click the Options icon.
-
Click Device > Software Updates > Update successful.
-
To return to a previous software version, click Downgrade.
- To delete a previous software version, press the ☐key > Delete Downgrade Data.
Update the BlackBerry Device Software from a web site
If your email account uses a BlackBerry ^® Enterprise Server you might not be able to perform this task. Check with your administrator for BlackBerry ^® Device Software updates that have been approved for use in your organization.
Research In Motion recommends that you regularly create and save a backup file on your computer, especially before you update any software. Maintaining an up-to-date backup file on your computer might allow you to recover device data if your device is lost, stolen, or corrupted by an unforeseen issue.
- From your computer, visit the BlackBerry Device Software update site.
- Click Check for Updates.
-
Connect your BlackBerry device to your computer.
-
On the Update summary screen, select the check box beside the update that you want to install.
- Do any of the following:
- To add or remove optional applications, click Options. Select or clear the check box beside one or more applications. Click Next.
- To back up your device data or delete all device data, click Settings. Select the check box beside one or more data types. Click OK.
- Click Next.
- Complete the instructions on the screen to sign up for or decline email notifications for new software.
- Click Next > Finish.
Update the BlackBerry Device Software using the BlackBerry Desktop Software
Research In Motion recommends that you regularly create and save a backup file on your computer, especially before you update any software. Maintaining an up-to-date backup file on your computer might allow you to recover device data if your device is lost, stolen, or corrupted by an unforeseen issue.
Connect your BlackBerry ^® device to your computer and open the BlackBerry ^® Desktop Software. For more information, see the Help in the BlackBerry Desktop Software.
Troubleshooting: BlackBerry Device Software
I cannot update the BlackBerry Device Software over the wireless network
Depending on the options that your wireless service provider or administrator sets, you might not be able to update your BlackBerry® Device Software over the wireless network.
Try the following actions:
- Verify that your BlackBerry device is connected to a wireless network.
- Verify that your device has enough storage space to update the BlackBerry Device Software.
- Verify that you are not roaming outside of your wireless service provider's wireless coverage area. Depending on your wireless service provider, you might not be able to update your BlackBerry Device Software when roaming. For more information, contact your wireless service provider.
- Try to update your BlackBerry Device Software over the wireless network at a later time. Depending on your wireless service provider, you might not be able to update your BlackBerry Device Software at certain times of the day, when there is a greater volume of network traffic.
- Try visiting your wireless service provider's website, as you might be able to update your BlackBerry Device Software from the website.
My device does not have enough available memory to update the BlackBerry Device Software
Try performing the following actions:
- Delete media files, display languages, or third-party applications that you do not use.
- Transfer media files that you have stored in the BlackBerry® device memory to a media card.
Manage Connections
Manage Connections basics
Check what wireless networks your device connects to
You can check the types of networks your device can connect to on your device, as well as by visiting www.blackberry.com/go/devices to see feature specifications for your device model. The types of networks listed do not reflect network connections, only the ability of your device model to connect to those networks.
- On the Home screen or in a folder, click the Options icon.
- Click Device > About Device Versions. The types of networks your device can connect to are listed in the brackets after your device model.
For more information about the wireless networks that your BlackBerry® device connects to, see the Safety and Product Information booklet for your device.
Wireless coverage indicators
Indicators in the upper-right corner of the Home screen display the wireless coverage level for the area in which you are using your BlackBerry ^® device. For more information about wireless coverage areas, contact your wireless service provider.
| Indicator | Description |
 | Provides information about the strength of the wireless signal. Three or more bars indicate a strong signal. A reduced signal display might indicate increased power output from your device as it attempts to connect to a weak signal. |
 | |
1XFV, 1X, 3GEDGE, GPRS, NXTL, MIKE, | You are connected to a mobile network and you can access features such as email messaging and Internet browsing. If you do not see one of the indicators, you might be in an area of reduced wireless coverage where some features are not available (you might only be able to make a phone call or send and receive text messages). |
 | You can call only emergency numbers. |
 | You are in an area of no wireless coverage. |
 | The connection to the mobile network is turned off. |
 | You are connected to a Wi-Fi® network and you can access BlackBerry services such as email messaging and Internet browsing over the Wi-Fi connection. |
| Indicator Description | |
| Your Wi-Fi connection is turned on, but you are not connected to a Wi-Fi network, or you are connected to a Wi-Fi network, but you cannot access BlackBerry services such as email messaging and Internet browsing over the Wi-Fi connection. | |
| Your Bluetooth® connection is turned on, and you are connected to a Bluetooth enabled device. | |
| Your Bluetooth connection is turned on, but you are not connected to a Bluetooth enabled device. | |
Related topics
About emergency calls and Emergency Callback Mode, 52
Turn on or turn off a network connection
You should keep network connections turned off in certain places, such as on an airplane or in a hospital. For more information, see the Safety and Product Information booklet for your BlackBerry ^® device.
On the Home screen, click the connections area at the top of the screen, or click the Manage Connections icon.
- To turn on a network connection, select the check box beside a connection type.
- To turn off a network connection, clear the check box beside a connection type.
- To turn on the network connections that were turned on previously, click Restore Connections.
Related topics
I cannot connect to a Wi-Fi network, 244
I cannot connect to the mobile network, 238
Turn on or turn off data service or set roaming options
Depending on your wireless service plan, you might be able to turn off data service (email messages, PIN messages, text messages with attachments, and browser service) on your BlackBerry® device so that only phone and basic text messaging are available. You can also set your device to turn off data services when roaming. For more information, contact your wireless service provider.
- On the Home screen, click the connections area at the top of the screen, or click the Manage Connections icon.
- Click Mobile Network Options.
-
Do one of the following:
-
To turn on or turn off data service, change the Data Services field.
- To turn on or turn off data service when roaming, change the While Roaming field.
-
To receive a prompt when roaming that allows you to turn on or turn off data service, change the While Roaming field to Prompt.
-
Press the key > Close.
Related topics
I cannot connect to the mobile network, 238
Check the status of network connections and services
- On the Home screen, click the connections area at the top of the screen, or click the Manage Connections icon.
- Click Services Status.
Mobile network
Roaming
About roaming and international roaming
In most cases, your BlackBerry ^® device automatically connects to the appropriate wireless network when you travel outside your wireless service provider's coverage area. Sometimes you might have to provide login information before you can access a wireless network. When you roam, a triangular roaming indicator appears at the top of the Home screen.
If your device requires a SIM card, your wireless service provider might need to set up your SIM card with roaming services before you can roam.
If your device normally connects to a CDMA network and your device supports international roaming, you might need to get a SIM card that is set up for international roaming from your wireless service provider. Your phone number stays the same when you travel internationally.
For more information about roaming and roaming fees, contact your wireless service provider.
Switch wireless networks manually
To perform this task, your wireless service plan must include this service and your BlackBerry ^® device must be connected to a GSM ^® or UMTS ^® network.
Your device is designed to switch to an appropriate wireless network automatically when you travel.
- On the Home screen, click the connections area at the top of the screen, or click the Manage Connections icon.
- Click Mobile Network Options.
- Change the Network Selection Mode field to Manual.
- Click a wireless network.
- Click Select Network.
- Press the Key > Close.
To connect to your wireless service provider's wireless network again, change the Network Selection Mode field to Automatic.
Related topics
I cannot connect to the mobile network, 238
Turn on or turn off data service or set roaming options
Depending on your wireless service plan, you might be able to turn off data service (email messages, PIN messages, text messages with attachments, and browser service) on your BlackBerry® device so that only phone and basic text messaging are available. You can also set your device to turn off data services when roaming. For more information, contact your wireless service provider.
- On the Home screen, click the connections area at the top of the screen, or click the Manage Connections icon.
- Click Mobile Network Options.
-
Do one of the following:
-
To turn on or turn off data service, change the Data Services field.
- To turn on or turn off data service when roaming, change the While Roaming field.
-
To receive a prompt when roaming that allows you to turn on or turn off data service, change the While Roaming field to Prompt.
-
Press the ☐ key > Close.
Related topics
I cannot connect to the mobile network, 238
Preferred wireless network list
About the preferred wireless network list
Your wireless service provider might have agreements with other wireless service providers that permit you to use their services when you are traveling. You can use the preferred wireless network list to control the order in which your BlackBerry ^® device uses these other wireless networks.
Your device tries to connect to a wireless network based on the order in which the wireless networks appear in your preferred wireless network list. When you travel, your device scans for the wireless networks on this list first. If no wireless network on the list is available, your device is designed to connect to another available wireless network automatically.
Note: Extra fees usually apply when you roam. For more information about roaming fees, contact your wireless service provider.
Add a wireless network to the preferred wireless network list
To perform this task, your BlackBerry ^® device must be connected to a GSM ^® or UMTS ^® network.
Depending on your wireless service plan, this feature might not be supported.
- On the Home screen, click the connections area at the top of the screen, or click the Manage Connections icon.
- Click Mobile Network Options.
- Press the key > My Preferred Network List.
- Press the ☐ key > Add Network.
- To scan for a wireless network to add, click Select From Available Networks. Click a wireless network. Click Select Network.
- To scan for a wireless network that is already known to your device, click Select From Known Networks. Click a wireless network. Click Select Network.
-
To add a wireless network, click Manual Entry. Set the priority for the wireless network. Type the MCC and MNC.
-
Press the ☐ key > Close.
Delete a wireless network from the preferred wireless network list
To perform this task, your BlackBerry ^® device must be connected to a GSM ^® or UMTS ^® network.
Depending on your wireless service plan, this feature might not be supported.
- On the Home screen, click the connections area at the top of the screen, or click the Manage Connections icon.
- Click Mobile Network Options.
- Press the ☐ key > My Preferred Network List.
- Highlight a wireless network.
- Press the key > Delete.
- Press the key > Close.
Change the order of preferred networks
To perform this task, your BlackBerry ^® device must be connected to a GSM ^® or UMTS ^® network.
Depending on your wireless service plan, this feature might not be supported. Your BlackBerry device connects to networks based on the order that they appear in the preferred network list.
- On the Home screen, click the connections area at the top of the screen, or click the Manage Connections icon.
- Click Mobile Network Options.
- Press the Key > My Preferred Network List.
- Highlight a wireless network.
- Press the Key > Move.
- Click the new location.
- Press the Key > Close.
Mobile network options
Change the connection speed for the wireless network
A faster connection speed requires more battery power.
Depending on your wireless service provider, you might not be able to change the connection speed for the wireless network.
- On the Home screen, click the Manage Connections icon.
- Click Mobile Network Options.
- Change the Network Mode field.
- Press the Escape key.
Related topics
I cannot connect to the mobile network, 238
Turn on flashing LED notification for wireless coverage
- On the Home screen or in a folder, click the Options icon.
- Click Display > Screen Display.
- Select the LED Coverage Indicator check box.
- Press the ☐ key > Save.
When your BlackBerry ^® device is connected to the wireless network, the LED light flashes green.
To turn off the wireless coverage notification, clear the LED Coverage Indicator check box.
Troubleshooting: Mobile network
I cannot connect to the mobile network
Try the following actions:
- If your BlackBerry® device uses a SIM card, verify that your SIM card is inserted in your device correctly.
- If your device normally connects to a CDMA network and your device supports international roaming, verify that your device is in global roaming mode and that your SIM card is inserted in your device correctly.
- Verify that you have turned on the connection to the wireless network.
- Verify that you are connected to your wireless service provider's network. If you switched wireless networks manually, your device remains connected to that wireless network until you select your wireless service provider's network again.
- If you have set a specific speed for wireless network connections, verify that you are in a wireless coverage area that supports the connection speed.
- If you have a Wi-Fi® enabled device and your wireless service provider supports UMA, verify that your connection preference is not set to Wi-Fi Only.
Related topics
Turn on or turn off a network connection, 234
Change your UMA connection preferences, 243
Switch wireless networks manually, 235
Turn on or turn off data service or set roaming options, 234
Error messages
Data service unavailable :
Description
This message appears when you do not have access to data services on your BlackBerry ^® device.
Possible solutions
Try the following actions:
- Verify that you are in a wireless coverage area.
- Verify that the data service on your device is turned on.
- If you are roaming, verify that you can access data services while you roam.
Related topics
Turn on or turn off data service or set roaming options, 234
Wi-Fi technology
Depending on your BlackBerry ^® device model, the Wi-Fi ^® feature might not be supported.
About connecting to a Wi-Fi network
With Wi-Fi ^® technology, your BlackBerry ^® device can access the Internet by connecting to a wireless router or wireless access point at your home, work, or in a hotspot area. Your device uses the Wi-Fi network instead of the mobile network to visit web pages, send and receive email messages, and so on. When you connect to the Internet with a Wi-Fi network, you might avoid data charges that are associated with using your mobile network, and, in many cases, the connection speed is faster.
Hotspots are available in many public places, such as libraries, airports, hotels, coffee shops, and so on. Some hotspots are free to use, while others require payment. Your wireless service provider might provide an application for your device that allows you to log in to a hotspot. If you do not have an application on your device, you might have to set up your own account online and log in manually.
If you have an access point or router that supports Wi-Fi Protected Setup™, you can connect to it using Wi-Fi Protected Setup.
When you connect to a Wi-Fi network, your device saves the connection information so that the next time that you are within range of that network, your device connects to it automatically.
Connect to a Wi-Fi network
- On the Home screen, click the connections area at the top of the screen, or click the Manage Connections icon.
- Click Set Up Wi-Fi.
- If you want to connect to a public hotspot or to a Wi-Fi® network that does not require authentication, select the Show Open networks only check box.
- Click the Wi-Fi network that you want to connect to.
- If the Wi-Fi network requires authentication, type a password for the network.
The name of the Wi-Fi network appears at the top of the Home screen.
Related topics
I cannot connect to a Wi-Fi network, 244
Connect to a Wi-Fi network using Wi-Fi Protected Setup
If your wireless router or wireless access point includes Wi-Fi Protected Setup™, you can quickly connect to a Wi-Fi® network without entering a long password.
- On the Home screen, click the connections area at the top of the screen, or click the Manage Connections icon.
- Click Set Up Wi-Fi > Other Ways to Connect.
- To use the Wi-Fi Protected Setup button on your router or access point, click Press Button on Router. On your router or access point, press the Wi-Fi Protected Setup button. On your BlackBerry® device, click Start.
- To use a PIN, click Enter PIN into router. On your device, click Start. Your device provides you with a PIN. On the administration screen for your router or access point, type the PIN.
Connect to a Wi-Fi network manually
If you know the name of the Wi-Fi ^® network that you want to connect to, you can manually connect to the network.
- On the Home screen, click the connections area at the top of the screen, or click the Manage Connections icon.
- Click Set Up Wi-Fi > Other Ways to Connect > Manually Connect to Network.
- In the SSID field, type the name of the Wi-Fi network.
- Click Next.
- In the Security Type field, click the Wi-Fi network security type and specify any requested information.
- Click Save and Connect.
Related topics
Options for saved Wi-Fi networks, 241
I cannot connect to a Wi-Fi network, 244
Change, move, or delete a saved Wi-Fi network
- On the Home screen, click the connections area at the top of the screen, or click the Manage Connections icon.
- Click Set Up Wi-Fi Network > Saved Wi-Fi Networks.
- Highlight a saved Wi-Fi ^® network.
-
Press the ☐ key.
-
To change options for the saved network, click Edit. Change the options. Click Save.
- To move the saved network and change the order that your BlackBerry® device tries to connect to your saved networks, click Move. Click a new location.
- To delete the saved network, click Delete.
Related topics
Options for saved Wi-Fi networks, 241
Prevent your device from connecting to a saved Wi-Fi network
- On the Home screen, click the connections area at the top of the screen, or click the Manage Connections icon.
- Click Set Up Wi-Fi > Saved Wi-Fi Networks.
- Highlight a saved Wi-Fi ^® network.
4. Press the Key > Disable.
Turn on the prompt that appears for hotspots
By default, your BlackBerry ^® prompts you if you are within range of a saved Wi-Fi ^® network that appears to be a hotspot. If you turn off these prompts, you can turn them on again.
- On the Home screen, click the connections area at the top of the screen, or click the Manage Connections icon.
- Click Set Up Wi-Fi.
- Press the ☐ key > Options.
- Select the Prompt me when a saved hotspot is found nearby check box.
- Press the ☐ key > Save.
Options for saved Wi-Fi networks
Common options
| Option Description | |
| Name Type a display name for the Wi-Fi® network. | |
| SSID Type the Wi-Fi network name. | |
| Security Type Set the security type that the Wi-Fi network supports. | |
| Band type Set the Wi-Fi network type. If you do not know the network type, do not change this field. | |
| SSID broadcasted Set whether the Wi-Fi network broadcasts its SSID. | |
| Automatically obtain IP address and DNS | Set whether your BlackBerry® device receives a routable IP address, a subnet mask, DNS settings, and a gateway address from the Wi-Fi network. |
| Allow inter-access point handover | Set whether your device remains connected to the Wi-Fi network when you move between wireless access points. |
| VPN profile If necessary, set a VPN profile to use with the saved Wi-Fi network. | |
| IP Address Type the IP address for your device. | |
| Subnet mask Type the subnet mask for the wireless access point that your device should connect to. | |
| Primary DNS Type the primary DNS that your device should connect to. | |
| Secondary DNS Type the secondary DNS that your device should connect to. | |
| Default gateway address | Type the default gateway IP address that your device should connect to. |
| Domain suffix Type the domain that your device uses to resolve host names into IP addresses. | |
WEP options
These options appear if you choose the WEP security type.
Option Description
Select WEP key Set the type of WEP key for the Wi-Fi network.
WEP key Type the WEP key for the Wi-Fi network in hexadecimal format.
WPA/WPA2 Personal options
These options appear if you choose the WPA/WPA2 Personal security type.
Option Description
Passphrase If necessary, type the WPA ^™ or WPA2 ^™ -Personal passphrase to connect to the Wi-Fi network.
WPA/WPA2 Enterprise options
These options appear if you choose the WPA/WPA2 Enterprise security type.
Option Description
Enterprise Sub-Type If necessary, set the enterprise security method for the Wi-Fi network.
Username If necessary, type the user name that you use to connect to the Wi-Fi network.
Password If necessary, type the password that you use to connect to the Wi-Fi network.
CA certificate Set the root certificate that your device should use to verify that it is connecting to the correct Wi-Fi network.
Client certificate Set the authentication certificate that your device should use to connect to the Wi-Fi network.
Inner link security If necessary, set the security protocol that the Wi-Fi network supports for its inner authentication method.
Token Set whether you use a hardware token to connect to the Wi-Fi network.
Server subject If necessary, type the server subject name that your device should use to verify that it is connecting to the correct Wi-Fi network.
Server SAN If necessary, type the server SAN that your device should use to verify that it is connecting to the correct Wi-Fi network.
Install a root certificate on your device
You might not be able to connect to some Wi-Fi ^® networks until you install a root certificate on your BlackBerry ^® device. You can install the root certificate on your computer, and then use the certificate synchronization tool of the BlackBerry ^® Desktop Software to synchronize the root certificate between your device and your computer. For more information, see the Help for the BlackBerry Desktop Software, or contact your administrator.
UMA connection settings
Depending on your wireless service provider, this feature might not be supported. For more information, contact your wireless service provider.
About using UMA with a Wi-Fi network
If your wireless service provider supports UMA (also known as GAN) and you subscribe to this service, you might be able to make calls, visit web pages, and send and receive email messages, PIN messages, and text messages with a Wi-Fi® network. Your BlackBerry® device automatically switches between using your mobile network and Wi-Fi networks, depending on what is available in the area where you are using your device. For more information about UMA, contact your wireless service provider.
Change your UMA connection preferences
- On the Home screen, click the connections area at the top of the screen, or click the Manage Connections icon.
- Click Mobile Network Options.
- Change the Connection Preference field.
- Press the key > Save.
Related topics
I cannot connect to a Wi-Fi network, 244
Submit a Wi-Fi diagnostic report
- On the Home screen or in a folder, click the Options icon.
- Click Networks and Connections > Wi-Fi Network.
- Press the Key > Troubleshoot > Wi-Fi Diagnostics.
- Press the Key > Email Report or PIN Report.
Set options for Wi-Fi diagnostic reports
When you set options for Wi-Fi ^® diagnostic reports, if you set a default recipient, each time that you submit a Wi-Fi diagnostic report, your BlackBerry ^® device sends the report to that recipient. If you want to specify a recipient each time that you submit a report, do not set a default recipient.
-
On the Home screen or in a folder, click the Options icon.
-
Click Networks and Connections > Wi-Fi Network.
- Press the key > Troubleshoot > Wi-Fi Diagnostics.
- Press the Key > Options.
- To include advanced data in Wi-Fi diagnostic reports, change the Display Mode field to Advanced.
- To set a default recipient for Wi-Fi diagnostic reports, type the contact information.
- Press the key > Save.
Connection permissions for third-party applications
| Permission Description |
| USB Set whether third-party applications can use physical connections, such as a USB cable or RS-232 cable, that you have set up for your BlackBerry® device. |
| Bluetooth Set whether third-party applications can use Bluetooth® connections. |
| Phone Set whether third-party applications can make calls or access call logs. |
| Location Data Set whether third-party applications can use your GPS location information. |
| Server Network Set whether third-party applications can access the Internet or your organization's intranet using your organization's network. |
| Internet Set whether third-party applications can access the Internet through your wireless service provider (for example, using a direct Internet connection or WAP gateway). |
| Wi-Fi (if supported) Set whether third-party applications can use Wi-Fi® connections. |
About using Wi-Fi with VPN and software tokens
If you have a Wi-Fi ^® enabled BlackBerry ^® device and if your organization uses a VPN to control access to its network, you might be able to log in to the VPN and access your organization's network using a Wi-Fi network. If you have a Wi-Fi ^® enabled device, you might also need a software token to connect to your organization's network using a Wi-Fi network.
Wi-Fi technology troubleshooting
I cannot connect to a Wi-Fi network
Depending on your BlackBerry ^® device model, the Wi-Fi ^® feature might not be supported.
Try the following actions:
- Verify that you have turned on the connection to the Wi-Fi network.
- Verify that you are in a Wi-Fi coverage area.
-
Verify that the time on your device is synchronized with the network time.
-
If the Wi-Fi network does not appear in the Set Up Wi-Fi application, it might be hidden. If you know the network name, try connecting to the Wi-Fi network manually.
- In the Set Up Wi-Fi application, verify that the options for the Wi-Fi network are correct.
- If you switched Wi-Fi networks manually, switch to another Wi-Fi network or set your BlackBerry device to scan for available Wi-Fi networks.
- If your wireless service provider supports UMA, verify that your connection preference is not set to Mobile Network Only.
- If your email account uses a BlackBerry® Enterprise Server, your device might prevent you from connecting to certain wireless access points. For more information, contact your administrator.
- If you are using the Push Button Setup method, verify that the access point is enabled with Wi-Fi Protected Setup™, and that it has been set to send its profile. Verify that another device is not also attempting to connect at the same time, and that not more than one access point within range is in this mode.
- If you use PEAP, EAP-TLS, EAP-FAST, EAP-TTLS, or EAP-SIM to connect to a Wi-Fi network, verify that you have installed the root certificate for the certificate authority server that created the certificate for the authentication server.
- If you use EAP-TLS to connect to a Wi-Fi network, verify that you have added your authentication certificate to your device.
Related topics
Turn on or turn off a network connection, 234
Connect to a Wi-Fi network, 239
Connect to a Wi-Fi network manually, 240
Bluetooth technology
Bluetooth technology basics
About Bluetooth
Bluetooth ^® technology is designed to establish a wireless connection between your BlackBerry ^® device and a Bluetooth enabled device, such as a hands-free car kit or a wireless headset.
Before you can connect your BlackBerry device to a Bluetooth enabled device, you must first turn on Bluetooth technology on both devices and then pair the devices. Pairing establishes a relationship between the devices and usually needs to be done only once.
After you pair the devices, you can connect the devices when the Bluetooth enabled device is within range of your BlackBerry device (a typical range is approximately 10 meters). For best results, keep your BlackBerry device within direct line of sight of the Bluetooth enabled device. For example, if your BlackBerry device is on the right side of your body, wear a Bluetooth enabled headset in your right ear.
When you turn on Bluetooth technology or when you connect your BlackBerry device to another Bluetooth enabled device, Bluetooth status indicators appear at the top of the Home screen.
Turn on Bluetooth technology
- On the Home screen, click the connections area at the top of the screen, or click the Manage Connections icon.
- Select the Bluetooth check box.
To turn off Bluetooth ^® technology, clear the Bluetooth check box.
Pair with a Bluetooth enabled device
You must pair your BlackBerry ^® device with a Bluetooth ^® enabled device before you can connect to it. For more information about preparing the Bluetooth enabled device for pairing, see the documentation that came with the Bluetooth enabled device.
- On the Home screen, click the connections area at the top of the screen, or click the Manage Connections icon.
- Click Bluetooth Connections > Add New Device > Search.
- Click a Bluetooth enabled device.
-
If necessary, do one of the following:
-
If the Bluetooth enabled device does not have a keyboard (for example, a wireless headset), on your BlackBerry device, type the pairing passkey that either appears on the Bluetooth enabled device or is provided in the documentation that came with the Bluetooth enabled device. The passkey is most often a numeric or alphanumeric code.
- If the Bluetooth enabled device has a keyboard (for example, a laptop), type a pairing passkey of your choice on both devices.
Related topics
Turn on Bluetooth technology, 246
I cannot pair with a Bluetooth enabled device, 252
Connect to a paired Bluetooth enabled device
To perform this task, Bluetooth ^® technology must be turned on and your BlackBerry ^® device must be paired with the Bluetooth enabled device.
Your BlackBerry device might attempt to connect to the Bluetooth enabled device automatically when Bluetooth technology is turned on and the devices are within range.
- On the Home screen, click the connections area at the top of the screen, or click the Manage Connections icon.
- Click Bluetooth Connections.
- Highlight a Bluetooth enabled device.
- Press the key > Connect.
- If necessary, verify that the same number appears in the dialog box for both paired devices.
To disconnect from a paired Bluetooth enabled device, highlight the device. Press the ☐ key > Disconnect.
Related topics
Turn on Bluetooth technology, 246
I cannot pair with a Bluetooth enabled device, 252
Switch to a paired Bluetooth enabled device during a call
To perform this task, you must turn on Bluetooth ^® technology.
During a call, press the key > Activate
Related topics
Turn on Bluetooth technology, 246
Share contacts with a paired Bluetooth enabled car kit
- On the Home screen, click the connections area at the top of the screen, or click the Manage Connections icon.
- Click Bluetooth Connections.
- Highlight a Bluetooth ^® enabled car kit.
- Press the ☐ key > Transfer Contacts.
Related topics
I cannot share contacts with a paired Bluetooth enabled device, 252
Receive a media file using Bluetooth technology
To perform this task, you must turn on Bluetooth® technology.
When a media file is sent to your BlackBerry ^® device using Bluetooth technology, a dialog box appears on the screen.
- In the dialog box that appears on your device, click Yes.
- In the drop-down list, click a location to save the file in.
- Click Save.
Related topics
Turn on Bluetooth technology, 246
Send a media file
You can send your pictures and videos to applications that you have installed such as Facebook ^® for BlackBerry ^® devices, and YouTube ^® for BlackBerry devices. You can send only media files that you have added.
- On the Home screen, click the Media icon.
- Click a media type.
- If necessary, click a category.
- Highlight a media file.
-
Press the key.
-
To send a picture or video, click Send. Click a message type or an application.
-
To send an audio file, click the send option for a message type.
-
If necessary, turn on Bluetooth ^® technology and choose a device or pair with a device.
Rename a paired Bluetooth enabled device
- On the Home screen, click the connections area at the top of the screen, or click the Manage Connections icon.
- Click Bluetooth Connections.
- Highlight a paired Bluetooth ^® enabled device.
- Press the ☐ key > Device Properties.
- In the Device Name field, change the name for the Bluetooth enabled device.
- Press the ☐ key > Save.
Delete a paired Bluetooth enabled device
To perform this task, you must first disconnect your BlackBerry ^® device from the Bluetooth ^® enabled device.
- On the Home screen, click the connections area at the top of the screen, or click the Manage Connections icon.
- Click Bluetooth Connections.
- Highlight a paired Bluetooth® enabled device.
- Press the key > Delete Device.
Bluetooth technology options
Bluetooth profiles
Depending on your BlackBerry ^® device model and wireless network, some profiles might not be supported.
| Option | Description |
| Audio Source (A2DP) | This profile allows you to output audio from your BlackBerry device to Bluetooth® enabled devices that support stereo audio such as stereo headsets, speakers, and car kits. |
| A/V Remote Control (AVRCP) | This profile allows you to use the buttons on a Bluetooth enabled headset to perform actions such as adjusting the volume or playing the next or previous media file on your BlackBerry device. |
| Data Transfer This service allows you to connect your BlackBerry device to Bluetooth enabled devices that support the transfer of data such as media files. | |
| Desktop Connectivity | This service allows you to connect your BlackBerry device to a Bluetooth enabled computer that is running BlackBerry® Desktop Software so that you can synchronize your organizer data. |
| Dial-Up Networking (DUN) | This profile allows you to use your BlackBerry device as a modem when it is connected to a Bluetooth enabled computer that is running BlackBerry Desktop Software. |
| Handsfree (HFP) This profile allows you to connect your BlackBerry device to Bluetooth enabled headsets and car kits that support the Handsfree profile. | |
| Headset (HSP) This profile allows you to connect your BlackBerry device to Bluetooth enabled headsets that support the Headset profile. | |
| Option Description | |
| Message Access Profile (MAP) | This profile allows you to use a Bluetooth enabled car kit with your BlackBerry device to notify you of new messages. This profile can also help you read, delete, browse, compose, and send messages. |
| Serial Port Profile This profile allows you to connect your BlackBerry device to Bluetooth enabled devices that support desktop connectivity, wireless bypass, and data transfer. | |
| SIM Access If your BlackBerry device uses a SIM card, this profile allows you to use a Bluetooth enabled car kit to control the SIM card on your BlackBerry device so that you can make and receive calls using the car kit.When you use this feature, data services (browser service, email messaging, PIN messaging, and MMS messaging) are not available on your device, and phone services are accessible only through the car kit. Before you can use this feature, you might need to enter a 16-digit alphanumeric code, generated by the car kit, on your BlackBerry device. | |
| Wireless Bypass This service allows you to connect your BlackBerry device to a Bluetooth enabled computer that is running the BlackBerry Desktop Software so that you can send and receive email messages and synchronize your organizer data without using a connection to the wireless network. To use this service, your email account must use a BlackBerry® Enterprise Server. | |
Prevent your device from making contacts available to other Bluetooth enabled devices
- On the Home screen, click the connections area at the top of the screen, or click the Manage Connections icon.
- Click Bluetooth Connections.
- Press the ☐ key > Options.
- Change the Contacts Transfer field.
- Press the key > Save.
To allow your device to make contacts available to other Bluetooth® enabled devices again, change the Contacts Transfer field to All.
Restrict outgoing calls
- On the Home screen, click the connections area at the top of the screen, or click the Manage Connections icon.
- Click Bluetooth Connections.
- Press the key > Options.
- Set the Allow outgoing calls field to Never or If Unlocked.
- Press the ☐ key > Save.
Make your BlackBerry device discoverable
If you make your BlackBerry ^® device discoverable, other Bluetooth ^® enabled devices can detect your device.
-
On the Home screen, click the connections area at the top of the screen, or click the Manage Connections icon.
-
Click Bluetooth Connections.
-
Set the Discoverable field to 2 Minutes.
After two minutes, the Discoverable field switches to No automatically.
Change the pairing name for your BlackBerry device
- On the Home screen, click the connections area at the top of the screen, or click the Manage Connections icon.
- Click Bluetooth Connections.
- Press the ☐ key > Options.
- In the Device Name field, type a name for your BlackBerry ^® device.
- Press the ☐ key > Save.
Turn off Bluetooth connection notification
- On the Home screen, click the connections area at the top of the screen, or click the Manage Connections icon.
- Click Bluetooth Connections.
- Press the key > Options.
- Clear the LED Connection Indicator check box.
- Press the key > Save.
To turn on Bluetooth ^® connection notification again, select the LED Connection Indicator check box.
Turn off the prompt that appears when connecting or pairing
- On the Home screen, click the connections area at the top of the screen, or click the Manage Connections icon.
- Click Bluetooth Connections.
- Highlight a paired Bluetooth ^® enabled device.
- Press the key > Device Properties.
- Set the Trusted field to Yes.
- Press the ☐ key > Save.
To turn on the prompt again, set the Trusted field to Prompt.
Set the message types that your Bluetooth enabled car kit notifies you of
To perform this task, your Bluetooth ^® enabled car kit must support the Message Access Profile (MAP).
For more information about using Bluetooth technology with your car, see the documentation that came with your car.
- On the Home screen, click the connections area at the top of the screen, or click the Manage Connections icon.
- Click Bluetooth Connections.
- Press the KEY > MAP Options.
- Select the check box beside one or more message types.
Turn off a Bluetooth profile
- On the Home screen, click the connections area at the top of the screen, or click the Manage Connections icon.
- Click Bluetooth Connections.
- Press the ☐ key > Options.
- In the Services section, clear the check box beside one or more Bluetooth ^® profiles.
- Press the key > Save.
Related topics
Bluetooth profiles, 248
Encrypt data that you send or receive using Bluetooth technology
To perform this task, the paired Bluetooth ^® enabled device must support data encryption.
- On the Home screen, click the connections area at the top of the screen, or click the Manage Connections icon.
- Click Bluetooth Connections.
- Press the Key > Options.
- Select the Encryption check box.
- Press the Key > Save.
Turn off automatic reconnection to Bluetooth enabled devices
By default, when you turn on your BlackBerry ^® device, your device attempts to connect to the last Bluetooth ^® enabled device that you used.
- On the Home screen, click the connections area at the top of the screen, or click the Manage Connections icon.
- Click Bluetooth Connections.
- Press the ☐ key > Options.
- Clear the Connect on Power Up check box.
- Press the key > Save.
Troubleshooting: Bluetooth technology
I cannot type a passkey on a Bluetooth enabled device
If you cannot type a passkey on a Bluetooth® enabled device, the passkey might already be defined.
On your BlackBerry ^® device, in the Enter passkey for
My list of paired Bluetooth devices does not appear
Try the following actions:
- Verify that Bluetooth® technology is turned on.
- Verify that you have added Bluetooth enabled devices to the paired Bluetooth enabled devices list.
Related topics
Bluetooth technology basics, 245
I cannot pair with a Bluetooth enabled device
Try the following actions:
- Verify that your BlackBerry® device is compatible with the Bluetooth® enabled device. For more information, see the documentation that came with the Bluetooth enabled device.
- If you do not know the passkey for your Bluetooth enabled device, see the documentation that came with the Bluetooth enabled device.
- If your BlackBerry device does not detect the Bluetooth enabled device that you want to pair with, try making your BlackBerry device discoverable for a short period of time. Many car kits need to discover your BlackBerry device rather than your BlackBerry device discovering the car kit. On the Home screen, click the connections area at the top of the screen, or click the Manage Connections icon. Click Bluetooth Connections. Click Add New Device. Click Listen. Bluetooth enabled devices can detect your BlackBerry device for 2 minutes.
- Turn off encryption for Bluetooth connections between your BlackBerry device and the Bluetooth enabled device. On the Home screen, click the connections area at the top of the screen, or click the Manage Connections icon. Click Bluetooth Connections. Highlight a Bluetooth enabled device. Press the ☐ key > Device Properties. Clear the Encryption check box. Press the Key > Save.
I cannot share contacts with a paired Bluetooth enabled device
Try the following:
- Verify that Bluetooth® technology is turned on.
- Verify that your BlackBerry® device is paired with the Bluetooth enabled device.
- Verify that, in the Bluetooth options, the Contacts Transfer field is not set to Disabled.
- Verify that your BlackBerry device is connected to a Bluetooth enabled device that supports the Handsfree profile or the Object Push profile. For more information about supported profiles, see the documentation that came with the Bluetooth enabled device.
Related topics
Bluetooth technology basics, 245
Share contacts with a paired Bluetooth enabled car kit, 247
Power and battery
Turn off your device
Depending on your theme, the location or name of the Power Off icon might differ from the location or name in this task.
- If you have not set your BlackBerry® device to turn on and turn off automatically at specific times, press and hold the key.
- If you have set your device to turn on and turn off automatically at specific times, on the Home screen or in a folder, click the Power Off icon. If you want your device to stay turned off until you turn it on again, click Full Power Off. If you want your device to turn on again at the specified time or for alarm or calendar reminders, click Turn Off.
Set your device to turn on and turn off automatically
- On the Home screen or in a folder, click the Options icon.
- Click Device > Auto On/Off.
- Select the Weekday check box.
- Specify the times when your BlackBerry ^® device should turn on and turn off on weekdays.
- Select the Weekend check box.
- Specify the times when your device should turn on and turn off on weekends.
- Press the ☐ key > Save.
Reset the device
Remove and reinsert the battery.
Check the battery power level
- On the Home screen or in a folder, click the Options icon.
- Click Device > Device and Status Information.
Tips: Extending battery life
For full instructions, click the links under Related information at the bottom.
| Set your BlackBerry® device to turn on and turn off automatically. | On the Home screen or in a folder, click the Options icon. Click Device > Auto On/Off. |
| You can set your device to turn off while you aren't using it for an extended period, like when you sleep. Data you receive when the device is turned off automatically updates when the device turns on. | |
| Set backlighting to remain on for a shorter period of time, and lower its brightness | On the Home screen or in a folder, click the Options icon. Click Display > Screen Display. |
| Turn off network connections you aren't using On the Home screen, click the connections area at the top of the screen, or click the Manage Connections icon. Click a network connection to clear the check box. | |
| Close apps when you are finished with them. | In an app, press the Key > Close. |
| When you switch from one app to another, some apps, such as the Browser app or the Music app, run in the background, which uses battery power. | |
| Switch your vibrating notifications to sound notifications or LED notifications, lower the volume of your sound notifications, or select a shorter ring tone | On the Home screen, click the Sound and Alert Profiles icon. Click Change Sounds and Alerts. |
| Delete the original text from a reply message | When you are replying to a message, press the Key > Delete Original Text. |
| If your device has a camera flash, turn off the flash | On the Home screen, click the Camera icon. Click the flash icon at the bottom of the screen until the flash off indicator appears. |
| Keep your battery connections clean. | Every few months, use a cotton swab or dry cloth to clean the metal contacts on the battery and the device. |
| Keeping the battery clean extends the life of your battery. | |
Related topics
Set your device to turn on and turn off automatically, 253
Set options for backlighting, 212
Turn on or turn off a network connection, 234
Change your ring tone, notifiers, or reminders, 9
Delete the original text from a reply message, 73
Memory and media cards
About media cards
Depending on your BlackBerry ^® device model, you can insert a microSD media card into your device to take videos and extend the memory that is available on your device for storing media files such as songs, ring tones, videos, or pictures. For more information about inserting a media card into your device, see the printed documentation that came with your device.
Supported media cards
Your BlackBerry ^® device supports media card sizes up to 32 GB. Only microSD media cards are supported.
View the amount of available storage space on your device
- On the Home screen or in a folder, click the Options icon.
- Click Device > Storage.
Related topics
The application memory on my device is low, 258
Turn off media card support
When you turn off media card support, your BlackBerry ^® device cannot access the files that are on your media card.
- On the Home screen or in a folder, click the Options icon.
- Click Device.
- Click Storage.
- Clear the Media Card Support check box.
- Press the ☐ key > Save.
Repair files stored on your media card or on your device
CAUTION: If you run the repair feature on your BlackBerry® device, your device might delete files that have errors from your media card or on your device.
- On the Home screen or in a folder, click the Options icon.
-
Click Device > Storage.
-
Press the key > Repair.
- Complete the instructions on the screen.
If your media card is still not repaired after you run the repair feature, you might want to try formatting it.
About compression
Compression is designed to reduce the size of your BlackBerry ^® device data while maintaining the integrity of that data. When compression is turned on, your device compresses all device data, including messages, contacts, calendar entries, tasks, and memos. You should keep compression turned on.
If both compression and encryption are turned on, your device compresses device data before encrypting it.
About file encryption
File encryption is designed to protect files that you store on your BlackBerry ^® device and on a media card that can be inserted in your device. You can encrypt the files on your device and on your media card using an encryption key that your device generates, your device password, or both.
If you encrypt the files using an encryption key that your device generates, you can only access the files on your media card when the media card is inserted in your device. If you encrypt the files using your device password, you can access the files on your media card in any device that you insert your media card into, as long as you know the password for the device.
Turn on encryption
To encrypt data on your BlackBerry ^® device, you must have set a password for your device.
Depending on the amount of storage space available for storing files on your device, you might not be able to encrypt files on your device.
- On the Home screen or in a folder, click the Options icon.
- Click Security > Encryption.
- To encrypt data on your device, in the Device Memory section, select the Encrypt check box.
-
To encrypt files that are stored on a media card and on your device, select the Media Card check box and do one of the following:
-
To encrypt files using an encryption key that your device generates, change the Mode field to Device Key.
- To encrypt files using your device password, change the Mode field to Device Password.
-
To encrypt files using an encryption key and your device password, change the Mode field to Device Password & Device Key.
-
To also encrypt media files such as pictures, songs, and videos, select the Include Media Files check box.
- Press the ☐ key > Save.
To stop encrypting data on your device, clear the Device Memory check box. To stop encrypting files, clear the Media Card check box.
Tips: Freeing and conserving storage space
Try to maintain at least 400 KB of available application storage on your BlackBerry® device. If you find that your device processes are unusually slow, try freeing storage space by deleting files that you don't need. Changing options for email messages, calendar entries, and media files might help you conserve storage space.
For full instructions, click the links under Related information at the bottom.
| Check how much free storage space you have | On the Home screen or in a folder, click the Options icon. Click Device > Storage. |
| Delete unneeded files | On the Home screen or in a folder, click the Files icon. Find and highlight a file. Press the Key > Delete. |
| Delete browsing history and clear the cache | On the Home screen, click the Browser icon. Press the Key > Options. Go to the Clear Browsing Data section. |
| Reduce the amount of time that your device stores email messages and calendar entries | On the Home screen, click the Messages icon or Calendar icon. Press the Key > Options. |
| Stop storing sent messages on your device | On the Home screen, click the Messages icon. Press the Key > Options > Email Preferences. |
| Receive only the first section of long email messages, and choose whether to download more | On the Home screen, click the Messages icon. Press the Key > Options > Message Display and Actions. |
| Store files on a media card instead of the device Your BlackBerry device supports media card sizes up to 32 GB. Only microSD media cards are supported. | |
| Reduce the size of pictures you take | On the Home screen, click the Camera icon. Press the Key > Options. |
Research In Motion recommends that you regularly create and save a backup file on your computer, especially before you update any software. Maintaining an up-to-date backup file on your computer might allow you to recover device data if your device is lost, stolen, or corrupted by an unforeseen issue.
Related topics
View the amount of available storage space on your device, 255
Move, rename, or delete a file, 125
Delete browsing information, 165
Set how long your device stores messages, 81
Change how long your device stores calendar entries, 178
Stop storing messages sent from your computer on your device, 82
Stop storing messages sent from your device on your computer, 82
Receive only the first section of long email messages, 80
Change the size of pictures that you take, 138
The application memory on my device is low, 258
Troubleshooting: Storage and media cards
The application memory on my device is low
When the application memory available on your BlackBerry ^® device is low, your device displays a dialog box that lists applications and languages that you do not use frequently. You can delete applications and languages in this list.
Consider the following guidelines:
- Verify that you have deleted old email messages and MMS messages, especially messages with attachments.
- Verify that you have deleted contacts that are already in your organization's address book.
- Verify that you have deleted media files from the device memory.
- If you recently updated your BlackBerry® Device Software over the wireless network, verify that you have deleted the previous version of the BlackBerry Device Software.
- Verify that you have cleared the browser cache.
Related topics
View the amount of available storage space on your device, 255
Tips: Freeing and conserving storage space, 32
Search
Search for an item
You can search for organizer items, pictures, videos, help topics, and more on your BlackBerry ^® device. You can also choose to expand your search to the Internet.
- On the Home screen, in the upper-right corner, click the search icon.
- Type your search terms.
To stop a search, press the ↩ key twice.
Set the types of items that are included in searches
- On the Home screen or in a folder, click the Options icon.
- Click Device > Search.
- Specify the types of items that you want to include in searches.
- Press the key > Save.
Search for messages
You can search for messages on your BlackBerry® device. You might also be able to search for messages in the email application on your computer or in another integrated email account if your email account uses the BlackBerry® Internet Service or a BlackBerry® Enterprise Server that supports this feature.
On the Home screen, click the Messages icon.
- To search for messages based on the subject, highlight a message. Press the > Search by > Subject.
- To search for messages based on the sender, highlight a message. Press the ☐ key > Search by > Sender.
- To perform an advanced search, press the ☐key > Advanced. Specify the search criteria. To save the search criteria, click Save. Click Search.
- To search for messages using the criteria from your last advanced search, press the ☐ key > Advanced > Last.
Note: If you search for messages, your device does not search attachments.
To stop a search, press the key.
Message search criteria
| Field Description |
| Advanced Search Criteria Specify whether you search for messages that are on your BlackBerry® device or for messages that are in an email application on your computer. |
| Name Specify one or more contacts or email addresses that your device should search for in messages. To widen the search, you can also specify part of a name. |
| Appears in Change the type of address field that your device should search in for the name or email address. |
| Subject Specify one or more words that your device should search for in the subject of messages. |
| Message Specify one or more words that your device should search for in the body of messages. |
| Include Encrypted Messages Specify whether your device searches encrypted messages, plain text messages, and digitally signed messages. |
| Service If your device is associated with more than one email address, change the email account that your device should search in for messages. Not all email accounts support this feature. |
| Folder Change the folder that your device should search for messages in. |
| Show Change the status of messages that your device should search for. |
| Type Change the type of messages that your device should search for. |
Do more with your message search results
- In the search results, highlight a message.
-
Press the Key.
-
To view more available search results, click Get More Results.
- To add the message that you highlighted to your message inbox, click Add.
-
To add all the messages from the search results to your message inbox, click Add All.
-
To delete the search results, click Delete Search.
- To start a new search, click Search by.
CAUTION: If you delete a message from the message search results, the message is also deleted from your message inbox or the email application on your computer.
Search for text in a message, in a file, or on a web page
To search for text in a presentation, you must view the presentation in text view or in text and slide view.
- In a message, in a file, in an attachment, or on a web page, press the ☐ key > Find or Find on Page.
- Type the text.
- Press the Enter key.
To search for the next instance of the text, press the key > Find Next.
View, change, or delete a saved search
- On the Home screen, click the Messages icon.
- Press the key > Search.
- Press the ☐ key.
- To view a list of saved searches, click Recall.
- To change a saved search, click Recall. Highlight a search. Press the ☐ key > Edit Search. Change the search criteria. Press the ☐ key > Save.
- To delete a saved search, click Recall. Highlight a search. Press the ☐ key > Delete Search.
Search for a contact in your organization's address book
To perform this task, your work email account must use a BlackBerry® Enterprise Server that supports this feature. For more information, contact your administrator.
- On the Home screen, click the Contacts icon.
- Press the ☐ key > Lookup.
- Type part or all of a contact name.
-
Press the key on the keyboard.
-
Press the key.
-
To add a contact to your contact list, click Add to Contacts.
- To add all the contacts, click Add All to Contacts.
-
To view information for a contact, click View.
-
To delete a contact from the contact lookup results, click Delete.
- To delete the contact lookup results, click Delete Lookup.
- To start a new contact lookup, click Lookup.
Search shortcuts
Depending on the typing input language that you are using, some shortcuts might not be available.
Search for an item on your BlackBerry ^® device Start typing on the Home screen.
Search for a contact in a list of contacts Type part or all of a contact name, or type initials separated by a space.
Search for text in a message Press \$
Search for text in a file or an attachment Press F
Search for text on a web page Press F
Search for text in a presentation Press F
Note: You can change what happens when you type on the Home screen.
To search for text in a presentation, you must view the presentation in text view or in text and slide view.
SIM card
Depending on your wireless service provider and wireless network, your BlackBerry ^® device might not use a SIM card.
About the SIM card phone book
If your wireless service provider has set up your SIM card with a SIM card phone book, you can use the SIM card phone book to access contacts that you have added to your SIM card. The SIM card phone book is different from the contact list on your BlackBerry ^® device. If you switch SIM cards, the contacts in the SIM card phone book change.
You can add ADN entries to your SIM card phone book. You can also search for ADN entries or SDN entries. ADN entries appear in plain text and SDN entries appear in bold.
Add a contact to your SIM card
- In the contact list, press the ☐ key > SIM Phone Book.
- Press the key > New.
- Type the contact information.
- Press the key > Save.
Copy contacts from your SIM card to your contact list
Depending on your wireless service provider and wireless network, this feature might not be supported.
- In the contact list, press the key > SIM Phone Book.
- Press the KEY > Copy All To Contacts.
Note: If you try to copy a SIM card contact with a phone number that matches the phone number of a contact that already appears in your contact list, your BlackBerry ^® device does not copy the SIM card contact.
Copy a contact from your contact list to your SIM card
- In the contact list, click a contact.
- Highlight a phone number.
- Press the Key > Copy to SIM Phone Book.
- Press the Key > Save.
Change or delete a SIM card contact
- In the contact list, press the key > SIM Phone Book.
-
Highlight a contact.
-
To change a SIM card contact, press the ☐ key > Edit. Change the contact information. Press the ☐ key > Save.
- To delete a SIM card contact, press the key > Delete.
Store text messages on your SIM card
Depending on your wireless service provider and wireless network, this feature might not be supported.
If your BlackBerry ^® device uses a SIM card and you set your SIM card to store text messages, your text messages still appear in the Messages application.
- On the Home screen, click the Messages icon.
- Press the ☐ key > Options > Text Messaging.
- Change the Leave Messages On SIM Card field to Yes.
- Press the key > Save.
To stop storing text messages on your SIM card, change the Leave Messages On SIM Card field to No. If you change this field to No, your text messages are deleted from your SIM card.
Change the display name for a phone number
If your SIM card supports more than one phone number, you can personalize the display name for your phone numbers.
- On the Home screen or in a folder, click the Options icon.
- Click Device > Advanced System Settings > SIM Card.
- Highlight a phone number.
- Press the key > Edit SIM Phone Number.
- Type a display name for the phone number.
- Press the key on the keyboard.
About SIM card security
You can protect your SIM card with a PIN code to add another level of security to your BlackBerry ^® device. If you lock your SIM card with a PIN code, other people cannot use their SIM card in your device. Before you can use your SIM card in another device, you must type the PIN code.
Protect your SIM card with a PIN code
To get your SIM card PIN code, contact your wireless service provider.
Note: If you type the SIM card PIN code incorrectly three times, your SIM card does not function.
- On the Home screen or in a folder, click the Options icon.
- Click Device > Advanced System Settings > SIM Card.
- Press the ☐ key > Enable Security.
- Type your SIM card PIN code.
- Press the ↕ key on the keyboard.
Change the SIM card PIN code
- On the Home screen or in a folder, click the Options icon.
- Click Device > Advanced System Settings > SIM Card.
- Press the key > Change PIN2 Code.
Security
Security basics
About the device password
If you set a BlackBerry® device password, you'll be prompted to enter your password to unlock your device.
If you forget your password, it can't be recovered. If you exceed the number of allowed password attempts, your device deletes all your device data for security reasons and you'll be prompted to set a new password. If your device uses a BlackBerry® Enterprise Server, depending on the IT policies that have been set by your administrator, data on your media card might be deleted as well. For more information, contact your administrator.
Research In Motion recommends that you regularly create and save a backup file on your computer, especially before you update any software. Maintaining an up-to-date backup file on your computer might allow you to recover device data if your device is lost, stolen, or corrupted by an unforeseen issue.
Set a device password
If you forget your BlackBerry ^® device password, it can't be recovered. You can reset your password without knowing your current password by deleting all your device data.
Research In Motion recommends that you regularly create and save a backup file on your computer, especially before you update any software. Maintaining an up-to-date backup file on your computer might allow you to recover device data if your device is lost, stolen, or corrupted by an unforeseen issue.
- On the Home screen or in a folder, click the Options icon.
- Click Security > Password.
- Click Set Password.
- Type a password.
- Press the Key > Save.
To turn off your BlackBerry ^® device password, clear the Enable check box.
Change the device password
- On the Home screen or in a folder, click the Options icon.
- Click Security > Password > Change Password.
Lock your device
You can lock the screen to avoid pressing it accidentally. If your email account uses a BlackBerry® Enterprise Server, depending on the options that your administrator sets, you might not be able to perform this task. For more information, contact your administrator.
Do one of the following:
- To lock your BlackBerry device, if you have set a device password, on the Home screen or in a folder, click the Password Lock icon.
• To lock the screen, press the 🔒 key on the top left of your device.
To unlock your device, type your device password. Press the Enter key. To unlock the screen, press the key again. If necessary, type your device password.
Lock your device when you insert it in the holster
- On the Home screen or in a folder, click the Options icon.
- Click Security > Password.
- Select the Lock Handheld Upon Holstering check box.
- Press the key > Save.
Set a limit for device password attempts
- On the Home screen or in a folder, click the Options icon.
- Click Security > Password.
- Change the Number of Password Attempts field.
- Press the key > Save.
Delete device data, third-party applications, or media card files
Before you delete your BlackBerry ^® device data or media card files, consider backing up these items so that you have a copy on your computer.
CAUTION: If you have turned on encryption, the process for deleting all device data can take up to an hour to complete. You cannot stop the process after you start it. If you reset your device, the process restarts after the device restarts.
- On the Home screen or in a folder, click the Options icon.
- Click Security > Security Wipe.
- To delete data from the messages application, contacts application, and other applications, select the Emails, Contacts, Etc check box.
- To delete all third-party applications that you have added, select the User Installed Applications check box.
- To delete all files from your media card, select the Media Card check box.
- Type blackberry.
- Click Wipe.
If you are preparing your device for resale and you have an email account that uses the BlackBerry® Internet Service, to prevent messages from this account from being sent to your device, contact your wireless service provider to disassociate the account from your device.
Password keeper
About the password keeper
Use the password keeper to store all your passwords in one place. The password keeper is designed to protect your passwords with a password keeper password. When you type this password, the password keeper decrypts your passwords.
You can also use the password keeper to generate random passwords that contain numbers, letters, and symbols.
Change a password in the password keeper
- On the Home screen or in the Applications folder, click the Password Keeper icon.
- Highlight a password.
- Press the Key > Open.
- Change the password information.
- Press the Key > Save.
Add a password to the password keeper
- On the Home screen or in the Applications folder, click the Password Keeper icon.
- Press the ☐ key > New.
- Type the password information.
- Press the key > Save.
Generate a random password
- On the Home screen or in the Applications folder, click the Password Keeper icon.
- Press the key > New.
- Press the key > Random Password.
- Press the key > Save.
Set criteria for randomly generated passwords
- On the Home screen or in the Applications folder, click the Password Keeper icon.
- Press the ☐ key > Options.
-
Set the random password fields.
-
Press the Key > Save.
Change the password keeper password
- On the Home screen or in the Applications folder, click the Password Keeper icon.
- Press the KEY > Change Password.
Delete a password from the password keeper
- On the Home screen or in the Applications folder, click the Password Keeper icon.
- Highlight a password.
- Press the key > Delete.
Copy a password
- On the Home screen or in the Applications folder, click the Password Keeper icon.
- Highlight a password.
- Press the key > Copy Username or Copy Password.
To clear the clipboard, press the key > Clear Clipboard.
Note: Passwords are not encrypted when they are on the clipboard.
Prevent password copying
- On the Home screen or in the Applications folder, click the Password Keeper icon.
- Press the Key > Options.
- Clear the Allow Clipboard Copy check box.
- Press the Key > Save.
Set a limit for password attempts in the password keeper
- On the Home screen or in the Applications folder, click the Password Keeper icon.
- Press the ☐ key > Options.
- Set the Password Attempts field.
- Press the key > Save.
Hide passwords in the password keeper
- On the Home screen or in the Applications folder, click the Password Keeper icon.
- Press the key > Options.
- Clear the Show Password check box.
- Press the key > Save.
To show passwords in the password keeper again, select the Show Password check box.
Encryption
About encrypting data on your device
When encryption for data on your BlackBerry ^® device is turned on, your device uses a private key to encrypt data as it is stored on your device, including data that your device receives when it is locked. Your device decrypts data as you access it.
You can set encryption to include or exclude your contacts. If you turn on encryption for contacts and you receive a call when your device is locked, the caller name does not appear on the screen.
If you use a smart card certificate for authentication, depending on the smart card, you might also be able to use one of your smart card certificates to provide two-factor encryption. In order to access the encrypted content, you must provide your device password and also connect your device to your smart card reader.
When you lock your device, an open lock indicator appears at the top of the screen to indicate that your device is in the process of securing your data, which includes deleting a copy of the private key from the temporary device memory. A lock indicator appears at the top of the screen when your device has deleted the key.
About file encryption
File encryption is designed to protect files that you store on your BlackBerry ^® device and on a media card that can be inserted in your device. You can encrypt the files on your device and on your media card using an encryption key that your device generates, your device password, or both.
If you encrypt the files using an encryption key that your device generates, you can only access the files on your media card when the media card is inserted in your device. If you encrypt the files using your device password, you can access the files on your media card in any device that you insert your media card into, as long as you know the password for the device.
Turn on encryption
To encrypt data on your BlackBerry ^® device, you must have set a password for your device.
Depending on the amount of storage space available for storing files on your device, you might not be able to encrypt files on your device.
- On the Home screen or in a folder, click the Options icon.
- Click Security > Encryption.
- To encrypt data on your device, in the Device Memory section, select the Encrypt check box.
- To encrypt files that are stored on a media card and on your device, select the Media Card check box and do one of the following:
- To encrypt files using an encryption key that your device generates, change the Mode field to Device Key.
- To encrypt files using your device password, change the Mode field to Device Password.
-
To encrypt files using an encryption key and your device password, change the Mode field to Device Password & Device Key.
-
To also encrypt media files such as pictures, songs, and videos, select the Include Media Files check box.
-
Press the Key > Save.
To stop encrypting data on your device, clear the Device Memory check box. To stop encrypting files, clear the Media Card check box.
Set encryption strength
If encryption of data that is stored on your BlackBerry ^® device is turned on, you can set the strength of the encryption that your device uses to protect data that you receive when your device is locked.
- On the Home screen or in a folder, click the Options icon.
- Click Security > Encryption.
- Change the Strength field.
- Press the ☐ key > Save.
Use a certificate to encrypt the encryption keys on your device
To perform this task, your work email account must use a BlackBerry ^® Enterprise Server that supports this feature. For more information, contact your administrator.
If you have encryption for data that is stored on your BlackBerry device turned on and your smart card reader supports this feature, you might be able to use a certificate from the smart card to encrypt the encryption keys on your device.
- On the Home screen or in a folder, click the Options icon.
- Click Security > Encryption.
- Select the Two-factor Protection check box.
- Press the ☐ key > Save.
About encryption keys
If your BlackBerry ^® device is associated with an email account that uses a BlackBerry ^® Enterprise Server or BlackBerry ^® Desktop Redirector, your device is designed to use an encryption key to protect data as it travels between the BlackBerry Enterprise Server or BlackBerry Desktop Redirector and your device.
You should generate a new encryption key every 2 weeks.
Generate an encryption key
To perform this task, your work email account must use a BlackBerry® Enterprise Server that supports this feature. For more information, contact your administrator.
If your email account uses a BlackBerry Enterprise Server that does not support this feature, you can generate an encryption key using the BlackBerry® Desktop Software, if it includes the email settings tool. For more information, see the Help in the BlackBerry Desktop Software.
- On the Home screen or in a folder, click the Options icon.
- Click Security > Security Status Information.
- Highlight a service.
- Press the ☐ key.
- Click Regenerate Encryption Key.
Memory cleaning
About memory cleaning
Memory cleaning is designed to delete sensitive data from the temporary memory on your BlackBerry ^® device. Examples of sensitive data include sensitive data in the cache for the key store browser, unencrypted data from email messages, LDAP authentication passwords, and data from certificate and key searches.
When memory cleaning is turned on, the memory cleaning application is designed to delete sensitive data automatically in the following situations:
- when you insert your device in a holster
- when you do not use your device for a specified period of time
- when you synchronize with your computer
- when you change the time or the time zone for your device
- when you lock your device
Turn on memory cleaning
- On the Home screen or in a folder, click the Options icon.
- Click Security > Advanced Security Settings > Memory Cleaning.
- Select the Enable check box.
- Press the ☐ key > Save.
Change when your device deletes sensitive data from the temporary device memory
- On the Home screen or in a folder, click the Options icon.
- Click Security > Advanced Security Settings > Memory Cleaning.
-
To prevent your BlackBerry® device from deleting sensitive data when you insert your device in a holster, clear the Clean When Holstered check box.
-
To prevent your device from deleting sensitive data when your device remains idle for a specified period of time, clear the Clean When Idle check box.
-
To change how long your device waits after you stop using it before it deletes sensitive data, change the Idle Timeout field.
-
Press the Key > Save.
Delete sensitive application data from the temporary device memory
- On the Home screen or in a folder, click the Options icon.
- Click Security > Advanced Security Settings > Memory Cleaning.
- To delete sensitive data for all applications, click Clean.
View the icon for the memory cleaning application on the Home screen
- On the Home screen or in a folder, click the Options icon.
- Click Security > Advanced Security Settings > Memory Cleaning.
- Select the Place Memory Cleaner Shortcut on Homescreen check box.
- Press the ☐ key > Save.
Certificates
About certificates
A certificate is a digital document that binds the identity and public key of a certificate subject. If your email account uses a BlackBerry® Enterprise Server that supports this feature, you can download certificates over the wireless network from a certificate authority profile that is provided by your administrator. The certificate authority signs the certificate to verify that it can be trusted.
Depending on your organization, enrollment for a certificate might be required and might also occur automatically.
Certificate basics
Download a certificate from an LDAP-enabled server or DSML-enabled server
- On the Home screen or in a folder, click the Options icon.
- Click Security > Advanced Security Settings > Certificates.
- Press the ☐ key > Fetch Certificates.
- Specify the search criteria.
- Press the Key > Search.
- Click a certificate.
7. Click Add Certificate to Key Store.
About certificate enrollment
If your email account uses a BlackBerry® Enterprise Server that supports this feature, you can download certificates over the wireless network from a certificate authority profile provided by your administrator. Depending on your organization, enrollment for a certificate might be required and might also occur automatically.
When you enroll with a certificate authority profile, the latest certificate is downloaded to your BlackBerry device and added to your certificate list. The certificate authority profile shows the status of the certificate. If the certificate is scheduled to expire soon you can re-enroll with the certificate authority profile to receive an updated certificate.
Download a certificate from a certificate authority
To perform this task, your work email account must use a BlackBerry ^® Enterprise Server that supports this feature. For more information, contact your administrator.
If your administrator has provided you with a certificate authority profile, you can enroll with the profile to download a certificate to your BlackBerry device. If the certificate is scheduled to expire soon, you can re-enroll to receive an updated certificate.
- On the Home screen or in a folder, click the Options icon.
- Click Security > Advanced Security Settings > Certificate Enrollment > Enroll or Re-enroll.
- If necessary, type the credentials that you use to connect to your organization's network.
To hide the screen for the certificate authority profile while the request is being processed, press the ☐ key > Hide. To return to this screen, on the Home screen, click the Certificate Authority Profile icon.
Import a certificate or PGP key that is saved on your device
- On the Home screen or in a folder, click the Media icon or Files icon.
- Find and highlight a certificate or PGP ^® key.
- Press the Key > Import Certificate or Import PGP Key.
To view the certificate or PGP key, press the ☐key > Display Certificate or Display PGP Key.
Import a certificate or PGP key from a media card
- On the Home screen or in a folder, click the Options icon.
- Click Security > Advanced Security Settings > Certificates or PGP.
- Press the ☐ key > Show Media Card Certificates or Show Media Card PGP Keys.
To view the certificate or PGP® key, press the ☐ key > Display Certificate or Display PGP Key.
View properties for a certificate
- On the Home screen or in a folder, click the Options icon.
- Click Security > Advanced Security Settings > Certificates.
- Click a certificate.
Certificate properties
| Property Description |
| Revocation Status This field displays the revocation status of the certificate at a specified date and time. |
| Trust Status This field displays the trust status of the certificate chain. Acertificate can be explicitly trusted (the certificate itself is trusted), implicitly trusted (the root certificate in the certificate chain is trusted on your BlackBerry® device), or not trusted (the certificate is not explicitly trusted and the root certificate in the certificate chain is not trusted or does not exist on your device). |
| Expiration Date This field displays the expiration date of the certificate, as specified by the certificate issuer. |
| Certificate Type This field displays the certificate format. Your device supports X.509 and WTLS certificate formats. |
| Public Key Type This field displays the standard to which the public key complies. Your device supports RSA®, DSA, Diffie-Hellman, and ECC keys. |
| Subject This field displays information about the certificate subject. |
| Issuer This field displays information about the certificate issuer. |
| Serial Number This field displays the certificate serial number in hexadecimal format. |
| Key Usage This field displays approved uses of the public key. |
| Subject Alt Name This field displays an alternate email address for the certificate subject, if an alternate email address is available. |
| SHA1 Thumbprint This field displays the SHA-1 digital thumbprint of the certificate. |
| MD5 Thumbprint This field displays the MD5 digital thumbprint of the certificate. |
View one type of certificate in the certificate list
- On the Home screen or in a folder, click the Options icon.
- Click Security > Advanced Security Settings > Certificates.
- Press the ☐ key.
- Click one of the following menu items:
• Show My Certificates
• Show Others Certificates
• Show CA Certificates
• Show Root Certificates
To view all the certificates on your BlackBerry® device, press the ☐ key > Show All Certificates.
Send a certificate
When you send a certificate, your BlackBerry ^® device sends the public key, but does not send the corresponding private key.
- On the Home screen or in a folder, click the Options icon.
- Click Security > Advanced Security Settings > Certificates.
- Highlight a certificate.
- Press the ☐ key > Send via Email or Send via PIN.
Delete a certificate
- On the Home screen or in a folder, click the Options icon.
- Click Security > Advanced Security Settings > Certificates.
- Highlight a certificate.
- Press the ☐ key > Delete.
View the certificate chain for a certificate
- On the Home screen or in a folder, click the Options icon.
- Click Security > Advanced Security Settings > Certificates.
- Highlight a certificate.
- Press the ☐ key > Show Chain.
Certificate status
Status indicators for certificates and certificate authority profiles
Status indicators for certificates
| Indicator Description | |
| The certificate has a corresponding private key that is stored on your BlackBerry® device or a smart card. | |
| √ | The certificate chain is trusted and valid, and the revocation status of the certificate chain is good. |
| ? | The revocation status of the certificate chain is unknown, or a public key for a certificate in the certificate chain is weak. |
| × | The certificate is untrusted or revoked, or a certificate in the certificate chain is untrusted, revoked, expired, not valid, or cannot be verified. |
Status indicators for certificate authority profiles
| Indicator Description | |
| A valid certificate is associated with the certificate authority profile. | |
| A new certificate is being retrieved because the current certificate is scheduled to expire soon. | |
| The enrollment request is pending approval from the certificate authority. | |
| Enrollment with the certificate authority profile is pending because an action from the user is required to continue, or because enrollment is scheduled to occur later. | |
| Enrollment with the certificate authority profile is required and will occur automatically. | |
Check the revocation status of a certificate or certificate chain
- On the Home screen or in a folder, click the Options icon.
- Click Security > Advanced Security Settings > Certificates.
- Highlight a certificate.
- Press the key > Fetch Status or Fetch Chain Status.
Change the trust status of a certificate
Depending on the types of certificates that your administrator allows, you might not be able to trust some types of certificates.
- On the Home screen or in a folder, click the Options icon.
- Click Security > Advanced Security Settings > Certificates.
- Highlight a certificate.
- Press the ☐ key > Trust or Distrust.
-
If you are trusting a certificate, do one of the following:
-
To trust the highlighted certificate, click Selected Certificate.
- To trust the highlighted certificate and all the other certificates in the chain, click Entire Chain.
Revoke a certificate
If you revoke a certificate, the certificate is revoked only in the key store on your BlackBerry ^® device. Your device does not update the revocation status on the certificate authority or CRL servers.
- On the Home screen or in a folder, click the Options icon.
- Click Security > Advanced Security Settings > Certificates.
- Highlight a certificate.
- Press the ☐ key > Revoke > Yes.
- Change the Reason field.
- Click OK.
To cancel a certificate hold, highlight the certificate. Press the ☐ key > Cancel Hold.
Certificate revocation reasons
| Reason Description |
| Unknown The revocation reason does not match any of the predefined reasons. |
| Key Compromise A person who is not the key subject might have discovered the private key value. |
| CA Compromise Someone might have revealed the private key of the certificate issuer. |
| Change in Affiliation The certificate subject no longer works for the organization. |
| Superseded A new certificate is replacing an existing certificate. |
| Cessation of Operation The certificate subject no longer requires the certificate. |
| Certificate Hold You want to revoke the certificate temporarily. |
Certificate options
Change the display name for a certificate
- On the Home screen or in a folder, click the Options icon.
- Click Security > Advanced Security Settings > Certificates.
- Highlight a certificate.
- Press the ☐ key > Change Label.
- Type a display name for the certificate.
- Click OK.
Add an email address to a certificate
- On the Home screen or in a folder, click the Options icon.
-
Click Security > Advanced Security Settings > Certificates.
-
Highlight a certificate.
- Press the key > Associate Addresses.
- Press the Key > Add Address.
- Do one of the following:
- Click a contact.
- Click Use Once. Type an email address. Press the ↕ key on the keyboard.
- Press the key > Save.
Turn off the display name prompt that appears when you add a certificate to the key store
- On the Home screen or in a folder, click the Options icon.
- Click Security > Advanced Security Settings > Certificates.
- Press the Key > Fetch Certificates.
- Press the key > Options.
- Change the Prompt for Label field to No.
- Press the key > Save.
When you add a certificate, your BlackBerry ^® device uses the certificate subject as the name for the certificate.
Turn off the fetch status prompt that appears when you add a certificate to the key store
- On the Home screen or in a folder, click the Options icon.
- Click Security > Advanced Security Settings > Certificates.
- Press the Key > Fetch Certificates.
-
Press the key > Options.
-
To download the revocation status of a certificate when you add it to the key store, change the Fetch Status field to Yes.
-
To add a certificate to the key store without downloading the revocation status, change the Fetch Status field to No.
-
Press the key > Save.
Change how often a certificate authority profile checks certificate status
Depending on your organization, you might be able to change how often a certificate authority profile checks the status of its certificate. If the certificate is scheduled to expire soon you can re-enroll with the certificate authority profile to receive an updated certificate.
- On the Home screen or in a folder, click the Options icon.
- Click Security > Advanced Security Settings > Certificates.
- Change the Certificate Status Check Interval field.
- Press the ☐ key > Save.
Certificate shortcuts
| View the label and issuer of a certificate Press the Space key. | |
| View the properties of a certificate Press the key. | |
| View the security level of a personal certificate | Press the Alt key and L. |
| View the serial number of a certificate Press the Alt key and S. | |
| View certificates for certificate authorities Press the Alt key and C | |
| View personal certificates and certificates for other people | Press the Alt key and E. |
| View personal certificates Press the Alt key and P. | |
| View certificates for other people Press the Alt key and O. | |
| View root certificates Press the Alt key and R. | |
| View all certificates Press the Alt key and A. | |
PGP keys
About PGP keys
If your email account uses a BlackBerry ^® Enterprise Server that supports this feature, you can download PGP ^® keys over the wireless network from a certificate server provided by your administrator. Depending on your organization, enrollment for a certificate might be required and might also occur automatically.
PGP keys allow you to send and receive PGP messages using your BlackBerry ^® device if you are already sending and receiving PGP messages on your computer.
PGP key basics
Download a PGP key from an LDAP-enabled server
If you use the PGP® Universal Server, you might not be able to download PGP keys from an LDAP-enabled server.
- On the Home screen or in a folder, click the Options icon.
- Click Security > Advanced Security Settings > PGP Keys.
- Press the ☐ key > Fetch PGP Keys.
- Specify the search criteria.
- Press the key > Search.
-
Click a PGP key.
-
Click Add PGP Key to Key Store.
Download a personal PGP key from the PGP Universal Server
- On the Home screen or in a folder, click the Options icon.
- Click Security > PGP.
- Press the key > Download Keys.
Download an updated PGP key from an LDAP-enabled server
- On the Home screen or in a folder, click the Options icon.
- Click Security > PGP.
- Highlight a PGP ^® key.
- Press the ☐ key > Fetch Updated PGP Key.
Import a certificate or PGP key that is saved on your device
- On the Home screen or in a folder, click the Media icon or Files icon.
- Find and highlight a certificate or PGP® key.
- Press the ☐ key > Import Certificate or Import PGP Key.
To view the certificate or PGP key, press the ☐key > Display Certificate or Display PGP Key.
Import a certificate or PGP key from a media card
- On the Home screen or in a folder, click the Options icon.
- Click Security > Advanced Security Settings > Certificates or PGP.
- Press the ☐ key > Show Media Card Certificates or Show Media Card PGP Keys.
To view the certificate or PGP® key, press the ☐ key > Display Certificate or Display PGP Key.
View properties for a PGP key
- On the Home screen or in a folder, click the Options icon.
- Click Security > PGP.
- Click a PGP ^® key.
- Click View Subkey.
PGP key properties
Property
Description
Revocation Status This field displays the revocation status of the PGP® key at a specified date and time.
| Property Description |
| Trust Status This field displays the trust status of the PGP key. A PGP key can be explicitly trusted (the PGP key itself is trusted), implicitly trusted (the PGP key is associated with a private key on your BlackBerry® device), or not trusted (the PGP key is not explicitly trusted and is not associated with a trusted PGP key on your device, and a chain of digital signatures to a trusted key does not exist). |
| Creation Date This field displays the date that the PGP® Universal Server generated the PGP key. |
| Expiration Date This field displays the date that the PGP Universal Server specified as the expiration date of the PGP key. |
| Email Address This field displays the email address that is associated with the PGP key. Multiple Email Address fields might appear. |
| Public Key Type This field displays the standard to which the public key complies. Your device supports RSA®, DSA, and Diffie-Hellman keys. |
| Key Usage This field displays approved uses of the PGP key. |
| Fingerprint This field displays the PGP key fingerprint in hexadecimal format. |
Send a PGP key
When you send a PGP ^® key, your BlackBerry ^® device sends the public key, but does not send the corresponding private key.
- On the Home screen or in a folder, click the Options icon.
- Click Security > PGP.
- Highlight a PGP key.
- Press the key > Send via Email or Send via PIN.
Delete a PGP key
- On the Home screen or in a folder, click the Options icon.
- Click Security > PGP.
- Highlight a PGP ^® key.
- Press the ☐ key > Delete.
Clear the PGP data cache
The PGP ^® data cache contains cached PGP public keys and the PGP ^® Universal Server policy that your BlackBerry ^® device downloads from the PGP Universal Server.
- On the Home screen or in a folder, click the Options icon.
- Click Security > PGP.
3. Press the Key > Clear Universal Cache.
The next time that you send a PGP protected message, your device downloads an updated PGP Universal Server policy and updated PGP public keys from the PGP Universal Server.
PGP key status
PGP key status indicators
| Indicator Description | |
| The PGP® key has a corresponding private key that is stored on your BlackBerry® device. | |
| √ | The PGP key is trusted and valid, and the revocation status of the PGP key is good. |
| ? | The revocation status of the PGP key is unknown or the key is weak. |
| × | The PGP key is untrusted, revoked, expired, not valid, or cannot be verified. |
Check the revocation status of a PGP key
- On the Home screen or in a folder, click the Options icon.
- Click Security > PGP.
- Highlight a PGP ^® key.
- Press the key > Fetch Status.
Change the trust status of a PGP key
- On the Home screen or in a folder, click the Options icon.
- Click Security > PGP.
- Highlight a PGP ^® key.
- Press the ☐ key > Trust or Distrust.
Revoke a PGP key
If you revoke a PGP ^® key, the PGP key is revoked only in the key store on your BlackBerry ^® device. Your device does not update the revocation status on the PGP ^® Universal Server.
- On the Home screen or in a folder, click the Options icon.
- Click Security > PGP.
- Highlight a PGP ^® key.
- Press the ☐ key > Revoke > Yes.
- Change the Reason field.
- Click OK.
PGP key revocation reasons
| Reason Description |
| Unknown The revocation reason does not match any of the predefined reasons. |
| Superseded A new PGP® key is replacing an existing PGP key. |
| Key Compromise A person who is not the key subject might have discovered the private key value. |
| Key Retired The PGP key is no longer used. |
| User ID Invalid The user information for the PGP key is not valid. |
PGP key options
Change the display name for a PGP key
- On the Home screen or in a folder, click the Options icon.
- Click Security > PGP.
- Highlight a PGP ^® key.
- Press the ☐ key > Change Label.
- Type a display name for the PGP key.
- Click OK.
Turn off the display name prompt that appears when you add a PGP key to the key store
- On the Home screen or in a folder, click the Options icon.
- Click Security > PGP.
- Press the key > Fetch PGP Keys.
- Press the key > Options.
- Change the Prompt for Label field to No.
- Press the key > Save.
When you add a PGP ^® key, your BlackBerry ^® device uses the name that the PGP ^® Universal Server set for the key when it generated the key.
Turn off the fetch status prompt that appears when you add a PGP key to the key store
- On the Home screen or in a folder, click the Options icon.
- Click Security > PGP.
- Press the Key > Fetch PGP Keys.
- Press the key > Options.
- To download the revocation status of a PGP® key when you add it to the key store, change the Fetch Status field to Yes.
• To add a PGP key to the key store without downloading the revocation status, change the Fetch Status field to No.
- Press the key > Save.
PGP key shortcuts
View the label of a PGP ^® key Press the Space key.
View the properties of a PGP key Press the key.
View the security level of a PGP private key Press the Alt key and L.
View personal PGP keys Press the Alt key and P.
View PGP keys for other people Press the Alt key and O.
View all PGP keys Press the Alt key and A.
Troubleshooting: PGP keys
I cannot download a PGP key from an LDAP-enabled server
Try the following actions:
- Verify that your organization permits you to download PGP® keys from an LDAP-enabled server. For more information, contact your administrator.
- If you changed the connection type that your BlackBerry® device uses to connect to an LDAP-enabled server, try using the default connection type.
Certificate servers
Add a certificate server
- On the Home screen or in a folder, click the Options icon.
- Click Security > Advanced Security Settings > Certificate Servers.
- Press the ☐ key > New Server.
- Specify information for the certificate server.
- Press the Key > Save.
Change connection information for a certificate server
- On the Home screen or in a folder, click the Options icon.
-
Click Security > Advanced Security Settings > Certificate Servers.
-
Highlight a certificate server.
- Press the key > Edit.
- Change the connection information for the certificate server.
- Press the ☐ key > Save.
Connection options for OCSP and CRL servers
Option Description
Friendly Name Type a display name for the certificate server.
Server URL Type the web address of the certificate server.
Connection options for LDAP-enabled servers and DSML-enabled servers
Option Description
Friendly Name Type a display name for the server.
Server Name Type the network address of the server.
Base Query Type the base query information for the server using X.509 certificate syntax (for example, o=test.rim.net).
Port Type the port number for your organization's network. The default port number is 389.
Authentication Type Specify whether you must log in to the server.
Connection Type Specify whether your BlackBerry ^® device uses an SSL connection or a TLS connection to connect to the server.
Send connection information for a certificate server
- On the Home screen or in a folder, click the Options icon.
- Click Security > Advanced Security Settings > Certificate Servers.
- Highlight a certificate server.
- Press the ☐ key > Email Server or PIN Server.
Delete a certificate server
- On the Home screen or in a folder, click the Options icon.
- Click Security > Advanced Security Settings > Certificate Servers.
- Highlight a certificate server.
- Press the ☐ key > Delete.
Key store
About the key store
The key store on your BlackBerry ^® device might store the following items. To access these items in the key store, you must type a key store password.
- Personal certificates (certificate and private key pairs)
- Certificates that you download using the certificate synchronization tool of the BlackBerry® Desktop Software
- Certificates that you download from an LDAP-enabled server or DSML-enabled server
• Certificates that you download from a certificate authority profile - Certificates that you import from your device or a media card
• Certificates that you add from a message - Root certificates that are included in the BlackBerry Desktop Software
- Personal PGP® keys (public and private key pairs)
- PGP public keys that you download from an LDAP-enabled server
- PGP public keys that you import from your device or a media card
- PGP public keys that you add from a message
Change the key store password
- On the Home screen or in a folder, click the Options icon.
- Click Security > Advanced Security Settings > Key Stores.
- Press the ☐ key > Change Key Store Password.
Synchronize the key store password with the device password
If you synchronize the key store password with your BlackBerry ^® device password, when you change your device password, the key store password changes to match it automatically.
- On the Home screen or in a folder, click the Options icon.
- Click Security > Advanced Security Settings > Key Stores.
- Change the Use Device Password as Key Store Password field to Yes.
- Press the KEY > Save.
Change when your device deletes the key store password
- On the Home screen or in a folder, click the Options icon.
- Click Security > Advanced Security Settings > Key Stores.
-
Change the Key Store Password Timeout field.
-
Press the Key > Save.
To access private keys after your BlackBerry® device deletes the key store password, you must type your key store password.
Add contacts to your Contacts application automatically when you add items to the key store
- On the Home screen or in a folder, click the Options icon.
- Click Security > Advanced Security Settings > Key Stores.
- Select the Add Certificate Email to Contacts check box.
- Press the ☐ key > Save.
Change the service that your device uses to download certificates
Depending on your organization, you might not be able to change the service that your BlackBerry ^® device uses to download certificates. For more information, contact your administrator.
- On the Home screen or in a folder, click the Options icon.
- Click Security > Advanced Security Settings > Key Stores.
- Change the Certificate Service field.
- Press the Key > Save.
Turn off automatic backup and restore of key store data
By default, items in the key store on your BlackBerry ^® device are backed up or restored when you back up or restore your device data. For security reasons, If you do not want to back up your private key to your computer or restore your private key from your computer, you can turn off automatic backup and restore of key store data.
- On the Home screen or in a folder, click the Options icon.
- Click Security > Advanced Security Settings > Key Stores.
- Clear the Allow Key Store Backup/Restore check box.
- Press the key > Save.
To turn on automatic backup and restore of key store data, select the Allow Key Store Backup/Restore check box.
Change the refresh rate for certificate revocation lists
- On the Home screen or in a folder, click the Options icon.
- Click Security > Advanced Security Settings > Key Stores.
- In the Certificate Status section, change the Expires After field.
- Press the ☐ key > Save.
Your BlackBerry ^® device downloads a new revocation status automatically when your device uses a key store item with a status that is older than the time limit that you set.
Reject certificate revocation lists from unverified CRL servers
- On the Home screen or in a folder, click the Options icon.
- Click Security > Advanced Security Settings > Key Stores.
- Clear the Accept Unverified CRLs check box.
- Press the ☐ key > Save.
Your BlackBerry ^® device rejects certificate revocation lists from CRL servers that the BlackBerry ^® MDS Connection Service cannot verify.
Smart cards
About using a smart card with your device
Smart cards store certificates and private keys. You can use a smart card reader to import certificates from a smart card to the key store on your BlackBerry ^® device, but you cannot import private keys. As a result, private key operations such as signing and decryption use the smart card, and public key operations such as verification and encryption use the public certificates on your device.
If you use a smart card certificate to authenticate with your device, after you connect your smart card reader to your device, your device requests authentication from the smart card each time that you unlock your device.
You can install multiple smart card drivers on your device, including drivers for microSD smart cards, but you can only authenticate to one smart card at a time. If you are authenticating using a microSD smart card and you want to transfer media files between your microSD smart card and your computer in mass storage mode, you must temporarily turn off two-factor authentication or select a different authentication option.
If the S/MIME Support Package for BlackBerry ^® devices is installed on your device, you can use smart card certificates to send S/MIME-protected messages.
Turn on two-factor authentication
To perform this task, you must have set a password for your BlackBerry ^® device and have the smart card password that you received with your smart card.
- On the Home screen or in a folder, click the Options icon.
- Click Security > Password.
- To use a smart card and your device password to unlock your device, set the Authentication Type field to Smart Card.
- To use your connected smart card reader (even if the smart card is not inserted) and your device password to unlock your device, set the Authentication Type field to Proximity. Select the Prompt for Device Password check box.
- Press the ☐ key > Save.
Import a certificate from a smart card
- On the Home screen or in a folder, click the Options icon.
- Click Security > Advanced Security Settings > Certificates.
- Press the ☐ key > Import Smart Card Certs.
- Type your smart card password.
- Select the check box beside a certificate.
- Click OK.
- Type your key store password.
- Click OK.
Lock your device when you remove your smart card from your smart card reader
- On the Home screen or in a folder, click the Options icon.
- Click Security > Password.
- If necessary, change the User Authenticator field to Smart card.
- Change the Lock On Card Removal field to Enabled.
- Press the ☐ key > Save.
About smart password entry
If you use advanced authentication and your BlackBerry® device password or smart card password is numeric, you might be able to use smart password entry in some password fields. When smart password entry is turned on, your device is designed to remember the format of a password that you type in a password field. When you type the password again, your device applies a smart password filter to the password field. If the password is numeric, a 123 indicator appears beside the password field and you do not have to press the Alt key to type numbers. If the password is alphanumeric, an ABC indicator appears beside the password field.
To use smart password entry, advanced authentication must be turned on and the correct smart card driver and smart card reader must be installed on your device.
Turn off smart password entry
To perform this task, you must be using a smart card and a password to unlock your BlackBerry ^® device.
You can turn off smart password entry to reduce the chance that someone might guess your device password or smart card password based on the smart password filter that your device applies to password fields.
- On the Home screen or in a folder, click the Options icon.
- Click Security > Password.
- If necessary, change the User Authenticator field to Smart Card.
- Set the Smart Password Entry field to Disabled.
5. Press the Key > Save.
To turn on smart password entry again, set the Smart Password Entry field to Enabled.
Switch smart password filters
In a blank password field, press the Enter key.
The indicator for the new smart password filter appears beside the password field.
Prerequisites: Using authentication certificates
- Your BlackBerry® device must have the correct smart card driver and smart card reader driver installed.
- You must have imported a certificate from your smart card that you can use for signing and verification.
- You must turn on advanced authentication.
- You must have set a device password.
- You must have the smart card password that you received with your smart card.
Use a certificate to authenticate your smart card
To perform this task, you must be using a smart card and a password to unlock your BlackBerry ^® device.
If you use a certificate to authenticate your smart card, the certificate authenticates your smart card whenever you use your smart card to unlock your device.
- On the Home screen or in a folder, click the Options icon.
- Click Security > Password.
- If necessary, change the User Authenticator field to Smart card.
- Change the Authentication Certificate field.
- Press the ☐ key > Save.
To stop using a certificate to authenticate your smart card, set the Authentication Certificate field to None.
Check the status of your authentication certificate automatically
To perform this task, you must be using a smart card and a password to unlock your BlackBerry® device.
- On the Home screen or in a folder, click the Options icon.
- Click Password.
- If necessary, change the User Authenticator field to Smart Card.
- Change the Certificate Status Check field.
- Press the ☐ key > Save.
If your device checks the status of your authentication certificate and finds that it is revoked or expired, your device locks.
Store the passphrase for your smart card on your device
- On the Home screen or in a folder, click the Options icon.
- Click Security > Smart Card.
- Select the PIN Caching check box.
- Press the ☐ key > Save.
Your BlackBerry ^® device stores the passphrase for the same length of time as it stores your key store password.
Turn off notification for smart card connections
- On the Home screen or in a folder, click the Options icon.
- Click Security > Smart Card.
- Clear the LED Session Indicator check box.
- Press the key > Save.
To turn on notification for smart card connections, select the LED Session Indicator check box.
VPN settings
Depending on the options that your administrator has set for you, this feature might not be supported.
About VPN profiles
A VPN profile contains the information that you require to log in to your organization's network over VPN. Depending on your organization, you might have more than one VPN profile on your BlackBerry® device. For more information about VPN profiles, contact your administrator.
Log in to a VPN
- Your email account must use a BlackBerry® Enterprise Server that supports this feature. For more information, contact your administrator.
-
If you use a software token to log in to a VPN, the software token must be on your device and the software token information that appears in the VPN profile must be correct.
-
On the Home screen or in a folder, click the Options icon.
- Click Security > Advanced Security Settings > VPN.
- To connect to your organization's network, click Log in.
Change the user name and password for a VPN profile
- On the Home screen or in a folder, click the Options icon.
- Click Security > Advanced Security Settings > VPN.
- Highlight a VPN profile.
- Press the ☐ key > Edit.
- In the Username field, type a new user name.
- In the Password field, type a new password.
- Press the ☐ key > Save.
About software tokens
You might need a software token to log in to a VPN. A software token includes a token code that your device regenerates periodically and a PIN. For more information about software tokens, contact your administrator.
Change the software token for a VPN profile
To perform this task, the software token that you want to use must be installed on your BlackBerry ^® device. For more information, contact your administrator.
- On the Home screen or in a folder, click the Options icon.
- Click Security > Advanced Security Settings > VPN.
- Highlight a VPN profile.
- Press the ☐ key > Edit.
- Change the Software Token Serial Number field.
- Press the key > Save.
Change the PIN for a software token on your device
- On the Home screen or in a folder, click the Options icon.
- Click Security > Advanced Security Settings > Software Tokens.
- Click a software token > Specify PIN.
Verify security software manually
Security self-tests are designed to verify that security software is implemented correctly on your BlackBerry® device. The tests should run automatically after you restart your device, but you can also verify security software manually.
- On the Home screen or in a folder, click the Options icon.
- Click Security > Security Status Information.
- Press the ☐ key > Verify Security Software.
Third-party application control
About permissions for third-party applications
You can set permissions that control how third-party applications on your BlackBerry ^® device interact with the other applications on your device. For example, you can control whether third-party applications can access data or the Internet, make calls, or use Bluetooth ^® connections.
If you have added third-party applications to your device, your device is designed to prevent these applications from sending or receiving data without your knowledge. Before a third-party application sends or receives data, a dialog box prompts you to accept or deny the connection request. For a selected application, you can turn off this prompt for a specific location or resource.
Reset connection permissions for third-party applications
- On the Home screen or in a folder, click the Options icon.
- Click Device > Application Management.
- Press the key > Edit Default Permissions.
- Press the key > Reset All Firewall Prompts.
- Press the key > Apply Defaults to All.
About direct Internet connections for third-party applications
Some third-party applications that you add to your BlackBerry ^® device might require a direct TCP or HTTP connection to the Internet. For example, a stock price application might need to connect to the Internet to retrieve the latest stock prices. You might have to set the APN that the third-party application uses for this connection.
Set up a direct Internet connection for a third-party application
To get the user name and password for the APN, contact your wireless service provider.
- On the Home screen or in a folder, click the Options icon.
- Click Device > Advanced System Settings > TCP IP.
- Type the APN information.
- Press the ☐ key > Save.
Turn on safe mode
When you start your BlackBerry ^® device, you can turn on safe mode to prevent third-party applications from running automatically. This safe mode enables you to troubleshoot or remove any unwanted applications.
- Remove and reinsert the battery.
- When the red LED light goes out, press and hold the Escape key as the device is loading.
- When the dialog appears, click OK.
When safe mode is on, a safe mode indicator appears in the device status section of the Home screen.
To turn off safe mode, repeat step 1.
Set permissions for a third-party application
Note: Changing permissions for third-party applications can significantly affect the operation of applications on your BlackBerry® device. For more information about how changing these permissions might affect the operation of the applications on your device, contact your wireless service provider or administrator.
- On the Home screen or in a folder, click the Options icon.
- Click Device > Application Management.
- To set permissions for a specific third-party application, highlight the application. Press the ☐ key > Edit Permissions.
- To set permissions for all third-party applications, press the ☐ key > Edit Default Permissions.
- Expand Connections, Interactions, or User Data.
- Change the permission fields.
- Press the ☐ key > Save.
Turn off a prompt for a third-party application connection
- On the Home screen or in a folder, click the Options icon.
- Click Device > Application Management.
- Highlight a third-party application.
- Press the ☐ key > Edit Permissions > Prompt Exceptions.
- To allow the application to connect to a specific location or resource without displaying a prompt, click Add Allow. Specify a protocol and, if necessary, the domain.
- To prevent the application from connecting to a specific location or resource without displaying a prompt, click Add Deny. Specify a protocol and, if necessary, the domain.
- Press the key > Save.
Interaction permissions for third-party applications
| Permission | Description |
| Cross Application Communication Specify whether third-party applications can communicate and share data with other applications on your BlackBerry® device. | |
| Device Settings Specify whether third-party applications can turn on or turn off your device or change device options, such as display options. | |
| Permission Description | |
| Media Specify whether third-party applications can access media files on your device. | |
| Application Management Specify whether third-party applications can add or delete application modules or access module information such as an application name or version. | |
| Themes Specify whether your device can use third-party applications as a source for customized themes. | |
| Input Simulation Specify whether third-party applications can simulate actions, such as pressing a key on your device. | |
| Browser Filtering Specify whether third-party applications can register browser filters with the browser on your device to add, change, or delete website content before it appears in your browser. | |
| Recording Specify whether third-party applications can take screen shots of your device screen or use other applications on your device to take pictures or recordings. | |
| Security Timer Reset Specify whether third-party applications can reset the duration that your device remains unlocked after you stop using it. | |
Data permissions for third-party applications
| Permission | Description |
| Email Set whether third-party applications can access email messages, text messages, or PIN messages on your BlackBerry® device. | |
| Organizer Data Set whether third-party applications can access organizer data such as contacts, calendar entries, tasks, or memos. | |
| Files Set whether third-party applications can access files that you store on your device. For example, you can set whether third-party applications can access files that you transfer to your device using Bluetooth® technology or the media manager tool of the BlackBerry® Desktop Software. | |
| Security Data Set whether third-party applications can access certificates or keys in the key store on your device. | |
Troubleshooting: Security
I cannot download a certificate
If you changed the connection type that your BlackBerry ^® device uses to connect to the LDAP-enabled server or DSML-enabled server, try switching to the default connection type.
I cannot unlock my device using my smart card
Try performing the following actions:
- Verify that the correct smart card is inserted in the smart card reader.
- Verify that the smart card is inserted in the smart card reader correctly.
- Verify that you typed the smart card password correctly. You should have received this password when you received your smart card.
- If you use a certificate to authenticate your smart card, verify that the certificate is not revoked or expired.
My device prompts me to make an emergency call when I type a password
If your BlackBerry ^® device password contains a combination of letters that corresponds to an emergency access number, your device might prompt you to make an emergency call when you type your device password.
To continue typing your device password, press the Escape key.
Service books and diagnostic reports
Accept, delete, or restore a service book
Your wireless service provider or administrator might send a service book to your BlackBerry ^® device over the wireless network to add an additional service or application to your device.
If your email account uses a BlackBerry® Enterprise Server, you can also receive service books on your device using the BlackBerry® Desktop Software. For more information, see the Help in the BlackBerry Desktop Software.
- On the Home screen or in a folder, click the Options icon.
- Click Device > Advanced System Settings > Service Book.
- Highlight a service book.
- Press the ☐ key.
- To accept a service book, click Accept.
- To delete a service book, click Delete.
- To restore a service book, click Undelete.
Run a diagnostic report
If you cannot connect to the wireless network or access services such as email messaging, your wireless service provider or administrator might ask you to run and submit a diagnostic report. Your wireless service provider or administrator can use the report to help you troubleshoot the issue.
- On the Home screen or in a folder, click the Options icon.
- Click Networks and Connections > Mobile Network.
- Press the ☐ key > Diagnostics Test.
- Press the ☐ key > Run.
View, submit, or delete a diagnostic report
- On the Home screen or in a folder, click the Options icon.
- Click Networks and Connections > Mobile Network.
- Press the key > Diagnostics Test.
- Highlight a report.
- Press the key.
- To view the diagnostic report, click View Report.
- To submit the diagnostic report, click Email Report or PIN Report.
- To delete the diagnostic report, click Delete.
- To delete all diagnostic reports, click Delete All.
Set a default recipient for diagnostic reports
If you set the default recipient, each time that you submit a diagnostic report, your BlackBerry ^® device sends the report to that recipient. If you want to specify a recipient each time that you submit a report, do not set the default recipient.
- On the Home screen or in a folder, click the Options icon.
- Click Networks and Connections > Mobile Network.
- Press the ☐ key > Diagnostics Test.
- Press the key > Options.
- Type the contact information.
- Press the key > Save.
I cannot run or submit a diagnostic report
Try the following actions:
- Try running the diagnostic report again. In the diagnostic report, press the ☐ key > Repeat All Steps.
- Verify that your BlackBerry® device is connected to the wireless network.
- If you cannot submit a diagnostic report to an email address, try submitting the report to a PIN. Likewise, if you cannot submit a diagnostic report to a PIN, try submitting the report to an email address.
View the version number of the BlackBerry Device Software on your device
- On the Home screen or in a folder, click the Options icon.
- Click Device > About Device Versions.
To return to the Options screen, press the → key three times.
Synchronization
About synchronization
The wireless data synchronization feature is designed to synchronize organizer data (contacts, calendar entries, tasks, and memos) between a subscriber's BlackBerry® smartphone and the email application on their computer over the wireless network.
The wireless email reconciliation feature is designed to reconcile email between the subscriber's smartphone and the email application on their computer over the wireless network. When a subscriber files or deletes email messages on their smartphone, these email message should be filed or deleted in their email application. Likewise, any changes that they make to email message in the email application on their computer should be reflected on the smartphone.
In rare cases, if a smartphone does not recognize fields in a contact, calendar entry, or email account, some data or email cannot be synchronized or reconciled.
If wireless data synchronization or wireless email reconciliation is not available on the smartphone or if the subscriber turned off these features, the subscriber can use the synchronization tool of the BlackBerry® Desktop Software to synchronize their organizer data and email. For more information, see the Help in the BlackBerry Desktop Software.
Research In Motion recommends that you regularly create and save a backup file on your computer, especially before you update any software. Maintaining an up-to-date backup file on your computer might allow you to recover device data if your device is lost, stolen, or corrupted by an unforeseen issue.
Reconcile email over the wireless network
You can set the Wireless Reconcile option for each email address that is associated with your BlackBerry ^® device.
- On the Home screen, click the Messages icon.
- Press the key > Options > Email Reconciliation.
- If the Message Services field appears, set this field to the appropriate email account.
- Select the Wireless Reconcile check box.
- Press the Key > Save.
If your device is associated with a Microsoft® Outlook® email account, you must use the synchronization tool of the BlackBerry® Desktop Software to reconcile email in personal folders. For more information, see the Help in the BlackBerry Desktop Software.
Delete email on your device and in your email application on your computer
You can set the Delete On option for each email address that is associated with your BlackBerry ^® device.
- On the Home screen, click the Messages icon.
- Press the ☐ key > Options > Email Reconciliation.
- If the Message Services field appears, set this field to the appropriate email account.
- Change the Delete On field to Mailbox & Handheld.
- Press the key > Save.
It takes a short period of time for email to be deleted over the wireless network.
Related topics
Delete messages, 75
Synchronize organizer data over the wireless network
Research In Motion recommends that you regularly create and save a backup file on your computer, especially before you update any software. Maintaining an up-to-date backup file on your computer might allow you to recover device data if your device is lost, stolen, or corrupted by an unforeseen issue.
- In the Contacts application, Calendar application, Tasks application, or MemoPad, press the ☐ key > Options.
- If necessary, click a calendar or contact list.
- Select the Wireless Synchronization check box.
- Press the Key > Save.
If you use the BlackBerry® Internet Service, you must use the synchronization tool of the BlackBerry® Desktop Software to synchronize calendar data. For more information, see the Help in the BlackBerry Desktop Software.
Related topics
Some characters in calendar entries do not appear correctly after synchronization, 179
About synchronization conflicts, 86
About synchronization conflicts
A synchronization conflict occurs when you change the same email or organizer data item on your BlackBerry ^® device and in the email application on your computer.
If you reconcile your email using wireless email reconciliation, on your device, you can set whether the email on your device or the email on your computer takes precedence when an email reconciliation conflict occurs.
If you synchronize your organizer data using wireless data synchronization, the organizer data on your computer takes precedence over the organizer data on your device when a data synchronization conflict occurs.
Research In Motion recommends that you regularly create and save a backup file on your computer, especially before you update any software. Maintaining an up-to-date backup file on your computer might allow you to recover device data if your device is lost, stolen, or corrupted by an unforeseen issue.
Related topics
Synchronize organizer data over the wireless network, 175
Some characters in calendar entries do not appear correctly after synchronization, 179
Manage email reconciliation conflicts
You can set the On Conflicts option for each email address that is associated with your BlackBerry ^® device.
- On the Home screen, click the Messages icon.
- Press the ☐ key > Options > Email Reconciliation.
- If the Message Services field appears, set this field to the appropriate email account.
- Change the On Conflicts field.
- Press the key > Save.
Manage data synchronization conflicts
You can change how conflicts that occur during organizer data synchronization are resolved by turning off wireless data synchronization, changing conflict resolution options, and synchronizing organizer data using the synchronization tool of the BlackBerry® Desktop Software. For more information about managing conflicts that occur during organizer data synchronization, see the Help in the BlackBerry Desktop Software.
About backing up and restoring device data
If you have installed the BlackBerry® Desktop Software on your computer, you can back up and restore most of your BlackBerry device data, including messages, organizer data, fonts, saved searches, and browser bookmarks using the backup and restore tool of the BlackBerry Desktop Software. For more information, see the Help in the BlackBerry Desktop Software.
If your email account uses a BlackBerry® Enterprise Server, you might be able to restore synchronized organizer data to your device over the wireless network. To restore synchronized organizer data over the wireless network, you must have an activation password. For more information, contact your administrator.
Research In Motion recommends that you regularly create and save a backup file on your computer, especially before you update any software. Maintaining an up-to-date backup file on your computer might allow you to recover device data if your device is lost, stolen, or corrupted by an unforeseen issue.
Empty the deleted items folder on your computer from your device
To perform this task, your work email account must use a BlackBerry® Enterprise Server that supports this feature. For more information, contact your administrator.
- On the Home screen, click the Messages icon.
- Press the ☐ key > Options > Email Reconciliation.
- If the Message Services field appears, set this field to the appropriate email account.
- Press the key > Purge Deleted Items.
Troubleshooting: Synchronization
Email is not reconciling over the wireless network
Try the following actions:
- Verify that your BlackBerry® device is connected to the wireless network.
- Verify that wireless email reconciliation is turned on.
- Reconcile email manually. On the Home screen, click the Messages icon. Press the ☐key >Reconcile Now.
Organizer data is not synchronizing over the wireless network
Try the following actions:
- Verify that your BlackBerry® device is connected to the wireless network.
- Verify that wireless data synchronization is turned on in the Contacts application, Calendar application, Tasks application, and MemoPad.
- If you use the BlackBerry® Internet Service, you must use the synchronization tool of the BlackBerry® Desktop Software to synchronize calendar data. For more information, see the Help in the BlackBerry Desktop Software.
Contact list field data is not appearing on my computer
You can only synchronize the data in a custom contact list field with a text field in the email application on your computer. For example, you cannot add a contact's birthday to a custom contact list field on your BlackBerry® device and synchronize it with the email application on your computer, because the birthday field is a date field in the email application on your computer.
Related topics
Create a custom contact field, 181
Some characters in calendar entries do not appear correctly after synchronization
If you schedule appointments or meetings on your BlackBerry ^® device that contain special characters or accents, your computer might not support these characters.
On your computer, verify that you are using the correct default code page and that the correct font support is installed on your computer. For more information, see the documentation for the operating system on your computer.
Research In Motion recommends that you regularly create and save a backup file on your computer, especially before you update any software. Maintaining an up-to-date backup file on your computer might allow you to recover device data if your device is lost, stolen, or corrupted by an unforeseen issue.
Related topics
Synchronize organizer data over the wireless network, 175
About synchronization conflicts, 86
I am not receiving email from personal folders on my computer
If your BlackBerry ^® device is associated with a Microsoft ^® Outlook ^® email account, you must use the synchronization tool of the BlackBerry ^® Desktop Software to reconcile email in personal folders. For more information, see the Help in the BlackBerry Desktop Software.
Accessibility options
About accessibility options
BlackBerry ^® devices include many features that facilitate use by persons with disabilities. For more information about accessibility options, visit www.blackberry.com/accessibility.
Screen accessibility options
Display closed captions in videos
You can turn on closed captioning so that text displays on the screen when you play video files that support closed captioning.
- On the Home screen, click the Media icon.
- Press the ☐ key > Options.
- Select the Display Closed Captions check box.
- If necessary, change the Appearance field, Position field, and Font Scale field.
- Press the key > Save.
Change the display font
- On the Home screen or in a folder, click the Options icon.
- Click Display > Screen Display.
- Change the font fields.
- Press the key > Save.
Use grayscale or reverse contrast for the screen display
- On the Home screen or in a folder, click the Options icon.
-
Click Accessibility.
-
To use grayscale for the screen display, change the Color Contrast field to Greyscale.
-
To use reverse contrast for the screen display, change the Color Contrast field to Reverse Contrast.
-
Press the ☐ key > Save.
Audio and phone accessibility options
Turn on event sounds
Event sounds alert you when you turn on or turn off your BlackBerry ^® device, when the battery power level is full or low, and when you connect or disconnect a USB cable or accessory to or from your device.
- On the Home screen or in a folder, click the Options icon.
- Click Accessibility.
- Select the Event Sounds check box.
- Press the ☐ key > Save.
Add a contact alert
You can create contact alerts that allow you to customize ring tones and alerts for calls and messages from specific contacts or groups of contacts. When you receive a call or message from the contact, your BlackBerry ^® device uses the assigned ring tone or alert, even if you select the Silent profile or Vibrate Only profile. If you do not want to be notified with the assigned ring tone or alert, you can select the All Alerts Off profile.
- On the Home screen, click the Sound and Alert Profiles icon.
- Click Change Sounds and Alerts > Sounds for Contacts > Add Contact Alert.
- In the Name field, type the name of the contact alert.
- In the Contacts field, type the name of the contact.
- Click a contact.
- Change the ring tone and alert information for calls and messages.
- Press the ☐ key > Save.
To delete a contact alert, highlight the contact alert that you want to delete. Press the ☐ key > Delete.
Hearing aid mode
Depending on your device model, this feature might not be supported.
About hearing aid mode
In hearing aid mode, or telecoil mode, the magnetic signal of your BlackBerry ^® device is modified to an appropriate level and frequency response to be picked up by hearing aids that are equipped with telecoils.
Turn on hearing aid mode
- From the Home screen, press the key.
-
Press the ☐ key > Options > Hearing Aid Mode.
-
Change the Mode Enabled field to Telecoil.
- Press the key > Save.
The H-T telecoil indicator appears at the top of the Home screen.
TTY support
Depending on your wireless service provider, this feature might not be supported.
About TTY support
When you turn on TTY support and you connect your BlackBerry ^® device to a TTY device that operates at 45.45 bits per second, you can make calls to and receive calls from TTY devices. Your BlackBerry device is designed to convert received calls to text that you can read on your TTY device.
If your TTY device is designed for use with a 2.5-mm headset jack, you must use an adapter accessory to connect your TTY device to your BlackBerry device. To get an adapter accessory that Research In Motion has approved for use with your BlackBerry device, visit www.shopblackberry.com.
Turn on TTY support
- From the Home screen, press the ∪ key.
- Press the key > Options > TTY.
- Change the TTY Mode field to Yes.
- Press the key > Save.
A TTY indicator appears in the connections area at the top of the Home screen.
To turn off TTY support, change the TTY Mode field to No.
Voice dialing
Perform an action using a voice command
- On the Home screen or in a folder, click the Voice Dialing icon.
- After the beep, say a voice command.
Related topics
I cannot make calls using a voice command, 67
Available voice commands
"Call
Say this voice command to make a call. To perform this task with a Bluetooth® enabled device, such as a handsfree car kit or wireless headset, the paired Bluetooth enabled device must support this feature and you must turn on Bluetooth technology. You cannot make calls to emergency numbers using voice commands.
"Call "
Say this voice command to call a specific phone number for a contact that is in your contact list. For example, if the contact has a work phone number and a mobile phone number, you can say "Call
"Call extension "
Say this voice command to dial an extension. To perform this task, you must set options for dialing extensions. You can dial extensions only within your company.
"Check my phone number"
If you have multiple phone numbers associated with your BlackBerry ^® device, say this voice command to check your active phone number.
"Check signal strength"
Say this voice command to check your wireless coverage level.
"Check network"
Say this voice command to check the wireless network that your device is connected to.
"Check battery"
Say this voice command to check the battery power level.
"Repeat"
Say this voice command to have the last voice prompt repeated to you.
"Cancel"
Say this voice command to close the voice dialing application.
Related topics
Set options for dialing extensions, 58
Typing accessibility options
Change or delete an AutoText entry
- On the Home screen or in a folder, click the Options icon.
- Click Typing and Input > Word Substitution.
- Highlight an AutoText entry.
-
Press the ☐ key.
-
To change the AutoText entry, click Edit. Change the entry. Press the ☐ key > Save.
- To delete the AutoText entry, click Delete.
Type text using the predictive input method
When you are typing text, perform any of the following actions:
- To select the highlighted suggestion and start typing a new word, press the Enter key.
- To select the highlighted suggestion and continue typing the same word, click the word.
- To ignore the suggestions, keep typing.
Change your typing style
You can change how your BlackBerry ^® device recognizes what you type by selecting a typing style.
- On the Home screen or in a folder, click the Options icon.
- Click Typing and Input > Typing.
-
For a keyboard, do one of the following:
-
To turn off all typing assistance, change the Style field to Direct.
- To set your device to suggest word predictions as you type, change the Style field to Predictive.
- To set your device to type the first letter on a key when you press a key once and type the second letter on the key when you press the key twice, change the Style field to Multitap. The Portrait Keyboard Type field must be set to Reduced in Options > Typing and Input > Keyboard, to have this option.
-
To set your device to suggest spelling corrections as you type, change the Style field to Corrective.
-
Press the ☐ key > Save.
Calculator
Use the calculator
On the Home screen or in the Applications folder, click the Calculator icon.
- To press a key in the calculator, click the key or press the corresponding key on the BlackBerry® device keyboard.
Convert a measurement
- On the Home screen or in the Applications folder, click the Calculator icon.
- Type a number.
-
Press the key.
-
To convert the number from imperial to metric, click To Metric.
-
To convert the number from metric to imperial, click From Metric.
-
Click a conversion type.
BrickBreaker
About BrickBreaker
The object of BrickBreaker is to destroy bricks using a paddle and a ball. During the game, capsules fall from the bricks that you destroy. The capsules provide you with different mechanisms for destroying bricks or controlling the ball or paddle.
If the ball hits the paddle, a brick, or the top of the game board 50 times on any level, the bricks descend one space each time that you hit the ball with the paddle.
BrickBreaker capsules
Long:
This capsule makes the paddle longer.
Slow:
This capsule slows down the ball.
Gun:
This capsule enables you to shoot three bullets at the bricks; a bullet can destroy unbreakable bricks.
Laser:
This capsule enables you to shoot unlimited laser beams at the bricks.
Multi:
This capsule puts four balls in play.
Catch:
This capsule enables you to catch and hold the ball.
Flip:
This capsule changes the direction of the paddle.
Wrap:
This capsule enables you to move the paddle beyond the edge of the screen.
Bomb:
This capsule destroys the next brick that you hit and damages nearby bricks.
Life:
This capsule gives you an additional life.
BrickBreaker scoring
Catching a capsule:
50 points
Shooting a brick with the gun:
50 points
Hitting a brick with the ball:
10 points
Shooting a brick with the laser:
10 points
Damaging a brick with a bomb:
5 points
Play BrickBreaker
- To move the paddle, slide your finger left or right on the trackpad.
- To release the ball in catch mode, press the Space key.
- To shoot the laser or gun, press the Space key.
Adjust the volume
- To increase the volume, press the Volume Up key on the right side of your BlackBerry® device.
- To decrease the volume, press the Volume Down key on the right side of your device.
• To mute the volume, press the 📄 key on the top of your device. To turn off mute, press the 📄 again. If you press the 📄y during a call, your device mutes the call so that you can hear others on the call, but they cannot hear you.
Related topics
Mute a call, 50
Amplify the volume using the audio boost feature, 132
Improve sound quality for media files, 132
Set the paddle speed
- On the Home screen or in the Games folder, click the BrickBreaker icon.
- Press the ☐ key > Options.
- To set the paddle speed, set the Paddle movement speed field.
- To accelerate the paddle as you slide your finger on the trackpad, select the acceleration check box.
- Press the key > Save.
Word Mole game
Word Mole game basics
About the Word Mole game
The object of the Word Mole® game is to form words using the letters in the garden. If you form a word using letters that are directly above, below, or beside each other in the garden, you receive new letters which you can use to form new words. Otherwise, holes appear in the garden, making it harder to form new words. You can replace a hole with a new letter by forming a word that uses a letter that is beside the hole.
In a single-player game, you complete a level by submitting enough words to reach the required point goal before the time expires. In a practice game, you have unlimited time to play a game. In a multiplayer game, you compete against other players to win awards for achievements such as submitting the longest word, or receiving the least number of holes.
Form a word
- Click each letter in the word.
-
Do one of the following:
-
To submit a word, press the key on the keyboard.
- To deselect a letter, click the letter again.
• To deselect all the letters, press the key.
Word Mole game scoring
Word length:
Form longer words to gain more points and vegetable bonus letters.
Letter usage:
Use less common letters to gain more points.
Speed:
Complete the level as quickly as possible to gain more points.
Water bonus letters:
Use water bonus letters in a word to fill the watering can.
Watering can:
Fill the watering can to grow vegetable bonus letters.
Vegetable bonus letters:
Use vegetable bonus letters in a word to gain bonus points. To gain even more bonus points, use multiple vegetable bonus letters in a single word.
Star bonus letters:
Use star bonus letters in a word to gain bonus points.
Time bonus letters:
Use time bonus letters in a word to gain bonus time.
Adjust the volume
- To increase the volume, press the Volume Up key on the right side of your BlackBerry® device.
- To decrease the volume, press the Volume Down key on the right side of your device.
- To mute the volume, press the key on the top of your device. To turn off mute, press the key again. If you press the key during a call, your device mutes the call so that you can hear others on the call, but they cannot hear you.
Related topics
Mute a call, 50
Amplify the volume using the audio boost feature, 132
Improve sound quality for media files, 132
Single-player games
Turn on tutorial mode
- During a game, press Game Options > General.
- Select the check box beside Show Tutorial Tips.
- Click OK.
Save a game
You can save up to four games at one time.
- During a game, press Save Game.
- If necessary, click a game to overwrite.
- Type a name for the game.
- Click OK.
Resume a game
- On the Home screen, in the Games folder, click the Word Mole icon.
-
Click Play > Resume Game.
-
Click a game.
Multiplayer games
Invite a player
- On the Home screen, in the Games folder, click the Word Mole icon.
- Click New Game > Multiplayer > Invite.
- Click a contact.
- Click OK.
When a player accepts an invitation, a green indicator appears beside their screen name. To start the game, click Start Game.
Accept an invitation
In the Word Mole ^® game invitation, click Accept.
To start the game, click Ready. Wait for the game to start.
Set multiplayer game options
To perform this task, you must be the game organizer.
- On the Multiplayer Game Setup screen, click Options.
- Do one of the following:
- To set the length for a game, set the Point Goal field.
- To set the season for a game, set the Season field.
-
To set bonuses for a game, set the Bonuses field.
-
Click OK.
Related topics
I cannot connect to a multiplayer game, 317
Change your screen name
- On the Multiplayer Game Setup screen, click your screen name.
- Click Change Screen Name.
- Type a new screen name.
- Press the ↕ key.
Chat with other players
- On the Multiplayer Game Setup screen, in the Chat field, type a message.
- Press the ↕ key.
Check the stats for a player
- On the Multiplayer Game Setup screen, click a player.
- Click Show Stats.
Remove a player
To perform this task, you must be the game organizer.
- On the Multiplayer Game Setup screen, click a player.
- Click Remove Player.
Troubleshooting: Word Mole
I cannot connect to a multiplayer game
Try performing the following actions:
- Verify that your BlackBerry® device is connected to the wireless network.
- If you are the game organizer, try resending the invitation.
- If you are a game participant, try accepting the invitation again.
- If you are a game participant, verify that the game organizer did not exit the multiplayer game.
Related topics
Set multiplayer game options, 316
Some words that I submit are not recognized
Some less common words might not be in the dictionary on your BlackBerry ^® device. Try submitting more commonly used words.
Glossary
ADN
An abbreviated dialing number (ADN) is a short telephone number, such as 911 or 112, that is used to reach public services.
APN
access point name
BCC
blind carbon copy
BlackBerry enabled device
A BlackBerry enabled device is a device with BlackBerry® Connect™ software, a device with BlackBerry® Built-In™ software, or a device that is running the BlackBerry® Application Suite. BlackBerry enabled devices provide users with access to BlackBerry device applications and BlackBerry services.
BlackBerry MDS
BlackBerry® Mobile Data System
cc
carbon copy
CDMA
Code Division Multiple Access
certificate
A certificate is a digital document that binds the identity and public key of a certificate subject. Each certificate has an corresponding private key that is stored separately. A certificate authority signs the certificate to indicate that it is authentic and can be trusted.
CMIME
Compressed Multipurpose Internet Mail Extensions
CRL
certificate revocation list
CRL server
A BlackBerry ^® device uses a CRL server to check the most recently published revocation status of a certificate. Certificate authorities publish certificate revocation lists on CRL servers.
DNS
Domain Name System
DSA
Digital Signature Algorithm
DSML
Directory Service Markup Language
DSML-enabled server
A BlackBerry ^® device uses a DSML-enabled server to search for and download certificates.
EAP-FAST
Extensible Authentication Protocol Flexible Authentication via Secure Tunneling
EAP-SIM
Extensible Authentication Protocol Subscriber Identity Module
EAP-TLS
Extensible Authentication Protocol Transport Layer Security
EAP-TTLS
Extensible Authentication Protocol Tunneled Transport Layer Security
ECC
Elliptic Curve Cryptography
FDN
Fixed Dialing Number
FIPS
Federal Information Processing Standards
GAN
generic access network
GPS
Global Positioning System
GSM
Global System for Mobile Communications®
HTTP
Hypertext Transfer Protocol
IMSI
International Mobile Subscriber Identity
IP
Internet Protocol
LDAP
Lightweight Directory Access Protocol
LDAP-enabled server
A BlackBerry ^® device uses an LDAP-enabled server to search for and download certificates and PGP ^® keys.
LED
light-emitting diode
mass storage mode
Mass storage mode enables users to transfer files between a media card and their computer when they connect their BlackBerry device to their computer.
MCC
mobile country code
MMS
Multimedia Messaging Service
MNC
mobile network code
MTP
Media Transfer Protocol
OCSP
Online Certificate Status Protocol
OCSP server
A BlackBerry ^® device uses an OCSP server to check the revocation status of a certificate on demand.
PEAP
Protected Extensible Authentication Protocol
personal certificate
A personal certificate is a certificate that a certificate authority assigns to a user.
personal PGP key
A personal PGP ^® key is made up of a PGP public key and PGP private key for a user.
PIN
personal identification number
private key
A private key is a key that only the certificate subject can use. Private key information is not distributed publicly. BlackBerry ^® devices use private keys to sign email messages or PIN messages that users send and to decrypt email messages that users receive.
public key
A public key is a key that people other than the certificate subject can use. BlackBerry ^® devices use public keys to encrypt email messages or PIN messages that users send to certificate subjects and to verify the signature on email messages or PIN messages that users receive from certificate subjects.
root certificate
A root certificate is a self-signed certificate and usually belongs to a certificate authority.
RTSP
Real Time Streaming Protocol
R-UIM
Removable User Identity Module
SAN
subject alternative name
SDN
A service dialing number (SDN) is a number that is preloaded on your SIM card by your wireless service provider that you can use to access information about your device service, such as the current call forwarding status.
SHA
Secure Hash Algorithm
SIM
Subscriber Identity Module
S/MIME
Secure Multipurpose Internet Mail Extensions
SMS
Short Message Service
SMSC
Short Message Service Center
SSID
service set identifier
SSL
Secure Sockets Layer
TCP
Transmission Control Protocol
TLS
Transport Layer Security
Triple DES
Triple Data Encryption Standard
TTY
teletype
VPN
virtual private network
WAN
wide area network
WAP
Wireless Application Protocol
WEP
Wired Equivalent Privacy
WML
Wireless Markup Language
WPA
Wi-Fi Protected Access
WTLS
Wireless Transport Layer Security
Legal notice
©2011 Research In Motion Limited. All rights reserved. BlackBerry ^® , RIM ^® , Research In Motion ^® , and related trademarks, names, and logos are the property of Research In Motion Limited and are registered and/or used in the U.S. and countries around the world.
iTunes is a trademark of Apple Inc. Bluetooth is a trademark of Bluetooth SIG. DataViz, Documents To Go, Sheet to Go, Slideshow to Go, and Word to Go are trademarks of DataViz, Inc. UMTS is a trademark of European Telecommunications Standard Institute. Gears and Google Mail are trademarks of Google Inc. GSM and Global System for Mobile Communications are trademarks of the GSM MOU Association. IBM, Domino, Lotus, Lotus iNotes, and Lotus Notes are trademarks of International Business Machines Corporation. JavaScript is a trademark of Oracle America, Inc. Microsoft, Hotmail, Outlook, Windows Live, and Windows Media are trademarks of Microsoft Corporation. Novell and GroupWise are trademarks of Novell, Inc. PGP, PGP Desktop Professional, and PGP Universal Server are trademarks of PGP Corporation. RSA is a trademark of RSA Security. vCard is a trademark of the Internet Mail Consortium. Wi-Fi, Wi-Fi Protected Access, Wi-Fi Protected Setup, and WPA are trademarks of the Wi-Fi Alliance. All other trademarks are the property of their respective owners.
Content owners use Windows Media digital rights management technology (WMDRM) to protect their intellectual property, including copyrights. This device uses WMDRM software to access WMDRM-protected content. If the WMDRM software fails to protect the content, content owners may ask Microsoft to revoke the software's ability to use WMDRM to play or copy protected content. Revocation does not affect unprotected content. When you download licenses for protected content, you agree that Microsoft may include a revocation list with the licenses. Content owners may require you to upgrade WMDRM to access their content. if you decline an upgrade, you will not be able to access content that requires the upgrade.
Portions of the BlackBerry ^® Device Software are copyright © 2007-2008 The FreeType Project (www.freetype.org). All rights reserved.
This documentation including all documentation incorporated by reference herein such as documentation provided or made available at www.blackberry.com/go/docs is provided or made accessible "AS IS" and "AS AVAILABLE" and without condition, endorsement, guarantee, representation, or warranty of any kind by Research In Motion Limited and its affiliated companies ("RIM") and RIM assumes no responsibility for any typographical, technical, or other inaccuracies, errors, or omissions in this documentation. In order to protect RIM proprietary and confidential information and/or trade secrets, this documentation may describe some aspects of RIM technology in generalized terms. RIM reserves the right to periodically change information that is contained in this documentation; however, RIM makes no commitment to provide any such changes, updates, enhancements, or other additions to this documentation to you in a timely manner or at all.
This documentation might contain references to third-party sources of information, hardware or software, products or services including components and content such as content protected by copyright and/or third-party web sites (collectively the "Third Party Products and Services"). RIM does not control, and is not responsible for, any Third Party Products and Services including, without limitation the content, accuracy, copyright compliance, compatibility, performance, trustworthiness, legality, decency, links, or any other aspect of Third Party Products and Services. The inclusion of a reference to Third Party Products and Services in this documentation does not imply endorsement by RIM of the Third Party Products and Services or the third party in any way.
EXCEPT TO THE EXTENT SPECIFICALLY PROHIBITED BY APPLICABLE LAW IN YOUR JURISDICTION, ALL CONDITIONS, ENDORSEMENTS, GUARANTEES, REPRESENTATIONS, OR WARRANTIES OF ANY KIND, EXPRESS OR IMPLIED, INCLUDING WITHOUT LIMITATION, ANY CONDITIONS, ENDORSEMENTS, GUARANTEES, REPRESENTATIONS OR WARRANTIES OF DURABILITY, FITNESS FOR A PARTICULAR PURPOSE OR USE, MERCHANTABILITY, MERCHANTABILITY, NON-
INFRINGEMENT, SATISFACTORY QUALITY, OR TITLE, OR ARISING FROM A STATUTE OR CUSTOM OR A COURSE OF DEALING OR USAGE OF TRADE, OR RELATED TO THE DOCUMENTATION OR ITS USE, OR PERFORMANCE OR NON-PERFORMANCE OF ANY SOFTWARE, HARDWARE, SERVICE, OR ANY THIRD PARTY PRODUCTS AND SERVICES REFERENCED HEREIN, ARE HEREBY EXCLUDED. YOU MAY ALSO HAVE OTHER RIGHTS THAT VARY BY STATE OR PROVINCE. SOME JURISDICTIONS MAY NOT ALLOW THE EXCLUSION OR LIMITATION OF IMPLIED WARRANTIES AND CONDITIONS. TO THE EXTENT PERMITTED BY LAW, ANY IMPLIED WARRANTIES OR CONDITIONS RELATING TO THE DOCUMENTATION TO THE EXTENT THEY CANNOT BE EXCLUDED AS SET OUT ABOVE, BUT CAN BE LIMITED, ARE HEREBY LIMITED TO NINETY (90) DAYS FROM THE DATE YOU FIRST ACQUIRED THE DOCUMENTATION OR THE ITEM THAT IS THE SUBJECT OF THE CLAIM.
TO THE MAXIMUM EXTENT PERMITTED BY APPLICABLE LAW IN YOUR JURISDICTION, IN NO EVENT SHALL RIM BE LIABLE FOR ANY TYPE OF DAMAGES RELATED TO THIS DOCUMENTATION OR ITS USE, OR PERFORMANCE OR NON-PERFORMANCE OF ANY SOFTWARE, HARDWARE, SERVICE, OR ANY THIRD PARTY PRODUCTS AND SERVICES REFERENCED HEREIN INCLUDING WITHOUT LIMITATION ANY OF THE FOLLOWING DAMAGES: DIRECT, CONSEQUENTIAL, EXEMPLARY, INCIDENTAL, INDIRECT, SPECIAL, PUNITIVE, OR AGGRAVATED DAMAGES, DAMAGES FOR LOSS OF PROFITS OR REVENUES, FAILURE TO REALIZE ANY EXPECTED SAVINGS, BUSINESS INTERRUPTION, LOSS OF BUSINESS INFORMATION, LOSS OF BUSINESS OPPORTUNITY, OR CORRUPTION OR LOSS OF DATA, FAILURES TO TRANSMIT OR RECEIVE ANY DATA, PROBLEMS ASSOCIATED WITH ANY APPLICATIONS USED IN CONJUNCTION WITH RIM PRODUCTS OR SERVICES, DOWNTIME COSTS, LOSS OF THE USE OF RIM PRODUCTS OR SERVICES OR ANY PORTION THEREOF OR OF ANY AIRTIME SERVICES, COST OF SUBSTITUTE GOODS, COSTS OF COVER, FACILITIES OR SERVICES, COST OF CAPITAL, OR OTHER SIMILAR PECUNIARY LOSSES, WHETHER OR NOT SUCH DAMAGES WERE FORESEEN OR UNFORESEEN, AND EVEN IF RIM HAS BEEN ADVISED OF THE POSSIBILITY OF SUCH DAMAGES.
TO THE MAXIMUM EXTENT PERMITTED BY APPLICABLE LAW IN YOUR JURISDICTION, RIM SHALL HAVE NO OTHER OBLIGATION, DUTY, OR LIABILITY WHATSOEVER IN CONTRACT, TORT, OR OTHERWISE TO YOU INCLUDING ANY LIABILITY FOR NEGLIGENCE OR STRICT LIABILITY.
THE LIMITATIONS, EXCLUSIONS, AND DISCLAIMERS HEREIN SHALL APPLY: (A) IRRESPECTIVE OF THE NATURE OF THE CAUSE OF ACTION, DEMAND, OR ACTION BY YOU INCLUDING BUT NOT LIMITED TO BREACH OF CONTRACT, NEGLIGENCE, TORT, STRICT LIABILITY OR ANY OTHER LEGAL THEORY AND SHALL SURVIVE A FUNDAMENTAL BREACH OR BREACHES OR THE FAILURE OF THE ESSENTIAL PURPOSE OF THIS AGREEMENT OR OF ANY REMEDY CONTAINED HEREIN; AND (B) TO RIM AND ITS AFFILIATED COMPANIES, THEIR SUCCESSORS, ASSIGNS, AGENTS, SUPPLIERS (INCLUDING AIRTIME SERVICE PROVIDERS), AUTHORIZED RIM DISTRIBUTORS (ALSO INCLUDING AIRTIME SERVICE PROVIDERS) AND THEIR RESPECTIVE DIRECTORS, EMPLOYEES, AND INDEPENDENT CONTRACTORS.
IN ADDITION TO THE LIMITATIONS AND EXCLUSIONS SET OUT ABOVE, IN NO EVENT SHALL ANY DIRECTOR, EMPLOYEE, AGENT, DISTRIBUTOR, SUPPLIER, INDEPENDENT CONTRACTOR OF RIM OR ANY AFFILIATES OF RIM HAVE ANY LIABILITY ARISING FROM OR RELATED TO THE DOCUMENTATION.
Prior to subscribing for, installing, or using any Third Party Products and Services, it is your responsibility to ensure that your airtime service provider has agreed to support all of their features. Some airtime service providers might not offer Internet browsing functionality with a subscription to the BlackBerry® Internet Service. Check with your service provider for availability, roaming arrangements, service plans and features. Installation or use of Third Party Products and Services with RIM's products and services may require one or more patent, trademark, copyright, or other licenses in order to avoid infringement or violation of third party rights. You are solely responsible for determining whether to use Third Party Products and Services and if any third party licenses are required to do so. If required you are responsible for acquiring them. You should not install or use Third Party Products and Services until all necessary licenses have been acquired. Any Third Party Products and Services that are provided with RIM's products and services are provided as a convenience to you and are provided "AS IS" with no express or implied conditions, endorsements, guarantees, representations, or warranties of any kind by RIM and RIM assumes no
liability whatsoever, in relation thereto. Your use of Third Party Products and Services shall be governed by and subject to you agreeing to the terms of separate licenses and other agreements applicable thereto with third parties, except to the extent expressly covered by a license or other agreement with RIM.
Certain features outlined in this documentation require a minimum version of BlackBerry® Enterprise Server, BlackBerry® Desktop Software, and/or BlackBerry® Device Software.
The terms of use of any RIM product or service are set out in a separate license or other agreement with RIM applicable thereto. NOTHING IN THIS DOCUMENTATION IS INTENDED TO SUPERSEDE ANY EXPRESS WRITTEN AGREEMENTS OR WARRANTIES PROVIDED BY RIM FOR PORTIONS OF ANY RIM PRODUCT OR SERVICE OTHER THAN THIS DOCUMENTATION.
Licensed by QUALCOMM Incorporated under one or more of the following United States Patents and/or their counterparts in other nations:
| 5,490,165 | 5,504,773 | 5,506,865 | 5,511,073 |
| 5,228,054 | 5,535,239 | 5,267,261 | 5,544,196 |
| 5,568,483 | 5,337,338 | 5,600,754 | 5,414,796 |
| 5,657,420 | 5,416,797 | 5,659,569 | 5,710,784 |
| 5,778,338 |
Copyright (c) 1999-2006, The Board of Trustees of the University of Illinois
All Rights Reserved.
Iperf performance test
Mark Gates
Ajay Tirumala
Jim Ferguson
Jon Dugan
Feng Qin
Kevin Gibbs
John Estabrook
National Laboratory for Applied Network Research
National Center for Supercomputing Applications
University of Illinois at Urbana-Champaign
www.ncsa.uiuc.edu
Permission is hereby granted, free of charge, to any person obtaining a copy of this software (Iperf) and associated documentation files (the "Software"), to deal in the Software without restriction, including without limitation the rights to use, copy, modify, merge, publish, distribute, sublicense, and/or sell copies of the Software, and to permit persons to whom the Software is furnished to do so, subject to the following conditions:
• Redistributions of source code must retain the above copyright notice, this list of conditions and the following disclaimers.
- Redistributions in binary form must reproduce the above copyright notice, this list of conditions and the following disclaimers in the documentation and/or other materials provided with the distribution.
- Neither the names of the University of Illinois, NCSA, nor the names of its contributors may be used to endorse or promote products derived from this Software without specific prior written permission.
THE SOFTWARE IS PROVIDED "AS IS", WITHOUT WARRANTY OF ANY KIND, EXPRESS OR IMPLIED, INCLUDING BUT NOT LIMITED TO THE WARRANTIES OF MERCHANTABILITY, FITNESS FOR A PARTICULAR PURPOSE AND NONINFRINGEMENT. IN NO EVENT SHALL THE CONTRIBUTORS OR COPYRIGHT HOLDERS BE LIABLE FOR ANY CLAIM, DAMAGES OR OTHER LIABILITY, WHETHER IN AN ACTION OF CONTRACT, TORT OR OTHERWISE, ARISING FROM, OUT OF OR IN CONNECTION WITH THE SOFTWARE OR THE USE OR OTHER DEALINGS IN THE SOFTWARE.
PCRE is a library of functions to support regular expressions whose syntax and semantics are as close as possible to those of the Perl 5 language.
This is JavaScriptCore's variant of the PCRE library. While this library started out as a copy of PCRE, many of the features of PCRE have been removed.
Copyright (c) 1997-2005 University of Cambridge. All rights reserved.
Redistribution and use in source and binary forms, with or without modification, are permitted provided that the following conditions are met:
• Redistributions of source code must retain the above copyright notice, this list of conditions and the following disclaimer.
- Redistributions in binary form must reproduce the above copyright notice, this list of conditions and the following disclaimer in the documentation and/or other materials provided with the distribution.
- Neither the name of the University of Cambridge nor the name of Apple Inc. nor the names of their contributors may be used to endorse or promote products derived from this software without specific prior written permission.
THIS SOFTWARE IS PROVIDED BY THE COPYRIGHT HOLDERS AND CONTRIBUTORS "AS IS" AND ANY EXPRESS OR IMPLIED WARRANTIES, INCLUDING, BUT NOT LIMITED TO, THE IMPLIED WARRANTIES OF MERCHANTABILITY AND FITNESS FOR A PARTICULAR PURPOSE ARE DISCLAIMED. IN NO EVENT SHALL THE COPYRIGHT OWNER OR CONTRIBUTORS BE LIABLE FOR ANY DIRECT, INDIRECT, INCIDENTAL, SPECIAL, EXEMPLARY, OR CONSEQUENTIAL DAMAGES (INCLUDING, BUT NOT LIMITED TO, PROCUREMENT OF SUBSTITUTE GOODS OR SERVICES; LOSS OF USE, DATA, OR PROFITS; OR BUSINESS INTERRUPTION) HOWEVER CAUSED AND ON ANY THEORY OF LIABILITY, WHETHER IN CONTRACT, STRICT LIABILITY, OR TORT (INCLUDING NEGLIGENCE OR OTHERWISE) ARISING IN ANY WAY OUT OF THE USE OF THIS SOFTWARE, EVEN IF ADVISED OF THE POSSIBILITY OF SUCH DAMAGE.
BlackBerry® Torch™ 9800 smartphone model number: RCY71UW or RDG71UW
CE0168 ^① This is a Wi-Fi ^® enabled device subject to restrictions of use in some member states of the European Community.
Research In Motion Limited
295 Phillip Street
Waterloo, ON N2L 3W8
Canada
Research In Motion UK Limited
Centrum House
36 Station Road
Egham, Surrey TW20 9LF
United Kingdom
Published in Canada


- BlackBerry Torch 9800 Smartphone
- Contents
- Quick Help....9
- Shortcuts 42
- Voice commands.... 68
- Quick Help
- Top 10
- Set up an email address
- Related topics
- Change your ring tone, notifiers, or reminders
- Find or hide an application icon
- About adding applications
- BlackBerry App World
- BlackBerry Desktop Software
- Application Center
- Add or change your signature
- Use a picture as your device wallpaper
- Supported audio and video file formats
- Transfer a file from your computer to your device using your device as a USB memory drive
- Open, close, or switch between tabs
- Reconcile email over the wireless network
- Getting to know your smartphone
- Home
- Important keys
- About the slider and keyboard
- Select commands using toolbars and pop-up menus
- Toolbars
- Pop-up menus
- Tips: Doing things quickly
- Applications
- Messages
- Text Messages
- Browser
- Media
- Camera (if supported)
- Instant Messaging
- Options
- Manage Connections
- Help
- Status indicators
- Home screen
- Tips: Managing indicators
- Contacts
- Search contacts
- Pop-up menu
- Camera
- Pictures
- Open a message
- Cut, copy, and paste
- Type text
- Feature availability
- Tips
- Tips: Extending battery life
- Tips: Freeing and conserving storage space
- Tips: Keeping your information safe
- Tips: Updating your software
- Visit the Setup application
- Make it yours
- Your Home screen
- Switch themes
- Move an application icon
- Add, change, or delete a folder on the Home screen
- Add a shortcut to your Home screen or Favorites view
- Set the number of icons that appear on the Home screen
- Change what happens when you type on the Home screen
- Add a message that appears when your device is locked
- Get apps, music, ring tones, pictures, and videos
- Transfer your media files from your computer to your device using BlackBerry Desktop Software
- Calls and sound profiles
- Change the default volume for calls
- Add a contact alert
- Set up speed dial for a contact
- Add a contact picture for caller ID
- Typing and trackpad
- Set the cursor speed
- Set the trackpad sensitivity
- Change your typing style
- Find more information
- Shortcuts
- Phone shortcuts
- Message shortcuts
- File and attachment shortcuts
- Typing shortcuts for the slide-out keyboard
- Media shortcuts
- Camera and video camera
- Browser shortcuts
- Move around a web page
- Calendar shortcuts
- Search shortcuts
- Map shortcuts
- Troubleshooting: Shortcuts
- I cannot use a shortcut
- Phone
- Phone basics
- Find your phone number
- Make a call
- Answer a call
- Answer a second call
- Mute a call
- Place a call on hold
- Turn on the speakerphone
- Dial an extension
- Dial using numbers or letters
- Switch applications during a call
- About using a headset
- Emergency calls
- About emergency calls and Emergency Callback Mode
- Make an emergency call
- Volume
- Adjust the volume
- Improve sound quality during a call
- Improve sound quality for all calls
- Voice mail
- About your voice mail greeting and voice mail password
- Check your voice mail
- Change the voice mail access number and password
- Change how many times your device rings before the call goes to voice mail
- Speed dial
- Change the contact that is assigned to a speed dial key
- Call waiting, call forwarding, and call blocking
- Turn on call waiting
- About call forwarding
- Forward calls
- Add, change, or delete a call forwarding number
- About call blocking
- Block calls
- Change the call blocking password
- Fixed dialing and smart dialing
- About fixed dialing
- Turn on fixed dialing
- Add, change, or delete a contact in your fixed dialing list
- About smart dialing
- Set the default country code and area code
- Set options for dialing extensions
- Conference calls
- About conference calls
- Make a conference call
- Create a phone number link for a conference call
- Speak privately with a contact during a conference call
- Disconnect a contact from a conference call
- Leave a conference call
- Call logs
- About call logs
- Send a call log
- Delete call logs
- Add, change, or delete call log notes
- View call logs in the Messages application
- Multiple phone numbers
- About multiple phone numbers
- Switch the active phone number
- Phone options
- Turn on dialing from the Lock screen
- Sort phone numbers or contacts on the Phone screen
- Hide or display your phone number when you make calls
- Turn off the prompt that appears before you delete items
- Change how you answer or end calls with the holster or the slider
- Reset a call timer
- About hearing aid mode
- Turn on hearing aid mode
- About TTY support
- Turn on TTY support
- Troubleshooting: Phone
- I cannot make or receive calls
- My phone number appears as Unknown in the Phone application
- I cannot check my voice mail
- I cannot make calls using a voice command
- I cannot change the number of times that my device rings
- Some features are not available on my device
- Voice commands
- Perform an action using a voice command
- Available voice commands
- "Call "
- "Call "
- "Call extension "
- "Check my phone number"
- "Check signal strength"
- "Check network"
- "Check battery"
- "Repeat"
- "Cancel"
- Change the language for voice commands
- Turn off choice lists for voice commands
- Change the options for voice prompts
- Improve voice recognition
- Troubleshooting: Voice dialing
- My device does not recognize names or numbers in voice commands
- Composing and sending email
- Send an email
- Resend a message
- Reply to or forward an email or PIN message
- Check spelling
- Save a draft of a message
- Attach a file to an email
- Attach a contact to a message
- Change the email address that you use to send messages or meeting invitations
- Delete the disclaimer from an email
- Delete the original text from a reply message
- Set the importance level for a message
- Blind carbon copy a contact
- Stop a message from sending
- Viewing and replying to email
- About email account icons
- Search for text in a message, in a file, or on a web page
- View email in plain text format
- Mark a message as opened or unopened
- Save a message
- Delete messages
- About flags
- Add, change, or remove a flag
- Change how a message inbox displays messages
- Group email by subject
- Use color to differentiate work messages from other messages
- Hide sent messages from the message inbox
- Hide messages from the Messages application
- Filing email
- About synchronization of email folders:
- File an email:
- Email options
- Set an out-of-office reply
- Change options for your personal email account
- Turn on or turn off read receipts
- Stop loading pictures in HTML email messages
- Turn off the prompt that appears before downloading external pictures in HTML email messages
- Receive only the first section of long email messages
- Open a new message automatically when you remove your device from your holster
- Hide the new or unopened message indicator
- Stop displaying recent contacts in email address fields
- Turn off the prompt that appears before you delete a message
- Turn off the prompt that appears when you mark messages as opened
- Storing and forwarding email
- Email filters
- About email filters
- Create an email filter
- Create an email filter based on a contact or subject
- Options for email filters
- Turn on an email filter
- Change, prioritize, or delete an email filter
- Synchronizing email
- About synchronization
- Delete email on your device and in your email application on your computer
- Press the Key > Save.
- Empty the deleted items folder on your computer from your device
- About synchronization conflicts
- Manage email reconciliation conflicts
- PIN messages
- About PIN messages
- Find your PIN
- Composing and sending PIN messages
- Compose and send a PIN message
- Set an importance level for received PIN messages
- Create a link for a PIN
- Viewing and replying to PIN messages
- View an address instead of a display name
- View filed messages
- PIN message options
- Set how long your device stores messages
- Some messages no longer appear on my device, 119
- About text messages
- Composing and sending text messages
- Send a text message
- Set whether pressing the Enter key sends text messages
- Forward a text message
- Attach a file to a text message
- Set the importance level for text messages that you send
- Request delivery notification or read notification for a text message
- Viewing and replying to text messages
- Delete the history from a text message
- Save a media file from a text message
- Save a vCard contact attachment from a message
- Add an appointment to your calendar from a text message
- Change how your text messages look
- Show names in the history of text messages
- Options for text messages
- Stop receiving text messages when roaming
- Block text messages
- Store text messages on your SIM card
- Turn off AutoText for text messages
- Set how long your service center attempts to send text messages
- Set a wireless network type for sending text messages
- Cell broadcasting
- About cell broadcasting
- Turn on cell broadcasting
- Stop receiving messages from a cell broadcast channel
- Rename a cell broadcast channel
- Security options for messages
- Block incoming messages
- Allow messages from contacts in your contact list or allowed sender list
- Add a contact to your allowed sender list
- Reset a blocked message counter
- Attachments
- About files and attachments
- Open a file or an attachment
- Save a file or an attachment
- Send a file as an attachment
- Open a link in a file or an attachment
- Set font options for a file or an attachment
- View properties for a file
- vCard contact attachments
- About vCard contact attachments
- S/MIME-protected messages
- S/MIME-protected message basics
- About signing and encrypting messages
- Sign or encrypt a message
- Encrypt a message with a pass phrase
- Attach a certificate to a message
- Download the certificate used to sign or encrypt a message
- Add a certificate from a message
- Add a certificate from an attachment
- Attachment indicators in S/MIME-protected messages
- Add connection information for a certificate server from a message
- View the certificate used to sign or encrypt a message
- View encryption information for a weakly encrypted message
- S/MIME-protected message status
- Digital signature indicators for S/MIME-protected messages
- Encryption status indicators
- S/MIME-protected message options
- Change your signing or encryption certificate
- Change options for downloading attachments in encrypted messages
- Change the default signing and encryption option
- About message classifications
- Change the default message classification
- Change the size of S/MIME indicators in messages
- Change the encryption algorithms for S/MIME-protected messages
- Request delivery notification for signed S/MIME-protected messages
- Turn off the prompt that appears before an S/MIME-protected message is truncated
- Turn off the prompt that appears when you use an S/MIME certificate that is not recommended for use
- S/MIME-protected message troubleshooting
- IBM Lotus Notes native encrypted messages
- About IBM Lotus Notes native encrypted messages
- Prerequisites: IBM Lotus Notes native encryption
- Encrypt a message using IBM Lotus Notes native encryption
- PGP protected messages
- PGP protected message basics
- Encrypt a PGP protected message with a pass phrase
- Attach a PGP key to a message
- Download the PGP key used to sign or encrypt a message
- Add a PGP key from a message
- Add a PGP key from an attachment
- Attachment indicators in PGP protected messages
- PGP protected message status
- Digital signature indicators for PGP protected messages
- PGP protected message options
- Change your signing and encryption key
- Change the size of PGP indicators in messages
- Change the encryption algorithms for PGP protected messages
- Turn off the prompt that appears before a PGP protected message is truncated
- Press the Key > Save.
- Turn off the prompt that appears when you use a PGP key that is not recommended for use
- Troubleshooting: PGP protected messages
- Some signing and encryption options are not available on my device
- I cannot open an attachment in an encrypted message
- Troubleshooting: Messages
- I cannot send messages
- I am not receiving messages
- I am not receiving email from personal folders on my computer
- I cannot file email
- I cannot send text messages
- I am not receiving text messages
- Some messages no longer appear on my device
- A message, attachment, or Google Mail conversation is cut short or doesn't appear
- HTML email messages do not appear correctly
- Some email folders appear dimmed
- Email filters are not working correctly
- I cannot turn on cell broadcasting
- I cannot attach a file to a text message
- I cannot use a shortcut to view one type of message in a message inbox
- A skipped content bar appears in a document
- A question mark appears on a slide
- The number of new or unopened messages is different than I expect
- Files
- File basics
- Search for a file that is saved on your device
- Search for a file that is saved on your organization's network
- Save a file from your organization's network to your device
- Managing files and attachments
- Move, rename, or delete a file
- Open a password-protected .pdf file
- View tracked changes in a document
- View the table of contents in a document
- Move around a spreadsheet
- View the content of a cell
- Change the size of a column
- Set display options for a spreadsheet
- Move around pages in a multipage .tif file
- Switch presentation views
- Switch slides
- Rotate or zoom in to or out from a slide
- Save a slide
- In a spreadsheet
- In a presentation
- Troubleshooting: Attachments
- Music
- Play a media file
- Shuffle or repeat songs
- Playlists
- Create a standard or an automatic playlist
- Add the song that is playing to a playlist
- Change the order of songs in a playlist
- Delete a song from a playlist
- Rename or delete a playlist
- Amplify the volume using the audio boost feature
- Improve sound quality for media files
- Rename, move, copy, or delete an audio file or a video file
- View properties for a media file
- Change the amount of time before the media player screen closes
- Podcasts
- Videos
- Keep backlighting on when you play a video
- Display closed captions in videos
- Video camera
- Record a video
- Turn on video lighting
- Change the video size and format
- Change the location for storing videos that you take
- Take a picture
- Change the flash setting for pictures that you take
- Change the camera scene mode
- Change the size of pictures that you take
- Geotag pictures that you take
- Change the autofocus setting
- Turn off digital zoom for the camera
- Change the review duration of the pictures that you take
- Change when the camera warns you about the number of pictures remaining
- Change the location for storing pictures that you take
- Zoom, pan, or rotate a picture
- Save a picture from a text message or a web page
- View pictures as a slide show
- Change the number of seconds between slides in a slide show
- View pictures in list view or thumbnail view
- Create a picture folder
- Import pictures to the Pictures application
- Click Import Pictures.
- Find a picture that you took with the camera
- Voice notes
- Record a voice note
- Ring tones
- Media storage
- Storage and media cards
- Supported media cards
- Repair files stored on your media card or on your device
- View the amount of memory used by media files
- Change the amount of memory available for media files
- Turn off media card support
- About compression
- About file encryption
- Turn on encryption
- Picture folders
- Transferring and downloading media files
- About transferring and synchronizing media files
- Send a media file
- Receive a media file using Bluetooth technology
- Troubleshooting: Media
- My device is not using the correct ring tone or wallpaper
- Some pictures that I take are blurry
- The flash dims or turns off
- I cannot save media files
- I cannot open media files
- My device does not recognize my media card
- I cannot find podcasts
- The media player screen closes
- Ring tones, sounds, and alerts
- About ring tones, sounds, and alerts
- Add a custom profile
- Silence your device
- Flashing LED
- Change alarm notification options
- Turn on event sounds
- Troubleshooting: Ring tones, sounds, and alerts
- My device is ringing or vibrating more times than expected
- My device is not ringing or vibrating when I receive a call or message
- Browser basics
- Browsing web pages
- Visit a web page or search the Internet
- About tabbed browsing
- Zoom in to or out from a webpage
- Move back or forward a web page
- Refresh a web page
- View a list of web pages that you visited recently
- Return to the home page
- Close the browser
- Create a shortcut icon for a web page on the Home screen
- Turn on browser shortcuts
- Viewing, copying, and forwarding addresses
- Copy an address for a web page, link, or picture
- Send a web address
- Send a link or picture from a web page
- Viewing pictures and playing media files
- Play a media file on a web page
- View a full picture on a web page
- Browser bookmarks
- About bookmarks for web pages
- Add a bookmark for a web page
- Change or delete a bookmark for a web page
- Send a bookmark for a web page
- File a bookmark for a web page
- Add, rename, or delete a bookmark folder for web pages
- RSS feeds
- About RSS feeds
- Add an RSS feed from the browser
- Browser options
- Change your home page or start page
- Turn off JavaScript support
- Stop loading images or playing embedded media files on web pages
- Stop blocking pop-ups on web pages
- Change the font size for text on web pages
- Set the character encoding for all web pages
- Receive a prompt before you close the browser or stream media from the Internet
- Delete browsing information
- Turn off cookies in the browser
- Turn on geolocation in the browser
- Browser security
- About TLS
- TLS options
- Manage browser security
- Add a trusted content server
- Add or change a web site that is associated with a certificate
- Browser push
- About browser push
- Turn off browser push
- Troubleshooting: Browser
- No browser is available on my device
- I cannot play a song or video on a web page
- I receive a prompt to switch networks when I stream a song or video
- I cannot open a new tab
- Calendar
- Calendar basics
- Switch calendar views
- Go to a specific date in the calendar
- Schedule a meeting or an appointment
- Set an alarm in the calendar
- Switch calendars
- Meetings
- Delete an appointment, meeting, or alarm
- Respond to a meeting invitation
- View your calendar when responding to a meeting
- Check availability of meeting participants
- Change the list of participants for a meeting
- Forward a meeting invitation
- Delegate a meeting invitation
- Send an email message to all meeting participants
- Conference call meetings
- Create a conference call meeting from your device
- Create a conference call meeting from your computer
- Example
- Enter a conference call meeting
- Save your conference call information
- Synchronizing calendar
- Synchronize organizer data over the wireless network
- About backing up and restoring device data
- Manage data synchronization conflicts
- Calendar options
- Change how the calendar is displayed
- Change options for reminders
- Change options for multiple calendars
- Change the default calendar
- Change how long your device stores calendar entries
- Show tasks in the calendar
- Troubleshooting: Calendar
- I cannot schedule appointments that span multiple days
- I cannot set some fields when scheduling appointments
- Some characters in calendar entries do not appear correctly after synchronization
- I cannot enter a conference call with the Join Now option
- Try the following actions:
- Contact basics
- Add a contact
- Create a custom contact field
- Add a pause or a wait to a phone number
- Change or delete a contact
- Search for a contact in your organization's address book
- Customizing contacts
- Change or delete a contact picture
- About categories
- Categorize a contact, task, or memo
- Create a category for contacts, tasks, or memos
- Synchronizing contacts
- Personal distribution lists
- Create a personal distribution list
- Change or delete a personal distribution list
- Multiple contact lists
- About multiple contact lists
- View a different contact list
- Change the default contact list
- Contact list options
- Change the display options for contacts
- View the number of contacts stored on your device
- Sort contacts or tasks
- Troubleshooting: Contacts
- Contact list field data is not appearing on my computer
- My contact pictures keep changing
- Clock
- Set the date and time
- Change what appears on the screen when your device is charging
- Change the clock face
- Display a second time zone on the clock
- Turn on the alarm
- Silence the alarm
- Turn on bedside clock mode
- Set options for bedside clock mode
- Use the stopwatch
- Use the timer
- Click OK.
- Change timer notification options
- Troubleshooting: Clock
- The time on my device is incorrect
- Tasks and memos
- Create a task or memo
- Send a task or memo
- Change or delete a task or memo
- Change the status of a task
- Hide completed tasks
- Synchronizing tasks and memos
- Typing
- Typing basics
- Highlight, cut, copy, or paste text
- Type a symbol
- Type an accent or special character
- Clear text from a field
- Type text using the predictive input method
- Typing input methods
- Switch typing input methods when you are typing
- Change options for typing input methods
- SureType technology and multi-tap input methods
- About typing using different keyboard styles
- About SureType technology and multi-tap
- Type text using SureType technology
- Type text using multi-tap
- Find more information about typing in other languages
- Typing options
- Change the default currency symbol
- Stop displaying contacts in the list that appears when you type
- Turn on key tones
- Turn off trackpad sounds
- Spelling checker
- Change options for checking spelling
- Stop displaying spelling suggestions in the list that appears when you type
- Custom dictionary
- About the custom dictionary
- Add, change, or delete a word in the custom dictionary
- Stop adding items to the custom dictionary automatically
- AutoText
- About AutoText
- Create an AutoText entry
- Change or delete an AutoText entry
- Highlight an AutoText entry.
- Press the Key.
- Undo an AutoText change
- Troubleshooting: Typing
- SureType technology does not recognize a word
- I cannot check spelling
- Keyboard
- Assign an application to a Convenience key
- Troubleshooting: Keyboard
- No application opens when I press a Convenience key
- Language
- About typing input languages
- Change the language
- Use a shortcut for switching typing input languages when you are typing
- Add a display language
- Delete a language
- Troubleshooting: Language
- Some characters do not appear correctly on my device
- Screen display
- Set options for backlighting
- Change the display font
- Organizing applications on the Home screen
- About organizing application icons
- Set the touch screen sensitivity
- Use grayscale or reverse contrast for the screen display
- Turn on flashing LED notification for wireless coverage
- Themes
- About themes
- Troubleshooting: Display
- My display changed
- The screen turns off
- GPS technology
- About GPS technology
- Turn on GPS technology
- Set the GPS receiver that you use to track your movement
- Get your GPS location
- Prevent others from tracking your location
- Turn off location aiding
- Troubleshooting: GPS technology
- I cannot use GPS technology
- Maps
- Map basics
- View a location on a map
- View an address on a map using a link
- Send a location
- Get directions
- Pan a map
- Zoom in to or out from a map
- View a list of points of interest near a location
- View contact information for a point of interest
- Clear a map
- Add a bookmark for a location or route
- Rename a bookmark for a location or route
- Delete a bookmark for a location or route
- Map options
- Keep backlighting on when you track your movement
- Troubleshooting: Maps
- About multitasking
- Keep an application running in the background and switch to another application
- Close an application so that it is not running in the background
- About social networking applications
- About instant messaging applications
- Require your device password before adding an application
- Delete an application
- View properties for an application
- View the size of an application database
- Troubleshooting: Applications
- I cannot add, update, or return to the previous version of an application
- BlackBerry Device Software
- About updating the BlackBerry Device Software
- Over the wireless network
- From a web site
- Using the BlackBerry Desktop Software
- Update the BlackBerry Device Software over the wireless network
- Return to or delete the previous version of the BlackBerry Device Software
- Update the BlackBerry Device Software from a web site
- Update the BlackBerry Device Software using the BlackBerry Desktop Software
- Troubleshooting: BlackBerry Device Software
- I cannot update the BlackBerry Device Software over the wireless network
- My device does not have enough available memory to update the BlackBerry Device Software
- Manage Connections basics
- Check what wireless networks your device connects to
- Wireless coverage indicators
- Turn on or turn off a network connection
- Turn on or turn off data service or set roaming options
- Check the status of network connections and services
- Mobile network
- Roaming
- About roaming and international roaming
- Switch wireless networks manually
- Preferred wireless network list
- About the preferred wireless network list
- Add a wireless network to the preferred wireless network list
- Delete a wireless network from the preferred wireless network list
- Change the order of preferred networks
- Mobile network options
- Change the connection speed for the wireless network
- Troubleshooting: Mobile network
- I cannot connect to the mobile network
- Error messages
- Description
- Possible solutions
- Wi-Fi technology
- About connecting to a Wi-Fi network
- Connect to a Wi-Fi network
- Connect to a Wi-Fi network using Wi-Fi Protected Setup
- Connect to a Wi-Fi network manually
- Change, move, or delete a saved Wi-Fi network
- Prevent your device from connecting to a saved Wi-Fi network
- Press the Key > Disable.
- Turn on the prompt that appears for hotspots
- Options for saved Wi-Fi networks
- Common options
- WEP options
- Option Description
- WPA/WPA2 Personal options
- WPA/WPA2 Enterprise options
- Install a root certificate on your device
- UMA connection settings
- About using UMA with a Wi-Fi network
- Change your UMA connection preferences
- Submit a Wi-Fi diagnostic report
- Set options for Wi-Fi diagnostic reports
- Connection permissions for third-party applications
- About using Wi-Fi with VPN and software tokens
- Wi-Fi technology troubleshooting
- I cannot connect to a Wi-Fi network
- Bluetooth technology
- Bluetooth technology basics
- About Bluetooth
- Turn on Bluetooth technology
- Pair with a Bluetooth enabled device
- Connect to a paired Bluetooth enabled device
- Switch to a paired Bluetooth enabled device during a call
- Share contacts with a paired Bluetooth enabled car kit
- Rename a paired Bluetooth enabled device
- Delete a paired Bluetooth enabled device
- Bluetooth technology options
- Bluetooth profiles
- Prevent your device from making contacts available to other Bluetooth enabled devices
- Restrict outgoing calls
- Make your BlackBerry device discoverable
- Change the pairing name for your BlackBerry device
- Turn off Bluetooth connection notification
- Turn off the prompt that appears when connecting or pairing
- Set the message types that your Bluetooth enabled car kit notifies you of
- Turn off a Bluetooth profile
- Encrypt data that you send or receive using Bluetooth technology
- Turn off automatic reconnection to Bluetooth enabled devices
- Troubleshooting: Bluetooth technology
- I cannot type a passkey on a Bluetooth enabled device
- My list of paired Bluetooth devices does not appear
- I cannot pair with a Bluetooth enabled device
- I cannot share contacts with a paired Bluetooth enabled device
- Try the following:
- Power and battery
- Turn off your device
- Set your device to turn on and turn off automatically
- Reset the device
- Check the battery power level
- Memory and media cards
- About media cards
- View the amount of available storage space on your device
- Troubleshooting: Storage and media cards
- The application memory on my device is low
- Consider the following guidelines:
- Search
- Search for an item
- Set the types of items that are included in searches
- Search for messages
- Message search criteria
- Do more with your message search results
- View, change, or delete a saved search
- SIM card
- About the SIM card phone book
- Add a contact to your SIM card
- Copy contacts from your SIM card to your contact list
- Copy a contact from your contact list to your SIM card
- Change or delete a SIM card contact
- Change the display name for a phone number
- About SIM card security
- Protect your SIM card with a PIN code
- Change the SIM card PIN code
- Security
- Security basics
- About the device password
- Set a device password
- Change the device password
- Lock your device
- Lock your device when you insert it in the holster
- Set a limit for device password attempts
- Delete device data, third-party applications, or media card files
- Password keeper
- About the password keeper
- Change a password in the password keeper
- Add a password to the password keeper
- Generate a random password
- Set criteria for randomly generated passwords
- Change the password keeper password
- Delete a password from the password keeper
- Copy a password
- Prevent password copying
- Set a limit for password attempts in the password keeper
- Hide passwords in the password keeper
- Encryption
- About encrypting data on your device
- Set encryption strength
- Use a certificate to encrypt the encryption keys on your device
- About encryption keys
- Generate an encryption key
- Memory cleaning
- About memory cleaning
- Turn on memory cleaning
- Change when your device deletes sensitive data from the temporary device memory
- Delete sensitive application data from the temporary device memory
- View the icon for the memory cleaning application on the Home screen
- Certificates
- About certificates
- Certificate basics
- Download a certificate from an LDAP-enabled server or DSML-enabled server
- Click Add Certificate to Key Store.
- About certificate enrollment
- Download a certificate from a certificate authority
- Import a certificate or PGP key that is saved on your device
- Import a certificate or PGP key from a media card
- View properties for a certificate
- Certificate properties
- View one type of certificate in the certificate list
- Send a certificate
- Delete a certificate
- View the certificate chain for a certificate
- Certificate status
- Status indicators for certificate authority profiles
- Check the revocation status of a certificate or certificate chain
- Change the trust status of a certificate
- Revoke a certificate
- Certificate revocation reasons
- Certificate options
- Change the display name for a certificate
- Add an email address to a certificate
- Turn off the display name prompt that appears when you add a certificate to the key store
- Turn off the fetch status prompt that appears when you add a certificate to the key store
- Change how often a certificate authority profile checks certificate status
- Certificate shortcuts
- PGP keys
- About PGP keys
- PGP key basics
- Download a PGP key from an LDAP-enabled server
- Download a personal PGP key from the PGP Universal Server
- Download an updated PGP key from an LDAP-enabled server
- View properties for a PGP key
- PGP key properties
- Send a PGP key
- Delete a PGP key
- Clear the PGP data cache
- Press the Key > Clear Universal Cache.
- PGP key status
- PGP key status indicators
- Check the revocation status of a PGP key
- Change the trust status of a PGP key
- Revoke a PGP key
- PGP key revocation reasons
- PGP key options
- Change the display name for a PGP key
- Turn off the display name prompt that appears when you add a PGP key to the key store
- Turn off the fetch status prompt that appears when you add a PGP key to the key store
- PGP key shortcuts
- Troubleshooting: PGP keys
- Certificate servers
- Add a certificate server
- Change connection information for a certificate server
- Connection options for OCSP and CRL servers
- Connection options for LDAP-enabled servers and DSML-enabled servers
- Send connection information for a certificate server
- Delete a certificate server
- Key store
- About the key store
- Change the key store password
- Synchronize the key store password with the device password
- Change when your device deletes the key store password
- Add contacts to your Contacts application automatically when you add items to the key store
- Change the service that your device uses to download certificates
- Turn off automatic backup and restore of key store data
- Change the refresh rate for certificate revocation lists
- Reject certificate revocation lists from unverified CRL servers
- Smart cards
- About using a smart card with your device
- Turn on two-factor authentication
- Import a certificate from a smart card
- Lock your device when you remove your smart card from your smart card reader
- About smart password entry
- Turn off smart password entry
- Switch smart password filters
- Prerequisites: Using authentication certificates
- Use a certificate to authenticate your smart card
- Check the status of your authentication certificate automatically
- Store the passphrase for your smart card on your device
- Turn off notification for smart card connections
- VPN settings
- About VPN profiles
- Log in to a VPN
- Change the user name and password for a VPN profile
- About software tokens
- Change the software token for a VPN profile
- Change the PIN for a software token on your device
- Verify security software manually
- Third-party application control
- About permissions for third-party applications
- Reset connection permissions for third-party applications
- About direct Internet connections for third-party applications
- Set up a direct Internet connection for a third-party application
- Turn on safe mode
- Set permissions for a third-party application
- Turn off a prompt for a third-party application connection
- Interaction permissions for third-party applications
- Data permissions for third-party applications
- Troubleshooting: Security
- I cannot download a certificate
- I cannot unlock my device using my smart card
- My device prompts me to make an emergency call when I type a password
- Service books and diagnostic reports
- Accept, delete, or restore a service book
- Run a diagnostic report
- View, submit, or delete a diagnostic report
- Set a default recipient for diagnostic reports
- I cannot run or submit a diagnostic report
- View the version number of the BlackBerry Device Software on your device
- Synchronization
- Troubleshooting: Synchronization
- Email is not reconciling over the wireless network
- Organizer data is not synchronizing over the wireless network
- Accessibility options
- About accessibility options
- Screen accessibility options
- Audio and phone accessibility options
- Hearing aid mode
- TTY support
- Voice dialing
- Typing accessibility options
- Calculator
- Use the calculator
- Convert a measurement
- BrickBreaker
- About BrickBreaker
- BrickBreaker capsules
- Long:
- Slow:
- Gun:
- Laser:
- Multi:
- Catch:
- Flip:
- Wrap:
- Bomb:
- Life:
- BrickBreaker scoring
- Play BrickBreaker
- Set the paddle speed
- Word Mole game
- Word Mole game basics
- About the Word Mole game
- Form a word
- Word Mole game scoring
- Word length:
- Letter usage:
- Speed:
- Water bonus letters:
- Watering can:
- Vegetable bonus letters:
- Star bonus letters:
- Time bonus letters:
- Single-player games
- Turn on tutorial mode
- Save a game
- Resume a game
- Multiplayer games
- Invite a player
- Accept an invitation
- Set multiplayer game options
- Change your screen name
- Chat with other players
- Check the stats for a player
- Remove a player
- Troubleshooting: Word Mole
- I cannot connect to a multiplayer game
- Some words that I submit are not recognized
- Glossary
- ADN
- APN
- BCC
- BlackBerry enabled device
- BlackBerry MDS
- cc
- CDMA
- certificate
- CMIME
- CRL
- CRL server
- DNS
- DSA
- DSML
- DSML-enabled server
- EAP-FAST
- EAP-SIM
- EAP-TLS
- EAP-TTLS
- ECC
- FDN
- FIPS
- GAN
- GPS
- GSM
- HTTP
- IMSI
- IP
- LDAP
- LDAP-enabled server
- LED
- mass storage mode
- MCC
- MMS
- MNC
- MTP
- OCSP
- OCSP server
- PEAP
- personal certificate
- personal PGP key
- PIN
- private key
- public key
- root certificate
- RTSP
- R-UIM
- SAN
- SDN
- SHA
- SIM
- S/MIME
- SMS
- SMSC
- SSID
- SSL
- TCP
- TLS
- Triple DES
- TTY
- VPN
- WAN
- WAP
- WEP
- WML
- WPA
- WTLS
- Legal notice
Brand : T-Mobile
Model : BlackBerry 9800
Category : Smartphone