
Saeco Xsmall HD8650 - Coffee machine PHILIPS - Free user manual and instructions
Find the device manual for free Saeco Xsmall HD8650 PHILIPS in PDF.


| Product Type | Super-automatic espresso machine |
| Brand | Philips (Saeco) |
| Model | Saeco Xsmall HD8650 |
| Dimensions (H x W x D) | 340 x 230 x 430 mm |
| Weight | 8 kg |
| Power Supply | 220-240 V, 50-60 Hz |
| Power Consumption | 1400 W |
| Water Tank Capacity | 1.5 L (removable) |
| Bean Hopper Capacity | 250 g |
| Pump Pressure | 15 bar |
| Functions | One-touch espresso, lungo, steam wand, hot water |
| Grind Settings | Adjustable ceramic burr grinder (5 settings) |
| Coffee Strength | Adjustable via bypass doser |
| Milk Frothing | Pannarello steam wand for cappuccino |
| Brew Group | Removable for easy cleaning |
| Water Filter | Optional AquaClean filter (compatible) |
| Cup Warmer | On top of the machine |
| Auto Shut-Off | Adjustable standby time (15 min to 3 hours) |
| Descaling Indicator | Built-in alert |
| Material | Plastic with stainless steel accents |
| Color | Black/silver |
| Control Type | Push buttons and rotary dial |
| Display | LED indicator lights |
| Warranty | 2 years (depending on region) |
Frequently Asked Questions - Saeco Xsmall HD8650 PHILIPS
User questions about Saeco Xsmall HD8650 PHILIPS
0 question about this device. Answer the ones you know or ask your own.
Ask a new question about this device
Download the instructions for your Coffee machine in PDF format for free! Find your manual Saeco Xsmall HD8650 - PHILIPS and take your electronic device back in hand. On this page are published all the documents necessary for the use of your device. Saeco Xsmall HD8650 by PHILIPS.
USER MANUAL Saeco Xsmall HD8650 PHILIPS
Always here to help you / 始终如一地为您提供帮助
Register your product and get support at / 请登录以下网址并得到相应的帮助
www.philips.com/welcome
HD8650


ENGLISH 6
繁體中文 27
简体中文 47

Table of contents
| Introduction | 6 |
| General description 7 | |
| Important | 7 |
| Danger | 7 |
| Warning | 7 |
| Caution | 8 |
| Electromagnetic fields (EMF) 8 | |
| Before first use 8 | |
| Installing the machine 8 | |
| Preparing for use 9 | |
| Filling the water tank 9 | |
| Filling the coffee bean container 9 | |
| Heating up the machine 10 | |
| Automatic rinsing cycle 11 | |
| Installing the Intenza+ water filter 12 | |
| Using the machine 12 | |
| Brewing coffee 13 | |
| Adjusting the machine | 13 |
| Adjusting the grinding degree | 13 |
| Adjusting the coffee volume | 14 |
| Cleaning and maintenance | 14 |
| Cleaning the brewing unit | 15 |
| Lubrication | 17 |
| Descaling the machine | 18 |
| Descaling procedure | 18 |
| Preparation | 18 |
| Descaling cycle | 19 |
| Rinsing cycle | 19 |
| If you are unable to finish the descaling cycle | 21 |
| Meaning of light signals | 21 |
| Recycling | 24 |
| Guarantee and support | 24 |
| Ordering maintenance products | 24 |
| Troubleshooting | 24 |
| Technical specifications | 26 |
Introduction
Congratulations on buying this fully automatic Philips espresso machine! To fully benefit from the support that Philips offers, please register your product at www.philips.com/welcome. The machine is suitable for preparing espresso coffee using whole coffee beans. In this user manual you find all the information you need to install, use and maintain your machine.
General description (Fig. 1)
1 Control panel
2 Coffee button
3 Descaling light
4 Warning light
5 2-cup light
6 'Water tank empty' light
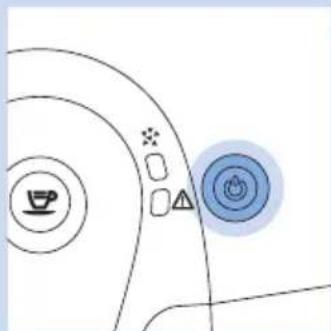
7 On/off button with light
8 Water tank
9 Coffee spout
10 Drip tray cover
11 'Drip tray full' indicator
12 Drip tray
13 Coffee grounds container
14 Brewing unit
15 Maintenance door
16 Grinding degree adjustment knob
17 Ceramic coffee grinder
18 Coffee bean container
19 Grinding degree adjustment tool
20 Lid of coffee bean container
21 Mains cord
Important
Read and follow the safety instructions carefully and only use the machine as described in this user manual to avoid accidental injury or damage due to improper use of the machine. Keep this user manual for future reference.
Danger
- Never immerse the machine in water or any other liquid.
- Never direct the steam wand at the body as this causes scalding.
- Never insert body parts or objects into the coffee grinder.
Warning
- Check if the voltage indicated on the machine corresponds to the local mains voltage before you connect the machine.
- Connect the machine to an earthed wall socket.
- This machine is not intended for use by persons (including children) with reduced physical, sensory or mental capabilities, or lack of experience and knowledge, unless they have been given supervision or instruction concerning use of the appliance by a person responsible for their safety.
- Children should be supervised to ensure that they do not play with the machine.
- Keep the machine and its cord out of the reach of children.
- This machine is designed to grind beans and brew coffee. Use it correctly and with care to avoid scalding by hot water and steam.
- Do not pour liquids on the mains cord connector.
- Do not use the machine if the plug, the mains cord or the machine itself is damaged.
- If the mains cord is damaged, you must have it replaced by Philips, a service centre authorised by Philips or similarly qualified persons in order to avoid a hazard.
Caution
- Always return the machine to a service centre authorised by Philips for examination or repair. Do not attempt to repair the machine yourself, otherwise your guarantee becomes invalid.
- Always put the machine on a flat and stable surface. Keep it in upright position, also during transport.
- Do not place the machine on a hotplate or directly next to a hot oven, heater or similar source of heat.
- Unplug the machine if problems occur during grinding or brewing and before you clean it.
- Let the machine cool down before inserting or removing any parts. The heating element surface is subject to residual heat after use.
- Descale the machine regularly.
- If you do not clean and descale the machine, you run the risk that the machine stops working and that your guarantee becomes invalid.
- Never fill the water tank with warm, hot or sparkling water, as this may cause damage to the water tank and the machine.
- Do not use aggressive cleaning agents, solvents or chemicals to clean the machine.
- Do not keep the machine at temperatures below 0° C. Water left in the heating system may freeze and cause damage.
- This machine is intended for normal household use only. It is not intended for use in environments such as staff kitchens of shops, offices, farms or other work environments.
Electromagnetic fields (EMF)
This machine complies with all applicable standards and regulations regarding exposure to electromagnetic fields.
Before first use
Installing the machine

1 Remove all packaging material from the machine.
2 Place the machine on a table or worktop away from the tap, the sink and heat sources.
3 Leave at least 15cm of free space above, behind and on both sides of the machine.
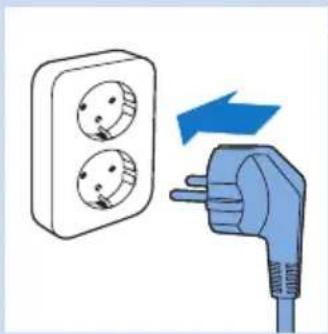
4 Insert the small plug into the socket located on the back of the machine.

5 Insert the plug into the wall socket.
6 Remove the protective sticker from the drip tray and slide the drip tray into the guiding grooves in the front of the machine.
Note: Make sure the drip tray is fully inserted.
Preparing for use
Filling the water tank

1 Remove the water tank from the machine.
2 Rinse the water tank under the tap.

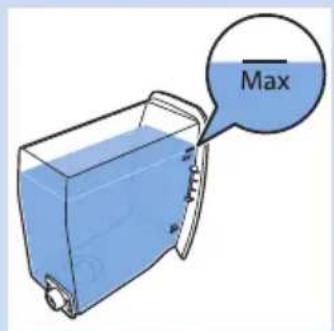
3 Fill the water tank with cold tap water up to the MAX indication.
Never fill the water tank with warm, hot or sparkling water, as this may cause damage to the water tank and the machine.
4 Slide the water tank back into the machine.
Filling the coffee bean container

1 Fill the coffee bean container with espresso beans.
Only use espresso beans. Never use ground coffee, unroasted coffee beans or caramelised coffee beans, as this may cause damage to the machine.

2 Put the lid on the coffee bean container.
Heating up the machine
During the initial heat-up process, fresh water flows through the internal circuit to heat up the machine. This takes a few seconds.
1 Place a bowl under the coffee spout.
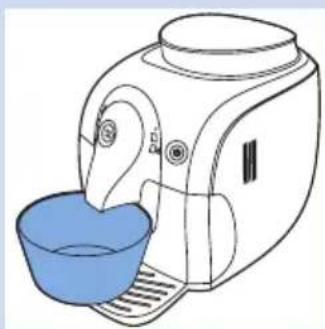
2 Press the on/off button.

3 The warning light flashes quickly to indicate there is no water in the internal circuit.
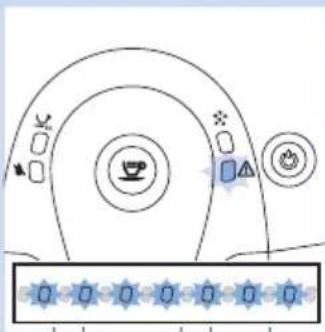
4 Press the coffee button. The machine lets the hot water flow through the coffee spout.
![graph TD A["Start"] --> B{Light} B --> C["Check"] B --> D["Stop"] B --> E["Exit"] C --> F["Light"] D --> G["Stop"] E --> H["Exit"]](/content/2026/06/1267937/images/24981ecf2b9f7cd98a7642b8e4374fd1bfce0372926d4c86e6147f56106ca7c2.jpg)
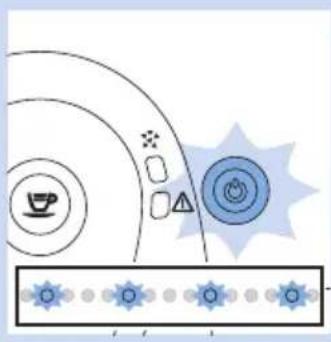
The on/off button flashes slowly and the warning light goes out.
5 After a few seconds hot water stops coming out of the coffee spout.
▶The machine is heating up.
The on/off button flashes slowly and the warning light goes out.
5 After a few seconds hot water stops coming out of the coffee spout.
▶The machine is heating up.
Automatic rinsing cycle
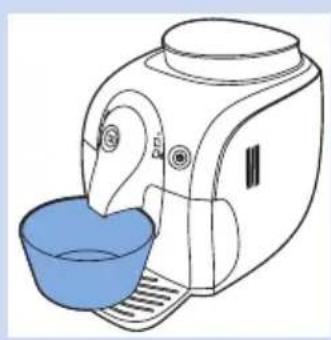
When the machine has heated up, it performs an automatic rinsing cycle to clean the internal circuit with fresh water. This takes approximately one minute.
1 Place a bowl under the coffee spout.

The on/off button flashes slowly.
2 Water flows from the coffee spout. Wait until the water stops coming out of the coffee spout.
Note: You can stop the automatic rinsing cycle by pressing the coffee button.
![graph TD A["Start"] --> B{Decision} B -->|Yes| C["VSP"] B -->|No| D["End"]](/content/2026/06/1267937/images/25a749a1d7ca8d9ec86693d310ab2be32436eae0e2ea967cf94a05c122710382.jpg)
3 When the on/off button lights up continuously, the machine is ready to brew coffee.

Note: The automatic rinsing cycle also takes place 15 minutes after the appliance switches to standby mode or switches off.
Note: The first cups of coffee may be a bit watery, this is normal. The machine needs to complete a few brewing cycles to optimise its settings.
Installing the Intenza+ water filter

We advise you to install the Intenza+ water filter as this prevents scale build-up in your machine. You can buy the Intenza+ water filter separately. For more details, see chapter 'Guarantee and support', section 'Ordering maintenance products'.
1 Remove the small white filter from the water tank and store it in a dry place.
Note: Please keep the small white filter for future use. You will need it for the descaling process.

2 Remove the filter from its packaging and immerse it in cold water with the opening pointing upwards. Press the sides of the filter gently to let out the air bubbles.
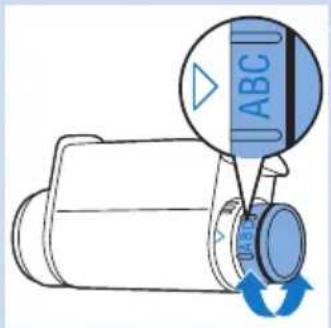
3 Turn the knob of the filter to the setting that corresponds to the water hardness of the area you live in.
A Soft water
B Hard water (default)
C Very hard water
Note: You can test the water hardness with a water hardness test strip.

4 Place the filter in the empty water tank. Press it down until it cannot move any further.
5 Fill the water tank with fresh water up to the MAX indication and slide it into the machine.
6 Let the machine brew a few coffees (see chapter 'Using the machine', section 'Brewing coffee').
7 Refill the water tank with fresh water up to the MAX indication and slide it back into the machine.
The on/off button lights up continuously.
The machine is ready for use.
Using the machine
To guarantee perfect coffee, the machine regularly rinses its inner circuit with water. This automatic rinsing cycle takes place 15 minutes after the appliance switches to standby mode or switches off. During the automatic rinsing cycle, some of the water flows through the inner circuit directly into the drip tray. Empty the drip tray regularly.
Brewing coffee

1 Make sure the on/off button lights up green continuously.
2 Place 1 or 2 cups on the drip tray cover.
![graph TD A["Start"] --> B{Light Check} B --> C["Check Point"] C --> D["Return to Traffic Light"] D --> E["Next Step"] E --> F["End"]](/content/2026/06/1267937/images/2d3f28173d4b4c55cad8ebcf19bf14e03753caaf03f22eae117f0b06a1985e24.jpg)
3 Press the coffee button.
Note: You can interrupt the brewing cycle at any time by pressing the coffee button.
- Press the coffee button once to brew 1 cup of coffee.
The machine grinds the required amount of coffee beans for one cup and then brews one cup of coffee. - Press the coffee button twice to brew 2 cups of coffee.
The 2-cup light lights up. The machine grinds the required amount of coffee beans for one cup and then fills both cups half. Then the machine grinds coffee beans for one cup again and fills both cups fully.
Note: When the machine is left in standby mode, it switches off automatically after 30 minutes.
Adjusting the machine
You can adjust the grinding degree and coffee volume to obtain coffee that is perfectly customised to your taste.
Adjusting the grinding degree
You can adjust the grinding degree of the machine. At each grinding degree selected, the ceramic coffee grinder guarantees a perfectly even grind for every cup of coffee you brew. It preserves the full coffee aroma and delivers the perfect taste to every cup.

1 Press the grinding degree adjustment knob firmly (1) and then turn it one notch at a time (2). There are 5 different grinding degree settings you can choose from. The smaller the dot, the stronger the coffee. The difference becomes noticeable after you have brewed 2-3 cups of coffee at the new setting.
Do not turn the grinding degree adjustment knob more than one notch at a time to prevent damage to the grinder.
Adjusting the coffee volume

You can adjust the coffee volume to your taste and the size of your cups. The coffee button can be programmed.
1 Place a cup on the drip tray cover.
2 Press and hold the coffee button for a few seconds. Release the button when the machine starts to grind coffee beans.

The 2-cup light and the on/off button flash slowly.
![graph TD A["Start"] --> B{Condition} B --> C["Process Step"] C --> D["End"]](/content/2026/06/1267937/images/c5ad71b10a546577dc690b4f347df89c13cd35cf0408d9211ad1089af682058f.jpg)
3 Press the coffee button again when the cup contains the desired amount of coffee.
The machine automatically saves the new setting.
Cleaning and maintenance
Regular cleaning and descaling prolongs the lifetime of your machine and ensures optimum quality and taste of your coffee.
Do not immerse the machine in water or any other liquid.
Never use scouring pads, abrasive cleaning agents or aggressive liquids to clean the machine.
Always unplug the machine and let it cool down before you clean it.
Note: None of the detachable parts are dishwasher-proof. Rinse them under the tap.
Note: The drip tray collects the water that comes out of the coffee spout during each rinsing cycle and coffee that might be spilled during coffee preparation. Empty and clean the drip tray regularly and when the 'drip tray full' indicator is raised.
Caution: Never remove the drip tray when the machine has just been switched on. Wait a few minutes until the machine has performed a rinsing cycle.
Cleaning the brewing unit

Do not clean the brewing unit in the dishwasher and do not use washing-up liquid or a cleaning agent to clean it.
Clean the brewing unit once a week.
1 Switch off the machine and unplug it.
2 Remove the coffee grounds container from the machine.

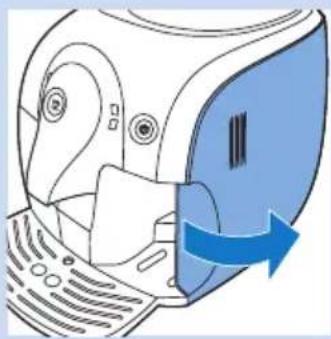
3 Open the maintenance door.

4 Press the PUSH button (1) and pull at the grip of the brewing unit (2) to remove it from the machine.

5 Clean the coffee exit duct thoroughly with a spoon handle or another round-tipped kitchen utensil.

6 Rinse the outside of the brewing unit under a lukewarm tap and clean the upper filter carefully.
Never use any washing-up liquid or other cleaning agent to clean the brewing unit.
Do not dry the brewing unit with a cloth to prevent fibres from collecting inside the brewing unit. After rinsing, just shake excess water off the brewing unit or let it air-dry.

7 Before you slide the brewing unit back into the machine, make sure the two reference signs on the side match. If they do not match, perform the following step:
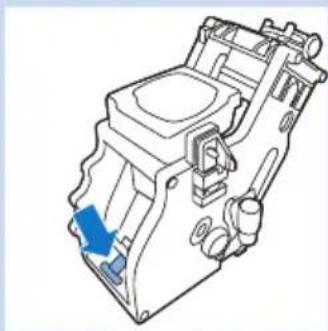
- Make sure the lever is in contact with the base of the brewing unit.
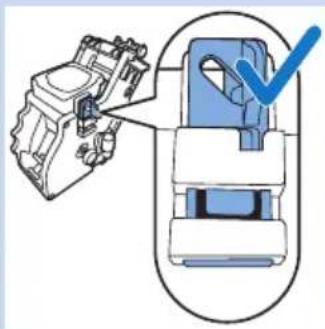
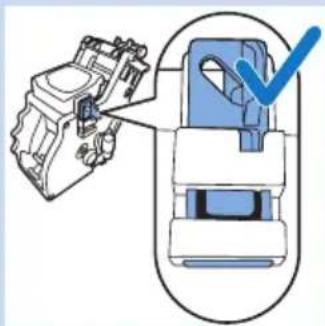
8 Make sure the locking hook of the brewing unit is in the correct position.

Note: You can find the locking hook on the back of the brewing unit (the side without the word "push"), at the top of the horizontal edge.

- To position the hook correctly, push it upwards until it is in uppermost position.

Note: The hook is not correctly positioned if it is still in bottommost position.
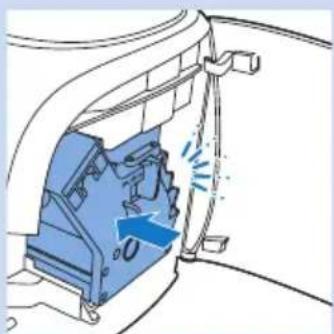
9 Slide the brewing unit back into the machine along the guiding rails on the sides until it clicks into position.
Do not press the PUSH button.
10 Close the maintenance door.

11 Slide the coffee grounds container back into the machine.
Lubrication
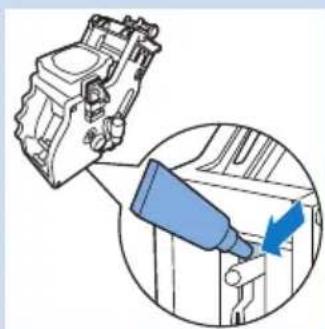
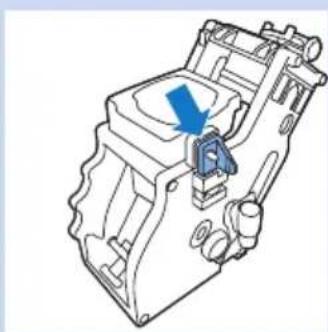
For optimal performance of the machine, lubricate the brewing unit after it has brewed 500 cups of coffee or once every 3 months. Contact the Philips Saeco hotline to buy lubricant.
1 Switch off the machine and unplug it.
2 Follow steps 2 to 4 in section 'Cleaning the brewing unit' to remove the brewing unit from the machine.
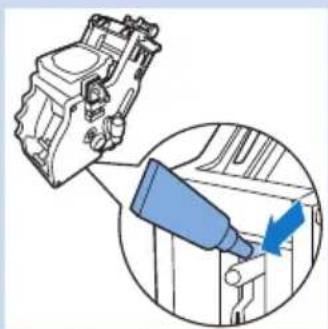
3 Apply some lubricant around the shaft in the bottom of the brewing unit.


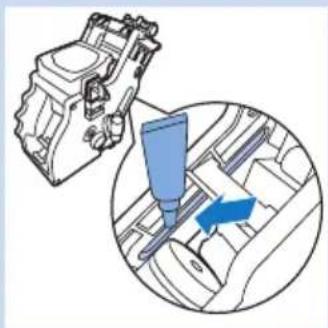
4 Apply some lubricant to both sides of the part shown in the illustration.

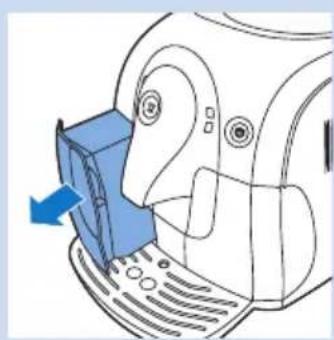
5 Follow steps 7 to 11 in section 'Cleaning the brewing unit' to place the brewing unit and the coffee grounds container back into the machine.
Descaling the machine
Scale builds up inside the machine during use. It is essential to descale the machine when the orange descaling light lights up continuously. Only use the special Saeco descaling solution to descale the machine. The Saeco descaling solution is designed to ensure optimal performance of the machine. You can buy the Saeco descaling solution in the online shop at www.shop.philips.com/service.
Note: The use of other descaling products may cause damage to the machine and leave residues in the water.
Never drink the water with descaling mixture that you pour into the water tank or any water with residues that comes out of the machine during the descaling procedure.
Descaling procedure
The descaling procedure lasts 30 minutes and consists of a descaling cycle and a rinsing cycle. When the orange descaling light lights up continuously, you need to descale the machine.
Note: Do not remove the brewing unit during the descaling procedure.
Preparation
1 Switch off the machine.
If you do not switch off the machine, you cannot enter the descaling cycle.
2 Empty the drip tray and place it back.
3 Empty the water tank and remove the Intenza+ water filter (if present). Pour the entire bottle of descaling solution into the water tank.
4 Add water to the descaling solution in the water tank up to the MAX indication.


5 Place a bowl under the coffee spout.

Descaling cycle
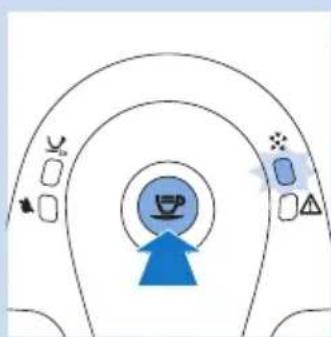
1 Press the coffee button for approximately 5 seconds.
The orange descaling light flashes slowly during the entire descaling cycle.
After each interval of one minute, the descaling solution flows out of the coffee spout. This happens several times until the water tank is completely empty.
![graph TD A["Start"] --> B{Decision} B -->|Yes| C["Process Box"] B -->|No| D["End"] C --> E["Arrow Up"] D --> F["Arrow Down"]](/content/2026/06/1267937/images/e572f3b736d2b02ebfe3ff8d454416313fa934d42001b7221cf7cd660f72d786.jpg)
Note: If you want to interrupt the flow of the descaling solution press the coffee button. To restart the flow of the descaling solution, press the coffee button again.

2 The 'water tank empty' light lights up continuously.
3 Empty the drip tray and place it back.

Rinsing cycle
1 Remove the water tank from the machine and rinse it.

2 Fill the water tank with fresh tap water up to the MAX indication and slide the water tank back into the machine.

3 Empty the bowl and place it back under the coffee spout.

Note: The orange descaling light flashes twice continuously.
4 Let hot water flow out of the coffee spout until the orange descaling light goes out and the on/off button flashes.
The machine is heating up and it performs an automatic rinsing cycle.
![graph TD A["Start"] --> B{Decision} B -->|Yes| C["Process"] B -->|No| D["End"]](/content/2026/06/1267937/images/804ccdedc5012af8751d3b8e16abd05a3ef6da5000c2a51ea1f806a378161578.jpg)
Note: If you want to interrupt the water flow press the coffee button. To restart the water flow, press the coffee button again.

5 When the on/off button light lights up continuously, remove the drip tray, rinse it and place it back.
6 Remove the water tank and rinse it.
7 Reinstall the Intenza+ water filter (if present).
8 Fill the water tank with fresh tap water up to the MAX indication and slide the water tank back into the machine.
9 The machine is ready to brew coffee.
Note: When the ‘water tank empty’ light lights up continuously and the descaling light is still flashing, the water tank has not been filled up to the MAX indication for the rinsing phase. Fill the water tank with fresh water and resume the rinsing cycle from step 4.
If you are unable to finish the descaling cycle.
If the machine gets stuck in the descaling procedure, you can press the on/off button. This allows you to complete the descaling procedure. Follow the steps below to make sure your machine is ready to brew coffee again.
1 Remove the drip tray, rinse it and place it back.
2 Remove the water tank and rinse it. Fill the water tank with fresh tap water up to the MAX indication and slide the water tank back into the machine.
3 Press the on/off button to switch on the machine. The machine will start the automatic rinsing cycle.
4 Place a bowl under the coffee spout.
5 Press the coffee button and brew the amount of 300ml of coffee.
Meaning of light signals

- The on/off button lights up continuously. The machine is ready to brew coffee.

- The on/off button flashes slowly. The machine is warming up or performing a procedure.

- The descaling light and the on/off button light up continuously. You have to descale the machine. Follow the instructions in chapter 'Descaling the machine'.
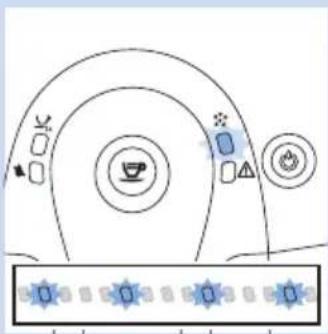
- The descaling light flashes slowly. The machine is in the descaling cycle.

- The descaling light flashes twice continuously. The machine is performing the rinsing cycle of the descaling procedure.
![graph TD A["Start"] --> B{Step 1} B --> C["Step 2"] C --> D{Step 3} D --> E["End"] style A fill:#f9f,stroke:#333 style E fill:#bbf,stroke:#333](/content/2026/06/1267937/images/f5b0a0433c8de8f1863e977652cf5636ba442396d1f8c3bc46b97b369bb3792d.jpg)
- The 2-cup light and the on/off button flash slowly. The machine is programming the amount of coffee to brew. Follow the instructions in chapter 'Using the machine', section 'Adjusting the coffee volume'.
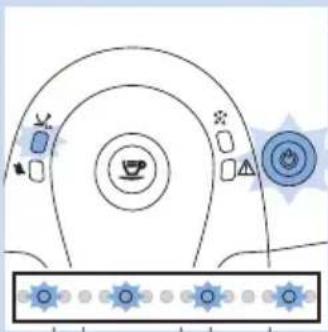
- The 2-cup light lights up continuously and the on/off button flashes slowly. The machine is brewing two cups of coffee.

- The 'water tank empty' light lights up continuously. The water level is low. Fill the water tank with fresh water up to the MAX indication.
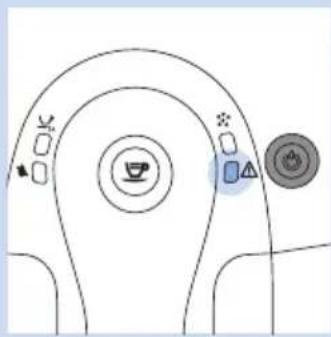
- The warning light lights up continuously and the on/off button goes out. The coffee grounds container is full. Empty the coffee grounds container while the machine is on. Make sure that the warning light flashes before you reinsert the coffee grounds container.
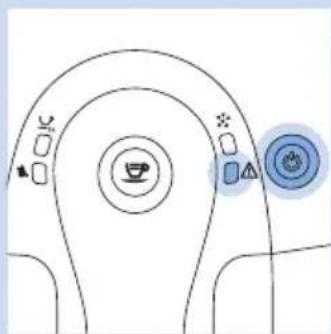
- The warning light and the on/off button light up continuously. The coffee bean container is empty. Refill the coffee bean container. The warning light goes out after brewing coffee.

- The warning light flashes quickly. There is no water in the internal circuit. See chapter 'Preparing for use' section 'Heating up the machine'. Follow steps 3 and 4.
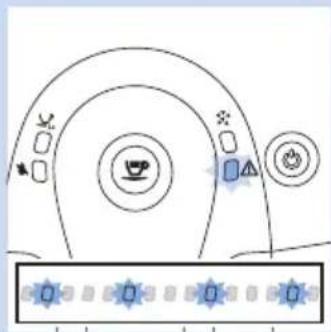
- The warning light flashes slowly. The brewing unit is not correctly inserted, the coffee grounds container is not inserted or the maintenance door is open. Make sure the brewing unit and coffee grounds container are inserted correctly and the maintenance door is closed. If you cannot take out the brewing unit or place it back, switch the machine off and on again.
![graph TD A["Start"] --> B{Decision} B -->|Yes| C["Process Step 1"] B -->|No| D["Process Step 2"] C --> E["End"] D --> E style A fill:#f9f,stroke:#333 style E fill:#bbf,stroke:#333](/content/2026/06/1267937/images/67b0f5c1a6e1664ae10863c372687bf2e95f7137a23e21afb6e862f69dba2bce.jpg)
- The lights flash slowly and simultaneously. The machine is out of order. Switch off the machine for 30 seconds, then switch it back on. Try this two or three times. If the machine does not reset, contact the Philips Consumer Care Centre in your country.
Recycling
Do not throw away the product with the normal household waste at the end of its life, but hand it in at an official collection point for recycling. By doing this, you help to preserve the environment.
Guarantee and support
If you need information or support, please visit www.philips.com/support or read the separate worldwide guarantee leaflet.
To buy spare parts, visit www.shop.philips.com/service or go to your Philips dealer. You can also contact the Philips Consumer Care Centre in your country.
Ordering maintenance products
- Intenza+ water filter (CA6702)
- Lubricant (HD5061)
- Descaling solution (CA6700)
- Maintenance kit (CA6706)
Troubleshooting
This chapter summarises the most common problems you could encounter with the machine. If you are unable to solve the problem with the information below, visit www.philips.com/support for a list of frequently asked questions or contact the Philips Consumer Care Centre in your country.
Problem Solution
| The machine does not work. | Make sure the small plug is inserted into the socket. Plug in and switch on the machine. |
| Make sure that the voltage indicated on the machine corresponds to the local mains voltage. | |
| The machine is stuck in the descaling procedure. | Press the on/off button. You can restart the descaling procedure or follow the instructions in chapter ‘Descaling the machine’. |
| The coffee is not hot enough. | Preheat the cups. Use thin-walled cups. |
| The espresso does not have enough crema. | Use a different type of coffee beans or adjust the ceramic coffee grinder (see chapter ‘Using the machine’, section ‘Adjusting the grinding degree’). |
Problem Solution
| The brewing unit cannot be removed. | Remove the coffee grounds container before you open the maintenance door. If you still cannot remove the brewing unit follow the next steps. Reinsert the coffee grounds container, close the maintenance door, switch on the machine. The machine prepares for use. Switch off the machine and try to remove the brewing unit again. |
| The brewing unit cannot be placed back. | Make sure that the lever is in contact with the base of the brewing unit. Also make sure that the hook of the brewing unit is in the correct position. See chapter 'Cleaning and maintenance', section 'Cleaning the brewing unit'. |
| If you still cannot place the brewing unit back.Reinsert the coffee grounds container and leave the brewing unit out. Close the maintenance door, switch on the machine. The machine prepares for use. Switch off the machine and try to place back the brewing unit again. | |
| The machine grinds the coffee beans but no coffee comes out (see note). | Clean the coffee exit duct and set the grinder to a coarser setting. Clean the brewing unit (see chapter 'Cleaning and maintenance', section 'Cleaning the brewing unit'). |
| Fill the water tank with water. | |
| Clean the coffee spout. | |
| The coffee is too weak(see note). | Adjust the ceramic coffee grinder to a finer setting (see chapter 'Using the machine', section 'Adjusting the grinding degree'). |
| Brew a few cups of coffee to let the machine adjust itself to the new grinding settings. | |
| Use a different type of coffee beans. | |
| Water ends up in the drip tray. | This is normal. To guarantee the perfect cup of coffee, the machine uses water to rinse the internal circuit and brewing unit. Some of the water flows through the internal system directly into the drip tray. Empty the drip tray regularly. |
| The machine seems to be leaking. | The drip tray is full and overflowed during brewing or the descaling procedure. |
| Check if the water tank is leaking. | |
| The brewing unit or the drains behind or under the brewing unit may be blocked. Rinse the brewing unit with lukewarm water and clean the upper filter carefully. Also clean the inside of the machine with a soft, damp cloth. | |
| Coffee is brewed slowly (see note). | The coffee grind is to fine. Change coffee blend or adjust the grind setting (see chapter 'Using the machine', section 'Adjusting the grinding degree'). |
| The brewing unit is dirty. Clean the brewing unit. | |
| The water circuit of the machine has become blocked by scale. Descale the machine. |
Note: These problems can be considered normal if you have just installed the machine or if the coffee blend has been changed.
Technical specifications
Feature Value / location
Nominal voltage Inside of maintenance door
Power rating Inside of maintenance door
Size (w × h × d) 295mm × 325mm × 420mm
Weight 6.9 kg
Housing material Plastic
Cord length 0.8m -1.2m
Water tank capacity 1000ml
Cup size Up to 95mm
Coffee bean container capacity 200g
Coffee grounds container capacity 8 cakes
Pump pressure 15 bar
Boiler Stainless steel
Safety devices
Thermal fuse
目錄
簡介 27
一般説明 27
重要事項 28
危險 28
警示 28
警告 28
電磁波 (EMF) 29
第一次使用前 29
安裝咖啡機 29
使用前準備 30
加水至水箱内 30
裝填咖啡豆槽 30
將咖啡機加熱 30
自動沖洗循環 32
安裝 Intenza+ 濾網 32
使用咖啡機 33
烹煮咖啡 34
調整咖啡機 34
調整研磨粗細 34
調整咖啡量 35
清潔與維護 35
清潔沖煮裝置 36
潤滑 38
為咖啡機除垢 39
除垢程序 39
準備工作 39
除垢循環 40
沖洗循環 40
如果您無法完成除垢循環。 41
指示燈號的意義 42
回收 44
保固與支援 44
訂購保養產品 44
疑難排解 45
技術規格 46
簡介
感謝您購買飛利浦全自動義式咖啡機!請於www.philips.com/
1 使用義式濃縮咖啡豆裝填咖啡豆槽。
2 將蓋子放在咖啡豆槽上。
將咖啡機加熱
1 在咖啡流出口下方放一個碗。
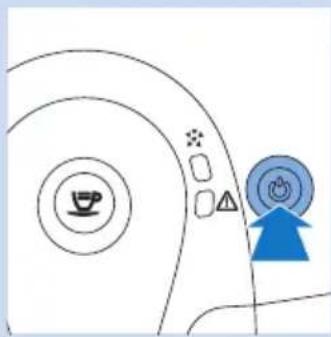
2 按下開關按鈕。
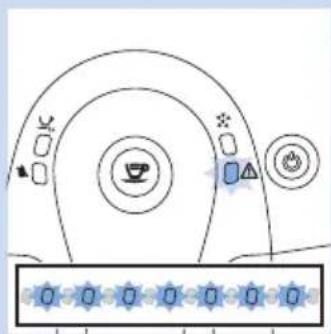
▶開關按鈕會緩慢閃爍,警示燈會熄滅。
1 在咖啡流出口下方放一個碗。

▶開關按鈕會緩慢閃爍。
3 按下咖啡按鈕。
調整咖啡機
▶2 杯指示燈和開關按鈕會緩慢閃爍。

1 關閉咖啡機電源,並拔除插頭。
2 從咖啡機中取出咖啡粉槽。

3 打開保養門蓋。

- 確定拉桿接觸到沖煮裝置底部。

11 將咖啡粉槽推回咖啡機中。
潤滑


除垢循環
1 按下咖啡按鈕約 5 秒鐘。
2 「水箱已空」指示燈會持續亮起。
3 清空滴盤後將其放回。

沖洗循環


| 設備名稱:飛利浦SAECO Xsmall全自動義式咖啡機 型號(型式):HD8745 HD8650/06Equipment name Type designation (Type) HD8651/16 HD8652 | ||||||
| 單元Unit | 限用物質及其化學符號Restricted substances and its chemical symbols | |||||
| 鉛Lead(Pb) | 汞Mercury(Hg) | 鎘Cadmium(Cd) | 六價鉻Hexavalent chromium(Cr (VI)) | 多溴联苯Polybro-minated biphenyls(PBB) | 多溴二苯醚Polybro-minated diphenyl ethers(PBDE) | |
| 印刷電路板 | - | O | O | O | O | O |
| 電源線組 | - | O | O | O | O | O |
| 分配電機螺絲 | - | O | O | O | O | O |
| 齒輪金屬棒 | - | O | O | O | O | O |
| 備考1. “超出0.1 wt %”及“超出0.01 wt %”係指限用物質之百分比含量超出百分比含量基準值。Note 1: “Exceeding 0.1 wt %” and “exceeding 0.01 wt %” indicate that the percentage content of the restricted substance exceeds the reference percentage value of presence condition.備考2. “O”係指該項限用物質之百分比含量未超出百分比含量基準值。Note 2: “O” indicates that the percentage content of the restricted substance does not exceed the percentage of reference value of presence.備考3. “-”係指該項限用物質為排願目。Note 3: The “-” indicates that the restricted substance corresponds to the exemption. | ||||||
目录
简介 47
基本说明 47
注意事项 48
危险 48
警告 48
警告 49
电磁场(EMF) 49
首次使用之前 49
安装咖啡机 49
使用准备 50
给水箱注水 50
向咖啡豆容器中加入咖啡豆 50
加热咖啡机 51
自动冲洗周期 52
安装 Intenza+ 滤水器 53
使用咖啡机 53
烹煮咖啡 54
调整咖啡机 54
调整研磨度 54
调整咖啡量 55
清洁和保养 55
清洁冲煮器件 56
润滑 58
为咖啡机除垢 59
除垢程序 59
准备 59
除垢周期 60
冲洗周期 60
如果您无法完成除垢周期。 61
指示灯信号的含义 62
回收 64
保修和支持 64
订购维护产品 65
故障种类和处理方法 65
技术规格 66
简介
2 将盖子放在咖啡豆容器上。
加热咖啡机
1 在咖啡壶口的下方放一个碗。

2 按开/关按钮。

▶开/关按钮缓慢闪烁,警告指示灯熄灭。
5 几秒钟后,咖啡壶口不再流出热水。
▶咖啡机正在加热。
自动冲洗周期
1 在咖啡壶口的下方放一个碗。

开/关按钮缓慢闪烁。
3 按下咖啡按钮。
调整咖啡机
▶2 杯量指示灯和开/关按钮缓慢闪烁。

1 关闭咖啡机并拔下电源插头。
2 将咖啡粉容器从咖啡机中取出。
3 打开维护舱门。

- 确保锁杠与冲煮器件的底座接触。
8 确保冲煮器件的锁钩处于正确位置。
11 将咖啡粉容器滑回咖啡机中。
润滑
4 在图示部件的两侧涂抹一些润滑剂。

![graph TD A["Start"] --> B{Decision} B -->|Yes| C["Process Step"] B -->|No| D["End"]](/content/2026/06/1267937/images/02a08020d857ae618792cfddb6855ada8d1f949bd11baf949cfe835bd5e8abfa.jpg)

除垢周期
1 按咖啡按钮约 5 秒钟。
橙色除垢指示灯会在整个除垢周期缓慢闪烁。

![graph TD A["Start"] --> B{Decision} B -->|Yes| C["Process"] B -->|No| D["End"]](/content/2026/06/1267937/images/3f0de9a541c7cefa2c3496df60478c2aeee3382f98ed9f087f35c1a2d1dcbab5.jpg)
3 将碗倒空,放回咖啡壶口的下方。
注意:橙色除垢指示灯持续闪烁两次。
- Always here to help you / 始终如一地为您提供帮助
- Introduction
- General description (fig. 1)
- Important
- Danger
- Warning
- Caution
- Electromagnetic fields (emf)
- Before first use
- Installing the machine
- Preparing for use
- Filling the water tank
- Filling the coffee bean container
- Heating up the machine
- Automatic rinsing cycle
- Installing the intenza+ water filter
- Using the machine
- Brewing coffee
- Adjusting the machine
- Adjusting the grinding degree
- Adjusting the coffee volume
- Cleaning and maintenance
- Cleaning the brewing unit
- Lubrication
- Descaling the machine
- Descaling procedure
- Preparation
- Descaling cycle
- Rinsing cycle
- If you are unable to finish the descaling cycle
- Meaning of light signals
- Recycling
- Guarantee and support
- Ordering maintenance products
- Troubleshooting
- Technical specifications
- Feature value / location
- 目錄
- 簡介
- 將咖啡機加熱
- 調整咖啡機
- 潤滑
- 除垢循環
- 沖洗循環
- 目录
- 简介
- 加热咖啡机
- 自动冲洗周期
- 调整咖啡机
- 润滑
- 除垢周期
Brand : PHILIPS
Model : Saeco Xsmall HD8650
Category : Coffee machine