
BWT6410E - Washing machine BRANDT - Free user manual and instructions
Find the device manual for free BWT6410E BRANDT in PDF.


| Product type | Front-loading washing machine |
| Brand | Brandt |
| Model | BWT6410E |
| Washing capacity | 8 kg |
| Maximum spin speed | 1400 rpm |
| Energy class | A+++ |
| Dimensions (H x W x D) | 85 x 60 x 55 cm |
| Net weight | 70 kg |
| Power supply | 220-240 V, 50 Hz |
| Total power | 2000 W |
| Washing programs | Cotton, Synthetic, Delicate, Quick, Wool, Rinse + Spin, Drain |
| Main functions | Delayed start, Temperature selection, Variable spin, Prewash option, Drum stop full |
| Noise level (wash/spin) | 57 dB / 76 dB |
| Annual water consumption | 9,900 L/year |
| Annual energy consumption | 178 kWh/year |
| Maintenance and cleaning | Clean the drain filter regularly, clean the detergent drawer, descale the drum |
| Safety | Child safety, Anti-overflow, Unbalance system, Leak protection |
| Spare parts and repairability | Parts available on Brandt website, repairability index 8.0/10 |
| General information | Manual in 68 pages, downloadable in PDF from notice-facile.com |
Frequently Asked Questions - BWT6410E BRANDT
User questions about BWT6410E BRANDT
0 question about this device. Answer the ones you know or ask your own.
Ask a new question about this device
Download the instructions for your Washing machine in PDF format for free! Find your manual BWT6410E - BRANDT and take your electronic device back in hand. On this page are published all the documents necessary for the use of your device. BWT6410E by BRANDT.
USER MANUAL BWT6410E BRANDT
FR GUIDE D'INSTALLATION & D'UTILISATION
EN INSTRUCTIONS FOR USE
As part of our commitment to constantly improving our products, we reserve the right to make changes to them based on technical advances to their technical and functional features and appearance.
Warning :
Before installing and using your appliance, please carefully read this Guide to Installation and Use, which will allow you to quickly familiarise yourself with its operation.

Pagina 25


• ALIMENTATION ÉLECTRIQUE

Important :
natural_image
Diagram showing a mechanical or electrical component with an arrow indicating rotation or movement (no text or symbols present)
• VALIDATION, ANNULATION, PAUSE
• DÉTAILS DES PROGRAMMES
natural_image
Illustration of a hand cleaning a surface with a faucet and sponge (no text or symbols)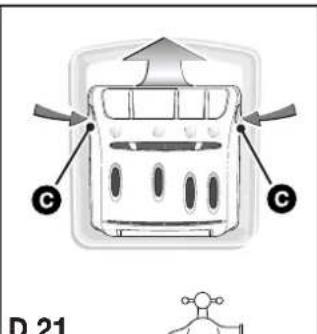


• INCIDENTS POUVANT SURVENIR
• INFORMATION PRODUIT
| Removing the transport packing | 15 |
| Moving your machine | 15 |
| Connecting to the cold water supply | 15 |
| Draining away the waste water | 15 |
| Connecting to the electricity supply | 16 |
| Installing your machine | 16 |
| Loading your washing | 16 |
| Loading the washing products | 16 |
| Programming | 17 |
Page
| Children's safety system | 19 |
| Details of the programmes and options | 19 |
| Modifying a washing programme | 21 |
| Automatic safety systems | 21 |
| Cleaning the pump filter | 22 |
| Maintaining your machine | 22 |
| Incidents that may arise | 23 |
| Messages shown on the display | 23 |
| Information concerning the EU regulations 1015/2010 | 24 |
Dear Customer,
You have just acquired a BRANDT washing machine and we would like to thank you.
We have invested all our dedication and know-how in this appliance so that it would best meet your needs. With innovation and performance, we designed it to be always easy to use.
In the BRANDT product range, you will also find a wide choice of ovens, microwaves, cooking hobs, ventilation hoods, cookers, dishwashers, driers, fridges and freezers, that you can coordinate with your new BRANDT washing machine.
Visit our website www.brandt.com where you will find all of our products, as well as useful and complementary information.
www.brandt.com
BRANDT
• SAFETY ADVICE

Important :
This machine is only for domestic use and is designed to rinse and spin machine-washable textiles.
You must observe the following instructions. We refuse to accept any liability and the guarantee if you do not observe these recommendations since this could result in damage to equipment or physical injury.
- This appliance is not intended for use by persons (including children) with reduced physical, sensory or mental capabilities, or lack of experience and knowledge, unless they have been given supervision or instruction concerning use of the appliance by a person responsible for their safety.
- The machine must only be used in accordance with its normal method of operation in order to avoid damaging your washing and your machine. Only use washing and maintenance products certified for use in domestic washing machines.
- If you pre-treat your washing with stain removers, solvents or, in general, any inflammable or potentially highly explosive product, do not insert them into the machine immediately.
Furthermore, you are also recommended not to use solvents or products in aerosol cans near to your washing machine or any electrical appliance in general in a poorly ventilated room (risk of fire and explosion).
– If any incidents occur and you cannot resolve them using the remedies we recommend (see the section “INCIDENTS THAT MAY ARISE”), call in a qualified professional.
- If you have to open your machine during a cycle (for example, to add or remove washing), depending on the stage the programme is at (during washing essentially), be careful of the temperature inside the machine, which may be very high (risk of severe burns).
- When making a new installation, the machine must be connected to the water supply with a new hose: the old hose must not be re-used.
- Do not let children play with the machine and keep your pets away from it.
- You must immediately make any obsolete machine unusable. Disconnect and cut off the power cable flush with the machine. Close the water tap and remove the hose. Disable the door lock.
- If there is a risk of frost, disconnect the water hose and drain off any water that may remain in the drain hose by placing this as low as possible in a bowl.
• SAVING ENERGY
- Only programme a prewash when it is absolutely necessary: for example, for very dirty sports or working clothes, etc.
- A low temperature programme is sufficient for impeccable washing results when your washing is only slightly or moderately dirty.
- For washing that is only slightly dirty, select a short washing cycle
- Use the right amount of washing products for the hardness of the water, the amount of washing and how dirty it is and follow the instructions on the detergent packs.
• ENVIRONMENTAL PROTECTION
This appliance's packaging material is recyclable. Help recycle it and protect the environment by dropping it off in the municipal receptacles provided for this purpose.

Your appliance also contains a great amount of recyclable material. It is marked with this label to indicate that in countries that are a members of the European Union the used appliances should not be mixed with other waste.
This way, the appliance recycling organised by your manufacturer will be done under the best possible conditions, in compliance with European Directive 2002/96/EC on Waste Electrical and Electronic Equipment. Contact your town hall or your retailer for the used appliance collection points closest to your home.
We thank you doing your part to protect the environment.
• DESCRIPTION OF YOUR MACHINE


A Control panel
B Handle for opening the lid (remains locked during the cycle)
C Lever for raising the machine on castors
D Drain hose
E Cross clamp
F Water supply hose (not connected)
G Power supply cable
• REMOVING THE TRANSPORT CLAMPS

Important :
Before using the machine in any way, you must first perform the following operations.
These comprise removing all the components designed to immobilise the drum in your machine during transport.
These so-called "releasing" operations are necessary for your machine to operate correctly and to conform to the prevailing safety standards. If they are not carried out completely, this could cause severe damage to your machine while it is operating.
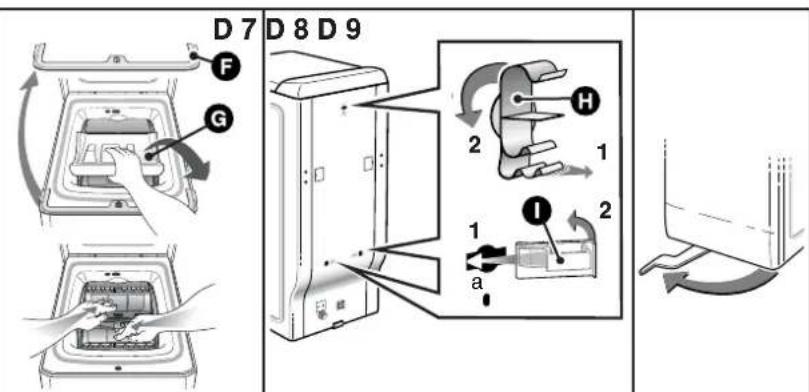
- Remove the washing machine from its plinth (check that the wedge A supporting the motor is not still inserted in the machine) (Diagram D3)
- Remove the 4 screws with a screwdriver (Diagram D4)
- Remove the cross clamp ⚙ removing the 2 screws Ⓞ (Diagram D5) using a 10 or 13mm spanner (depending on the model). (Ensure that you remove the two plastic braces fixed on the cross clamp at the same time as the clamp itself).
- Replace the screws in their initial positions.

Warning:
You must block off the two holes using the hole covers provided E (supplied in the accessories bag) (Diagram D6)
- Remove the drum-tank assembly locking wedge (Diagram D7). To do this:
- Lift the lid on the machine
- Remove wedge F
- Remove wedge G
- Release the drum doors, locked in the lower position, by pressing down on both eaves simultaneously.

Warning:
Remove the pipe support collars Ⓗ You must block off the holes revealed with the hole covers ① supplied in the accessories bag (Diagram D8).

Advice:
We would recommend that you keep all the locking components since these must be refitted if you must subsequently transport your machine again.

Information:
Your machine has been scrupulously checked before it left the factory. You may therefore notice a little water still remaining in the tank or the products box.
•MOVING YOUR MACHINE
- Mounting it on castors
If your machine is equipped with removable castors, you will be able to move it quite easily.
To mount it on castors, swivel the lever on the bottom of the machine from the right to the far left (Diagram D9).

Important:
The machine must not rest on the "front" castors while it is operating: remember to return the lever to its initial position.
• CONNECTING TO THE COLD WATER SUPPLY
Connect the supply hose (Diagram D10):
- At one end to the connection on the back of the machine
- On the other end to a tap fitted with a threaded end 20mm dia. x 27 (3/4 BSP).
If you use a self-piercing tap, the useful aperture must have a minimum diameter of 6mm.
Water supply:
- Minimum water pressure: 0.1 MPa or 1 bar
- Maximum water pressure: 1 MPa or 10 bars
• Replacing a water supply hose
When replacing the hose, ensure that the hose is tightly fastened and that there is a seal at both ends.
• DRAINING AWAY THE WASTE WATER
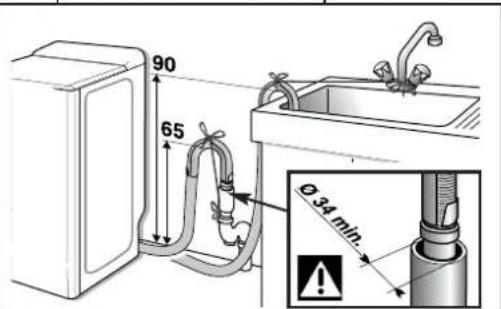
Fit the hose bracket provided inside your machine to the end of the drain hose and then connect the hose (Diagram D11):
— Either, temporarily, over a sink or a bathtub.
- Or permanently to a ventilated U-bend.
If your installation does not have a ventilated U-bend, check that the connection is not sealed. In fact, to avoid any waste water flowing back into the machine, you are strongly recommended to leave an air gap between the machine's drain hose and the drainpipe.
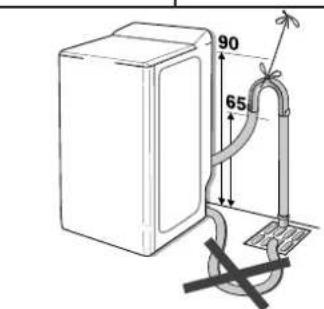
In any case, the drain hose bracket must be placed at a height of 65 to 90 cm higher than the base of the machine.

Important:
Ensure that the drain hose is tied firmly in place with cord to
avoid the bracket coming loose during draining and causing a flood. For correct draining of the waste water, make sure that the drain hose is as straight as possible. In fact, the more bends the less effective the drain pump.
The waste water can be drained away to the ground provided that the drain hose passes through a point 65 to 90 cm higher than the base of the machine (Diagram D12).



• CONNECTING TO THE ELECTRICITY SUPPLY

Important:
For your safety, you must comply with the instructions below.
- Before connecting your machine, you must ensure that your installation's electrical characteristics match those of your machine (see the details provided on the information plate affixed to the back of the machine).
The electrical installation must comply with the prevailing standards and the Electricity Board's regulations in the country concerned, particularly as regards Earthing and installation in shower rooms.
We cannot be held responsible for any incident caused by the machine being incorrectly earthed.

Advice:
Advice on the electrical installation of your machine
- Do not use an extension lead, adapter or multiple socket.
– Never cut out the Earth wire.
– The socket must be readily accessible but out of the reach of children.
If in any doubt, please contact your installer.

Important:
Your machine conforms to European Directives 2006/95/CE
(Low Voltage Directive) and 2004/108/CE (Electromagnetic Compatibility).
• INSTALLING YOUR MACHINE

Important:
If you are installing your machine next to another machine or a
unit, we recommend that you leave a gap between them to allow for air circulation.

Advice:
We also strongly recommend that you do NOT:
- Install your machine in a damp, poorly ventilated room.
- Install your machine in an area where it could be subject to water splashes.
- Install your machine on a carpeted floor.
If you cannot avoid doing this, please take every precaution to avoid blocking air circulation at the bottom of the machine in order to ensure that the internal components are well ventilated.
• Levelling the machine:
Use a spirit level to check that the floor is horizontal: maximum slope 2irc , i.e. a discrepancy of approximately 1cm over the width and of 1.5cm over the depth of the machine.
- Adjustable feet
Some machines are fitted with two adjustable feet at the front to enable you to compensate for any unevenness in the floor. Proceed as follows to adjust the feet to level and stabilize your machine:
- Set the machine on its castors (or tilt it slightly backwards if it does not have retractable castors)
- Screw in or unscrew the feet to adjust the height to suit the shape of the floor (Diagram D13)
- Set the machine back on its feet and check that it is stable.
• TEXTILE MAINTENANCE CODES
- Washing 95: Never exceed the indicated temperatures
- Use of cold diluted bleach possible:
– Iron: Low 📄 Medium 📄 High 📄
– Dry clean: mineral spirit Ⓕ perchlorethylene Ⓟ
all solvents Ⓐ
- NB: A crossed-out code indicates that it is forbidden ✗ ✗ ✗
- LOADING YOUR WASHING
Perform these actions in the following order:
- Open the machine
- Check that the Programme selector is correctly positioned on "☐".
– Lift the opening handle on the front of the machine.
The lid will open.
- Open the drum by pressing the button on the front door.
- Insert your washing
For optimum washing performance, place your washing, preferably sorted and folded, in the drum, distributing it evenly without heaping it up. Mix large and small items to obtain an optimum, well-balanced spin.
- Close the drum
Ensure that the drum is correctly closed.

Important:
Check that the three hooks and the border of the button are visible.
- LOADING THE WASHING PRODUCTS

Important:
(Diagram D14)
- The "WASH" container may contain powder or liquid but liquid detergent should not be used for programmes WITH Prewash and/or WITH "Delayed Start" (depending on the model).
— Concentrated softener should be diluted with warm water.
— Concentrated bleach must be diluted.
— To fill the product containers correctly, place the lid fully open.
— Do not exceed the MAX level.
• Dispensing the detergent
The amount of detergent to be used depends on the hardness of the water, the extent to which your washing is soiled and the amount of washing to be washed.
Please refer to the dosing instructions on your pack of detergent.
Warning: in most cases, the detergent manufacturer's recommendations apply to the drum filled to the maximum. Adjust the dosage correctly to the weight of the washing you have placed in the machine.
These recommendations will help you to avoid using too much detergent, which causes foam to be produced. Too much foam can reduce your machine's performance and increase the length of the washing cycle and the consumption of water.
• Detergents for woollens and delicate fabrics
You are recommended to use an appropriate detergent for washing these fabrics (avoid placing such detergents directly on the drum because they have an aggressive action on the metal).
• Before your first wash
Before making your first wash, we recommend that you carry out a "COTTON 90 wash without pre-wash" and with no washing in the drum, using a 1/2 measure of your usual detergent in order to eliminate any residues from manufacturing that may remain in your machine.
D 13 D 14

natural_image
Diagram showing a mechanical or electrical component with curved arrows indicating motion or force (no text or symbols)
① | Pre-wash container (powder)
② || Wash container (powder or liquid)
③ Softener
④ cl Bleach

POWDERED DETERGENT

LIQUID DETERGENT
• DESCRIPTION OF THE CONTROL PANEL


Information:
All the buttons are touch-
sensitive and therefore do not push in. In any case, the "Start/Pause" button cannot cancel a programme.

Important:
Before starting your machine,
check that the power cable is plugged in and the water tap is open.
Also ensure that the drum doors are closed correctly and the machine's lid is shut.
During the "End of Cycle" phase, when "StOP" is lit, any action on one of the controls (the selector or the buttons) returns you to "Programming" mode.
As a safety measure, when the cycle is over, we recommend that you unplug the power cable and turn off the water tap.
• CONFIRM, CANCELLING, PAUSE
- Confirm your choice:
—The "Start/Pause" button is used to confirm the program you have chosen
NB: After programming a delayed start wash cycle, there is no need to press "Start/Pause". The selection will be registered after a few seconds.
- Cancelling:
-You can cancel your selections at any time by turning the selector 1 to "0".
This operation can be performed during programming, during the waiting period before the cycle actually starts and throughout the whole washing cycle.
It also cancels the "Children's Safety" system.
- Pause:
- You can also temporarily stop the cycle by briefly pressing the button "Start/Pause" .6

Important:
This action is not possible during the spin cycle.
For more details on this function, please refer to the section «PROGRAMMING : Adding or removing an item...».
• ACTIVE MEMORY FUNCTION
Your washing machine memorises your washing habits. Every time you start a programme, it records the temperature, the speed and the options you generally use and suggests these when you switch on.

Important:
hen you start your machine for the first time, it proposes the manufacturer's recommended programme but it will learn your habits after
a few cycles.
• PROGRAMMING
- Programming a washing cycle:
| – Turn the selector ☐ choose the most suitable programme for the type of fabric to be washed.NB: Turning the selector to any position other than “☐” provides power to the machine. | The machine displays the most suitable temperature and spin speed for the programme selected as well as the length of this programme. |
| – If you wish, the suggested wash temperature can be changed using button 2NB: For a cold wash, change the temperature to "0". | |
| – You can also use button ☐:- modify the suggested spin speed.- programme drainage for the end of the cycle.The cycle will finish with a gentle spin at 110 rpm.- or even select a full drum stop.Your machine will stop with the tub full of water before the final spin. | |
| – Use the buttons ☐ select any options you wish. | Light(s) for the option(s) selected |

Information:
For each of the selections above, the machine will only allow you to select values or
options that are compatible with the programme selected.
• PROGRAMMING
| • Programming a washing cycle (continued) : | Display |
| - Select immediate start by pressing “Start/Pause”6. | The phase of the cycle the machine is in is displayed throughout the cycle... ... along with the remaining cycle time. ... along with the remaining cycle time. |
| - ... or select a start delayed using buttons5(for how to do this, see the section "DETAILS OF THE OPTIONS • Delayed start"). | 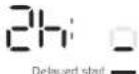 An animation (four small elements turning on themselves) shows the waiting period before the start of the cycle. An animation (four small elements turning on themselves) shows the waiting period before the start of the cycle. |
- Adding or removing an item during the cycle (impossible during spin):
| - Press the "Start/Pause" button ☑ interrupt the cycle.- Add or remove the items of laundryThe time the lid remains locked depends on the temperature inside the machine and, for safety reasons, may take several minutes if you are interrupting a cycle at more than 40 °C.- Press the "Start/Pause" button ☑ restart the cycle.NB: If you have selected a delayed start, you can access the drum instantly at any time in the period before the washing cycle starts without having to interrupt and restart the cycle. | Countdown of the time is stopped and cycle progress and "Remaining time" lights flashing alternately.  Resumption of the countdown and lights stop flashing and remain lit.Remaining time Resumption of the countdown and lights stop flashing and remain lit.Remaining time |
- Cancelling while programming, washing or during a pause:
| – Set the selector 1 to the “☐” position.NB :- In all cases, after cancelling you must reprogramme everything from the start.- If you have cancelled during the washing phase, remember to empty the water, if necessary. To do this, select a "Spin" programme by setting the speed to "I ☐". | All displays are off. |
• End of the cycle:
| NB: After spinning, your machine automatically position the drum opening at the top to provide easy access to the washing. This operation lasts at most 3 minutes.- The machine then displays "StOP", indicating that the cycle has finished, the display will switch off automatically after a few minutes in order to save energy in standby modeSet the selector ☐ the "☐" position.You can now open the lid and remove your washing. | 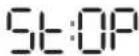 Delayed start = Delayed start = |
- Maintaining your machine's performance (Maintaining the pump filter):
| You must clean the drain pump filter regularly (for how to do this, see the section "CLEANING THE PUMP FILTER"). |
| Important :Your machine's performance can be affected if you do not clean the pump filter regularly. |
For more details on the various functions, please refer to the sections "DETAILS OF THE PROGRAMMES" and "DETAILS OF THE OPTIONS".

Information:
After a power failure, when the power is restored, the washing cycle automatically resumes at the point where it was interrupted.
• SOME EXAMPLES OF PROGRAMMES
To select the most suitable programme for your type of washing, follow the instructions on the labels that most textiles bear.
| Programmes table | U | ∅ | ∅ | ∅ | 10 Son | LJ Son | |||
| Type of textile | Temperature (°C) | Maximum weight of dry clothes | Prewash | Save time | Rinse plus | Easy ironing | Drip-dry | Full drum stop | |
 | COTTON | 0 - 90° | 6,0 kg | ● | ● | ● | ● | ● | ● |
| [7XYI] | MIXED | 0 - 60° | 2,5 kg | ● | ● | ● | ● | ● | ● |
| [8YH] | DELICATES | 0 - 40° | 1,5 kg | ● | ● | ● | |||
| [KY50] | WOOL | 0 - 40° | 1,5 kg | ● | ● | ● | |||
| Special programmes | |||||||||
| OptiA 45 min | 0 - 40° | 3,0 kg | ●● | ||||||
| Flash 30 min | 0 - 40° | 2,5 kg | ● | ● | |||||
| Hand wash | 0° | 1,0 kg | ● | ● | ● | ||||
| Additional programmes | |||||||||
| Rinsing | - | - | ● | ● | |||||
| Spinning | - | - | ● | ||||||
●: These functions can be used alone or in combinations: no illogical combinations can be made.
•TEST PROGRAMMES ACCORDING TO DELEGATED REGULATION (EU) No. 1061/2010
- Standard cotton programme at 60°C : Cotton - 60°C - no option - max spin.
- Standard cotton programme at 40°C : Cotton - 40°C - no option - max spin.
- To protect your programming, activate the "Children's Safety" system by simultaneously pressing the 2nd and 4th option buttons 4
When the safety lock is on, the light by the symbol is lit.
- To deactivate the "Children's Safety" system, press both buttons again simultaneously.
NB: You can activate or deactivate the "Children's Safety" system at any time.
Of course, we recommend that you only activate it after you have programmed and started the cycle.
Display

• DETAILS OF THE PROGRAMMES
The main programmes provided by the machine are as follows:
- OptiA 45 min
This 40°C cycle washes a normal 3 kg load of cotton and mixed fabrics in 45 minutes, ensuring perfect washing results and maximum energy saving.
• Cotton

If your washing comprises hard-wearing white or coloured COTTONS.

Important:
When washing coloureds do not exceed a maximum
temperature of 60°C.
NB: During the first few minutes of the programme, your machine automatically evaluates the washing load you have introduced and adapts the water consumption and the length of the programme accordingly to provide a perfect wash.
• Mixed

If your washing comprises of DELICATE COLOURS, HARD-WEARING SYNTHETICS or MIXED FIBRES.
• Delicates
If your washing comprises NETTING, DELICATE FABRICS or FRAGILE TEXTILES
NB : A programme with agitation and spin phases specially adapted to these types of fabrics
• Wool
If your washing comprises WOOLLENS or MACHINE-WASHABLE WOOLLENS"
NB : A programme with agitation and spin phases specially adapted to these types of fabrics
- Hand wash

If your washing comprises SILK or PARTICULARLY DELICATE FABRICS NB : A programme with a very gentle mechanical action and no intermediate spins between rinses.
The cycle ends with a very gentle, progressive spin restricted to 600 rpm.
• DETAILS OF THE PROGRAMMES (continued)
• Rinsing

A separate rinse followed by a choice of:
– Either spin and drain
- Or drain only ("Drip-dry" option)
- Or a stop with the drum full of water.
- Spinning
This allows a separate spin and drain.

Important:
In the case of "Rinse only" followed by a spin or "Spin only", ensure that you select a suitable spin speed for the type of washing in the machine.
- Flash 30 min
This programme enables you to refresh a small load of 2.5 kg of lightly soiled washing composed of WHITES, COTTONS, COLOUREDS or HARD-WEARING SYNTHETICS.
The cycle time is restricted to around 30 minutes
In this programme, the washing temperature is automatically programmed at 40irc C.

Important:
For this programme, the doses of detergent should be ed by half.
• DETAILS OF THE OPTIONS
• Prewash ⊕
Specially designed for heavily soiled washing (mud, blood, etc.).
A specific initial agitation in cold water precedes a phase of heating to 30irc C.
This agitation phase in cold water enables the particles soiling the washing to be removed before the water is heated.

Important:
Detergent must be placed in the "1" container in the products box (see the section "LOADING THE WASHING PRODUCTS").
- Save time

Allows for a reduction in the cycle time according to 2 levels that can be accessed by pressing on the button several times. Level 1, reduces the average time by 20% . Level 2 reduces the average time by 40% for laundry that is only lightly soiled.
- Rinse plus

"Especially for sensitive and allergic skin": adds an extra rinse to the washing cycle.
- Easy ironing

This option washes your laundry more gently, but with an identical washing performance. The spin speed is slower so that your laundry creases less.
• Drip dry (10)
This function, for very delicate linen, enables you to remove spinning and to pass directly to the draining of the washing machine.
• Full drum stop (L\_J)
This function enables you to remove the washing from your machine before the spin phase or to delay this phase with you washing remaining in water to prevent creasing.
NB: When the machine stops with the drum full of water, the "Spin" cycle progress light (⑨) flashes and the remaining time displayed is "00:00".
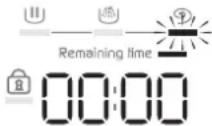
Then:
— Either you want to drain after spinning.
In this case, use the button (⑨) 3 to choose a suitable spin speed for your type of washing.
The programme will end automatically.
— Or you just want to drain.
In this case, use the button ☐ select the "Drip Dry" function (spin speed "f")☐
- Delayed start
You can delay the start of your programme to use off-peak electricity or to avoid your washing standing in the drum for too long at the end of the cycle.
To do this, press the button "+" 5
By repeatedly pressing the (+) button, select the time by which you wish to delay the cycle start (in increments of 1 hour).
NB:
- The "-" button can be used to go backwards.
- The time remaining before the cycle start is counted down by the hour until 1 hour and then by minutes from 59 minutes to 1 minute.

Information:
Throughout the whole waiting period, four elements light up in succession


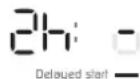
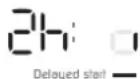
At the end of the waiting period, the programme starts and the machine counts down the time remaining before the end of the cycle.
• MODIFYING A WASHING PROGRAMME
• During programming:
Anything can be changed before the "Start/Pause" button is pressed.
• After the cycle has started:
If you want to change the type of fabric (e.g. from "COTTON" to „MIXED") after you have pressed the "Start/Pause" button "6", you have to cancel the current programme. To do this, turn the selector "10".
Then programme your new selection remembering to confirm it by pressing the „Start/Pause“ button 6.
NB: If you change the programme without first cancelling it, the machine displays:
This indicates that the new selection has not been registered.
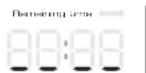
On the other hand, the current cycle is not cancelled and if you turn the selector switch back to its original position, this cycle will resume.
• Throughout the cycle:
The following changes are possible without pressing the "Start/Pause" button 6.
- You can change the temperature for the same type of textile.
NB: If the temperature achieved by the washing cycle is higher than your new selection, heating the water stops immediately and the cycle continues.
- You can alter the spin speed throughout the cycle.
- You can select "Drip Dry" and "Full drum stop" throughout the washing phase.
- You can activate the "Rinse plus" (option until rinsing starts (until the cycle progress light " illuminates").
- You can deactivate all the options throughout the cycle provided that their action has not already finished.
- During the period before the cycle actually starts (if you have chosen to delay the time your washing starts):
– Any kind of programme modification is accepted during a delayed start's waiting period.
- You can alter the length of a delayed start throughout the waiting period before the cycle effectively starts. To do this, press the (+) or (-) buttons 5 to select a new value.
NB:
- During this period, selecting a new time cancels out the previous selection. The new period selected is accepted based on the last selection made.
- If, during this time, you wish to completely cancel the "delayed start", press either the (+) button or the (-) button until the „Delayed start" light goes out and the „Remaining time" light comes on.
Then briefly press "Start/Pause" 6
The cycle will start immediately.
- When the cycle is over:
When the machine shows "StOP", you can programme a new cycle without having to reset the selector to the "☐" position.
For this, all you have to do is turn the selector or press one of the buttons 2, 3 or 4.
The machine displays the time of the previously selected programme.
The machine is then ready to be reprogrammed.
• AUTOMATIC SAFETY SYSTEMS
• Lid opening safety system:
As soon as washing commences, the lid on your machine is locked. When the cycle is finished or when the machine has stopped with the drum full of water, the lid unlocks.
If you have selected a delayed wash, the lid remains unlocked throughout the waiting period until the cycle actually starts.
If you wish to open the lid during the cycle, press button "Start/Pause" briefly and wait 1-2 minutes for the safety system to unlock the lid.
Important:
Depending on when you wish to open the lid during the cycle, this time delay may be a little longer because a cooling down period may also have to be included.
In fact, to avoid your being severely burnt, the lid safety system will not open during the cycle unless the temperature inside the machine is below a certain threshold.
• Water safety system:
During operation, constant control of the water prevents any overflows.
- Spin safety system:
Your washing machine is fitted with a safety system that restricts the spin when poor load distribution is detected.
In this case, your washing may be insufficiently spun. Redistribute your washing in the drum and programme a new spin.
• Anti-foam system:
Your machine can detect when too much foam is being produced during spinning.
At such times, spinning stops and the machine drains.
The cycle then restarts, adapting the spin rates and possibly adding an extra rinse.
• CLEANING THE PUMP FILTER
This filter collects the small objects you may have inadvertently left in your clothes and prevents them from disrupting the pump's operation. To clean the filter, proceed as follows:
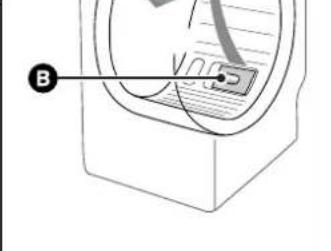
— Open the drum doors. At the back of the drum, you will see a plastic component Ⓐ (Diagram D15)
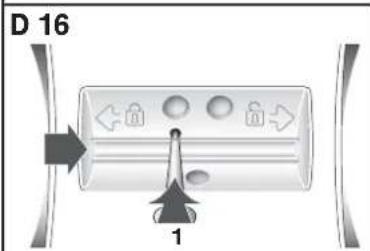
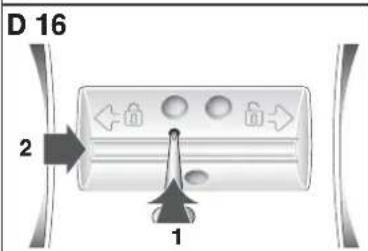
— Release this (Diagram D16).
To do this:
- Insert a rod (a pencil or a screwdriver, for example) into the hole in the component A
- Press down vertically with the rod, while pushing the component over to the right until it is released from its housing
— Remove the component A
— Turn the drum slightly towards the front of the machine, with the doors open (Diagram D17)
You can access the pump filter through the openings freed by removing the plastic component A
— Remove the filter from its housing (Diagram D17)
— Remove the various objects it may have in it
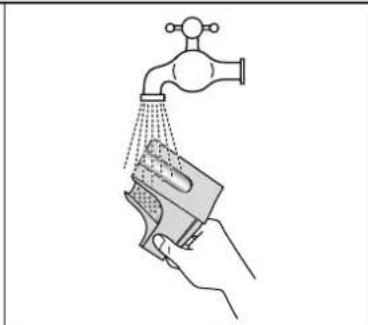
— Rinse it under the tap (Diagram D18)
— Re-insert it, pushing it firmly into its housing after checking that the housing is clean
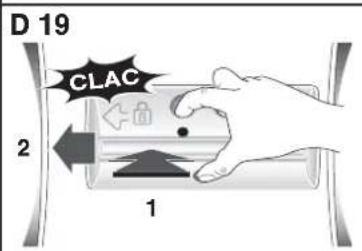
— Re-insert the plastic component Ansuring that it is positioned correctly in the openings at the bottom of the drum and pushing it to the left until it is fully engaged (Diagram D19).
• CLEANING THE MACHINE

Important :
To clean the casing, the control panel and all the plastic parts in general, use a sponge or a soft cloth dampened only with water and liquid soap.
In all cases, do not use:
— Abrasive powders
— Metal or plastic sponges
— Alcohol-based products (alcohol, thinners, etc.)
• CARE OF THE INTERNAL COMPONENTS
To ensure better hygiene, we recommend that you:
— Leave the lid open for a short time after washing.
— Clean the plastic and rubber access components to the tank approximately once a month using a slightly chlorinated product. Run a rinsing cycle to remove any residue of this product.
— Run a washing cycle at 90irc C at least once a month.
• CLEANING THE PRODUCTS' BOX
Clean the products' box regularly. To do this:
— Press the bosses of each side of the box simultaneously to extract it from its housing (Diagram D20).
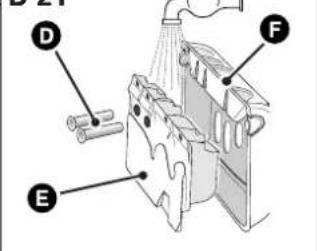
— Remove the siphons from the rear of the box and separate the box from its front cover (Diagram D21)
— Rinse everything under the tap (taking care to empty any excess water remaining inside the box).
— Refit all the box' components, ensuring that the box section itself is properly clipped into the cover and then re-insert the complete assembly into its location under the machine's lid.
• PERIODIC CHECKS
To avoid any water damage, we recommend that you regularly check the condition of the water and drain hoses. If you notice the slightest cracking, do not hesitate to replace the hoses with identical ones available from the manufacturer or his After-Sales Service. For how to replace the water supply hose, please refer to the section "CONNECTING TO THE COLD WATER SUPPLY"
• REPLACING THE POWER SUPPLY CABLE

Warning:
For your safety, the power cable and, depending on the model, the complete electric box and its associated cable must only be replaced by the manufacturer's After-Sales Service or a qualified electrician.


natural_image
Illustration of a hand cleaning a faucet with a spray can (no text or symbols)

natural_image
Technical line drawing of a mechanical component with labeled point B (no text or symbols beyond label)

• INCIDENTS THAT MAY OCCUR
• The cycle does not start
- You have not pressed the "Start/Pause" button
– There is no power to the machine:
- Check that the plug is correctly in the socket
- Check the circuit breaker and the fuses.
– The water tap is closed
– The machine's lid is not closed properly
• A puddle of water forms around the machine
Warning:
7 First of all remove the plug and the fuse and shut off the water supply tap.
While the machine is operating, the permanent level control prevents the water from overflowing. If, despite this, water comes out of your machine, it may be that:
– The drain hook is wrongly positioned in the drain pipe.
- The water supply hose is not sealed tightly at the machine or tap end:
- Check that the seals are in place and the connections are tight.
• Heavy vibration during spin
- All the transport materials have not been removed correctly from the machine:
- Check that all the transport wedges have been removed (see "REMOVING THE TRANSPORT CLAMPS").
– The floor is not level.
- Your machine is resting on its two "front" castors (depending on the model):
- Reset your machine on its feet by pushing the castor engagement lever to the right.
• The washing is not spun or not spun enough
- You have selected a programme with no spin, for example "Drip-dry"
– The spin safety system has detected poor distribution of the washing in the drum:
- Untangle the washing and programme a new spin.
• The machine does not drain
- You have programmed "Full drum stop"
– The pump filter is blocked:
- Clean it (see "CLEANING THE PUMP FILTER" for the relevant procedure)
– The drain hose is kinked or squashed
• The lid does not open
– The programme has not yet finished
The lid remains locked throughout the programme.
• The drum doors open very slowly
(On machines fitted with gently opening doors)
- Your machine has not operated for a long time
– It is located in too cold a position.
- Detergent residue (powder) is blocking the hinges
- In all cases, everything returns to normal after the doors have opened initially
- At the end of the programme, the display will switch off automatically.
- In order to save energy in standby mode, the display will switch off automatically when the programme has finished. To reactivate the display, simply press any button.

Important :
As a general rule, whatever the anomaly detected, you
should stop the machine, unplug the power cable and shut off the water tap
• NOTE ON OPERATION - THIS IS NOT AN INCIDENT:
- The programme time decreases or increases during the wash
This is not a fault. The length of time displayed at the start of the programme is updated according to the load in the machine (automatic weighing). This guarantees perfect washing results and water and energy consumption appropriate to the load. This is normal. The spin safety and anti-foam systems may extend the initial programme time displayed.
- MESSAGES SHOWN ON THE DISPLAY
- Incidents indicated, which you can rectify yourself In this section, we explain how you can rectify these incidents very easily yourself.
Your machine automatically detects some operating incidents and indicates these by particular messages shown on the screen.
Messages
Causes / Remedies
| Remaining line —d:01 | The water tap is closed. Check that the water tap is open and then press the “Start/Pause” button again to restart the cycle. This incident may also be caused by the drain hose being poorly connected (see the section “DRAINING AWAY THE WASTE WATER”). |
| Remaining line —d:02 | The pump filter is clogged. Clean the pump filter (for how to do this, see the section “CLEANING THE PUMP FILTER”) and then press the “Start/Pause” button again to restart the cycle.Also check the drain hose’s position in the drain: the connection must not be airtight (see the section “DRAINING AWAY THE WASTE WATER”). |
| Remaining line —d:07 | Lid not closed properly. Check that the lid is closed and then press the “Start/Pause” button again to restart the cycle.Drum blocked. Check that a small item of laundry (e.g. a handkerchief or a sock, etc.) has not slipped down between the tub and the drum and is stopping the drum from turning. To access the bottom of the tub, please refer to the section “CLEANING THE PUMP FILTER”. |
NB:
If you have experienced an operating incident which is not mentioned above, we recommend proceeding as follows before calling a breakdown engineer:
- Set the Programme selector to the “☐” position and remove the electrical plug for at least 10 seconds
- Reconnect the plug and restart a washing cycle.
If the fault persists, call your breakdown engineer.
Important:
Do not restart a washing cycle if the drum remains locked or if you notice water around your machine of if you notice a burning smell.
• AFTER-SALES SERVICE :
Possible maintenance on your washing machine should be undertaken by :
– either your dealer,
- or another qualified mechanic who is an authorized agent for the brand appliances.
When making an appointment, state the complete reference of your equipment (model, type and serial number). This information appears on the manufacturer's nameplate attached to the rear of the equipment.
To keep your appliance in good working order, we recommend that you use Clearit household products.

Professional expertise for the general public
Clearit offers you professional products and adapted solutions for the daily upkeep of your household and kitchen appliances.
You may find them in conventional retail outlets, along with a complete line of by-products and consumables.
In accordance with EU regulation 1015/2010, below you will find additional product information. The purpose of this information is to provide details on the energy-saving directives to which all appliances sold in the EU must conform.
• WASHING YOUR CLOTHES CORRECTLY
Care labels on items of clothing specify appropriate detergents, temperatures and settings.
| Type of cloth Programme Detergent | |||
| White cotton laundry | ☐ | Cotton20°C - 90°C max. | Detergent with a bleaching product |
| Coloured linen or cotton laundry | ☐ | Cotton20°C - 90°C max. | Detergent for coloured laundry without a bleaching product |
| Synthetic items | ☐ | Synthetic items20°C - 60°C max. | Colour/delicate detergent |
| Delicate fabrics | ☐ | Synthetic items20°C - 60°C max. | Detergent for delicate laundry |
| Delicate fabrics | ☐ | Wool20°C - 40°C max. | Detergent for woollen items |
• PRODUCT INFORMATION
• Residual moisture of the laundry
To find the spin-drying efficiency of your appliance, consult its energy label and refer to the table below:
| Spin drying efficiency class | Residual moisture D in % |
| A (very efficient) | D < 45 |
| B | 45 ≤D < 54 |
| C | 54 ≤D < 63 |
| D | 63 ≤D < 72 |
| E | 72 ≤D < 81 |
- Programmes for tests defined by (EU) delegated regulation 1061/2010
These programmes are suitable for cleaning averagely soiled cotton cloth and are more efficient in terms of both energy and water consumption.
| Class and maximum load according to your model. | Maximum load of dry laundry (kg) | |||||
| 5 kg 6 kg | 7 kg | |||||
| Programme* | Class/kWh/l | min | Class/kWh/l Class | min | min | |
| Cotton 60°C full load | A++/0.77/46 | 138 | A+ /1.20/50 170 A | /1.40/55 | 165 | |
| A++/0.99/50 189 A | /1.40/55 | 160 | ||||
| A+++/0.81/50 | 189 | A++/1.14/49 | 140 | |||
| Cotton 60°C half load | A++/0.65/29 | 84 | A+ /0.74/35 | 108 A | 0.87/41 125 | |
| A++/0.71/35 122 A | /0.74/45 | 146 | ||||
| A+++/0.53/35 | 122 | A++/0.76/40 | 121 | |||
| Cotton 40°C half load A++/0.39/29 | 82 | A+ /0.52/35 | 108 A | 0.64/42 124 | ||
| A++/0.45/35 118 A | /0.57/44.5 | 135 | ||||
| A+++/0.43/35 118 | A++/0.55/39 | 120 | ||||
* Programme without options, max. spin
For energy-saving purposes, the actual washing temperature can vary from the temperature of the selected programme.
• Electricity consumption in on and 'left-on' modes
| Off-mode : | < 0,50 W | 'Left-on' mode : | < 1,50 W |
• INDICE
Pagina


natural_image
Diagram showing a mechanical or electrical component with an arrow indicating rotation or movement (no text or symbols present)D 14

① | Vaschetta prelavaggio (polvere)
② || Vaschetta lavaggio (polvere o liquido)
③ Ammorbidente
④ cl Candeggina
: DETERSIVO IN POLVERE : DETERSIVO LIQUIDO
• DESCRIZIONE DEL QUADRO DI COMANDO

• DETTAGLI DEI PROGRAMMI
natural_image
Illustration of a hand cleaning a surface with a faucet and cloth (no text or symbols)
• INCIDENTI CHE POSSONO ACCADERE
natural_image
Diagram showing a mechanical or fluidic component with curved arrows indicating motion (no text or symbols)
① | Cubeta prelavado (polvo)
② || Cubeta lavado (polvo o líquido)
③ Suavizante
④ cl Lejía cl

DETERGENTE POLVO

DETERGENTE LÍQUIDO
• DETALLES DE LOS PROGRAMAS
natural_image
Illustration of a hand cleaning a faucet with a cloth (no text or symbols)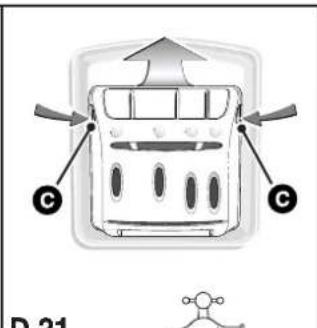


• INCIDENTES SUSCEPTIBLES DE OCURRIR
- El ciclo no arranca
Perchlorethylen Ⓟ alle

Lösungsmittel
natural_image
Pure diagram of a mechanical or electrical component with no visible text, numbers, or symbolsD 14


• PROGRAMMDETAILS
natural_image
Illustration of a hand cleaning a faucet with a sponge (no text or symbols)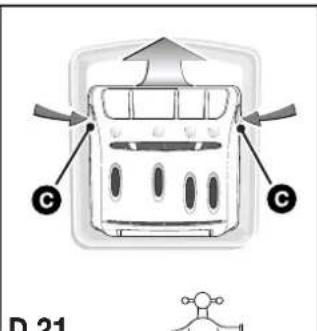


natural_image
Simple line drawing of a mechanical component with an arrow indicating rotation (no text or symbols)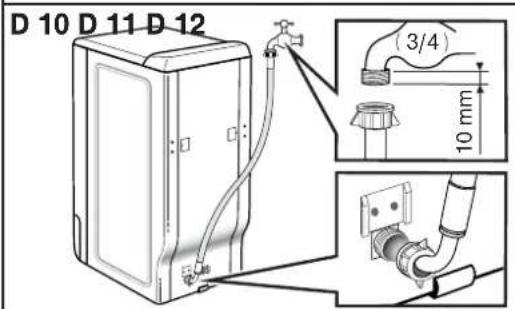

• ЭЛЕКТРОПИТАНИЕ

Важно!
natural_image
Diagram showing a mechanical or fluidic component with curved arrows indicating motion or flow, no text or symbols present.
natural_image
Illustration of a hand cleaning a faucet with a cloth (no text or symbols)


- Warning :
- Pagina 25
- • ALIMENTATION ÉLECTRIQUE
- Important :
- • VALIDATION, ANNULATION, PAUSE
- • DÉTAILS DES PROGRAMMES
- • INCIDENTS POUVANT SURVENIR
- • INFORMATION PRODUIT
- Dear Customer,
- • SAFETY ADVICE
- • SAVING ENERGY
- • ENVIRONMENTAL PROTECTION
- • DESCRIPTION OF YOUR MACHINE
- • REMOVING THE TRANSPORT CLAMPS
- Warning:
- Advice:
- Information:
- •MOVING YOUR MACHINE
- - Mounting it on castors
- Important:
- • CONNECTING TO THE COLD WATER SUPPLY
- • Replacing a water supply hose
- • DRAINING AWAY THE WASTE WATER
- • CONNECTING TO THE ELECTRICITY SUPPLY
- • INSTALLING YOUR MACHINE
- • Levelling the machine:
- - Adjustable feet
- • TEXTILE MAINTENANCE CODES
- - LOADING YOUR WASHING
- - Open the machine
- - Insert your washing
- - Close the drum
- - LOADING THE WASHING PRODUCTS
- • Dispensing the detergent
- • Detergents for woollens and delicate fabrics
- • Before your first wash
- • DESCRIPTION OF THE CONTROL PANEL
- • CONFIRM, CANCELLING, PAUSE
- - Confirm your choice:
- - Cancelling:
- - Pause:
- • ACTIVE MEMORY FUNCTION
- • PROGRAMMING
- • SOME EXAMPLES OF PROGRAMMES
- •TEST PROGRAMMES ACCORDING TO DELEGATED REGULATION (EU) No. 1061/2010
- • DETAILS OF THE PROGRAMMES
- - OptiA 45 min
- • Cotton
- temperature of 60°C.
- • Mixed
- • Delicates
- • Wool
- - Hand wash
- • DETAILS OF THE PROGRAMMES (continued)
- • Rinsing
- - Spinning
- - Flash 30 min
- • DETAILS OF THE OPTIONS
- • Prewash ⊕
- - Save time
- - Rinse plus
- - Easy ironing
- • Drip dry (10)
- • Full drum stop (L\_J)
- — Either you want to drain after spinning.
- — Or you just want to drain.
- - Delayed start
- NB:
- • MODIFYING A WASHING PROGRAMME
- • During programming:
- • After the cycle has started:
- • Throughout the cycle:
- - During the period before the cycle actually starts (if you have chosen to delay the time your washing starts):
- - When the cycle is over:
- • AUTOMATIC SAFETY SYSTEMS
- • Lid opening safety system:
- • Water safety system:
- - Spin safety system:
- • Anti-foam system:
- • CLEANING THE PUMP FILTER
- • CLEANING THE MACHINE
- • CARE OF THE INTERNAL COMPONENTS
- • CLEANING THE PRODUCTS' BOX
- • PERIODIC CHECKS
- • REPLACING THE POWER SUPPLY CABLE
- • INCIDENTS THAT MAY OCCUR
- • The cycle does not start
- • A puddle of water forms around the machine
- • Heavy vibration during spin
- • The washing is not spun or not spun enough
- • The machine does not drain
- • The lid does not open
- • The drum doors open very slowly
- - At the end of the programme, the display will switch off automatically.
- • NOTE ON OPERATION - THIS IS NOT AN INCIDENT:
- - The programme time decreases or increases during the wash
- - MESSAGES SHOWN ON THE DISPLAY
- • AFTER-SALES SERVICE :
- Professional expertise for the general public
- • WASHING YOUR CLOTHES CORRECTLY
- • PRODUCT INFORMATION
- • Residual moisture of the laundry
- - Programmes for tests defined by (EU) delegated regulation 1061/2010
- • DESCRIZIONE DEL QUADRO DI COMANDO
- • DETTAGLI DEI PROGRAMMI
- • INCIDENTI CHE POSSONO ACCADERE
- • DETALLES DE LOS PROGRAMAS
- • INCIDENTES SUSCEPTIBLES DE OCURRIR
- - El ciclo no arranca
- • PROGRAMMDETAILS
- • ЭЛЕКТРОПИТАНИЕ
- Важно!
Brand : BRANDT
Model : BWT6410E
Category : Washing machine