
Vaporetto SV205 - Steam cleaner POLTI - Free user manual and instructions
Find the device manual for free Vaporetto SV205 POLTI in PDF.


| Type | Steam cleaner |
| Brand | Polti |
| Model | Vaporetto SV205 |
| Power | 1500 W |
| Steam pressure | 4.5 bar |
| Water tank capacity | 1.2 L |
| Heating time | Approx. 3-4 minutes |
| Continuous steam | Yes, adjustable flow |
| Weight | 4.5 kg (with accessories) |
| Dimensions (L x W x H) | 35 x 25 x 30 cm |
| Cable length | 5 m |
| Safety features | Auto shut-off, pressure safety valve |
| Accessories included | Floor nozzle, brush kit, extension tubes, measuring cup |
| Water type recommended | Distilled or demineralized water |
| Maintenance | Regular descaling recommended |
Frequently Asked Questions - Vaporetto SV205 POLTI
User questions about Vaporetto SV205 POLTI
0 question about this device. Answer the ones you know or ask your own.
Ask a new question about this device
Download the instructions for your Steam cleaner in PDF format for free! Find your manual Vaporetto SV205 - POLTI and take your electronic device back in hand. On this page are published all the documents necessary for the use of your device. Vaporetto SV205 by POLTI.
USER MANUAL Vaporetto SV205 POLTI
INSTRUCTION MANUAL MANUEL D'INSTRUCTIONS
MANUAL DE INSTRUÇÕES


POLTI®
NATURAL HOME FEELING


TUBO IMPUGNATURA
HANDLE TUBE
POIGNEE TUBE
BARRA DE EMPUÑADURA
ROHR HANDGRIFF
TUBO DA PEGA
PISTOLA VAPORE
STEAM GUN
PISTOLET DE VAPEUR
PISTOLA A VAPOR
DAMPFPISTOLE
PISTOLA VAPOR


SPAZZOLA RETTANGOLARE
RECTANGULAR BRUSH
BROSSE RECTANGULAIRE
CEPILLO RECTANGULAR
RECHTECKIGE BÜRSTE
ESCOVA RETANGULAR
CUFFIA
CAP
FUNDA
PAEU0307
BONNETTE
KAPPE
TOUCA

PANNO SPAZZOLA
CLOTH FOR BRUSH
CHIFFON BROSSE
PAÑO CEPILLO
BÜRSTENTUCH
PANO ESCOVA

ACCESSORIO PER FUGHE
GROUT ACCESSORY
ACCESSOIRE POUR JOINTS
ACCESORIO PARA JUNTAS
FUGENZUBEHÖR
ACESSORIO REJUNTES
CARAFFA
JUG
CARAFE
JARRA
NACHFÜLLBEHÄLTER
JARRO

ADATTATORE PER IMBOTTITI
ADAPTOR FOR UPHOLSTERY
ADAPTATEUR POUR MEUBLES REMBOURRES
ADAPTADOR PARA TAPICERIAS
POLSTERADAPTER
ADAPTADOR PARA ACOLCHOADOS

TELAIO PER TAPPETI
FRAME FOR RUGS
CADRE POUR TAPIS
CHASIS PARA ALFOMBRAS
RAHMEN FÜR TEPPICHE
ESTRUTURA PARA TAPETES

SPAZZOLINO TONDO
ROUND BRUSH
BROSSE RONDE
CEPILLO REDONDO
RUNDBÜRSTE
ESCOVA REDONDA
LANCIA
LANCE
LANCE
LANZA
DÜSE
LANÇA
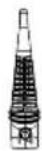
TELAIO LAVAVETRI
WINDOW-CLEANING FRAME
RACLETTE LAVE-VITRES
CHASIS LIMPIACRISTALES
FENSTERREINIGERRAHMEN
ESTRUTURA LAVA-VIDROS






ACCESSORI PER TUTTE LE ESIGENZE
ACCESSORIES FOR ALL NEEDS
On our web site www.polti.co.uk and in good appliance shops you will find a wide range of accessories to increase the performance and the practical applications of your appliances to make home cleaning even easier.
To check the compatibility of an accessory with your appliance, search the code PAEUXXXX listed next to each accessory on page 2.
If the accessory code you wish to buy is not listed in this manual, please contact our Customer Service team for more information.

REGISTER YOUR PRODUCT
Visit our website www.polti.co.uk or call our Customer Services department to register your product.
You can benefit from a special welcome offer, in participating countries, and keep up to date on all the latest Polti news, as well as buy accessories and consumables.
To register your product, in addition to your personal information, you must enter the serial number (SN) which you will find on the silver label, located on the box and underneath the appliance.
To save time and have your serial number to hand, write it in the space provided on the back cover of this manual.

Want to know more? Visit our official channel: www.youtube.com/poltispa.
We will demonstrate the effectiveness of the natural and ecological power of steam both for ironing and cleaning, with many videos of the Polti Vaporetto and all the other products from the world of Polti.
Sign up to the official channel to keep yourself updated about our video contents!
ATTENTION: The safety warnings are only indicated on this manual.
IMPORTANT PRECAUTIONS FOR USE

WARNING! BEFORE USING THE APPLIANCE, CAREFULLY READ ALL THE INSTRUCTIONS AND WARNINGS IN THIS MANUAL, AND ON THE APPLIANCE ITSELF.
Polti S.p.A. declines all liability for any accident deriving from any improper use of this appliance.
Correct use of the product is only as detailed in this instruction manual.
Any use which does not comply with these instructions will invalidate the warranty.
SAFETY SYMBOLS:

WARNING: High temperature. Risk of scalding!
If shown on the product, do not touch as parts may be very hot.

WARNING: Steam.
Risk of scalding!
This appliance reaches very high temperatures. Incorrect use of the device can cause scalding.
- Never disassemble or carry out maintenance on the appliance apart from that indicated in this manual. In the event of a fault or malfunction, do not try to repair the appliance yourself. Incorrect use or a lack of respect for the instructions herein may lead to serious accidents. Always contact Authorised Service Centres.
- This appliance must not be used if it has been dropped, if there are visible signs of damage or if it leaks.
-
The plug must be removed from the socket before the tank/boiler is filled with water.
-
The appliance has to be unplugged after use and before carrying out user maintenance on the appliance.
- This appliance can be used by persons with reduced physical, sensory or mental capabilities or lack of experience and knowledge if they have been given supervision or instruction concerning use of the appliance in a safe way and understand the hazards involved. Children must be supervised to ensure they do not play with the appliance.
- Keep the appliance out of reach of children when it is plugged in or cooling down.
- Keep all the parts of the packaging out of the reach of children; they are not toys. Keep the plastic bag out of the reach of children: danger of suffocation.
- The appliance should not be left unattended while it is connected to the supply mains.
- Steam must not be directed towards equipment containing electrical components, such as the interior of ovens.
- This appliance is intended exclusively for indoor domestic use.
In order to reduce the risk of accidents, including: fires, electrocution, personal injury and scalding, both during use and during preparation, maintenance and storage, always take the basic precautions listed in this manual.
RISKS CONNECTED TO THE POWER SUPPLY - ELECTROCUTION
- The earthing system and highly sensitive residual-current circuit breaker, complete with magnetothermic cut-out for your domestic system, guarantee safe use of electrical appliances.
Therefore, for your own safety, check that the electrical system to which the appliance is connected complies with current laws.
- Do not connect the appliance to the mains if the voltage does not correspond with that of the domestic electrical circuit in use.
- Do not overload sockets with adaptors and/or transformers. Only connect the product to a single socket with current that
is compatible with the supplied plug.
- Electrical extension leads that are unsuitable for the power rating or which are not compliant with law. They may overheat and possibly lead to short circuiting, fire, power outage or damage to the equipment. Only use extension leads which are certified, suitable for the power rating, supporting 16A and earthed.
- Always turn the appliance off at the ON/OFF switch before unplugging it.
- To remove the plug from the socket, do not pull the power cable, but hold the plug itself to avoid damage to the plug and the cable.
- Fully unwind the cable from the cable winder (if present) before connecting the appliance to the mains and before use. Always use the product with the cable completely unwound
- Do not pull or jerk the cable or expose it to stresses (twisting, crushing or stretching). Keep the cable away from hot and/or sharp surfaces and elements. Avoid crushing the cables in doors and windows. Do not pull the cable tightly around corners. Avoid treading on the cable. Do not wind the power cable around the appliance, especially if the appliance is hot. Do not place the appliance on top of the power cable, this can be dangerous.
- Do not change the plug on the power cable.
- If the power cable is damaged, it must be replaced by the manufacturer, its service agent or similarly qualified persons in order to avoid all possible hazards. Do not use the product if the power cable is damaged.
- Do not touch or use the appliance barefoot and/or with wet body or feet.
- Do not use in swimming pools containing water. Do not use the appliance near containers full of water, e.g. sinks, baths and swimming pools.
- Never immerse the cleaner in water or other fluid.
RISKS DURING USE OF THE PRODUCT - INJURIES/SCALDING
- The product should not be used in areas where there is a danger of explosions or in the presence of toxic substances.
- Do not pour toxic substances, acids, solvents, detergents, corrosive substances and/or explosives or perfumes into the tank.
- Only pour water or the water mix indicated in the Chapter "WHICH WATER TO USE" into the tank.
- Do not direct the steam jet onto toxic substances, acids, solvents, detergents or corrosive substances.
- Do not direct the steam jet onto explosive powders or liquids, hydrocarbons, open flames and or extremely hot objects.
- The handling and removal of dangerous substances must be carried out according to the indications of the manufacturers of these substances.
- Do not position the product near sources of heat such as fireplaces, stoves and ovens.
- Do not position the product near electromagnetic fields such as induction plates.
- Re-wind the cable when the appliance is not in use.
- Do not obstruct the openings and grills on the product.
- Do not direct the steam jet onto any part of the body of people or animals.
- Do not direct the steam jet onto clothes while they are being worn.
- Cloths, rugs and fabrics which have been subjected to a deep steam reach very high temperatures, above 100°C. Wait a few minutes and check that they have cooled before handling them. Therefore, avoid contact with the skin if they have just been steamed.
CORRECT USE OF THE PRODUCT
This appliance is for internal home use to clean and sanitise hard floors, laminates, PVC, tiles, sealed marble, work surfaces and kitchen and bathroom surfaces and to clean and brighten fabrics, rugs and carpet. Please read these instructions carefully and keep them. If this manual is lost, it can be consulted and/or downloaded from the website www.polti.co.uk.
The appliance only functions correctly with the tank inserted, and complete with all its parts.
POLTI S.p.A. reserves the right to make the aesthetic, technical and construction changes it deems necessary, without prior notice.
Before leaving our factory all our products are rigorously tested. This is the reason why your Polti Vaporetto may contain some residual water in the tank.
Correct use of the product is only as detailed in this instruction manual. Any other use may damage the appliance and invalidate the warranty.
INFORMATION FOR USERS
Pursuant to European Directive 2012/19/EU, regarding electric and electronic appliances, this appliance must not be disposed of with domestic waste, but sent to an official collection facility. This appliance complies with EU Directive 2011/65/EU.
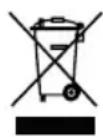
The crossed-out bin symbol on the appliance indicates that, at the end of its useful lifespan, the product must be disposed of separately from other waste. Therefore, at the end of its life, the user must hand over the appliance to an appropriate collection centre for electric and electronic waste or, according to the legislation in force in the country, leave the used appliance with the distributor when buying a new product to replace it. Proper separate waste collection to facilitate the subsequent recycling, treatment and environmentally compatible disposal of the appliance helps to prevent negative effects on the environment and human health, and promotes recycling of the materials the product is made of. Unlawful disposal by the owner may result in the sanctions envisaged by current legislation.
WHICH WATER TO USE
This appliance has been designed to function with normal medium tap water between 8° f and 20° f. If the tap water contains a lot of limescale use a mix composed of 50% tap water and 50% demineralised water which is widely available to purchase.
Warning: check the hardness of the water at the technical office at your local council or the local water supplier.
Never use distilled water, rain water or water containing additives (e.g. starch, perfumes), or water produced by other domestic appliances, by water softeners or filter jugs.
Do not add chemical, natural, detergent, or limescale removing substances, etc.
IMPORTANT
Polti Vaporetto SV205 is a practical appliance with 5 cleaning settings, ideal for floors, rugs, glass, upholstery and tile grouting. It can be used in two ways: Steam Broom and Steam Gun.
1. PREPARATION
1.1 Remove the appliance from the packaging, checking that the product is whole and that all the parts are there.
1.2 Turn the water tank cap anti-clockwise to open it, and fill the tank with water using the jug.
1.3 Close the cap.
1.4 The appliance is ready in Steam Gun mode.
Do not add other substances or additives to the tank.
This operation must always be carried out with the power cable disconnected from the mains.
2. PREPARATION FOR STEAM BROOM USE
2.1 Connect the portable appliance to the brush, matching the pin on the brush with the hole on the portable appliance (1).
2.2 Position the cloth under the brush (4) and fasten by pulling the cord (5).
2.3 Make sure that the ignition/steam-adjustment dial is in the "OFF" position.
2.4 Connect the handle tube to the coupling hole (2), making sure that the pin on the handle tube matches with the hole on the portable appliance (3).
To remove the handle tube, just press the pin on the tube and pull it.
By inserting the tube, an internal micro-switch is activated, which will start steam emission.
2.5 Plug the power lead into a suitable socket with an earth connection.
3. CLEANING HARD FLOORS
Ensure that the points in Sections 1 and 2 have been followed.
3.1 Turn the ignition/steam-adjustment dial clockwise, from the "OFF" position to one of the three steam-adjustment positions; for this type of surface, we recommend the Maximum level of steam.
The “steam ready” indicator light will come on to indicate that the appliance is on (heating).
WARNING: If the ignition/steam-adjustment dial (E) has been turned from the "OFF" position, by inserting the handle tube in the coupling hole, the appliance will start to emit steam. Always face the appliance downwards, not directing it towards people, animals or objects.
3.2 About 30 seconds after it has been turned on, the appliance will start to dispense steam 3.3 Clean the floors by moving the brush.
WARNING: Do not use the appliance without the cloth.
WARNING: To remove the cloth from the brush, turn the ignition/steam-adjustment dial to the "OFF" position, unplug the power supply from the electric socket and wait few minutes to allow the cloth to cool.
4. CLEANING DELICATE FLOORS
Before using the appliance on delicate surfaces, ensure that the part in contact with the surface is free from foreign bodies that could cause scratches.
Ensure that the points in Sections 1 and 2 have been followed.
4.1 Turn the ignition/steam-adjustment dial clockwise, from the "OFF" position to one of the three steam-adjustment positions; for this type of surface, use the Minimum level of steam.
The “steam ready” indicator light will come on to indicate that the appliance is on (heating).
WARNING: If the ignition/steam-adjustment dial (E) has been turned from the "OFF" position, by inserting the handle tube in the coupling hole, the appliance will start to emit steam. Always face the appliance downwards, not directing it towards people, animals or objects.
4.2 About 30 seconds after it has been turned on, the appliance will start to dispense steam
4.3 Clean the floors by moving the brush.
WARNING: Do not use the appliance without the cloth.
WARNING: To remove the cloth from the brush, turn the ignition/steam-adjustment dial to the "OFF" position, unplug the power supply from the electric socket and wait few minutes to allow the cloth to cool.
5. CLEANING WOODEN FLOORS
Before using the appliance on delicate surfaces, ensure that the part in contact with the surface is free from foreign bodies that could cause scratches.
Ensure that the points in Sections 1 and 2 have been followed.
5.1 Turn the ignition/steam-adjustment dial clockwise, from the "OFF" position to one of the three steam-adjustment positions; for this type of surface, use the Minimum level of steam.
The “steam ready” indicator light will come on to indicate that the appliance is on (heating).
WARNING: If the ignition/steam-adjustment dial (E) has been turned from the "OFF" position, by inserting the handle tube in the coupling hole, the appliance will start to emit steam. Always face the appliance downwards, not directing it towards people, animals or objects.
5.2 About 30 seconds after it has been turned on, the appliance will start to dispense steam 5.3 Clean the floors by moving the brush.
WARNING: Do not use the appliance without the cloth.
WARNING: To remove the cloth from the brush, turn the ignition/steam-adjustment dial to the "OFF" position, unplug the power supply from the electric socket and wait few minutes to allow the cloth to cool.
WARNING: For additional safety, test steam delivery on a hidden part, leave the steamed part to dry to ensure that no changes in colour or deformation have occurred.
6. CLEANING RUGS AND CARPETS
Before using the appliance on delicate surfaces, ensure that the part in contact with the surface is free from foreign bodies that could cause scratches.
Ensure that the points in Sections 1 and 2 have been followed.
6.1 To clean rugs and carpets, rest the brush (with the cloth attached) on the special frame so that it can slide over the surface (6).
6.2 Turn the ignition/steam-adjustment dial clockwise, from the "OFF" position to one of the three steam-adjustment positions; for this type of surface, use the Medium level of steam.
The “steam ready” indicator light will come on to indicate that the appliance is on (heating).
WARNING: If the ignition/steam-adjustment dial (E) has been turned from the "OFF" position, by inserting the handle tube in the coupling hole, the appliance will start to emit steam. Always face the appliance downwards, not directing it towards people, animals or objects.
6.3 About 30 seconds after it has been turned on, the appliance will start to dispense steam
6.3 Clean the floors by moving the brush.
WARNING: Do not use the appliance without the cloth.
WARNING: To remove the cloth from the brush, turn the ignition/steam-adjustment dial to the "OFF" position, unplug the power supply from the electric socket and wait few minutes to allow the cloth to cool.
WARNING: For additional safety, test steam delivery on a hidden part, leave the steamed part to dry to ensure that no changes in colour or deformation have occurred.
7. CLEANING WINDOWS, MIRRORS AND TILED WALLS
Make sure that chapter 1 has been completed. Only use the steam gun.
7.1 Connect the adapter to the steam gun.
To connect the accessory to the accessory-
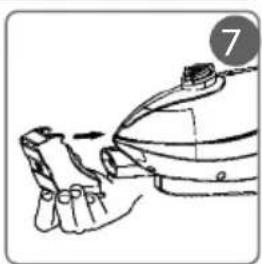
connection socket (1), just insert until the accessory-locking button clicks (7). Fit the cap to the adapter (8).
7.2 Attach the frame to the adaptor by inserting hook under slot B (9), then turn the frame (10), so that hook C is wedged into slot D (11).
To mount the frame to the adaptor, it is first necessary to attached the cap to the adaptor. Do not mount the frame without having first attached the cap.
7.3 Plug the power lead into a suitable socket with an earth connection.
7.4 Turn the ignition/steam-adjustment dial clockwise, from the "OFF" position to one of the three steam-adjustment positions; for this type of surface, use the Medium level of steam.
The “steam ready” indicator light will come on to indicate that the appliance is on (heating).
7.5 About 30 seconds after it has been turned on, the appliance will start to dispense steam.
7.6 Clean the surface.
Windows should be cleaned in 2 stages:
- Steam the surface to be cleaned to dissolve the dirt, using the steam control lever;
- Rub the window-cleaner frame over it to remove the dirt, without steaming.
8. CLEANING UPHOLSTERY, ARMCHAIRS, CUSHIONS
(mattresses, sofas, car interiors, etc.)
WARNING: Before cleaning leather or fabrics with steam, consult the manufacturer's instructions and always carry out a test on a hidden part or on sample of the material. Allow the steamer part to dry to make sure that no changes in colour or deformations have occurred.
Make sure that chapter 1 has been completed. Only use the steam gun.
8.1 Connect the adapter to the steam gun.
To connect the accessory to the accessory-connection socket (I), just insert until the accessory-locking button clicks (7). Fit the cap to the adapter (8).
8.2 Plug the power lead into a suitable socket with an earth connection.
8.3 Turn the ignition/steam-adjustment dial clockwise, from the "OFF" position to one of the three steam-adjustment positions; for this type of surface, use the Medium level of steam.
The “steam ready” indicator light will come on to indicate that the appliance is on (heating).
8.4 About 30 seconds after it has been turned on, the appliance will start to dispense steam.
8.5 Go over the surface to be cleaned. Use of steam allows the most efficient sanitising of the surface, dissolving dirt and removing grease, germs and mites; it also brightens the colour of fibres.
9. CLEANING BATHROOM FIXTURES, GROUTING AND KITCHEN WORKTOPS, BARBECUE
Make sure that chapter 1 has been completed.
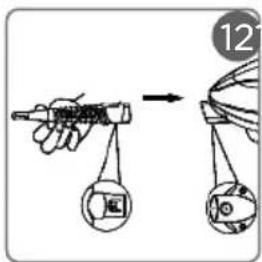
9.1 Connect the lance to the steam gun (12).
To connect the accessory to the accessory-connection socket, just insert until the accessory-locking button clicks.
9.2 Plug the power lead into a suitable socket with an earth connection.
9.3 Turn the ignition/steam-adjustment dial clockwise, from the "OFF" position to one of the three steam-adjustment positions; for this type of surface, we recommend the Maximum level of steam.
The “steam ready” indicator light will come on to indicate that the appliance is on (heating).
9.4 About 30 seconds after it has been turned on, the appliance will start to dispense steam.
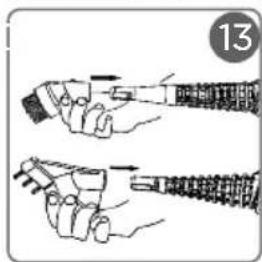
9.5 Thoroughly steam the surface to dissolve the dirt. Use a dry cloth to remove the dirt dissolved by the steam. It is possible to connect the lance to the round brush to remove encrusted dirt from very narrow surfaces. The grout accessory should be used for cleaning tile grouting (13).
10. CLEANING FURNITURE AND DELICATE SURFACES
WARNING: Before cleaning the surface, always do a test on a hidden part and show it reacts to the application of steam.
Make sure that chapter 1 has been completed.
10.1 Plug the power lead into a suitable socket with an earth connection.
10.2 Turn the ignition/steam-adjustment dial clockwise, from the "OFF" position to one of the three steam-adjustment positions; for this type of surface, use the Minimum level of steam.
The “steam ready” indicator light will come
on to indicate that the appliance is on (heating).
10.3 About 30 seconds after it has been turned on, the appliance will start to dispense steam.
10.4 Steam the cloth.
WARNING: Do not direct the steam jet directly onto surfaces.
10.5 Use the cloth previously steamed to clean the surface, avoiding prolonged use on the same spot.
11. OTHER GENERAL USES
WARNING: Before cleaning the surface, always do a test on a hidden part and show it reacts to the application of steam.
11.1 BRIGHTENING UP CURTAINS AND DRAPES
Mites and dust can be removed from curtains and drapes by steaming the fabric with just the handle. The steam is able to remove odours and brighten up colours, allowing the fabric to be washed less frequently.
For this surface, set the steam to the Minimum level.
11.2 REMOVING STAINS FROM CARPETS AND UPHOLSTERY

WARNING: Steam.
Risk of scalding!
Connect the lance, direct the steam directly onto the stain with the greatest angle possible (never vertically to the surface to be cleaned) and place a cloth beyond the stain to collect the dirt that has been “blown” away by the steam pressure.
For this surface, set the steam to the Minimum level.
11.3 TAKING CARE OF PLANTS AND HUMIDIFYING ROOMS
To take care of your house plants, remove the dust from the leaves using just the handle, vacuuming the surface: adjust the steam to the Minimum level and vacuum at a distance of 50 cm. Plants breathe better and will be cleaner and brighter. The steam can also be used to refresh rooms, especially those frequented by smokers: steam the room by directing the jet towards the ceiling and distributing evenly.
12. OUT OF WATER
The water level is always visible thanks to the transparent tank.
When the water inside the tank has been used up, steam will stop being released.
To restart operations just fill the water tank again as described in the chapter 1.
WARNING: This operation must always be done after having disconnected the appliance from the mains.
13. GENERAL MAINTENANCE
Ensure that the appliance is switched off and disconnected from the mains.
To clean the outside of the appliance, only use a damp cloth and tap water.
All accessories can be cleaned using running water, ensuring they are completely dry before the next use.
Do not use detergents of any type.
The cloths provided can be washed by following the instructions included on the label.
14. STORAGE
14.1 Turn off the appliance and disconnect from the mains electricity.
14.2 Completely empty the water tank to avoid water leaks.
14.3 Before detaching the cloth from the brush, wait a few minutes to allow it to cool.
14.4 Wind the power cable around the special cable rewinds.
Before using the appliance again, remember to unwind the power cable completely. The upper cable winder rotates 180° in order to wind up the power cable quickly.
WARNING: Do not keep the appliance connected to the power supply with the cable wound up.
- TROUBLESHOOTING
| PROBLEM CAUSE SOLUTION | ||
| The appliance does not turn on | No powerPower/adjustment dial in the OFF position. | Check that the appliance has been disconnected from the mains, as indicated in Section 2.Turn the power/adjustment dial to one of the three steam-adjustment settings. |
| Does not dispense steam | Boiler out of waterAppliance turned off. | Disconnect the appliance from the mains, fill the water tank and wait about 30 seconds.Switch on the appliance by turning the power/adjustment dial to one of the three steam-adjustment set- tings. |
| Steam is weak or inter- mittent. | Steam adjustment dial set to the Minimum level. | Increase the steam by turning the power/adjustment dial to a higher setting. |
| The product leaves too much water on the floor | Steam adjustment dial set to the Maximum level. | Reduce the quantity of steam to the minimum. If necessary, mo-mentarily stop the disbursement of steam, while continuing to rub the surface. |
| Floor marked/dirty Dirty | cloth Clean the floor again, | changing the cloth. |
| If problems persist or are not listed above, please contact a Polti Authorised Service Cen-tre (www.polti.co.uk for the updated list) or contact Customer Services. | ||
WARRANTY
This appliance is for domestic use only and is guaranteed for two years from the date of purchase against any defects present at the time the goods are handed over; the date of purchase must be proven via a proof of purchase document valid for tax purposes and issued by the seller.
For repairs, the appliance must be accompanied by proof of purchase.
This warranty does not affect the consumer rights deriving from European Directive 99/44/EC as regards some aspects of sale and warranty of consumer goods, rights which the consumer should uphold against to the seller.
This warranty is valid in the countries which adhere to European Directive 99/44/EC. For other countries, local regulations on warranties apply.
WHAT THE WARRANTY COVERS
During the warranty, Polti guarantees free repair of a product with a manufacturing or factory defect and, therefore, the client is not liable to pay for any work or materials. In case of irreparable defects, Polti may replace the product free of charge.
To avail of the warranty, the customer should visit one of the Polti Authorised Service Centres or contact Customer Services with proof of purchase from the seller valid for tax purposes and bearing the date of purchase of the product. Without proof of purchase and the relative date of purchase, the work will be charged for. Store the proof of purchase document safely for the whole duration of the warranty.
WHAT THE WARRANTY DOES NOT COVER
- Any fault or damage not deriving from a manufacturing defect.
- Any fault due to improper use or use other than that indicated in the instruction booklet, an integral part of the product sales contract.
- Any defect resulting from force majeure (fires, short circuits) or caused by third parties (tampering).
- Damage caused by the use of non-original Polti parts, and repairs or modifications performed by staff or service centres not authorised by Polti.
• Damage caused by the customer. - Parts (filter, brush, hose, battery, etc.) damaged by use (consumable goods) or normal wear and tear.
- Any damage caused by limescale.
- Defects resulting from lack of maintenance/cleaning according to the manufacturer's instructions.
- Assembly of non-original Polti accessories or those that have been modified or which are not suitable for the appliance.
Inappropriate use and/or use not compliant with the instructions for use and any other warnings or indications contained in this manual invalidates the warranty.
Polti takes no responsibility for any direct or indirect damage to people, objects or animals caused by non-compliance with the instructions indicated in this instruction booklet, regarding warnings for use and product maintenance.
To see the up-to-date list of the Polti Authorised Service Centres, visit the website www.polti.co.uk.
BIENVENUE DANS LE MONDE DE POLTI VAPORETTO
LE SYSTÈME DE NETTOYAGE INTEGRÉ QUI NETTOIE LES SURFACES DE LA MAISON EN UN SEUL PASSAGE, NEUTRALISANT ACARIENS, GERMES ET BACTÉRIES SANS L'AIDE DE PRODUITS DE NETTOYAGE CHIMIQUES.

DES ACCESSOIRES POUR TOUS LES BESOINS
ENREGISTREZ VOTRE PRODUIT
ACCESORIOS PARA TODAS LAS NECESIDADES
REGISTRE SU PRODUCTO
USO CORRECTO DEL PRODUCTO
ZUBEHOER FUER ALLE BEDUERFNISSE
REGISTRIEREN SIE IHR PRODUKT
ACESSÓRIOS PARA TODAS AS NECESSIDADES
REGISTE O SEU PRODUTO
POLTI®
NATURAL HOME FEELING
Discover the world and the complete offering of Polti on polti.co.uk, sign up for the newsletter to stay up to date on all the news and offers.
22070 Bulgarograsso (CO) - Italy
www.polti.com
Follow us:


- ACCESSORI PER TUTTE LE ESIGENZE
- ACCESSORIES FOR ALL NEEDS
- REGISTER YOUR PRODUCT
- IMPORTANT PRECAUTIONS FOR USE
- SAFETY SYMBOLS
- RISKS CONNECTED TO THE POWER SUPPLY - ELECTROCUTION
- RISKS DURING USE OF THE PRODUCT - INJURIES/SCALDING
- CORRECT USE OF THE PRODUCT
- INFORMATION FOR USERS
- WHICH WATER TO USE
- IMPORTANT
- PREPARATION
- PREPARATION FOR STEAM BROOM USE
- CLEANING HARD FLOORS
- CLEANING DELICATE FLOORS
- CLEANING WOODEN FLOORS
- CLEANING RUGS AND CARPETS
- CLEANING WINDOWS, MIRRORS AND TILED WALLS
- CLEANING UPHOLSTERY, ARMCHAIRS, CUSHIONS
- CLEANING BATHROOM FIXTURES, GROUTING AND KITCHEN WORKTOPS, BARBECUE
- CLEANING FURNITURE AND DELICATE SURFACES
- OTHER GENERAL USES
- 11.1 BRIGHTENING UP CURTAINS AND DRAPES
- 11.2 REMOVING STAINS FROM CARPETS AND UPHOLSTERY
- 11.3 TAKING CARE OF PLANTS AND HUMIDIFYING ROOMS
- OUT OF WATER
- GENERAL MAINTENANCE
- STORAGE
- WARRANTY
- WHAT THE WARRANTY COVERS
- WHAT THE WARRANTY DOES NOT COVER
- BIENVENUE DANS LE MONDE DE POLTI VAPORETTO
- ACCESORIOS PARA TODAS LAS NECESIDADES
- REGISTRE SU PRODUCTO
- USO CORRECTO DEL PRODUCTO
- ZUBEHOER FUER ALLE BEDUERFNISSE
- REGISTRIEREN SIE IHR PRODUKT
- ACESSÓRIOS PARA TODAS AS NECESSIDADES
- REGISTE O SEU PRODUTO
- POLTI®
Brand : POLTI
Model : Vaporetto SV205
Category : Steam cleaner