
Cairo Slim 2000w - Heating TAURUS - Free user manual and instructions
Find the device manual for free Cairo Slim 2000w TAURUS in PDF.


| Brand | Taurus |
| Model | Cairo Slim 2000w |
| Product type | Electric space heater |
| Power | 2000 W |
| Power supply | 220-240 V ~ 50/60 Hz |
| Dimensions (W x D x H) | Approximately 25 x 15 x 40 cm |
| Weight | Approximately 2.5 kg |
| Heating type | Convection with fan |
| Main functions | Adjustable thermostat, 2 power levels (1000/2000 W), fan-only mode |
| Timer | Not specified, likely absent |
| Remote control | Not included |
| Safety | Overheat protection, tip-over switch |
| Care and cleaning | Unplug before cleaning; clean with a damp cloth; do not immerse |
| Spare parts and repairability | Parts available via Taurus after-sales service; professional repair recommended |
| Protection rating | IP21 (protection against solid objects >12.5 mm and vertical water drops) |
| Insulation class | Class II (double insulation) |
| Usage | Indoor use only |
Frequently Asked Questions - Cairo Slim 2000w TAURUS
User questions about Cairo Slim 2000w TAURUS
0 question about this device. Answer the ones you know or ask your own.
Ask a new question about this device
Download the instructions for your Heating in PDF format for free! Find your manual Cairo Slim 2000w - TAURUS and take your electronic device back in hand. On this page are published all the documents necessary for the use of your device. Cairo Slim 2000w by TAURUS.
USER MANUAL Cairo Slim 2000w TAURUS
natural_image
Line drawing of a multi-tiered industrial printing machine with control panel and display unit (no text or symbols)
natural_image
Color palette bar with grayscale shades and a central crosshair (no text or symbols)

natural_image
Diagram of a pen inserted into a device component, labeled Fig.1 (no text or symbols on the diagram itself)

Español
Emisor Térmico
Cairo Slim

natural_image
Color palette bar with grayscale swatches and a black horizontal bar at bottom, no text or symbols present
L Interruptor principal
M Control remot
natural_image
Color palette bar with grayscale swatches and a black horizontal bar at the bottom (no text or symbols)natural_image
Color palette bar with grayscale swatches and a black horizontal bar at bottom, no text or symbols presentnatural_image
Color palette bar with grayscale swatches and a black horizontal bar at bottom, no text or symbols presentMany thanks for choosing to purchase a TAURUS brand product.
Thanks to its technology, design and operation and the fact that it exceeds the strictest quality standards, a fully satisfactory use and long product life can be assured.
Description
A LCD screen
B Operation/stand-by button
C Programming Button
D Button "+"
E Button "-"
F "Comfort" mode selector button
G "Economic" mode selector button
H "Anti frost" mode selector button
I Base feet (not compatible with wall support)
J Wall support (not compatible with base feet)
K Base feet bolts
L Main switch
M Remote Control
- Day of week indicator
- "Comfort" mode indicator
- "Comfort" mode indicator
- "Economic" mode indicator
- Ambient temperature and set temperature indicator
- Time band indicator
- Heating element on indicator
- Keypad locked indicator


Safety advice and warnings
- Read these instructions carefully before switching on the appliance and keep them for future reference. Failure to follow and observe these instructions may result in an accident.
Use or working environment:
- The appliance must not be placed below a power socket.
-The appliance should be used and kept over a flat and stable surface.
- When the appliance is positioned on its support, ensure that the surface on which the support is placed is stable.
- CAUTION: In order to prevent overheating, do not cover the appliance.
- Do not use the appliance in association with a programmer, timer or other device that automatically switches it on, as there is a risk of fire if the appliance is covered or incorrectly situated.
Electric safety:
- Do not use the appliance if the cable or plug is damaged.
- Ensure that the voltage indicated on the nameplate matches the


mains voltage before plugging in the appliance.
- Connect the appliance to a base with an earth socket withstanding a minimum of 16 amperes.
- The appliance's plug must fit into the mains socket properly. Do not alter the plug. Do not use plug adaptors.
- Do not use or store the appliance outdoors.
- Do not leave the appliance out in the rain or exposed to moisture. If water gets into the appliance, this will increase the risk of electric shock.
- If any of the appliance casings breaks, immediately disconnect the appliance from the mains to prevent the possibility of an electric shock.
- Do not use the appliance if it has fallen on the floor, if there are visible signs of damage or if it has a leak.
- CAUTION: Do not use the appliance near water.
- Do not use the appliance near bathtubs, showers or swimming pools.
- Do not force the electrical wire.
Do not force the power cord. Never use the power cord to lift up, carry or unplug the battery charger.
- Check the condition of the electrical connection cable. Damaged or tangled cables increase the risk of electric shock.
- If the appliance is used outdoors, use an electrical extension cord suitable for outdoor use.
- As an additional protection to the electrical supply for the appliance, it is advisable to have a differential current device with a maximum sensitivity of 30mA.
Ask for advice from a competent installer.
- Do not touch the plug with wet hands.
Personal safety:
- Do not use the appliance, in the case persons insensitive to heat (the appliance has heated surfaces).
- Do not touch metal parts or the body when it is operating, as it may cause serious burns.
Use and care:
- Do not use the appliance if the on/off switch does not work.
- Do not move the appliance while in use.
- This appliance is only for domestic use, not for industrial or professional use.
- Ensure that this product is not used by the disabled, children or people unused to its handling.
- Cleaning and user maintenance shall not be made by children unless they are supervised
- This appliance is not a toy. Children should be supervised to ensure that they do not play with the appliance.
- This appliance should be stored out of reach of children and/or the disabled.
- Do not store or transport the appliance if it is still hot.
- Make sure that dust, dirt or other foreign objects do not block the fan grill on the appliance.
- Do not use the appliance to dry textiles of any kind.
- Any misuse or failure to follow the instructions for use renders the


guarantee and the manufacturer's liability null and void.
Installation
- Be sure to remove all packaging material from inside the appliance.
- Respect the legal provisions concerning safety distances from other elements such as pipes, electrical connections, etc.
- Ensure that the appliance is level with respect to the floor.
- The appliance requires suitable ventilation in order to work properly. Leave a space of 15 cm between walls or other obstacles and 20cm from the floor. (Fig 2)
- Do not cover or obstruct any of the openings of the appliance.
- Do not cover or obstruct the sides of the appliance, leave a minimum space of 2cm around the appliance.
- To achieve the highest efficiency from the appliance and so as to be able to install the appliance on a cold wall (an exterior wall) and below a window. But never obstructing or covering a ventilation area.
- The appliance should work well with its wall support attached or with its base/feet attached.
Assembling the wall bracket:
- The appliance has a wall support (J) to support the product.
- Fix the wall support as you think appropriate, using plugs.
- Taking into account the separation distances mentioned above, place the wall support in the required position and mark the drilling points on the wall (fig 1).
- Drill on the marks and introduce the plugs (fig 2).
- Fit the support, lining up its holes with those of the plugs, and screw on (Fig. 3).
- Make sure that the bracket is firmly fixed; it should be able to support twice the weight of the appliance.
- Fit the appliance into the wall support.
Fitting the base feet
- The appliance has some base feet (I) on which the product can be supported.
- To assemble the base feet, place the appliance face down.
- Position the base feet on the body of the appliance using the screws (K) (provided with the appliance)
- Stand the appliance up again so as to check that the base feet work properly.

Instructions for use
Before use:
- Make sure that all the product's packaging has been removed.
Use:
- Unroll the cable completely before plugging it in.
- Connect the appliance to the mains.
- Turn the appliance on using the on/off switch.
The transmitter comes on, going into stand-by mode.
- The ambient temperature will appear in the screen.
Press the operation/stand-by button to turn the appliance on.
When it is switched on, the appliance will start in the last mode used. If it is the first time you are using it, the following factory configuration will appear:
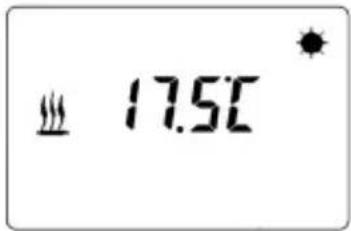
Operation selection
The transmitter offers 2 possibilities for operation: Manual or Automatic.
Use in Manual Mode
The appliance offers the possibility of Manual operation, without the need for programming.
- Press the "Comfort", "Economic" or "Anti frost" selector button as desired.
- Press "+" or "-" to select the set temperature. While you are selecting the set temperature the letter "C" will appear flashing.
Once the set temperature has been selected, this will disappear from the screen and the ambient temperature will appear once more.
- The symbol will disappear from the screen when the set temperature is reached.
- When the temperature drops 3 degrees the symbol will reappear and the appliance will function automatically once more.
Use in Automatic Mode
- To use the appliance in Automatic mode press the programming button.
If it is the first time you are using it, the following factory configuration will appear:

Establishing the set temperatures
The appliance offers the possibility of operation according to programming established depending on the day, time and operation modes: Comfort, Economy and Defrost.
- Before programming the appliance you must establish the set temperature for the operating modes: Comfort, Economic and Anti frost.
- Press the "Comfort", "Economic" or "Anti frost" selector button as desired.
- Press “+” or “-” to select the set temperature. While you are selecting the set temperature the letter “C” will appear flashing.
- Once the set temperature has been selected, this will disappear from the screen and the ambient temperature will appear once more.
- The range for the Comfort temperature runs from 5° to 35°.
- The range for the Economy temperature runs from 5° to 25°.
- The temperature range of the Anti frost mode varies between 5° and 15°.
Programming
A day (24 hours) has been divided equally into segments, represented on the screen by small time fractions. Selecting an operating mode for each hour will represent a day of programming.
Each hour has a set temperature assigned to it - the ones marked with a double bar represent comfort mode, with a single bar representing economy mode. The empty hours keep the set temperature for defrost mode.
Comfort Mode
Economic Mode
Anti frost mode
- To set the weekly programming, press the programming button for a few seconds.
- The digits of the time will appear in the screen. Use the “+” and “-” buttons to go forward or back until the clock reaches the current time and confirm by pressing the programming button. Repeat the same steps to adjust the minutes.
- Day 1 (Monday) will appear in the screen. Use the “+” or “-” buttons to access the day of the week you wish to programme and confirm by pressing the programming button.
The following message will appear in the screen:

- The first time fraction will begin to flash. Select the desired operating mode and press the "+" button to go on to the next time fraction.
Repeat the same step for the other time fractions.
- Once all the intervals have been set for the desired day, confirm by pressing the programming button and the programming will automatically advance to the next day.
- Repeat the above steps to programme the other days of the week.
- To finalise the programming, press the programming button.
CAUTION: During programming of the appliance, the heating elements will not work.
- When the appliance is operating in programming mode and you wish work in manual mode, press the operation/standby button twice, then press the programming button.
- To go back to working in programming mode, press the programming button.
Backlit screen
The appliance has a backlit LCD screen to make it easier to use.
When the appliance is switched on, pressing any button will light the screen.
Locking the keyboard
- To prevent the appliance from accidentally de-programming during cleaning, it has an automatic keypad lock which activates after 1 minute of use.
- To re-enable the keypad, press the “ - ” button for 5 seconds.
Once you hace finished using the appliance:
- Put the appliance on stand-by, activating the operation/stand-by button.
- Turn the appliance off, using the on/off switch.
- Unplug the appliance to the mains.
- Clean the appliance
Safety thermal protector:
- The appliance has a safety device, which protects the appliance from overheating.
When the appliance switches itself on and off repeatedly, for reasons other than the thermostat control, check to ensure that there are no obstacles that impede correct air entry or expulsion.
- If the appliance turns itself off and does not switch itself on again, disconnect it from the mains supply, and wait for approximately 15 minutes before reconnecting. If the machine does not start again seek authorised technical assistance.

Cleaning
Disconnect the appliance from the mains and let it cool before undertaking any cleaning task.
- Clean the electrical equipment and the mains connection with a damp cloth and dry. DO NOT IMMERSE IN WATER OR ANY OTHER LIQUID.
- Clean the equipment with a damp cloth with a few drops of washing-up liquid and then dry.
- Do not use solvents, or products with an acid or base pH such as bleach, or abrasive products, for cleaning the appliance.
- Do not let water or any other liquid get into the air vents to avoid damage to the inner parts of the appliance.
- Do not submerge the appliance in water or any other liquid, or place it under a running tap.

Anomalies and repair
- Take the appliance to an authorised technical support service if problems arise. Do not try to dismantle or repair without assistance, as this may be dangerous.
- If the connection to the mains has been damaged, it must be replaced and you should proceed as you would in the case of damage.
For EU product versions and/or in case that it is requested in your country:

natural_image
Color palette bar with grayscale swatches and a black horizontal bar at bottom, no text or symbols presentEcology and recyclability of the product

This symbol means that in case you wish to dispose of the product once its working life has ended, take it to an authorised waste agent for the selective collection of
waste electrical and electronic equipment (WEEE)

This symbol indicates that the appliance must not be covered.
This device complies with Directive
2006/95/EC on Electromagne-
tic Compatibility, with Directive
2004/108/EC on Electromagnetic.


Français
Emetteur Thermique
Cairo Slim

Cher Client,
natural_image
Color palette bar with grayscale swatches and a black horizontal bar at the bottom (no text or symbols)
natural_image
Color palette bar with grayscale swatches and a black horizontal bar at the bottom (no text or symbols)natural_image
Color palette bar with grayscale swatches and a black horizontal bar at the bottom (no text or symbols)werden kann.
natural_image
Color palette bar with grayscale swatches and a black horizontal bar at bottom, no text or symbols presentnatural_image
Color palette bar with grayscale swatches and a black horizontal bar at the bottom (no text or symbols)natural_image
Color palette bar with grayscale swatches and a black horizontal bar at bottom, no text or symbols presentvas interiores do aparelho.
natural_image
Color palette bar with grayscale swatches and a black horizontal bar at bottom, no text or symbols present
Gebruiksaanwijzing
natural_image
Color palette bar with grayscale swatches and a black horizontal bar at bottom (no text or symbols)Economisch en Antivries.
natural_image
Color palette bar with grayscale swatches and a black horizontal bar at bottom (no text or symbols)natural_image
Color palette bar with grayscale swatches and a black horizontal bar at the bottom (no text or symbols)natural_image
Color palette bar with grayscale swatches and a black horizontal bar at bottom, no text or symbols presentnatural_image
Color palette bar with grayscale swatches and a black horizontal bar at bottom (no text or symbols)Calorifer Cairo Slim

Stimate client,
Va multumim ca ati ales un produs electrocasnic marca TAURUS.
natural_image
Color palette bar with grayscale swatches and a black horizontal bar at the bottom (no text or symbols)culos. Duceti aparatul la un service autorizat.
natural_image
Color palette bar with grayscale swatches and a black horizontal bar at bottom, no text or symbols present


- Español
- Emisor Térmico
- Cairo Slim
- Description
- Safety advice and warnings
- Use or working environment:
- Electric safety:
- Personal safety:
- Use and care:
- Installation
- Assembling the wall bracket:
- Fitting the base feet
- Instructions for use
- Before use:
- Use:
- Operation selection
- Use in Manual Mode
- Use in Automatic Mode
- Establishing the set temperatures
- Programming
- Backlit screen
- Locking the keyboard
- Once you hace finished using the appliance:
- Safety thermal protector:
- Cleaning
- Anomalies and repair
- Ecology and recyclability of the product
- Français
- Emetteur Thermique
- Cher Client,
- Gebruiksaanwijzing
- Calorifer Cairo Slim
- Stimate client,
Brand : TAURUS
Model : Cairo Slim 2000w
Category : Heating