OPN2001 - Barcode Reader Opticon - Free user manual and instructions
Find the device manual for free OPN2001 Opticon in PDF.

| Product Type | Barcode Reader (Pocket Memory Scanner) |
| Brand | Opticon |
| Model | OPN2001 |
| Connectivity | USB (mini USB connector) |
| Power Source | Internal rechargeable battery, charged via USB |
| Charging Time | Approximately 2.5 hours |
| Battery Indicator | Red (charging), Green (fully charged) |
| Scan Button | Press and hold to scan barcodes; stores in memory |
| Clear Button | Press and hold to delete a scanned barcode from memory |
| Special Functions | Clear all data (hold Clear 6 sec), Toggle buzzer (hold Scan 10 sec), Reset to default (hold both 10 sec) |
| Memory | Stores barcodes; can clear all data |
| Laser Type | Class I laser product |
| Operating Temperature | 0°C to 40°C (avoid freezing and high heat) |
| Cleaning | Wipe exterior with soft, lightly moist cloth; avoid scratching reading window |
| Maintenance | No user-serviceable parts; consult dealer for malfunction |
| Accessories Included | Hand strap, USB cable |
| Compatibility | Windows XP/2000 (requires driver installation) |
| Weight | Approximately 100 g |
| Dimensions (approx.) | 120 x 40 x 25 mm |
| Warranty | 2 years covering defects in material and workmanship |
| Buzzer | Audio feedback for good read, errors, and function toggling |
| LED Indicators | Multi-color (green, orange, red) for scan/clear and battery status |
| Disposal | Recycle as electronic product; do not dispose in household waste |
Frequently Asked Questions - OPN2001 Opticon
User questions about OPN2001 Opticon
0 question about this device. Answer the ones you know or ask your own.
Ask a new question about this device
Download the instructions for your Barcode Reader in PDF format for free! Find your manual OPN2001 - Opticon and take your electronic device back in hand. On this page are published all the documents necessary for the use of your device. OPN2001 by Opticon.
USER MANUAL OPN2001 Opticon
natural_image
Top-down view of a black OP TICON smartphone with visible internal components (no text or symbols on body)OPTICON
CAUTION: This user's manual may be revised or withdrawn at any time without prior notice.
Copyright 2006
Opticon Sensors Europe B.V.
All rights reserved.
This manual may not, in whole or in part, be copied, photocopied, reproduced, translated or converted to any electronic or machine readable form without prior written consent of Opticon Sensors Europe B.V.
BY OPENING THE PACKAGE OF THIS PRODUCT YOU AGREE TO BECOME BOUND BY THE LIABILITY AND WARRANTY CONDITIONS.
IN ALL CIRCUMSTANCES THIS MANUAL SHOULD BE READ ATTENTIVELY, BEFORE INSTALLING AND/OR USING THE PRODUCT.
Serial number
A serial number appears on all Opticon products. This official registration number is strictly related to the device purchased. Make sure that the serial number appearing on your Opticon device has not been removed. Removing the serial number might affect the warranty conditions and liability disadvantageously, so please be strict at maintaining the label with serial number on the Opticon product.
Warranty / Warranty period / Liability
Unless otherwise agreed in a contract, all Opticon products are warranted for a period of two years after purchase, covering defects in material and workmanship. Opticon will repair or, at its opinion, replace products that prove to be defective in material or workmanship under proper use during the warranty period. Opticon will not be liable in cases where modifications are made by the customer. In such case the standard repair charge will be applicable. The standard charge for repair will also be applicable in cases where no defect is found at all. These rules also apply for products that are still under warranty. Under no circumstance Opticon Sensors Europe B.V. will be liable for any direct, indirect, consequential or incidental damages arising out of use or inability to use both the hardware and software, even if Opticon has been informed about the possibility of such damages.
Packaging
The packing materials are not harmful for the environment. We recommend that you save all packing materials, as it should be used whenever you need to transport your scanner (eg. for service). Damage caused by improper repacking is not covered by the warranty.
Trademark
Trademarks used are property of their respective owners.
Version 01-2006
Table of contents
1 Introduction 4
1.1 Unpacking ....4
1.2 Detailed view....4
2 Handling Instructions....5
3 Getting Started....6
3.1 Scan barcodes (Add items to memory)....6
3.2 Clear Barcodes (Remove items from memory) 6
3.3 Special functions....7
3.3.1 Clear all data (Remove all items from memory) 7
3.3.2 Toggle buzzer ON/OFF 7
3.3.3 Reset to default 7
4 Install the USB driver for Windows XP/2000 8
5 Connect the Scanner to the PC....8
6 Charging the battery....10
7 Buzzer and LED indicators....10
1 Introduction
The OPN 2001 pocket memory scanner makes barcode data collection simple for anyone. Using this scanner is straightforward – scan a barcode and it will be stored automatically. When you make a mistake, the Clear button allows you to re-scan the barcode in order to remove the item from memory. For easy data transfer to a computer, the device is equipped with a standard USB port, which is also used to charge the internal battery.
1.1 Unpacking
The OPN 2001 is supplied with a hand strap and an USB cable.
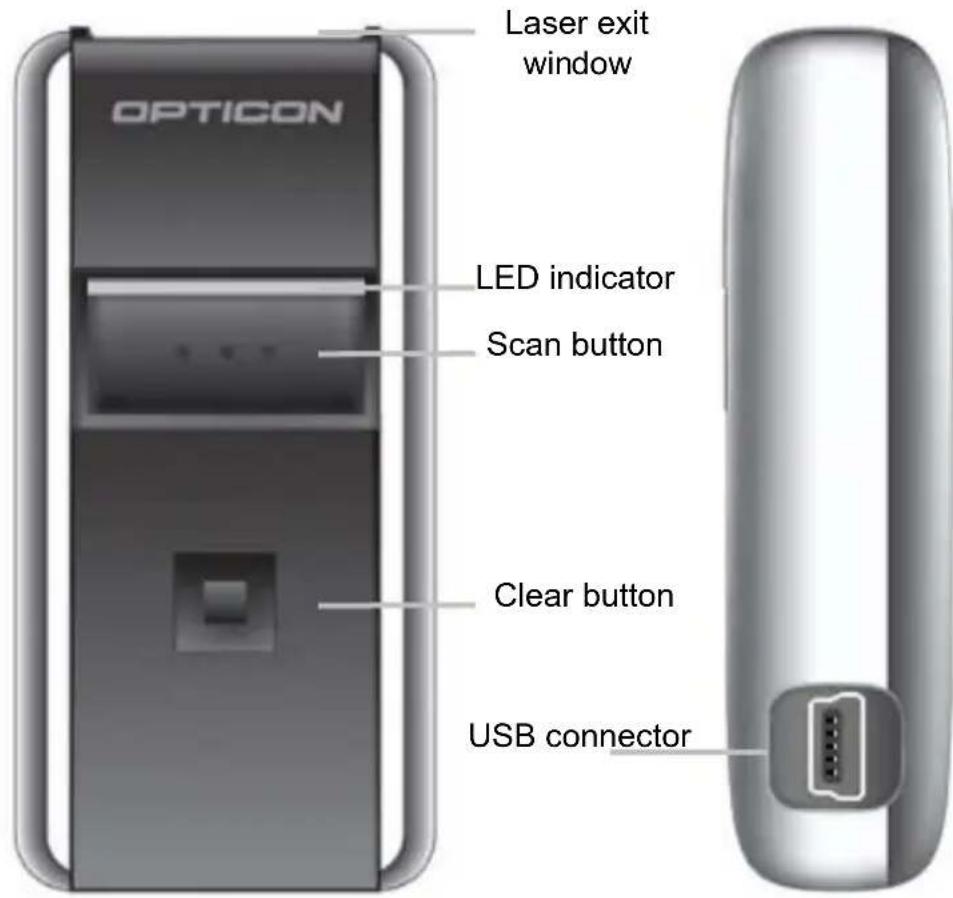
1.2 Detailed view
2 Handling Instructions
Temperature conditions
- Do not use in freezing area's.
- Do not use in area's with temperatures higher than 40^
- Do not expose the scanner for a long time to direct sunlight, or near direct heat.
- Avoid contact with water.
Shock
- Do not expose the scanner to strong impact, do not throw or drop the scanner from great heights.
- Do not present mechanical shocks to the product.
- Do not leave the bar code data collector in an area where static charge is accumulated, or near devices where electromagnetic emission is generated.
Cleaning
- Clean the exterior of the scanner by wiping it with a soft, lightly moist cloth.
- When cleaning the reading window gently wipe the window without causing scratches to maintain optimum reading performance.
- Do not use a high pressure cleaning method. If a cleaning liquid is needed, only use one drop of a non-abrasive household liquid.
Maintenance
- There are no user-serviceable parts inside the scanner. So do not try to take it apart.
- In case of serious malfunction, please consult your local dealer or Opticon.
Recycling & Disposal instructions

The icon on the product or package indicates that the product should not be thrown in the home waste bin. The product must be recycled as an electronic product. For proper treatment of end-of-life products consult the section for Environmental care on www.opticon.com.
3 Getting Started
3.1 Scan barcodes (Add items to memory)
natural_image
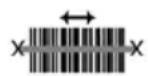
Exterior view of a modern office building (no signage)Point the scanner towards a barcode (such as the sample code as shown below) and press and hold the Scan button. Make sure that the laser beam covers the whole barcode including a fair white margin. When the barcode is not decoded immediately, then move the scanner towards the barcode. Make sure that the scanner is held at a slight angle.

While the scanner is reading, the laser is visible, and the green LED is flashing. After a few seconds, the laser is shut off, and the LED starts flashing orange, indicating that you should release the button and try again.
Note: The OPM2001 is a Class I laser product conforming to the strictest laser safety standards. However, we recommend you to avoid looking directly into the laser beam.
3.2 Clear Barcodes (Remove items from memory)

natural_image
Exterior view of a modern office building (no signage)Point the scanner towards a barcode and press and hold the small Clear button. When the barcode is not decoded immediately, then move the scanner towards the barcode and make sure that the scanner is held at a slight angle.
While the scanner is reading, the laser is visible, and the orange LED is flashing. When the barcode is decoded, the scanner searches in its memory for this barcode, and deletes the first match (if there are more of these barcodes, they are not deleted). If the barcode was not found in memory, the scanner will issue a low error beep.
3.3 Special functions
The two buttons both have a special function, which is activated when the button is pressed for a longer time:
3.3.1 Clear all data
(Remove all items from memory)
When the Clear button is pressed and held pressed for at least 6 seconds, the scanner clears all scanned items from its memory.
Note: Aim the scanner away from a barcode when performing this action.
3.3.2 Toggle buzzer ON/OFF
When the Scan button is pressed and held pressed for at least 10 seconds, the "good read" buzzer is switched on when it was off; Otherwise it is switched off. The scanner sounds its buzzer when it is switched on, no sound is heard when it is switched off.
3.3.3 Reset to default
When both the Scan button and the Clear button are pressed and held pressed for at least 10 seconds, the scanner sets all configuration variables to factory default and clears all the data.
4 Install the USB driver for Windows XP/2000
Please install the USB driver software before connecting the scanner to your PC.
You can obtain the USB driver for this product by downloading it from the support section of the Opticon website; alternatively contact your Opticon representative. Once downloaded, start the setup program. It then shows the following screen:
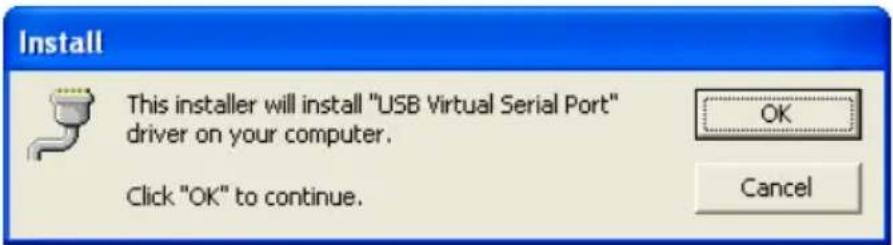
After clicking the OK button, wait a few seconds while the installation is completed.
5 Connect the Scanner to the PC.
Connect the supplied cable to the scanner. The scanner has a so called mini USB connector, which is used for charging and for data communication. The mini USB connector only fits in one position, so when it does not easily slide into the scanner, try to hold the connector upside down.
Now that the cable is connected to the scanner, connect the other side to your computer. Refer to the manual of your PC on how to do this. An A-type USB connector also fits in one position only, so when it does not easily slide into the PC, try to hold the connector upside down.
When the battery is completely empty, it can take a while before it is charged enough to power the scanner and thus for Windows to notice that the scanner has been connected.
When the scanner is connected to the PC for the first time, Windows will show you a dialog box, telling you that it has found new hardware - a barcode scanner - and that driver software is required:
Keep the selection to "Install the software automatically" and click on the Next button. The software will be installed and when the following screen is shown, a click on the Finish button finalizes the installation:
6 Charging the battery
The scanner battery is charged via the USB interface, so connect the scanner to the PC and switch the PC on. The charging process is completely controlled by the scanner, and it will automatically switch off the charging current when the battery is full.
It takes about 2.5 hours to completely charge an empty battery. While the battery is being charged, the LED indicator will be red. When the battery is fully charged, the indicator becomes green.
7 Buzzer and LED indicators
Charge indicators
The descriptions below are indicated when the product is connected to the PC.
| Red – Continuous:The battery is being charged. |
| Green – Continuous:The battery is fully charged. |
| Red / Green flashing:The battery may be defective. Return the scanner to the nearest Opticon service centre. |
Scan / Clear LED indicators
| Green - flashing:The Scan button is pressed and the laser is on. When the laser is aimed at a barcode, the code will be read and stored in memory. |
| Green - solid:A barcode was successfully read and stored in memory. |
| Red - solid:While scanning: The barcode was read but the memory is full, so it can NOT be stored in memory.While clearing: The barcode was read but it could not be found in memory so it can NOT be deleted. |
| Orange - flashing:The Clear button is pressed. When the laser is aimed at a barcode, the code will be read and deleted from memory. |
| Orange - solid:The Clear button is pressed for more then 6 seconds. All data stored in memory will now be cleared. |
Buzzer indicators
| MEDIUM, HIGH, MEDIUM:While scanning: The barcode is added to memory.While clearing: The “Clear all codes” sequence has been performed.While setting a function: The buzzer is ‘toggled on’.While the scanner is connected to the PC: The scanner is connected to the PC, and the connect (or disconnect) command has been received: |
| MEDIUM, LOW, MEDIUM:While the scanner is connected to the PC: The scanner is disconnected from the PC, while the application did not disconnect the scanner. |
| 2 x LOW, MEDIUM, LOW:“Set all default” sequence has been performed. |
| LOW, MEDIUM:The barcode is deleted from memory:. |
| A long LOW:The barcode was not previously scanned, so it is NOT deleted. |
| HIGH, LOW:The memory is FULL, the barcode is NOT added. |
- Copyright 2006
- Opticon Sensors Europe B.V.
- Serial number
- Warranty / Warranty period / Liability
- Packaging
- Trademark
- Table of contents
- Introduction
- Unpacking
- Detailed view
- Handling Instructions
- Temperature conditions
- Shock
- Cleaning
- Maintenance
- Recycling & Disposal instructions
- Getting Started
- Scan barcodes (Add items to memory)
- Clear Barcodes (Remove items from memory)
- Special functions
- Clear all data
- (Remove all items from memory)
- Toggle buzzer ON/OFF
- Reset to default
- Install the USB driver for Windows XP/2000
- Connect the Scanner to the PC.
- Charging the battery
- Buzzer and LED indicators
- Charge indicators
Brand : Opticon
Model : OPN2001
Category : Barcode Reader