
USB 2.0 Ultimate Card Reader int. 3.5 - Memory reader Equip - Free user manual and instructions
Find the device manual for free USB 2.0 Ultimate Card Reader int. 3.5 Equip in PDF.


| Product Type | Internal Card Reader |
| Brand | Equip |
| Model | USB 2.0 Ultimate Card Reader int. 3.5 |
| Interface | USB 2.0 (480 Mbps) |
| Supported Memory Cards | SD, SDHC, SDXC, microSD, microSDHC, microSDXC, MMC, MS, MS Pro, MS Duo, CF, Microdrive, SmartMedia, xD-Picture Card, Memory Stick Micro (M2) |
| Form Factor | 3.5-inch internal drive bay |
| Dimensions (W x H x D) | 101.6 x 25.4 x 146 mm (4 x 1 x 5.75 in) |
| Weight | Approx. 150 g (5.3 oz) |
| Power Source | USB bus power; internal power connector (optional) |
| LED Indicator | Activity LED (blue/red) |
| Operating System Compatibility | Windows 7, 8, 10, 11; macOS 10.10+; Linux |
| Color | Black |
| Material | Metal casing, plastic bezel |
| Hot-Swappable | Yes |
| Installation | Internal 3.5-inch bay; requires USB motherboard header or rear USB port |
| Included Accessories | Mounting screws, USB cable, user manual |
Frequently Asked Questions - USB 2.0 Ultimate Card Reader int. 3.5 Equip
User questions about USB 2.0 Ultimate Card Reader int. 3.5 Equip
0 question about this device. Answer the ones you know or ask your own.
Ask a new question about this device
Download the instructions for your Memory reader in PDF format for free! Find your manual USB 2.0 Ultimate Card Reader int. 3.5 - Equip and take your electronic device back in hand. On this page are published all the documents necessary for the use of your device. USB 2.0 Ultimate Card Reader int. 3.5 by Equip.
USER MANUAL USB 2.0 Ultimate Card Reader int. 3.5 Equip
USB 2.0 Ultimate Card Reader int. 3.5"
english
Content
- Package contents 3
- Layout 3
- Hardware Installation 3
- 4-pin USB Connector 4
- USB Pin-out Header 4
- Software Installation 5
- Functions of Application Software 6
A. The File Management Function 6
B. The File-Security Function 6
C. The Private Disk Function 7
D. Online Update Function 8
1. Package Contents
• USB2.0 Ultimate Card Reader internal 3,5"
- Setup CD
- Set of screws
- Front bezel in black
- Front bezel in silver
2. Layout

3. Hardware Installation
- Turn OFF the power to your computer and all connected peripheral devices.
- Unplug the power cord from the back of the computer.
- Remove the computer's cover.
- Select an available 3.5" drive bay for mounting the Ultimate Card Reader/Writer, remove the cover plate from the selected drive bay. Secure the Reader/Writer to the drive bay by using the supplied mounting screws.
- Connect the Ultimate Card Reader/Writer with the attached USB cable directly to the motherboard.
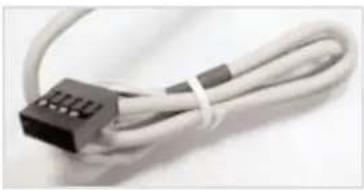
4. 4-pin USB Connector
natural_image
Close-up of a black USB connector with white wires, no visible text or symbolsNote:
The 4-pin USB Connector is keyed to plug into the 4-pin row of a USB Pin-out Header. Make sure that the Red wire is plugged into the +5VDC pin on the header.
5. USB Pin-out Header
On most motherboards, the internal USB Pin-out Header consists of 9 pins arranged in 2 rows; each header allows for 2 USB connections (i.e. USB1 and USB2).
Normally, the pins for USB1 and USB2 are in separate rows.
Pin Assignments


red
white
green
black
6. Software Installation
Special Notices:
You MUST install driver before you start to using this card reader.
Plug in your card reader to hardware, and then start to install software.
a. Put the Driver CD into your DVD/CD Drive and double-click the "setup.exe" program to start the installation procedure.

b. Follow the prompted steps to finish the installation.
c. Please re-start your PC to complete the installation.

d. After re-start, you can now start to enjoy the Card Manager application software. Don't forget to insert a memory card first.
7. Functions of Card Manager ™ application software
A. The File Management Function
a. When you insert any memory card into the card reader, the software will automatically detect the memory card and the Multi-Window will pop-up.
b. The left window shows the files of the memory card you just inserted. The right window shows the files of system disk (it's default is "c" disk).
c. Most of common functions in Windows are also available in Card Manager, such like Right-Click menu, View Menu, New Folder, Upper Layer, Cut/Copy/Paste hotkeys, etc.

Image 2.1
d. If more than one memory card is inserted, select the memory card at the path windows as shown in below screenshot to view its contents (image 2.1).
B. The File-Security Function
Encryption (image 2.2)
a. Select the files or folders you want to encrypt.
b. Right-click and select "Add to C-Media Encryption Box", or click the Encrypt hotkey. The file or folders you select will be encrypted into "Security Box".

Image 2.2
Decryption (image 2.3)
a. Click the "Security Box" and input the password.
b. Select the files or folders you want to decrypt, then click decrypt bottom on the dialog box.

Image 2.3
C. The Private Disk Function
Private disk function allows you to create a personal hard disk with card-key protection. Only when the specified card-key is inserted, your private disk can be seen. Other users who have no card-key can not see your disk.
a. Click the hotkey of "Private Disk" (image 2.4).
b. Please specify the size, label, card-key and location you want to build the personal disk.
c. Click "Make" and key-in a password.
d. Please also set a rescue password, that can remind you your password, in case that you might have forgotten your password.
e. Now you can see the private hard disc.
f. Click the hotkey "Private Disk" to manage your private hard disc (image 2.5).

Image 2.4

Image 2.5
D. Online Update Function
Online update function allows you to update your card reader with the most update card specification (please note that some major specification update can not be made due to hardware limitation).
Therefore please visit www.equip-info.net and search for 128567.
Under "Downloads" you will find the newest driver for your card reader.

- USB 2.0 Ultimate Card Reader int. 3.5"
- Content
- Package Contents
- Layout
- Hardware Installation
- 4-pin USB Connector
- Note:
- USB Pin-out Header
- Software Installation
- Special Notices:
- Functions of Card Manager ™ application software
- The File Management Function
- The File-Security Function
- Encryption (image 2.2)
- Decryption (image 2.3)
- The Private Disk Function
- Online Update Function
Brand : Equip
Model : USB 2.0 Ultimate Card Reader int. 3.5
Category : Memory reader