
Cocoon Portable DSD300BKE2 - Docking Station DENON - Free user manual and instructions
Find the device manual for free Cocoon Portable DSD300BKE2 DENON in PDF.


| Product Type | Portable Docking Station with Speaker |
| Brand | Denon |
| Model | Cocoon Portable DSD300BKE2 |
| Dimensions (W x H x D) | Approx. 10.6 x 4.3 x 5.6 inches (270 x 110 x 142 mm) |
| Weight | Approx. 2.9 lbs (1.3 kg) |
| Power Supply | AC adapter (100-240V, 50/60 Hz) or built-in rechargeable battery |
| Battery Life | Up to 8 hours of playback |
| Charging Time | Approx. 3 hours |
| Audio Output | 2 x 20W (total 40W) with bass reflex |
| Speaker Configuration | Stereo with passive radiators |
| Bluetooth Version | Bluetooth 4.2 (A2DP, AVRCP) |
| Supported Audio Formats | MP3, WMA, AAC, FLAC, WAV |
| Docking Compatibility | Apple Lightning connector (30-pin adapter not included) |
| Additional Inputs | 3.5mm auxiliary input, USB port for charging devices |
| Remote Control | Included wireless remote |
| FM Tuner | Yes, with 30 station presets |
| Alarm Function | Dual alarm with sleep timer |
| Display | LCD screen with white backlight |
| Cleaning Instructions | Wipe with a soft dry cloth; avoid liquids and abrasives |
| Safety Features | Overcharge protection, thermal shutdown, auto power-off |
| Spare Parts Availability | Contact Denon support for replacement battery, remote, and adapter |
| Repairability Index | 6.5/10 (moderate repairability, battery replaceable) |
| Warranty | 1 year limited manufacturer warranty |
| Compliance | FCC, CE, RoHS |
Frequently Asked Questions - Cocoon Portable DSD300BKE2 DENON
User questions about Cocoon Portable DSD300BKE2 DENON
0 question about this device. Answer the ones you know or ask your own.
Ask a new question about this device
Download the instructions for your Docking Station in PDF format for free! Find your manual Cocoon Portable DSD300BKE2 - DENON and take your electronic device back in hand. On this page are published all the documents necessary for the use of your device. Cocoon Portable DSD300BKE2 by DENON.
USER MANUAL Cocoon Portable DSD300BKE2 DENON
The lightning flash with arrowhead symbol, within an equilateral triangle, is intended to alert the user to the presence of uninsulated "dangerous voltage" within the product's enclosure that may be of sufficient magnitude to constitute a risk of electric shock to persons.

The exclamation point within an equilateral triangle is intended to slert the user to the presence of important operating and maintenance (servicing) instructions in the literature accompanying the appliance.
WARNING:
TO REDUCE THE RISK OF FIRE OR ELECTRIC SHOCK, DO NOT EXPOSE THIS APPLIANCE TO RAIN OR MOISTURE.
IMPORTANT SAFETY INSTRUCTIONS
- Read these instructions.
- Keep these instructions.
- Heed all warnings.
- Follow all instructions.
- Do not use this apparatus near water.
- Clean only with dry cloth
- Do not block any ventilation openings.
Install in accordance with the manufacturer's instructions. - Do not install near any heat sources such as radiators, heat registers, stoves, or other apparatus (including amplifiers) that produce heat.
- Protect the power cord from being walked on or pinched particularly at plugs, convenience receptacles, and the point where they exit from the apparatus.
- Only use attachments/accessories specified by the manufacturer.
- Use only with the cart, stand, tripod, bracket, or table specified by the manufacturer, or sold with the apparatus. When a cart is used, use caution when moving the cart apparatus combination to avoid injury from tip-over.
- Unplug this apparatus during lightning storms or when unused for long periods of time.
- Refer all servicing to qualified service personnel. Servicing is required when the apparatus has been damaged in any way, such as power-supply cord or plug is damaged, liquid has been spilled or objects have fallen into the apparatus, the apparatus has been exposed to rain or moisture, does not operate normally, or has been dropped.
- Batteries shall not be exposed to excessive heat such as sunshine, fire or the like.
CAUTION:
To completely disconnect this product from the mains, disconnect the plug from the wall socket outlet.
The mains plug is used to completely interrupt the power supply to the unit and must be within easy access by the user.

CE①
R&TTE Directive 1999/5/EC
This product may be operated in the following countries;
| AT BE CZ DK FI | |||
| FR DE GR HU IE | |||
| IT NL PL PT SK | |||
| ES SE GB NO CH |
Indoor use only.
Rechargeable battery precautions
- Do not toss the rechargeable battery into a fire, and do not heat up the battery. Doing so could cause battery heat generation, battery fires, and battery rupture.
- Do not subject the rechargeable battery to strong impact forces, such as stabbing it with sharp objects (a nail, etc.), tapping it with a hammer, or stepping on it. Doing so could cause battery heat generation, battery fires, and battery rupture.
- Do not place foreign objects inside the Portable Speaker Dock. Doing so could cause fires and electrical shocks.
- Do not charge, use, or place the Portable Speaker Dock in high-temperature locations such as near heaters and stove burners. In areas exposed to direct sunlight, or inside a car on a hot day. Doing so could cause battery heat generation, battery fires, and battery rupture.
Such actions could also affect the performance and shorten the life of the internal rechargeable battery.
- Stop using the Portable Speaker Dock immediately, and contact the sales outlet or DENON in the event that abnormal oxders or heat generation occurs while using, charging, or storing the Portable Speaker Dock, or if other abnormalities such as discoloration, etc., are detected.
• Always observe the following precautions:
- Do not place the Portable Spesker Dock in a microwave oven or in a high-pressure container.
- Do not place the Portable Speaker Dock on top of an electromagnetic cooker. - Do not attempt to recharge the internal rechargeable battery by connecting it to a power outlet or a car's cigarette lighter socket.
- Strictly observe the recharging procedure and conditions specified by DENON.
- If fluid should leak from the rechargeable battery and get into the eyes, do not rub the eyes. Instead, rinse the eyes thoroughly with tap water, etc., and see a doctor without delay for treatment. Leaving the eyes untreated could cause vision impairment.
- Do not use the Portable Speaker Dock near medical devices, automatic doors, or fire alarms, etc. Signals from the Portable Speaker Dock could interfere with the operation of those devices, possibly causing malfunctions and accidents.
- If recharging fails to complete even though the prescribed recharging time period has elapsed, stop the recharging operation. Continuing to recharge the battery could cause battery heat generation, battery fires, and battery rupture.
• DECLARATION OF CONFORMITY
We declare under our sole responsibility that this product, to which this declaration relates, is in conformity with the following standards: EN60065, EN55013, EN55020, EN61000-3-2, EN61000-3-3, EN300328, EN301489-01, EN301489-17 and EN50371.
Following the provisions of Low Voltage Directive 2006/95/EC and EMC Directive 2004/108/EC, the EC regulation 1275/2008 and its frame work Directive 2009/125/EC for Energy-related Products (EriPI).
DENON EUROPE
Division of D&M Germany GmbH
A NOTE ABOUT RECYCLING:
This product's packaging materials are recyclable and can be reused. Please dispose of any materials in accordance with the local recycling regulations.
When discarding the unit, comply with local rules or regulations.
Batteries should never be thrown away or incinerated but disposed of in accordance with the local regulations concerning battery disposal.
This product and the supplied accessories, excluding the batteries, constitute the applicable product according to the WEEE directive.


Pb
1. IMPORTANT NOTICE: DO NOT MODIFY THIS PRODUCT
This product, when installed as indicated in the instructions contained in this manual, meets R&TTE directive requirements. Modification of the product could result in hazardous Radio and EMC radiation.
2. CAUTION
This product and its antenna must not be co-located or operating in conjunction with any other antenna or transmitter.
NOTES ON USE
WARNINGS
- Avoid high temperatures.
Allow for sufficient heat dispersion when installed in a rack.
- Handle the power cord carefully.
Hold the plug when unplugging the cord.
- Keep the unit free from moisture, water, and dust
- Unplug the power cord when not using the unit for long periods of time.
- Do not obstruct the ventilation holes.
- Do not let foreign objects into the unit.
- Do not let insecticides, benzene, and thinner come in contact with the unit.
- Never disassemble or modify the unit in any way.
- Ventilation should not be impeded by covering the ventilation openings with items, such as newspapers, tablecloths or curtains.
- Naked flame sources such as lighted candles should not be placed on the unit.
- Observe and follow local regulations regarding battery disposal.
- Do not expose the unit to dripping or splashing fluids.
- Do not place objects filled with liquids, such as vases, on the unit.
- Do not handle the mains cord with wet hands.
- When the switch is in the OFF (STANDBY) position, the equipment is not completely switched off from MAINS.
- The equipment shall be installed near the power supply so that the power supply is easily accessible.
- Do not keep the battery in a place exposed to direct sunlight or in places with extremely high temperatures, such as near a heater.
CAUTION:
This product has a built-in battery, so you can also use it outdoors. This unit has a water-proof structure that can withstand a small amount of rain. However, be careful not to get water directly on this unit. In case water gets on this unit, immediately turn the power off and wipe the water off the surface.
□ CAUTIONS ON INSTALLATION


* For proper heat dispersal, do not install this unit in a confined space, such as a bookcase or similar enclosure.
• More than 0.3 m is recommended.
- Do not place any other equipment on this unit.
Getting started
Thank you for purchasing this DENON product. To ensure proper operation, please read this owner's manual carefully before using the product. After reading them, be sure to keep them for future reference.
Contents
| Getting started | 1 |
| Accessories | 1 |
| Features | 2 |
| Cautions on handling | 2 |
| Remote operation | 3 |
Preparations 4
| Connections | 5 |
| Connecting the power cord | 5 |
| Connecting a portable player | 5 |
| Connecting an iOS device | 6 |
| Connecting to a home network (LAN) | 7 |
| Required system | 7 |
| Network connections and settings | 8 |
Operations 12
| Playback | 13 |
| Preparations | 13 |
| Operations possible during playback | 13 |
| Various memory functions | 14 |
| Playing an iOS device | 14 |
| AirPlay function | 15 |
| Listening to internet radio | 17 |
| Playing a portable player | 17 |
| Playing back files stored on PCor NAS with Cocoon App (Music server) | 18 |
| How to make detailed settings | 20 |
| Menu map | 20 |
| Setting the language (Language) | 21 |
| Setting the clock (Clock) | 21 |
| Setting the volume limit (Max Vol Level) | 23 |
| Setting the network (Network Info.) | 23 |
Informations 25
| Part names and functions | 26 |
| Front panel | 26 |
| Rear panel | 27 |
| Remote control unit | 27 |
| Other information | 28 |
| Trademark information | 28 |
| Explanation of terms | 29 |
| Troubleshooting | 31 |
| Resetting the microprocessor | 33 |
| Specifications | 33 |
Accessories
Check that the following parts are supplied with the product.
① Quick Setup Guide 1
② CD-ROM (Owner's manual) 1
③ Safety Instructions 1
④ Service network list....1
⑤ Power cord 1
⑥ AC adaptor 1
⑦ Remote control unit (With battery)....1
⑧ Ethernet cable (CAT-5) 1

natural_image
Three labeled illustrations of electrical connectors: a wire, a remote control, and a coiled cable (no text or symbols present)Features
Equipped with a lithium-ion battery
This unit is equipped with a rechargeable lithium-ion battery, allowing you to enjoy high-quality sound anywhere without a power outlet.
Equipped with a Dock that supports iPhone® and iPod touch® (page 6)
This unit employs a slide type Dock that comes out when you push its front. By storing the Dock within this unit when you do not use it, this unit becomes compact.
You can charge iPhone or iPod touch at the same time while playing back music.
Compatible with the AirPlay® function (page 15)
You can enjoy comfortable streaming playback of music from iPhone, iPod touch and iPad.
Received song and artist names appear on the display.
Compatible with "Cocoon App" for performing basic operations of the unit with an iPhone and iPod touch (page 3)
Equipped with Wi-Fi capabilities including Wi-Fi Protected Setup (WPS) (page 9)
Compatible with the Internet radio (page 17) Also equipped with the Music Server function that plays back audio content on the network (page 18)
In addition to music files stored on PC and music servers on the network, you can enjoy various audio sources on the Internet such as the Internet radio.
Equipped with an organic EL display with great visibility
High contrast with low power can be achieved. Song and artist names are clearly displayed.
Cautions on handling
• Before turning the power on
Check once again that all connections are correct and that there are no problems with the connection cables.
- Power is supplied to some of the circuitry even when the unit is set to the standby mode. When going on vacation or leaving home for long periods of time, be sure to unplug the power cord from the power outlet.
- About condensation
If there is a major difference in temperature between the inside of the unit and the surroundings, condensation (dew) may form on the operating parts inside the unit, causing the unit not to operate properly.
If this happens, let the unit sit for an hour or two with the power turned off and wait until there is little difference in temperature before using the unit.
• Cautions on using mobile phones
Using a mobile phone near this unit may result in noise. If that occurs, move the mobile phone away from this unit when it is in use.
- Moving the unit
Turn off the power and unplug the power cord from the power outlet. Next, disconnect the connection cables to other system units before moving the unit.
- About care
- Wipe the cabinet and control panel clean with a soft cloth.
- Follow the instructions when using a chemical cleaner
- Benzene, paint thinner or other organic solvents as well as insecticide may cause material changes and discoloration if brought into contact with the unit, and should therefore not be used.
Remote operation
About the remote control unit

Before using
Remove the insulating sheet before using the remote control unit.
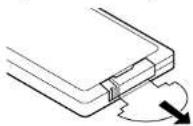
☐Inserting the batteries
① Remove the rear lid in the direction of the arrow and remove it.
② Load the two batteries properly as indicated by the marks in the battery compartment.


Put the rear cover back on.
NOTE
- Insert the specified batteries in the remote control unit.
- Replace the batteries with new ones if the set does not operate even when the remote control unit is operated close to the unit. (The supplied batteries are only for verifying operation. Replace them with new batteries at an early date.)
- When inserting the batteries, be sure to do so in the proper direction, following the and marks in the battery compartment.
• To prevent damage or leakage of battery fluid - Do not use a new battery together with an old one.
- Do not use two different types of batteries
- Do not attempt to charge dry batteries.
- Do not short-circuit, disassemble, heat or dispose of batteries in flames.
-
Do not keep the battery in a place exposed to direct sunlight or in places with extremely high temperatures, such as near a heater.
-
If the battery fluid should leak, carefully wipe the fluid off the inside of the battery compartment and insert new batteries.
- Remove the batteries from the remote control unit if it will not be in use for long periods.
- Used batteries should be disposed of in accordance with the local regulations regarding battery disposal.
- The remote control unit may function improperly if rechargeable batteries are used.
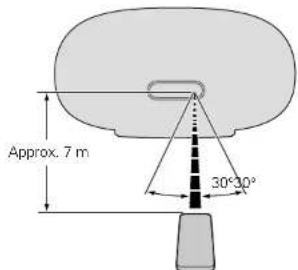
☐Operating range of the remote control unit
Point the remote control unit at the remote sensor when operating it.
NOTE
- The set may function improperly or the remote control unit may not operate if the remote control sensor is exposed to direct sunlight, strong artificial light from an inverter type fluorescent lamp or infrared light.
- When using 3D video devices that transmit radio communication signals (such as infrared signals etc.) between the various units (such as the monitor, 3D glasses, 3D transmitter unit etc.), the remote control unit may not operate due to interference from those radio communication signals. If this occurs, adjust the direction and distance of the 3D communication for each unit, and check that the remote control unit operation is not affected by these signals.
Cocoon App

Cocoon App is DENON's proprietary application developed for iPhone and iPod touch.
With Cocoon App, you can use iPhone and iPod touch to:
- Operate this unit
- Manually make the wireless LAN settings on this unit (page 9)
- Change preset Internet radio stations (page 17)


- Bidirectional communication is performed.
• The Cocoon App can be downloaded for free from the App Store.
Preparations
Preparations
Here, we explain the connections methods for this unit.
● Connections page 5

page 5

page 5

page 6
● Connecting to a home network (LAN) page 7

page 9

page 10
Connections
NOTE
- Do not plug in the power cord until all connections have been completed.
- When making connections, also refer to the owner's manual of the other components.
- Do not bundle power supply cords together with connection cables. Doing so can result in humming or noise.
Connecting the power cord
When all of the connections are completed, insert the power plug into the power outlet.
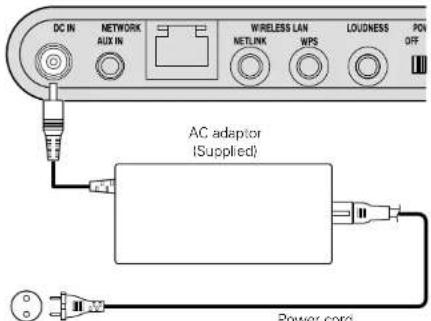
To household power outlet (AC 230 V, 50/60 Hz)
NOTE
- When using this unit for the first time or when this unit has not been used for a long time, its battery has no charge. In this case, connect this unit to the power outlet before use.
- Only use the supplied power cord and AC adaptor.
- Be sure the power cord is unplugged from the power outlet before connecting or disconnecting it to the AC inlet.
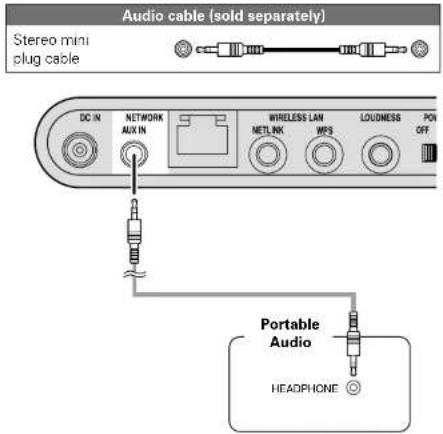
Connecting a portable player
- If a portable player is connected via the AUX IN jack of the unit, music from the portable player can be played.
- For operating instructions see "Playing a portable player" (15 page 17).
Cables used for connections
Connecting an iOS device
- You can enjoy music stored on an iOS device.
- For operating instructions see "Playing an iOS device" ( page 14)

Dismantling
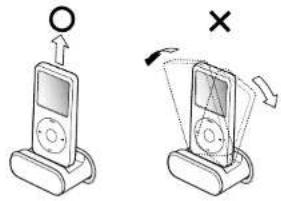
Supported iPod models
- iPod / iPod classic

iPod classic 80GB

iPod classic 160GB (2007)

iPod classic 160GB (2009)
- iPod nano

iPod nano
2nd generation (aluminum)
2GB 4GB 8GB

iPod nano
3rd generation
(video)
4GB 8GB

iPod nano
4th generation (video) 5th generation (video camera)
8GB 16GB
iPod nano
8GB 16GB

iPod nano
generation (video camera)
8GB 16GB

iPod nano
6th generation
8GB 16GB
- iPod touch

iPod touch
1st generation
8GB 16GB 32GB

iPod touch
2nd generation
8GB 16GB 32GB

iPod touch
3rd generation
32GB 64GB

iPod touch
4th generation
8GB 32GB 64GB
NOTE
- Depending on the type of iOS device and the software version, some functions may not operate.
- Note that DENON will accept no responsibility whatsoever for any problems arising with the data on an iOS device when using this unit in conjunction with the iOS device.
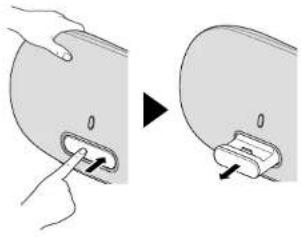
How to eject/store the Dock
① Push the front of the Dock, and it comes out.
② Push it again to store within this unit.
natural_image
Diagram showing a hand pressing a button on a device, then adding a button to a device (no text or symbols present)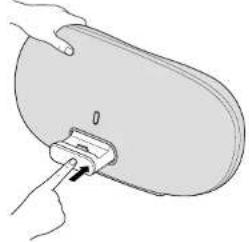
natural_image
Illustration of a hand inserting a small object into a rounded rectangular object (no text or symbols)- iPhone

iPhone
4GB 8GB 16GB

iPhone 3G
8GB 16GB

iPhone 3GS
8GB 16GB 32GB

iPhone 4
16GB 32GB

iPhone 4S
16GB 32GB 64GB
(as of July 2012)
NOTE
- When ejecting/storing the Dock, hold the upper part of this unit with your hand to prevent this unit from moving or tipping over.
- When iPhone or iPod touch is not connected to this unit, store the Dock within this unit.
Connecting to a home network (LAN)
When this unit is connected to your home network (LAN), you can enjoy various audio sources via the network.
- Streaming playback from iPhone, iPod touch or iPad with AirPlay
- Internet radio
• Music files on music servers
Furthermore, you can operate this unit by using Cocoon App on iPhone or iPod touch.

To check for any firmware update available for improving this unit, etc., see "Firmware Update" (page 24) in the menu.
Required system
Broadband internet connection
□Modem
Device that connects to the broadband circuit and conducts communications on the Internet.
A type that is integrated with a router is also available.
Router
When using this unit, we recommend you use a router equipped with the following functions:
• Built-in DHCP server
This function automatically assigns IP addresses on the LAN.
• Built-in 100BASE-TX switch
When connecting multiple devices, we recommend a switching hub with a speed of 100 Mbps or greater.
- When using with a wireless LAN, prepare a broadband router with built-in access point.
☐Ethernet cable (supplied)
(CAT-5 or greater recommended)
- Use only a shielded STP or SoTP LAN cable which is available at retailer.
- The normal shielded-type Ethernet cable is recommended. If a flat-type cable or unshielded-type cable is used, other devices could be affected by noise.

- If you have an Internet provider contract for a line on which network settings are made manually, make the settings at "When "DHCP" is set to "Off" on your router" (page 10).
- With this unit, it is possible to use the DHCP and Auto IP functions to make the network settings automatically.
- When using this unit with the broadband router's DHCP function enabled, this unit automatically performs the IP address setting and other settings.
When using this unit connected to a network with no DHCP function, make the settings for the IP address, etc., at "When "DHCP" is set to "Off" on your router" (page 10). - When setting manually, check the setting contents with the network administrator.
NOTE
- A contract with an ISP is required to connect to the Internet.
No additional contract is needed if you already have a broadband connection to the Internet. - The types of routers that can be used depend on the ISP. Contact an ISP or a computer shop for details.
-
DENON assumes no responsibility whatsoever for any communication errors or troubles resulting from customer's network environment or connected devices.
-
This unit is not compatible with PPPoE. A PPPoE-compatible router is required if you have a contract for a type of line set by PPPoE.
- Do not connect an NETWORK connector directly to the LAN port/Ethernet connector on your computer.
- To listen to audio streaming, use a router that supports audio streaming.
Network connections and settings
There are two types of network connections available – wired and wireless. Select either of them according to your router functions and operating environment.
Using a router equipped with the wireless LAN function
Connect this unit to your router wirelessly. Connection procedures differ according to the type of your router.
□When your router is equipped with a WPS button (page 9)
□When your router is not equipped with a WPS button and you are using iPhone or iPod touch (page 9)
Using a router that is not equipped with the wireless LAN function
Connect this unit to your router with an Ethernet cable. Connection procedures differ according to your router settings.
□When "DHCP" is set to "On" on your router (i page 10)
□When "DHCP" is set to "Off" on your router (page 10)
Using PC to make network settings of this unit
You can also use your PC to make network settings of this unit without iPhone or iPod touch.
□When this unit is connected to your PC through wireless LAN (page 11)

"WPS" stands for Wi-Fi Protected Setup, a standard for making it easy to make security settings required when connecting wireless LAN devices.
Wireless LAN

Network connections and settings
□When your router is equipped with a WPS button
By just pressing the WPS button on your router and this unit, the wireless LAN connection settings are made.

- Before turning this unit on, make sure that an Ethernet cable is not connected to this unit. If a cable is connected, have this unit enter the power standby mode and disconnect the cable.
- After the unit is turned on, it takes approximately 30 seconds for the WPS button on this unit to be available.
1 Press the WPS button of the router.
2 Press WPS on the rear panel.
"Connecting" is displayed, and the unit starts connecting to the LAN.

- When the connection is made successfully, "Succeeded" appears. - If the connection cannot be established, "Connection Failed" is displayed. Perform steps 1 – 2 again.

- If this unit is still not connected to the network after this procedure, manually enter the PIN code of WPS (page 23).
When your router is not equipped with a WPS button and you are using iPhone or iPod touch

Use the DENON application "Cocoon App" to make the wireless LAN connection settings.

- "Cocoon App" is free.
- Before turning this unit on, make sure that an Ethernet cable is not connected to this unit. If a cable is connected, have this unit enter the power standby mode and disconnect the cable.
- To make the connection settings by using PC without iPhone or iPod touch, see "Using PC to make network settings of this unit" (page 11).
1 Download "Cocoon App" to your iPhone or iPod touch from App Store.
2 Start the application.
3 When the "Setup" screen is displayed, tap "NetLink".
- "Scanning network for devices" is displayed.

See overleaf

Enter the encryption key.
① Enter the encryption key of your router that is connected to your iPod or iPhone.
② Tap "Join".
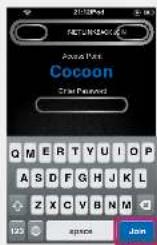

Place your iPod or iPhone in the dock of this unit (page 6).

Tap "JOIN".
The network settings are copied to this unit from your iPod or iPhone and this unit is connected to the network.

- When this unit could not connect to the network, the application displays an error message. Perform steps 1–6 again.

The wireless network name (SSID) and encryption method used for this unit are the same as those set for the connected iPod or iPhone.
Wired LAN

flowchart
graph TD
    A["Internet"] --> B["Modem"]
    B --> C["PC"]
    C --> D["NAS (Network Attached Storage)"]
    D --> E["LAN port/Ethernet connector"]
    E --> F["LAN port/Ethernet connector"]
    F --> G["To LAN port"]
    G --> H["To WAN side"]
    H --> I["Router"]
    I --> J["Ethernet cable (Supplied)"]
    J --> K["DC IN NETWORK AUX IN WIRELLER LAN LOUDNESS PD OFF"]
For connections to the Internet, contact an ISP (Internet Service Provider) or a computer shop.
□When "DHCP" is set to "On" on your router
When using this unit with the broadband router's DHCP function enabled, this unit automatically performs the IP address setting and other settings.

Connect the supplied Ethernet cable by referring to the above figure.

Press ⏻ to turn on power to the main unit.
- When this unit could not connect to the network, perform steps 1 and 2 again.

You may need to set the network connection manually, depending on the provider you use. To set the connection manually, use the setting procedure of "When "DHCP" is set to "Off" on your router".
□When "DHCP" is set to "Off" on your router
This section explains the settings when connecting this unit to a network that does not have a DHCP function.

to configure the settings manually, check the setting details with our network administrator.

Complete steps 1-4 in "When this unit is connected to your PC through wireless LAN" (page 11).

On the page that appears, set the information necessary for the network connection.
① Click "Profile Configuration" on the upper left part of the page.
② Click "ADVANCE SETTING".
③ Enter required items.
④ When settings are completed, click "Apply".
⑤ Connect the Ethernet cable.
- "Connecting" is displayed, and the unit starts connecting to the LAN.
- When the connection is made successfully, "Succeeded" appears.
- If the connection cannot be established, "Connection Failed" is displayed. Turn this unit off and on.
If this unit is still not connected to the network after this procedure, complete steps 1 - 2 again.
Using PC to make network settings of this unit
□ When this unit is connected to your PC through wireless LAN

Before turning this unit on, make sure that an Ethernet cable is not connected to this unit. If a cable is connected, have this unit enter the power standby mode and disconnect the cable.

Press ⏻ to turn on power to the main unit. It takes approximately 30 seconds for this unit to start.

Press NETLINK on the rear panel. This unit restarts and "NetLink" appears on the display.

Connect to "Cocoon_Setup" in the wireless network settings on your PC.
- If "Cocoon_Setup" is not displayed, refresh the network. - It may take up to two minutes to establish the connection.

Launch the browser on the PC connected to this unit, and enter the address "http://169.254.1.1".

On the page that appears, set the information necessary for the network connection.
① Click "Profile Configuration" on the upper left part of the page.
② From the "Digital Media Player Wireless LAN Settings" dropdown list, select the SSID (Service Set ID) of your router.
③ Enter the password.
④ When settings are completed, click "Apply".
- "Connecting" is displayed, and the unit starts connecting to the LAN.
- When the connection is made successfully, "Succeeded" appears.
- If the connection cannot be established, "Connection Failed" is displayed. Perform steps 1 – 5 again.
- It may take 120 seconds to establish the network connection.
Network connections and settings

- Enter the name in the "Friendly Name" box and click "Set" to change the friendly name. A friendly name is the name of this unit that is presented to the network.
- In "ADVANCE SETTING", you can manually make settings such as the IP address.
NOTE
NETLINK does not support proxy servers.
Operations
Operations
Here, we explain functions and operations that let you make better use of this unit.
● Playback page 13

● How to make detailed settings page 20
Playback
This section provides how to play back music with this unit.
This unit can play back music from the following devices (media).
- iPhone and iPod
When connected to this unit (page 14)
When using AirPlay (page 15)
• Internet radio (12 page 17)
- Portable player (page 17)
• Music server (PC on the network) (page 18)
Preparations
Turning the power on
Press ⏻ to turn on power to the unit.
This unit is turned on and the operation button on top lights.

□When power is switched to standby
Press ⏻
- The operation button on top lights off and this unit enters the standby mode.
Completely turning off the power
Power continues to be supplied to some of the circuitry even when the power is in the standby mode. When leaving home for long periods of time, unplug the power cord from the power outlet.
NOTE
The settings made for the various functions may be cleared if the power cord is left unplugged from a power outlet for an extended period of time.
Preparations
Setting the current time (Auto Adjust) (24-Hour Display)
When this unit is connected to the network, the current time is automatically set.

- The default time zone of this unit is set to Western European Standard Time.
To change the Time Zone and Summer Time, see "Adjusting the clock automatically (Auto Adjust)" (15 page 21). - When this unit is not connected to the network, set the time manually. See "Setting the current time (Manual Adjust) (24-Hour Display)" (1 page 22).
Operations possible during playback
Selecting the input source
You can select the device for which this unit outputs the audio that is connected to this unit.

- The input source is switched each time the button is pressed.

*These items are displayed if a relevant device is connected to this unit.
Adjusting the master volume
Press + or -.
The volume level is displayed
[Adjustable range] 0 - 50

Operations possible during playback
Adjusting the tone (LOUDNESS)
When you press LOUDNESS to the "On" (■) state, bass and treble sounds, which are hard to hear at a low volume level, are enhanced for a more natural audio quality.
Press LOUDNESS on the main unit.

- Press the button again to the "Off" (■) state to return to the original audio quality.
Various memory functions
Last function memory
This function stores the settings which were made before going into the standby mode.
When the power is turned back on, the settings are restored.
Playing an iOS device
With this unit, you can listen to music on an iOS device. It is also possible to operate the iOS device from the main unit or remote control.
For information on the iOS device models that can be played back with this unit, see "Connecting an iOS device" ( page 6).
Load the iOS device onto the Dock of this unit (page 6 "Connecting an iOS device").
When the iOS device is loaded to the dock tray on this unit, the input source automatically switches to "Device".
- During AirPlay, the input source does not switch automatically. Press 📂 to switch the input source to "iDevice".
NOTE
This function is activated around 30 seconds after the power is turned on.
☐Streaming music stored in iPhone, iPod touch or iPad directly to the unit (page 15)
Playing iTunes music with this unit (page 15)
☐Disconnecting the iOS device
1 Press ⏻ to set the standby mode.
2 Remove the iOS device from the Dock of this unit.

NOTE
- Depending on the type of iOS device and the software version, some functions may not operate.
- Note that DENON will accept no responsibility whatsoever for any problems arising with the data on an iOS device when using this unit in conjunction with the iOS device.
☐Remote control and iOS device button relations
| Remote control buttons | iOS device buttons | Operation on this unit |
| Play the track / Pause the track | ||
| |◀◀, ▶▶| (Press and release) | |◀◀, ▶▶| (Press and release) | Play the track from the beginning/Play the next track |
| |◀◀, ▶▶| (Press and hold) | |◀◀, ▶▶| (Press and hold) | Fast-reverse the track/Fast-forward the track. |
AirPlay function
Enjoy music from your iTunes library with high quality sound anywhere in your home.
Use the Apple Remote app* for iPhone, iPod touch and iPad to control iTunes from any room in your home.
* Available as a free download from the App Store.
NOTE
- Before using the AirPlay function, this unit must be connected to the network. For how to connect this unit to the network, see "Network connections and settings" (page 8).
- To use the AirPlay function, you must update iPhone, iPod touch or iPad to iOS 4.2.1 or higher.
□Streaming music stored in iPhone, iPod touch or iPad directly to the unit
1 Make the Wi-Fi settings for iPhone, iPod touch or iPad.
- For details, see your device's manual.
2 Startup iPhone, iPod touch, or iPad music or iPod app.
is displayed on the iPhone, iPod touch or iPad screen.
3 Tap the AirPlay icon
4 Select the speaker you want to use.


NOTE
When the AirPlay function is used, this unit plays back at the volume level set on iPhone, iPod touch, iPad, or iTunes.
First minimize the volume level on iPhone, iPod touch, iPad, or iTunes before playback. Then, start playback and adjust the volume to the desired level.
□Playing iTunes music with this unit
1 Install iTunes 10, or later, on a Mac or Windows PC that is connected to the same network as this unit.
2 Turn this unit ON.
3 Launch iTunes and click the AirPlay icon ▲ displayed in the lower right of the window and select this unit from the list.
natural_image
Pure graphical interface element with no text, numbers, or symbols4 Choose a song and click play in iTunes. The music will stream to this unit.
Selecting multiple speakers (devices)
It is possible to play iTunes songs on your home's AirPlay compatible speakers (devices) other than those of this unit.
1 Click the AirPlay icon ▲ and select "Multiple Speakers" from the list.
2 Check the speakers you want to use.

See overleaf

Listening to internet radio
Internet radio refers to radio broadcasts distributed over the Internet. Internet radio stations from around the world can be received.
NOTE
Before playing back the Internet radio, this unit must be connected to the network. For how to connect this unit to the network, see "Network connections and settings" (1 page B).
Important information
The broad cast station types and specifications supported by this unit for playback are as follows.
[Playable broadcast station types]
| Supported file types Internet radio | |
| WMA (Windows Media Audio) | √ |
| MP3 (MPEG-1 Audio Layer-3) | √ |
[Playable broadcast station specifications]
| Sampling frequency | Bit rate Extension | |
| WMA (Windows Media Audio) | 32/44, 1/48 kHz 48 - 192 kbps .wma | |
| MP3 (MPEG-1 Audio Layer-3) | 32/44, 1/48 kHz 32 - 320 kbps .mp3 |
Listening to preset Internet radio stations
1 Prepare for playback.
① Check the network environment, then turn on this unit's power (L3 page 8 "Network connections and settings").
② If settings are required, make the "Network connections and settings" (page 8).
③ If settings are required, make the "Setting the current time (Auto Adjust) (24-Hour Display)" (page 13).
2 Press 📂 switch the input source to "Preset 1", "Preset 2" or "Preset 3". Playback starts.
- Use Cocoon App to change preset details.


- There are many Internet radio stations on the Internet, and the quality of the programs they broadcast as well as the bit rate of the tracks varies widely.
Generally, the higher the bit rate, the higher the sound quality, but depending on the communication lines and server traffic, the music or audio signals being streamed may be interrupted. Inversely, lower bit rates mean a lower sound quality but less tendency for the sound to be interrupted. - "Server Full" or "Connection Down" is displayed if the station is busy or not broadcasting.
• The Internet radio station name appears on the display of this unit.
NOTE
The radio station database service may be suspended without notice.
□Internet radio operation buttons
| ← |
| → |
| - |
| ↓ |
| ↑ |
| Operation buttons Function | |
| +, - Volume up / down | |
| ▶II | Mute On/Off |
| ♪ | Switching the input source |
| ∅ | Power on/standby |
Playing a portable player
The following describes the procedure for playing portable player.
1 Connect the portable player to this unit (page 5 "Connecting a portable player").
2 Press ⏻ to turn on power to the main unit.
3 Press ♪ to switch the input source to "AUX".
4 Play the component connected to this unit.
Playing back files stored on PC or NAS with Cocoon App (Music server)
This unit can play back music files and playlists (m3u, wpll stored on a PC, Digital Media Server (DMS) and on Network Attached Storage (NAS) that supports DLNA.
NOTE
- Before playing back music files on music servers, this unit must be connected to the network. For how to connect this unit to the network, see "Connecting to a home network (LANI)" ( page 7).

For playable file formats and restrictions, see "Important information" (page 19).
Applying media sharing settings
Here, we apply the settings to share music files stored on a PC and NAS on the network.
☐Sharing media stored in PC
If you are using a media server, be sure to apply this setting first.

- While this unit is operated by a media control device, "Music server" appears on the display of this unit.
- When selecting this unit from the media control device, the name of this unit is displayed as its friendly name.
- To check the friendly name, see "Checking the network information" ( page 23).
Settings for playing back with Windows Media Player 12 (Windows 7)
NOTE
Perform this procedure after changing the control panel display to "Category".
1 In the PC's "Control Panel", select "Network and Internet" - "Choose homegroup and sharing options".
2 Select the "Stream my pictures, music, and videos to all devices on my home network" check box and select "Choose media streaming options".
3 Select "Allowed" in the drop-down list for "Cocoon 1".
4 Select "Allowed" in the drop-down list for "Media programs on this PC and remote connections...".
5 Click "OK" to finish.
Settings for playing back with Windows Media Player 11
1 Start up Windows Media Player 11 on the PC.
2 Select "Media Sharing" in the "Library".
3 Click the "Share my media" check box, select "Cocoon 1", and then click "Allow".
4 As you did in step 3, select the icon of the device (other PCs and mobile devices) you want to use as a media controller, and then click "Allow".
5 Click "OK" to finish.
Sharing media stored in NAS
Change settings on the NAS to allow this unit and other devices (PCs and mobile devices) used as media controllers to access the NAS. For details, see the owner's manual that came with the NAS.
Playing back files stored on PC or NAS with Cocoon App (Music server)
About playback

When you start playback on PC, NAS, or DMS, the input source for this unit automatically switches to "Music server", and audio is output from this unit.
The name of the currently played back track and its artist name appear on the display of this unit.
When this unit is operating, you can perform operations such as playing back and stopping files through DMC operations. You can also adjust or mute the volume.
Pressing ♪ while this unit is playing back stops the playback on this unit and switches to "Preset 1".

- When using a server that supports transcoding such as Windows Media Player (version 11 or higher), you can play back WMA Lossless files.
- Depending on the played back file, the track name or artist name may not be displayed.
NOTE
The music display order depends on the specifications of your PC, NAS, or DMS.
□Music server operation buttons
| + | ||
| - | ||
| + |
| Operation buttons Function | |
| +, - Volume up / down | |
| ▶II | Mute On/Off |
| ♪ | Switching the input source |
| ∅ | Power on/standby |
Important information
• The network audio playback function of this unit connects to the server using technologies shown below.
• Windows Media Player Network Sharing Service
- File types that this unit can play back and specifications are shown below.
[Supported file types]
| Supported file types Music server | *1 |
| WMA (Windows Media Audio) | √ |
| MP3 (MPEG-1 Audio Layer-3) | √ |
| WAV | √ |
| MPEG-4 AAC | √*2 |
| FLAC (Free Lossless Audio Codec) | √ |
A server or server software compatible with distribution in the corresponding formats is required to play music files via a network.
*1 Music server
• This unit is compatible with MP3 ID3-Tag (Ver. 2) standard.
• This unit is compatible with WMA META tags.
*2 Only files that are not protected by copyright can be played on this unit.
Content downloaded from pay sites on the Internet are copyright protected. Also, files encoded in WMA format when ripped from a CD, etc. on a computer may be copyright protected, depending on the computer's settings.
NOTE
File types that this unit does not support are not displayed.
[Specifications of supported files]
| Sampling frequency Bit rate Extension | |||
| WMA (Windows Media Audio) 32/44 | 1/48 kHz 48 - 192 kbps .wma | ||
| MP3 (MPEG-1 Audio Layer-3) 32/44.1/48 kHz 32 - 320 kbps .mp3 | |||
| WAV 32/44.1/48 kHz - | .wav | ||
| MPEG-4 AAC | 32/44.1/48 kHz 16 - 320 kbps | .aac/.m4a/.mp4 | |
| FLAC (Free Lossless Audio Codec) 32/44.1/48 kHz - | .flac | ||
How to make detailed settings
Menu map
| Setting items Detailed items Description Page | |||
| LanguageLanguageSets the language for display the menu. | 21 | ||
| ClockClock | Auto Adjust(On) Auto | matically performs the clock setting from the time information on the Internet. | 21 |
| Time Zone(+12H) Sets your local time zone (for Auto Adjust). | 21 | ||
| Summer Time(Off) Sets the Summer Time information (for Auto Adjust). | 22 | ||
| Auto Adjust Now Obtains the current time. | 22 | ||
| Manual Adjust Adjusts the clock manually. | 22 | ||
| Max Vol LevelMax Vol Level | Make a setting for maximum volume. | 23 | |
| Network Info.Network Info. | Display network information.Friendly Name / DHCP=On or Off / IP Address / Primary DNS / Secondary DNS / MAC Address | 23 | |
| WPSWPS(PIN) | Sets the wireless connection using WPS (PIN code method). | 23 | |
| Firmware UpdateFirmware Update | Starts the firmware update. | 24 | |
| Factory ResetFactory Reset | Reset to the defaults. - | ||
| ExitExit | To exit the menu, select "Exit". | - | |
Menu operation
NOTE
Use buttons on this unit for menu operations. Buttons on the remote control do not work.
1 Press + and - at the same time.
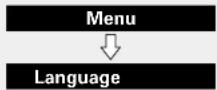

- The selected item appears on the display.
2 Press + or - to select the menu to be set.
3 Press ▶II to enter the setting. - To return to the previous item, use + or - to select "Exit", and press ▶II.
- To exit the menu, select "Exit" in the top menu, and press ▶II. The menu disappears.
Setting the language (Language)
Sets the language for display the menu. • The factory default setting is "English"
1 Press + and - at the same time. Turns on the menu settings mode and the menu appears on the display (page 20 "Menu map").

2 Press ▶II, then press + or - to select the language you want to set.
| English | / | Deutsch | / | Français | / | Español | / | Italiano | / |
| Svenska | / | Nederlands | / | РУССКИЙ | / | (EXIT) |
3 Press ▶II to enter the setting The top menu is displayed again.
Setting the clock (Clock)
You can automatically adjust the clock of this unit using the Internet.

To use this function, the unit must be connected to the Internet.
Adjusting the clock automatically (Auto Adjust)
Use the following procedure to automatically adjust the clock.
1 Press + and – at the same time. Turns on the menu settings mode and the menu appears on the display (I: 5 page 20 "Menu map").
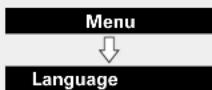
2 Press + or - to select "Clock", then press ▶II.
3 Press + or - to select "Auto Adjust(On)", then press ▶II.
4 Press + or - to select "On" or "Off". The operation to receive the current time starts.
On Automatically adjust the clock.
Off Does not automatically adjust the clock.
5 Press ▶II to enter the setting The "Clock" menu is displayed again.
Setting the Time Zone (Time Zone)
Use the following procedure to select your local standard time (time zone).
1 Press + and - at the same time. Turns on the menu settings mode and the menu appears on the display (page 20 "Menu map").
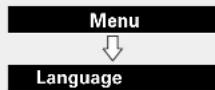
2 Press + or - to select "Clock", then press ▶II. "Auto Adjust(On)" is displayed.
3 Press + or - to select "Time Zone(+1H)", then press ▶II. "+1H(Central European Time)" is displayed.
4 Press + or - to select your local standard time (time zone) in your lives, then press ▶II. The "Clock" menu is displayed again.
Setting the clock (Clock)
Setting the Summer Time (Summer Time)
Use the following procedure to set Summer time if the Summer time system is used in your country.
1 Press + and - at the same time. Turns on the menu settings mode and the menu appears on the display (page 20 "Menu map").

2 Press + or - to select "Clock", then press ▶II. "Auto Adjust(On)" is displayed.
3 Press + or - to select "Summer Time(Off)", then press ▶II.
4 Press + or - to select "Off(0H)" or "On(+1H)", then press ▶II. The "Clock" menu is displayed again.
Setting the current time (Auto Adjust Now)
When the unit is connected to the Internet, the current time is set automatically.
1 Press + and - at the same time. Turns on the menu settings mode and the menu appears on the display ( page 20 "Menu map").

2 Press + or - to select "Clock", then press ▶II. "Auto Adjust(On)" is displayed.
3 Press + or - to select "Auto Adjust Now", then press ▶II. The operation to receive the current time starts.
- The current time is displayed for several seconds when it is received successfully. - If the current time is not received successfully, "Connection Failed" appears.
Setting the current time (Manual Adjust) (24-Hour Display)
When the unit is not connected to the Internet, set the current time manually.
1 Press + and - at the same time. Turns on the menu settings mode and the menu appears on the display (page 20 "Menu map").

2 Press + or - to select "Clock", then press ▶II. "Auto Adjust(On)" is displayed.
3 Press + or - to select "Manual Adjust", then press ▶II.
4 Press + or - to set the "hours", then press ▶II.
5 Press + or - to set the "minutes", then press ▶II. The current time is set.

If you use "Manual Adjust" to set the time, "Auto Adjust" is set to "Off".
Setting the volume limit (Max Vol Level)
Make a setting for maximum volume.
• The factory default setting is "50".
1 Press + and - at the same time. Turns on the menu settings mode and the menu appears on the display (page 20 "Menu map").

2 Press + or - to select "Max Vol Level", then press ▶II.
"Max Volume" menu appears.
3 Press + or - to select the volume "0 - 50", then press ▶II.
The top menu is displayed again.
Setting the network (Network Info.)
Checking the network information
1 Press + and - at the same time. Turns on the menu settings mode and the menu appears on the display (page 20 "Menu map").

2 Press + or - to select "Network Info.", then press ▶II.
3 Press + or - to select the item you want to check.
- Select "Exit" and press ▶II to return to the top menu.
WPS Settings (PIN code method)
Use this procedure to configure the wireless LAN settings.

Before turning this unit on, make sure that an Ethernet cable is not connected to this unit. If a cable is connected, have this unit enter the power standby mode and disconnect the cable.
1 Press + and - at the same time.
Turns on the menu settings mode and the menu appears on the display It page 20 "Menu map").
2 Press + or - to select "WPS(PIN)", then press ▶II. "Searching" is displayed, and the access point you have set is displayed.
3 Press + or - to select the access point whose PIN code you want to display, and press ▶II.
PIN code number is displayed.
4 Set this PIN code to the register.
When connection is established with access point, "Succeeded" is displayed.
- For how to register the PIN code, see the owner's manual of your router with access point.
Firmware Update
- In order to update the firmware, the environment and settings required for connecting to broadband internet are needed ( page 8)
- Perform the firmware update operation after at least 2 minutes has elapsed since turning this unit's power ON.
1 Press + and - at the same time. Turns on the menu settings mode and the menu appears on the display ( page 20 "Menu map").
2 Press + or - to select "Firmware Update", then press ▶II.
3 Press + or - to select "Check for Update" or "Start", then press ▶II.
Check for Update Check for firmware updates.
Use + or - to select the item, and press ▶II. - Up to Date: It is already the latest firmware. - Available Yes: Updates to the latest firmware. - Available No: Does not update to the latest firmware.
Start Determines whether to update or not.
Use + or - to select the item, and press ▶II.
- Yes: Performs update.
• No: Does not perform update.
- If updating fails, the set automatically retries, but if updating is still not possible, one of the messages shown below is displayed. If the display reads as shown below, check the settings and network environment, then update again.
| Display Description |
| Updating fail Updating failed. |
| Login failed Failure to log into server. |
| Server is busy Server is busy. Wait a while then try again. |
| Connection fail Failure in connecting to server. |
| Download fail Downloading of the firmware has failed. |
□Notes concerning use of "Firmware Update"
- Do not turn off the power until updating or upgrading is completed.
- Even with a broadband connection to the Internet, approximately 20 minutes is required for the updating procedure to be completed.
- Once updating starts, normal operations on this unit cannot be performed until updating is completed. Furthermore, updating the firmware may reset the backup data for the parameters, etc. set for this unit.
- If the update fails, remove and re-insert the power cord. "Update Retry" appears on the display and update restarts from the point at which update failed. If the error continues despite this, check the network environment.

See the DENON website for details about updates.
Auto standby
With the Auto Standby ON, this unit will automatically enter the standby mode after about 30 continuous minutes of stop mode with no operation. - The default setting for the Auto Standby mode is "On".
1 Move the power operation slide switch on the rear panel from "OFF" to "ON".
"Always Display Clock?" is displayed.
2 Press + or - to select "Yes" or "No", then press ▶II.
Yes (Auto Satandby Off)
No (Auto Satandby On)
NOTE
In the following situations, the Auto standby function does not operate.
- When iPod or iPhone is connected to the Dock connector on this unit.
- When the input source is "AUX" and a devices connected to the AUX IN jack.
- When the input source being played is "Internet Radio" or "Music Server".
Informations
Informations
Here, we list various information related to this unit. Please refer to this information as needed.
● Part names and functions page 26
● Other information page 28
● Troubleshooting page 31
Specifications page 33
Index page 34
Part names and functions
Front panel
For buttons not explained here, see the page indicated in parentheses ().

① Display
[Remaining battery level indication during battery operation]

: 75 % or more

50 - 75%

25-50%

25% or less
("Low Battery" is displayed.)
- Battery level indication while the battery is being charged during AC operation

During AC operation, the battery mark lights off when the battery is fully charged.
NOTE
- If the battery level reaches zero during use, the power is turned off.
- Usage time may vary depending on the usage environment's temperature, method of use, etc.
- If usage time is extremely short even when the battery has been fully charged, the battery may be near the end of its life. In this case, please contact DENON service center.
- Battery replacement must be performed by a service person.
② Remote control sensor …… (3)
③ Dock …… (6)
④ Input source select button (♪) ..... (13)
⑤ Play/Pause button (▶II) ..... (14, 20)
⑥ Volume control buttons
(+,-) (13.20)
Rear panel
See the page indicated in parentheses ( ).
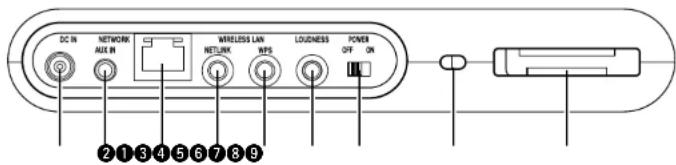
① DC input (DC IN) ..... (5)
② AUX IN jack …… (5)
③ Network connector (NETWORK) …… (10)
④ NETLINK button ...... (11)
⑤ WPS button....(9)
⑥ LOUDNESS button (14)
⑦ Power operation slide switch (POWER ON/OFF)....(13)
Tums power to this unit on and off.
NOTE
⑧ Security slot
You can attach a security cable to deter theft. Use a security cable that is compatible with this unit. For details, contact your dealer.
Security cables have deterrent effects, but do not completely prevent theft or misuse of this unit.
⑨ Remote control storage space
Remote control unit
For buttons not explained here, see the page indicated in parentheses ().
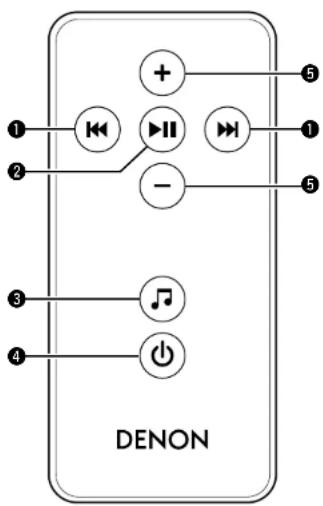
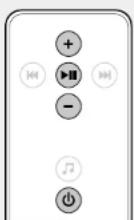
① Skip buttons (I◄◄, ►►I) ......(14)
② Play/Pause button (▶II) ..... (14)
③ Input source select button (☐) .....(13)
4 Power operation button (⏻) ...... (13)
⑤ Volume control buttons (+, -) ..... (13)
Other information
Trademark information (page 28)
Explanation of terms (page 29)
Trademark information
This product uses the following technologies (Random order):
Made for

Pod

Phone

"Made for iPod" and "Made for iPhone" mean that an electronic accessory has been designed to connect specifically to iPod, or iPhone, respectively, and has been certified by the developer to meet Apple performance standards.
Apple is not responsible for the operation of this device or its compliance with safety and regulatory standards. Please note that the use of this accessory with iPod or iPhone, may affect wireless performance.
AirPlay, the AirPlay logo, iPad, iPhone, iPod, iPod classic, iPod nano, iPod shuffle and iPod touch are trademarks of Apple Inc., registered in the U.S. and other countries.
- Individual users are permitted to use iPhone, iPod, iPod classic, iPod nano, iPod shuffle, and iPod touch for private copy and playback of non-copyrighted contents and contents whose copy and playback is permitted by law. Copyright infringement is prohibited by law.
Explanation of terms
A
F
AES (Advanced Encryption Standard)
This is a next generation standard encryption method replacing the current DES and 3DES, and because of its high security it is expected to be applied widely to wireless LANs in the future. It uses the "Rijndael" algorithm developed by two Belgian cryptographers to divide the data into blocks of fixed lengths and encrypt each block. It supports data lengths of 128, 192 and 256 bits and key lengths of 128, 192 and 256 bits as well, offering extremely high encryption security.
AirPlay
AirPlay sends (plays) contents recorded in iTunes or on an iPhone/iPod touch/iPad to a compatible device via the network.
App Store
App Store is a site that sells application software for such devices as the iPhone or iPod Touch, and is operated by Apple Inc.
B
Bit rate
This expresses the read amount per 1 second of video/audio data recorded in a disc. A larger number means higher sound quality, but also means a larger file size.
D
DLNA
DLNA and DLNA CERTIFIED are trademarks and/or service marks of Digital Living Network Alliance. Some contents may not be compatible with other DLNA CERTIFIED™ products.
FLAC
FLAC stands for Free lossless Audio Codec, and is a lossless free audio file format. Lossless means that the audio is compressed without any loss in quality. The FLAC license is as shown below.
Copyright (C) 2000,2001,2002,2003,2004,2005,2006,2007,2008,2009 Josh Coalson
Redistribution and use in source and binary forms, with or without modification, are permitted provided that the following conditions are met:
- Redistributions of source code must retain the above copyright notice, this list of conditions and the following disclaimer.
- Redistributions in binary form must reproduce the above copyright notice, this list of conditions and the following disclaimer in the documentation and/or other materials provided with the distribution.
- Neither the name of the Xiph.org Foundation nor the names of its contributors may be used to endorse or promote products derived from this software without specific prior written permission. THIS SOFTWARE IS PROVIDED BY THE COPYRIGHT HOLDERS AND CONTRIBUTORS "AS IS" AND ANY EXPRESS OR IMPLIED WARRANTIES, INCLUDING, BUT NOT LIMITED TO, THE IMPLIED WARRANTIES OF MERCHANTABILITY AND FITNESS FOR A PARTICULAR PURPOSE ARE DISCLAIMED. IN NO EVENT SHALL THE FOUNDATION OR CONTRIBUTORS BE LIABLE FOR ANY DIRECT, INDIRECT, INCIDENTAL, SPECIAL, EXEMPLARY, OR CONSEQUENTIAL DAMAGES INCLUDING, BUT NOT LIMITED TO, PROCUREMENT OF SUBSTITUTE GOODS OR SERVICES; LOSS OF USE, DATA, OR PROFITS; OR BUSINESS INTERRUPTION) HOWEVER CAUSED AND ON ANY THEORY OF LIABILITY, WHETHER IN CONTRACT, STRICT LIABILITY, OR TORT (INCLUDING NEGLIGENCE OR OTHERWISE) ARISING IN ANY WAY OUT OF THE USE OF THIS SOFTWARE, EVEN IF ADVISED OF THE POSSIBILITY OF SUCH DAMAGE.
1
IEEE 802.11b
This is one wireless LAN standard set by the B02 working group that establishes LAN technology standards at the IEEE (Institute of Electrical and Electronics Engineers) of the United States. It uses the 2.4 GHz band usable freely without a radio frequency license (ISM band), enabling communications at a maximum speed of 11 Mbps.
- The value indicated above is the maximum theoretical value for the wireless LAN standard, and does not indicate the actual data transfer rate. IEEE 802.11g
This is another wireless LAN standard set by the 802 working group that establishes LAN technology standards at the IEEE (Institute of Electrical and Electronics Engineers) of the United States, and is compatible with IEEE 802.11b. It also uses the 2.4 GHz band, but enables communications at a maximum speed of 54 Mbps.
- The value indicated above is the maximum theoretical value for the wireless LAN standard, and does not indicate the actual data transfer rate.
iTunes
iTunes is the name of the multimedia player provided by Apple Inc. It enables management and playback of multimedia contents including music and movies. iTunes supports many main file formats including AAC, WAV, and MP3.
M
MP3 (MPEG Audio Layer-3)
This is an internationally standardized audio data compression scheme, using the "MPEG-1" video compression standard. It compresses the data volume to about one eleventh its original size while maintaining sound quality equivalent to a music CD.
MPEG (Moving Picture Experts Group), MPEG-2, MPEG-4
These are the names for digital compression format standards used for the encoding of video and audio. Video standards include "MPEG-1 Video", "MPEG-2 Video", "MPEG-4 Visual", "MPEG-4 AVC". Audio standards include "MPEG-1 Audio", "MPEG-2 Audio", "MPEG-4 AAC".
N
Network Names
(SSID: Security Set Identifier)
When forming wireless LAN networks, groups are formed to prevent interference, data theft, etc. This grouping is done by "SSID" or "Security Set Identifiers". For further security, a WEP key is set and signal transfer is not possible unless the SSID and WEP key match.
P
Protection Circuit
This is a function to prevent damage to devices within the power supply when an abnormality such as an overload, excess voltage occurs or temperature for any reason.
In this unit, the power indicator blinks and the unit enters standby mode when an abnormality occurs.
s
Sampling frequency
Sampling involves taking a reading of a sound wave (analog signal) at regular intervals and expressing the height of the wave at each reading in digitized format (producing a digital signal).
The number of readings taken in one second is called the "sampling frequency". The larger the value, the closer the reproduced sound is to the original.
T
TKIP (Temporal Key Integrity Protocol)
This is a network key used for WPA. The encryption algorithm is RC4, the same as for WEP, but the security level is increased by changing the network key used for encryption for each packet.
Explanation of terms
V
vTuner
This is a free online content server for Internet radio. Note that usage fees are included in upgrade costs.
For inquiries about this service, visit the vTuner site below.
vTuner website: http://www.radiodenon.com
This product is protected by certain intellectual property rights of Nothing Else Matters Software and BridgeCo. Use or distribution of such technology outside of this product is prohibited without a license from Nothing Else Matters Software and BridgeCo or an authorized subsidiary.
W
WEP Key (Network Key)
This is key information used for encrypting data when conducting data transfer. On this unit, the same WEP key is used for data encryption and decryption, so the same WEP key must be set on both devices in order for communications to be established between them.
Wi-Fi®
Wi-Fi Certification assures tested and proven interoperability by the Wi-Fi Alliance, a group certifying interoperability among wireless LAN devices.
Windows Media DRM
This is a copyright protection technology developed by Microsoft.
Content providers are using the digital rights management technology for Windows Media contained in this device (WM-DRMI) to protect the integrity of their content (Secure Content) so that their intellectual property, including copyright, in such content is not misappropriated. This device uses WM-DRM software to play Secure Content (WM-DRM Software). If the security of the WM-DRM Software in this device has been compromised, owners of Secure Content (Secure Content Owners) may request that Microsoft revoke the WM-DRM Software's right to acquire new licenses to copy, display and/or play Secure Content. Revocation does not alter the WM-DRM Software's ability to play unprotected content. A list of revoked WM-DRM Software is sent to your device whenever you download a license for Secure Content from the Internet or from a PC. Microsoft may, in conjunction with such license, also download revocation list onto your device on behalf of Secure Content Owners.
Windows Media Player Ver.11 or later
This is a media player distributed free of charge by Microsoft Corporation.
It can play playlists created with Ver.11 or later of Windows Media Player, as well as WMA, DRM WMA, WAV, and other files.
WMA (Windows Media Audio)
This is audio compression technology developed by Microsoft Corporation.
WMA data can be encoded using Windows Media ^® Player Ver.7, 7.1, Windows Media ^® Player for Windows ^® XP and Windows Media ^® Player 9 Series.
To encode WMA files, only use applications authorized by Microsoft Corporation. If you use an unauthorized application, the file may not work properly.
WPA (Wi-Fi Protected Access)
This is a security standard established by the Wi-Fi Alliance. In addition to the conventional SSID (network name) and WEP key (network key), it also uses a user identification function and encrypting protocol for stronger security.
WPA2 (Wi-Fi Protected Access 2)
This is a new version of the WPA established by the Wi-Fi Alliance, compatible with more secure AES encryption.
WPA-PSK/WPA2-PSK (Pre-shared Key)
This is a simple authentication system for mutual authentication when a preset character string matches on the wireless LAN access point and client.
WPS (Wi-Fi Protected Setup)
This is a standard drawn up by the Wi-Fi Alliance to ease the task of setting up wireless LAN connections and configuring security.
There are two methods: push-button and PIN (Personal Identification Number) code.
Troubleshooting
If a problem should arise, first check the following:
-
Are the connections correct?
-
Is the set being operated as described in the owner's manual?
-
Are the other devices operating properly?
If this unit does not operate properly, check the items listed in the table below. Should the problem persist, there may be a malfunction.
In this case, disconnect the power immediately and contact your store of purchase.
[General]
| Symptom Cause/Solution Page | ||
| Power does not turn on. | Check whether the power plug is correctly inserted into the power outlet. | 5 |
| The operation buttons on the upper part of this unit flash white approximately every 2 seconds. | The protection circuit has been activated by a rise in the humidity inside the unit. Please turn off power once, and re-apply the power after the temperature has fallen sufficiently.Please re-install this unit in a place having good ventilation. | 29- |
| The operation buttons on the upper part of this unit flash white approximately every 0.5 seconds. | This unit amplifier circuit has failed. Turn off the power and please contact the DENON service adviser. | - |
| Set does not operate properly. | Reset the microprocessor. | 33 |
[Audio]
| Symptom Cause/Solution Page | ||
| Audio is not output. | Check the connections for all devices.Check whether the audio device power is turned on.Adjust the master volume.Check the connection with the playback device and select the proper input source. | 6, 9, 10--1313 |
[iPod / Internet radio / Music server ]
| Symptom Cause/Solution Page | ||
| iOS device cannot be played. | Some iOS devices do not support being used connected directly to the Dock connector. | 6 |
| The file names are not displayed properly I"...", etc.). | Characters that cannot be displayed are used. This is not a malfunction. On this unit, characters that cannot be displayed are replaced with a "..." (period). | - |
| Internet radio cannot be played. | Ethernet cable is not properly connected or network is disconnected. Check the connection status.Program is being broadcast in non-compatible format. Only Internet radio programs in MP3 and WMA can be played on this unit.The firewall of the PC or router has been activated. Check the firewall settings of the connected PC or router.Radio station is not currently broadcasting. Choose a radio station that is currently broadcasting.IP address is wrong. Check the set's IP address.Some radio stations may go silent at certain times of the day. In this case, no audio is output even when a station is received. Try again later, or switch to another radio station. | 9, 1017--23- |
| Files stored on a computer cannot be played. | Files are stored in a non-compatible format. Record in a compatible format.You are attempting to play a file that is copyright protected. Files that are copyright protected cannot be played on this unit.Media sharing settings are not correct. Change media sharing settings so that the unit can access the folders on your computer. | 191918 |
| Music stored on a NAS cannot be played. | If you use a NAS in conformity with the DLNA standard, enable the DLNA server function in the NAS setting.If you use a NAS that does not conform with the DLNA standard, play the music via a PC. Set Windows Media Player's media sharing function and add NAS to the selected play folder.If connection is restricted, set audio equipment as the connection target. | -18- |
| Server is not found, or it is not possible to connect to the server. | The computer's or router's firewall is activated. Check the computer's or router's firewall settings.Computer's power is not turned on. Turn on the power.Server is not running. Launch the server.Set's IP address is wrong. Check the set's IP address. | --23 |
| Cannot connect to preset radio stations. | Radio station is not currently broadcasting. Wait a while before trying again.Radio station is not currently in service. It is not possible to connect to radio stations that are no longer in service. | -- |
| For some radio stations, "Radio station server full" or "Connection down" is displayed and station cannot be connected to. | Station is congested or not currently broadcasting. Wait a while before trying again. | - |
| Sound is broken during playback. | Network signal transfer speed is slow or communications lines or radio station is congested. This is not a malfunction. When playing broadcast data with a high bit rate, the sound may be broken, depending on the communications conditions. | - |
| Sound quality is poor or noise is heard during play. | File being played has a low bit rate. This is not a malfunction. - | |
[AirPlay]
| Symptom Cause/Solution Page | ||
| The AirPlay iconIs not displayedin iTunes or on theiPhone/iPod touch/iPad. | This unit and the computer or iPhone/iPod touch/iPad are not connected to the same network (LAN). Connect the computer or iPhone/iPod touch/iPad to the same network as this unit.Tunes or the iPhone/iPod touch/iPad do not have firmware that supports AirPlay installed. Update to the latest firmware | 9.1024 |
| No sound. | The volume in iTunes or on the iPhone/iPod touch/iPad is set to the minimum setting. Adjust the volume to the optimum level.This unit is not selected in the screen that is displayed when iTunes or the iPhone/iPod touch/iPad is started. Start iTunes or switch on the iPhone/iPod touch/iPad, click the AirPlay iconin the displayed screen, and select this unit.AirPlay playback has not started. Click thebutton in iTunes or press thebutton on the iPhone/iPod touch/iPod. | -15- |
| When using AirPlay with the iPhone/iPod touch, the sound suffers from intermittent breaks or AirPlay does not function. | Quit the application running in the background of the iPhone/iPod touch, and then play using AirPlay.When playing via a wireless connection, outside conditions may affect the unit. To remedy this, change the network environment, e.g. shorten the distance to the wireless LAN access point.Update the iPhone/iPod touch application or iTunes to the latest version. | -- |
[Remote control unit]
| Symptom Cause/Solution Page | ||
| The set cannot be operated with the remote control unit. | Batteries are worn out. Replace with new batteries.Operate the remote control unit within a distance of about 7 m from this unit and at an angle of within 30^ .Remove any obstacle between this unit and the remote control unit.Insert the batteries in the proper direction, checking the and marks.The set's remote control sensor is exposed to strong light (direct sunlight, inverter type fluorescent bulb light, etc.). Move the set to a place in which the remote control sensor will not be exposed to strong light. | 333333 |
Resetting the microprocessor
When the microprocessor is reset, all the settings are reset to their default values.
1 Press + and - at the same time. Turns on the menu settings mode and the menu appears on the display (page 20 "Menu map").
2 Press + or - to select "Factory Reset", then press ▶II.
3 Press + or - to select "Reset? Yes", then press ▶II. "Initialized" is displayed and the default settings are restored.


If "Initialized" does not display in step 3, start over from step 1.
Specifications
□Audio section
- Amplifiers 2 x 25 W ClassD - Drivers 2 x 100 mm Woofer
Clock
- Clock method Within 1 – 2 minutes per month
□Wireless LAN
Network type
(wireless LAN standards):
Transfer rate: DS-SS: 11/5.5/1 Mbps
Security: SSID (Network name)
Conforming to IEEE 802.11b
Conforming to EEE 802.11g (Conforming to Wi-Fi®)*
(Automatic switching)
OFDM: 54/18/36/24/18/12/9/6 Mbps (Automatic switching)
WEP key (network key) (64/128 bits)
WPA-PSK (TKIP/AES)
WPA2-PSK (TKIP/AESI
Used frequency range: 2.412 MHz - 2.472 MHz
No. of channels: Conforming to IEEE 802.11b : 13ch (DS SS) (OI which 1 channel used)
Conforming to EEE 802.11g : 13ch (OFDM) (Of which 1 channel used)
□General
AC adapter:
Input: 100 - 240 V 50/60 Hz
Output: DC 20 V, 2.5 A
* Wi-Fi conformity indicates tested and proven interoperability by the "Wi-Fi Alliance", a group certifying interoperability among wireless LAN devices.
For purposes of improvement, specifications and design are subject to change without notice.
Index
A
Accessories 1
Adjusting the master volume 13
Adjusting the tone 14
AES 29
AirPlay 15,29
App Store 3,15,29
Auto Adjust 21
Auto Adjust Now 22
Auto standby 24
B
Bit rate 29
C
Cable
Ethernet cable 10
Power cord 5
Stereo mini plug cable 5
Clock
Auto Adjust 21
Auto Adjust Now 22
Manual Adjust....22
Summer Time 22
Time Zone 21
Cocoon App....3, 17, 18
Condensation 2
Connection
Home network (LAN)....7
OS device 6
Portable player 5
Power cord 5
Wired LAN 10
Wireless LAN 9
D
DHCP 10
Display 26
DLNA....18,29
19F
Firmware Update 24
FLAC 19,29
Front Panel 26
H
How to eject/store the Dock 6
[NO TEXT]
IEEE 802.11b 29
IEEE 802.11g 29
Inputting characters 23
iTunes 15,29
L
Language 21
M
Manual Adjust 22
Max Vol Level 23
Menu map 20
Menu operation....20
MP3 17.19.29
MPEG 19.29
N
NETLINK 11
Network Info 23
Network Info.
Firmware Update 24
PIN code method 23
Network Names 29
150
Operation Mode 14
P
Playback
AirPlay function 15
FLAC 19
Internet radio 17
OS device 14
MP3 17,19
MPEG-4 AAC 19
Music server 18
NAS 18
PC 18
Portable player 17
WAV 19
WMA 17,19
Progressive 29
Protection circuit 29
R
Rear panel 27
Remote control unit 27
Inserting the batteries 3
Resetting the microprocessor 33
S
Sampling frequency 17, 19, 29
Security slot 27
Selecting the input source 13
Setting the current time 13
Setting the volume limit
(Max Vol Level) 23
Summer Time 22
Supported iPod models 6
GPT
Time Zone 21
TKIP 29
Trademark 2B
Troubleshooting 31
Turning the power on 13
V
vTuner 30
W
WAV 19
WEP Key 30
Wi-Fi 30
Windows Media DRM 30
Windows Media Player 18,30
WMA 17, 19, 30
WPA 30
WPA2 30
WPA-PSK/WPA2-PSK 30
WPS 9,23,30
Dimensions
Unit: mm
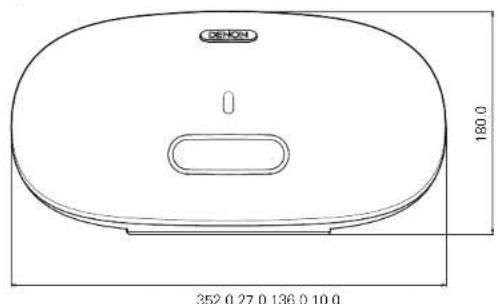

natural_image
Technical line drawing of a mechanical component with a circular housing and mounting base (no text or symbols)Weight : 3.3 kg
DENON
www.denon.com
D&M Holdings Inc. 3520 10122 00AD


- WARNING:
- IMPORTANT SAFETY INSTRUCTIONS
- CAUTION:
- CE①
- R&TTE Directive 1999/5/EC
- Rechargeable battery precautions
- • DECLARATION OF CONFORMITY
- A NOTE ABOUT RECYCLING:
- IMPORTANT NOTICE: DO NOT MODIFY THIS PRODUCT
- CAUTION
- NOTES ON USE
- WARNINGS
- □ CAUTIONS ON INSTALLATION
- Getting started
- Accessories
- Features
- Equipped with a lithium-ion battery
- Equipped with a Dock that supports iPhone® and iPod touch® (page 6)
- Compatible with the AirPlay® function (page 15)
- Compatible with "Cocoon App" for performing basic operations of the unit with an iPhone and iPod touch (page 3)
- Equipped with Wi-Fi capabilities including Wi-Fi Protected Setup (WPS) (page 9)
- Compatible with the Internet radio (page 17) Also equipped with the Music Server function that plays back audio content on the network (page 18)
- Equipped with an organic EL display with great visibility
- Cautions on handling
- • Before turning the power on
- - About condensation
- • Cautions on using mobile phones
- - Moving the unit
- - About care
- Remote operation
- About the remote control unit
- Before using
- ☐Inserting the batteries
- NOTE
- ☐Operating range of the remote control unit
- Cocoon App
- Preparations
- ● Connections page 5
- ● Connecting to a home network (LAN) page 7
- Connections
- Connecting the power cord
- Connecting a portable player
- Connecting an iOS device
- Supported iPod models
- How to eject/store the Dock
- Connecting to a home network (LAN)
- Required system
- Broadband internet connection
- □Modem
- Router
- ☐Ethernet cable (supplied)
- (CAT-5 or greater recommended)
- Network connections and settings
- Using a router equipped with the wireless LAN function
- Using a router that is not equipped with the wireless LAN function
- Using PC to make network settings of this unit
- □When your router is equipped with a WPS button
- Press the WPS button of the router.
- Press WPS on the rear panel.
- When your router is not equipped with a WPS button and you are using iPhone or iPod touch
- Download "Cocoon App" to your iPhone or iPod touch from App Store.
- Start the application.
- When the "Setup" screen is displayed, tap "NetLink".
- Enter the encryption key.
- Place your iPod or iPhone in the dock of this unit (page 6).
- Tap "JOIN".
- □When "DHCP" is set to "On" on your router
- Connect the supplied Ethernet cable by referring to the above figure.
- Press ⏻ to turn on power to the main unit.
- □When "DHCP" is set to "Off" on your router
- Complete steps 1-4 in "When this unit is connected to your PC through wireless LAN" (page 11).
- On the page that appears, set the information necessary for the network connection.
- □ When this unit is connected to your PC through wireless LAN
- Operations
- ● Playback page 13
- ● How to make detailed settings page 20
- Playback
- Turning the power on
- □When power is switched to standby
- Completely turning off the power
- Setting the current time (Auto Adjust) (24-Hour Display)
- Operations possible during playback
- Selecting the input source
- Adjusting the master volume
- Adjusting the tone (LOUDNESS)
- Various memory functions
- Last function memory
- Playing an iOS device
- ☐Disconnecting the iOS device
- AirPlay function
- □Streaming music stored in iPhone, iPod touch or iPad directly to the unit
- □Playing iTunes music with this unit
- Selecting multiple speakers (devices)
- Listening to internet radio
- Important information
- Listening to preset Internet radio stations
- Prepare for playback.
- Playing a portable player
- Playing back files stored on PC or NAS with Cocoon App (Music server)
- Applying media sharing settings
- ☐Sharing media stored in PC
- Settings for playing back with Windows Media Player 12 (Windows 7)
- Settings for playing back with Windows Media Player 11
- Sharing media stored in NAS
- About playback
- How to make detailed settings
- Menu operation
- Setting the language (Language)
- Setting the clock (Clock)
- Adjusting the clock automatically (Auto Adjust)
- Setting the Time Zone (Time Zone)
- Setting the Summer Time (Summer Time)
- Setting the current time (Auto Adjust Now)
- Setting the current time (Manual Adjust) (24-Hour Display)
- Setting the volume limit (Max Vol Level)
- Setting the network (Network Info.)
- Checking the network information
- WPS Settings (PIN code method)
- Firmware Update
- □Notes concerning use of "Firmware Update"
- Auto standby
- Informations
- Part names and functions
- Front panel
- ① Display
- Rear panel
- Remote control unit
- Other information
- Trademark information
- Explanation of terms
- A
- F
- AES (Advanced Encryption Standard)
- AirPlay
- App Store
- B
- Bit rate
- D
- DLNA
- FLAC
- 1
- IEEE 802.11b
- iTunes
- M
- MP3 (MPEG Audio Layer-3)
- MPEG (Moving Picture Experts Group), MPEG-2, MPEG-4
- N
- Network Names
- (SSID: Security Set Identifier)
- P
- Protection Circuit
- s
- Sampling frequency
- T
- TKIP (Temporal Key Integrity Protocol)
- V
- vTuner
- W
- WEP Key (Network Key)
- Wi-Fi®
- Windows Media DRM
- Windows Media Player Ver.11 or later
- WMA (Windows Media Audio)
- WPA (Wi-Fi Protected Access)
- WPA2 (Wi-Fi Protected Access 2)
- WPA-PSK/WPA2-PSK (Pre-shared Key)
- WPS (Wi-Fi Protected Setup)
- Troubleshooting
- Resetting the microprocessor
- Specifications
- □Audio section
- Clock
- □Wireless LAN
- □General
- Index
- C
- 19F
- H
- [NO TEXT]
- L
- 150
- R
- GPT
- Dimensions
- DENON
Brand : DENON
Model : Cocoon Portable DSD300BKE2
Category : Docking Station