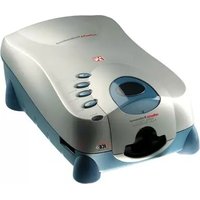
RPS 7200 - Scanner Reflecta - Free user manual and instructions
Find the device manual for free RPS 7200 Reflecta in PDF.


| Product Type | Film Scanner |
| Brand | Reflecta |
| Model | RPS 7200 |
| Optical Resolution | Up to 7200 dpi |
| Color Depth | 8-bit or 16-bit per channel |
| Interfaces | USB 2.0, IEEE 1394 (FireWire) |
| Power Adapter | Input: 100-240V AC, Output: 12V DC |
| Dimensions (Approximate) | 10 x 6 x 4 inches (25 x 15 x 10 cm) |
| Weight | About 4.4 lbs (2 kg) |
| Supported Film Types | 35mm film strips and slides (color/black & white, positive/negative) |
| Software | CyberView X-MF (TWAIN/Plug-in), compatible with Adobe Photoshop Elements |
| Special Features | Auto focus, ROC (color restoration), GEM (grain enhancement) for models with Digital ICE3 technology |
| Operating Temperature | 50°F to 104°F (10°C to 40°C) |
| Operating Humidity | 15% to 76% RH (non-condensing) |
| Package Contents | Scanner, power adapter, USB cable, IEEE1394 cable, CyberView CD, software CD, user manual, 2 slide mounts |
| Safety Certifications | FCC Class B, CE |
Frequently Asked Questions - RPS 7200 Reflecta
User questions about RPS 7200 Reflecta
0 question about this device. Answer the ones you know or ask your own.
Ask a new question about this device
Download the instructions for your Scanner in PDF format for free! Find your manual RPS 7200 - Reflecta and take your electronic device back in hand. On this page are published all the documents necessary for the use of your device. RPS 7200 by Reflecta.
USER MANUAL RPS 7200 Reflecta
Federal Communications Commission (FCC) Statement
This Equipment has been tested and found to comply with the limits for a class B digital device, pursuant to Part 15 of the FCC rules. These limits are designed to provide reasonable protection against harmful interference in a residential installation. This equipment generates, uses and can radiate radio frequency energy and, if not installed and used in accordance with the instructions, may cause harmful interference to radio communications. However, there is no guarantee that interference will not occur in a particular installation. If this equipment does cause harmful interference to radio or television reception, which can be determined by turning the equipment off and on, the user is encouraged to try to correct the interference by one or more of the following measures :
- Re-orient or relocate the receiving antenna.
- Increase the separation between the equipment and receiver.
- Connect the equipment into an outlet on a circuit different from which the receiver is connected to.
- Consult the dealer or an experienced radio/TV technician for help.
Warning :
Use only shielded signal cables to connect I/O devices to this equipment.
You are cautioned that changes or modifications not expressly approved by the party responsible for compliance could void your authority to operate the equipment.
Power Adapter :
Model A:
natural_image
Technical line drawing of a mechanical device with internal components (no text or symbols)User's Manual
TABLE OF CONTENTS
GETTING STARTED....2
PACKAGE CONTENTS....2
QUICK INSTALLATION GUIDE....3
TO INSTALL SOFTWARE AND DRIVER (FOR PC USER)....3
TO INSTALL SOFTWARE AND DRIVER (FOR MAC USER)......3
TO INSTALL HARDWARE....4
HOW TO SCAN FILM OR SLIDE....6
CYBERVIEW X - MF USER'S INTERFACE....9
I、MAIN WINDOW AREA【FIXED WINDOW】....10
II、PREVIEW WINDOW AREA 【FIXED WINDOW】....18
Ⅲ、ACTIVE FRAME SETTING WINDOW AREA 【FLOATING WINDOW】...20
IV、THUMBNAIL PANEL WINDOW AREA 【FLOATING WINDOW】……21
TECHNICAL SUPPORT....22
GETTING STARTED
Check the package content before getting started.
For Quick Installation please refer to Quick Installation Guide. (Ref. Pg. 3\~5)

Important! Save the original box, receipt and packing material for possible shipping needs.
Package Contents
- Film Scanner.
• Power Adapter and Cable.
Warning! Using any other power adapter may severely damage the scanner and will void the product warranty.
- USB Cable.
- IEEE1394 Cable.
- CyberView X – MF Driver CD. (MF means for Multiple Frames capability)
- TWAIN or Plug-In compliant application software CD.
- Printed User Manual.
- 2 Slide Mounts.
REMARKS :
- The models implanted with Digital ICE 3TM TECHNOLOGY please refer to Digital ICE 3TM user's guide.
- TWAIN or Plug-In compliant application software means the imaging software such as Photoshop Elements, this is subject to change without notice.
| Operating Ambient Temperature Range50° to 104°F (10° to 40°C) |
| Note: Do not turn on the scanner unless it is within this range.If the scanner has been stored or transported outside of this range, allow it to return to within this range before turning it on. |
| Operating Ambient Humidity Range15% to 76% relative humidity (non-condensing) |
| Note: If the scanner is stored or to be transported in cold temperature and then brought into a warm / humid environment condensation may occur. |
QUICK INSTALLATION GUIDE (QIG)
TO INSTALL SOFTWARE AND DRIVER... (For PC User)

IF WINDOWS XP IS INSTALLED ON YOUR SYSTEM DURING DRIVER INSTALLATION A LOGO TESTING DIALOGUE BOX MAY APPEAR, IF THIS IS THE CASE PLEASE SELECT "CONTINUE ANYWAY".
Be sure to install the Application Software BEFORE installing the scanner driver CyberViewX -MF.
You may install the scanner driver directly if you have already installed TWAIN compliant application software in your computer.
a. Place the TWAIN or Plug-In compliant application software CD into CD-ROM. If you have CD auto play switched off then you will need to explore the CD and double click the file "AutoPlay.exe" and follow the on-screen instructions to complete the installation then eject the CD.
b. Place the CyberView X-MF CD into CD-ROM, which will auto play. If you have auto play switched off on the CD drive then you will need to explore the CD and double click the file "LAUNCH.EXE", click the "CyberView X" and follow the on-screen instructions to complete the installation.
Notice : If you are Win XP users, please DO NOT eject the CyberView X - MF CD after rebooting. After rebooting, turn on the power of scanner. Windows XP will detect USB or IEEE 1394 hardware then search for the driver on the CD :
- In "Found New Hardware Wizard" window, select "Install the software automatically (Recommended) and click "Next".
- In "Completing the Found New Hardware Wizard" window, click "Finish", then eject the CD.
TO INSTALL SOFTWARE AND DRIVER... (For MAC User)
MAC user before Installing the Scanner Driver...
Be sure to install Application Software, BEFORE installing the scanner driver CyberView X - MF.
You may install the scanner driver directly if you had already installed TWAIN compliant application software in your computer.
a. Place the TWAIN or Plug-In compliant application software CD into CD-ROM and double click the icon to install the program then eject the CD.
b. Place the CyberView X-MF driver CD into CD-ROM, double click the "CyberView X-MF" icon on the desktop then "CyberView X installer" folder to install the driver.
TO INSTALL HARDWARE...
Connect The Film Scanner...
1. To a power source
- Make sure scanner is power OFF.
- Make sure the adapter is complies with local voltage.
- Plug the AC adapter in AC power source FIRST then plug the other end of power adapter to the port on the back panel of scanner.

natural_image
Simple line drawing of an electronic device with a power outlet connected to a wall-mounted cable (no text or symbols)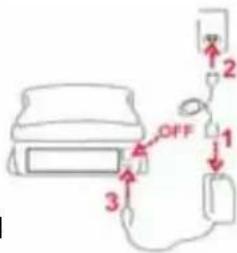
2. For product with the USB interface.
- Attach one end of USB cable to computer.
- Attach another end of USB cable to the port on the back panel of scanner.
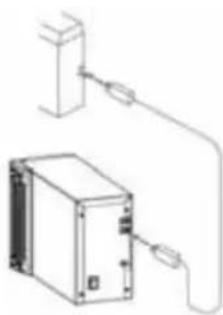
3. For products that have both USB and IEEE 1394 interface, there is a switch for USB or IEEE1394 interface on the back panel. You can connect either USB or IEEE 1394 interfaces to your scanner and computer.
Connect the scanner with USB interface
- Turn the switch to USB interface before power on the scanner.
- Attach the USB cable to computer.
- Attach another end to scanner.
Connect the scanner with IEEE 1394 interface
- Turn the switch to IEEE 1394 interface on the back panel before you power on the scanner.
- Attach the IEEE1394 cable to computer.
- Attach the other end to scanner.
※ On the back panel, there is the symbol ✅ for IEEE 1394 and the symbol ✅ for USB.
natural_image
Technical line drawing of an electrical enclosure with wiring and grounding (no text or symbols)
Attention Before Scanning...
Make sure there is no filmstrip inside scanner before you insert the slide and there is no slide inside scanner before you insert the filmstrip.
※ Please note the slide and filmstrip cannot be put into the scanner at the same time.
1. With a filmstrip / roll film
Please hold a 35mm filmstrip at least 3 frames from the beginning end (recommend 4 frames). The scanner will load the filmstrip automatically when you insert it up to the 3rd frame of the film. You can scan the color negatives, color slide film, or black and white negative films. If your filmstrip is less than 3 frames, it is recommended to cut them into individual frames and put them in the slide mount.
Notice : If the first film is transparent or blank, please cut it off.
Model A
1-1. Turn on the scanner and the computer.
1-2. Clean the filmstrip using compressed air or a soft brush.
1-3. Make sure there is no slide inside the scanner.
1-4. Make sure the image of the film is right side up, feed the filmstrip gently into the upper film entrance until the film is pulled into the scanner.

natural_image
Technical line drawing of a mechanical device with no visible text or symbolsModel B
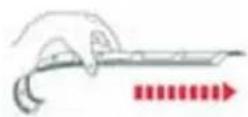
1-1. Insert the filmstrip with emulsion side up from the left film entrance.
1-2. Scanner will auto load and position the first frame in the center of the viewing window, if the first frame is not at the correct position, please move it by clicking "FORWARD" or "REVERSE" button and you can also move it via the fine tuning function in CyberView X - MF interface.
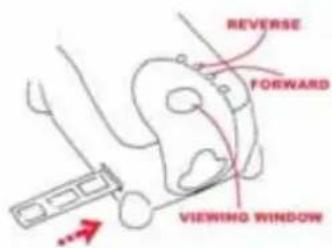
※To load the film easily by holding the 3rd frame of the filmstrip which is bent downward.
Model A. Model B.

2. With a slide
Model A.
2-1. Please use single mounted 35mm slides.
2-2. Push the front sliding door down until it locks into position.
2-3. Hold the slide vertically with the image side facing left and longer side parallel to the slot.
2-4. Push slide gently and completely into the scanner, to remove, push the eject button next to the slot and pull slide out from the scanner.

natural_image
Simple line drawing of a rectangular box with an internal opening, no text or symbols present.Model B.
2-1. Please use single mounted 35mm slides.
2-2. Insert the mounted slide with emulsion side (shiny side) up into the slot completely.

natural_image
Simple line drawing of a vehicle's head and front view with a red arrow pointing to the side (no text or symbols)HOW TO SCAN FILM OR SLIDE
Start to Scan...
STEP 1 – Acquire Driver
Put the frame or filmstrips into scanner then open Adobe Photoshop Elements or other TWAIN compliant application software.
Photoshop Elements... (For PC and MAC User)
Open the Photoshop Elements and select "File→ Import" then choose "CyberView X - MF..." to acquire the TWAIN driver.
STEP 2 – Scan Setting ...
Select the film type, brand and model.
EX : If the film is Fuji 200 Negative then select "Negative > Fuji > Fuji 200".

If you are MAC User, select the film type and model.
EX : If the film is Agfa 200 Negative then select "Negative Film > Agfa 200".

STEP 3 – Pre-scanning...
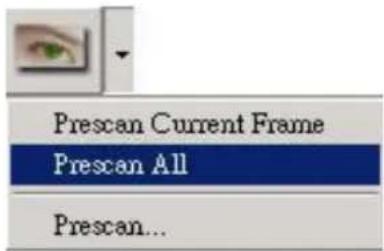
Select the "Prescan Current Frame" to pre-scan a existing film or "Prescan All" to pre-scan a filmstrip or a single roll film.

【Single Pre-scan】
【Multi-Pre-scan】
Fine Tuning Function:
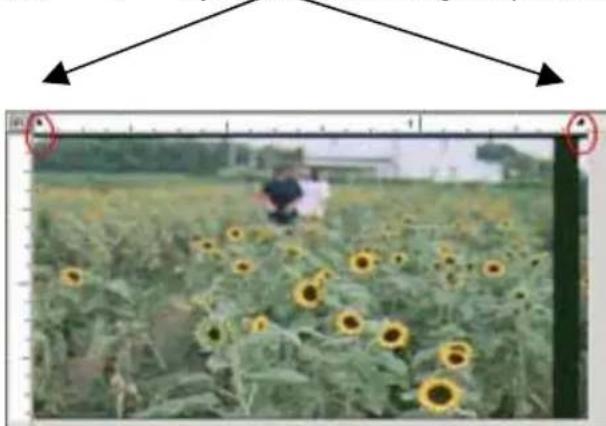
If the first frame is not in the correct position, use the fine tuning function to adjust the first film frame to an accurate location.
【Drag the “L” or “J” symbol to fine tuning the position】
natural_image
Field of sunflowers with a person standing in the background, no visible text or symbolsSTEP 4 – To Set Desired Resolution...
Setup the resolution of scanning image, the default image resolution is 1800dpi.
Notice : The higher resolution you set the more scanning time is needed and larger hardisk space required.
Ex : The color image file size for one side with different resolution:
| Scanning Resolution Color Depth Hard Discs Space | ||
| 300dpi 8 bit About 350KB | ||
| 600dpi 8 bit About 1 MB | ||
| 1800dpi 8 bit About 11 MB | ||
| 3600dpi 24 bit About 52 MB | ||
| 7200dpi | 24bit | About |
208MB

Choose "Scan Current Frame" to scan an existing frame or "Scan All" to scan a filmstrip or a single roll film.

【Single Scan】

【Multi-Scan】
STEP 6 – Exit
After scanning film(s), all of the images will transfer to the imaging application software
(ex : Adobe Photoshop), click the sign of "X" or "Scan > Exit" to close the driver then you can edit, save and print the image from the application software.
Please note: When scanning multiple images at high resolution (i.e. a roll of film) it is advisable to select the Scan All to file" option, mutilpe images scanned at high resolution will take up a lot of system RAM and may lock up your computer if the amount of available RAM is exceeded.
CyberView X – MF USER INTERFACE

Description of CyberView X - MF
There are four major parts of CyberView X – MF user interface
1. Main Window Area【Fixed Windows】
Menu Command
Scan
1. Prescan
Prescan Current Frame : Pre-scan an existing frame.
Prescan All : Pre-scan a filmstrip or a single roll film you loaded.
Prescan... : Pre-scan the current film or designate film(s) separated by comma symbol.

2. Scan
2-1 Scan Current Frame : Scan the current frame.
2-2 Scan Selected : Scan the film(s) you selected.
2-3 Scan All : Scan a filmstrip or a single roll film you loaded.
2-4 Scan Current Frame to File... : Scan the existing film to a file and set the file path, file name, file type and jpeg quality, then click "OK".

i. Select Browse and choose the designated folder you wish to save the scanned image to.
ii. Enter the file name.
iii. Trailing Index after Base File Name
-Digits: user can adjust the digits to define the length of the file name and it Hill support up to 6 digits at most)
-Options:
use Film Index: Automatically accumulate the number and the default number is 1 user Defined Start Number: user can change the default number
iv. Choose the file type to "TIF" or "JPG".
v. Choose image quality in JPEG mode. (Good, Better, or Best compression, Best provides the highest quality JPEG setting with the least amount of compression)
2-5 Scan Selected to File : Scans only selected frames to file(s).
2-6 Scan All to File : Scans a filmstrip or a single roll film you loaded to files.
- DMin : Measure the film's minimum density and strip location, this function is only enabled in Negative or Black and White mode.
- Focus: Starts the auto-focus function, if the auto-focus function has already been performed, a window pops up asking you to perform a manual or auto-focus operation.

- Revert : Discard all modifications and restores the image back to the original state in preview windows.
- Preference... : Scan and pre-scan setting windows.

i. "Prescan Resolution" - To set the default per pre-scan resolution.
ii. "Using default real scan resolution" - Click to select the default scan resolution.
iii. "Color Depth" – To set the default color depth "8 bit" or "16 bit" while scanning.
iv. "Scan Mode" – To set the default scan mode "Normal" or "Quality" mode while scanning. Quality mode will take longer time to scan and image process for better quality.

i. "Auto Exposure" -Select to apply Auto Exposure to all of the scanned film(s).
ii. "Auto Gamma" - Select to apply Auto Gamma to all of the scanned film(s).

i. "None" - No prescan will be performed while loading the film or slide.
ii. "Prescan First Frame" - Prescans the first frame after loading the filmstrip or slide.
iii. "Prescan All" – Pre-scan all frames in filmstrip or roll film after loading the filmstrip.
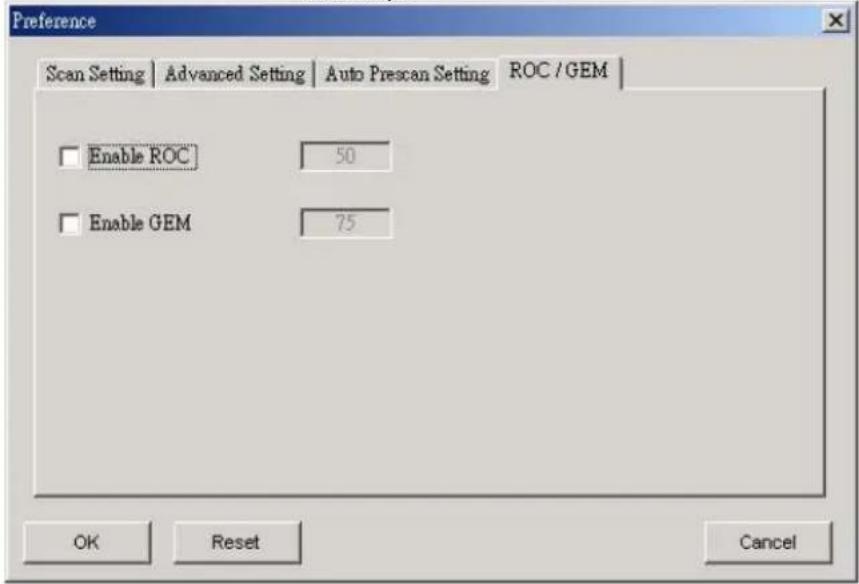
i. Enable or Disable the "Enable ROC" to start or stop the ROC function default while scanning.
ii. Enable or Disable the "Enable GEM" to start or stop the GEM function default while scanning.
- Exit : Closes the CyberView X-MF user interface.
Preview
- Zoom In : Magnify image.
- Zoom Out : Reduce image.
- Rotate 90 Left : Turn the image 90° counter clockwise.
- Rotate 90 Right : Turn the image 90° clockwise.
- Flip Horizontal : Flips the image horizontally.
- Flip Vertical : Flips the image vertically.
Image Adjustment
- Variations : Provides different views of image with options to make changes to highlights midtones etc.
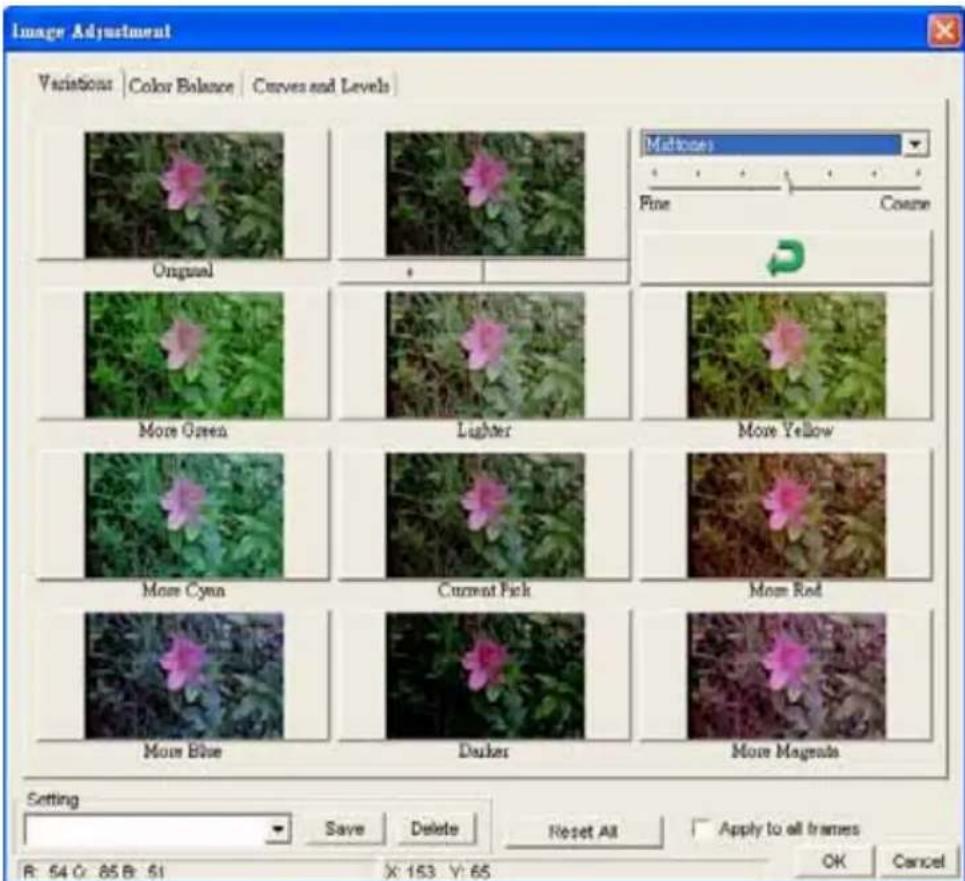
- Color Balance... : To adjust the brightness, contrast, saturation, and color (CMY or RGB) of the image. Comparison between before and after adjusted will be shown for reference.

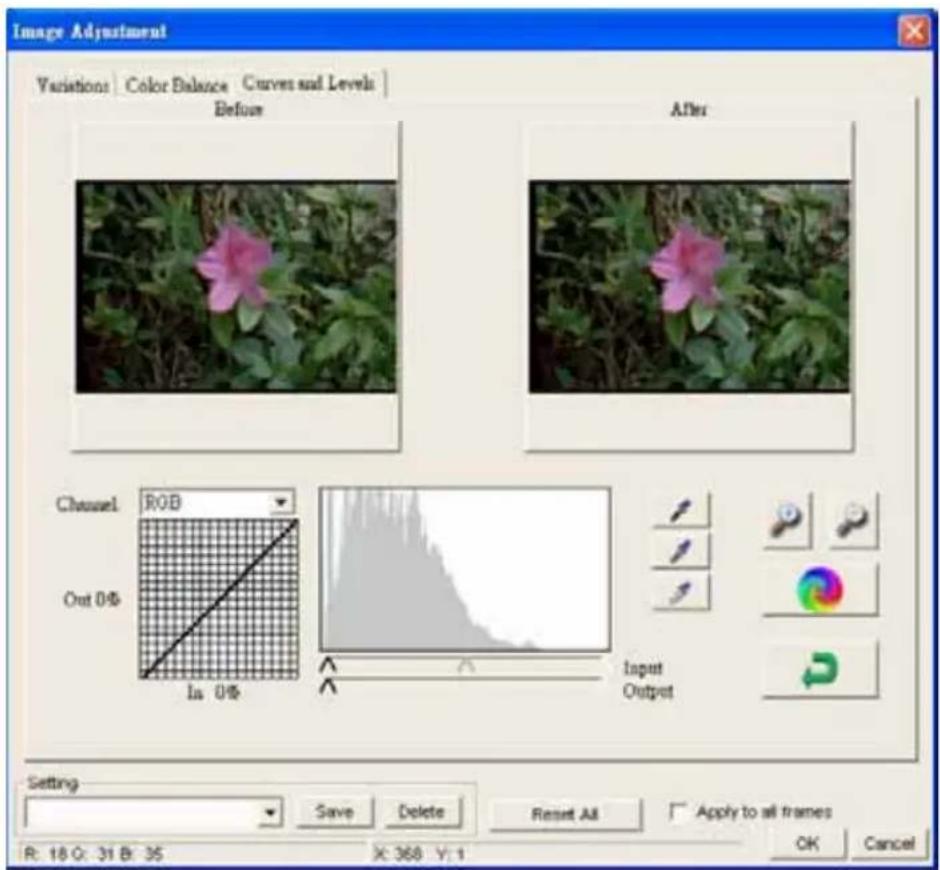
- Curves and Levels... : To adjust image quality by moving Curve and Levels. Comparison between before and after adjusted will be shown for reference.
Windows
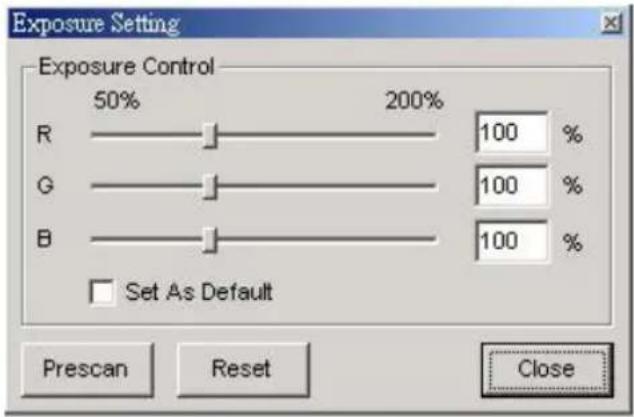
- Exposure Setting... : To adjust the exposure time (R,G, B) press "Reset" to restore to the default setting.
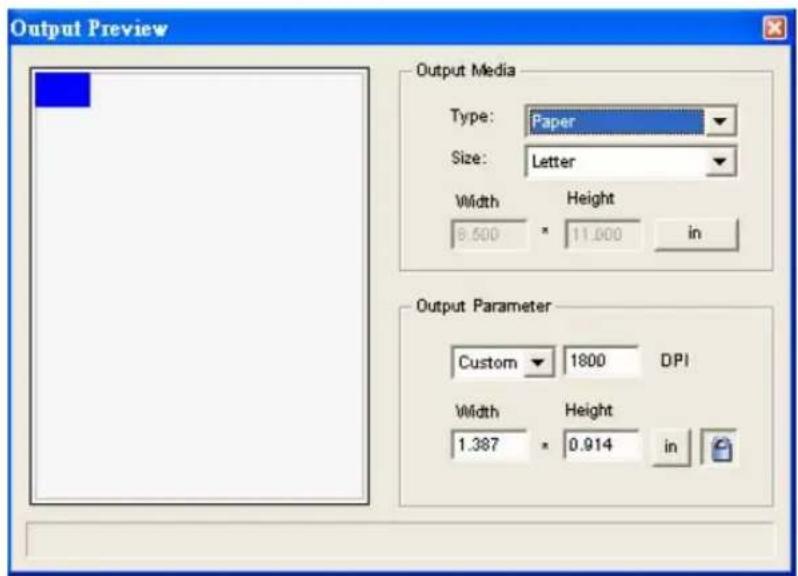
- Output Preview... : To preview the output format of image. A pop-up window to set the output media (type and side), parameter (resolution and size).
Help
- User Manual : Opens the electronic user's manual.
- Update Firmware : Upgrade the firmware version, select the path where the file of firmware has been saved.
- About... : Displays system information (including Operation System, CPU), product information (including product name, model name, hardware version, firmware version, software version), device information (including type of information and optical of resolution).
◆ Function Bar Diagram
In order to optimize scanned image quality, please select your film type and brand from the toolbar.

【Negative】

【Positive】

【Black and White】

Prescan: Pre-scan the current film, press ▼ button down for more options.

Scan: Scan film, press ▼ drop down button for more options.

Image Adjustment: Press ▼ drop down button for more options.

Output Preview: To display the output preview image.

Backward Eject: Eject the roll of film from top.

Forward Eject: Eject the roll of film from bottom.

Backward One Frame: Moves film back one frame.

Forward One Frame: Moves film forward one frame.

Go to...: Will pop-up a dialogue box to prompt you to enter which frame you want to move to.
◆ Status line
To shows the RGB values in the image on the lower right hand corner.
Exposure R: 100% G: 100% B: 100%
To select the scan area, more than one selection could be done at one time.

Zoom In: To magnify the image where the cursor point, the image will be magnified one time every click until maximum multiple (1000%).

Zoom Out: To reduce the size point the cursor to the desired area, the image will reduce by half with every click until the least multiple (25%).

Rotate 90 Left : To rotate the image counter clockwise 90 degrees.

Rotate 90 Right : To rotate the image clockwise 90 degrees.

Flip Horizontal: To Flip the image 180 degrees horizontally.

Flip Vertical: To Flip the image 180 degrees vertically.

Revert: Discard all modifications and restores the image back to the original state in preview windows.

ROC: Automatically restores original colors by analyzing the base image and applying corrections to the faded colors. (Function only for ASF Digital ICE 3TM function build in model.)

GEM: Automatically enhances the clarity of a scanned film image while preserving its colors, gradations and sharpness. (Function only for ASF Digital ICE 3TM function build in model.)
◆ Preview Window
Preview the image you pre-scan, you can select the measurement unit „in“-„cm“-„px“ by clicking the upper left corner.
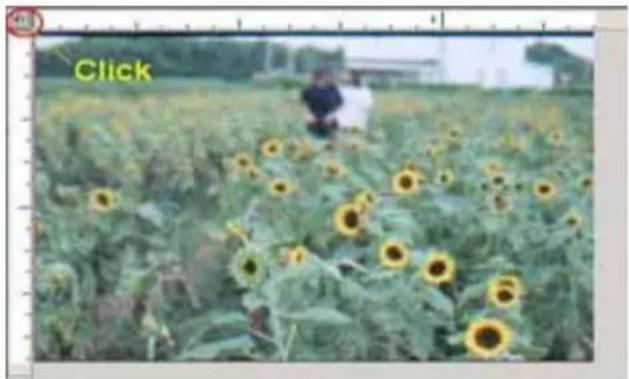
natural_image
Field of sunflowers with a person standing in the background (no visible text or symbols)◆ State Line
On the lower left hand corner, it shows the color level of red、green、blue and coordinates of location 【ex : I】; on the lower right hand corner, it shows the zoom scale, which frame it located, how many blocks you selected 【ex : II】.
R:0 G:0 B:0 X:1.443 Y:1.413
[1]
Zoom Scale: 100% Location: 1 Selections: 1
[II]
Ⅲ、Active Frame Setting Window Area【Floating Window】
A comprehensive advanced mode is available to allow for more user defined adjustments.
Normal mode【ex : I】to set the basic parameter of scan (including scan resolution, film size, color depth).
Advanced mode 【ex : II】 to set the parameter of scan and output (including scan resolution, size, color depth and output resolution, size, scan mode).
The "Active Frame Setting" only imitates in the current preview image, click "Apply to All" to imitate in all preview images.

Normal Mode [I]

Advanced Mode [II]
IV、Thumbnail Panel Window Area【Floating Window】
Displays thumbnail view of pre-scanned images. By default all pre-scanned images are selected. Note the small check mark below each image.
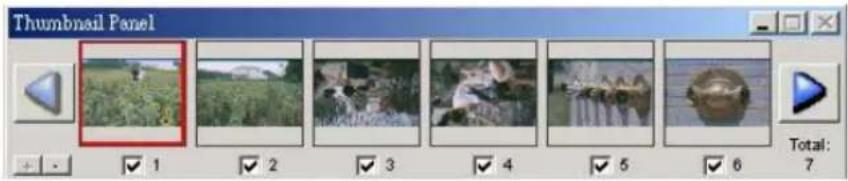
When scanning more than 6 frames (6 at a time are viewable in the thumbnail panel) you may scroll to view more by clicking on the right arrow button. The left / right arrow buttons allow you to scroll through pre-scanned images with ease.

To de-select frames you do not wish to scan click on the check mark box to remove selection.

TECHNICAL SUPPORT
CyberView X - MF
For question regarding film scanner and CyberView X-MF driver, please contact with your dealer immediately.
Bundled application software
For questions regarding bundled application software, you can refer to the HELP function on the application menu bar or visit the software company's website.
**This user manual has also been archived in the packaged CD.

- Federal Communications Commission (FCC) Statement
- Warning :
- TABLE OF CONTENTS
- GETTING STARTED....2
- QUICK INSTALLATION GUIDE....3
- HOW TO SCAN FILM OR SLIDE....6
- CYBERVIEW X - MF USER'S INTERFACE....9
- TECHNICAL SUPPORT....22
- GETTING STARTED
- Package Contents
- REMARKS :
- QUICK INSTALLATION GUIDE (QIG)
- TO INSTALL SOFTWARE AND DRIVER... (For PC User)
- TO INSTALL SOFTWARE AND DRIVER... (For MAC User)
- MAC user before Installing the Scanner Driver...
- TO INSTALL HARDWARE...
- Connect The Film Scanner...
- To a power source
- For product with the USB interface.
- For products that have both USB and IEEE 1394 interface, there is a switch for USB or IEEE1394 interface on the back panel. You can connect either USB or IEEE 1394 interfaces to your scanner and computer.
- Attention Before Scanning...
- With a filmstrip / roll film
- Model A
- Model B
- With a slide
- Model A.
- Model B.
- HOW TO SCAN FILM OR SLIDE
- Start to Scan...
- STEP 1 – Acquire Driver
- Photoshop Elements... (For PC and MAC User)
- STEP 2 – Scan Setting ...
- STEP 3 – Pre-scanning...
- Fine Tuning Function:
- STEP 4 – To Set Desired Resolution...
- STEP 6 – Exit
- CyberView X – MF USER INTERFACE
- Description of CyberView X - MF
- Main Window Area【Fixed Windows】
- Menu Command
- Scan
- Prescan
- Scan
- Preview
- Image Adjustment
- Windows
- Help
- ◆ Function Bar Diagram
- ◆ Status line
- ◆ Preview Window
- ◆ State Line
- Ⅲ、Active Frame Setting Window Area【Floating Window】
- IV、Thumbnail Panel Window Area【Floating Window】
- TECHNICAL SUPPORT
- CyberView X - MF
- Bundled application software
Brand : Reflecta
Model : RPS 7200
Category : Scanner