
dLAN 1200+ - Powerline Adapter DEVOLO - Free user manual and instructions
Find the device manual for free dLAN 1200+ DEVOLO in PDF.


| Product Type | Powerline Adapter (PLC) |
| Brand | Devolo |
| Model | dLAN 1200+ |
| Data Rate | Up to 1200 Mbps |
| Ports | 1x Gigabit Ethernet |
| Frequency Band | 2-68 MHz |
| Security | 128-bit AES encryption |
| Pairing | Automatic or via encryption button |
| Dimensions (W x H x D) | Approx. 70 x 120 x 35 mm |
| Weight | Approx. 150 g |
| Power Consumption | Max 5 W, standby < 0.5 W |
| Operating Temperature | 0°C to 40°C |
| Indicators | Green LED for power, connection, and data transfer |
| Compliance | CE, Ethernet, HomePlug AV2 |
| Installation | Plug directly into wall socket, no configuration needed |
| Maintenance | Wipe with dry cloth; do not use liquids or solvents |
| Safety | Do not cover; ensure proper ventilation; disconnect from power before cleaning |
| Spare Parts | Not available; device is non-repairable; recycling at end of life |
| Green Features | Low standby power consumption, no standby network traffic |
Frequently Asked Questions - dLAN 1200+ DEVOLO
User questions about dLAN 1200+ DEVOLO
0 question about this device. Answer the ones you know or ask your own.
Ask a new question about this device
Download the instructions for your Powerline Adapter in PDF format for free! Find your manual dLAN 1200+ - DEVOLO and take your electronic device back in hand. On this page are published all the documents necessary for the use of your device. dLAN 1200+ by DEVOLO.
USER MANUAL dLAN 1200+ DEVOLO
devolo
devolo dLAN ® 1200+ WiFi ac
© 2018 devolo AG Aachen (Germany)
While the information in this manual has been compiled with great care, it may not be deemed an assurance of product characteristics. devolo shall be liable only to the degree specified in the terms of sale and delivery.
The reproduction and distribution of the documentation and software supplied with this product and the use of its contents is subject to written authorization from devolo. We reserve the right to make any alterations that arise as the result of technical development.
Trademarks
Linux ® is a registered trademark of Linus Torvalds.
Ubuntu ® is a registered trademark of Canonical Ltd.
Mac ® and Mac OS X ® are registered trademarks of Apple Computer, Inc.
Windows ® and Microsoft ® are registered trademarks of Microsoft, Corp.
Wi-Fi ® , Wi-Fi Protected Access TM , WPA TM , WPAZ TM and Wi-Fi Protected Setup TM are registered trademarks of the Wi-Fi Alliance ® .
devolo, dLAN ® and the devolo logo are registered trademarks of devolo AG.
All other names mentioned may be trademarks or registered trademarks of their respective owners. Subject to change without notice. No liability for technical errors or omissions.
devolo AG
Charlottenburger Allee 67
52068 Aachen
Germany
www.devolo.com
Aachen, March 2018
Version: 1.1
Contents
1 Preface 5
1.1 About this manual 5
1.1.1 Intended use 7
1.1.2 CE conformity 7
1.1.3 Safety notes 7
1.2 devolo on the Internet 8
2 Introduction 9
2.1 What exactly is dLAN? 9
2.2 What is WLAN? 9
2.3 Wi-Fi or WLAN? 10
2.4 What exactly is range +? 10
2.5 What does WiFi Clone mean? 10
2.6 What is WiFi Move Technology? 10
2.7 The dLAN 1200+ WiFi ac .... 11
2.7.1 Encryption button 11
2.7.2 WiFi button 13
2.7.3 Network jack 14
2.7.4 Reset 15
2.7.5 WiFi antennas 15
2.7.6 Integrated electrical socket 15
3 Initial use 16
3.1 Package contents 16
3.2 System requirements 16
3.3 Connecting the dLAN 1200+ WiFi ac 17
3.3.1 Starter Kit - Setting up a new dLAN network ..... 17
3.3.2 Addition - Expanding an additional network 18
3.4 Installation of devolo software 21
3.5 Removing a dLAN 1200+ WiFi ac from the network 22
4 Network configuration 23
4.1 Calling up the built-in configuration interface 23
4.2 Menu description 24
4.3 WiFi configuration 26
4.3.1 Access point 26
4.3.2 WLAN time control 28
4.3.3 Guest account 29
4.3.4 Parental controls 30
4.3.5 WLAN filters 31
4.3.6 WiFi Clone and WiFi Move 32
4.3.7 WiFi Protected Setup (WPS) 32
4.4 Status overview 34
4.5 Device configuration 35
4.5.1 dLAN settings 35
4.5.2 dLAN devices 35
4.5.3 Add a dLAN device 35
4.6 Management 36
4.6.1 Language selection 36
4.6.2 Device security 36
4.6.3 Network settings 37
4.6.4 System 38
4.6.5 Management 39
5 Appendix 40
5.1 Frequency range and transmitting power 40
5.2 Channels and carrier frequencies 41
5.3 Bandwidth optimisation 42
5.4 Disposal of old devices 42
5.5 Warranty conditions 43
1 Preface
Thank you for placing your trust in this dLAN 1200+ WiFi ac.
The dLAN 1200+ WiFi ac allows you to set up your own home network with almost no effort. Because the clever dLAN technology transmits the data over the household electrical wiring, you do not have to lay any new cables.
1.1 About this manual
Carefully read all instructions before setting up the device and store the manual and/or installation guide for later reference.
After a brief introduction to dLAN® and WiFi basics and an introduction to the dLAN 1200+ WiFi ac in
Chapter 2, Chapter 3 tells you how to successfully start using the adapter in your network. Chapter 4 describes in detail the setting options of the built-in configuration interface and thus also access to the Wi-Fi. Tips for bandwidth optimisation, information about product safety and environmental compatibility of the device, as well as our warranty terms, can be found in Chapter 5 at the end of the manual.
Description of the icons
This section contains a brief description of the icons used in this manual and/or on the rating plate, the device connector, as well as the icons used on the package:
| Icon Description | |
 | Very important safety symbol that warns you of imminent electrical voltage which if not observed can result in serious injury or death. |
 | An important safety symbol that warns you of a potentially dangerous situation involving a burn hazard which can result in minor injuries or damage to property. |
 | An important note that should be observed which can potentially lead to material damages. |
 | The installation may be performed by a qualified electrician only. |
 | The device may only be used indoors in dry conditions. |
 | The manufacturer/distributing company uses the CE marking to declare that the product meets all applicable European regulations and has been subjected to the prescribed conformity assessment procedures. |
 | It is used to prevent the occurrence of waste electrical and electronic equipment and to reduce this type of waste through reuse, recycling and other forms of utilisation. It establishes minimum standards for handling waste electrical and electronic equipment in the EU. |
| ### | Additional information, background material and configuration tips for your device. |
| Icon Description | |
| √ | Indicates a completed course of action |
1.1.1 Intended use
Use the adapter as described in these instructions to prevent damage and injuries.

CAUTION! Damage to the device caused by ambient conditions Only use device indoors in dry conditions
1.1.2 CE conformity

This product complies with the technical requirements of the directives 2014/53/EU, 2011/65/EU und 2009/125/EC.
This product is designed for use in the EU, Switzerland and Norway.
A printout of the simplified CE declaration of this product is separately included and can also be found under www.devolo.com.
1.1.3 Safety notes
It is essential to have read and understood all safety and operating instructions before the devolo device is used for the first time; keep them safe for future reference.

DANGER! Electrical shock caused by electricity
Do not reach into the electrical socket, do not open the device and do not insert any objects into the electrical socket or into the ventilation openings
Users do not need to carry out any maintenance on devolo devices. In the event of damage, disconnect the devolo device from the mains supply by pulling it or its plug out of the electrical socket. Then contact qualified specialist personnel (after-sales service) exclusively.
Damage is deemed to have occurred, for example,
- if the power plug is damaged.
- if the devolo device has been showered with liquid (such as rain or other water).
- if the devolo device is inoperable.
- if the housing of the devolo device is damaged.
Do not plug devolo devices directly into each other. Devices that are plugged into each other can experience a decrease in transmission rate.

DANGER! Electric shock caused by electricity
Device must be plugged into a power socket with a connected earth wire
devolo devices may be operated only on a mains power supply as described on the rating plate.
To disconnect devolo devices from the mains supply, unplug the device from the electrical socket.
The power socket and all connected network devices should be easily accessible so that you can pull the power plug quickly if needed.

CAUTION! Heat development during operation
Certain housing components can become very hot in certain situations. Attach device so that it is touch-proof, observing optimal positioning
devolo devices should only be installed at locations that guarantee adequate ventilation. Slots and openings on the housing are used for ventilation:
Do not cover devolo devices during operation.
- Do not place any objects on devolo devices.
- Do not insert any objects into the openings of devolo devices.
● devolo devices must not be placed directly next to a naked flame (such as fire or candles).
● devolo devices must not be exposed to direct heat radiation (e.g. radiator, direct sunlight).

CAUTION! Damage to housing from cleaning agents containing solvents Clean only electroless and with dry cloth
1.2 devolo on the Internet
For detailed information on our products and dLAN, visit www.devolo.com. The Powerline area not only contains product descriptions and documentation, but also updates of devolo software and your device's firmware.
If you have any further ideas or suggestions related to our products, please don't hesitate to contact us at support@devolo.com!
2 Introduction
dLAN is an intelligent, secure technology that lets you set up a home network easily, quickly and economically via your household electrical wiring, without the need for complex and expensive dedicated cabling.

Fig. 1 devolo dLAN and WiFi throughout the home
2.1 What exactly is dLAN?
The dLAN (direct Local Area Network) uses the household power grid to transfer data between computers and other network components equipped with suitable adapters. As a result, any electrical socket can be used as a network access point. The data is modulated prior to transfer and sent as a signal via household power lines. State-of-the-art technology ensures that the power and data networks do not interfere with one another. Networking via dLAN is fast and secure. The data is encrypted using a key to prevent interception by third parties.
2.2 What is WLAN?
WiFi refers to a WLAN (Wireless Local Area Network), the use of radio technology to network computers and other devices. While it is possible to wirelessly connect computers in pairs ("peer-to-peer", p2p), a central access point is usually required to set up a network of multiple devices. This turns a WiFi router into an access point as well as a modem for Internet access and into a router for acting as a go-between within the network.
The wireless network established by an access point has only limited range. The range of the access point,
which is also known as a "radio cell", is impeded by building walls. In some cases, stable connections are often only possible between WiFi devices within a single room.
Since it is not possible to rely on hardware such as network cables (in a LAN) or household wiring (in a dLAN) to control access to a WiFi network, wireless networking naturally presents special security challenges. WiFi networks therefore use a number of security measures, such as a concealed network name (SSID - Service Set Identifier), data encryption and access control via the MAC addresses of the devices (clients).
2.3 Wi-Fi or WLAN?
Wi-Fi is an invented brand name of the Wi-Fi Alliance, a consortium that certifies devices with wireless interfaces. In many countries, Wi-Fi is also used synonymously with WLAN, which if taken strictly, is incorrect, because Wi-Fi designates the wireless standard and WLAN the wireless network.
2.4 What exactly is range +?
Range + is a technology for devolo dLAN products. Unlike conventional Powerline technology, range+ Technology uses all three lines (neutral, earth wire, phase) of the electrical circuit, making use of the full physical potential. Thanks to patented signal coupling, data transmission over the mains supply is optimised. This results not only in a more stable Internet connection that is less sensitive to interference, but also increased range.
2.5 What does WiFi Clone mean?
WiFi Clone is a technology for devolo WiFi products that makes it extremely easy to integrate new devices into an existing WiFi network. For this purpose, just plug the corresponding adapter into an available electrical socket and press the encryption button (for older models, the WPS button). The devolo WiFi devices now automatically exchange their WiFi credentials with the existing WiFi router and synchronise SSIDs, keys and any configured settings, such as parental control and time control settings.
2.6 What is WiFi Move Technology?
WiFi Move Technology is a function for devolo WiFi products that expands and optimises the existing WiFi network. If multiple devolo WiFi devices are used, these act as access points that connect via Powerline. The devolo WiFi products automatically connect to the
access point with the strongest signal. This creates a fast and stable WiFi network throughout the home.
2.7 The dLAN 1200+ WiFi ac
The dLAN 1200+ WiFi ac is equipped with
- An encryption button (home icon) with LED status display,
● A WiFi button with LED status display,

The LED status display can be deactivated on the configuration interface of the adapter (see 4.6 Management).
- Two network jacks
One reset button
Four internal WiFi antennas
One integrated electrical socket
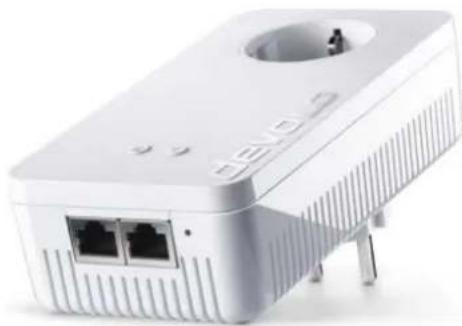
Fig. 2 is country-specific
2.7.1 Encryption button

This button controls the following functions:
Encrypting the dLAN network
To encrypt your dLAN network individually, press each encryption button on the connected devices for approx. 1 second – within 2 minutes.
- To remove a dLAN device from your network, press the encryption button on the corresponding device for at least 10 seconds.
For more information, refer to Chapter 3.3 Connecting the dLAN 1200+ WiFi ac.

Indicator lights
The integrated indicator lights (LEDs) show the dLAN status for the dLAN 1200+ WiFi ac by illuminating and/or flashing:

Check whether the adapter is connected to the mains supply correctly and whether the encryption process has been carried out successfully. For more information about this, refer to 3.3 Connecting the dLAN 1200+ WiFi ac.
Flashing behaviour of the dLAN LED
| LED | Flashing behaviour | Meaning |
| Red LED Lights up steady | Adapter is in the start-up process | |
| Red LED Flashes at intervals of 0.5 sec.(on/off) | No dLAN connection exists | |
| Red LED Flashes at intervals of 2 sec.(on/off) | Data transmission rate not in optimum range * | |
| LED | Flashing behaviour | Meaning |
| White LED | Lights up steady | An encrypted dLAN connection exists and the adapter is ready to operate |
| White LED | Flashes at intervals of 0.5 sec.(on/off) | dLAN encryption being established |
| White LED | Flashing at intervals of 0.5/50-60 sec.(On/off) | Adapter is in PowerSave mode |
* For information on improving transmission rate, refer to Chapter 5.3 Bandwidth optimisation.
Setting up WiFi Clone and using WiFi Move Technology
WiFi Move Technology is a function for synchronising the WiFi settings of all WiFi adapters. Activate the synchronisation either using the functions on the configuration interface (see Chapter 4.3.6 WiFi Clone and WiFi Move) or at the touch of a button on the adapter.
① First press the encryption button with the home icon (for about 1 second) on an existing dLAN 1200+ WiFi ac that has the entire WiFi configuration which is to be transferred to all other dLAN 1200+ WiFi ac adapters. T within 2 minutes, press each encryption button on the new dLAN 1200+ WiFi ac devices (for about 1 second). The WiFi settings are now being synchronised (WiFi Clone).
② The WiFi adapters are now continuously connected to each other and, from now on, share changes to the WiFi configuration automatically with each other (WiFi Move Technology).
2.7.2 WiFi button

The WiFi button controls the following WiFi functions:
WiFi On/Off:
In the factory default settings, the WiFi setting is already enabled and the WiFi encryption is set to WPA2. The WiFi key is the unique key of the dLAN 1200+ WiFi ac. You can find this key on the label on the rear side of the housing.
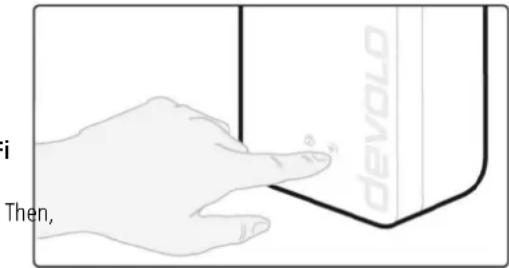
Fig. 3 WiFi button
In order to switch WiFi off, press and hold the WiFi button longer than 3 seconds.
In order to switch WiFi back on, tap the WiFi button.
Connecting WiFi devices via WPS
- If the device is still on factory defaults, tap the WiFi button in order to activate WPS.
- If the WiFi connection was switched off and you would like to activate WPS, press the
WiFi button twice; once to switch WiFi on, and again to activate WPS.
WPS, developed by the WiFi Alliance, is one of the encryption standards in a WiFi network. The objective of WPS is to make it easier to add devices to an existing network. For more detailed information, refer to Chapter 4.3.7 WiFi Protected Setup (WPS).
Reading the WiFi indicator light
The integrated indicator lights (LEDs) show the WiFi status for the dLAN 1200+ WiFi ac by illuminating and/or flashing:
Flashing behaviour of the WiFi LED
| LED | Flashing behaviour | Meaning |
| White LED Lights up steady | An encrypted WiFi connection exists and the adapter is ready to operate | |
| White LED Off WiFi connection | switched off or Adapter is in the start-up process | |
| White LED Flashes at intervals of 0.5 sec.(on/off) | WPS encryption being established | |
2.7.3 Network jack
A PC or other network device can be connected to the dLAN 1200+ WiFi ac at this port using a standard network cable.
2.7.4 Reset
The reset button (next to the network jack) has two different functions:
- The device restarts if you press the Reset button for less than 10 seconds.
To change the configuration of the dLAN 1200+ WiFi ac back to the factory defaults, press the Reset button for more than 10 seconds. Keep in mind that all settings that have already been configured will be lost!
You can use a pointed object (such as a paper clip) to press the Reset button.
2.7.5 WiFi antennas
The internal WiFi antennas are for connecting to other network devices wirelessly.
2.7.6 Integrated electrical socket
To connect other network devices to your mains supply, use the electrical socket of the dLAN 1200+ WiFi ac. The mains filter integrated into the dLAN 1200+ WiFi ac eliminates any noise of connected devices and significantly improves data transmission in the network.
3 Initial use
This chapter covers everything you need to know to set up your dLAN 1200+ WiFi ac. We provide a description of how the device is connected and briefly introduce the included devolo software.
3.1 Package contents
Please ensure that the delivery is complete before beginning with the installation of your dLAN 1200+ WiFi ac.
Single Kit:
○ dLAN 1200+ WiFi ac
○ Hard copy of installation guide
○ CE declaration
or
- Starter Kit:
○ dLAN 1200+ WiFi ac
○ dLAN 1200+
○ Network cable
○ Hard copy of installation guide
○ CE declaration
devolo AG reserves the right to change the package contents without prior notice.
3.2 System requirements
- Operating systems: Windows 7 Home Premium (32-bit/64-bit), Windows 8 (32-bit/64-bit), Windows 8 Pro (32-bit/64-bit), Linux (Ubuntu 12.4), Mac (OS X 10.6) and all operating systems with network support
Network connection
Please note that your computer or other device must have a network adapter with a network port.
To set up a dLAN network, you need at least two dLAN devices (200 Mbps, 500 Mbps, 600 Mbps, 1000 Mbps or 1200 Mbps).
3.3 Connecting the dLAN 1200+ WiFi ac

CAUTION! Damage to the device caused by ambient conditions
Only use device indoors in dry conditions
In the following sections we describe how to connect the dLAN 1200+ WiFi ac and integrate it into the network. We clarify the exact procedures based on potential network scenarios.

For the permitted voltage range for operating the device and the power consumption, refer to the label on the rear of the device. For additional technical information on our products, refer to the Service Centre area at www.devolo.com.
3.3.1 Starter Kit – Setting up a new dLAN network
① Connect the dLAN 1200+ to your Internet access device's network jack (e.g. WiFi router).

CAUTION! Tripping hazard
Lay the network cable in a barrier-free manner and ensure that the electrical socket and the connected network devices are easily accessible
② Plug the dLAN 1200+ WiFi ac into a wall socket. As soon as the LED indicator light flashes red at regular intervals of 0.5 sec., the adapter is ready to operate but not yet integrated into the dLAN network.
Connecting the two dLAN 1200+ WiFi ac to a dLAN network
Before you can use the adapter in a dLAN network, first you have to connect it as a network. This is accomplished by using a shared dLAN password. This forms a delimited dLAN network. Shared use of the dLAN password serves both as access control to the dLAN network as well as the encryption, and thereby the interception protection, of the transmitted data.
The dLAN password can be set in different ways:
③
dLAN network encryption:
- dLAN network encryption: at the touch of a button: First press the encryption button of the dLAN 1200+ for approx. 1 second, and then within 2 minutes press the encryption button of the dLAN 1200+ WiFi ac for approx. 1 second.
or
- dLAN network encryption by entering the dLAN password in the dLAN: More information can be found in Chapter 4.5 Device configuration.

As soon as the white LED lights up steady on both devices, your dLAN network is set up and protected from unauthorised access.
3.3.2 Addition – Expanding an additional network
① Plug the dLAN 1200+ WiFi ac into a wall socket. As soon as the LED indicator light flashes red at regular intervals of 0.5 sec., the adapter is ready to operate but not yet integrated into the dLAN network.
Integrating the dLAN 1200+ WiFi ac into an existing dLAN network
Before you can use the dLAN 1200+ WiFi ac in your dLAN network, first you have to connect it to your existing dLAN devices as a network. This is accomplished by using a shared dLAN password. The dLAN password can be set in different ways:
②
dLAN network encryption:
- dLAN network encryption: at the touch of a button: First press the encryption button on a device in your existing network for approx. 1 second and within 2 minutes, press the encryption button of the new dLAN 1200+ WiFi ac for approx. 1 second.
or
- dLAN network encryption by entering the dLAN password in the dLAN: More information can be found in Chapter 4.5 Device configuration.

As soon as the white LED lights up steady, the new dLAN 1200+ WiFi ac is integrated into your existing, encrypted dLAN network.
Integrating the dLAN 1200+ WiFi ac into an existing WiFi network
①
- Establish the WiFi connection with your laptop, tablet or smartphone by entering the previously noted WiFi key as the network security key.
To ensure that the dLAN 1200+ WiFi ac has the same WiFi configuration as your WiFi router, you can apply the WiFi access data at the touch of a button using the WiFi Clone function. This can be enabled in different ways:
②
Enabling WiFi Clone:
Enabling WiFi Clone at the touch of a button: First press the encryption button with the home icon on the front side of dLAN 1200+ WiFi ac and then press the WPS button of the WiFi router with the access data you want to apply.
or
- Enabling WiFi Clone via the configuration interface.
More information about this function can be found in Chapter 4.3.6 WiFi Clone and WiFi Move.
To integrate the dLAN 1200+ WiFi ac into an existing WiFi network with devolo WiFi devices of the 500 series (e.g. dLAN 500 WiFi or dLAN 500 Wireless+), you have to transfer the settings of your existing WiFi configuration manually to the configuration interface of the dLAN 1200+ WiFi ac.
For more information on the configuration interface, refer to Chapter 4 Network configuration.
![graph TD A["Internet"] --> B["Switch"] B --> C["Adapter A"] C --> D["Adapter B"] D --> E["OCEV050 Interface"]](/content/2026/06/1259203/images/87da0bfe3ecc57c8f75a687596fbc70f54ccc467ef13290c4e841e3a5c3f11c9.jpg)
Fig. 4: Setting up the dLAN network
Connecting devices to the WiFi network
③ Establish the WiFi connection with your laptop, tablet or smartphone by entering the previously noted WiFi key as the network security key.
3.4 Installation of devolo software
Downloading my devolo App
The my devolo App is devolo's free app also for checking and configuring WiFi, dLAN and LAN connections for the dLAN 1200+ WiFi ac (via smartphone or tablet). The smartphone or tablet connects to the dLAN 1200+ WiFi ac at home via WiFi.
① Download the my devolo App to your smartphone or tablet computer from the corresponding store.
The quickest way to find the app is by clicking the magnifying glass in the store and searching directly for devolo.
② my devolo App is placed in your smartphone's or tablet's app list as usual. Tapping on the my devolo App icon brings you to the start menu.
You can find more information about my devolo App online at www.devolo.co.uk/service/my-devolo-app/.
Installing devolo Cockpit software
The devolo Cockpit computer program finds all accessible dLAN adapters in your dLAN network, displays information about these devices and encrypts your dLAN network individually. The software takes you to the configuration interface to configure your WiFi network on a computer.
Software for Windows
The devolo Cockpit software is available at www.devolo.com/cockpit. After you have downloaded the installation file to your PC, start it by double-clicking on it.
Use the installation wizard to install devolo Cockpit for using the adapter with the Windows operating system. You can find the installed application in the Start All Programs devolo program group.
Software for Mac (OS X)
The devolo Cockpit software is available at www.devolo.com/cockpit. After you have downloaded the installation file to your PC, start it by double-clicking on it.
Software for Linux (Ubuntu)
The devolo Cockpit software is available at www.devolo.com/cockpit. After you have
downloaded and installed the installation file to your PC, start the file.
You can find more information about the devolo Cockpit software online at www.devolo.com/cockpit.
3.5 Removing a dLAN 1200+ WiFi ac from the network
To remove the dLAN 1200+ WiFi ac device from an existing network, press the encryption button with the home icon on the corresponding adapter for at least 10 seconds. The device will be assigned a new randomly generated password and will thus no longer be able to access the network. To integrate the device into a different network, follow the steps described above, depending on whether you are setting up a new network or adding the device to an existing one.
4 Network configuration
The dLAN 1200+ WiFi ac has a built-in configuration interface that can be called up using a standard web browser. All settings for operating the device can be modified here.
4.1 Calling up the built-in configuration interface
You can access the built-in online configuration interface for the dLAN 1200+ WiFi ac in different ways:
- Using the my devolo App on your smartphone or tablet, you can access the device's configuration interface by going to the my devolo App overview page and tapping on the gear/arrow.
You can find more information on my devolo App in Chapter 3.4 Installation of devolo software. - Using the devolo Cockpit software under Start, you can reach the device's configuration interface by clicking the corresponding entry of the dLAN 1200+ WiFi ac.
Then the program determines the current IP address and starts the configuration in the web browser.
You can find more information on devolo Cockpit software in Chapter 3.4 Installation of devolo software.

By default, the configuration interface will open directly. However, if a login password was set via the option Device configuration (symbol on the left) ◆ Device security, you have to enter this first (refer to 4.6.2 Device security).
4.2 Menu description
All menu functions are described in the corresponding interface as well as in the associated chapter in the manual. The sequence of the description in the manual follows the structure of the menu.
The four central areas of the configuration interface are displayed on the bottom edge of the screen. Click the button of an area to move directly into it.

Fig. 5 Interface of the devolo Cockpit software

All of the device's WiFi functions are in the WiFi configuration area, where you can configure settings.
In the Status overview area, you get general information about all connected dLAN, WiFi and LAN devices.

You can find all of the dLAN functions in the Device configuration area.

In addition to the language selection, the Management area includes configuration options for the network, device security and management, i.e. resetting, securing and restoring your individual configurations and updating firmware.
Click OK to save the settings of the respective area of the configuration interface.
Click Cancel to leave the respective area of the configuration interface.
4.3 WiFi configuration
In the WiFi configuration area, configure settings for the WiFi network and its security:
- Access point
WLAN time control
Guest account
Parental controls
WLAN filters
WiFi Move
WiFi Protected Setup (WPS)
Click or tap the respective icon to go the corresponding area.
4.3.1 Access point
Wi-Fi On/Off
You can enable or disable the WiFi function of your dLAN 1200+ WiFi ac:
- To enable the WiFi function, press the WiFi button on the front side once briefly.
- To disable the device, press the WiFi button on the front side for 3 seconds until the LED out.
or
- On the configuration interface under WiFi configuration ↩ Access Point, use the WiFi off/on button.
or - Enable the WLAN time control. For more information, refer to Chapter 4.3.2 WLAN time control.
The WiFi function of the dLAN 1200+ WiFi ac is enabled by default.
If you want to operate the adapter exclusively as a simple dLAN device via the built-in Ethernet connection, you can completely shut off the WiFi function.
For operation as a WiFi access point, configure the WiFi parameters for your wireless network as follows:
Network name
The network name (SSID) determines the name of your wireless network. You can see this name when logging onto the WiFi, allowing you to identify the correct WiFi network.
Hiding the SSID
If you enable the Hide SSID option, your wireless network remains hidden. In this case, potential network
users must know the exact SSID and enter it manually to be able to set up a connection.
Some WiFi adapters have difficulty connecting to such hidden wireless networks. If the connection with a hidden name poses problems, first try setting up the connection with a visible network name and then hiding the network name afterwards.
Channel
For operation as an access point, a (transmission) channel must be specified. There are 13 channels available. We recommend keeping the default setting Auto, since in this setting the dLAN 1200+ WiFi ac selects the channel regularly and independently. If no stations are connected, the device automatically selects a channel every 2 hours.
Encryption
You should always encrypt the connections in your WiFi network. Otherwise anyone within range could penetrate into your network.
WPA2 is the WiFi encryption set by default for dLAN 1200+ WiFi ac. The default WiFi key is the WiFi key of the dLAN 1200+ WiFi ac. You can find the key on the label on the rear side of the housing.
The WPA and WPA/WPA2 (WiFi Protected Access) security standards are available for securing data transmission in your wireless network.
This method allows for individualised keys consisting of letters and numbers with a length of up to 63 characters. You can simply enter them via the keyboard.
Key
To do so, enter a corresponding number of characters into the Key field.
Without encryption, not only are all data transmitted from client computers to the dLAN 1200+ WiFi ac in your wireless network without protection, but there is also no password prompt to establish the connection. If no other security measures are set up, such as a WiFi filter (see Chapter 4.3.5 WLAN filters), third parties
could gain access to your network at any time and, for example, use your Internet connection without permission. Each instance of access is visible to you in the WiFi monitor.
Save all modified settings before leaving this configuration area again by pressing OK to confirm them.
Keep in mind that after saving this setting, you will be disconnected from any existing wireless connection to the dLAN 1200+ WiFi ac. In this case, configure the device via the network cable (Ethernet) or dLAN. When activating the encryption, also make sure that the WiFi settings (network name and key) of the access point always match the settings on the clients, as otherwise you will be (unintentionally) excluding devices from your network.
4.3.2 WLAN time control
WiFi time control setting off/on
To be able to use the WLAN time control, enable the time control option.
You can define multiple time periods during which your wireless network is to be enabled for each weekday. Then the time control automatically switches the wireless network on or off.
If you enable the Automatic disconnection option, the wireless network is not switched off until the last station has logged off.
i Manually switching the access point on or off (i.e. using a button) always overrides the automatic time control. The configured time control then takes effect automatically during the next defined time period.
4.3.3 Guest account
Guest account off/on
If you have friends or acquaintances visiting and you want to provide them with Internet access but without giving away the password for your WiFi, you can set up a separate guest account in addition to the main Internet connection. The guest account can have its own network name, time limit and WiFi password. This way your visitors can surf the Internet without having access to your local network.
To set up a guest account, enable the Guest account option.
You can also enable or disable the guest account in the my devolo App using the Guest account button.
If you would like to restrict the guest account to Internet use, enable the Only allow Internet use option as well.
Automatic shutoff
If you would like to set a time limit for the guest account, enable the option Automatically shut off guest account after ... and enter the desired time limit.
Note that the guest account depends on the adapter and can only be active as long as the adapter is active.
Network name
Define the name of the guest network in the Network name field.
Encryption
You should also encrypt the guest account to prevent anyone in signal range from intruding into your network and, for example, sharing your Internet connection. The WPA/WPA2 (WiFi Protected Access) security standard is available for this.
This method allows for individualised keys consisting of letters and numbers with a length of up to 63 characters. You can simply enter them via the keyboard.
To do so, enter a corresponding number of characters into the Key field.
4.3.4 Parental controls
Child-safety feature off/on
You can regulate WiFi access for specific devices based on time using this function. For instance, to prevent your children from using the Internet excessively, you can define how long they may use the WiFi per day.
Synchronisation with an (Internet) time server is necessary to be able to use the parental controls. In this case, the time server (Management ▶ Management ▶ Date and time ▶ Retrieve date and time automatically) for the dLAN 1200+ WiFi ac has to be enabled and an active Internet connection is also required.

The time server pool.ntp.org is enabled by default.
If you would like to set up a daily time quota (usage quota in hours), enable the option Turn on parental controls. Now enter the MAC addresses for the devices for which you would like to set up a time quota. You can enter the MAC addresses manually or select them from the list of currently known devices (see Status overview ◇ WiFi monitor). Confirm the entries with OK.
WiFi devices with time quota
Here you can find a list of all the WiFi devices for which the usage time per day is limited.
Each device is displayed with its MAC address, name, usage time remaining and the specified time quota.
To delete a device from this list, click the trash icon.
Click or tap the gear icon to go to the settings menu for the time quota. If you would like the time quota to be monitored, enable the option The time limit will be monitored.
The daily time quota (time window, usage time from - to a.m./p.m.) can be specified in hours and minutes. If you want to assign the same time quota, you can automatically apply your entry to all days under Apply time quota to all days of the week by clicking the arrow icon.
To delete a time quota later, click the corresponding trash icon.
A time quota can only be used if it matches the time periods defined in the WLAN time control and if the dLAN 1200+ WiFi ac is enabled and there is an Internet connection. (see 4.3.2 WLAN time control).
The time quotas for the parental controls and the WiFi time control setting are defined per weekday.
If you set a time quota, it will not be enabled until the next day (midnight).
4.3.5 WLAN filters
WPS off/on
In addition to encryption (see 4.3.1 Access point), you can secure your wireless network even more by using a WiFi filter to limit access to WiFi devices. Even if the encryption is switched off, the device will not establish a connection.
The WiFi filter should be used only as an additional option for WiFi encryption. By using it you can limit access to your wireless network, but without encryption it is relatively easy for third parties to eavesdrop on all of your data transmissions.
To use the WiFi filter, enable the filter. Now you can manually enter different network devices to provide access to your dLAN 1200+ WiFi ac using what is known as their MAC address or you can select them from a list of known devices (see Status overview ▶ Wi-Fi monitor). Create new entries with Save your entries with OK.
Permitted WiFi devices
Network devices connected to your dLAN 1200+ WiFi ac are automatically listed; that is, to enable an already connected device for the dLAN 1200+ WiFi ac, simply select the MAC address of this device and confirm it with the plus sign. This then appears under Permitted WiFi devices. To remove a permitted device, select its MAC address and confirm it by clicking the Trash icon.
The WiFi filter does not have an effect on devices that connect via the guest access.
The MAC address designates the hardware interface of each individual network device uniquely (e.g. the WiFi adapter of a computer or the Ethernet port of a printer). It consists of six double-digit hexadecimal numbers, each separated by a colon (e.g. 00:0B:3B:37:9D:C4).
You can easily determine the MAC address of a Windows computer by opening the window with the command prompt under Start ◇ All Programs ◇ Accessories ◇ Command Prompt. Enter the command IPCONFIG /ALL here. The MAC address is displayed under the designation Physical address.
Keep in mind that you also have to enter the WiFi MAC address of your own computer if you are connected to the dLAN 1200+ WiFi ac not via the Ethernet port, but via WiFi. Otherwise you will block your own access to the device via WiFi by activating the WiFi filter.
Save all modified settings before leaving this configuration area again by pressing OK to confirm them.
4.3.6 WiFi Clone and WiFi Move
WiFi Clone
WiFi Clone lets you apply the WiFi access data of an existing WiFi access point (such as your WiFi router) at the touch of a button. Start the procedure with the Start setup option and then press the WPS button of the device with the WiFi access data (SSID and WiFi password) to be applied.
WiFi Move
WiFi Move Technology is a function for synchronising the WiFi settings of all devolo WiFi adapters connected to your network.
The WiFi function and WiFi Move Technology of the dLAN 1200+ WiFi ac are enabled by default.
You can enable synchronisation of the WiFi settings either by using the functions in this menu or by pressing the respective encryption button with the home icon on the corresponding adapters. To learn how to synchronise the WiFi settings at the touch of a button, refer to Chapters 2.7.1 Encryption button and 3.3 Connecting the dLAN 1200+ WiFi ac.
WiFi Move Technology support enabled
Switch on WiFi Move Technology (if necessary) by clicking/tapping under WLAN configuration ◆ WiFi Move. All WiFi adapters are now continuously connected to each other and, from now on, share changes to the WLAN configuration with each other automatically.
In addition, you can see when the last synchronisation took place and which devices are connected via WiFi Move Technology.
4.3.7 WiFi Protected Setup (WPS)
WPS encryption off/on
You can enable or disable the WPS encryption of your dLAN 1200+ WiFi ac:
WiFi Protected Setup (WPS) is one of the international encryption standards developed by the WiFi Alliance for easily and quickly setting up a secure wireless net-
work. The encryption keys of the respective WiFi devices are transmitted automatically and continuously to the other WiFi device(s) in the wireless network. The dLAN 1200+ WiFi ac offers two different variants for transmitting these encryption keys:
WPS via PBC (Push Button):
① Start the encryption process on the dLAN 1200+ WiFi ac
○ either by pressing the WiFi button on the front panel of the device or
○ by pressing the Start setup button on the user interface under WiFi configuration ◆ WiFi Protected Setup (WPS).
② Then either press the WPS key of the WiFi device you are adding or enable the WPS mechanism in the WiFi settings of the WiFi device. Now the devices exchange their encryption keys and establish a secure WiFi connection. The WiFi LED on the front panel indicates the synchronisation process by flashing.
WPS via PIN:
① To interconnect WiFi devices in your wireless network securely by means of PIN variants, enter an individualised key in the configuration interface under WLAN configuration ◇ WiFi Protected Setup (WPS) ◇ PIN and start the encryption process by pressing the Start setup button.
② Open the configuration interface of the WiFi client to be added and transmit the PIN selected on the dLAN 1200+ WiFi ac. Confirm the encryption process as described there. Now the devices exchange their encryption keys and establish a secure WiFi connection. The WiFi LED on the front panel indicates the synchronisation process by flashing.
Use of the WPS method implies the use of the WPA/WPA2 encryption standard. Therefore take note of the following automatic settings:
- If WLAN configuration ◇ Access Point ◇ No encryption is selected in advance, WPA2 is set automatically. The newly generated password is displayed under WiFi configuration ◇ Access Point in the Key field.
- If WLAN configuration ◇ Access Point ◇ WPA/WPA2 is selected in advance, this setting remains with the previously assigned password.
4.4 Status overview

In the Status overview area, you get general information about all connected dLAN, WiFi and LAN devices.
Information about the dLAN 1200+ WiFi ac is also displayed in this menu on the left next to the status of the connected WiFi, dLAN and LAN devices. On the right in the menu you will find the corresponding link to go directly to the menu.
WiFi status
Here you can see whether the WiFi function of your dLAN 1200+ WiFi ac is switched on or off, as well as whether encryption is used and which frequency band has been configured.
Clicking or tapping Access Point takes you directly to the WiFi settings. More information about WiFi network security can be found in Chapter 4.3.1 Access point.
Clicking or tapping Configure guest account takes you directly to the corresponding menu. More information about configuring the guest account can be found in Chapter 4.3.3 Guest account.
Click or tap WiFi monitor to display all of the known WiFi devices. If there is an Internet connection and a time server has been found, each WiFi device known since the last system start is displayed along with its name, MAC and IP address, the last login date and, if possible, the speed.
dLAN status
The colour of the lock icon tells you whether an individualised dLAN password or the default password is set (green = individualised password, red = default password). Click or tap dLAN devices to display all of the connected dLAN devices. For more information, refer to Chapter 4.5 Device configuration.
Clicking or tapping Configure dLAN takes you to the dLAN settings. For more information, refer to Chapter 4.5.1 dLAN settings.
Before the networking procedure, note the security IDs of all dLAN adapters. This unique identifier of each dLAN device is located on the label on the back of the housing. It consists of 4 x 4 letters separated by dashes (e.g. ANJR-KMOR-KSHT-QRUV). Ensure that all dLAN adapters are connected to the mains supply and computers or other network components as appropriate.
Ethernet status
The status (red = not connected, green = connected) and connection speed of the network jacks are displayed here.
Firmware version
The firmware version is displayed here. Clicking or tapping Firmware update takes you directly to the corresponding menu. For more information about the firmware update, refer to Chapter 4.6.4 System.
Access password
For security you can set a login password for access to the configuration interface. The colour of the lock icon tells you whether an individualised login password or no password at all is set (green = individualised password, red = no password). Clicking or tapping Set access password takes you directly to the corresponding menu. More information about creating an access password can be found in Chapter 4.6.5 Management.
Network settings
Network settings such as the IP address and subnet mask of the dLAN 1200+ WiFi ac are displayed here. Clicking or tapping Configure network takes you directly to the network settings. For more information, refer to Chapter 4.6.3 Network settings.
4.5 Device configuration
You can find everything about your dLAN in the Device configuration area. Click or tap the respective icon to go the corresponding area.
4.5.1 dLAN settings
In a dLAN network, all connected components must use the same password. The dLAN password can be defined in the my devolo App or the devolo Cockpit program by using the encryption button with the home icon or at this location in the configuration interface. You can configure the password for the entire network.

The dLAN default password is HomePlugAV.
4.5.2 dLAN devices
Each connected dLAN device, regardless of whether it is connected locally or remotely in the network, is displayed with its MAC address, name, type and data rate.
4.5.3 Add a dLAN device
You can add additional dLAN devices to your dLAN network:
Using the encryption button with the home icon
First press the encryption button (for about 1 second) on a device in your existing network and then, within 2 minutes, press the button Start setup on the new dLAN 1200+ WiFi ac (for about 1 second).
Via security ID
To do so, enter the security ID for the respective dLAN adapter in the Security ID field and confirm it with Start setup.
Before the networking procedure, note the security IDs of all dLAN adapters. This unique identifier of each dLAN device is located on the label on the back of the housing. It consists of 4 x 4 letters separated by dashes (e.g. ANJR-KMOR-KSHT-QRUV). Ensure that all dLAN adapters are connected to the mains supply and computers or other network components as appropriate.
4.6 Management

In addition to the language selection, the Management area includes configuration options for the network, device security and management, i.e. resetting, securing and restoring your individual configurations and updating firmware.
Click or tap the respective icon to go the corresponding area.
4.6.1 Language selection
Select your desired menu language here. Save your entry with OK.
4.6.2 Device security
Here you can set a login password for access to the configuration interface.
By default, the configuration interface of the dLAN 1200+ WiFi ac is not protected by a password. However, after installing the dLAN 1200+ WiFi ac, you should create a custom password to protect the configuration interface from being accessed by third parties.
① To do so, first enter (if present) the current password and then enter the desired new
password twice. Now the configuration interface is protected against unauthorised access with your custom password!
② Call up the configuration interface again later; the following window appears first:

③ Enter admin in the User name field and your custom password in the Password field.
The admin user name is set by default and cannot be changed.
4.6.3 Network settings
As a component of your network, the dLAN 1200+ WiFi ac also communicates via the TCP/IP protocol. The IP address required for this can either
be entered manually or obtained automatically from a DHCP server.
The option Network settings are automatically retrieved from a DHCP server is enabled by default.
If a DHCP server is already present in the network for giving out IP addresses, have this option enabled so that the dLAN 1200+ WiFi ac automatically receives an address from it. This is usually the router.
To assign a static IP address, first disable the option Network settings are automatically retrieved from a DHCP server and make your individual entries.
Save your entries with OK.
If you happen to forget the IP address of your dLAN 1200+ WiFi ac, proceed as described under 4.1 Calling up the built-in configuration interface.
4.6.4 System
Here you can reset the current configuration to the factory defaults, save it to your computer as a file or restore it from there and update the firmware of the dLAN 1200+ WiFi ac.
Ensure that the update procedure is not interrupted. To do so, it is best to connect your computer to the dLAN 1200+ WiFi ac via dLAN or LAN rather than WiFi.
Automatic firmware update
The firmware of the dLAN 1200+ WiFi ac includes the software for operating the device. If necessary, devolo offers new versions on the Internet as a file download, for example to modify existing functions. If you would like the dLAN 1200+ WiFi ac to perform firmware updates automatically, enable the Automatic firmware update option and start the update procedure with Search for newer firmware and update now.
The icon on the front side of the device flashes red during the update procedure. After a successful update, the dLAN 1200+ WiFi ac restarts automatically.
Updating firmware
To update the firmware to the latest version manually, start by going to the devolo website, www.devolo.com, and downloading the appropriate file for the dLAN 1200+ WiFi ac to your computer.
In the Management ➕ System area click File name... and select the downloaded file.
Then start the update procedure with Update firmware. After a successful update, the dLAN 1200+ WiFi ac restarts automatically.
Using the Updates button in devolo Cockpit, you can also carry out automatic firmware updates from our website, www.devolo.com. This procedure requires an active Internet connection. For more information about devolo Cockpit, visit www.devolo.com/cockpit.
Saving the device configuration
To save the enabled configuration to your computer as a file, select the corresponding button in the Management System Save device configuration area. Then enter a storage location and name for the settings file.
Restoring the device configuration
An existing configuration file can be sent to the dLAN 1200+ WiFi ac in the Management ◇ System area and enabled there. Select a suitable file via the
File name... button and start the operation by clicking the Restore device configuration button.
Resetting the device configuration
The dLAN 1200+ WiFi ac is reset to the original factory defaults in the Management ▶ System area with the Reset device configuration option.
Doing so causes you to lose your personal WiFi and dLAN settings. The last-assigned passwords for the dLAN 1200+ WiFi ac are also reset.
For backup purposes, all active configuration settings can be transmitted to your computer, stored there as a file and reloaded into the dLAN 1200+ WiFi ac. This function can be useful for creating a variety of configurations that will let you quickly and easily set up the device for use in different network environments.
4.6.5 Management
Date and time
A time server is a server on the Internet whose task consists of providing the exact time. Most time servers are coupled with a radio clock. The option Retrieve date and time automatically is activated by default so that the dLAN 1200+ WiFi ac can automatically synchronise the date and time.
Select your Time zone and the Time server. If you have enabled the option Adjust to daylight saving time automatically, the adapter automatically adjusts to daylight saving time.
LED settings
The LED status display can be disabled by enabling the option Device LEDs, such as for avoiding unwanted lighting in a bedroom. The LED status display is activated in the factory default state.
Error states of the adapter are displayed even though the LED is switched off.
License information
You can find the license information about the dLAN 1200+ WiFi ac here.
5 Appendix
5.1 Frequency range and transmitting power
Technical specifications in the 2.4 GHz frequency range
| Frequency range 2.4 GHz | |
| IEEE standard 802.11 b | 802.11 g802.11 n |
| Indoor frequency range – | |
| Indoor & outdoor frequency range | 2399.5 – 2484.5 MHz |
| Channel bandwidth 20 MHz (802.11 b/g)20, 40 MHz (802.11 n) | |
| Max. indoor transmission power (EIRP) | 100 mW / 20 dBm |
| Max. transmitting power | 100 mW / 20 dBm |
Technical specifications in the 5.0 GHz frequency range
| Frequency range 5 GHz | |
| IEEE standard 802.11 a/h | 802.11 n802.11 ac |
| Indoor frequency range 51 | 50 – 5350 MHz |
| Indoor & outdoor frequency range | 5150 – 5725 MHz(802.11 a/h, n)5150 – 5350 MHz /5470 – 5725 MHz(802.11 ac) |
| Channel bandwidth 20 MHz | (802.11 a/h)20, 40 MHz (802.11 n)20 MHz, 40 MHz, 80 MHz,160 MHz (802.11 ac) |
| Max. indoor transmission power (EIRP) | 200 mW (channel 36 –64) / 23 dBm |
| Max. transmitting power | 1,000 mW (channel 100 –140) / 30 dBm |
5.2 Channels and carrier frequencies
Channels and frequencies in the 2.4 GHz band
| Channel Carrier frequency | |
| 1 2412 MHz | |
| 2 2417 MHz | |
| 3 2422 MHz | |
| 4 2427 MHz | |
| 5 2432 MHz | |
| 6 2437 MHz | |
| 7 2442 MHz | |
| 8 2447 MHz | |
| 9 2452 MHz | |
| 10 2457 MHz | |
| 11 2462 MHz | |
| 12 2467 MHz | |
| 13 2472 MHz | |
Channels and frequencies in the 5.0 GHz band
| Channel Carrier | frequency |
| 36 5180 MHz | |
| 40 5200 MHz | |
| 44 5220 MHz | |
| 48 5240 MHz | |
| 52 5260 MHz | |
| 56 5280 MHz | |
| 60 5300 MHz | |
| 64 5320 MHz | |
| 100 5500 MHz | |
| 104 5520 MHz | |
| 108 5540 MHz | |
| 112 5560 MHz | |
| 116 5580 MHz | |
| 120 5600 MHz | |
| 124 5620 MHz | |
| 128 5600 MHz | |
| 132 5660 MHz | |
| 136 5680 MHz | |
| 140 5700 MHz |
5.3 Bandwidth optimisation
To significantly improve the transmission capacity of the network, we recommend that you comply with the following connection rules:
- Plug the dLAN 1200+ WiFi ac directly into a wall socket.
- Avoid using a power strip. This may impair the transmission of the dLAN signals..


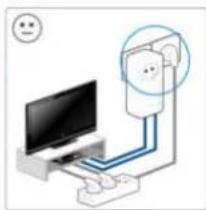
Fig. 6 dLAN bandwidth optimisation
5.4 Disposal of old devices
To be used in the countries of the European Union and other European countries with a separate collecting system:

The icon with crossed-out wastebasket on the device means that this product is an electrical or electronic device that falls within the scope of application of the European Community WEEE Directive. These types of devices may no longer be disposed of with household waste. Rather they can be given to a municipal collection point free of charge. Contact your municipal government to find out the address and hours of the nearest collection point.
5.5 Warranty conditions
If your devolo device is found to be defective during initial installation or within the warranty period, please contact the vendor who sold you the product. The vendor will take care of the repair or warranty claim for you. The complete warranty conditions can be found at www.devolo.com/warranty.
Index
C
CE declaration 7
D
Default WiFi key 13, 27
DHCP server 37
Disposal of old devices 42
dLAN 9
dLAN password 35
|
IP address 37
L
LAN (network connection) 14
LED status display 11, 39
Linux 21
M
Mac (OS X) 21
MAC address 31
P
Package contents 16
R
Reset 15
S
Safety notes 7
Security ID 34, 36
System requirements 16
T
Time server 39
W
Warranty 43
WiFi 9
WiFi antenna 15
WiFi Clone 32
WiFi key 13, 27
WiFi Move Technology 32
Windows 21
WLAN filters 31
WLAN time control 28
WPA 29
WPA2 27, 29


- © 2018 DEVOLO AG AACHEN (GERMANY)
- TRADEMARKS
- DEVOLO AG
- CONTENTS
- 1 PREFACE 5
- 2 INTRODUCTION 9
- 3 INITIAL USE 16
- 4 NETWORK CONFIGURATION 23
- 5 APPENDIX 40
- 1 PREFACE
- 1.1 ABOUT THIS MANUAL
- DESCRIPTION OF THE ICONS
- 1.1.1 INTENDED USE
- 1.1.2 CE CONFORMITY
- THIS PRODUCT IS DESIGNED FOR USE IN THE EU, SWITZERLAND AND NORWAY
- 1.1.3 SAFETY NOTES
- 1.2 DEVOLO ON THE INTERNET
- 2 INTRODUCTION
- 2.1 WHAT EXACTLY IS DLAN
- 2.2 WHAT IS WLAN
- 2.3 WI-FI OR WLAN
- 2.4 WHAT EXACTLY IS RANGE
- 2.5 WHAT DOES WIFI CLONE MEAN
- 2.6 WHAT IS WIFI MOVE TECHNOLOGY
- 2.7 THE DLAN 1200+ WIFI AC
- 2.7.1 ENCRYPTION BUTTON
- ENCRYPTING THE DLAN NETWORK
- INDICATOR LIGHTS
- SETTING UP WIFI CLONE AND USING WIFI MOVE TECHNOLOGY
- 2.7.2 WIFI BUTTON
- WIFI ON/OFF
- CONNECTING WIFI DEVICES VIA WPS
- READING THE WIFI INDICATOR LIGHT
- 2.7.3 NETWORK JACK
- 2.7.4 RESET
- 2.7.5 WIFI ANTENNAS
- 2.7.6 INTEGRATED ELECTRICAL SOCKET
- 3 INITIAL USE
- 3.1 PACKAGE CONTENTS
- SINGLE KIT
- STARTER KIT
- 3.2 SYSTEM REQUIREMENTS
- NETWORK CONNECTION
- 3.3 CONNECTING THE DLAN 1200+ WIFI AC
- 3.3.1 STARTER KIT – SETTING UP A NEW DLAN NETWORK
- CONNECTING THE TWO DLAN 1200+ WIFI AC TO A DLAN NETWORK
- DLAN NETWORK ENCRYPTION
- 3.3.2 ADDITION – EXPANDING AN ADDITIONAL NETWORK
- INTEGRATING THE DLAN 1200+ WIFI AC INTO AN EXISTING DLAN NETWORK
- INTEGRATING THE DLAN 1200+ WIFI AC INTO AN EXISTING WIFI NETWORK
- ENABLING WIFI CLONE
- CONNECTING DEVICES TO THE WIFI NETWORK
- 3.4 INSTALLATION OF DEVOLO SOFTWARE
- DOWNLOADING MY DEVOLO APP
- INSTALLING DEVOLO COCKPIT SOFTWARE
- SOFTWARE FOR WINDOWS
- SOFTWARE FOR MAC (OS X)
- SOFTWARE FOR LINUX (UBUNTU)
- 3.5 REMOVING A DLAN 1200+ WIFI AC FROM THE NETWORK
- 4 NETWORK CONFIGURATION
- 4.1 CALLING UP THE BUILT-IN CONFIGURATION INTERFACE
- 4.2 MENU DESCRIPTION
- 4.3 WIFI CONFIGURATION
- 4.3.1 ACCESS POINT
- WI-FI ON/OFF
- NETWORK NAME
- HIDING THE SSID
- CHANNEL
- ENCRYPTION
- KEY
- 4.3.2 WLAN TIME CONTROL
- WIFI TIME CONTROL SETTING OFF/ON
- 4.3.3 GUEST ACCOUNT
- GUEST ACCOUNT OFF/ON
- AUTOMATIC SHUTOFF
- 4.3.4 PARENTAL CONTROLS
- CHILD-SAFETY FEATURE OFF/ON
- WIFI DEVICES WITH TIME QUOTA
- 4.3.5 WLAN FILTERS
- WPS OFF/ON
- PERMITTED WIFI DEVICES
- 4.3.6 WIFI CLONE AND WIFI MOVE
- WIFI CLONE
- WIFI MOVE
- WIFI MOVE TECHNOLOGY SUPPORT ENABLED
- 4.3.7 WIFI PROTECTED SETUP (WPS)
- WPS ENCRYPTION OFF/ON
- WPS VIA PBC (PUSH BUTTON)
- WPS VIA PIN
- 4.4 STATUS OVERVIEW
- WIFI STATUS
- DLAN STATUS
- ETHERNET STATUS
- FIRMWARE VERSION
- ACCESS PASSWORD
- NETWORK SETTINGS
- 4.5 DEVICE CONFIGURATION
- 4.5.1 DLAN SETTINGS
- 4.5.2 DLAN DEVICES
- 4.5.3 ADD A DLAN DEVICE
- USING THE ENCRYPTION BUTTON WITH THE HOME ICON
- VIA SECURITY ID
- 4.6 MANAGEMENT
- 4.6.1 LANGUAGE SELECTION
- 4.6.2 DEVICE SECURITY
- 4.6.3 NETWORK SETTINGS
- 4.6.4 SYSTEM
- AUTOMATIC FIRMWARE UPDATE
- UPDATING FIRMWARE
- SAVING THE DEVICE CONFIGURATION
- RESTORING THE DEVICE CONFIGURATION
- RESETTING THE DEVICE CONFIGURATION
- 4.6.5 MANAGEMENT
- DATE AND TIME
- LED SETTINGS
- LICENSE INFORMATION
- 5 APPENDIX
- 5.1 FREQUENCY RANGE AND TRANSMITTING POWER
- 5.2 CHANNELS AND CARRIER FREQUENCIES
- 5.3 BANDWIDTH OPTIMISATION
- 5.4 DISPOSAL OF OLD DEVICES
- 5.5 WARRANTY CONDITIONS
- INDEX
- C
- D
- L
- M
- P
- R
- S
- T
- W
Brand : DEVOLO
Model : dLAN 1200+
Category : Powerline Adapter