
H-LED32V8 - Television HYUNDAI - Free user manual and instructions
Find the device manual for free H-LED32V8 HYUNDAI in PDF.


| Product Type | LED TV |
| Screen Size | 32 inches (81 cm) |
| Resolution | 1920 x 1080 (Full HD) |
| Aspect Ratio | 16:9 |
| Dimensions (without stand) | 732 x 432 x 80 mm |
| Dimensions (with stand) | 732 x 482 x 200 mm |
| Weight (without stand) | 3.9 kg |
| Weight (with stand) | 4.2 kg |
| Power Supply | AC 100-240V, 50/60Hz |
| Power Consumption (typical) | 45 W |
| Standby Power Consumption | < 0.5 W |
| Audio Output | 2 x 8W stereo speakers |
| Tuner | DVB-T2/C (digital terrestrial and cable) |
| Inputs | 2x HDMI, 1x USB 2.0, 1x AV, 1x VGA |
| Outputs | 1x Headphone jack, 1x Digital audio out (coaxial) |
| Remote Control | IR remote with batteries (AAA) |
| Wall Mount Compatibility | VESA 200 x 200 mm |
| Maintenance | Clean with soft dry cloth; avoid solvents |
| Safety | Do not expose to water; unplug before cleaning |
| Spare Parts Availability | Contact Hyundai service center |
Frequently Asked Questions - H-LED32V8 HYUNDAI
User questions about H-LED32V8 HYUNDAI
0 question about this device. Answer the ones you know or ask your own.
Ask a new question about this device
Download the instructions for your Television in PDF format for free! Find your manual H-LED32V8 - HYUNDAI and take your electronic device back in hand. On this page are published all the documents necessary for the use of your device. H-LED32V8 by HYUNDAI.
USER MANUAL H-LED32V8 HYUNDAI
natural_image
Three people performing a handstand in a modern indoor space with large windows and potted plants (no text or symbols visible)HYUJIAO

natural_image
Pure electrical circuit lines without any symbols
natural_image
Two glossy spheres with reflective surface, no text or symbols presentLED TV

ТЕЛЕВИЗОР
Thank you for purchasing our product. For safety, it is strongly recommended to read this manual carefully before connecting, operating and/or adjusting the product and keep the manual for reference in the future.
Table of contents 2
Before you start 3
Utilization of the product 3
Important safeguards 3
Installation 4
Wall mounting 4
Stand installation 4
Connection 5
Connection.... 5
Outdoor antenna connection 5
Other connections 5
Operation 6
Control elements 6
Front panel 6
Back panel 6
Remote controller 7
Changing the battery 7
General operations 8
Teletext operations 8
OSD operation.... 8
Picture setting 9
Sound setting 9
Setting page 9
Geometry setting.... 10
Channel setting 10
USB operation 10
General information.... 10
File playback 11
General information 12
Troubleshooting 12
Causes of interference 12
Accessories 13
Specifications 13
Utilization of the product
If you want to dispose this product, do not mix it with general household waste. There is a separate collection system for used electronic products in accordance with legislation that requires proper treatment, recovery and recycling.
Please contact your local authorities for the correct method of disposal. By doing so, you will ensure that your disposed product undergoes the necessary treatment, recovery and recycling and thus prevent potential negative effects on the environment and human health.
Important safeguards
- Before connecting the AC power cord to the mains supply outlet, make sure that the voltage designation of the unit corresponds to the local electrical supply.
- Please unplug the power cord from the AC outlet and contact a service center for repair if following occurs: any obvious abnormality appears in the unit, such as smoky, peculiar smell or strange sound; liquid has been spilled or other objects have fallen into the unit; no picture or sound; cover or panel is broken; although you have operated the unit following the operating instructions, it still cannot work normally.
- This unit should only be connected to a wall socket having grounding.
• Always disconnect the power cord and antenna during a storm. - Do not fix the power cord with a metal nail.
- Unplug the power cord from the AC outlet; also unplug the signal cables from the input ports when the unit is unused for long periods of time.
- When unplugging the plug, always hold the wide slot, do not touch the metal part, and do not destroy, refit, twist, pull or roast the power cord.
- Please contact the service center immediately if you found that the core is showed in the air or has been broken.
- Please replace the AC outlet if the metal bolt cannot be inserted into the power socket
completely or it cannot be fastened even when it was pushed in, otherwise, any accidents of shocks and fires would happen.
- Never touch the antenna lie or power plug if it stars to thunder.
- Do not touch the power plug with wet hands.
- Do not use any non-rated power socket with numerous devices jointed on one power socket or cable device. The wire of non-designated capacity may cause the fire due to the generation of heat.
- All instructions must be read and understood well before you operate the unit. Heed all warnings and follow all instructions.
- Please use the accessories provided by the manufacturer. Using inadequate accessories may result in accidents.
- Please adjust the product through the panel buttons or the remote controller, do not remove the cover or attempt to service the product by yourself. Do not disassemble back cover and do not make maintenance by yourself to avoid the electric shock.
• Over-press the panel may destroy the product.
- Do not place the product on an unstable cart, stand surface, tripod, bracket, or table. The product may fall, causing serious accidents as well as the damage to the product.
- Please place the product on a flat surface in a well-ventilated location. Keep it away from the burning-light, direct sunlight, vibration,
high-temperature and humidity.
- Do not place any vase, potted plant, cup, medicine and any container with water on this product. If the liquid is spilt, it may cause the fire, electric shock or breakdown.
- Do not install it at the place on the strong magnetic field or current field. It may cause break down. This equipment may be observed deterioration of the picture by electromagnetic radiation in electromagnetic environment.
- Fasten the wheel of the product or shelf with wheels when installing this product. If it moves or is tipped over, it may be damaged.
- Do not place any fire source such as candlelight close to this product or place it on this product. If it is tipped over or fallen down, it may cause damage or fire.
- Do not place the unit into closed space of TV for better ventilation; it can reduce the product lifetime. Keep a space at least 10 cm at above, left and right of the TV.
- Please place all the signal cords behind of rear panel.
- Do not overexert or touch the panel when you convey the product. Do not transfer the LED TV up or down display direction.
- Do not transport it with the power cord or the connection cable connected. If you move this product with the power cord or the connection cable connected, the damaged power cord, connection cable or connection terminal may cause the fire, the electric shock or breakdown.
- 2 persons or more shall transport the device, which is heavier than 18kg . If you drop or tip over the device, it may damage it.
- The temperature of the product's body becomes a little higher after a long period use. This phenomenon indicates that heat exchange in normal working mode, thus please do not let children or anyone who is sensitive of temperature to touch.
All images provided herein are schematic drawings and may differ from of real objects.
Installation
Wall mounting
For wall mounting the back panel of this unit is equipped with 4 holes; screw the 4 supplied hexagonal bolts into the holes. Now the screw holes on the hexagonal bolts (200 mm horizontal and 100 mm vertical spread distance) can be used for fixing the wall-mounting bracket. The wall-mount bracket is not included and should be acquired separately. Manufacturer is not responsible for improper mounting resulting in damage of the unit.
Stand installation
Align the holes in the glass stand and base and fix them by 3 supplied screws as shown below:

natural_image
Technical line drawing of a mechanical assembly with a base plate and a central component (no text or symbols)Place the LED TV on a solid flat surface. Use soft material to place over the front screen to avoid any damage. Fix the stand assembly with 4 supplied screws to the holes in the bottom part of the back panel as shown below.

natural_image
Technical line drawing of a mechanical device with no visible text or symbolsConnection

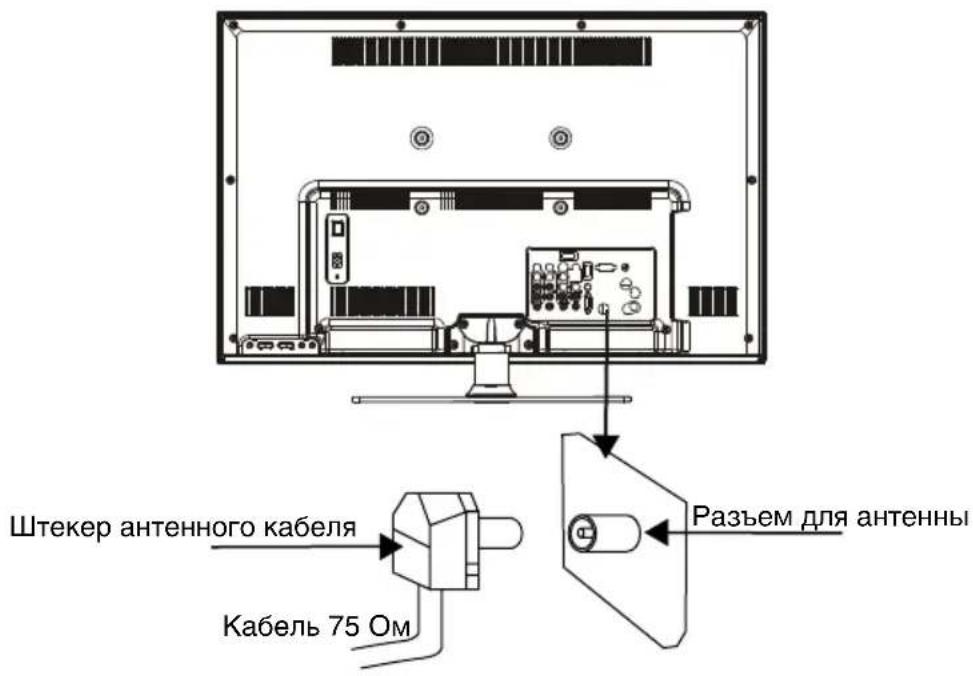
Outdoor Antenna Connection
Use 75Ω coaxial cable plug or 300-75Ω impedance converter to plug in antenna input terminal on the rear of the cabinet.
Other connections
- Connect a video source to the Composite video input jack with RCA cable (not included).
- Connect an audio source to the proper Audio input jacks (left and right).
- When using the unit as a computer screen, connect the PC to the VGA jack of the unit by the relevant cable to get the video signal from the PC. For audio signal from the PC, connect the left and right jacks of the VGA/Component audio input of this unit to the audio output jack of the PC by using relevant connector (not included).
- If the video source has a HDMI output
jack, you can connect the signal to the unit by HDMI cable (not included).
- Component input is intended for receiving component video signal if connected to the component output of external signal source.
- Connect an external device (e.g., VCR-/DVD-recorder) to the proper Audio/Video output jacks of this unit with AV RCA cable (not included).
- Coaxial output is intended for transmitting multi-channel sound to an external decoder (e.g. in 5.1-CH format). RCA cable should be used for connection.
Control elements
Front panel
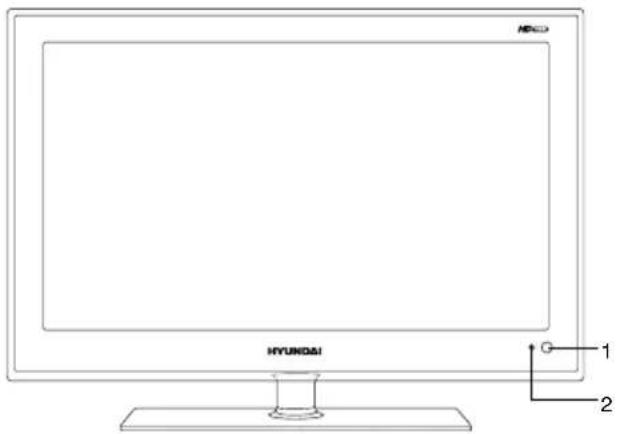
- IR sensor
- Power indicator
Back panel

- POWER button
- CH+/- buttons
- VOL+/- buttons
- MENU button
- SOURCE button
- Power switch
- Power cord input
- USB port
- Audio stereo input-2
- Composite video input-2
- HDMI input
- Coaxial output (SPDIF)
- Component video input
- Audio input for VGA and component video
- Video/audio input-1
- Composite video/audio output
- VGA input
- RF antenna jack
Remote controller (RC)

- button
- Number buttons
- INFO button
- SOURCE button
- Cursor (UP/DOWN/LEFT/RIGHT) buttons/OK button
- TXT button
- VOL+/VOL- buttons
- USB button
-
SCALE/SIZE button
-
PICTURE/REV button
- MTS button/red button
- Green button
- POWER button
- RETURN button
- MENU button
- EXIT button
- INDEX button
- CH+/CH- buttons
- FREEZE/SUB button
- SOUND/HOLD button
- DEMO button
- Cyan button/ button
Changing the battery
- Remove the battery compartment cover on the back of the RC.
- Insert the batteries into the battery compartment making sure that the correct polarity is observed.
- Install the cover back.

natural_image
Diagram of a battery internal structure with an upward arrow indicating direction (no text or symbols)123

natural_image
Diagram of a device internal structure with no visible text or symbols
natural_image
Diagram of a mechanical device with a downward arrow and internal components (no text or symbols)- Use two AAA batteries for the RC. The RC should be pointed at remote sensor within 8 meters and within 30 degrees at the left or the right side.
• Take the battery out of the RC if it is not used for a long time. - Do not mix new and used batteries or different types of batteries. Weak batteries can leak and severely damage the RC.
- Do not expose the RC to shock, liquids, and do not place it in an area with high humidity.
General operations
- Press POWER button on the unit or on the RC to switch on the unit from standby mode. When the unit is on, press POWER button on the RC to switch the unit to standby.
- Press VOL- button on the unit or on the RC repeatedly to decrease the volume; press VOL+ button on the unit or on the RC repeatedly to increase the volume.
- Press RETURN button on the RC to select from the present channel and the previously displayed channel.
- Press 📄 button to cut off sound, press this button again or adjust volume to resume sound.
- In TV mode press CH+/CH- buttons on the RC or on the unit to select previous or next channel; or press number buttons to enter a channel number directly.
- Press PICTURE button repeatedly to cycle through the available video picture modes from the following types: Standard => Bright => Soft => Personal.
- Press SOUND button repeatedly to cycle through the available sound modes from the following types: Stereo => Movie => Music => News => Personal.
- Press INFO button to display the preset TV channel information.
- In TV mode press MTS button to switch NICAM sound mode (not available for some channels).
- Press SCALE button repeatedly to select a screen display size from the available list: 4:3/Full/Subtitle/Wide/Zoom/Expand/Original/Nature. Available aspects may differ for different signal sources.
- Press FREEZE button to freeze the picture on or off.
Press SOURCE button, then press cursor buttons on the RC to select a source from available source list: TV => YPbPr => PC => HDMI => AV1 => AV2. Press OK button to confirm. You can press USB button to access Media source mode directly; you can press TV button to access TV source mode directly.
- Press 📞 button to enable/disable Natural light function. This is to adjust the brightness of the backlight according to the content of the inputted signal automatically, so as to optimize the picture quality and decrease the power consumption.
- Press DEMO button to display the menu including E care (Eyes care), E saving (Energy saving) and E pic (Enhance picture) items. Press cursor buttons to select an item and press Ok button to demonstrate the selected mode of Natural light function. Press DEMO button or EXIT button to cancel.
It is recommended to demonstrate this function in full-screen mode.
TELETEXT operations (option)
- Select the TV source mode. Then press CH-/CH+ buttons to select TV channel in order to pick up the picture signal of Teletext.
- Teletext button functions are as follows:
TXT: Press this button to enter into Teletext mode. Press this button to mix the teletext and current TV signal image. Press this button again to return to the channel you are watching.
HOLD: Press this button to stop the move to the next page. Press this button again to cancel operation.
INDEX: Press this button to go to the index page.
SIZE: Press this button to enlarge the top part of the page. Press this button again to enlarge the bottom part of the page. Press this button third time to normal size text page view.
REV. (Reveal): Press this button to reveal the cancelled information. Press this button again to cancel the information.
SUB. (Subpage): Press this button to select sub-page. Input the number of sub-page and use numeric buttons in the format 0001 for sub page 1. The teletext will search for the sub page. Press SUBPAGE button again to exit the subpage mode.
Red/Green/Yellow/Cyan buttons: Press these 4 color buttons to access directly to corresponding color page displayed at the
lower parts of teletext screen.
OSD operation
- Press MENU button to enter the setting menu displayed on the screen.
- Press UP/DOWN cursor buttons on the RC to select setting page.
- Press OK button on the RC to go to the parameter list.
- Press UP/DOWN cursor buttons on the RC to select a parameter to adjust.
- Press LEFT/RIGHT cursor buttons on the RC to adjust the selected parameter.
- Press MENU button to return to the previous menu page. Press EXIT button on the RC to quit the menu.
Some menu items may be in grey color, in this case they are not adjustable. Pictures of OSD menu are for reference only; they may differ from the real screens.
Picture setting page
| Picture |
| Backlight |
| Picture mode |
| Scale |
| Brightness |
| Contrast |
| Saturation |
| Sharpness |
| Tint |
| Color temperature |
| Natural light |
| Dynamic contrast |
- Backlight: adjust the brightness of screen backlight depending on environmental lighting.
- Picture Mode: Standard/Bright/Soft/Personal.
- Scale: 4:3/Full/Subtitle/Wide/Zoom/Expand/Original/Nature.
- Brightness, Contrast, Saturation, Sharpness, Tint (tint available only for NTSC system).
• Color temperature: Select color temperature mode of the picture - Normal/
Warm/Cool.
- Natural light: to adjust the brightness of the backlight according to the content of the inputted signal automatically.
- Dynamic contrast: to adjust the image contrast automatically.
Sound setting page
| Sound |
| Sound modeBalanceSound EQ |
- Sound mode: News/Music/Movie/Stereo/Personal.
• Balance: adjust balance between left and right speaker. - Sound EQ: adjust the equalizer. Note: after you adjust the equalizer, the sound mode will automatically switch to Personal.
Setting page
| Setting |
| DNR |
| Smart switch |
| Startup setting |
| Language |
| TTX language |
| Color system |
| Watch time limit |
| Time setting |
| Restore to default |
- DNR: Digital noise reduction effect for reducing the video noise level: Off/On, if the broadcast signal received is weak.
- Smart switch:
Switch: when the connected external device is turned on, the TV will automatically switch to the corresponding source mode.
Display: when the connected external device is turned on, the TV will show a prompt message; select OK to switch to the corresponding source mode.
Off: disable Smart switch function.
- Startup setting: you can select the default startup picture, capture picture (Logo) and no startup picture (Off).
- Language: select the language of the OSD menu.
- TXT Language: select the language of the teletext subtitles. If selected teletext language does not correspond to the program language, subtitles can be displayed incorrectly.
• Color system: PAL/SECAM/NTSC.
- Watch time limit: set the period of time for you to watch the TV; when the time elapses, the TV will switch off automatically. You must enter the password first (the default password is 0000; you can also assign your own password in PW Modify menu). If you forgot your password, you can use 0432 code.
- Time setting:
Current time: set the current time.
Turnon repeat: Select the mode of TV turn-on at a specific time (Off/Once/Everyday).
Note: If Off is selected, Turnon time, Wake source and Wake channel are unavailable.
Turnon time: set the time at which the TV will turn on automatically.
Wake source: select the source mode to which the TV will automatically turn on.
Wake channel: select the channel to which the TV will automatically turn on (available only if TV is selected as Wake source).
Turnoff repeat: Select the mode of TV turn-off at a specific time (Off/Once/Everyday). Note: If Off is selected, Turnoff time is unavailable.
Turnoff time: set the time at which the TV will turn off automatically.
Sleep time: set the period after which the TV will automatically turn off (0 - 120 minutes).
- Restore to default: reset the parameters to initial factory settings.
Geometry setting (only for PC mode)
| Geometry |
| Auto adjust |
| H position |
| V position |
| AD clock |
| Phase |
- Auto adjust: automatic setting of the parameters.
- Horizontal Position: adjust horizontal position of the image.
- Vertical Position: adjust vertical position of the image.
- AD clock: adjust the image frequency manually.
- Phase: adjust the phase manually.
Channel setting
| Channel |
| Auto tuning |
| Intellegent tuning |
| Manual tuning |
| Fine-tune |
| Sound system |
| Channel edit |
- Auto tuning: press OK button to start automatic search of available channels. To stop the process press MENU or EXIT button.
- Intellegent tuning: This operation will keep all the existed channels and add newly found channels to the end of the channel list. To stop search, press MENU button; detected channels will be stored.
- Manual tuning: Press OK button to enter into manual tuning menu:
Channel: select channel number.
Band: select frequency band (VHFH/UHF/VHFL).
Frequency: adjust the current frequency step by step.
- Fine tune: adjust the current frequency manually to improve the quality of signal if it is too week.
- Sound system: select the sound system (DK/BG/I/M).
- Channel edit:
Current Channel: select the current channel number.
Target Channel: select a target channel for swapping.
Skip: select Current channel number to be skipped. Select Skip item and select Yes to confirm. Now this channel will be skipped when next/previous channels are selected.
Swap: select Current channel and Target
channel to be swapped. Select Swap item and and select Yes to confirm swapping.
USB operation
General information
USB file systems supported: FAT32.
2.0 USB version is supported. For correct and satisfactory operation, licensed USB devices of famous brands should be used with this unit. Avoid using USB devices of unknown brands. Playback of images and music of only JPEG and MP3 format is supported.
- This unit supports playback of video files with 3GP, AVI, DAT, M2TS, TS, MKV, MOV, VOB extension, with video codecs H264/AVC, H263, DIVX, XVID, MPEGI, MPEGII and audio codecs PCM, DD(AC3), MP3, WAV, WMA.
The above list of extensions and codecs is for information only and is not a guarantee that all files having the above extensions and codecs should be read by this unit.
- Some AVI files cannot be played due to their parameters and recording conditions. Video files more than 2 Gb having AVI extension can be played partially.
File playback
Insert a USB into the USB jack. Press MENU button, select Media option and press OK button. The screen will show USB playback menu:
| Multimedia |
| Movie showPhoto showMusic showAuto play |
- Video file playback: Select Movie Show item and press OK button. Press cursor buttons to select a file and press OK button to start playback. During playback press MENU button to show playback menu in which you can select an operation by LEFT/RIGHT cursor buttons and perform this operation by press-
ing OK button. The operations include Play/Pause, Backward, Forward, Prev., Next, Stop, Repeat Mode, AB Repeat setting, Playlist, Info., Slow Forward, Step Forward, Goto Time, Brightness, Contrast. To exit video playback press EXIT button.
- Image file playback: Select Photo Show item and press OK button. Press cursor buttons to select a file and press OK button to start playback. During playback press MENU button to show playback menu in which you can select an operation by LEFT/RIGHT cursor buttons and perform this operation by pressing OK button. The operations include Play/Pause, Prev., Next, Stop, Rotate Right, Rotate Left, Music(on/off), Musiclist, Zoom in, Zoom out, Repeat Mode, Brightness, Contrast, Capture and Info. To exit photo playback press EXIT button.
If you want to capture a picture as start-up, select the Capture icon, press OK button, then select the Logo in Startup setting page of OSD menu and press OK button.
- Audio file playback: Select Music show item and press OK button. Press cursor buttons to select a file and press OK button to start playback. During playback press MENU button to show playback menu in which you can select an operation by LEFT/RIGHT cursor buttons and perform this operation by pressing OK button. The operations include Play/Pause, Backward, Forward, Prev., Next, Stop, Repeat Mode, Mute, Playlist, Info. and Goto Time. To exit music playback press EXIT button.
- Auto playback: Select Auto play item and press OK button. Music and photo files will be played automatically. This function is only available if audio and image files are stored in the same root foled of the USB.
Troubleshooting
Below is a table describing simple measures that can help you eliminate most problems likely to emerge when this unit is in use. If below measures do not help, turn to a service center or to the nearest dealer.
| Symptom Cause | Use Solution | |
| No picture, no sound, and no indicator light | The power cord is not plugged in. Contrast, brightness, color and volume are all in the minimum value or TV is in mute mode. | Plug the power cord in. Alter the value of contrast, brightness, color and volume. |
| Picture and sound with abnormality | Contrast and color are set improperly. Color system is set improperly. Sound system is set improperly. | Set the value of Contrast and color properly. Set the sound system properly. |
| Picture is spotted or with snow | Signal source is low-grade or the signal is in a lower quality. | Use the qualified signal cord. |
| Blue background | No video signal or the signal cord is improperly/not connected. | Connect the signal cord properly. |
| No sound No audio | signal or the signal cord is improperly/not connected. | Connect the audio signal cord properly. Set the sound system properly. |
| The RC does not work | Batteries are improperly installed or exhausted. | Make sure the positive and the negative polarities are correct. Reattach the battery lid. Replace the batteries. |
Causes of interference
Incorporated in your TV receiver are the most up-to-date devices to eliminate interference. Local radiation however, can create disturbances, which visibly affect your picture. Proper installations, a good aerial are your best safeguards against these disturbances.
- RF INTERFERENCE: Moving ripples across the screen are caused by nearby transmitting or receiving short-wave radio equipment.
- DIATHERMY: Herringbone pattern and partial picture loss can result from the operation of diathermy equipment from a nearby doctor's surgery or hospital.
- SNOW: Weak TV signals from long distant stations result in an instead picture and give the effect of falling snow. An antenna adjustment or antenna amplifier may be needed.
- GHOST: Multiple image, caused by TV signals reflected back from surrounding buildings, hills, aircraft, etc. is minimized by correct aerial positioning.
- CAR IGNITION: Nearby cars and electrical motors can cause small streaks across the picture or make the picture roll.
Accessories
- LED TV 1 pc
- Remote controller 1 pc
- Battery 2 pcs
- Glass stand 1 pc
-
Stand base 1 pc
-
Screw 7 pcs
- Hexagonal bolts 4 pcs
- Power cord 1 pc
- Consumer information 1 pc
- Warranty card 1 pc
- Instruction manual 1 pc
Specifications
Size (diagonal) 32" (81 cm)
Response time 5 ms
Resolution 1366 x 768
Aspect ratio 16:9
Color system PAL, SECAM
Sound system B/G, DK, I
NICAM Stereo 2 x 5 W
Component video in +
AV RCA in x 2
AV RCA out +
USB port +
VGA +
HDMI +
Coaxial output +
Russian and English OSD +
Progressive scan +
Digital comb filter +
Sleep timer +
Quantity of channels 199
Teletext 1000 pages
Power supply \~110-240 V, 50/60 Hz
Electric shock protection class II
Power consumption 55 W
Unit dimensions: with stand 789.4 x 555.2 x 210 mm
without stand 789.4 x 505.4 x 76 mm
Net/Gross weight 10.5 kg/12.5 kg
The LCD panel is a high technology product with many thin film transistors that can give you a fine picture details. Occasionally, a few non-active pixels may appear on the screen as a fixed point of blue, green, red, black or white, please note that this does not affect the performance of your LCD TV.
Warning: Specifications may be subject to change without notice for improvement.
natural_image
Technical line drawing of a mechanical assembly with a base plate and a central component (no text or symbols)natural_image
Technical line drawing of an open electronic device with speaker and panel components, showing light rays from the base (no text or symbols)Подключение

- Table of contents 2
- Before you start 3
- Connection 5
- Operation 6
- General information 12
- Utilization of the product
- Important safeguards
- Installation
- Wall mounting
- Stand installation
- Connection
- Outdoor Antenna Connection
- Other connections
- Control elements
- Remote controller (RC)
- Changing the battery
- General operations
- TELETEXT operations (option)
- OSD operation
- USB operation
- General information
- File playback
- Troubleshooting
- Causes of interference
- Accessories
- Specifications
- Подключение
Brand : HYUNDAI
Model : H-LED32V8
Category : Television