
Studio GT - Loudspeaker SAMSON - Free user manual and instructions
Find the device manual for free Studio GT SAMSON in PDF.


| Product Type | Active Studio Monitor |
| Brand | Samson |
| Model | Studio GT |
| Driver Configuration | 8" Woofer, 1" Tweeter |
| Frequency Response | 50 Hz - 20 kHz |
| Amplifier Power | 100W (bi-amped) |
| Inputs | XLR, 1/4" TRS |
| Dimensions (HxWxD) | 400 x 250 x 300 mm |
| Weight | 10 kg |
| Enclosure Type | Bass-reflex |
| Power Supply | 100-240V AC, 50/60Hz |
| Standby Power | <0.5W |
| Crossover Frequency | 2.5 kHz |
| Signal-to-Noise Ratio | >100 dB |
| Maximum SPL | 110 dB |
| Cabinet Material | MDF with vinyl finish |
| Included Accessories | Power cable, user manual |
| Maintenance | Clean with dry cloth; avoid liquids |
| Safety | Do not open; no user-serviceable parts |
| Spare Parts | Contact Samson support |
| Service | Authorized service only |
Frequently Asked Questions - Studio GT SAMSON
User questions about Studio GT SAMSON
0 question about this device. Answer the ones you know or ask your own.
Ask a new question about this device
Download the instructions for your Loudspeaker in PDF format for free! Find your manual Studio GT - SAMSON and take your electronic device back in hand. On this page are published all the documents necessary for the use of your device. Studio GT by SAMSON.
USER MANUAL Studio GT SAMSON
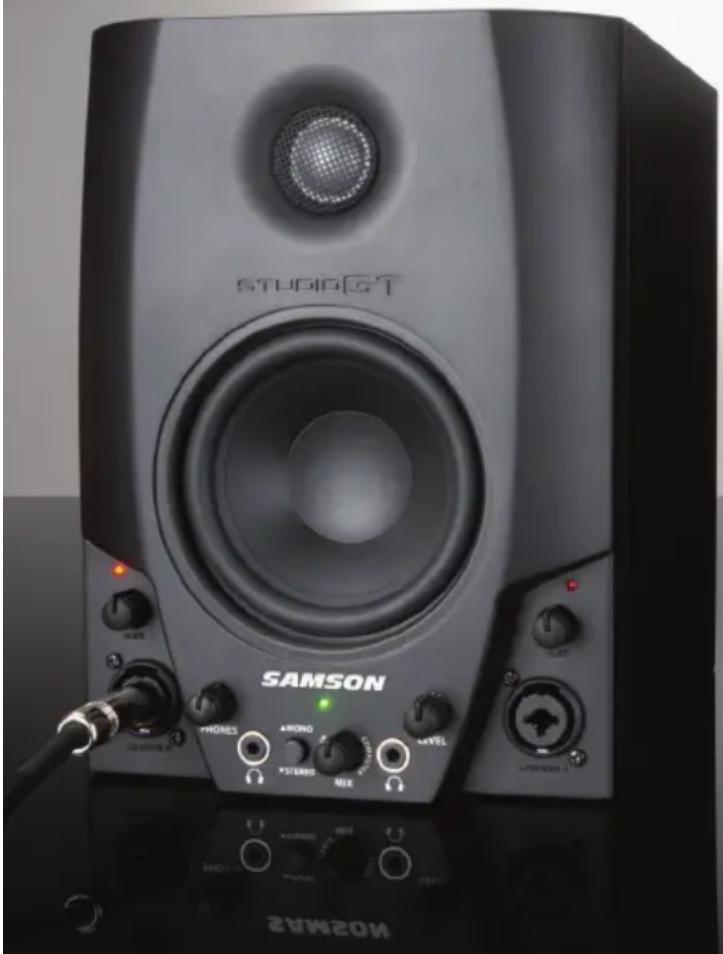
with USB AUDIO INTERFACE
natural_image
Close-up of a black SAMSON audio amplifier with speaker, microphone, and control knobs (no readable text beyond brand name)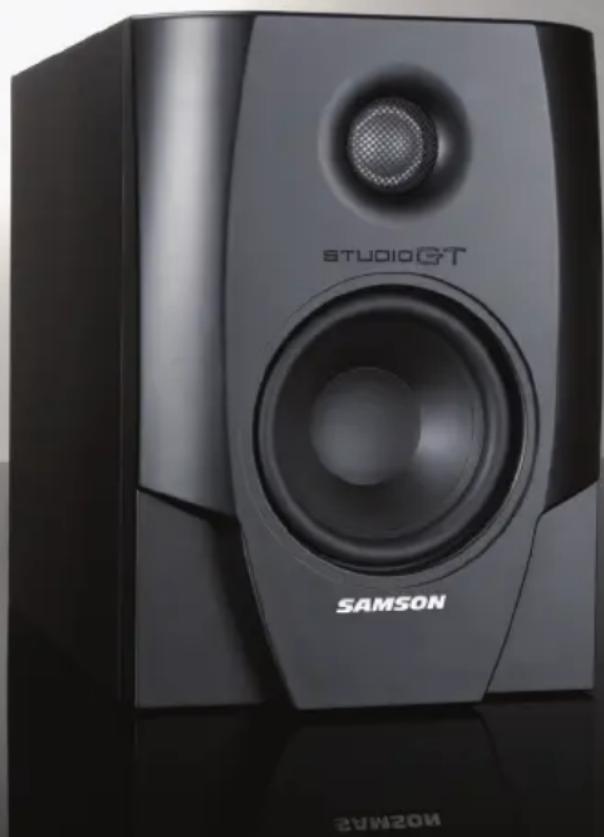
natural_image
Black studio GT audio amplifier with SAMSON brand label (no additional text or symbols visible)Owner's Manual
SAMSON
IMPORTANT SAFETY INSTRUCTIONS
TO PREVENT FIRE OR SHOCK HAZARD. DO NOT USE THIS PLUG WITH AN EXTENSION CORD, RECEPTACLE OR OTHER OUTLET UNLESS THE BLADES CAN BE FULLY INSERTED TO PREVENT BLADE EXPOSURE. TO PREVENT FIRE OR SHOCK HAZARD. DO NOT EXPOSE THIS APPLIANCE TO RAIN OR MOISTURE TO PREVENT ELECTRICAL SHOCK, MATCH WIDE BLADE PLUG TO WIDE SLOT AND FULLY INSERT.
 | CAUTION: TO REDUCE THE RISK OF ELECTRIC SHOCK, DO NOT REMOVE COVER (OR BACK). NO USER-SERVICEABLE PARTS INSIDE. REFER SERVICING TO QUALIFIED SERVICE PERSONNEL. |
 | This lightning flash with arrowhead symbol, within an equilateral triangle, is intended to alert the user to the presence of uninsulated “dangerous voltage” within the product’s enclosure that may be of sufficient magnitude to constitute a risk of electric shock to persons. |
 | The exclamation point within an equilateral triangle is intended to alert the user to the presence of important operating and maintenance (servicing) instructions in the literature accompanying the appliance. |
THIS DEVICE COMPLIES WITH PART 15 OF THE FCC RULES CLASS B. OPERATION IS SUBJECT TO THE FOLLOWING TWO CONDITIONS: (1) THIS DEVICE MUST NOT CAUSE HARMFUL INTERFERENCE, AND (2) THIS DEVICE MUST ACCEPT ANY INTERFERENCE RECEIVED INCLUDING INTERFERENCE THAT MAY CAUSE UNDESIRED OPERATION. SUITABLE FOR HOME OR OFFICE USE.
- Read these instructions.
- Keep these instructions.
- Heed all warnings.
- Follow all instructions.
- Do not use this apparatus near water.
- Clean only with dry cloth.
- Do not block any ventilation openings. Install in accordance with the manufacturer's instructions.
- Do not install near any heat sources such as radiators, heat registers, stoves, or other apparatus (including amplifiers) that produce heat.
- Do not defeat the safety purpose of the polarized or grounding type plug. A polarized plug has two blades with one wider than the other. A grounding type plug has two blades and a third grounding prong. The wide blade or the third prong are provided for your safety. If the provided plug does not fit into your outlet, consult an electrician for replacement of the obsolete outlet.
- Protect the power cord from being walked on or pinched particularly at the plugs, convenience receptacles, and at the point where they exit from the apparatus.
- Only use attachments/accessories specified by the manufacturer.
- Use only with the cart, stand, tripod, bracket, or table specified by the manufacturer, or sold with the apparatus. When a cart is used, use caution when moving the cart/apparatus combination to avoid
injury from tip-over.

natural_image
Symbolic illustration of a person climbing a ladder inside a circle (no text or symbols)- Unplug the apparatus during lightening, sort or when unused for long periods of time.
- Refer all servicing to qualified personnel. Service is required when the apparatus has been damaged in any way, such as power supply cord or plug is damaged, liquid has been spilled or objects have fallen into the apparatus has been exposed to rain or moisture, does not operate normally, or has been dropped.
- This appliance shall not be exposed to dripping or splashing water and that no object filled with liquid such as vases shall be placed on the apparatus.
- Caution-to prevent electrical shock, match wide blade plug wide slot fully insert.
- Please keep a good ventilation environment around the entire unit.
Studio GT Front Panel Layout....3
Studio GT Rear Panel Layout 4
Studio GT Quick Start....5
Setting Up the Studio GT 10
Direct Monitoring and Latency....11
Installing the Studio GT 12
Studio GT Specifications ..... 16
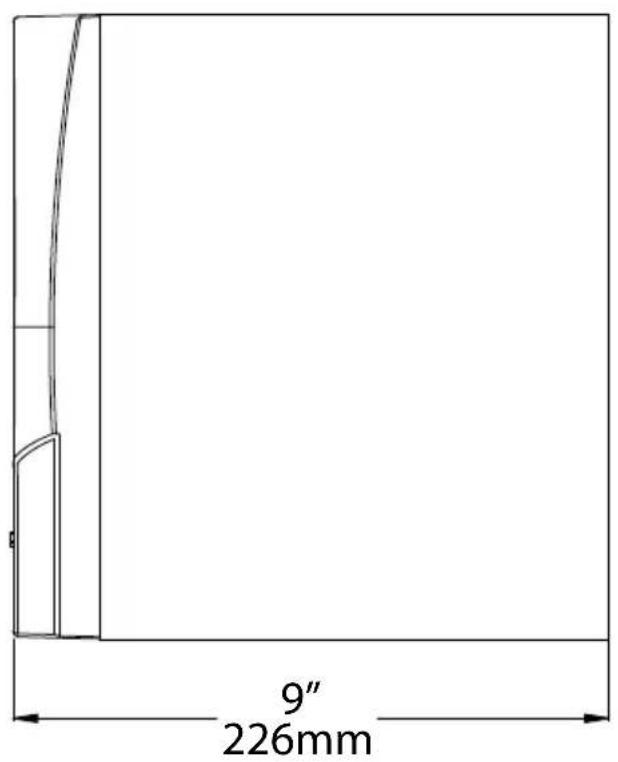
Studio GT Dimensional Drawing....17
Copyright 2010, Samson Technologies Corp.
v1.1
Samson Technologies Corp.
45 Gilpin Avenue
Hauppauge, New York 11788-8816
Phone: 1-800-3-SAMSON (1-800-372-6766)
Fax: 631-784-2201
www.samsontech.com
Thank you for purchasing the Samson Studio GT studio monitors with integrated USB audio interface. The Samson Studio GT provides accurate monitoring thanks to its 4.25-inch copolymer woofer and its 1-inch silk dome high frequency driver powered by 2 x 20 watts of internal power. Beyond the boundaries of the typical studio monitor, the Samson Studio GT includes two professional-quality microphone and instrument/line inputs, two headphone outputs with independent level controls, as well as high-quality analog-to-digital and digital-to-analog converters, that make it an ideal solution for your digital audio workstation. The Studio GT also features an input/computer MIX control and 2-position switch for no-latency direct monitoring.
Designed to make home recording easy and professional, Studio GT includes Cakewalk® Sonar LE music production software for enhanced control over the development of your creations. Thanks to the versatile recording and monitoring solutions provided by the Studio GT, it has never been easier to create professional, studio-quality tracks on any Mac or PC.
In these pages, you'll find a detailed description of the features of the Studio GT monitors, as well as a guided tour through its control panel, step-by-step instructions for its setup and use, and full specifications. You'll also find a warranty card enclosed - please don't forget to fill it out and mail it in so that you can receive online technical support and so that we can send you updated information about these and other Samson products in the future. Also, be sure to check out our website (www.samsontech.com) for complete information about our full product line.
With proper care and adequate air circulation, your Studio GT will operate trouble-free for many years. We recommend you record your serial number in the space provided below for future reference.
Serial number: ____
Date of purchase: ____
Should your unit ever require servicing, a Return Authorization number (RA) must be obtained before shipping your unit to Samson. Without this number, the unit will not be accepted. Please call Samson at 1-800-3SAMSON (1-800-372-6766) for a Return Authorization number prior to shipping your unit. Please retain the original packing materials and if possible, return the unit in the original carton and packing materials. If you purchased your Samson product outside the United States, please contact your local distributor for warranty information and service.
STUDIO GT FEATURES


The Samson Studio GT studio monitor system with USB audio interface provide a smooth response that's accurate, and at the same time pleasant to listen to. Here are some of their main features:
- Two-way, active studio reference monitor with ported tuned enclosure providing extremely accurate monitoring for recording studio, post-production, video gaming and multi-media applications.
- Integrated two-channel USB audio interface provides the ability to connect a microphone, line, or instrument signal to record directly onto your digital audio workstation.
- Onboard high quality 16-bit 44.1kHz/48kHz D-to-A (digital-to-analog) and A-to-D (analog-to-digital) converters.
- Two combination XLR/ 14 " mic and instrument/line inputs.
• 2-position switch for no-latency direct stereo and mono monitoring. - To listen to your mix on headphones, there are two 1/8-inch stereo headphone outputs with individual level controls. The internal speakers automatically turn off when you plug into the right Headphone output.
- For tight and controlled low frequency response, the Studio GT employs a 4.25-inch custom designed, inverted cone, copolymer woofer with santoprene surround.
- The Studio GT's 1-inch silk dome high frequency driver is set in a custom designed wave guide, producing a high frequency response that's accurate and natural.
- You can connect a second stereo input from an MP3 player, keyboard, sound card or any other stereo line level signal to the Studio GT rear panel's stereo RCA or 3.5 mm stereo Aux Input jack.
• Stereo Class D internal power amplifier.
• Passive crossovers utilizing a multi-pole design for linear response from bottom to top.
• Solid MDF (Medium Density Fiberboard) construction provides maximum SPL. - Precision-tuned rear vented enclosure, attractively finished in black satin vinyl covering.
• 2 meter, 20-gauge speaker cable and USB cable included. - Includes Cakewalk® Sonar LE music production software.
-
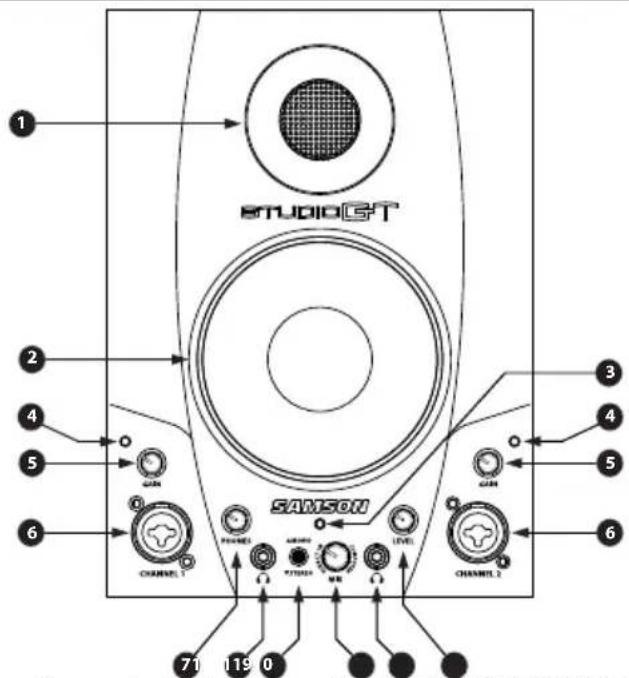
Silk Dome Tweeter - Smooth high frequency response produced from a 1-inch silk dome tweeter.
-
Low Frequency Driver - Heavy duty 4.25" extended range low frequency transducer.
-
POWER LED (active) - Green LED illuminates indicating the unit is powered on, ready for operation.
-
Clip LED - The Clip LED will illuminate red when the input signal reaches clipping point. If the red Clip LED lights often or stays lit for any period of time, lower the input gain level on that channel.
-
Input Gain Level Knob (GAIN) - Controls the input level of the associated Mic/Inst input (6).
-
Microphone/Instrument Inputs (Channel 1 & Channel 2) - Each XLR / 1/4" combo connector will accept a standard mic, line or instrument level signal. Phantom power is provided on the XLR microphone input.
-
Headphone - 3.5mm stereo output jack for connecting headphones.
-
Phones Level - Controls the overall output level to the left HEADPHONE output (7).
-
STEREO/MONO Button - This button allows you to select the direct input monitoring between stereo and mono operation. In Mono mode, the input signals will be heard equally in the left and right side of the Studio GT. In Stereo mode, Channel 1 will be heard in the left and Channel 2 will be heard in the right.
-
MIX Control - The MIX control is used to balance the audio mix of the input signals and the audio coming from the computer. When turned fully counterclockwise, only the signals connected to the Studio GT inputs are heard. When turned fully clockwise, only the output signal from your computer is heard at the speaker and headphone outputs. Any adjustment between the two endpoints will result in a proportional mix of both the Studio GT inputs and computer audio.
-
Headphone - 3.5mm stereo output jack for connecting headphones. The monitors automatically mute when the right headphone is connected.
-
Level Control - Controls the overall output level for both speakers and the right HEADPHONE output (11).


- 1/8" AUX INPUT - 3.5mm stereo input jack for connecting a second line level signal source, like an MP3 player. This input is not sent through the USB output.
- RCA INPUT – Used to connect signals from unbalanced, -10dBV devices, like a mixer. The Red connector is for the Right input and the White is for the Left input.
- USB Connector – Connect the supplied USB cable to this rear panel USB "B" connector.
- LEFT SPEAKER OUTPUT – Push Terminals for connecting the Left-side Extension Speaker.
- POWER SWITCH – Main power switch. When set to the ON position, the front panel green LED illuminates indicating the Studio GT is powered up and ready for operation.
- AC INLET - Connect the supplied IEC power cable here.
- TERMINAL CUP – Push Terminals for connecting the Left-side Extension Speaker to the Active (Right-side) speaker.
- TUNED PORT - Quiet port design offering linear extended low frequency response.
STUDIO GT HOOK-UP

- Unpack the Studio GT system components and included cables. Be sure to save the packaging in case you ever move or need to send the units for service.
- Set the Studio GT monitors in place near your computer or multi media center. The active speaker (the one with the front panel controls and jacks) is the right side speaker and the passive speaker (no knobs and jacks) is the left-side speaker.
- Connect the left and right speaker using the included speaker cable.
- Plug the included power cable into the AC IN jack.
- Connect the USB cable from the right speaker to an available USB port on your computer.
- Power on your Studio GT system using the rear panel POWER switch, but keep the volume all the way down to start.
- Make sure your computer Output Volume is set to maximum.
- Run an audio signal through your Studio GT monitors and raise the Level control to a comfortable listening level.
- Turn the GAIN knob fully counter-clockwise.
- Connect a microphone to the CHANNEL 1 XLR INPUT on the front panel using an XLR cable.
- While singing or playing into the microphone, slowly turn the GAIN knob clockwise until the CLIP indicator turns on. Then turn the knob counter-clockwise until the clip indicator no longer illuminates.
- Now raise the LEVEL control knob until you reach a comfortable listening level.
- In your DAW, select the Studio GT LEFT INPUT as the input source for a mono track.
- Set the STEREO/MONO switch to the MONO position, to hear the input out of both speakers.
- If recording two microphones, create two mono tracks in your DAW and select the Studio GT LEFT INPUT for the left front panel input, and the Studio GT RIGHT INPUT for the right front panel input.
RECORDING A GUITAR

- Turn the GAIN knob fully counter-clockwise.
-
Connect a guitar to the 14 " INPUT on the front panel using a standard 14 " instrument cable.
Note: The 14 " INPUT can accept either a high impedance or low impedance soure. -
While playing guitar at its loudest level, slowly turn the GAIN knob clockwise until the CLIP indicator turns on. Then turn the knob counter-clockwise until the clip indicator no longer illuminates.
-
Now raise the LEVEL control knob until you reach a comfortable listening level.
-
In your DAW, select the Studio GT LEFT INPUT as the input source for a mono track.
-
Set the STEREO/MONO switch to the MONO position, to hear the input out of both speakers.
-
If recording two guitars, create two mono tracks in your DAW and select the Studio GT LEFT INPUT for the left front panel input, and the Studio GT RIGHT INPUT for the right front panel input.
- Turn the CHANNEL 1 and CHANNEL 2 GAIN knobs fully counter-clockwise.
- Connect a keyboard to the CHANNEL 1 and CHANNEL 2 14 " INPUTS on the front panel using standard 14 " instrument cables.
- While playing the keyboard at its loudest levels, slowly turn up the GAIN knobs clockwise until the CLIP indicators turn on. Then turn the knobs counter-clockwise until the clip indicators no longer illuminate.
- Now raise the LEVEL control knob until you reach a comfortable listening level.
- In your DAW, select the Studio GT LEFT and RIGHT INPUT as the input source for a stereo track.
- Set the STEREO/MONO switch to the STEREO position, so that the left output of the keyboard is heard out of the left speaker and the right output of the keyboard is heard out of the right speaker.
DIRECT MONITORING

-
To send a mono mix from the CHANNEL 1 and CHANNEL 2 inputs to the Studio GT speakers and headphone outputs, set the MONO/STEREO button to the up, MONO position.
-
To separate the mix from the CHANNEL 1 and CHANNEL 2 inputs to the Studio GT speakers and headphone outputs, set the MONO/STEREO button to the down STEREO position. CHANNEL 1 will be heard in the LEFT speaker and CHANNEL 2 will be heard in the RIGHT speaker.
-
The input signals are mixed with the output signal from your DAW. The MONO/STE-REO switch does not affect the inputs of your audio software.
-
To balance the signals from the front panel inputs with the output signal from your DAW, adjust the MIX control until you find the desired mix. When the MIX control is turned fully counter-clockwise, only the input signal will be heard. When the MIX control is turned fully clockwise, only the audio coming from the computer will be heard.
Background on the Studio GT Active Monitors with Studio Interface
The Studio GT are near field reference monitors featuring a custom designed, 4-inch copolymer, low frequency driver and a 25mm silk dome tweeters, employing a ferro-fluid cooled voice coil and neodymium magnet. The monitors' crossover has been carefully designed with high quality components ensuring a linear frequency and phase response. The Studio GT enclosures are constructed from MDF (Medium Density Fiberboard) and are finished in scuff resistant, textured vinyl covering. The monitors' enclosures also include tuned vent ports that provide extended low-end response, and with a low turbulence design, the low frequency driver can move freely with minimal effect on the overall impedance. On the front panel, you'll find two XLR 1/4 input channels with Gain controls, two 3.5mm Headphone output jacks, Headphone and Speaker Volume controls, Direct Monitoring STEREO/MONO switch, and MIX control. On the rear of one enclosure, you'll find Studio GT's connection panel, which features an RCA unbalanced input, 3.5mm Aux input, USB "B" style connector and AC power inlet. Input and output signals are connected to Studio GT's internal stereo power module, providing 20 watts per channel through passive crossovers.
Positioning the Studio GT
Near field monitoring has become the choice of many engineers in large and small studios because it minimizes the effect of room acoustics. This is especially important in today's project studios since the budget for room acoustics is often minimal. By positioning the reference monitors in the near field (close to the listeners), you can greatly reduce the effects of room acoustics. The most important considerations when evaluating the effects of room acoustics are reflective surfaces that are around the monitoring area. These can include flat tabletops, glass mirrors or framed pictures, large open walls and even the surface of your mixing console. Most reflecting sound will eventually reach the listening position, but since it is slightly delayed from the direct source, the result is random cancellation of some frequencies, or comb filtering. If possible, remove any and all reflective surfaces from the vicinity of the studio monitors. You may also want to hang some acoustic foam on walls that are close to the monitors. When positioning the monitors, you'll want to set up what is commonly referred to as the "mix triangle." In this ideal configuration, the space between the left and right monitor is equal to the distance from the listener to each monitor, forming an equilateral triangle.

flowchart
graph TD
    A["Rectangle"] --> B["Circle"]
    C["Rectangle"] --> B["Circle"]
    B["Circle"] --> D["Equal Distance"]
    style B fill:#fff,stroke:#000
    style A fill:#fff,stroke:#000
    style C fill:#fff,stroke:#000
    style D fill:#fff,stroke:#000
Prime Listening Spot
Using the Direct Monitor
The Studio GT has a simple, yet sophisticated direct monitor system, which provides zero latency monitoring.
What is Latency? What is Zero Latency, and why do I need it?
Latency is the delay time between recording and playback that all computer DAW's, including yours, have when recording and monitoring simultaneously. Simply stated, when recording, the DAW needs to recognize the input signal, then crunch a bunch of numbers and then send the signal through to the output. Depending on several factors like the speed of your computer, the amount of tracks you've recorded, and whether or not you're using the DAW's effects, this can take several milliseconds. A delay of even a few milliseconds can sometimes make it hard for a musician to play on time. To solve this problem, the Studio GT lets you monitor the inputs directly through the speakers, or on headphones, without making the round-trip in and out of the DAW. As a result, you hear the inputs with no latency.
The Studio GT's Direct Monitor system has two modes of operation, Mono and Stereo, and an Input/CPU balance control. Adjustments to the STEREO/MONO switch and MIX control do not affect what is being recorded by your DAW.
MONO Mode
When the MONO mode is selected, you hear the two mono input signals. For example guitar and mic, directly from the Studio GT's input circuitry, with the input signals in mixed mono. This way you hear both of the input signals, with no delay, in both sides of the monitors or headphones. Since the direct monitor affects only the input signals, you'll still hear the playback of the DAW in stereo.
STEREO Mode
When you switch the Direct Monitor to STEREO, you'll hear the inputs while maintaining the stereo image. This is perfect for recording a keyboard or drum machine. This way you'll hear the input signals, with no delay, and with their proper left / right image in the monitors or headphones. Since the direct monitor affects only the input signals, you'll still hear the playback of the DAW in stereo.
MIX Control
The MIX knob controls the source of the audio sent to the speakers, fading between the input signal at the front panel inputs and the output signal from your computer. When the knob is turned fully counter-clockwise, only the input signals are heard through the speakers. When the knob is turned fully clockwise, only the output signal from the computer is heard through the speakers or headphones.
Installing the Studio GT is a simple procedure that takes just a few minutes. Since the Studio GT is USB compliant, you can use most any PC, connect the included USB cable and plug and play. You will be able to control your StudioDock using the standard audio interface controls in the MAC or Windows operating system. You will find detailed instructions on setting up Windows 7 & Vista in the following sections of this manual.
The Studio GT does not require any special drivers or software. Just plug in the Studio GT into a USB port on your computer and everything is installed automatically.
- The first time you plug the Studio GT into a USB port, Windows 7 and Vista will install the universal drivers for that port. A balloon tip will pop up, telling you it has found the USB Audio codec (Figure 1).
- When it is finished installing the drivers, it will say "Your new hardware is installed and ready to use" (Figure 2). This balloon will not pop up again for the same USB port.
- The Studio GT becomes the Default Device after you plug it in and defaults to maximum volume. Double-check this by hovering over the speaker icon in the bottom right hand corner of the screen. It should show Volume:100 and "Samson StudioGT".
- If it is not the default device, you can set it under the Sound Properties panel in Control Panel (figure 3).
- Select the "Recording" tab. Select the "Samson StudioGT" from the list.
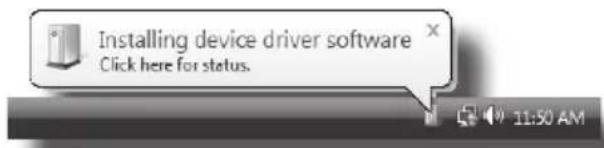
Figure 1
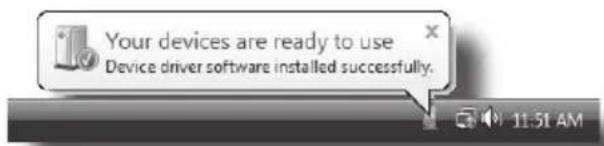
Figure 2

Figure 3
- To set the gain (volume) settings. Select the "Properties" button, then select the "Levels" tab. The "Input" volume control should be set as close as possible to 0 dB to get the best dynamic range (Figure 4). If the level is set higher than this, the noise will be unecessarily high. The "Input" volume level can be shown in either percent or dB, by right-clicking on it (Figure 5).
- Select the "Playback" tab, then select the "Level" tab to set the computer's Master Volume to 100 % (Figure 6), and use the Studio GT's front panel Level knob to control the overall output from the speakers and headphones.
Note: Even setting the "Input" volume at 0 dB, the audio signal is still passing through the Windows volume control and is not bit-perfect. You can use a free program like ASIO4ALL, which is a hardware independent low latency ASIO driver for WDM audio devices.
Use the following steps to utilize this tool: Go to http://www.asio4all.com and download the latest available version of ASIO4ALL.
Install the software, and restart your computer if instructed to by the installer. In your DAW select ASIO4ALL as the default audio device.
In Sonar LE, for instance, go to Options Menu>Audio>Advanced tab and set the Driver Mode to ASIO and press APPLY. Then go to the General Tab and press the ASIO Panel button and the ASIO4ALL panel will open. Select the Samson StudioGT.
If you have any setup questions or issues please read the FAQ/Troubleshooting section at the ASIO4ALL website.

Figure 4

Figure 5

Figure 6
The Studio GT does not require any special drivers or software. Just plug in the Studio GT into a USB port on your computer and everything is installed automatically.
- The first time you plug the Studio GT into a USB port, Windows XP will install the universal drivers for that port. A balloon tip will pop up, telling you it has found the Samson StudioGT (Figure 7).
- When it is finished installing the drivers, it will say "Your new hardware is installed and ready to use" (Figure 8). Note: This balloon will not pop up again for the same USB port.
- You will then set the Studio GT as your SOUND PLAYBACK and SOUND RECORDING default device in Sound and Audio Devices Properties in Control Panel (Figure 9).
- Set the output volume by clicking the speaker icon in the bottom right hand corner (Figure 10).
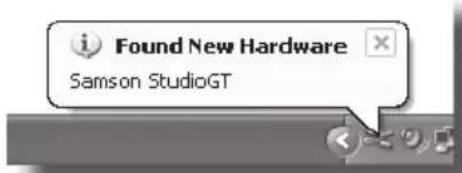
Figure 7

Figure 8

Figure 9

Figure 10
Macintosh OSX
The following example is for setting up the Studio GT in MAC OS X.
- Plug in the Studio GT into an available USB port on your MAC using the supplied USB cable. The MAC will recognize the USB audio device and automatically install a universal driver.
- To select the Studio GT as the computer's audio input, open the System Preferences from the dock or the main Apple Menu (Figure 11).
- Next open the Sound preferences (Figure 12).
- Now, click in the Input tab and select Samson StudioGT (Figure 13).
- Next, click in the Output tab and select Samson StudioGT. You may notice that the Volume slider sets itself to the full level. This will allow you to have full range using Studio GT's hardware Volume control (Figure 14).
At this point you can begin using your studio monitors with most any audio recording software, but you need to select it as an input and output device within the DAW. When selecting the inputs and outputs just look for and select the Samson StudioGT.
Plug and Play - Some MAC OS DAW's, like Apple's Garage band, will let you plug and play without going to the Sound preference set up. When you plug the Studio GT into the USB port you'll see a dialog box that will ask you if you want to select Samson StudioGT. Select yes and you're ready to go.
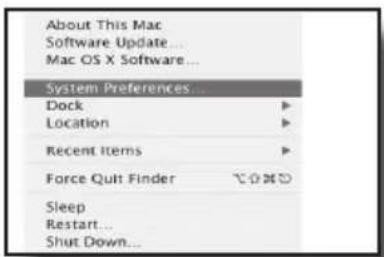
Figure 11
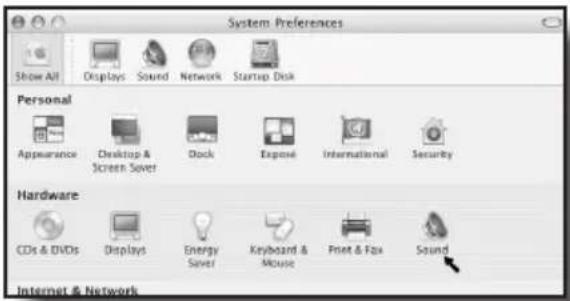
Figure 12

Figure 13

Figure 14
STUDIO GT SPECIFICATIONS
Transducers
Woofer . . . . . . . . . . . . . . 4" polypropylene with santoprene surround, Tweeter. . . . . . . . . . . . 1-inch silkdome ferro fluid neodymium tweeter Frequency response. . . . . . 65Hz - 22kHz Amplifier Power . . . . . . . 2 x 18 Watts RMS Crossover Frequency . . . . . HPF: 4kHz, 6 dB/oct Butterworth; LPF: 1400Hz, 12 dB/oct Linkwitz-Riley
Inputs
MIC Input
Connector....XLR (1: GND, 2: HOT, 3: COLD)
Input impedance. ..... 1.4 kΩ
Input level . . . . . . . . . . -40 dBu (Trim max) to -5 dBu (Any gain)
Equivalent Noise Level . . . . -120 dBu (A-weighted)
Phantom Power .....+48V
LINE/INSTRUMENT Input
Connector....1/4" Phone jack unbalanced (Tip: HOT, Sleeve: GND)
Input impedance.....1 MΩ
Input level .....-14 dBu (Trim max) to +20 dBu (Any gain)
Aux Input Connectors .... RCA, 3.5mm
Headphone Outputs
Connector....1/8" Phone jack (Tip: L, Ring: R, Sleeve: GND)
Output Power.....50 mW at 32Ω 1% THD+N
USB Audio
USB ..... USB 2.0 connection
USB audio ....Full speed
Connector.....B type
ADC and DAC (Internal) . . . 16 bit delta sigma, 44.1kHz or 48kHz
Input dynamic range .....93 dB (A-weighted)
Output dynamic range . . . . >90 dB (A-weighted)
Enclosure
Construction .....MDF
Finish . . . . . . . . . . . . . . Black textured vinyl covering
Dimensions .....6.625"W x 7.625"D x 9.125"H
168mm W x 194mm D x 232mm H
Weight
Active. . . . . . . . . . . . . . . . . . . . . . 9.5 lbs / 4.3 kg
Passive . . . . . . . . . . . . . . . . . . . . . . . . . . . . . . . . . . . . . . . . . . . . . . . . . . . . . . . . . . . 6.5 lbs / 3 kg
Specifications are subject to change without notice.

SAMSON®
45 Gilpin Avenue
Hauppauge, New York 11788-8816
Phone: 1-800-3-SAMSON (1-800-372-6766)
Fax: 631-784-2201
www.samsontech.com

- IMPORTANT SAFETY INSTRUCTIONS
- STUDIO GT FEATURES
- STUDIO GT HOOK-UP
- RECORDING A GUITAR
- DIRECT MONITORING
- Background on the Studio GT Active Monitors with Studio Interface
- Positioning the Studio GT
- Using the Direct Monitor
- What is Latency? What is Zero Latency, and why do I need it?
- MONO Mode
- STEREO Mode
- MIX Control
- Macintosh OSX
- STUDIO GT SPECIFICATIONS
- Transducers
- Inputs
- USB Audio
- Enclosure
- SAMSON®
Brand : SAMSON
Model : Studio GT
Category : Loudspeaker