
HMP200 - Media player SANYO - Free user manual and instructions
Find the device manual for free HMP200 SANYO in PDF.


| Product Type | Media Player |
| Brand | Sanyo |
| Model | HMP200 |
| Dimensions (W x D x H) | 210 x 150 x 40 mm |
| Weight | 0.6 kg |
| Power Supply | DC 5V / 2A via AC adapter |
| Power Consumption | 10 W (max) |
| Supported Media | USB flash drive, SD/MMC card |
| Video Formats | AVI, MP4, MKV, MOV, WMV, MPEG |
| Audio Formats | MP3, WMA, WAV, AAC, OGG |
| Image Formats | JPEG, BMP, PNG, GIF |
| Video Output | HDMI, Composite AV |
| Audio Output | HDMI, Stereo RCA |
| Maximum Video Resolution | 1080p (Full HD) |
| USB Port | 1 x USB 2.0 Host |
| Card Reader | SD/MMC slot (up to 32GB) |
| Remote Control | Infrared remote included |
| On-Screen Display Languages | English, French, German, Spanish, Italian, Dutch, Portuguese, Russian, Chinese |
| Playback Features | Pause, fast forward/rewind, subtitle support, slideshow with music |
| Maintenance | Clean with dry soft cloth; avoid liquids; keep vents dust-free |
| Safety | Use only supplied adapter; avoid moisture; do not disassemble |
| Spare Parts & Repairability | Remote and adapter available; contact Sanyo support for service |
| Warranty | 1 year limited warranty |
| Compliance | CE, RoHS |
Frequently Asked Questions - HMP200 SANYO
User questions about HMP200 SANYO
0 question about this device. Answer the ones you know or ask your own.
Ask a new question about this device
Download the instructions for your Media player in PDF format for free! Find your manual HMP200 - SANYO and take your electronic device back in hand. On this page are published all the documents necessary for the use of your device. HMP200 by SANYO.
USER MANUAL HMP200 SANYO
natural_image
Three network equipment units (SPINETIX, HMP130, HMP200) shown from different angles and ports, no visible text or symbols on the devices themselves.Disclaimer
THE SPECIFICATIONS AND INFORMATION REGARDING THE PRODUCTS IN THIS MANUAL ARE SUBJECT TO CHANGE WITHOUT NOTICE. ALL STATEMENTS, INFORMATION, AND RECOMMENDATIONS IN THIS MANUAL ARE BELIEVED TO BE ACCURATE BUT ARE PRESENTED WITHOUT WARRANTY OF ANY KIND, EXPRESS OR IMPLIED. USERS MUST TAKE FULL RESPONSIBILITY FOR THEIR APPLICATION OF ANY PRODUCTS. THE SOFTWARE LICENSE AND LIMITED WARRANTY FOR THE ACCOMPANYING PRODUCT ARE SET FORTH IN THE INFORMATION PACKET THAT IS SHIPPED WITH THE PRODUCT AND ARE INCORPORATED HEREIN BY THIS REFERENCE. IF YOU ARE UNABLE TO LOCATE THE SOFTWARE LICENSE OR LIMITED WARRANTY, CONTACT YOUR SPINETIX REPRESENTATIVE FOR A COPY.
NOTWITHSTANDING ANY OTHER WARRANTY HEREIN, ALL DOCUMENT FILES AND SOFTWARE OF THESE SUPPLIERS ARE PROVIDED "AS IS" WITH ALL FAULTS. SPINETIX DISCLAIMS ALL WARRANTIES, EXPRESSED OR IMPLIED, INCLUDING, WITHOUT LIMITATION, THOSE OF MERCHANTABILITY, FITNESS FOR A PARTICULAR PURPOSE AND NONINFRINGEMENT OR ARISING FROM A COURSE OF DEALING, USAGE, OR TRADE PRACTICE.
IN NO EVENT SHALL SPINETIX OR ITS SUPPLIERS BE LIABLE FOR ANY INDIRECT, SPECIAL, CONSEQUENTIAL, OR INCIDENTAL DAMAGES, INCLUDING, WITHOUT LIMITATION, LOST PROFITS OR LOSS OR DAMAGE TO DATA ARISING OUT OF THE USE OR INABILITY TO USE THIS MANUAL, EVEN IF SPINETIX OR ITS SUPPLIERS HAVE BEEN ADVISED OF THE POSSIBILITY OF SUCH DAMAGES.
"SpinetiX" and "HMP Hyper Media Player" are registered trademarks, and all logo and graphic designs are trademarks of SpinetiX S.A. Other product and company names appearing in SpinetiX S.A. products and materials are used for identification purposes only and may be trademarks or registered trademarks of their respective companies. Registered and unregistered trademarks used in any SpinetiX S.A. products and materials are the exclusive property of their respective owners.
End-User Software License Agreement and Hardware Limited Warranty Agreement
The SpinetiX End-User Software License Agreement and Hardware Limited Warranty Agreement can be found under: http://www.spinetix.com/legal
Table of Contents
Introduction 4
Support Wiki keywords 4
How does it work? 5
Easy Installation and low maintenance....6
Complete Plug & Play setup....6
Top reliability 7
Smallest form factor 7
Remote Monitoring 7
Updates and upgrades 7
Full Connectivity 8
Installation....9
Front panel connectors....9
Back panel connectors....9
Power up your Hyper Media Player....10
Troubleshooting 11
Updating firmware 12
Check for updates....12
Updating firmware 13
Automatic update 13
Reset an HMP to factory default settings....14
Get Connected....15
Getting started....15
Requirements: 15
Troubleshooting 16
Checking the HMP configuration 17
Troubleshooting 17
Fixed IP configuration....18
Troubleshooting 18
Control Center overview....19
Set Display settings....19
Controlling the display power....20
Controlling the content displayed by the HMP 20
Control content via Fusion software....20
Use a USB drive with an HMP 21
Using a network server with HMP 22
Pull mode 23
Configure network credentials for remote servers....24
Control user rights....25
Configuration guide....25
Using the HMP to control external appliances 26
Enabling control of external devices....26
Configuring the protocols 27
Introduction
The SpinetiX Hyper Media Players are the first appliance range dedicated to the professional digital signage industry, relied on worldwide by end-users, integrators and service providers alike. They offer a dependable and effective alternative to PCs and proprietary software.
HMPs support tried-and-tested standardized methods to schedule, combine, update, animate, stream and display video, audio, vector graphics, pictures and text with low acquisition and operational costs. The rich set of functionalities offered by the HMPs simplifies the implementation, management and maintenance any digital signage installation, large or small.
An HMP is not a simple media player, but a Hyper Media player, combining an embedded solution with the connectivity and functionality of a PC.
Hyper Media “is a logical extension of the term hypertext in which graphics, audio, video, plain text and hyperlinks intertwine to create a non-linear medium of information.” - Wikipedia
A movie or video clip is a typical piece of linear content: it watched from beginning to the end. The content of a web page is a typical example of non-linear content: multiple media elements are available, dynamically and interactively. Web servers use scripts and databases to retrieve content on-the-fly, allowing the browser to display “live” information.
The HMP range allows you to achieve the same result on any digital screen or projector and display true Hyper Media content exactly as you want.
Thanks to its compact form factor, robust and dedicated hardware, an HMP turns any digital display into a network device.
This manual is updated regularly, but for up-to-the-minute news and information about improved features, check the SpinetiX website at http://www.spinetix.com, and for detailed technical information, the SpinetiX Support Wiki at http://support.spinetix.com.
Support Wiki keywords
Information which is likely to change regularly is published and updated on our Support Wiki at http://support.spinetix.com. If a particular section has more information on the Support Wiki, it is illustrated by a banner and a keyword to find the content.
Support Wiki keyword: Keyword
How does it work?
SpinetiX HMPs simplify the publishing and maintenance of your digital signage project.
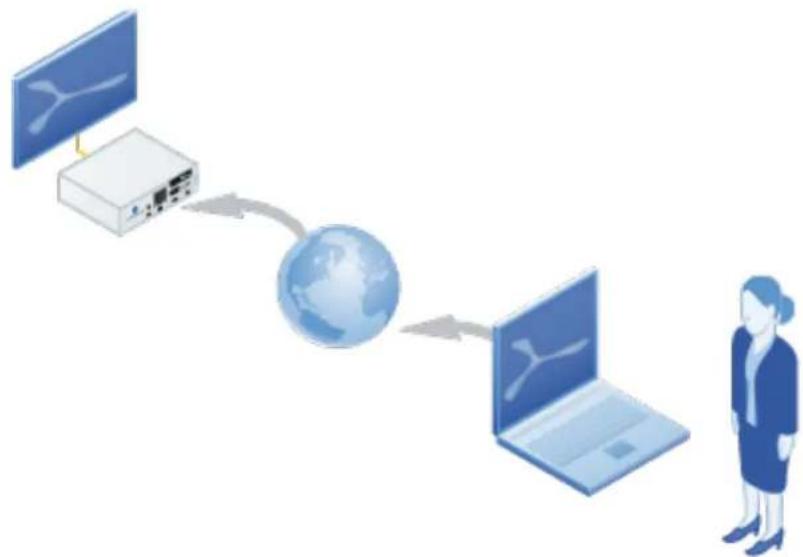
Connected to digital displays through HDMI and VGA, an HMP is capable of rendering combinations of media elements from a rich set of formats: audio, video, vector graphics, pictures and text. The HMP natively implements the open standards required to schedule, update, stream, and animate objects. Distributing content from a central location onto a specific display is as easy as publishing a web page.
As network appliances, the HMPs offer plug & play functionality that simplifies installation, remote maintenance and monitoring. From anywhere, your network of digital displays is under control.
flowchart
graph TD
    A["Device 1"] --> B["Network"]
    C["Device 2"] --> B
    B --> D["Global"]
    D --> E["Laptop"]
    E --> F["Person"]
Content publishing over the network
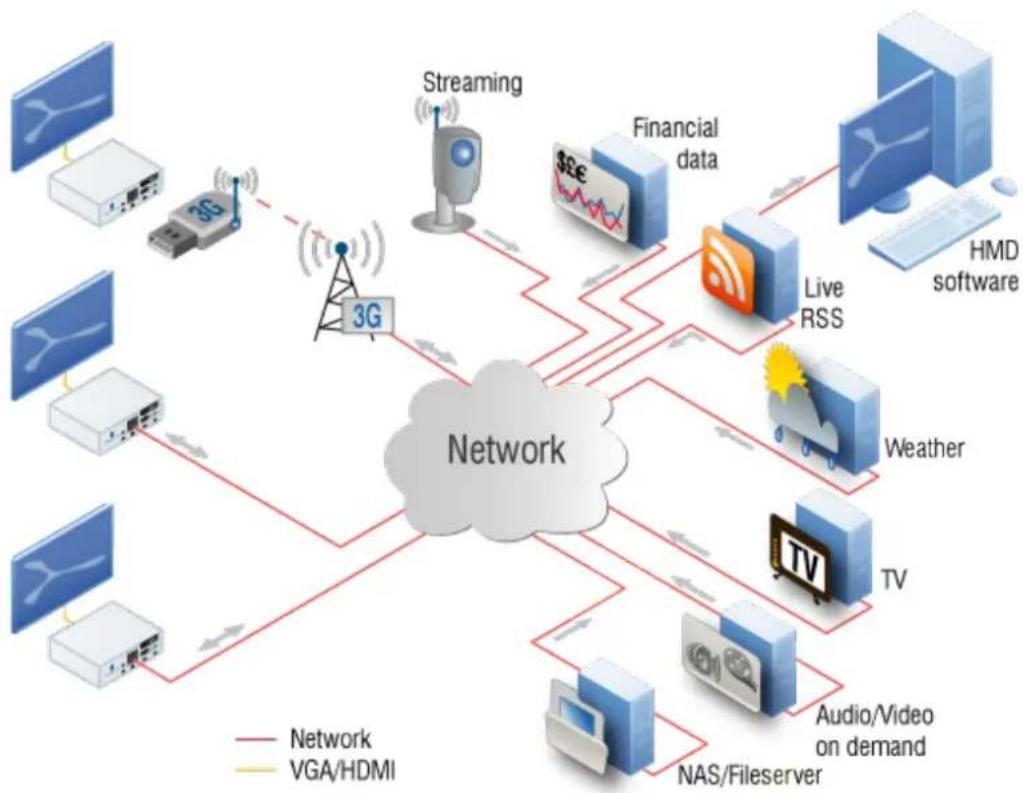
HMPs enhance digital signage projects with high quality video, audio, images, animations and text. Any assets on the player can exist locally or on at network locations, and can be combined and rendered on any type of digital display.
• What are the some of the ways in which Hyper Media can bring life to presentations?
- Access public or private databases (including SQL, Sharepoint, SAP and Domino) and manipulate data on-the-fly to selectively display content, entirely integrated with your project's graphical assets.
- Connect to public or private streaming servers and display live events, news and security feeds.
• Aggregate and display RSS news; filter based on key words.
• Retrieve images and video from remote asset management systems, schedule display down to the second.
- Integrate interactive devices, with hundreds of thousands of supported peripherals from X10 home automation and touch screen controllers, to movement sensors and DMX lighting control.
- Spread content across multiple screens with no limitations on layout or dimensions.
flowchart
graph TD
    A["Streaming"] --> B["Financial data"]
    B --> C["HMD software"]
    B --> D["Live RSS"]
    D --> E["TV"]
    D --> F["News"]
    D --> G["Radio"]
    D --> H["Video"]
    D --> I["Audio/Video on demand"]
    D --> J["NAS/Fileserver"]
    A --> K["3G"]
    K --> L["3G"]
    L --> M["Network"]
    style A fill:#f9f,stroke:#333
    style B fill:#ccf,stroke:#333
    style C fill:#cfc,stroke:#333
    style D fill:#fcc,stroke:#333
    style E fill:#cff,stroke:#333
    style F fill:#ffc,stroke:#333
    style G fill:#cfc,stroke:#333
    style H fill:#fcc,stroke:#333
    style I fill:#ffc,stroke:#333
    style J fill:#cfc,stroke:#333
HMP's can access various sources and render them within the same project
Easy Installation and low maintenance
In high-availability environments where uptime must be guaranteed 24/7, installing PCs and keeping them updated, upgraded and in correct working order is the task of a dedicated team of IT specialists and regular visits from technicians. This overhead represents unnecessary expense, and the poor suitability of PCs means power is wasted, excessive heat is generated and components are worn out quickly.
HMPs have been designed to simplify both the installation and the maintenance tasks by offering:
- Complete Plug & Play – no proprietary driver installation
• Top reliability – “five nines” annual uptime - Smallest form factor – smaller than a PC hard drive
• Remote monitoring – peace of mind
Complete Plug & Play setup
As dedicated appliances, the SpinetiX HMPs are truly "plug and play".
Power on your HMP by plugging in the power line and connecting the video cable (HDMI and/or VGA) to a digital display. After power-on, the HMP boots in a few seconds and automatically selects the best resolution supported by the digital display. Content rendering beings in less than 1 minute from cold.
When connected to a local network via the RJ45 connector, the HMP automatically detects and configures the right parameters without the need of special network configuration. Whether you choose automatic DHCP, use the built-in "zeroconf" support or manually specify the IP address and network properties, setting up the network is done in a few clicks. For custom configurations, every HMP includes an intuitive web configuration interface for configuration – no unfriendly telnet or similar interface.
Top reliability
HMPs have been designed from the ground-up to satisfy the strict reliability requirements of nonstop 24/7 information displays, and to minimize the costs of maintenance that represent more than 40% of the operative costs in most legacy digital signage projects.
To achieve this goal, the HMP hardware design does not have no mechanical parts such as fans or hard drives; the most lifespan-limited components of many installations, especially with dusty environments or ambient air temperature.
HMPs use many components depended on by the automotive industry, ensuring top quality and standards of reliability. The unit is protected by a sealed lightweight and compact aluminum case.
Smallest form factor
The HMPs are the smallest digital signage hyper media players on the market. Integrate them behind screens, underneath technical flooring or above suspended ceilings with minimal fixtures required. No moving parts mean very high tolerance of dust and heat.
Remote Monitoring
The management of a distributed network of HMPs is simplified by native support of SNMP protocol and RPC (Remote Procedure Call). Through these standards, network administrators and other stakeholders can use existing network management tools to monitor uptime, storage level and CPU status, scalable to installations of thousands of devices.
RPC allows triggering of remote maintenance functions such as content updates, feature upgrades (via firmware) and reporting of performance, network statistics and much more.
Updates and upgrades
The HMP's capabilities are always evolving via firmware upgrades, adding support for new codecs and standards, new peripherals, and new extensions. SpinetiX provides updates free of charge for installation on HMPs via a range of methods; directly via the internet, from a private server, or on a USB drive using the software packages distributed by SpinetiX.
Full Connectivity


The HMP connects to digital displays via onboard HDMI and VGA connections. Both connectors are simultaneously active, allowing you to drive two monitors without the need of additional hardware. HDMI is a digital audio/video connector widely
adopted by most digital displays. VGA is an analogue computer video connector also supported by the majority of digital displays. VGA does not carry audio information, so two-channel audio is also included via a standard mini-jack port.
• The HMP100 and HMP130 support output resolutions up to 1280x720 @ 60Hz
• The HMP200 is a full HD device and can run 1920x1080 @ 60Hz

An HMP connects to the network through an onboard RJ-45 connector. HMPs will broadcast its details on the network for services such as DNSSD and SpinetiX HMD to find.
HMPs support 10/100BASE-T Ethernet and all the required protocols to connect to various network resources and retrieve media elements. In particular:
- Ethernet 10/100 Mbit/s,
• IPv4, DHCP or fixed address - HTTP configuration server, password protected
- HTTP client for web content retrieval
- WebDAV server, password protected
- SNMP v2c
• Zero Configuration Networking (Zeroconf)
• NTP
The HMPs support USB2.0 "Hi-Speed" with maximum bandwidth up to 10 MByte/s.

The USB interface can be used to extend the local storage through memory sticks and hard drives. The same interface can support external devices such as touch screen controllers. Any USB Human Interface Device (HID) controller is supported. The HMPs also support HID input/output devices such as the models from U-HID. And some 3G USB modems.
Support Wiki keyword: Touchscreens

When professional displays are connected to an HMP, the standard RS-232 connector lets you control the behavior of the monitor: On/off, volume, sources, image properties and any other commands the screen will accept.
New protocol descriptions can be uploaded to an HMP to support different display models. The required cable can be purchased from SpinetiX or built (pin outs are freely available). Input devices such as GPS can also be used together with the RS232 port.
Support Wiki keyword: RS233
Installation
Integrators and electricians will appreciate the small amount of cabling required to connect the HMP unit, and its lightweight form factor: the HMP100 can be used with Velcro or adhesive pads; the HMP200 includes two mounting holes.
Although the HMPs are more tolerant of imperfect environments, always ensure humidity and temperatures within the operating ranges of the players.
Support Wiki keyword: HMP Operating Environment
Once installed, getting started with your HMP is a matter of a few steps. In the following sections we outline how to connect one or more units onto your network and how to publish content from the Hyper Media Director software.
Front panel connectors
| IOIOI | RS232 interface: used for sending and receiving commands to/from peripherals |
 | Ethernet RJ45: plug the Ethernet cable in this socket |
 | USB 2.0 for storage expansion and HID peripherals |
| [VW-08] | Push-button: multi-functional button for rebooting, and shutting down (HMP200 only) |
Back panel connectors
 | 5V-DC input: power socket where the power adapter DC output jack is to be connected. |
 | Digital Video out. Standard High Definition Media Interface (HDMI) available on most recent digital displays. Also carries stereo digital audio. Can be used with a passive converter to fit DVI screens. |
 | Analog Audio out: Stereo audio output |
 | Analog Video out: Standard Video Graphics Array (VGA) supported by most CRT and analog LCD screens. |
Power up your Hyper Media Player
- Check your display is correctly connected. The HMP can drive a digital display through HDMI or VGA connectors.
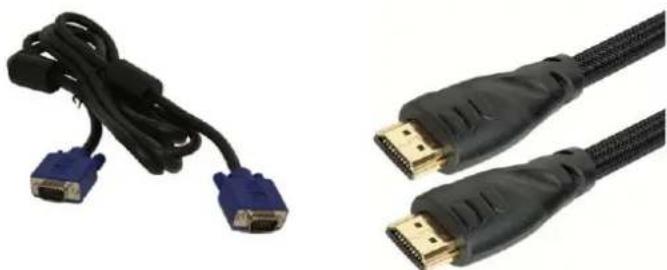
- Use the correct video cable. The HMP is not delivered with HDMI or VGA cables: these are often provided with the display or can be found in specialized shops.
natural_image
Two types of connected USB cables: a black VDA with two gold connectors and a blue VGA connector (no text or symbols visible)- Connect the HMP to the display.
- Power up the display. Be sure to select the right video input on the display.
- Power up the HMP. Use the cables and the regional power adapter in the HMP package. Connect the plug adapter to one side of the 110-220V outlet the other end to the back panel DC jack on the HMP.
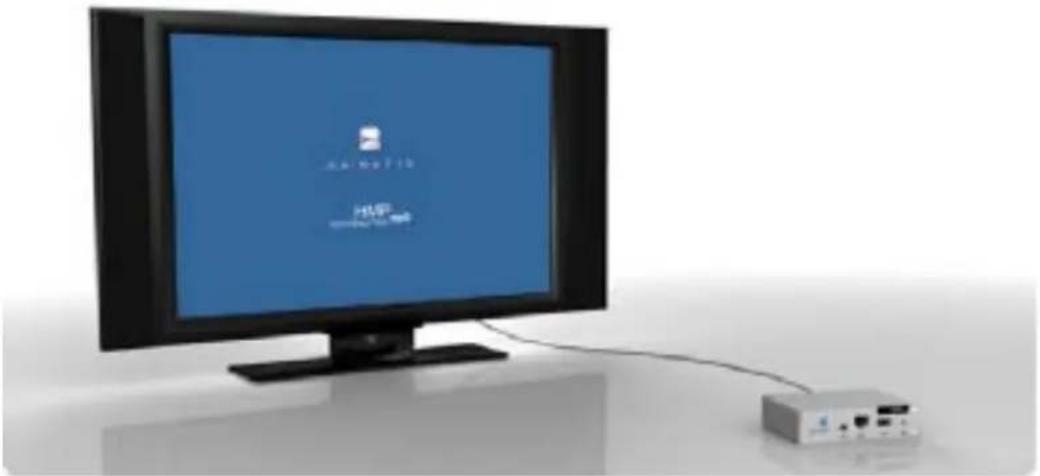
Shortly after power up, the screen displays the SpinetiX splash screen:
natural_image
Exterior view of a modern office building (no signage)HMP splash screen (power up)
The first time an HMP boots, the automatic configuration procedure takes about 1½ minutes. The process will be reduced to less than 50 seconds when you will reboot the HMP again. During this booting process the front panel LED(s) will show some activity which can be ignored unless the device fails to boot properly.
Support Wiki keyword: Diagnostic LED
At the end of the booting process, the screen will start displaying the animated SpinetiX logo. This is the default content. The LED ('SYS' Led on HMP200) blinks regularly on and off once per second to indicate normal operation.
natural_image
Exterior view of a modern office building (no signage)HMP splash screen (power up)
Troubleshooting
If the HMP does respond as described, check the following:
- Check the display is functional and that the right input has been selected.
- Check the cables connecting the HMP to the screen and try alternative cables.
- If the HMP displays the SpinetiX logo on a blue background and then the screen signal disappears, your screen is not being properly detected by the HMP. Open the web interface, then under the "Display Settings" page, set "Power mode for VGA output" to "Always On".
Support Wiki keyword: SpinetiX Support
Updating firmware
SpinetiX regularly publishes new firmware versions for the HMPs. These new versions are free to all customers and improve the performances and reliability of your product.
Support Wiki keyword: Firmware
Check for updates
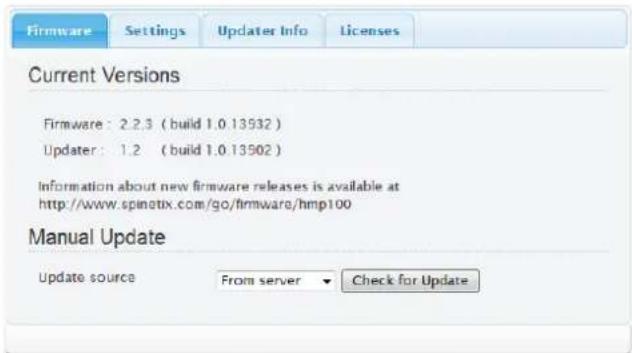
To check if a new version of the firmware is available for your unit, follow the simple steps below:
- With your preferred web browser, connect to Control Center (the web interface for the player) via the HMPs IP address or hostname.
- Click on Firmware Update under the Administration menu on the left of the page.
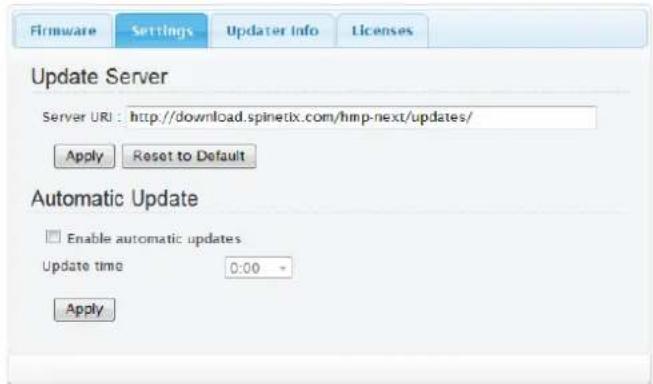
- Check that the field Server URI is set to the default.
- In the section Manual Update, select the update source "From server" and click the Check for Update button.
A new page will open. At the end of the check, the page reports the current update status of your unit. Three cases are possible:
• No updates are available.
- Updates are ready to install.
- Update failed: The most probable source of this error is that your HMP failed to connect to the update server. Check your internet connection and your network configuration. Make sure that a Gateway and a DNS server are configured.
Checking for Updates
This operation might take some time.
Update log
INFO: updater version 0.8, product hmpl00
INFO: updating versions from repository 'SpinetiX HMP100 Updates' (URI 'http://download.spinetix.com/hmpl00/updates/')
INFO: --- 0 UPDATE(S) ---
INFO: no updates
INFO: --- EXIT OK ---
No updates available
Information about new firmware releases is available at http://www.spinetix.com/hmp100/firmware.
OK
Information about new firmware releases is available at http://www.spinetix.com/hmp100/firmware.
No update available
Checking for Updates
This operation might take some time.
Update log
INFO: updater version 0.8, product hmp100
INFO: updating packages from repository 'SpinetiX HMP100 Updates' (URI 'http://download.spinetix.com/hmp100/updates/')
ERROR: failed retrieving repository path 'repodata/repomd.xml' (could not connect to server)
ERROR: failed getting repository resource 'repodata/repomd.xml'
ERROR: could not update repository data
INFO: --- EXIT ERROR ---
Update failed.
Cancel
Update failed
Updating firmware
If the check for updates procedure reported that updates are available for your HMP, an Update Now button appears in the page. Simply click this button to start the update process.

Important Do not power down the unit during the whole update process.
The HMP will restart automatically once the update process is over. It is possible that the web page displays a time-out error during the update. However, this has no influence on the update process itself.
At the end of this process, by refreshing your web browser the new firmware version will be reported under section Current Versions. If you click the Check for Update button again, the page will report that no updates are available.
Automatic update
If your HMP has automatic update enabled and has direct access to the Internet, it will update its firmware in an automatic and transparent manner as soon as a firmware is available. The check (and update, if appropriate) will take place at 3:00 AM and will not modify the content played by the HMP nor the display and networks settings.
Automatic update is not recommended if your HMP is deployed in a production environment.
To enable automatic update:
- Check the "Enable automatic updates" check box
- Select the update time.
- Press Apply to validate your changes
HMP Control Center
Information
Status
Snapshot
Display Info
Storage
Logs
Administration
Display Settings
Network Settings
Media Sources
Security
Date/Time
RS232 / USB IO
Pull Mode
Firmware Update
Fusion
Maintenance
Serial Number
001d5000018b
Copyright (c) 2011 Spinetik SA. All rights reserved.
Software copyrights and licences
Firmware tab with "check for updates" button
HMP Control Center
Information
Status
Snapshot
Display Info
Storage
Logs
Administration
Display Settings
Network Settings
Media Sources
Security
Date/Time
RS232 / USB IO
Pull Mode
Firmware Update
Fusion
Maintenance
Serial Number
001d5000018b
Copyright (c) 2011 SpineOK SA. All rights reserved.
Software copyrights and licences
Settings tab
Reset an HMP to factory default settings
This procedure depends on the HMP type and on the firmware improvements. The procedure is therefore described on our website.
Support Wiki keyword:
Reset Factory Defaults
Get Connected
Getting started
This section explains how to access an HMP unit for the first time via the network. This is required in order to access Control Center (the built-in HMP web interface) or to publish content on a unit.
Requirements:
• One of the following configurations
o PC with RJ-45 10/100/1000 Ethernet interface and an Ethernet cable.
- PC with RJ-45 10/100 Ethernet interface and an Ethernet crossover cable.
o PC with RJ-45 10/100 Ethernet interface, a switch and 2 Ethernet cables.
- One HMP unit
○ Running latest firmware.
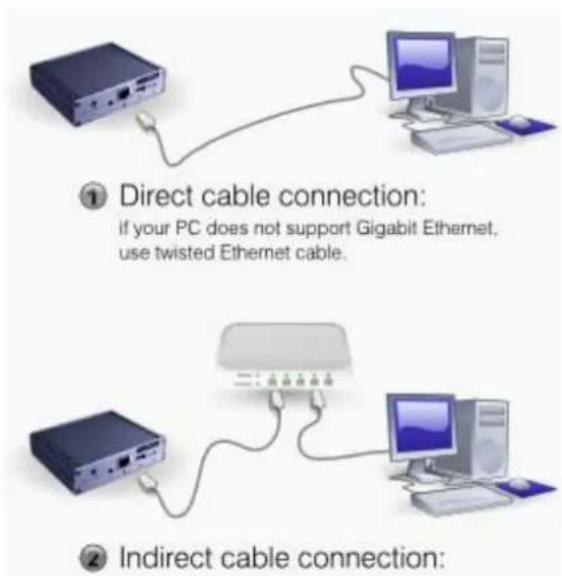
- Connect the PC, depending on the chosen setup, to the HMP.
- Power up the PC (and switch, if present).
- Power up the HMP. (Note that the HMP does not need to be connected to a display: allow about 90 seconds for the HMP boot to complete)
- Configure the network on your PC to use DHCP. Note that your PC might indicate the only limited network connectivity is available. This will not prevent you from connecting to the HMP.
- Make sure that the Bonjour client is installed on your PC (either install the Hyper Media Director (HMD) software from SpinetiX or download the Bonjour installer from the Apple website)
- Validate that the above steps are successful:
a. Make sure that HMP has completed the booting phase. If you have connected the Player to a display you should see the default animated logo.
b. Check that the LED (SYS LED on HMP200) is blinking green once per second. If this is not the case check the troubleshooting section at the end of this guide.
c. Open a Web Browser and type http://spx-hmp-[serial number of the hmp].local/ in the location bar at the top.
The browser should connect to Control Center and display the following page:
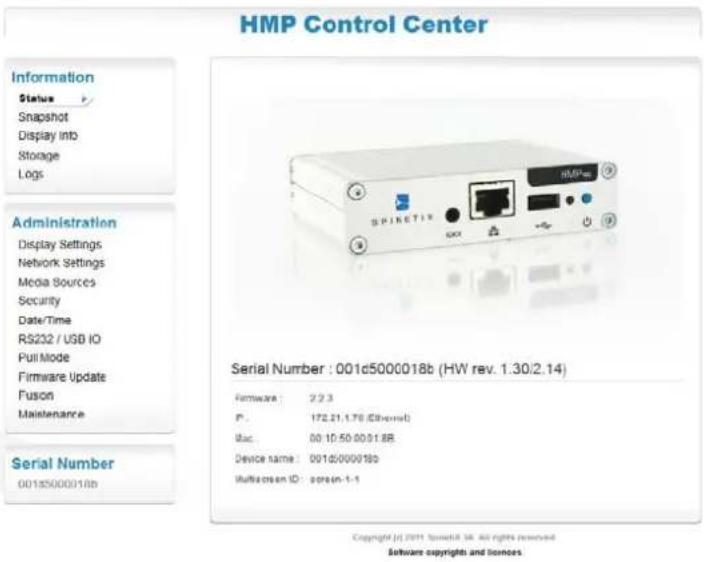
Congratulations. You can now explore the configuration interface of your Hyper Media Player.
Troubleshooting
If you have not been able to connect to your HMP, check the Support Wiki for troubleshooting steps.
Support Wiki keyword: Get Connected
The Support Wiki also details the latest recommended 3rd party plug-ins that can assist with device discovery. A simply way to directly open Control Center for a given HMP is via HMD:
Support Wiki keyword: Device Discovery
- If you are using Safari, then the list of HMPs can be found under the bookmark menu. All devices compatible with Bonjour will be listed in "My Devices":
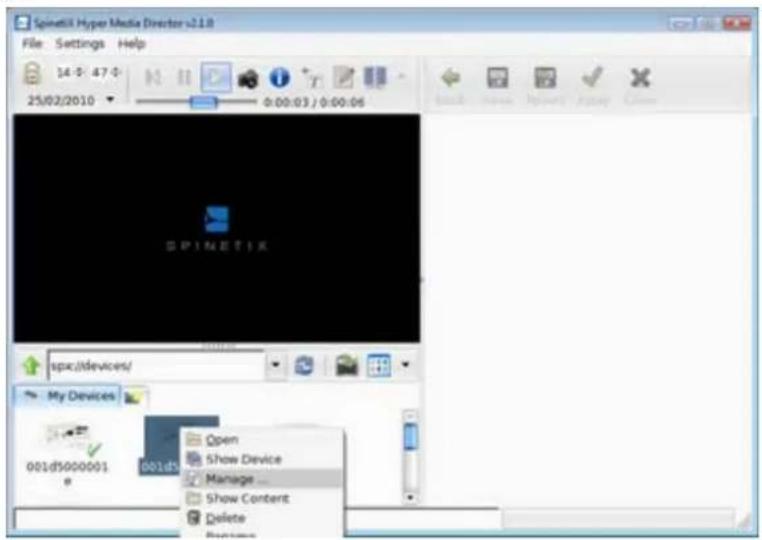
Checking the HMP configuration
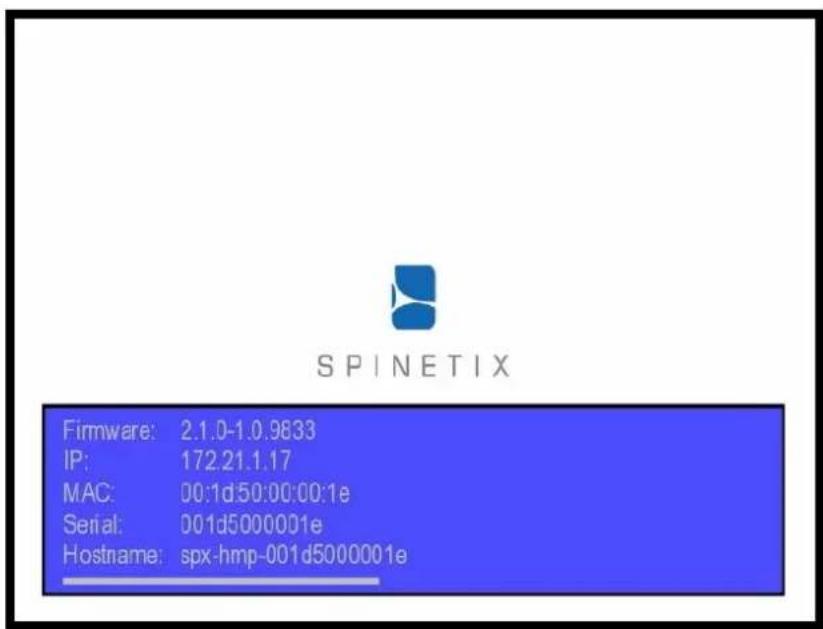
Your HMP has a built-in On Screen Display which is triggered via a brief press of the push button.
- Connect a screen through a VGA, HDMI or DVI converter cable, to the HMP.
- Check that some content is displaying on the screen. If your HMP has never been used before you should see the animated SpinetiX logo on the screen.
- Press the HMP's push button briefly.
- Check the screen. The following information will be displayed on the screen for 10 seconds:
- Firmware version
- IP Address
- MAC Address
- Serial number
- Hostname (you can reach the unit using http://[hostname].local from any PC on the network)
Note: Make sure you press only briefly the push button. Pressing the button for longer will cause the player to reboot.
Troubleshooting
If you cannot display HMP information, please check the following before contacting support@spinetix.com
- The screen displays nothing:
a. Check the cables connecting the HMP to the screen.
b. If the LED of the player is not blinking, it might be malfunctioning.
-
The screen displays a fix SpinetiX logo with the text "Recovery System". Your HMP is in recovery mode. In this case, unplug the unit and wait for one minute before powering up again. If the HMP remains in recovery mode, contact your distributor.
-
The HMP displays the SpinetiX logo on a blue background and then the screen switched to black. You are probably using a VGA cable and your screen is not detected by the HMP. Go to the HTTP configuration interface, and under the "Display Settings" page, set "Power mode for VGA output" to "Always On".
Fixed IP configuration
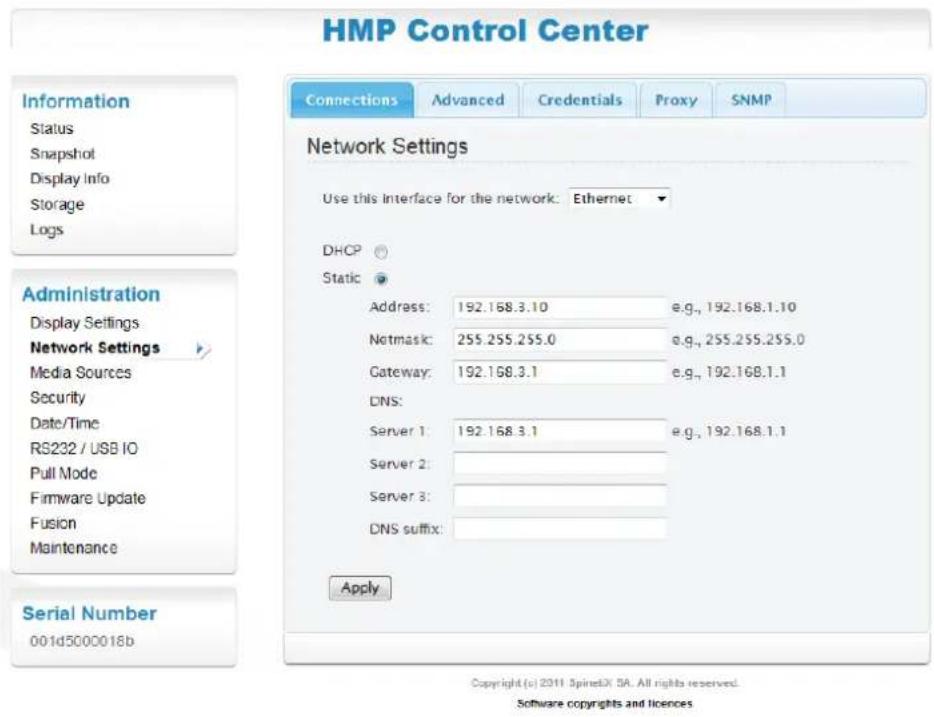
This tutorial explains how to manually configure an HMP to connect to a specific network with a fixed IP address. Note that this procedure assumes that you can access Control Center on the HMP already.
1) Collect information on your network configuration.
The following information should be available about your network:
- A range of free IP addresses that can be allocated to the HMP unit(s) without network conflicts.
• The correct subnet mask. - The address of the Gateway and the DNS servers if you want your HMP to be able to connect to the Internet.
2) Open the web interface of your HMP.
3) Select the Network Settings page.
- Under the Connections tab note the current network configuration of the HMP, including the IP address, host name and MAC address. If the player is configured to use DHCP, then these details will not be shown (see the Status page)
4) Enter the static IP address and the subnet mask.
- Select the Static radio button.
- Configured the HMP to use a static IP address in the range of the free IP addresses of your network.
- Ensure that the subnet mask corresponds to your network configuration.
• Other network settings are optional.
5) Validate the changes.
- Validate the new network configuration with the Apply button.
Troubleshooting
Once the device has rebooted, you can check the new configuration by accessing Control Center as before, but using the new IP address.
If your HMP has mistakenly been configured with the wrong IP address and can no longer be contacted, the player must be reset to factory defaults.
Support Wiki keyword: Reset Factory Defaults
Control Center overview
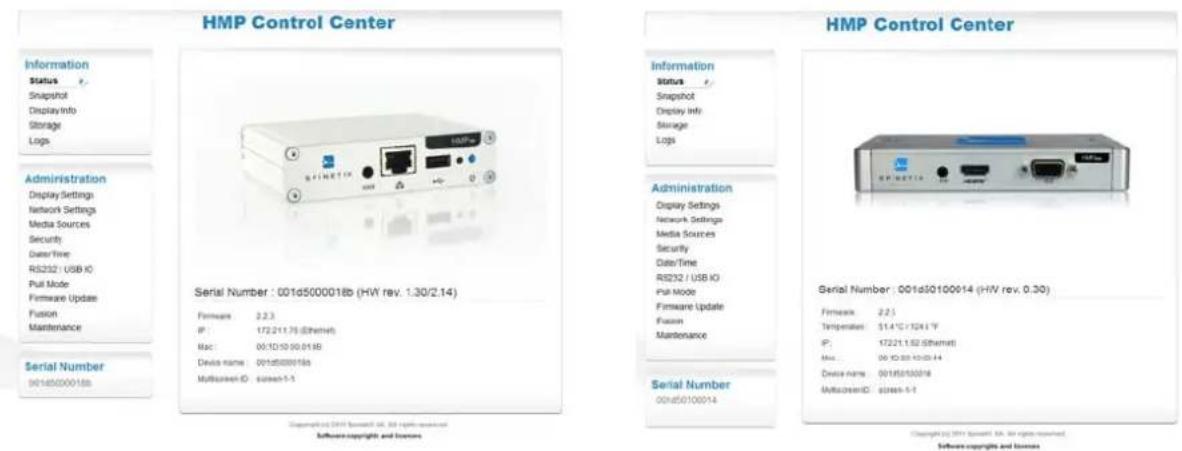
Control Center landing page for HMP100 and HMP200
Set Display settings
- Select Display Settings from the left menu (under Administration.)
- Choose the output resolution to activate. The Basic menu allows selection between several presets resolutions. For more precise settings, use the Advanced menu.
The aspect ratio of your display will be automatically updated according to the chosen resolution. You can modify it by checking the Force aspect ratio check box.
- Choose your display orientation. If you are using a vertical display ensure you select the correct rotation direction.
- If you require audio output, enable it using the Enable audio output checkbox. (Audio is disabled by default for performance reasons)
The preview icon helps you to choose the correct settings for your display.
All changes need to be confirmed with the Apply button, and depending on the state of the player, may trigger a reboot of the unit.
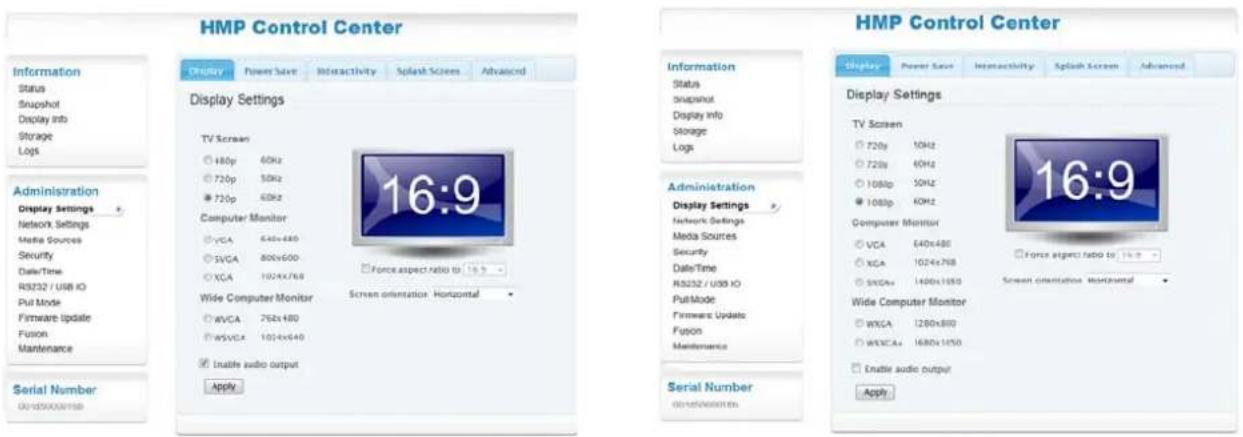
Control Center: Display Settings on HMP100/HMP130 and HMP200, showing optimum Display settings
Controlling the display power
The HMP is capable of controlling the power mode of the display when the display is connected using VGA or DVI. If the "Enable display power saving" is enabled, the player will turn on and off using the power saving feature of the screen ("DPMS") when instructed.
Enabling "Use fixed schedule" will force the HMP to send the PowerOn and PowerOff commands at the specified times regardless of the content on the device.
It is possible to have a more flexible control of the power mode of the display using schedules and SVG files in the displayed content. In this scenario, leave the first "Enable display power saving" option enabled, but do not specify a schedule.
Controlling the content displayed by the HMP
By default the player displays the content stored on its internal storage. The content can be updated via the network using the Hyper Media Director (HMD) software or any WebDAV client.
The HMP can be used to access content to be displayed in five different modes:
- Fusion mode: Files are uploaded to an HMP using the built-in web interface. No external software is required to manage the HMP.
- Push mode: Files are pushed to the HMP using a WebDAV server. For example, the HMD uses the push mode to publish an Hyper Media Project to a HMP.
- USB drive: Files are stored on a external USB drive. The HMP displays the files of the drive currently plugged into the device.
- Client/Server mode: The HMP accesses files from a remote HTTP server. The internal storage will be used as a cache. Configuring the client mode is explained in Use network servers.
• Pull mode: Files are copied periodically from a remote server to the local storage of the HMP.
Push and Client/Server modes are simpler publishing mechanisms, but may not fit all network architectures. In particular, when network security constraints are introduced, for example a firewall in front of the HMP(s) at a remote site, Pull Mode is required, so the HMPs can initiate a connection from within the protected network.
Support Wiki keyword: Operating Modes
Control content via Fusion software
The Fusion operating mode is for using your HMP in an entirely self-contained manner. When selected, normal WebDAV publishing is not possible; instead content is uploaded, scheduled and managed via a separate web interface, accessible at the same address as Control Center, but at the page /fusion.
For example: http://spx-hmp-001d50000005.local/fusion/ or http://192.168.3.1/fusion/
Fusion documentation is available entirely online.
Support Wiki keyword: Fusion mode
Use a USB drive with an HMP
USB storage can be used instead of the onboard storage of the player, if desired.
- In Control Center, open the Media Sources page (under Administration). The current settings will be displayed.
- Ensure the Primary source is set to "Local Storage". Enable "Set Local Storage to USB storage device when available"
- Press Apply.
- Insert a USB storage device into the USB port of the HMP. Wait for a few seconds and then press the Reload button.
Media Sources:
The player will start with the primary source. If it is not available, the fallback will be used.


√ Set Local Storage to USB storage device when available.
Apply
Detected USB Storage devices:
Note: it may take some time for a USB storage device to be fully recognized, reload this page if you think the information below is not accurate.
Reload
Device # 1:
Storage size: 63 Mbytes
Used for: Local Storage
Writable: no
Disconnect
USB storage is connected as read-only. USB storage must be specially formatted to use it as writable local storage, otherwise it is used as read-only.
Warning: formatting a USB storage device erases all content on it.
Format Now
The page should indicate that the local storage is currently set to USB storage
By default most USB storage is formatted using the FAT16 or FAT32 file system. This has the advantage that the storage is readable both by the HMP and any PC (and many other devices).
However FAT-formatted file systems cannot be written to by the HMP. To use USB storage permanently, and continue to write to the storage via the network, the drive must be formatted by the HMP.
Support Wiki keyword: Storage
Using a network server with HMP
This section explains how to configure your HMP unit to use a network server as content source.
The HMP can use an HTTP server as the source for the multimedia content to be displayed. In this scenario the player will frequently check for modifications to the files on the server, while using the internal storage to cache some of the files.
If you require your HMP to instead periodically download the content of a network server to its internal storage, see the Pull Mode section of this document.
- In the main page of Control Center, select from the left menu Media Sources.
- Change the Primary source to Network Project.
- Enter the URI of your network project. The HMP will open the index.svg file in the root of the entered URI. Note: you can use HTTP or HTTPS servers
- Press Apply
You can specify a Fallback source in case your network server cannot be reached by the HMP.
If your server requires a username and a password, you can enter them using the Advanced dialog as described in Network credentials.
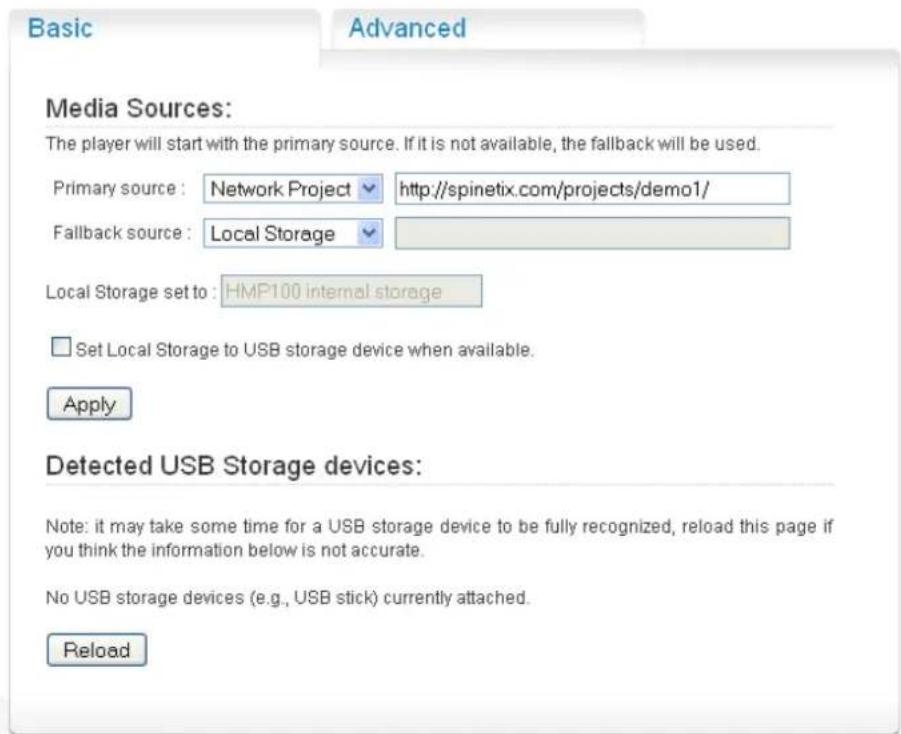
Setting the media sources
Pull mode
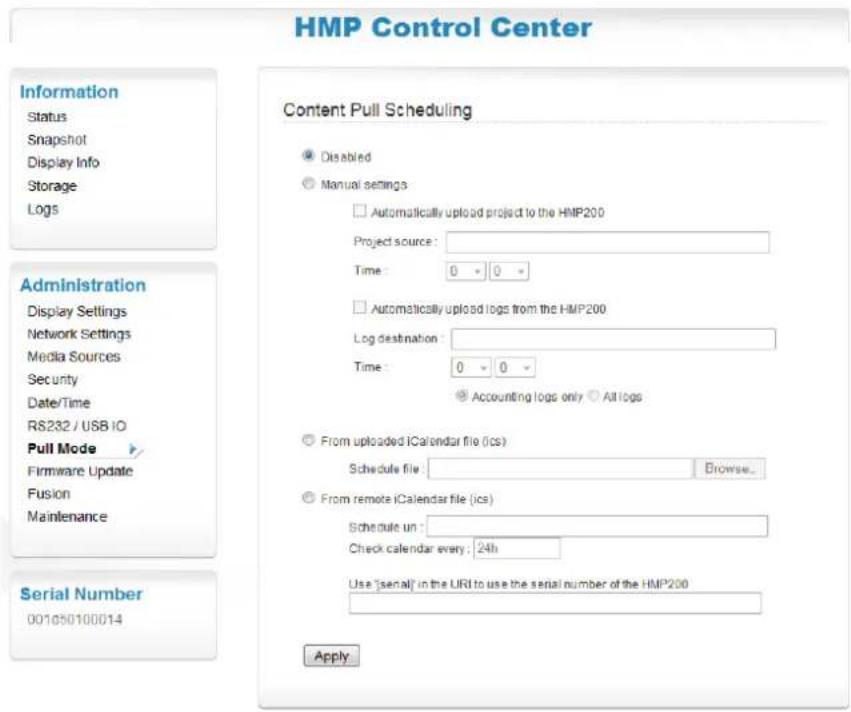
Setting up the pull mode
Pull mode can be used in a bidirectional manner to automatically publish files to the HMP.
Each time the HMP has been scheduled to update the content of its local storage, it will connect to the specified server, check for changes, and download all modified files.
The publish action of the Pull mode can be used with WebDAV server or with standard HTTP servers. For the latter, an XML file describing the content of the server must be available. Pull mode scheduling can be configured either directly from Control Center, or by using a custom-built iCalendar file. There are two ways to configure Pull mode on a HMP unit:
- Using Control Center. This option is easy to configure, but has some limitations. For example, it forces a daily project publishing at a specific timing. Moreover, the options for uploading logs are limited.
- Using iCalendar schedule files: This option gives you full control over the Pull mode of the HMP, but requires an external tool to create the iCalendar files (such as Sunbird or HMD for instance).
Support Wiki keyword: Pull Mode
Configure network credentials for remote servers
This section explains how to configure network credentials for remote servers accessed by your HMP.
- In the main page of Control Center, open the Network Settings page
- Click on the Credentials tab.
- For each remote server protected by a password, enter:
- The full URI to the resource, optionally including a port number.
- The username
- The password
-
You can specify multiple username and password for the same server but for different realms
-
If you need to add additional server credentials, press the Add server row button.
-
Press Apply to save your changes
Note that networks credentials are used by the HMP player when accessing the remote resource via any method (Pull mode or Client/Server mode).
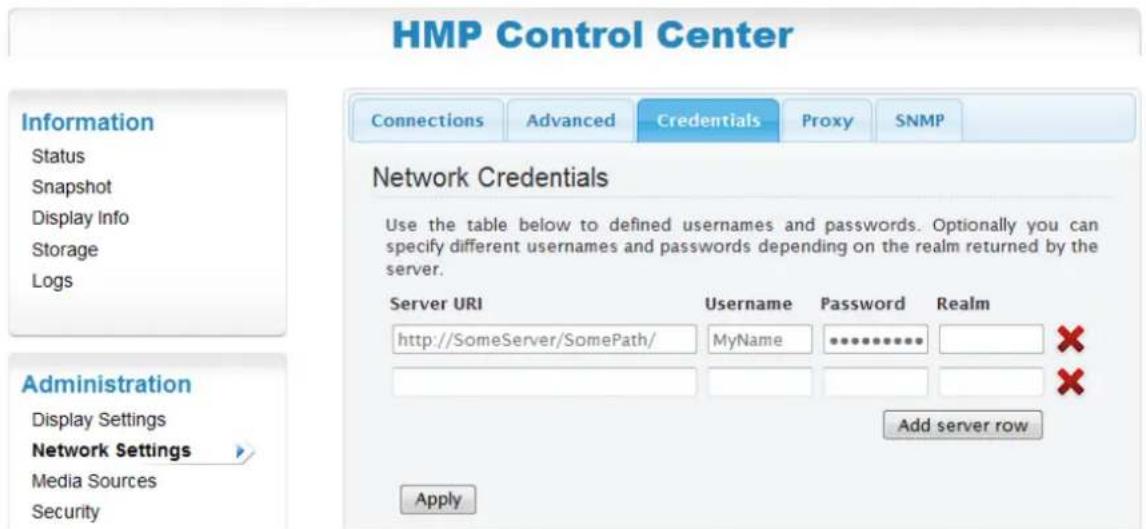
Network credentials settings
Control user rights
This section explains how to manage access rights for your HMP. The HMP offers three levels of security:
- Administrative Server: Controls the access to all pages of the HTTP administration server. It is recommended to always protect this area.
- Content Server: Controls the access to the content storage area. This username and password will be needed to upload content via WebDAV.
• Monitoring: Controls the access to the logs and snapshot of the player.
Configuration guide
- In the main page of Control Center, open the Security page. The current security settings will be shown.
- Choose the type of access you would like to configure.
Note: it is recommended to always setup a password for the Administrative area. By default no password is set and the administrative area is not protected.
- Enter the password and confirm it in the second text area.
- Press Apply to save your changes.
Note: you need to press apply for each password you want to change; it is possible to change only one password at the time.
HMP Control Center
Information
Status
Snapshot
Display Info
Storage
Logs
Administration
Display Settings
Network Settings
Media Sources
Security
Date/Time
RS232 / USB IO
Pull Mode
Firmware Update
Fusion
Maintenance
Serial Number
001d50100014
Administrative Server
Warning: Administrative area is not password protected.
User name
Old password
New password
Confirm password
Apply
Content Server
Password protected
User name
New password
Confirm password
Apply
Monitoring
Password protected
User name
New password
Confirm password
Apply
admin
-
m = 311
广力云
© yes
content
-
1
© yes
monitoring
广力云
-
Using the HMP to control external appliances
The SpinetiX HMP can control external appliances using its serial port (RS232) interface. This type of interface is also preferred by most professional screens to allow switch on/off operations or image configurations. The HMP also supports USB-IOs presented as HID controls such as models from U-HID.
The following are the minimum requirements for controlling an appliance through the serial port or USB interface:
- A protocol file for your appliance. (testing and debugging your protocol file can be done on a PC using the Serial Port Protocol Studio application, installed with HMD)
• The protocol file must be uploaded to the HMP and enabled.
• A pre-built or serial port cable you have constructed, to connect your appliance to the HMP. - Special SpinetiX elements
in your content to control the appliance.
Support Wiki keyword: RS232 port
Enabling control of external devices
Enabling the RS232/USB IO support is done via Control Center, in the RS232/USB IO menu:
![HMP Control Center Information Status Snapshot Display Info Storage Logs Administration Display Settings Network Settings Media Sources Security Date/Time RS232 / USB IO Pull Mode Firmware Update Fusion Maintenance Serial Number 001d50100014 Settings Protocols : [disabled] Use fixed schedule for display power Turn monitor ON 00:00 Turn monitor OFF 24:00 Modify COM port settings Baud rate 9600 Data bits 8 Parity none Stop bits 1 Apply Upload Protocol File Browse_ Upload Copyright (c) 2011 SpinetiX SA. All rights reserved. Software copyrights and licences](/content/2026/06/1258740/images/36ec0ade89e3d8cbe12c8b9ca8f38673334a1156f14fb6e687acd3a84edd221a.jpg)
By default the serial port control is disabled. It is enabled by selecting a protocol file in the Protocols drop-box. Choose either pre-loaded files designed by SpinetiX (identified by the prefix [sys] before the name of the protocol), or files that you have uploaded on this page.
Configuring the protocols
The drop down menu below shows the configuration of an HMP when certain protocol files are selected
• No protocol files, the RS232 interface is disabled ([disabled])
• A system version of the Sharp Aquos protocol ([sys]sharp_aquos)
• An uploaded protocol file for the LG LF65 screen (LG LF65)
• An uploaded protocol file for the Sharp Aquos monitors (sharp_aquos)
![[disabled] [disabled] [sys] sharp_aquos LG LF65 sharp_aquos](/content/2026/06/1258740/images/2bcae6cc23c808576f9955150b4d50dca01ff72797bba211b3c2ef2a7704fee2.jpg)
Once a protocol file is selected, you may change the serial port configuration, and/or enable automatic power on and power off of the attached screen (see Display)
- Disclaimer
- End-User Software License Agreement and Hardware Limited Warranty Agreement
- Table of Contents
- Introduction
- Support Wiki keywords
- How does it work?
- Easy Installation and low maintenance
- Complete Plug & Play setup
- Top reliability
- Smallest form factor
- Remote Monitoring
- Updates and upgrades
- Full Connectivity
- Installation
- Power up your Hyper Media Player
- Troubleshooting
- Updating firmware
- Check for updates
- Checking for Updates
- Important Do not power down the unit during the whole update process.
- Automatic update
- HMP Control Center
- Information
- Administration
- Serial Number
- Reset an HMP to factory default settings
- Get Connected
- Getting started
- Requirements:
- Checking the HMP configuration
- Fixed IP configuration
- 1) Collect information on your network configuration.
- 2) Open the web interface of your HMP.
- 3) Select the Network Settings page.
- 4) Enter the static IP address and the subnet mask.
- 5) Validate the changes.
- Set Display settings
- Controlling the display power
- Controlling the content displayed by the HMP
- Control content via Fusion software
- Use a USB drive with an HMP
- Media Sources:
- Detected USB Storage devices:
- Device # 1:
- Using a network server with HMP
- Pull mode
- Configure network credentials for remote servers
- Control user rights
- Configuration guide
- Security
- Administrative Server
- Content Server
- Monitoring
- Using the HMP to control external appliances
- Enabling control of external devices
- Configuring the protocols
Brand : SANYO
Model : HMP200
Category : Media player