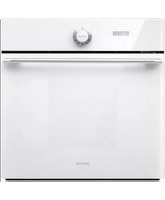
USER MANUAL BO75SYW GORENJE
Instructions for use, installation, and connection

Electric oven
Electric oven
Dear customer!

We sincerely thank you for your purchase. We believe you will soon find ample evidence that you can really rely on our products. To make the use of the appliance
easier, we attach these comprehensive instruction manual.
The instructions should aid you in getting familiar with your new appliance. Please, read them carefully before using the appliance for the first time.
In any case, please make sure the appliance was supplied to you undamaged. Should you identify and transport damage, contact your sales representative or the regional warehouse from where the product was delivered. You will find the telephone number on the receipt or delivery report. We wish you a lot of pleasure with your new household appliance.
Instructions for connection
The connection should be carried out in compliance with the instructions in the section “Connection to the power mains”, and the relevant effective regulations and standards. This should only be performed by a qualified technician.
Rating plate
The rating plate indicating the basic information on the appliance is attached to the edge of the oven and it is visible when you open the oven door.
Important warnings ....3
Appliance description ....4
The oven ....5
Food preparation ....14
Cleaning and maintenance ....23
Special warnings and error reporting....29
Instructions for installation and connection ....30
Technical characteristics ...... 33
Important warnings
- The appliance may only be connected to the power mains by a service technician or other qualified expert.
- Unprofessional tampering and repairs may result in serious physical injury and damage to the appliance. The repairs may only be carried out by the service personnel or an authorized technician.
- During cooking, the overheated fat or oil on the hob may ignite. There is a risk of burning and fire; therefore, control the cooking process at all times.
- Attention: the danger of burning is considerable particularly for small children and children who are not fully aware of the danger. There is a risk of burning or scalding. Therefore, keep small children away from the appliance and only let older children use the appliance under suitable supervision.
- Attention: danger of burning. Heating elements, the oven, and parts of the utensils may become very hot during use; therefore, always use a kitchen cloth or kitchen gloves when handling cookware, and take every precaution necessary to avoid burns.
- Power cords of other appliances located in the vicinity of this large appliance may be damaged if they are pinched e.g. by oven door, which can result in a short circuit. Therefore, keep the power cords of any other appliances at a suitable distance.
- Do not use steam cleaners or high-pressure cleaners to clean the cooking hob, as this may result in an electric shock.
- Pay a special attention when preparing the food in the oven. Baking pans, wire shelf and the whole interior of the oven are very hot due to high temperatures, therefore the use of protective gloves is highly recommended.
- During operation, oven door heats up. A third glass is installed for extra protection, reducing the surface temperature of the outside door (only with some models).
- Do not cover the oven interior with aluminum foil and do not place baking trays or other containers on the oven bottom. Aluminum foil will prevent air circulation in the oven, thus impeding the cooking process, and damage the enamel coating.
- Oven door hinges can be damaged when overloaded. Do not place heavy pans on the open door, and do not lean against them when cleaning the oven interior. Before cleaning, remove the oven door (see section Removing and replacing the oven door). Do not step on the open oven door or sit on them – this applies particularly to children.
- The appliance is manufactured in compliance with the relevant effective safety standards. Nevertheless, we strongly recommend that persons with impaired physical, motoric, or mental capacity, or persons with inadequate experience or knowledge, do not use the appliance unless attended by a qualified person. The same recommendation applies when the appliance is used by persons of less-than-legal age.

The symbol on the product or on its packaging indicates that this product may not be treated as household waste. Instead it shall be handed over to the applicable collection point for the recycling of electrical and electronic equipment. By ensuring this product is disposed of correctly, you will help prevent potential negative consequences for the environment and human health, which could otherwise be caused by inappropriate waste handling of this product. For more detailed information about recycling of this product, please contact your local city office, your household waste disposal service or the shop where you purchased the product.
Appliance purpose
The appliance is intended for conventional preparation of food in households and should not be used for any other purpose. Individual options of use are comprehensively described in this instruction manual.
Appliance description
The figure represents one of the appliance models. Since a group of appliances to which these instructions apply have different features, the instruction manual may describe functions and equipment that may not be available in your appliance.
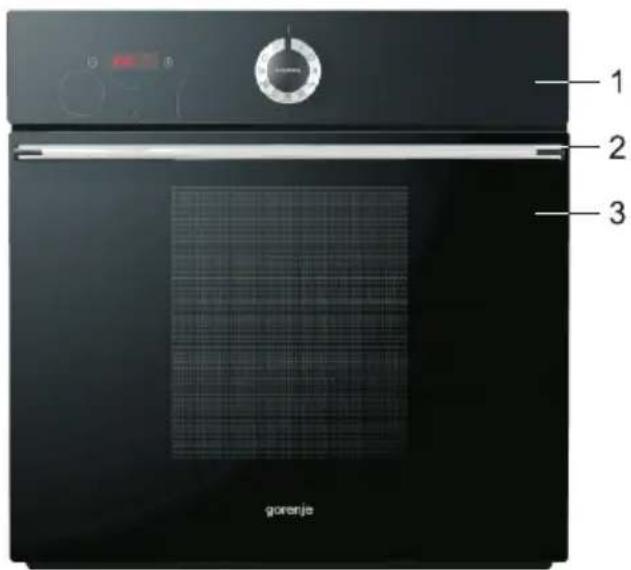
1 Electronic temperature display 2 On/off button and oven mode selector
(only with some models)
The appliance features a built-in cooling fan which cools the appliance housing and control panel.
Cooling fan
The oven
Before using the oven for the first time
Important warnings
- Remove all accessories from the oven and clean them with warm water and a conventional detergent. Do not use abrasive cleaning aids.
- When the oven is heated up for the first time, a specific odor of a “new appliance” will be discharged; therefore, ventilate the room thoroughly while the oven heats up.
- Use dark, black silicon coated or enamel coated baking trays, as these transmit the heat particularly well.
- Only preheat the oven if specifically stated in the recipe or in the instruction tables herein.
- Heating up an empty oven uses a lot of energy; therefore, a lot of power is saved if several types of pastry are cooked consecutively, as the oven is already heated up.
- Approximately ten minutes before the anticipated end of the cooking process, the oven may be turned off. This way, you will save some power and make use of the accumulated heat.
- Note: When cooking is completed, the cooling fan will stop operating. If you leave the dish in the oven, steam could evaporate from it and condense on the front panel and the oven door. In order to prevent condensation, set the program selector switch to the »light« position. Thus, the cooling fan will continue to operate and cool the oven, preventing the accumulation of condensate.
Electronic temperature display
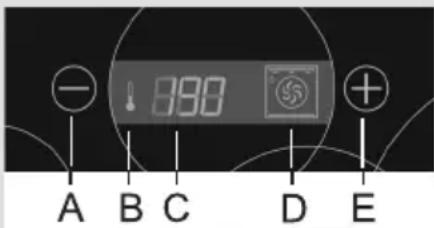
A Reduce temperature key B Rising temperature indicator C Temperature indicator D Cooking mode / system display E Increase temperature key
Each time a key is pressed, a short audible signal will sound.

For better key response, cover more of their surface with your finger.
Operating your oven
Rapid oven preheat
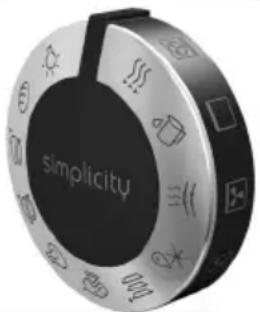
On/off button and oven mode selector
Rotate the selector dial to the desired cooking mode/system or the desired type of food. Cooking mode and the preset temperature will appear on the display. The oven starts to operate.
The selector dial may be used in two ways:
cooking by selecting the type of food and cooking by selecting the cooking mode.
Use this system to rapidly preheat the oven to the desired temperature. This operation mode is not suitable for cooking food.
- Select the cooking system with the oven mode selector.
- Oven preheating starts immediately.
- If required, adjust the preset temperature.
- When the oven is heated up to the desired temperature, the preheat process is completed and an intermittent sound will be emitted. To turn off this sound, rotate the selector dial.
- The oven is now ready for further cooking.
The oven can operate in the following modes:

Cooking by selecting the type of food or operation mode
Use this mode when you wish to prepare any type and quantity of food. It allows you to choose the heating system and temperature. Preset temperature may also be changed as you may find suitable.
Cooking table for selected types of food
| Symbol | Dish/ Function | Preset temperature (°C) | Maximum possible temperature setting (°C) | Estimated cooking time (h/min) | Quantity (kg) | Guide level (height) (from bottom) | Warning | Preset operation mode |
 | Cutlets, chops, fi sh* (larger pieces) | 240 275 0:25 | 4x0,2 | | | 43* | Cooking / grilling on the grid placed in guides 4, 3*; a dip tray should be placed in guides 2, oven door should be closed. Turn the food halfway through. | |
 | Cutlets, fi sh* (smaller pieces) | 240 275 0:23 | 2x0,2 | | | 43* | Cooking / grilling on the grid placed in guides 4, 3*; a dip tray should be placed in guides 2, oven door should be closed. Turn the food halfway through. | |
 | Chicken 170 275 1:05 1 2 | | | | | | Roast the chicken on a grid in the 2nd guide, installing the dip tray in the bottom guide. | |
 | Pizza 200 275 0:19 1x0,5 2 Baking in the shallow baking tray / tin. | | |
- | Small pastry, cookies 160 275 0:26 2x0,3 2,3 | | | | | | Baking in shallow baking trays in two levels / guides simultaneously. | |
 | Bread 190 275 0:55 1 2 Baking in shallow baking tray / tin. | | |
| Defrosting - - - - 2 | | | | | | Place the food on the grid, the dip tray should be installed in the bottom guide. | |
 | Cleaning | 70 | 90 | 0:30 | - | 2 | Pour 0.6 l of water into the baking tray and place it into the bottom guide. After 30 minutes, the food remains on the oven enamel surfaces will soften and they can be removed with a damp cloth. | |
 | Rapid preheat | 160 | 275 | - | - | - | Not appropriate for cooking food. | |
 | Plate warmer | 60 | 230 | | | 2 | | |
Note: A dot next to the food symbol means that the oven should be preheated to the indicated temperature before the food is placed in it. With large and small grill heater, preheating takes approximately 5 minutes.


Oven lighting
With some models, there are two interior lighting lamps: one on the upper part of the back wall, and the other, an additional lamp on the middle of the right side wall. Oven lighting can be selected independently, without selecting another function. With all other modes of operation, the oven lighting is turned on automatically when the operation mode is selected.
( ) Upper / lower heater
The heaters on the upper and lower side of the oven radiate heat uniformly and evenly into the oven interior. Pastry and meat can be cooked on one shelf level only.
Preset temperature 200°C .
( ) Grill
Only the infra / grill heater, a part of the large grill, will operate. It is appropriate for grilling smaller quantities of sandwiches, sausages, or for toasting bread. Temperature is preset to 240° C.
( ) Large grill
With this operation mode, the upper heater and the infra heater are activated simultaneously. The infra heater installed on the oven interior ceiling radiates heat directly. To boost the heating effect or to make optimal use of the entire area of the oven grid, the upper heater is also activated.
This operation mode is appropriate for cooking smaller chunks of meat, such as steaks, roasts, chops, ribs, etc.
Preset temperature 240°C .
( ) Grill & fan
With this operation mode, the infra heater and the fan are activated simultaneously. It is appropriate for grilling meat and large chunks of meat or poultry on one shelf level. Also appropriate for cooking food au gratin or browning.
Preset temperature 170°C .
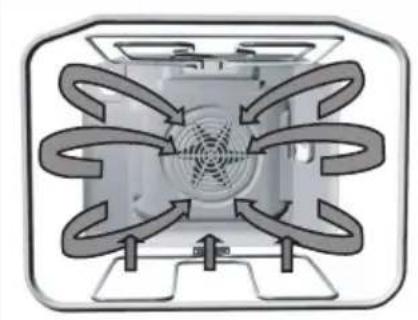
Hot air and lower heater
With this operation mode, the lower heater and the hot air fan operate simultaneously. This is particularly convenient for making pizza. Also ideal for moist or heavy pastry, fruit cakes made of leavened dough, short pastry, or cheesecakes.
Preset temperature 200°C.

Hot air
With this operation mode, the round heater and the fan operate simultaneously. The fan at the oven back wall causes the hot air to circulate constantly around a roast or pastry. This operation mode is appropriate for roasting meat and making pastry on several shelves simultaneously. Cooking temperature should be set lower than with conventional operation modes.
Preset temperature 160°C.

Defrosting
With this mode, the air is circulating without any heater being turned on. Only the fan is in operation. This is used for slow defrosting or thawing of frozen food.

Lower heater and fan
In this mode, the lower heater and fan operate simultaneously. Such mode of operation is appropriate for heating the plates, as well as for baking low-risen pastry and preserving fruit and vegetables.
Use the first guide from the bottom and baking trays that are not too high, as the heated air should be allowed to circulate around the upper part of the food as well.
The temperature is preset to 60°C.
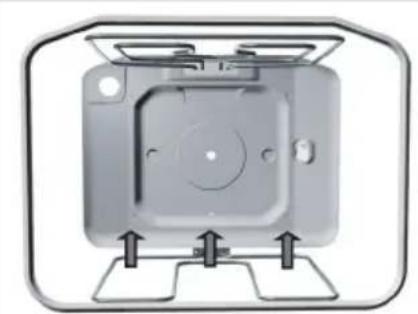
Lower heater
Lower heater may be used to clean your oven.
Further details on cleaning can be found in the chapter "Cleaning and Maintenance".
Only the heater in the bottom of the oven will operate in this mode. Select this operation mode when you wish to brown the lower side of the pastry (e.g. when baking a juicy sponge cake with fruit filling).
Setting the oven temperature
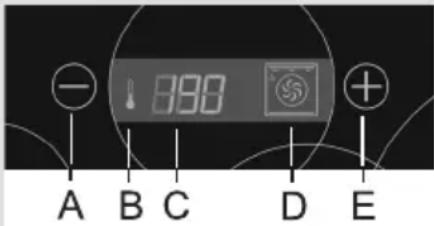
Use the electronic temperature display to change the preset temperature after selecting the type of food or oven operation mode.
Touch the (+, -) key to set the temperature as desired, in the range from 30 to 275 °C (depending on the oven operation mode), in 5°C intervals.
- Rising temperature will be indicated on the temperature display, in 5°C intervals. As long as the temperature inside the oven is below 30°C, “--- °C” will be indicated on the display. The symbol (B) will also appear, indicating the temperature is rising.
- When the set oven temperature is reached, the symbol (B) will go off, and a short beep will sound.
- During the cooking / baking process, the temperature is maintained by periodical activation of heaters. Any time a heater is activated, the symbol (B) will appear.
- The temperature may be changed any time by pressing the (+, -) key.
Turning off the oven
Shelf levels (depending on the model)

After the completion of the cooking or baking process, rotate the selector dial back to "zero" position; decreasing temperature will be indicated on the temperature display until it reaches 50°C.
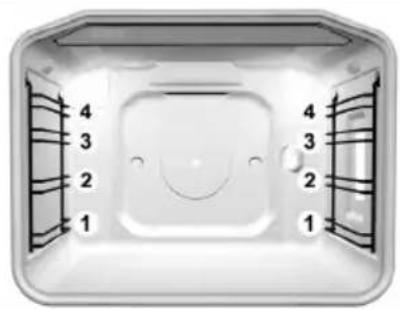
- Accessories (grid, shallow and deep baking tray) can be inserted into the oven at four levels.
- Please note that the shelf levels are always referred to by consecutive numbers starting from the bottom (particular shelf levels are described in the cooking tables below).
- The guides may be drawn, wire, or telescopic (depending on the appliance model). Telescopic (pull-out or retractable) guides are installed for the second, third, and fourth level. In case of wire guides, the grid and the trays should always be inserted into the leading slot formed by adjacent wire profiles.

Telescopic pull-out guides (depending on the model)


Oven accessories (depending on the model)


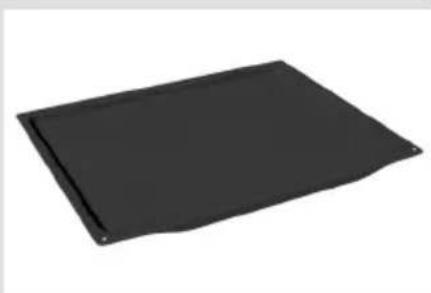
Telescopic (pull-out or retractable) guides are installed for the second, third, and fourth levels. They are installed on the left and right side walls of the oven interior at three levels.
Pull-out levels consist of (depending on the model):
- three guides that can be pulled out partially,
- one guide that can be pulled out completely and two that can be pulled out partially, or
- three guides that can be pulled out completely.

Telescopic pull-out guides and other parts of oven accessories will heat up! Use a kitchen glove or similar protection when handling them.
- To insert the grid, baking tray, or drip tray, first pull out the telescopic guides of the desired level.
- Place the grid or the shallow or deep baking tray on the pull-out guides and push it into the oven with your hand. Close the oven door only when the telescopic guides have been fully retracted.
The glass tray is intended for baking dishes, but may also be used as a serving tray.
The grid onto which the container with food, or the food directly, is placed.
Shallow baking tray is only intended for baking pastry and cakes.

Deep baking tray is intended for baking meat and moist pastry; it is also intended as a drip tray.

Unless you are using the grill, or the deep baking tray is used only as a drip tray when spit-roasting, the deep tray should not be inserted into the first guide.
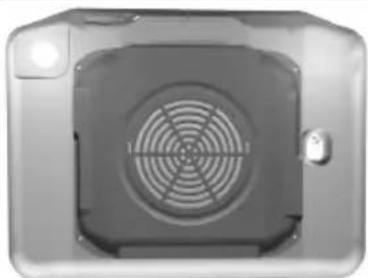
Oven back wall is coated with a catalytic film that may be installed or removed only by an authorized expert or service technician.
Grease filter (depending on the model)
When roasting meat, the use of grease filter is highly recommended. The grease filter, installed on the back wall of the oven interior, protects the fan, the round heater, and the oven from grease. When baking pastry, always remove the filter. If the grease filter is in place when baking rolls with risen dough, the results may be below your expectations.
Food preparation
Baking pastry


- For baking pastry, use the ☐ or ☒ mode of operation. (Oven operation with the selected mode, or system, depends on the appliance model).
- When baking pastry, always remove the fat filter.
Instructions
- When baking pastry, always observe the instructions on the shelf / guide level, temperature, and cooking time indicated in the pastry baking table. Do not be prejudiced by experience you may have with other ovens. The values indicated in the cooking table are defined and checked especially for this particular oven.
- If the baking table does not specifically address a particular type of pastry, see the information for a similar type of pastry.
☐ Baking pastry with upper and lower heater
- Bake the pastry at one level only.
- Upper / lower heater combination is particularly appropriate for baking various types of pastry, bread, and meat.
- Use dark-colored baking trays. Light-colored trays reflect the heat, which leads to poorer cooking (browning) results. Always place the models on the grid. If you are using the supplied baking tray, remove the grid.
- Preheating will shorten the cooking time. Place the dish into the oven only when the selected temperature has been reached, i.e. when the control lamp (heater operation lamp) goes off for the first time.
Baking pastry with hot air
Baking pastry with hot air is particularly convenient when you wish to bake on several shelf / guide levels simultaneously, especially when preparing bite-size pastry in shallow trays. Preheating is recommended, and the use of the second and third guide level. This mode is also appropriate for moist pastry and fruit cakes (in this case, bake on a single level only).
- The temperature is normally set lower than when baking with the upper/lower heater combination (see also the pastry baking table).
- Various types of pastry can be baked simultaneously, if the required temperature is at least approximately the same for all.
- Baking time can vary, even for equal baking trays. When baking in several baking trays simultaneously – on two or even three levels, baking time for each tray can be different. You may have to remove one of the trays sooner (normally, this would be the uppermost tray).
- If possible, prepare bite-size pastry, such as cupcakes, in the same thickness and height. Unevenly sized pastry will be unevenly browned!
- When baking several types of pastry simultaneously, there will be a significant amount of vapor in the oven, resulting in accumulation of condensate on the oven door.
Tips on baking pastry: Is the pastry completely done?
Use a wooden stick to pierce the pastry at the highest point. If there are no traces of dough when the stick is removed, the pastry is done. Turn off the oven and use the remaining accumulated heat.
The pastry has collapsed.
Check the recipe. Next time, use less liquid. Observe the instructions on mixing / kneading time, especially when using small household appliances.
The pastry is too light-colored.
Next time, use a dark-colored baking tray, place the tray one guide level lower, or turn on the lower heater towards the end of the cooking process.
The pastry with a moist filling (e.g. cheesecake) is not completely done.
Next time, reduce the temperature and extend the cooking time.
Notes on the pastry baking table:
- Two values are indicated for temperature, lower and upper. Initially, set the lower temperature; if the pastry is not brown enough, increase the temperature next time.
- Cooking times are given as an estimate and may vary subject to a number of circumstances.
- The value printed in bold in the temperature table indicates the most appropriate operating mode for a particular type of pastry.
- The indication * means that the oven should be preheated with the corresponding operating mode selected.
- When using baking paper, make sure it is resistant to high temperature.
Pastry baking table for combined upper and lower heater or hot air operating mode - when cooking on one level only
| Type of pastry Guide | (from the bottom) | Temperature (°C) | Guide (from the bottom) | Temperature (°C) | Cooking time (minutes) |
| Sweet pastry |
| Marble cake, ring cake 1 160-170 | 1 150-160 | 50-70 | | | |
| Rectangle-shaped cake 1 160-170 | 1 150-160 | 55-70 | | | |
| Cake made in cake tin 1 160-170 | 2 150-160 | 45-60 | | | |
| Cake tin cheesecake 1 170-180 | 2 150-160 | 65-85 | | | |
| Fruit cake, short pastry 1 180-190 | 2 160-170 | 50-70 | | | |
| Fruit cake with dressing 1 170-180 | 2 160-170 | 60-70 | | | |
| Sponge cake* 1 170-180 | 2 150-160 | 30-40 | | | |
| Cake with icing 2 180-190 | 2 160-170 | 25-35 | | | |
| Fruit cake, mixed dough | 2 170-180 | 2 150-160 | 45-65 | | |
| Cherry cake | 2 180-200 | 2 150-160 | 35-60 | | |
| Sponge cake roll* 2 180-190 | 2 160-170 | 15-25 | | | |
| Leavened dough cake | 2 160-170 | 2 150-160 | 25-35 | | |
| Hefezopf (leavened dough) 2 180-200 | 2 160-170 | 35-50 | | | |
| Christmas cake | 2 170-180 | 2 150-160 | 45-70 | | |
| Apple pie | 2 180-200 | 2 170-180 | 40-60 | | |
| Oven-baked donuts | 1 170-180 | 2 150-160 | 40-55 | | |
| Savory pastry |
| Quiche Lorraine | 1 190-210 | 2 170-180 | 50-65 | | |
| Pizza* | 2 210-230 | 2 190-210 | 25-45 | | |
| Bread | 2 190-210 | 2 170-180 | 50-60 | | |
| Buns* | 2 200-220 | 2 180-190 | 30-40 | | |
| Bite-size pastry |
| Short pastry - cookies * | 2 160-170 | 2 150-160 | 15-25 | | |
| Merengue * | 2 160-170 | 2 150-160 | 15-28 | | |
| Leavened dough | 2 180-190 | 2 170-180 | 20-35 | | |
| Puff pastry | 2 190-200 | 2 170-180 | 20-30 | | |
| Choux pastry (cream filled) | 2 | 180-190 | 2 | 180-190 | 25-45 |
| Soufflés | | | | | |
| Rice soufflé | 1 | 190-200 | 2 | 180-190 | 35-50 |
| Fresh cheese soufflé | 1 | 190-200 | 2 | 180-190 | 40-50 |
| Frozen pastry | |
| Apple, cheese pie | 2 180-200 | 2 170-180 | 50-70 | | |
| Cheesecake | 2 180-190 | | 2 160-170 | 65-85 | |
| Pizza | 2 200-220 | 2 170-180 | 20-30 | | |
| French fries for oven * | 2 200-220 | 2 170-180 | 20-35 | | |
| Croquettes | 2 200-220 | 2 170-180 | 20-35 | | |
Note: Guide number refers to the grid onto which smaller baking trays or cake tins are placed, and to shallow baking tray. The deep baking tray should not be inserted into the first guide.
Settings table for baking pastry with hot air and lower heater
| Type of pastry Guide (from the bottom) Temperature (°C) Cooking time | (minutes) |
| Cheesecake (750g cheese)- short pastry | 2 150-160 65-80 | | |
| Pizza * - leavened dough 2 200-210 15-20 | | | |
| Quiche Loraine - short crust dough | 2 180-200 35-40 | | |
| Apple pie with icing - leavened dough | 2 150-160 35-40 | | |
| Fruit cake - mixed dough 2 150-160 45-55 | | | |
| Apple pie - flaky pastry 2 170-180 45-65 | | | |
Cooking / roasting meat
- To cook meat, use the operating modes and.
- Data printed in bold represent the most appropriate operation mode for a particular type of meat.
- When cooking meat, the use of the fat filter is recommended (depending on the model).
Tips on using the cookware
- Meat can be cooked in enamel coated cookware, tempered glass (Pyrex) cookware, clay, or cast iron cookware.
- Stainless steel baking trays are less appropriate because they reflect the heat.
- If the roast is covered, it will remain juicier, and the oven will not be as dirty.
- In an open baking tray, the roast will brown sooner.
Some notes on cooking meat
- The meat cooking table indicates recommended temperatures, guide/shelf level, and cooking time. Since cooking times depend strongly on the type, weight, and quality of meat, they may have to be adjusted.
- Cooking meat, poultry, and fish in an oven is economical only at weights exceeding 1 kg.
- When cooking meat, add enough liquid to prevent the fat and juices from the meat from being burnt onto the baking tray. This means that, in case of longer cooking times, the roast should be checked every once in a while, and liquid should be added.
- After approximately half of the cooking time, turn the roast around, especially when baking in a tray. For better results, start the cooking with the upper side turned downwards.
- When cooking larger chunks of meat, condensate may accumulate on the oven door. This is a natural phenomenon which does not affect the operation of the appliance. After cooking, wipe the door and door glass dry.
- In order to prevent accumulation of condensate, do not let the dishes cool down in the oven.
Meat cooking table for upper/lower heater combination or with hot air - when cooking on one level only
| Type of meat Weight | (g) | Guide (from bottom) | Tempera-ture (°C) | Guide (from bottom) | Tempera-ture (°C) | Cooking time (min.) |
| Beef |
| Beef roast 1000 2 190-210 2 | 180-190 1 | 00-120 | | | | |
| Beef roast 1500 2 190-210 2 | 170-180 1 | 20-150 | | | | |
| Roastbeef, medium done 10 | 00 2 200-2 | 0 2 180-200 3 | 0-50 | | | |
| Roastbeef, well done 1000 2 | 200-210 2 | 180-200 40-60 | | | | |
| Pork |
| Pork roast, incl. skin 1500 2 | 180-190 2 | 170-180 140-160 | | | | |
| Pork belly 1500 2 190-200 2 | 170-180 1 | 20-150 | | | | |
| Pork belly 2000 2 180-200 2 | 160-170 1 | 0-180 | | | | |
| Shoulder 1500 2 190-200 2 | 160-170 1 | 20-140 | | | | |
| Pork roll 1500 2 190-200 2 1 | 60-170 1 | 20-140 | | | | |
| Cutlet 1500 2 180-200 2 160 | -170 100-120 | | | | | |
| Minced meet roast (pork meat loaf) | 1500 2 | 200-210 2 170 | 180 60-70 | | | |
| Veal |
| Veal roll 1500 2 180-200 2 1 | 70-190 | 90-120 | | | | |
| Veal joint | 1700 2 | 180-200 2 170 | 180 120-130 | | | |
| Lamb |
| Lamb loin | 1500 2 | 190-200 2 170 | 180 100-120 | | | |
| Sheep joint | 1500 2 | 190-200 2 170 | 180 120-130 | | | |
| Venison |
| Rabbit loin | 1500 2 | 190-200 2 180 | 190 100-120 | | | |
| Deer joint | 1500 2 | 190-200 2 170 | 180 100-120 | | | |
| Wild boar joint | 1500 2 | 190-200 2 170 | 180 100-120 | | | |
| Poultry |
| Chicken, whole | 1200 2 | 190-200 2 180 | 190 60-80 | | | |
| Chicken | 1500 2 | 190-200 2 180 | 190 70-90 | | | |
| Duck | 1700 2 | 180-190 2 160 | 170 120-150 | | | |
| Goose | 4000 2 | 160-170 2 150 | 160 180-200 | | | |
| Turkey | 5000 2 | 150-160 2 140 | 150 180-240 | | | |
| Fish |
| Whole fish | 1000 | 2 | 190-200 | 2 | 170-180 | 50-60 |
| Fish soufflé | 1500 | 2 | 180-200 | 2 | 150-170 | 50-70 |
Note: The guide indication applies to the deep tray; smaller trays should be placed on the grid inserted into the first guide – □; 1st – 2nd guide ☑ – . (The deep tray may not be inserted into the first guide from the bottom).
Grilling and browning
- When grilling meat, you should be particularly careful. The high temperatures and infra heater heat the grid and other parts of the oven to very high degrees; use protective kitchen gloves and special meat tongs.
- Hot fat may squirt out of pierced meat (e.g., from sausages). To avoid burning your skin or eyes, use meat tongs.
- When grilling meat, control the process at all times. Due to high temperature, meat can be burnt quickly!
- Do not let children anywhere near the grill.
- Roasting with infra heater is recommended for crisp and low-fat preparation of grilled sausages, meat chunks, and fish (steak, chops, salmon fillets, etc.) or toasted bread, as well as for browning.
Some tips on using the grill function
- When using the grill, the oven door should always be closed.
- The cooking table for grilling indicates recommended temperature, guide level, and cooking time. Since cooking time depends strongly on the type, quality, weight, and quality of meat, it may have to be adjusted.
- When cooking meat, the use of a fat filter is recommended (depending on the model).
- The infra heater (Large grill and Grill operating mode) should be preheated for five minutes.
- When cooking on a grid, spread some oil over it to prevent the meat from sticking onto it.
- Place thin slices of meat on the grid and insert it into the fourth guide level.
- Insert a baking tray, which will serve as a drip tray in this case, into the first or second guide level to collect the dripping fat and meat juices.
- Grilled meat should be turned halfway through the cooking. Cook the first side somewhat longer than the other one.
- When grilling larger chunks of meat on a grid (chicken, fish), insert the grid into the second level and the drip tray into the first level.
- Thinner slices of meat should only be turned once, while the thicker ones should be turned several times. Use meat tongs to turn the meat around, to prevent too much juice from being lost.
- Darker meat will brown better and sooner than pork or veal.
- After using the grill, clean the oven and accessories each time to prevent the dirt from being burnt onto the oven the next time you use it.
Cooking table - Large grill
| Type of food Weight | (g) | Guide level (from bottom) | Temperature (°C) | Temperature (°C) | Cooking time (min) |
| Meat and sausages |
| 4 beef loin chops, rare 180g/pc 4 | 240 - 14-16 | | | | |
| 4 beef loin chops, medium " 4 240 - 16-20 | | | | | |
| 4 beef loin chops, well done " 4 240 - 18-21 | | | | | |
| 4 pork neck chops " 4 240 - 19-23 | | | | | |
| 4 cutlets " 4 240 - 20-24 | | | | | |
| 4 veal steaks " 4 240 - 19-22 | | | | | |
| 6 lamb cutlets 100g/pc 4 240 - 15 | -19 | | | | |
| 8 grill sausages 100g/pc 4 240 - | | 11-14 | | | |
| 3 pcs of meatloaf | 200g/pc 4 | 240 - | 9-15 | | |
| 1/2 chicken | 600g | 2 | - | 180-190 | 25 (1.side)20 (2. side) |
| Fish |
| Salmon slices | 600 | 3 240 - | 19-22 | | |
| 4 trout | 200g/pc | 2 | - | 170-180 | 45-50 |
| Toasted bread |
| 6 slices white bread | / 4 240 | - | 1,5-3 | | |
| 4 slices of mixed flour bread | / | 4 | 240 | - | 2-3 |
| Toasted sandwich | / 4 240 | - | 3,5-7 | | |
| Meat / poultry* |
| Duck* | 2000 | 2 | 210 | 150-170 | 80-100 |
| Chicken* | 1500 | 2 | 210-220 | 160-170 | 60-85 |
| Pork roast | 1500 | 2 | - | 150-160 | 90-120 |
| Pork shoulder | 1500 | 2 | - | 150-160 | 120-160 |
| Pork joint | 1000 | 2 | - | 150-160 | 120-140 |
| Roastbeef / beef loin | 1500 | 2 | - | 170-180 | 40-80 |
| Vegetables au gratin ** | |
| Cauliflower, kale | 750 | 2 | - | 210-230 | 15-25 |
| Asparagus | 750 | 2 | - | 210-230 | 15-25 |
Note: the guide level refers to the grid on which you place the meat; in the section meat/poultry, the guide level refers to the deep tray, while with chicken, it refers to the grid.
When cooking meat in a tray, make sure there is enough liquid in the tray to prevent the meat from burning; approximately halfway through the cooking progress, turn the chunk of meat around. When grilling meat on the grid, insert the deep tray into the first or second guide; this way, it will serve as a drip tray (see tips on grilling meat).
Recommendation: Dry the trout with a paper towel. Put some parsley, salt, and garlic into the fish abdomen, oil it from the outside, and place it on the grid. Do not turn during grilling.
* This type of meat can also be prepared on a roast spit (see instructions for spit roasting). **Vegetables are first partly cooked and covered in béchamel sauce and grated cheese. Use the smaller glass baking tray and place it on the grid.
Cooking table - grill
| Food type Weight (g) Guide | | level (from bottom) | Temperature (°C) | Temperature (°C) | Cooking time (min.) |
| Meat and sausages | |
| 2 beef loin stakes, well done 180g/pc 4 240 - 18-21 | | | |
| 2 cutlets 4 240 - 20-22 | | | | | |
| 2 pork neck steaks 180g/pc 4 240 18-22 | | | | |
| 4 grill sausages 100g/pc 4 240 - 11-14 | | | | |
| 4 toasted sandwiches | | 4 240 - | 5-7 | |
| Toast - browning | | 4 240 | | 3-4 | |
| 3 trout - on the grid | 200g/pc | 2 | - | 160-170 | 40-50 |
| Chicken - on the grid | 1500g | 2 | - | 160-170 | 60-80 |
| Pork shoulder - deep tray | 1500g | 2 | - | 150-160 | 120-160 |
Preservation
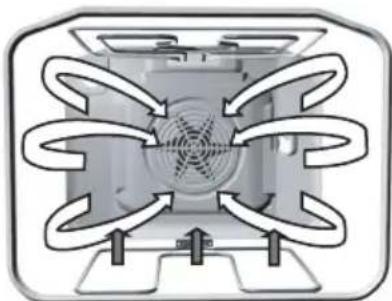
For food preservation, use the lower heater + fan operating mode.
Prepare the food to be preserved and the jars as usually. Use conventional jars with a rubber sealing and glass cover. Do not use jars with threaded or metal covers and metal cans / tins. Preferably, the jars should be of the same size, filled with the same type of food, and tightly sealed. Up to six one-liter jars can be placed into the oven simultaneously.
- Only use fresh food.
- Pour approximately one liter of hot water (about 70°C) into the deep baking tray to provide the required humidity level in the oven. Place the jars into the oven in such way that they are not in contact with the walls and each other (see figure). Rubber seals should be wetted before use.
- Insert the deep tray with the jars into the second guide level from bottom up. During preservation, observe the jars; cook until the contents of the jars starts to boil – bubbles appear in the first jar. Please note the cooking times from the preservation table below.
Preservation table
| Food to be preserved Quantity | | T=170-180°C, until boiling / bubbling (min.) | After appearance of bubbles | Standing time (in the oven (min) |
| Fruit | |
| Strawberries 6x1 liter approx. 40-55 turn off 25 | | | | |
| Stone fruit 6x1 liter approx. 40-55 turn off 30 | | | | |
| Apple puree 6x1 liter approx. 40-55 turn off 35 | | | | |
| Vegetables | |
| Sour gherkin 6x1 liter approx. 40 do 55 turn off 30 | | | | |
| Beans, carrots 6x1 liter approx. 40 do 55 Set to 120°C, | | | 60 min | 30 |
Durations given in the chart are approximate only. Actual time may vary due to differences in room temperature, number of jars, quantity and temperature of the fruit and vegetables to be preserved, etc. Before turning off the oven (for fruit) or setting a lower temperature (for some types of vegetables), make sure there are actually visible bubbles in the jars.
Important: Observe carefully when the bubbles appear in the first jar.
Defrosting *
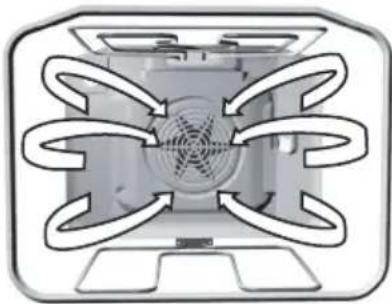
- Air circulating in the oven may speed up the process of defrosting frozen food. To do this, set the oven to "Defrosting" mode.
- Food appropriate for defrosting includes cakes with heavy cream or butter-based filling, other cakes and pastry, bread, buns, and deep-frozen fruit.
- For reasons of hygiene, meat and poultry should not be defrosted in an oven.
If possible, turn the food around or mix several times to make sure they are defrosted evenly.
Cleaning and maintenance
Do not use a steam cleaner or a high-pressure steam cleaner to clean the appliance. Before you start cleaning the appliance, disconnect it from the power mains and let it cool down.
Appliance housing front
Clean the surfaces with liquid non-abrasive detergents intended for smooth surfaces, and a soft cloth. Apply the detergent on the cloth and wipe off the dirt; then, rinse with water. Do not apply the detergent directly on the surfaces. Do not use aggressive or abrasive cleaners, sharp objects or steel wool, as these will scratch the appliance.
Aluminum surfaces
Aluminum surfaces should be cleaned with non-abrasive liquid detergents intended for such materials. Apply the detergent on a wet cloth and clean the surface; then, rinse the surface with water. Do not apply the cleaner directly on the aluminum surface. Do not use abrasive cleaners or abrasive sponges. The surface should not come into contact with oven cleaning sprays.
Stainless steel front panels
(only with some models)
Clean the surface with a mild cleaner (soapsuds) and a soft sponge that will not scratch the material. Do not use abrasive or solvent-based cleaners. If these instructions are ignored, the housing surface can be damaged.
Lacquer-coated and plastic surfaces
(only with some models)
Clean the buttons / knobs and the door handle with a soft cloth and liquid detergents intended for cleaning smooth lacquer-coated surfaces. You may also use the cleaners made especially for this type of surfaces; in this case, follow the manufacturer's instructions.
WARNING: The above surfaces should never come into contact with oven cleaning sprays, as these will permanently damage the aluminum parts.
Oven
- The oven can be cleaned in conventional manner (with detergents, oven spray), but only when it is very dirty and when the stains are particularly stubborn.
- For regular cleaning of your oven (after each use), the following procedure is recommended: rotate the operation mode selection knob to the position 📋. Pour 0.6 liter of water into a baking tray and insert it into the lowermost guide. After thirty minutes, the food residues on the enamel will have softened, allowing you to wipe them with a damp cloth.
When dealing with stubborn stains, please note the following:
The oven should be cooled down before each cleaning process.
- Clean the oven and accessories after each use to prevent the dirt from being burnt onto the oven.
- The easiest way to remove grease is by using warm soapsuds while the oven is still warm.
- In case of particularly stubborn dirt, use the conventional oven cleaners. Then, rinse the oven thoroughly with clean water to remove all residues of the cleaner.
- Never use aggressive cleaners such as steel wool, abrasive dishwashing sponges, stain removers, etc.
- Lacquer-coated, stainless steel, and zinc-coated surfaces, as well as aluminum parts, should never come into contact with oven cleaning sprays, as these may cause damage and discoloration. The same applies for the thermostat sensor (if the cooker features a timer with a probe) and the heaters accessible at the upper part.
- When purchasing and dispensing detergents, consider the environment and observe the instructions provided by respective cleaning agent manufacturers.
Catalytic layer (only with some models)
- Catalytic enamel is soft and sensitive to mechanical stress; therefore, the use of abrasive cleaners and sharp objects is not recommended.
- Coarse catalytic enamel speeds up the disintegration of grease and other types of impurities. Minor stains that remain after cooking normally disintegrate by the time the oven is used for the next time. In general, the stains will disappear at temperatures above 220°C, while at lower temperatures they will disappear only in part.
- The self-cleaning power of the catalytic parts weakens over time. We recommend replacing the layer after a few years of regular use.
Practical tip
- When cooking larger fatty chunks of meat, we recommend wrapping them in aluminum foil or a suitable cooking bag, to prevent the grease from being spattered on the oven interior walls.
- When grilling meat on the grid, place a drip tray underneath.
Maintenance (depending on the model)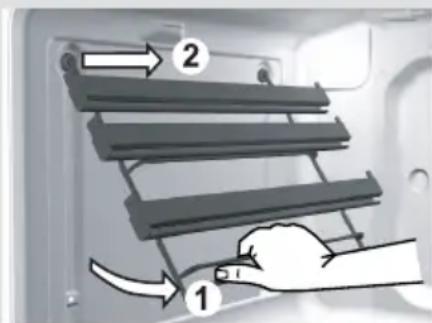

Accessories
Wash the accessories (baking trays, grid, etc.) with hot water and some conventional detergent.
Grease filter (only with some models)
After each use, clean the grease filter with a soft brush in hot water and some detergent, or wash it in a dishwasher.
Special enamel coating
The oven, interior side of the door, and baking trays are covered with special enamel that has a smooth and resistant surface.
This special layer enables easier cleaning at room temperature.
Removing the telescopic pull-out guides
To facilitate cleaning of the oven interior side walls, the telescopic pull-out guides can be removed
- Hold the guide rack by its lower end and rotate it inwards; then, remove them from the holes on the upper side.
- Clean the racks with telescopic guides only with conventional cleaners.
- Do not wash the telescopic pull-out guides in a dishwasher.

Do not attempt to grease the telescopic retractable guides.
After cleaning, simply replace the guide rack by following the procedure in reverse order.
Removing wire guide racks
To facilitate cleaning of the oven interior side walls, the wire guide rack can be removed.
- Hold the guide rack by its lower end and rotate it inwards; then, remove them from the holes on the upper side.
- Clean the guide racks guides only with conventional cleaners.
- After cleaning, simply re-hang the guide rack in the holes provided and pull the downwards.


Removing the interior glass on the oven door (applies to fully glass door only)
Door glass panes can also be cleaned from the inside; however, they must first be removed as follows:
- Remove the oven door (see section on removing and inserting the oven door).
- Hold the door glass pane by its lower edge. Pull it gently towards yourself and lift it slightly – but not too far – by a maximum of 10 mm, until the glass support wedge slips out of the groove (Figure 1).
- Remove the glass (in the direction of arrow 3).
- Interior glass (only in some models) is removed by first undoing the screws on the glass supports and then by lifting it (Figure 2). Remove the supports before cleaning the glass pane.
- Reinstall the door by following the same procedure in reverse order.
Note: Insert the glass into the slot and push it forward (Figure 3).
REMOVING AND REPLACING THE OVEN DOOR WITH A SINGLE-AXIS HINGE (depending on the model)
a) Conventional closing b) GentleClose – the system absorbs the shock from door closing. It allows simple, quiet, and smooth closing. A gentle push (to a 15° angle relative to the closed door position) is enough for the door to close automatically and softly.

If the force applied to close the door is too strong, the effect of the GentleClose system is reduced or the system will be bypassed for safety.
- Fully open the oven door and rotate the stoppers all the way back – applies to conventional door closing (Figure 1).

figure 2
figure 3
- With GentleClose door system, rotate the stoppers back by 90° (Figure 2).
- Slowly close the door until the clips are pressed against the supports / seats. At approximately 15° (relative to the closed door position), pull the door slightly upward and pull them out of the both hinge supports on the appliances (Figure 3).
- Replace the door in the reverse order. Insert the door at an angle of 15° into the hinge supports at the front of the appliance, and push them downwards and to the front until they slide into their supports/seats.
- Then, completely open the door and rotate the attachment clips back to their initial position. Slowly close the door and check if they close properly. If the door does not open or close correctly, make sure the hinge notches are correctly placed in their seat hinges.
Attention
Always make sure the hinge attachment clips are firmly seated in their supports when installing the door. If this is not the case, the main hinge, which is operated by a strong spring, may be released at any time while installing or removing the door. Risk of physical injury.
Door lock (only on some models)
- The oven door is fitted with a door lock that prevents it from being opened until the lock is released. The door lock is opened by slightly pressing your thumb to the right and simultaneously pulling the door outwards.
- When the oven door is closed, the door lock automatically returns to its initial position.
Note: If the door lock is supplied with the appliance, attach it under the appliance control panel in compliance with the installation instructions supplied with the lock.
Replacing appliance parts
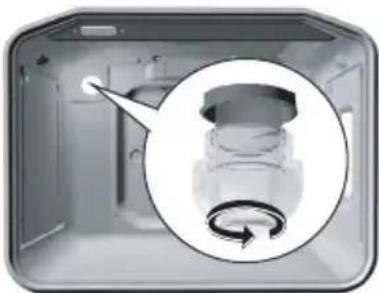
The oven lamp base and socket are under voltage. There is a risk of electric shock!
Before replacing the oven lighting bulb, disconnect the appliance from the power mains by removing the fuses or tripping the main network switch.
Oven bulb
(only on some models)
The oven bulb is considered a replacement part and is not covered by the warranty. Replace the bulb with a new one with the following specifications: socket E 14, 230 V, 25 W, 300°C.
- Unscrew the glass cover in the counterclockwise direction, replace the bulb, and replace the cover.
Bulb lamps used in this appliance are special purpose lamps selected for household appliances use only. They are not suitable for household room illumination.
Special warnings and error reporting
During the warranty period, any repairs may only be performed by service technicians authorized by the appliance manufacturer.
Before starting the repair, the appliance must be disconnected from the power mains by removing the fuse or by removing the mains cord from the wall outlet.
Unauthorized tampering and repairs may cause the risk of electric shock and short circuit; therefore, do not attempt them yourselves. Leave such tasks to an expert or an authorized service technician.
In case of minor faults or problems with the appliance operation, check the following instructions to see whether you can eliminate the causes by yourselves.
Important
A visit by a service technician during the warranty period will be charged if the appliance is not functioning because of improper use. Store these instructions in a place where they are always readily accessible; if you pass the appliance on to another person, the instructions should also be included.
Following is some advice on rectifying some common problems.
| Sensors do not respond, the display has frozen | · Disconnect the cooker from the power network for a few minutes (remove the fuse or trip the main switch); then, reconnect it to the power network and turn on the oven |
| The main fuse is tripped repetitively | · Call a service technician! |
| Oven interior lighting does not work | · The process of replacing the bulb is described in the section “Appliance part replacement”. |
| The oven does not heat up... | · Was the temperature and operating mode selected appropriately? · Is the oven door closed? |
| The pastry is not cooked thoroughly... | · Have you removed the grease fi lter? · Did you observe the instructions and tips from the section “Baking pastry”? · Did you follow the instructions in the baking table closely? |
| Electronic temperature display indicates unusual or unreasonable values, or turns on and off uncontrolled | · In case of a failure of the electronic temperature display, disconnect the appliance from the power mains for a few minutes (remove the fuse or turn off the main switch); then, reconnect it. |
If the problem persists despite observing the instructions above, call an authorized service technician. Elimination of any errors or warranty claims that resulted from improper connection or use of the appliance is not covered by our warranty. In such cases, the costs of repair are borne by the user.
Instructions for installation and connection
Important warnings
- The appliance may only be connected by a qualified expert.
- The appliance should be fitted with a device that disconnects it from all poles of the home network (an omnipolar switch), with at least 3 mm of distance between the contacts in open position. LS-switches or fuses are appropriate.
- To connect the appliance, use the rubber mains cords (type HO5RR-F with the green/yellow earth wire), PVC insulated (type HO5VV-F with the green/yellow earth wire), or other equivalent or superior cables.
- Veneer, glue, or plastic finish of the furniture next to which the cooker is installed should be heat resistant (above 75°C). If the veneers are not high temperature resistant, they may be deformed.
- Packaging (plastic foil, polystyrene, etc.) must be kept out of reach of children, as it can be a source of danger or threat to them. Small parts can be swallowed by children, and the foils are hazardous because of the risk of suffocation.
Installation
- Veneer or other finish of the furniture the appliance is being built into should be processed with heat-resistant glue (100°C); otherwise, high temperatures may cause them to deform.
- Before installing the appliance, remove the back wall from the piece of kitchen furniture the appliance is being built into, along the entire length of the cutout.
- The installation cutout should be dimensioned as indicated in the figure.
- The bottom panel of the piece of kitchen furniture (max. 530 mm) should always be shorter than the side walls to enable adequate air circulation.
- Level the piece of furniture the appliance was built into with a spirit level.
- The piece of kitchen furniture the appliance is built into must be secured against movement, e.g. attached to the adjacent pieces of kitchen furniture.
- Push the appliance into the kitchen furniture element enough that the guides for the screws that are inserted in the oven frame holes are placed against the kitchen element side walls.
- When attaching the appliance, make sure the screws are not fastened too strongly as this may damage the furniture or the appliance enamel coating.

Electrical connection
The appliance may only be connected to the power mains by an authorized service technician or a registered electrician! Incorrect connection may result in damage to or destruction of respective parts of the appliance; in such cases, the warranty is void.
- Open the connection clip using a screwdriver, as indicated on the figure on the cover.
- The voltage (230V against N) in your home network must be checked by an expert using appropriate equipment!
- Before connection, make sure the voltage on the rating plate is consistent with the actual network voltage.
- The length of the power cord should be at least 1.5 meters; thus, the appliance can be connected before it is pushed to the wall.
- The length of the power cord should be adjusted in such way that in case of pulling load on the cable, the ground wire is strained later than the voltage wires.


Procedure
- Use a screwdriver to open the connection clamp cover at the back of the appliance. Use the screwdriver to release the two clips as indicated on the connection clamp cover.
- The power mains cable must be led through a tension release device that protects the cable from being pulled out.
Conduit colors
L1 = external conduit conveying voltage. Normally, the color is black or brown.
N = neutral
This conduit is normally blue.
Make sure the N-wire is correctly connected!
PE = protection (ground) conduit
This conduit is green and yellow.
Technical characteristics
Rating plate