
PET101 - DVD player PHILIPS - Free user manual and instructions
Find the device manual for free PET101 PHILIPS in PDF.


| Product Type | Portable DVD Player |
| Brand | Philips |
| Model | PET101 |
| Display Size | 7 inches |
| Resolution | 480 x 234 pixels |
| Dimensions (L x W x H) | 190 x 140 x 35 mm |
| Weight | 1.2 kg (including battery) |
| Power Supply | AC 100-240V, 50/60Hz; DC 9V 1.5A |
| Battery Type | Rechargeable lithium-ion, 2000 mAh |
| Battery Life | Up to 3 hours |
| Disc Formats Supported | DVD, DVD±R/RW, CD, CD-R/RW, MP3-CD, JPEG CD |
| Video Playback | MPEG-4, DivX, XviD |
| Audio Playback | MP3, WMA, PCM |
| Photo Viewing | JPEG |
| Outputs | Headphone jack (3.5mm), AV output (composite) |
| Inputs | AV input (composite) |
| USB Port | Yes, USB 2.0 for media playback |
| Card Slot | SD/MMC card slot |
| Remote Control | Infrared remote included |
| Maintenance | Clean lens with soft cloth; avoid moisture and dust |
| Safety | Do not expose to liquids; use only approved charger |
| Spare Parts | Battery, remote, power adapter available from Philips service centers |
| Repairability | Serviceable by authorized technicians; user replaceable battery |
Frequently Asked Questions - PET101 PHILIPS
User questions about PET101 PHILIPS
0 question about this device. Answer the ones you know or ask your own.
Ask a new question about this device
Download the instructions for your DVD player in PDF format for free! Find your manual PET101 - PHILIPS and take your electronic device back in hand. On this page are published all the documents necessary for the use of your device. PET101 by PHILIPS.
USER MANUAL PET101 PHILIPS
Register your product and get support at
www.philips.com/welcome
All rights reserved.
Document order number: 000000000000
PHILIPS
EN User manual 4
1 Important 6 Important safety instructions 6 Notice
2 Your portable DVD player 14 Introduction 14 What's in the box 15 Overview of the main unit 16 Overview of the remote control 18
3 Get started 21 Connect to TV 22 Connect power 23 Install remote control battery 24 Select display language 25
4 Use your player 27 Turn on 27 Play discs 27 Play options 28
4 EN 5EN
5 Adjust settings 32 Playback control options 32 DivX Video-on-Demand code 33 Restrict access 34 Return to default settings 36 Select TV display aspect ratio 37 Select video output format 10 Select MPEG-4 video subtitle 39 Select audio output 39
6 Troubleshooting 41 7 Product information 44
1 Important
Important safety instructions
① Read these instructions. ② Keep these instructions. ③ Heed all warnings. ④ Follow all instructions. ⑤ Do not use this apparatus near water. ⑥ Clean only with dry cloth. ⑦ Do not block any ventilation openings. Install in accordance with the manufacturer's instructions. ⑧ Do not install near any heat sources such as radiators, heat registers, stoves, or other apparatus (including amplifiers) that produce heat.
⑨ For countries with a polarized mains, do not defeat the safety purpose of the polarized or grounding-type plug. A polarized plug has two blades with one wider than the other. A grounding type plug has two blades and a third grounding prong. The wide blade or the third prong are provided for your safety. If the provided plug does not fit into your outlet, consult an electrician for replacement of the obsolete outlet.
Caution: To prevent electric shock, match the wide blade of the plug to the wide slot, fully insert.

⑩ Protect the power cord from being walked on or pinched, particularly at plugs, convenience receptacles, and the point where they exit from the apparatus.
⑪ Only use attachments/accessories specified by the manufacturer.
⑫ Use only with the cart, stand, tripod, bracket, or table specified by the
manufacturer or sold with the apparatus. When a cart is used, use caution when moving the cart/apparatus combination to avoid injury from tip-over.

⑬ Unplug this apparatus during lightning storms or when unused for long periods of time.
⑭ Refer all servicing to qualified service personnel. Servicing is required when the apparatus has been damaged in any way, such as power-supply cord or plug is damaged, liquid has been spilled or objects have fallen into the apparatus, the apparatus has been exposed to rain or moisture, does not operate normally, or has been dropped.
⑮ Battery usage CAUTION – To prevent battery leakage which may result in bodily injury, property damage, or damage to the unit:
• Install all batteries correctly, + and - as marked on the unit. - Do not mix batteries (old and new or carbon and alkaline, etc.). - Remove batteries when the unit is not used for a long time.
⑯ Apparatus shall not be exposed to dripping or splashing. ⑰ Do not place any sources of danger on the apparatus (e.g. liquid filled objects, lighted candles). ⑱ This product may contain lead and mercury. Disposal of these materials may be regulated due to environmental considerations. For disposal or recycling information, please contact your local authorities or the Electronic Industries Alliance: www.eiae.org.

Warning
• Never remove the casing of this player. • Never lubricate any part of this player. • Never place this player on other electrical equipment. - Keep this player away from direct sunlight, naked flames or heat. • Never look into the laser beam inside the player. - Ensure that you always have easy access to the power cord, plug or adaptor to disconnect the player from the power.
Norge
Type plate is located on the back of the device.
Note: The mains switch is connected in series.
Any changes or modifications made to this device that are not expressly approved by
Philips Consumer Electronics may void the user's authority to operate the equipment.
Disposal of old equipment and used batteries
Information for users on collection and disposal of old equipment and used batteries

These symbols on the products, batteries, packaging, and/or accompanying documents mean that used electrical and electronic products and batteries should not be mixed with general household waste. For proper treatment, recovery and recycling of old products and used batteries, please take them to applicable collection points, in accordance with your national legislation and the Directives 2002/96/EC and 2006/66/EC.
By disposing of these products and batteries correctly, you will help to save valuable resources and prevent any potential negative effects on
human health and the environment which could otherwise arise from inappropriate waste handling.
For more information about collection and recycling of old products and batteries, please contact your local municipality, your waste disposal service or the point of sale where you purchased the items.
Information on disposal in other countries outside the European Union
These symbols are only valid in the European Union. If you wish to discard these items, please contact your local authorities or dealer and ask for the correct method of disposal.
Note for the battery symbol

This symbol might be used in combination with a chemical symbol. In this case it complies with the requirement set by the Directive for the chemical involved.
Environmental information
All redundant packing material has been omitted. We have done our utmost to make the packaging easily separable into mono materials.
Please observe the local regulations regarding the disposal of packing materials.

The making of unauthorized copies of copy-protected material, including computer programs, files, broadcasts and sound recordings, may be an infringement of copyrights and constitute a criminal offence. This equipment should not be used for such purposes.
Recording and playback of material may require consent. See Copyright Act 1956 and The Performer's Protection Acts 1958 to 1972.
This player includes this label:

2 Your portable DVD player
Congratulations on your purchase, and welcome to Philips! To fully benefit from the support that Philips offers, register your product at www.Philips.com/welcome.
Introduction
Your portable DVD player plays digital video discs that conform to the universal DVD Video standard. With it, you can play movies with true cinema picture quality and stereo or multi-channel sound (depending on disc and playback set-up).
You can also select sound track, subtitle languages, and different angle of view (again depending on DVD disc). Besides, you can restrict the play of discs that are not suitable for children.
You can play the following discs on the DVD player:
| DVD video disc | |
| Video CDs | |
| MP3s | |
| Audio CDs | |
| CD with JPEG files |
What's in the box
Check and identify the contents of your package:
- Portable DVD player
- Remote control • AC power adaptor (AY4195)
- AV cable • SCART converter
Overview of the main unit

① AV OUT
• Audio/Video output jack

- Move cursor up / down

- Skip to previous/next chapter, track or title
- Move cursor to left/right

- Stop play
⑤ SETUP
• Enter or exit system setup menu
⑥ OPEN
- Open disc door to insert or remove disc
⑦ IR/POWER
• Remote sensor/Power indicator
⑧ POWER
• Turn DVD player on/off
⑨ MENU
• Enter or exit DVD menu
10
• Start or interrupt play
⑪ DC IN
• Power supply socket
Overview of the remote control

① SETUP
• Enter or exit system menu
◀ ▶ , OK
• Move cursor up / down / left / right.
• Confirms selection.
③ OSD
• Access available functions
4
- Skip to previous chapter, track or title.
5
• Start / pause / resume play
⑥ MUTE
- Turn off sound
⑦ Numeric Keypad 0 - 9
• Input numbers.
⑧ SUBTITLE
• Select a subtitle language for DVD disc.
⑨ RETURN
• Return to the PBC (playback control) menu of VCD disc
⑩ A-B
• Setup repeated play of a specific section
⑪ DVD MENU
• Return to main menu of DVD disc
⑫ TITLE
• Return to title menu of DVD disc
13
- Skip to the next chapter, track or title
■ 14
- Stop play
⑮ AUDIO
- Select an audio language when playing a DVD disc or select an audio mode (Stereo, Mono-Left or Mono-Right) when playing a VCD/CD disc
⑯ ZOOM
• Enlarge or reduce picture or active image size
3 Get started

Caution
Use the controls only as stated in this user manual.
Always follow the instructions in this chapter in sequence.
If you contact Philips, you will be asked for the model and serial numbers. Find the model number and serial number of this player at the back or the bottom of your player. Write these numbers here:
Model No.
Serial No.
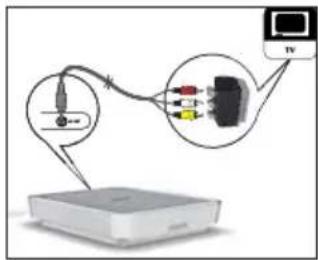
Connect to TV

Note
- Match the color of the AV cable with the jacks: the yellow cable is for the yellow video jack, the red/white cable is for the red/white audio jacks.
1 Connect AV cable to the player and to the TV.

- If there are no matching AUDIO IN jacks on the TV, plug the supplied SCART converter onto the TV first, then connect the AV cable to the SCART converter.
Connect power

Caution
- Risk of product damage! Ensure that the power supply voltage corresponds to the voltage printed on the back or the underside of the player.
- Risk of electric shock! When you unplug the AC adaptor, always pull the plug from the socket. Never pull the cord.
1 Connect the AC adaptor to the DC IN jack of the player and to the power outlet.

Install remote control battery

Caution
- Risk of explosion! Keep batteries away from heat, sunshine or fire. Never discard batteries in fire.
- Risk of decreased battery life! Never mix different brands or types of batteries.
- Risk of product damage! When the remote control is not used for long periods, remove the batteries. • Perchlorate Material - special handling may apply. See www.dtsc.ca.gov/hazardouswaste/perchlorate.
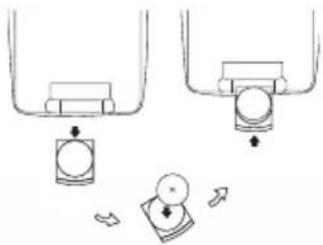
For first-time use:
1 Remove the protective tab to activate the remote control battery.
To replace the remote control battery:
1 Open the battery compartment. 2 Insert 1 CR2025 battery with correct polarity (+/-) as indicated. 3 Close the battery compartment.
Select display language
English is the default language for screen display. You can change the display language.
1 Slide the POWER switch to turn on the DVD player. 2 Turn on the TV.
3 Press SETUP.
4 Select [General] > [Language].

5 Select the language, then press OK.
4 Use your player
Turn on
Slide the POWER switch to turn on the DVD player.
2 Turn on the TV.
Play discs
1 Slide OPEN on the DVD player and lift up the CD compartment. 2 Insert the disc with label side facing up. 3 Push down to close the CD compartment.
Play starts automatically.
• If a menu appears, select an item, then press OK to start play. • To stop play, press ■. • To pause, press ‖. Press again to resume play.
• To select the previous/next item, press ◀◀ or ▶▶.
• To start search within video/audio, press and hold ◀ or ▶. Briefly press ◀ or ▶ during search to adjust search speed.
• For Video CDs or Super Video CDs: Press RETURN to return to the previous menu.
Play options
Select audio language
For DVDs that contain two or more audio languages.
1 During play, press AUDIO repeatedly until the language is selected.
Select subtitle language
For DVDs that contain two or more subtitle languages.
1 During play, press SUBTITLE repeatedly until the language is selected.
Select audio mode
When you play VCDs/CDs, you can select an audio mode.
1 Press AUDIO repeatedly until the audio mode is selected.
Zoom
For DVDs, VCDs and picture CDs, you can zoom in and out for video images or pictures.
1 Press ZOOM repeatedly to zoom in and out. 2 When the video image or picture is enlarged, press ▲▼◀▶ to pan through it.
Repeat a section
You can repeat a specific section of audio/video within a title/chapter/track (repeat A-B).
1 During play, press A-B to mark the start of the section to repeat.
2 Press and hold to search for the end of the section.
3 Press A-B to mark the end of the section. 4 The selected section plays repeatedly. 5 Press A-B to cancel.
Repeat one/all
1 During play, press OSD.
2 Select [Repeat], then press OK.
3 Select [Repeat 1] or [Repeat all], then press OK to confirm.
Random play
For audio CDs and MP3 CDs only.
1 Press OSD. 2 Select [Shuffle]. 3 Select [On] or [Off], then press OK to confirm.
Rotate pictures
For picture CDs only.
1 When you view the picture, press OSD. 2 Select [Rotate], then press OK.
3 Press to rotate counter-clockwise. 4 Press to rotate clockwise. 5 Press OSD again to exit.
5 Adjust settings
DivX Video-on-Demand code
Playback control options
For VCDs (version 2.0 only) and SVCDs.
1 Press SETUP.
2 Select [General] > [PBC settings].

3 Select [On] or [Off], then press OK to confirm.
4 Press SETUP to exit.
DivX is a popular media technology created by DivX, Inc. DivX media files contain highly compressed video with high visual quality that maintains a relatively small file size. DivX files can also include advanced media features like menus, subtitles, and alternate audio tracks. Many DivX media files are available for download online, and you can rent and purchase DivX videos with the DivX VOD (Video on Demand) service. To use this service, you need the DivX VOD registration code of this player. For more information and instructions, visit www.divx.com/vod.
1 Press SETUP.
2 Select [General] > [DivX (VOD)].
The DivX registration code appears.
3 Write down the number for future reference.
4 Press SETUP to exit.

"DivX, DivX" Certified, and associated logos are trademarks of DivX, Inc. and are used under license.
Official DivX® Certified product. Plays all versions of DivX® video (including DivX® 6) with standard playback of DivX® media files.
Restrict access
You can restrict the play of discs that are not suitable for children, or have certain discs played with alternative scenes. Once you select an access level, discs with higher levels cannot be played.
1 Press SETUP.
2 Select [General] > [Parental].
A list of disc ratings is displayed. → [1 kid safe] : acceptable for children. → [2 G] : acceptable for general viewers. → [3 PG] : parental guidance suggested. → [4 PG 13] : unsuitable for children under age 13.
[5 PGR] : recommend parents to restrict children under 17 to view. [6 R] : restricted. Recommend parent to guide children under 17 to view. → [7 NC 17] : unsuitable for children under age 17. → [8 Adult] : acceptable for adults only.
3 Select a setting, then press OK to confirm.
4 Enter the password.
• If this is the first time you restrict access, enter 9999 as the password.
5 Press SETUP to exit.
Set password
1 Press SETUP.
2 Select [General] > [Set password].
3 Enter the current password.
• If this is the first time you restrict access, enter 9999 as the password. 4 Enter the new 4-digit password, then press OK to confirm.
5 Enter the new password again, then press OK to confirm.
6 Press SETUP to exit.
Return to default settings

Note
- When you return to default settings, the access restriction password will not be reset.
1 Press SETUP.
2 Select [General] > [Factory settings], then press OK.
The settings return to their default setting.
3 Press SETUP to exit.
Select TV display aspect ratio
Set the screen format according to how you want the picture to appear on your TV:
1 Press SETUP.
2 Select [Video] > [TV display], then select an option:
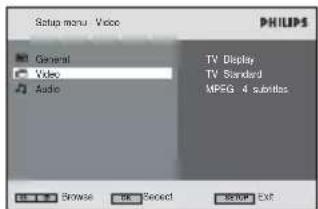
• [16:9] : For widescreen TVs • [4:3 LB] : For normal TVs. While playing a wide-screen picture, black bars may appear on the top and the bottom of the screen. • [4:3 PS] : For normal TVs. While playing a full-height picture, the sides of the picture may be trimmed.
3 Press OK to confirm.
4 Press SETUP to exit.
Select video output format
The default video output format has been chosen according to format that is broadcast in your country. If the picture looks unusual, change the video output.
1 Press SETUP.
2 Select [Video] > [TV standard].
A list of output formats is displayed. [Multi]: The correct format is set automatically. Select this option if you are not sure which format should be selected. [NTSC]: used in the United States, Canada, Japan, Mexico, the Philippines, South Korea, Taiwan, and some other countries. [PAL]: used in most of the western European countries (except France), Australia, and some other countries.
3 Select an option, then press OK to confirm.
4 Press SETUP to exit.
Select MPEG-4 video subtitle
You can select subtitle language for MPEG-4 video, e.g., DivX video.
1 Press SETUP.
2 Select [Video] > [MPEG-4 subtitle]. A list of available languages is displayed. 3 Select an option, then press OK to confirm. 4 Press SETUP to exit.
Select audio output
When you play DVD/VCDs that contain Dolby sound effects, you can select an output format.
1 Press SETUP.
2 Select [Audio] > [Dolby].

3 Select [Stereo] or [Lt/Rt], then press OK to confirm.
4 Press SETUP to exit.
6 Troubleshoot

Warning
Never remove the casing of this player.
To keep the warranty valid, never try to repair the system yourself.
If you encounter problems when using this player, check the following points before requesting service. If the problem remains unsolved, go to the Philips web site www.philips.com/welcome.
When you contact Philips, ensure that your player is nearby and the model number and serial number are available (see 'Get started' on page 21).
No power
- Ensure that both plugs of the mains cord are properly connected. • Ensure that there is power at the AC outlet.
Distorted picture
- Clean the disc. With a clean, soft, lint-free cloth, wipe the disc outwards from the center. • Make sure that the video output format of the disc is compatible with the TV.
- Change the video output format to match your TV or program (see 'Select video output format' on page 38).
No sound
Ensure that the AV cable is connected correctly.
Cannot play disc
• Ensure the disc label is upwards. - Clean the disc. With a clean, soft, lint-free cloth, wipe the disc outwards from the center. - Check if the disc is defective by trying another disc.
No response to the remote control
- Ensure that the path between the remote control and the player is clear from obstacles. • From a close distance, point the remote control directly at the player.
- Replace the remote control battery. • The function does not work for this disc. Refer to the disc instructions.
The player feels warm
- When the player is in use for a long period of time, its surface will be heated. This is normal.
7 Product information

Note
- Product information is subject to change without prior notice.
Dimensions (player) 157 × 32 × 151 mm
(6.2 × 1.3 × 5.9 inches)
Weight (player) 0.35 kg / 0.77 pounds
Power supply DC 12V 1.0A
Power Consumption <10W
Operating temperature 0 - 50°C
range
Laser wavelength 650nm
Video system NTSC / PAL / AUTO


100% recycled paper
100% recycled paper
- IMPORTANT
- IMPORTANT SAFETY INSTRUCTIONS
- WARNING
- NORGE
- DISPOSAL OF OLD EQUIPMENT AND USED BATTERIES
- INFORMATION ON DISPOSAL IN OTHER COUNTRIES OUTSIDE THE EUROPEAN UNION
- YOUR PORTABLE DVD PLAYER
- INTRODUCTION
- WHAT'S IN THE BOX
- OVERVIEW OF THE MAIN UNIT
- ① AV OUT
- ⑤ SETUP
- ⑥ OPEN
- ⑦ IR/POWER
- ⑧ POWER
- ⑨ MENU
- ⑪ DC IN
- OVERVIEW OF THE REMOTE CONTROL
- ⑮ AUDIO
- ⑯ ZOOM
- GET STARTED
- CAUTION
- CONNECT TO TV
- NOTE
- CONNECT POWER
- INSTALL REMOTE CONTROL BATTERY
- FOR FIRST-TIME USE
- SELECT DISPLAY LANGUAGE
- USE YOUR PLAYER
- TURN ON
- PLAY DISCS
- PLAY OPTIONS
- SELECT AUDIO LANGUAGE
- SELECT SUBTITLE LANGUAGE
- SELECT AUDIO MODE
- ZOOM
- REPEAT A SECTION
- REPEAT ONE/ALL
- RANDOM PLAY
- ROTATE PICTURES
- ADJUST SETTINGS
- DIVX VIDEO-ON-DEMAND CODE
- PLAYBACK CONTROL OPTIONS
- RESTRICT ACCESS
- SET PASSWORD
- RETURN TO DEFAULT SETTINGS
- SELECT TV DISPLAY ASPECT RATIO
- SELECT VIDEO OUTPUT FORMAT
- SELECT MPEG-4 VIDEO SUBTITLE
- SELECT AUDIO OUTPUT
- TROUBLESHOOT
- NO POWER
- NO SOUND
- CANNOT PLAY DISC
- NO RESPONSE TO THE REMOTE CONTROL
- THE PLAYER FEELS WARM
- PRODUCT INFORMATION
Brand : PHILIPS
Model : PET101
Category : DVD player