
UFS 651sw - Digital decoder KATHREIN - Free user manual and instructions
Find the device manual for free UFS 651sw KATHREIN in PDF.


| Product Type | Digital Decoder (Satellite) |
| Brand | Kathrein |
| Model | UFS 651sw |
| Dimensions (W x H x D) | 280 mm x 45 mm x 180 mm |
| Weight | 0.5 kg |
| Power Supply | 230 V AC, 50 Hz |
| Power Consumption | 15 W (typical), <1 W standby |
| Tuner Type | DVB-S2 (Satellite) |
| Video Output | HDMI, Scart (CVBS/RGB) |
| Audio Output | Digital optical (S/PDIF), Analog stereo (RCA) |
| Supported Resolutions | 576i, 576p, 720p, 1080i |
| Recording Function | USB recording (PVA/TS) to external storage |
| USB Ports | 1 x USB 2.0 front |
| Smart Card Slot | 1 x CI (Common Interface) slot |
| Remote Control | Infrared, included (batteries: 2x AAA) |
| Display | LED front panel (channel number, standby) |
| Operating Temperature | 5 °C to 40 °C |
| Cleaning Instructions | Wipe with a dry, soft cloth. Do not use liquids or aerosol cleaners. |
| Safety | Do not expose to rain or moisture. Place on a stable surface with proper ventilation. |
| Spare Parts & Repairability | Contact Kathrein service center or authorized dealers. Use only original power adapter. |
Frequently Asked Questions - UFS 651sw KATHREIN
User questions about UFS 651sw KATHREIN
0 question about this device. Answer the ones you know or ask your own.
Ask a new question about this device
Download the instructions for your Digital decoder in PDF format for free! Find your manual UFS 651sw - KATHREIN and take your electronic device back in hand. On this page are published all the documents necessary for the use of your device. UFS 651sw by KATHREIN.
USER MANUAL UFS 651sw KATHREIN
DVB Satellite Receiver UFS 651si/sw

PREFACE
Dear customer,
This operating manual is intended to help you make the fullest use of the extensive range of functions offered by your new satellite receiver.
We have tried to make the operating instructions as easy as possible to understand, and to keep them as concise as possible. To help you understand particular specialist terms that cannot be translated, we have added a short glossary at the end of the manual.
The power switch is an environmentally friendly feature. If you will not be using your receiver for an extended period, you should use the power switch to disconnect it from the power supply and save energy. For shorter breaks, you can use the remote control to switch the receiver to standby, which uses only a minimal amount of energy.
We wish you good reception and much pleasure using your new DVB satellite receiver.
Your
KATHREIN team
IMPORTANT INFORMATION
The channels available on the satellites and transponders are subject to continual change. If changes do occur, the new channels have to be set in the receiver because the factory preset programming corresponds to the status on the date of manufacture. The information for these settings can be found on the Internet or in relevant magazines.
Your receiver is equipped in the factory with the latest software version at that time. We are, however, constantly working on adapting the software to the wishes of our customers and to developments in technology. The “Service Menu” section provides more information on this.
The information in this operating manual was correct at the time of going to press.
We reserve the right however to make changes at any time and without prior notice. If new software is released for your receiver, and this affects the information in the operating manual (e.g. changes to the menus and/or functions), if we believe it necessary we will make available a new operating manual for download under “www.kathrein.de”.
Please keep the original packaging in case you need to return the product at any time. If the product is not properly packed, the warranty claim is invalidated.
Please make a note of your receiver's default setting (are configured during the first installation) so that you can refer to it at any time!
Before you switch off your receiver with the mains switch, you must first switch it into stand-by mode by pressing the stand-by button on your remote control. This ensures that modified and new data are saved to the receiver. As soon as the receiver is in stand-by mode, it can be switched off completely using the on/off switch on the receiver front panel. Do not press the on/off button when the receiver is in operation! This can lead to loss of data or damage to software.
The receiver conforms to the latest European directive for energy using products (EUP) and has (by itself) a power consumption of only 5 W in operational mode (excluding Sat lead). The 15 W power consumption mentioned on the receiver rear panel is due to the necessity to power the satellite reception system's LNB and or multi-switch. This 15 W value is normally not reached, but may do so in the most disadvantageous case.
The term DiSEqC TM , which appears in this user manual, is a registered trademark of the European Telecommunication Satellite Organization (EUTELSAT).
INFORMATION ON AUDIO MPEG INC. AND S.I.SV.EL, S.P.A:
This unit makes use of legally protected technologies, which are protected by patents in the USA and also by other intellectual property rights in other countries. KATHREIN-Werke KG has obtained licences from Audio MPEG Inc. and Societa' Italiana per lo sviluppo dell'elettronica, S.I.SV.EL, S.P.A to use these technologies. These licences carry certain restrictions, which apply also to you as the customer. Accordingly this unit may be used by the end customer only for private non-commercial purposes and for the licensed content. It may not be used for commercial purposes. The use of products or processes that are sold or used with this unit is not included in this statement. The use of reverse engineering is not permitted in respect of the licensed technologies, nor is disassembly.


Manufactured under license from Dolby Laboratories. Dolby and the double-D symbol are trademarks of Dolby Laboratories.
HDMI, the HDMI logo and High-Definition Multimedia Interface are either trademarks or registered trademarks of HDMI Licensing LLC.
CONTENTS
PREFACE 2
IMPORTANT INFORMATION.... 3
CONTENTS.... 4
SAFETY INSTRUCTIONS - IMPORTANT NOTES 6
RECEIVER FEATURES / SCOPE OF SUPPLY 8
CONTROLS, DISPLAYS AND CONNECTIONS 9
CONNECTION AND SET-UP 10
REMOTE CONTROL.... 12
FIRST INSTALLATION: General 13
FIRST INSTALLATION: DiSEqC™1.0 16
FIRST INSTALLATION: Simple LNB 18
FIRST INSTALLATION: One Cable 19
FIRST INSTALLATION: single-cable system 21
FIRST INSTALLATION: Channel search 26
FIRST INSTALLATION: Channel Search/Date and time 27
OPERATING INSTRUCTIONS 28
MENU CONCEPT 28
MENU TREE 29
ALPHANUMERIC INPUTS 30
LANGUAGE SETTING - OSD.... 30
ON-SCREEN DISPLAYS (OSD) 31
CHANNEL MESSAGES 31
CHANNEL INFORMATION.... 31
CALLING UP THE OPTIONS CHANNEL 31
OPTION SELECTION.... 32
ERROR SIGNALLING 32
CHANNEL LIST – TV/RADIO 32
EPG - ELECTRONIC PROGRAMME GUIDE 34
CALLING UP THE EPG 34
"CURRENT" VIEW 35
"PREVIEW" VIEW (PROGRAMME LISTINGS) 36
ADDITIONAL INFORMATION (i BUTTON) 37
RECORDING (TIMER) 38
RECORD ONCE 39
RECORD DAILY 39
RECORD WEEKLY 40
PLAN RECORDING 41
VIDEOTEXT (TELETEXT)...... 42
CONTENTS
EDIT CHANNEL LIST.... 43
SELECTION OF THE LIST / CHANNELS TO BE EDITED 43
EDITING LISTS / CHANNELS 44
"LAST FUNCTION" MEMORY 45
MOVE CHANNELS 45
DELETE CHANNELS 45
SKIP CHANNELS 45
LOCK CHANNELS 46
COPY CHANNELS TO THE FAVOURITES LIST 46
START BLOCKSELECTION (HIGHLIGHTING SEVERAL CHANNELS) 46
EDIT FAVOURITES LISTS 47
REMOVE FROM THE FAVOURITES LIST 47
LOCK CHANNELS 48
RENAME FAVOURITES LIST 48
START BLOCKSELECTION (HIGHLIGHTING SEVERAL CHANNELS) 48
SEARCH CHANNELS (CHANNEL SEARCH).... 49
AUTOMATIC (CHANNEL) SEARCH 49
MANUAL (CHANNEL) SEARCH 51
CHANNEL SEARCH WITH SERVICE ID 53
PARENTAL CONTROL.... 55
LOCKING MAIN MENU 55
LOCK SET-TOP-BOX 55
DEFINE NEW PIN CODE 56
SETTINGS 57
TV SETTINGS (TV, PICTURE AND SOUND) 58
CUSTOMIZE SCREEN MENU 60
DATE AND TIME 61
SCART SOCKET ASSIGNMENT 70
VHS/S-VHS SWITCHING.... 70
CONNECTION EXAMPLE....71
SAT IF CONNECTIONS....72
SHORT TECHNICAL GUIDE 76
TROUBLESHOOTING.... 79
SAFETY INSTRUCTIONS - IMPORTANT NOTES
This page contains important information about the operation, installation location and connection of the unit. Read these instructions carefully before setting up the unit.

Danger!
Mains cable
Make sure that the mains cable (power supply cable) is not damaged. Units with a damaged mains cable must be disconnected from the mains (unplug it at the socket) and repaired by an electrical specialist before setup. Only use the power pack supplied (if available)!
Risk of fatal injury due to electric shock!
Cleaning
Disconnect the mains plug before cleaning the unit. Only use a dry cloth for cleaning and only clean the outer surface. Never open the casing of the unit.
Touching the parts inside the unit carries a risk of death due to electric shock!
Playing children
Make sure that children do not push any objects into the ventilation slots.
Risk of fatal injury due to electric shock!

Warning!
Earthing
The antenna system must be earthed as specified or equipotentially bonded. EN 60728/11 and any national regulations must be complied with.
Risk of voltage surges due to lightning strikes!
Power supply voltage
Only operate the unit at the specified mains voltage (indicated on the rear of the unit or on the external power pack). The unit may only be connected to the mains and turned on once it has been connected to the antenna and to the TV set or the cable network and PC.
If the mains voltage is too high, there is a risk of fi re!
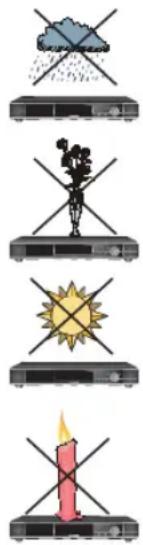
Moisture, direct sunlight, heat, naked flames
Protect the unit against moisture, dripping and splashed water (do not place any filled objects such as vases on top of the unit). Do not place the unit close to a heater or expose it to direct sunlight; and do not operate it in rooms where there is high humidity. Only use the unit in a moderate climate, not in tropical conditions! Place no naked flames such as candles on top of the unit!
There is a risk of fi re!

Batteries
If your unit was supplied with batteries (e.g. for the remote control), take care that the batteries are not exposed to excessively high temperatures, direct sunshine or fire. Exchange the batteries only with types that are identical or equivalent. Otherwise the batteries and also the remote control may be damaged. Comply also with the safety instructions stated on the batteries:

There is a risk of explosions!

Ventilation
The heat generated in this unit is adequately dissipated. However, the unit should never be installed in a cupboard or on shelves with inadequate ventilation. Never cover the cooling slots on the unit (e.g. with other equipment, magazines, tablecloths, clothing or curtains)!

Do not cover
SAFETY INSTRUCTIONS - IMPORTANT NOTES
Do not place any objects on top of the unit. Unless stated to the contrary in the “Connection and Set-Up” and “Installation” sections in the manual supplied, maintain a clearance of at least 10 cm above the unit, 2 cm to either side and 5 cm behind the unit, to allow unobstructed dissipation of the heat generated.
There is a risk of fi re!
Installation location
All electronic equipment generates heat. However, the heating of this unit lies within the permissible range. Sensitive furniture surfaces and veneers may become discoloured by the effects of constant heat over time. The feet of the unit can also cause colour changes to treated furniture surfaces. If necessary, place the unit on a suitable stable and fl at base!

Repairs
Ensure that any repairs to your unit are carried out by qualified personnel. Opening the unit and attempting to repair it yourself voids all warranty claims! Improper work on the unit may jeopardise the electrical safety of the unit.
The manufacturer accepts no liability for accidents caused by the user opening the casing of the unit!
Connections
Incorrect wiring of the connections can lead to malfunctions or defects on the unit!
Periods of extended absence, thunderstorms, mains socket accessibility
In order to disconnect the unit from the mains completely, the mains plug must be unplugged from the wall socket! Therefore install the unit close to a mains socket and make sure that socket is accessible at all times, so that you can disconnect the unit from the mains if necessary. If you are away for an extended period, and during thunderstorms, always switch the unit off at the mains and unplug it from the socket. This also applies to the other equipment connected to the unit. Isolation from the cable network is also recommended. Note any timer programs (receiver) and turn the unit on again promptly before the recording time.

Electronic equipment is not household waste - must be disposed of properly in accordance with directive 2002/96/EC OF THE EUROPEAN PARLIAMENT AND THE COUNCIL of 27th January 2003 on used electrical and electronic equipment.
At the end of its service life, take this unit for disposal to an appropriate official collection point.

Spent batteries are special waste!
Do not throw spent batteries into your domestic waste; take them to a collection point for spent batteries!
Automatic stand-by
The receiver includes the „Automatic stand-by“ function. When this function is activated, after three hours during which no buttons are pressed on the receiver remote control, the receiver switches automatically into stand-by mode. The setting is performed by selecting the menu items „Settings“, „TV, Video and Audio“.
RECEIVER FEATURES / SCOPE OF SUPPLY
The UFS 651 is suitable for reception of digital satellite TV and radio programmes.
The HDMI interface enables connection of a flat-screen TV for optimal viewing comfort. An integrated upscaler ensures optimal picture processing for flat-screen TVs.
Due to its energy-efficient concept, the receiver is environmentally friendly both in standard operation mode and in stand-by mode.
Features are for instance: Kathrein EPG, guided first installation with country setting, electric audio output for Dolby Digital (AC 3), a video cinch output and Teletext with an 800-page memory.
The receiver is available in silver and black.
PRODUCT PACKAGE
- UFS 651
- Remote control RC 671
- Scart cable
- 2 batteries AAA 1.5 V
- Operating manual
- Safety Notes
DISPLAY OF ANTENNA SIGNAL LEVEL AND EMISSION OF SEARCH TONE (SAT FINDER) ON THE TV SET
Initial installation must first be completed before you can use the search tone to align the antenna.
Press the MENU-Taste to access the main menu and
press the i-button for three seconds to activate the search tone. On the screen, you will then be able to see the menu "antenna configuration" where the bars signal strength and signal quality are displayed. At the same time, the receiver will display the current signal strength (available at the receiver input).
The higher the tone, the better the signal strength.

Press the BACK-Taste button to switch off the tone and exit the menu..
CONTROLS, DISPLAYS AND CONNECTIONS
This section provides a brief description of all the controls, displays and connections.
VIEW OF FRONT PANEL (FLAP REMOVED)

VIEW REAR PANEL

Front Panel Controls and Displays
- On/Off switch (with mains disconnect) 1)
- Channel select buttons - (▼▲)
- Display
1) The unit is not completely disconnected from the power supply (see chapter „Safety Instructions - Important notes“, “Periods of extended absence, thunderstoms, mains socket accessibility”)
Rear Panel Controls and Displays
- LNB input
- LNB loop-through input
- Scart socket for VCR/AUX connection
- Scart socket for TV connection
- Video output (composite colour)
- Electrical data stream output (SPDIF/Sony Philips Digital Interface Format) for Dolby Digital AC 3 audio
- Audio outputs (L/R) - cinch sockets
- HDMI output
- RJ 11 data interface / connection port for an external IR sensor
- Mains voltage lead
CONNECTION AND SET-UP
The following section is intended specifically for specialist dealers. You need not refer to this section unless you are carrying out the installation yourself.
The “Technical Appendix” section provides a “Connection Example” as a sample configuration.
Do not connect the receiver to the power supply until all installation work has been properly carried out. Refer to the information in the “Safety instructions” section.
CONNECTING THE UNIT (SAT-IF CONNECTIONS)

Connect the Sat IF input on the receiver to the satellite reception system. Use a coaxial cable with a standard F connector.
If the F standard connectors are not yet fitted on the cables, strip the insulation from the cables as shown in the following illustration and carefully screw the F standard connectors on to the ends of the cables until they are securely seated.


When fitting the connector, make sure that no wires from the braid are touching the inner conductor, so no short circuit can occur.
The quality of the reception signal depends on this connection.
RECEPTION REQUIREMENTS

Make sure that your own satellite antenna system is equipped at least with a universal LNB for digital reception in the high-band range.
RECEPTION SYSTEM PRESETS
The presets for the control signals have been made for standard reception systems, i.e. 14/18 V for polarity reversal and 22 kHz switching signal for low/high band changeover on multi-feed reception systems.
CONNECTION AND SET-UP
Connect the satellite receiver (TV Scart socket) and the TV set using a Scart cable (see "Connection Example"). If your TV has a stereo capability, you can receive the sound in stereo via the Scart connection. Use a further Scart cable to connect the satellite receiver (VCR/Scart socket) to the video recorder/DVR. For system reasons, the same video signals are to be found at the TV Scart socket as at the video cinch output.

If you are recording using an external video recorder, remember not to operate the receiver during recording, otherwise all the on-screen displays will appear on your recording.
AUDIO CONNECTION
If you want to play the sound on your hi-fi system, connect the audio cinch sockets to the input sockets on the hi-fi system, using an appropriate cable (see "Connection Example").
ELECTRICAL DIGITAL OUTPUT
The electric digital output is intended for the connection of a Dolby Digital system (see “Connection Example”).
INSERTING BATTERIES INTO THE REMOTE CONTROL
Remove the cover on the rear of the remote control.
Insert the two batteries supplied into the remote control. Ensure correct polarity of the batteries; the + and - markings as indicated inside the battery compartment.
Slide the cover back into the housing until it locks in place.
REMOTE CONTROL


The button symbols shown here can also be found in the description of the operating steps.
FIRST INSTALLATION: General

Before using your receiver for the first time, read the "Safety Instructions" and "Connection and Setup" sections.
The “Technical Appendix” section provides a “Connection Example” as a sample configuration.
Do not connect the receiver to the power supply until all installation work has been properly carried out.
The guidance given in the “First Installation” section assumes that the receiver has been properly connected as per the “Safety Instructions” and Connection and Set-Up” sections.
First switch your TV set on and select the AV channel slot. Switch on your receiver at the power switch at the front of the unit. The following display appears:

Also pay attention to the bars at the bottom of the on-screen display! These provide information on what to do next.
Select the menu language you want using the ▲▼ buttons. Available options: German, English, French, Italian, Spanish, Czech, Dutch and Turkish.
Press the 📄 (green) button to move to the next menu.
Note: If you are unsure whether you chose the right option from a previous menu, you can go back a step at any time during the first installation process by pressing the (red) button.
FIRST INSTALLATION: General
The following display appears:

Use the ▶▶ buttons here to select whether you wish to use the pre-programmed channel list (select "no") or generate a new channel list by searching (select "yes" - you will be asked later in the first installation to compile this list). Press the ▶▼ buttons to access the next line.
Use the ▶▶ buttons to select the country for which you wish to load the pre-programmed channel list (this is relevant only if you did not reject the pre-programmed channel list). Press the □ (green) button to move to the next menu.
The following display appears:

Use the 📁 buttons here to select the settings for your TV set.
When doing this, refer to the operating instructions for your TV set!
TV format
Select the TV's picture format. Either
4:3 or
16:9
FIRST INSTALLATION: General
Picture format
Here you select the type of screen display, depending on the setting of your TV format:
- TV format "4:3": Pan & Scan or Letterbox
- TV format "16:9": "Automatic" or "Always 16:9"
TV-Scart-Output
Select the type of video signal at the TV Scart socket here. Select the signal that your TV set can process.
- FBAS - composite colour signal or
- RGB - Red/Green/Blue signal
HDMI format
Here please select the format (resolution) that will be output at the HDMI socket. Select the resolution appropriate to your TV set.
Available options: Auto (automatic format choice), 576p, 720p or 1080i
Press the ☐ (green) button to move to the next menu. The following display appears:

Use the ▶▶ buttons here to select the setting to match your reception system. You have the following options:
- DiSEqC™1.0
- Simple LNB or
- Single-cable system
Now continue with the first installation chapter that applies to your reception system.

When selecting the LNB type in the setting that applies to you, note that "Wideband" is available only for the "single-cable system" setting!
FIRST INSTALLATION: DiSEqC™1.0

When selecting the satellite(s), make sure that your reception position is aligned to the desired satellite(s)!

Use the ▲▼ buttons here to switch to the "Number of Satellites" selection
Number of Satellites
Press the ▶ button to select the number of satellites to be received. You can select a number from one to four satellites to be received.
The following display appears (example):

Use the ▲▼ buttons to select the first satellite slot. Press the OK button to open the menu for the satellite settings.
FIRST INSTALLATION: DiSEqC™1.0
The following display appears (example):
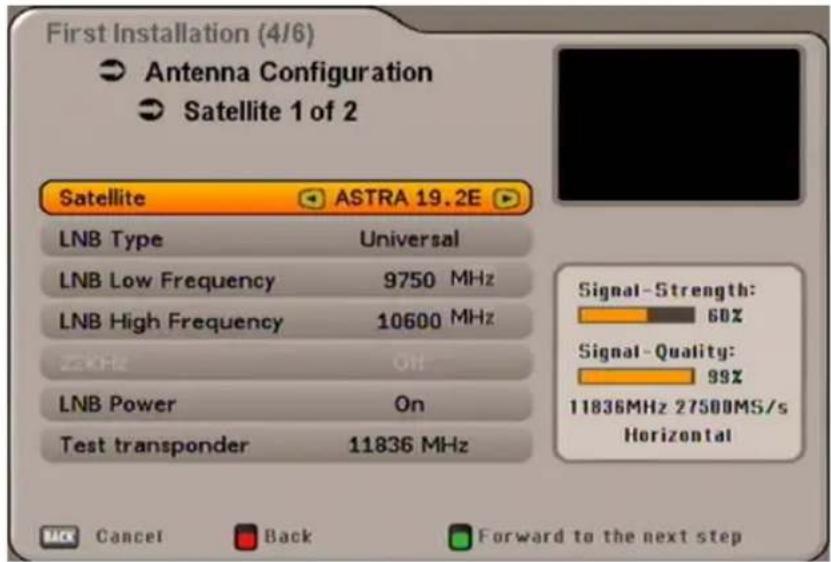
Satellite and Position
Use the ▶▶ buttons to set the desired satellite (selection from 17 pre-programmed options).
LNB settings
Use the ▶▶ buttons here to select the LNB type used in your system. The choice is between "Universal" and "user-defined".
Universal:
No further input is required, since all necessary frequency ranges are covered by a universal LNB.
User-defined:
If you choose not to use a universal LNB, you must here set the frequency ranges for which your LNB was configured.
Use the ▶▶ buttons to select the frequency range to be changed (low / high frequency).
Use the □▶ buttons or the keypad to set the exact frequency for which your LNB was configured.
Test transponder
To check whether the settings that you have made are correct, use the ▲▼ buttons to move to the "Test transponder" fi eld. Use the ◀▶ buttons to select the required transponder from the various ones listed. If your settings are correct, you will see at the top right of the screen the live signal of a channel for the currently selected transponder.
If you do not receive a signal, check your settings again and if necessary call for expert help.
You have now completed all settings for the first satellite. Press the BACK button to return to the "Satellite Selection Menu" and perform the settings in the same way for the remaining satellites. When you have finished configuring the satellite press PIP (green). The receiver then automatically calls up the selection menu for the channel search. Continue by selecting the item ("Perform channel search").
FIRST INSTALLATION: Simple LNB
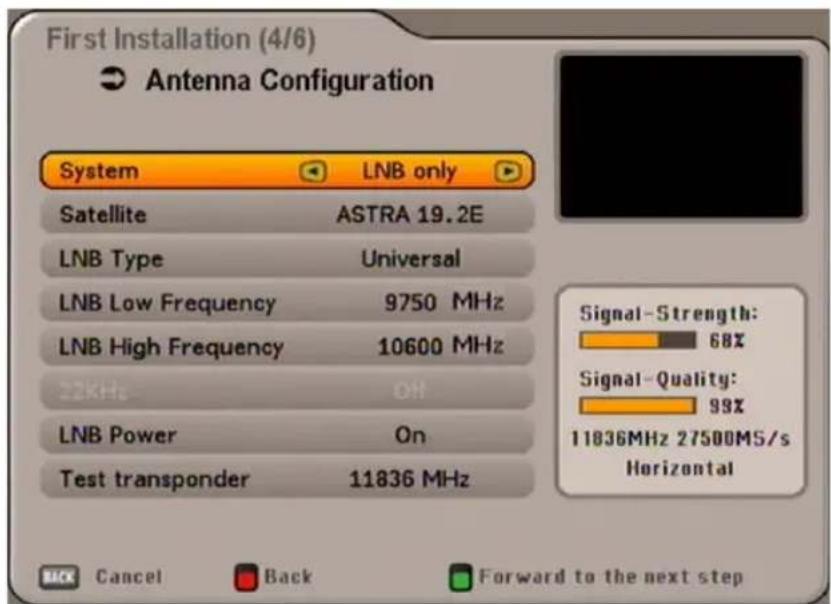
Satellite and position
Use the ▶▶ buttons to select the desired satellite whose signal is to be received by the tuner.
When you ▲▼ have selected your
desired satellite, use the ▲▼ buttons to switch to the selection of the "LNB Type".
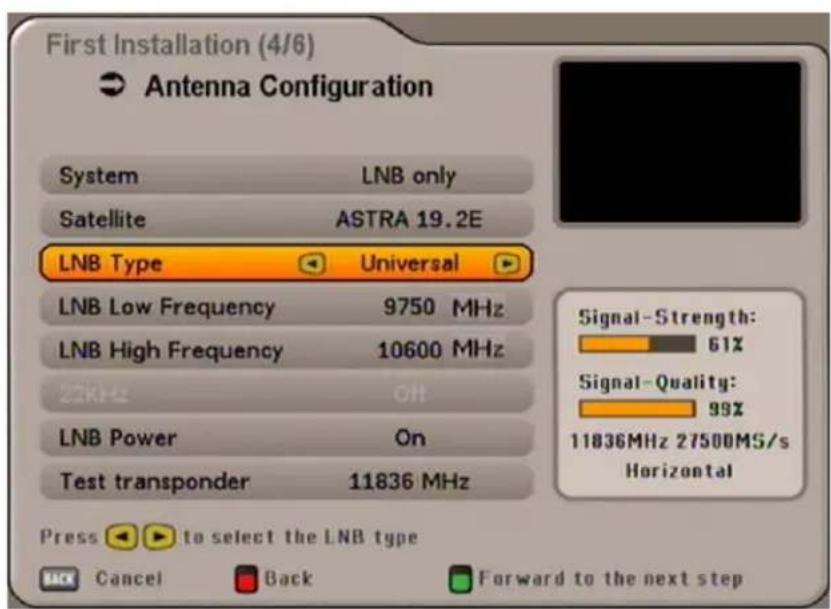
LNB settings
Use the ▶▶ buttons here to select the LNB type used in your system. The choice is between "Universal" and "user-defined".
Universal:
No further input is required, since all necessary frequency ranges are covered by a universal LNB.
User-defined:
If you choose not to use a universal LNB, you must here set the frequency ranges for which your LNB was configured.
Use the ▲▼ buttons to select the frequency range to be changed (low / high frequency).
Use the ▶ buttons or the keypad to set the exact frequency for which your LNB was configured.
LNB voltage
Use the ▲▼ buttons to select whether your LNB is supplied with power from the receiver ("On") or whether it has its own power supply ("Off").
Test transponder
To check whether the settings that you have made are correct, use the ▲▼ buttons to move to the "Test transponder" fi eld. Use the ◀▶ buttons to select the required transponder from the various ones listed. If your settings are correct, you will see at the top right of the screen the live signal of a channel from the currently selected transponder.
If you are not receiving a signal, check your settings again and if necessary call for expert help.
FIRST INSTALLATION: One Cable
Use the ▶▶ buttons here to select "One cable" as the "System". Press the ▼ button to move to the next menu item. The following display appears:

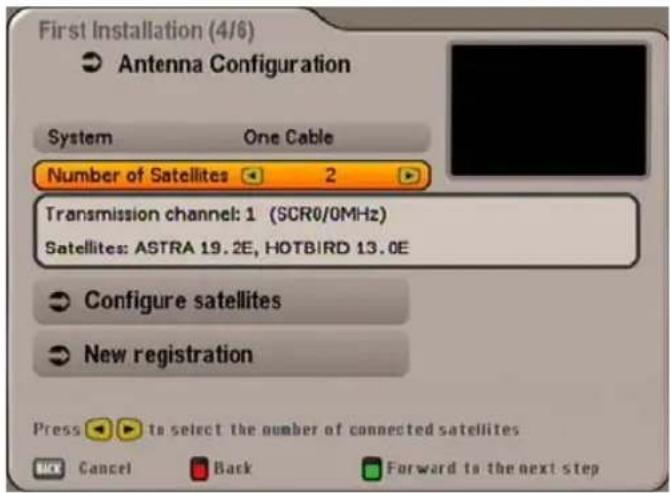
Number of satellites
Use the ▶▶ buttons to select how many satellites (max. 2) you are able to receive with your reception system. Press the ▼ button to move to the next menu item.
Configure satellites
Press the OK button to open the menu. The following display appears:

Satellite and Position
Use the ▶▶ buttons to select the first satellite (satellite 1 of 2, depending on the setting), as shown on the screen.
LNB settings
Use the ▶▶ buttons here to select the LNB type used in your system. The choice is between "Universal", "Wideband" and "Single".
If in your reception system you use a single-cable LNB (e.g. UAS 481 from Kathrein), please select here the setting "Wideband". If you use a single-cable matrix (EXU 908) or a single-cable changeover matrix (EXR 2581 or EXR 2542) from Kathrein, the LNB you use must be a "Universal LNB"!
FIRST INSTALLATION: One Cable
Universal:
No further input is required, since all necessary frequency ranges are covered by a universal LNB.
Wideband:
No further input is necessary, since all frequency ranges are set by the Wideband LNB.
Single:
If you are not using a Universal or a Wideband system, you must set the frequencies here. You can find the necessary information in the documentation supplied with your system.
Use the ▲▼ buttons to select the line "LNB Low Frequency"). Use the ◀▶ buttons or the keypad to set the exact frequency for which your LNB was configured.
When you have completed all setting for the currently selected satellite, press the OK button. If you have selected more than one satellite, repeat the previous "Satellite and Position" and "LNB Type" processes for the number of satellites you selected.
When you have completed the settings for all the satellites, the following display appears:
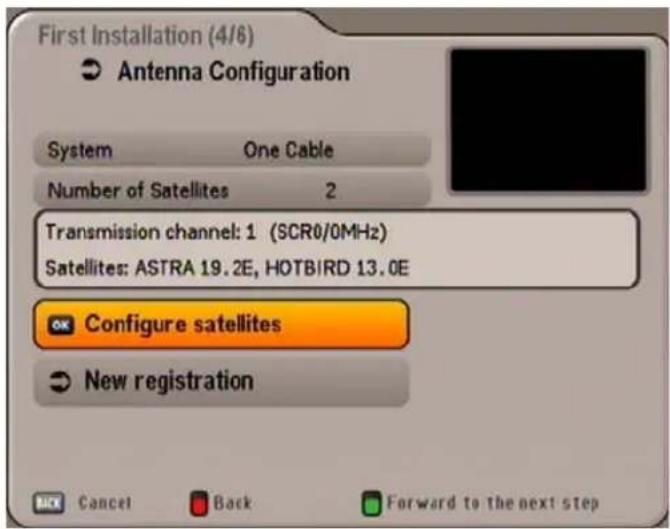
Use the ▼ button to select the next menu item "New registration", then press the OK button. The following display appears:
FIRST INSTALLATION: single-cable system

If one or more receivers are already present on the system and an additional receiver is to be connected, you must assign the new receiver a transmission frequency that is not already in use (otherwise the receivers will interfere with each other).
Depending on the system to which they are connected, a maximum of four or eight receivers may be connected to a single-cable system (a twin receiver counts as two receivers)
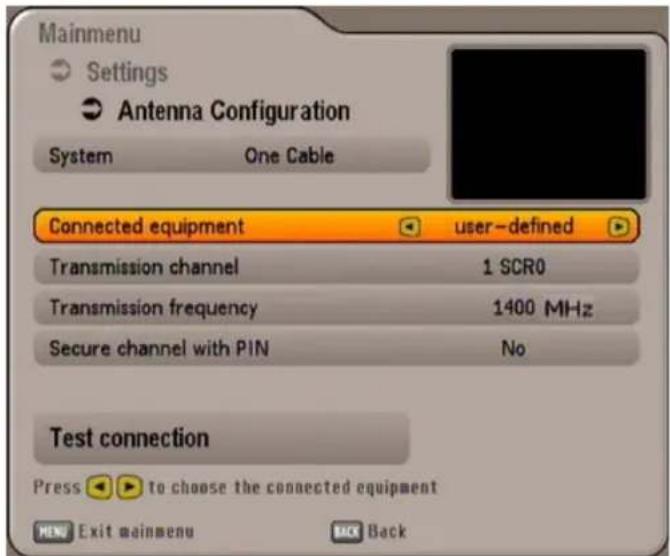
Connected equipment
Use the ▶▶ buttons to select the type of system to which they are connected or the single-cable system components fitted (refer to the manuals, instructions and notes for the system and the system components). Available options:
- user-defined
- KATHREIN UAS 481 (single-cable feed system, max. four receivers)
- KATHREIN EXR 551 (single-cable switching matrix, max. four receivers)
- KATHREIN EXR 552 (single-cable switching matrix, max. four receivers)
- KATHREIN EXU 908 (single-cable matrix, max. eight receivers)
- EXR 4 subscriber (for future Kathrein single-cable (switching) matrices, max. four receivers)
- EXR 8 subscriber (for future Kathrein single-cable (switching) matrices, max. eight receivers)
Selection "user-defi ned"
Transmission channel
Use the ▶▶ buttons to select a free available transmission channel.
Transmission frequency
Use the number buttons to input the four-digit transmission frequency.

No frequency can be used by more than one receiver.
The receivers would interfere with each other.
You can find the necessary information (transmission frequencies) in the documentation supplied with your system.
Secure channel with PIN
If your single-cable system allows the transmission frequency to be protected by inputting a PIN, this is the menu where that can be done. No other receiver can then use that transmission frequency unless the PIN is input.
Use the ▶▶ buttons to select the setting "Yes". A line with the text "Password PIN" is then displayed.
Press the ▲▼ buttons to select this line. You can now use the number buttons to enter a PIN (0-255).
FIRST INSTALLATION: single-cable system
Test connection
When you have completed all the settings, press the ▲▼ buttons to switch to the "Test connection" selection fi eld and press the OK button. The receiver now tests whether a connection to the single-cable system can be established or not. As soon as the receiver has established a connection to the single-cable system, you will see the following display:
Confi rm this display with the OK button. Then press the BACK button. You will be asked whether you wish to save the changes. Use the ▲▼ buttons to select "Yes, save changes" and confi rm by pressing the OK button. Now press the PIP (green) button.

The receiver will automatically display the menu for the channel search. Continue by selecting the item ("Perform channel search").
If no connection to the single-cable system could be established, the following display appears:
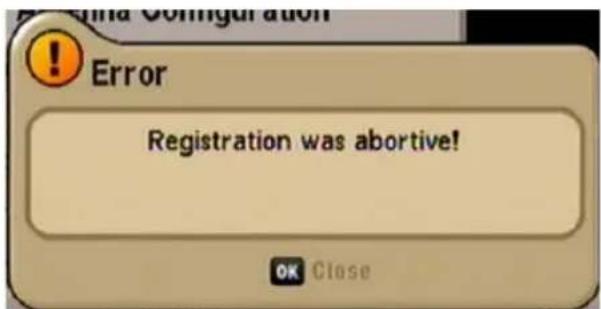
Check your settings (frequency and transmission channel) and if necessary call for expert help.
FIRST INSTALLATION: single-cable system
Selection "UAS 481" or "EXR 551"


Transmission channel
Use the ▶▶ buttons to select a free available transmission channel. A maximum of four transmission channels are available (1400, 1516, 1632 and 1748 MHz).
Test connection
When you have set a free transmission channel, press the ▲▼ buttons to switch to the "Test connection" selection fi eld, then press the OK button. The receiver now tests whether a connection to the single-cable system can be established or not. As soon as the receiver has established a connection to the single-cable system, you will see the following display:
Confi rm this display with the OK button. Then press the BACK button. You will be asked whether you wish to save the changes. Use the ▲▼ buttons to select "Yes, save changes" and confi rm by pressing the OK button. Now press the PIP (green) button.

The receiver will automatically display the menu for the channel search. Continue by selecting the item ("Perform channel search").
If no connection to the single-cable system could be established, the following display appears:
Check your settings and if necessary call for expert help.

FIRST INSTALLATION: single-cable system
Selection "EXR 552"

When the "EXR 552" single-cable switching matrix is being used, it is essential that the LNB is set to "Universal"!

Transmission channel
Use the ▶▶ buttons to select a free available transmission channel. A maximum of two transmission channels are available (1400 and 1516 MHz).
Test connection
When you have set a free transmission channel, press the ▲▼ buttons to switch to the "Test connection" selection fi eld, then press the OK button. The receiver now tests whether a connection to the single-cable system can be established or not. As soon as the receiver has established a connection to the single-cable system, you will see the following display:
Confi rm this display with the OK button. Then press the BACK button. You will be asked whether you wish to save the changes. Use the ▲▼ buttons to select "Yes, save changes" and confi rm by pressing the OK button. Now press the PIP (green) button.

The receiver will automatically display the menu for the channel search. Continue with the section "Execute channel search".
If no connection to the single-cable system could be established, the following display appears:
Check your settings and if necessary call for expert help.

FIRST INSTALLATION: single-cable system
Selection "EXU 908"

When the "EXU 908" single-cable matrix is being used, it is essential that the LNB is set to "Universal"!

Transmission channel
Use the ▶▶ buttons to select a free available transmission channel. A maximum of eight transmission channels are available (1284, 1400, 1516, 1632, 1748, 1864, 1980 and 2096 MHz).
Secure channel with PIN
The EXU 908 single-cable matrix allows the transmission frequency to be protected by inputting a PIN. No other receiver can then use that transmission frequency unless the PIN is input.
Use the ▶▶ buttons to select the setting "Yes". A line with the text "Password PIN" is then displayed. Press the ▶▼ buttons to select this line. You can now use the numeric keys to enter the assigned PIN for the chosen transmission channel (see EXU 908 instructions for use).
Test connection
When you have set a free transmission channel, press the ▲▼ buttons to switch to the "Test connection" selection fi eld, then press the OK button. The receiver now tests whether a connection to the single-cable system can be established or not. As soon as the receiver has established a connection to the single-cable system, you will see the following display:
Confi rm this display with the OK button. Then press the BACK button. You will be asked whether you wish to save the changes. Use the ▲▼ buttons to select "Yes, save changes" and confi rm by pressing the OK button. Now press the PIP (green) button.

The receiver will automatically display the menu for the channel search. Continue with the section "Execute channel search".
If no connection to the single-cable system could be established, you will receive the message "Registration was abortive!".
Check your settings and if necessary call for expert help.
FIRST INSTALLATION: Channel search

Perform a Channel search
Use the ▶▶ buttons to select (yes or no) whether you wish to start a channel search. It is not essential to start a channel search; instead you can use the factory pre-programmed channels. However the channels do change from time to time (e.g. their frequencies change), which the receiver does not automatically detect, and can then be found only by performing a channel search.
If you selected "No", you can press the ☐ (green) button to skip directly to the next item of the first installation.
If you selected "Yes", you can press the ▼ button to progress to the next selection item.
Channel Search Mode
Use the ▶▶ buttons to select whether you wish to search "free & encrypted", "only free" or "encrypted only" channels.
The UFS 651 does not allow encrypted channels to be viewed, because no Common Interface is fitted for insertion of the necessary CA modules and smart cards.
Press the ▼ button to move to the next selection item.
Network Search
If you set the network search to "Off", only the factory stored transponders of the satellites you previously selected will be scanned for new and as yet unlisted channels.
If you set the network scan to "On", the transponder network enables additional transponders that have not yet been stored to be located. They are then stored and searched for new channels in the same way as the existing transponders.
Press the ☐ (green) button to start the channel search, or if you set channel search to "Off" you are guided straight to the next item in the first installation process.
When the search has been completed, you will see the following message (example):
FIRST INSTALLATION: Channel Search/Date and time

Use the OK button to move to the next step of the first installation. The following display appears:

Local time offset
Use the ▶▶ buttons to set the time zone variation from UTC (formerly GMT) (e.g. for Germany +1 hour).
Use the ▲▼ buttons to switch to the “Automatic clock change” field. Use the ▶▶ buttons to select whether the receiver should automatically change over to and from summer and winter time. If “On” is selected, the receiver automatically sets itself to the right time. If “Off” is selected, the field for manual selection of summer and winter time is displayed below.
Press the □▶ buttons to perform the setting.
Press the ☐ (green) button to close First Installation and return to the TV picture.
OPERATING INSTRUCTIONS
MENU CONCEPT
The structure of the menu concept is based on logical operating sequences. The programme showing on the current selected channel always appears in the top right-hand corner of the screen.
You will find detailed descriptions of the selected menu items in the relevant sections of the operating manual.
Note: The selected menus, sub-menus and positions, as well as the parameters to be set, are each highlighted in colour. The menus are self-explanatory.
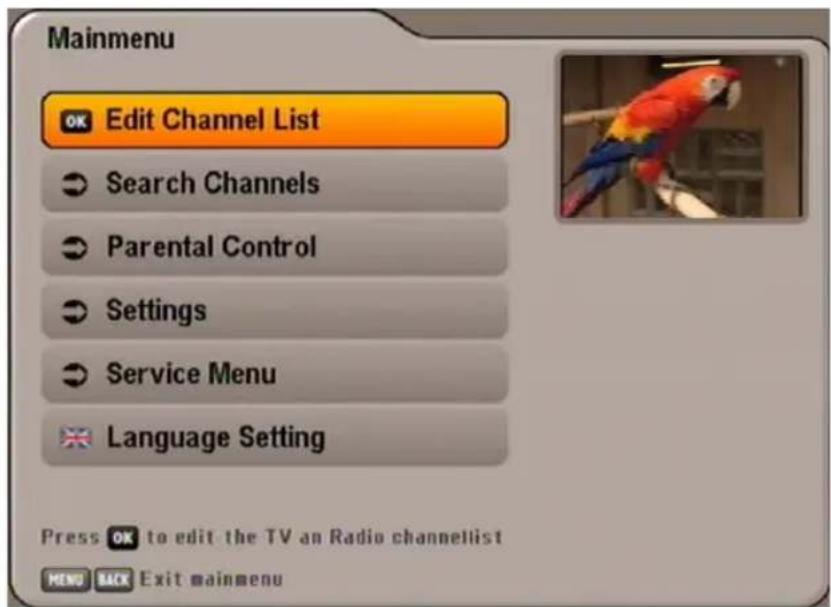
Pay attention to the bar at the bottom of the on-screen display. These provide information on what to do next.
Press the MENU button to open the main menu, and use the ▲▼ buttons to select the sub-menus.
Press the OK button to access the sub-menus. Use the ▲▼ buttons to select the sub-menu options.
The settings under the various options are made either by pressing the ▶ buttons or using the numeric pad. You can exit the main menu and sub-menus, and the various options, step-by-step by pressing the BACK button (the settings/changes you made are saved). Press MENU to return directly from one of the menus to the TV picture (the settings/changes you made are saved).
OPERATING INSTRUCTIONS
MENU TREE
Main Menu
Open the menu by pressing the MENU button
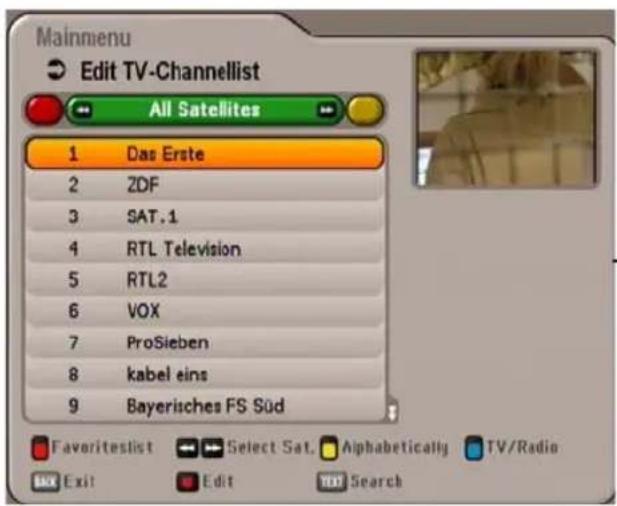
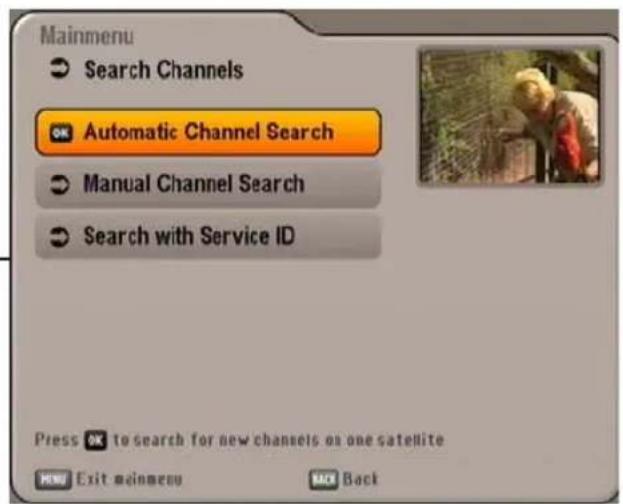


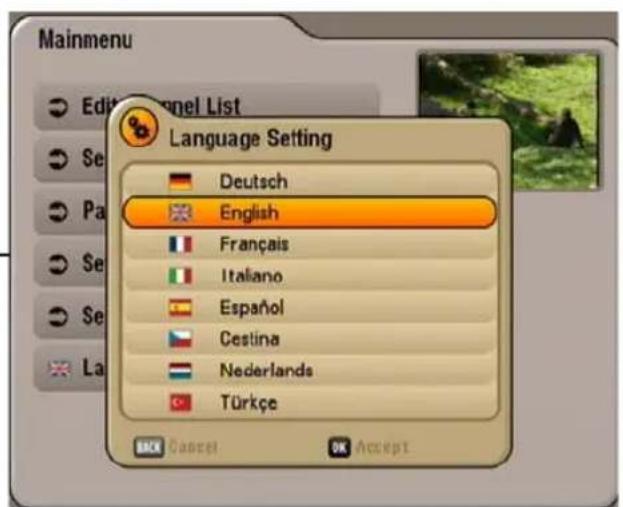
OPERATING INSTRUCTIONS
ALPHANUMERIC INPUTS
Use the displayed keypad (see fi gure to the right) for entry of favourites names or search expressions by selecting numerals for the desired letters / digits. You can write
with upper or lower case letters (MENU button). Use the numeric pad to select the desired character. About two seconds after selection of the character, the cursor moves automatically to
the next position. The ▼ button allows you to delete your entry character by character.

When you have selected all the characters, press the OK button to save your entry and start a scan to find the desired expression.
LANGUAGE SETTING - OSD
The language for the on-screen display is set as follows:
MENU → ▲ ▼ → Language setting → OK → ▲ ▼ → English → OK
Available options: German, English, Italian, French, Dutch, Spanish, Czech and Turkish.
After you have performed the settings, press the MENU or BACK button to exit the main menu. You will then return to the TV picture.
ON-SCREEN DISPLAYS (OSD)
CHANNEL MESSAGES
TV CHANNEL MESSAGES
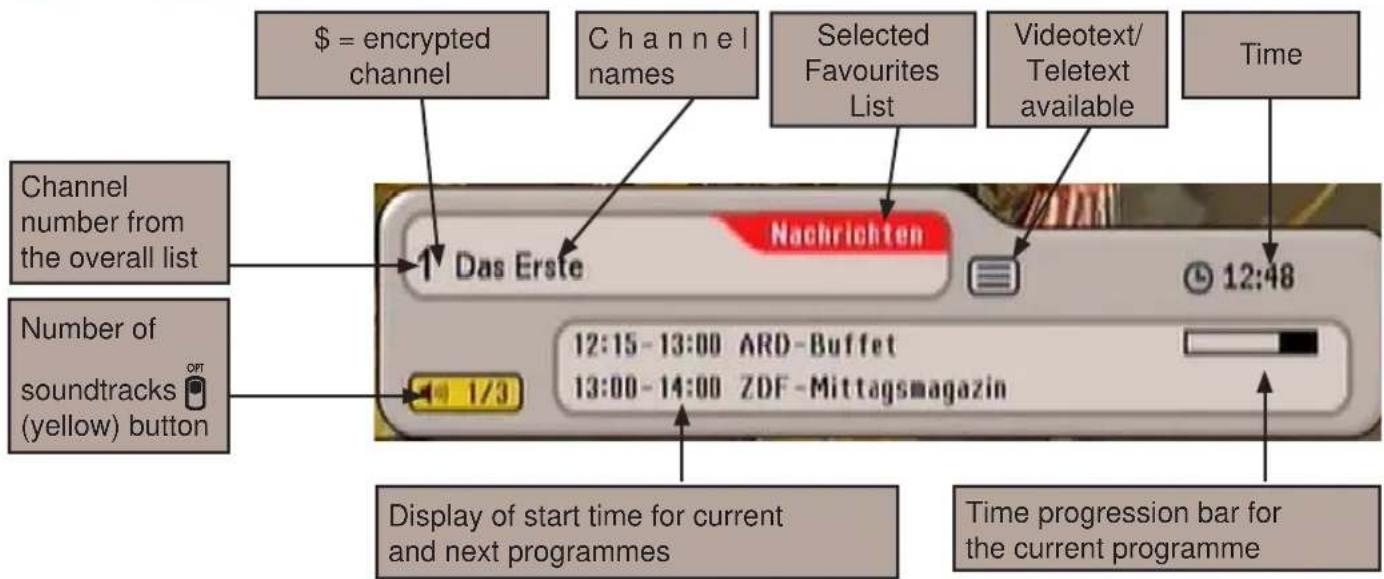
Channel information is shown for a few seconds each time the channel is changed (this can be changed under "Settings", "Customize screen menu") or displayed continuously by pressing the ⓘ button.
RADIO CHANNEL MESSAGES
The information for the current radio channel has the same layout.
CHANNEL INFORMATION
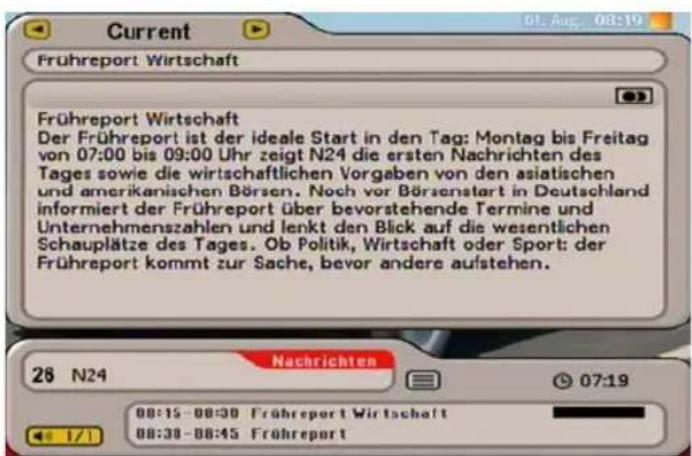
Press i twice to view information on the current channel, if transmitted by the channel provider.
Use the ▲▼ buttons to scroll through the
pages. By pressing the ▶▶ buttons you can obtain information on the programmes to come on
the current channel. Press the i or BACK button to exit the display.
CALLING UP THE OPTIONS CHANNEL
If the channel OSD contains the following icon ,this /is a portal channel. Press the button to display the channels available on this portal (such as matches on a specific day of play). In this example three “sub-channels” are available for selection within this portal channel.
ON-SCREEN DISPLAYS (OSD)
Select the channel using the ▲▼ buttons OK. You can also however select the sub-channels of a portal channel directly using the ▲▼ buttons, without having previously pressed the OPT (yellow) button.
OPTION SELECTION
Press the ☐ (yellow) button once (twice for portal channels) to view further audio selection options, if these are transmitted by the channel provider. Use the ▲ buttons to scroll through the available selection options. Press the ☐ (yellow) button again, or press the BACK button to exit this display again.

ERROR SIGNALLING
"Weak or no signal" indicates that an error has occurred in the reception system or in the receiver settings, or that the transponder is not transmitting.
Check the Sat IF connection and the LNB configuration. If you have changed settings, compare them against the basic settings (provided you had made a note of them as suggested).
CHANNEL LIST - TV/RADIO
Also pay attention to the bars at the bottom of the on-screen display! These provide information on what to do next.
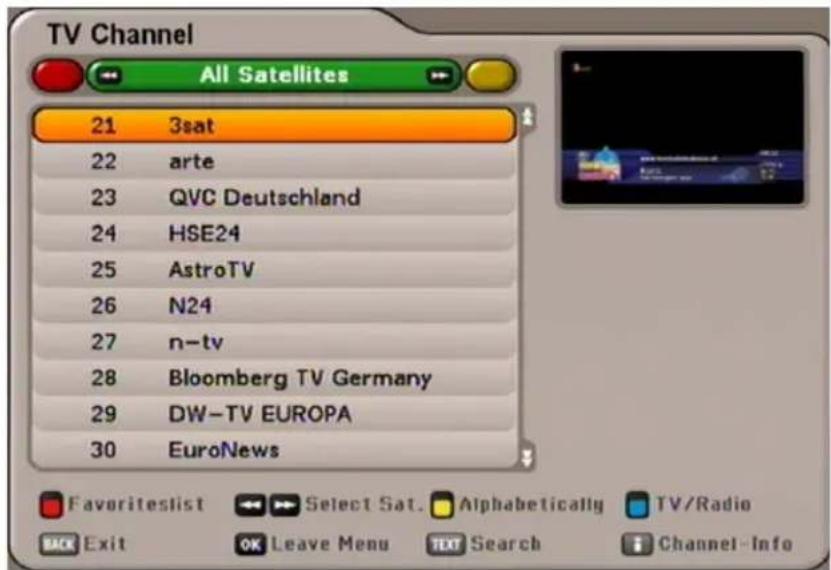
Press the OK button to access the channel list.
When you open this list the channel list selection / sort order is displayed from where you selected the last channel.
At the top left you will see the selected channel list (TV Channel or Radio Channel) displayed.
Press the TV (blue) button to switch between the TV and radio channel lists.
ON-SCREEN DISPLAYS (OSD)
Underneath you can see the channel list with the sort order you selected.
The channel list can display channels sorted by various selection and sorting criteria.
Selection and sorting options:
- Press the (red) button to open the favourites list selection. The <◀▶> buttons allow you to scroll through the existing favourites lists
- Press t→(green) button to return to the overall list (all satellites). Use the ▶▶ buttons to choose between the received satellites (display all channels from a satellite) and the list of "New channels" (provided by channel search).
- Press the (yellow) button to see an alphabetic listing. This list displays all the channels sorted alphabetically, or the ones beginning with the selected initial letter. Use the ←→ buttons to make the selection.
Search function:
- Press the Text button to start the search. The numeric pad buttons allow you to input the desired search expression for the channel that is sought (see also "Operating instructions", "Alphanumeric input"). Press the OK button to start the search (see screenshot below for an example of a search result)
Press i to view the following items of information on a channel (see screenshot on the right as an example):
- Signal strength
- Signal quality
- Transmitting satellite
- Frequency (MHz)
- Polarisation
- Symbol Rate

The cursor buttons ( ) are used to navigate within the respective channel
list view to select the desired channel. The selection of the desired channel is confirmed by pressing the OK button. You will now hear and see the currently selected channel in the small window at the top right. To exit the channel list and return to the TV picture, press the OK button again, or press the BACK button.
EPG - ELECTRONIC PROGRAMME GUIDE
CALLING UP THE EPG
The EPG is opened by pressing the EPG button. Each time the EPG is opened, you will automatically be shown the "Current" view, irrespective of which view you were shown the last time you left the EPG. The following display appears (example):
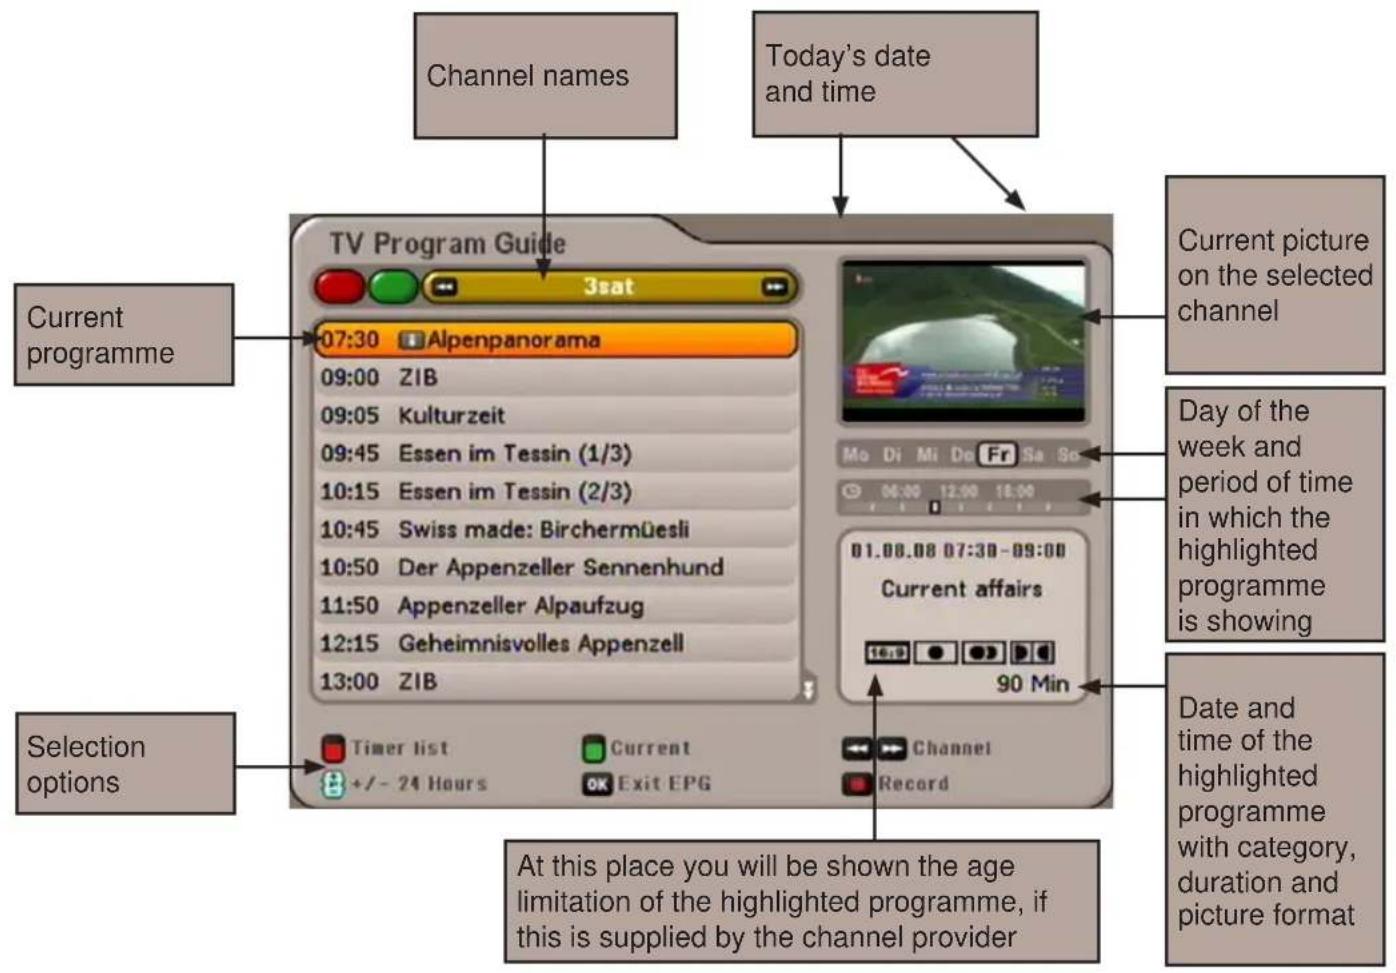
Note: If you selected a favourites list before opening the EPG, you will see in the EPG only the data for the channels that are included in this favourites list. Press the EPG button again to display the EPG for all channels.
EPG - ELECTRONIC PROGRAMME GUIDE
Selection options:
- FAV (red) button Open the timer list (display of all pre-programmed recordings)
- (yellow) button Open the "EPG" view
- (green) button Open the "Current" View
- button Changing the channel in the "EPG" view
- button Next programme in the "Current" view
- + button (P+) jump forwards 24 hours in the EPG, (P-) jump backwards 24 hours
- OK button Select the currently highlighted channel in all views. Pressing the OK or the BACK button again closes the EPG and the selected channel is shown again on the TV screen
- (red dot) button Add a programme to the recording settings
- i button Show, if present, further information on the selected programme.
Navigation within each view is always performed using the cursor buttons ( ). The ▲▼ buttons allow you to select individual channels/programs, and the ◀▶ buttons allow you to scroll from page to page of the currently selected list.
Pressing the EPG or the BACK button exits the EPG again and returns to the TV picture.

You see information on the current or next following programmes in the EPG only if it is supplied by the channel provider.
"CURRENT" VIEW
The “Current” view can be called up at any time in EPG by pressing the ☐ (green) button.
In the “Current” view you see all channels displayed in the order of the overall channel list. Provided that EPG data has been supplied by the channel provider, the receiver shows for each channel the current programme being shown, with start time, finish time, and progression bar.
You can use the cursor buttons (A) to select the desired programme and if available you can use the button to call up further information on the desired programme.
EPG - ELECTRONIC PROGRAMME GUIDE
Pressing the ➤ button displays the next programme ("Next" view); pressing the ➤ button returns you to the "Current" view.
If you wish to view the programme currently being shown on a channel, you need not exit the EPG, just select the desired channel. At the top right of the screen you will see the current TV picture for the selected channel.
"PREVIEW" VIEW (PROGRAMME LISTINGS)
The "Coming up" view (programme listings) can be called up at any time in EPG by pressing the ☐ (yellow) button.

Also pay attention to the bars at the bottom of the on-screen display! These provide information on what to do next.
In the “Coming up” view you will see all the programmes that will be shown in the previous “Current” list of selected channels. Provided that EPG data has been supplied by the channel provider, the receiver displays the programmes that will be shown on the selected channel for several days in advance.
You can use the cursor buttons (☐) to select the desired programme and, if available, you can use the button to open further information on the desired programme.
Using the ←→ buttons you can scroll through the channels in their sequence in the overall channel list. You remain however within the "EPG" view at all times.
The button allows you to scroll backwards and forwards a day at a time.
Using the ☐ (red dot) button you can load the selected programme into the recording settings (see "Recording" section).
EPG - ELECTRONIC PROGRAMME GUIDE
ADDITIONAL INFORMATION (i BUTTON)
The additional information can always be called up by pressing
the i button whenever the "i symbol" appears in front of the programme name (see screenshot on the right). First however the channel must be selected. The following display appears (example):

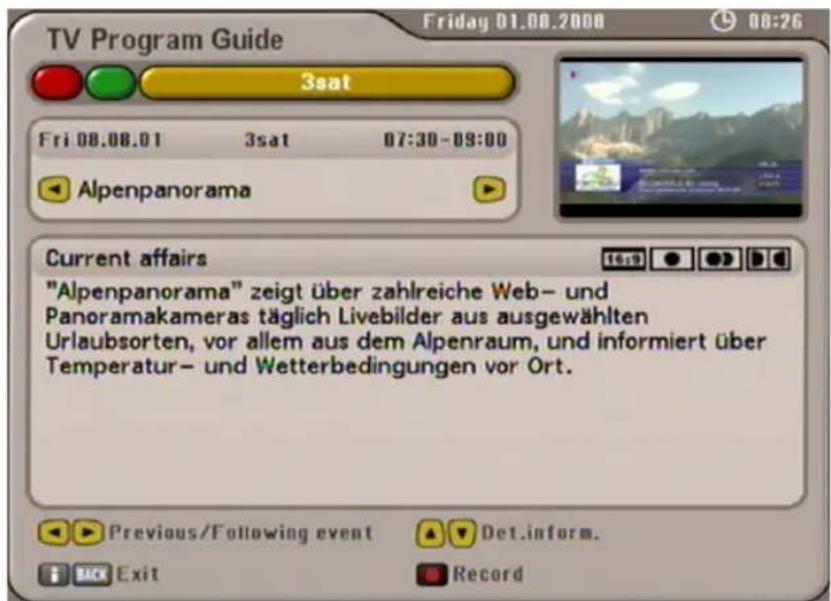
The additional information available for a programme is displayed in its own window. By pressing the button, if available, you can open further additional information on the selected programme.
The ▶▶ buttons enable you to display the additional information for the preceding or following programmes in the order of the previously selected list (see header). This feature always assumes that the data has been supplied by the channel provider.
Using the ☐ (red dot) button you can load the selected programme into the recording settings (see "Recording" section).
Press the i or BACK button to drop the additional information.
EPG - ELECTRONIC PROGRAMME GUIDE
RECORDING (TIMER)
The (red dot) button allows you to set up a programme at any time for recording on an external recorder.
The programme to be recorded can be selected in any of the EPG views, provided the ☐ (red dot) button appears at the bottom of the screen display.
If the programme is present in the EPG:
Select the desired programme and press the ☐ (red dot) button. The following display appears (see example picture below):
Programme not present in the EPG:
Select any programme on the channel on which the desired programme is to be transmitted at a later time
and press the ☐ (red dot) button (starting and finishing times together with the recording date must be input manually). The following display appears (example):

Remember to programme your external recorder in accordance with the timer list programmed in the receiver.

Use the ▶▶ buttons to select the desired recording mode. The following recording mode options are available:
- once: The recording will be performed once
- daily: The recording will be performed daily at a time specified by you
- weekly: The recording will be performed once a week on the same day and at the same time
Use the cursor buttons ( A ) to select the further items and use the keypad to complete the settings. When all settings have been made, press the OK button to save the recording settings. You can view the scheduled recordings in the timer list view of the EPG (see section "Timer list").
EPG - ELECTRONIC PROGRAMME GUIDE
RECORD ONCE
Use the ▶▶ buttons to select the recording mode “once” (see screenshot “Recording (timer)” section).
Use the ▲▼ buttons to switch to the selection fi eld "Date" and use the◀▶ buttons to select the desired recording day.
Use the ▲▼ buttons to switch to the selection fi eld "Start" and use the ◀▶ buttons or the number pad buttons to select the desired recording start time.
Use the ▲▼ buttons to switch to the selection field "Duration" and use the ◀▶ buttons or the numeric pad buttons to select the desired recording length.
When all settings have been made, press the OK button to save the recording settings. You can view the scheduled recording in the timer list view of the EPG (see section "Timer list").
RECORD DAILY
Use the ▶▶ buttons to select the recording mode "daily" (see screenshot below).
Use the ▲▼ buttons to switch to the selection fi eld "Start" and use the
buttons or the number pad buttons to select the desired recording start time.
Use the ▲▼ buttons to switch to the selection fi eld "Duration" and use
the ▶▶ buttons or the numeric pad buttons to select the desired recording length.

When all settings have been made, press the OK button to save the recording settings. You can view the scheduled recording in the timer list view of the EPG (see section "Timer list").
EPG - ELECTRONIC PROGRAMME GUIDE
RECORD WEEKLY

Remember that the day of the week for the desired programme is loaded in the recording list and you can make no further manual corrections to it! Therefore before pressing
the (red dot) button, select the programme on the day of the week that in future you will wish to make the weekly recording.
Use the □▶ buttons to select the recording mode "weekly" (see screenshot below).
Use the ▲▼ buttons to switch to the selection fi eld "Start" and use the ◀▶ buttons or the number pad buttons to select the desired recording start time.
Use the ▲▼ buttons to switch to the selection field "Duration" and use the ◀▶ buttons or the numeric pad buttons to select the desired recording length.

When all settings have been made, press the OK button to save the recording settings. You can view the scheduled recording in the timer list view of the EPG (see section "Timer list").
EPG - ELECTRONIC PROGRAMME GUIDE
PLAN RECORDING
The "Recording schedule" view can be called up at any time in EPG by pressing the (red) button.

The timer list view shows you all the recordings that are scheduled.
The ←→ buttons allow the recordings to be sorted into "once" or "repeated" recordings.
The cursor buttons ( ) allow you to select a recording.
The ☐ (red dot) button allows you to delete a recording that had been scheduled. Press the button ☐ to cancel a running recording.
VIDEOTEXT (TELETEXT)
This symbol ☐ in the channel notification shows you whether Videotext/Teletext is available for the selected channel.
When you press the button, the receiver processes the videotext/Teletext service data for your TV set to display, even when the signal is encrypted.
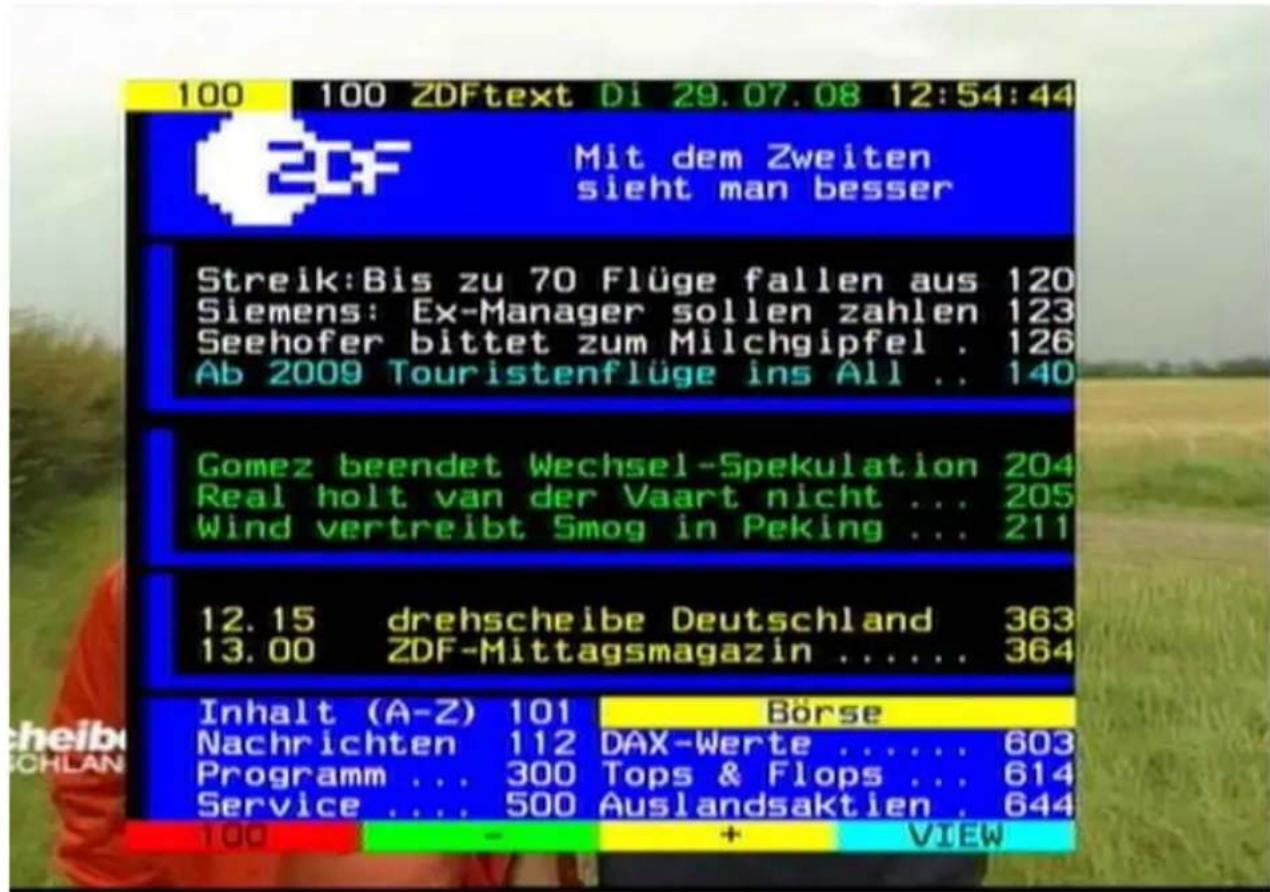
When the search is finished, the videotext/Teletext being broadcast by the relevant encrypted provider appears:
You have several options for opening the desired pages:
- Input with the number keys.
- Page backwards and forwards using the ▲▼ buttons
- Sub-pages (e.g. 1/2, 2/2) can be selected using the buttons
- Selection using the options indicated by the coloured buttons (blue) listed across the bottom of the screen
Press the BACK button or the TEXT button to exit.
EDIT CHANNEL LIST
Select the "Edit channel list" menu using the MENU button, the ▲▼ buttons on the main menu and OK.

Also pay attention to the bars at the bottom of the on-screen display! These provide information on what to do next.
Press the OK button to close the information display for editing channels and channel lists. When the menu is opened, the standard setting is for the receiver to show the "All Satellites" channel list with all channels available on the satellites that are being received.
SELECTION OF THE LIST / CHANNELS TO BE EDITED
Press the TV (blue) button to switch between the TV and radio channel lists. Radio channels are edited in the same way as TV channels.
Editing favourites lists is explained as a separate item.
Selection options:
- TVR (blue) button Switch between radio and TV channels
- (green) button Open satellite channel lists
- (yellow) button Open the channel lists, sorted alphabetically
- button Search for a specific channel (input the search expression using the numeric pad on the remote control, see also the sections "Operating instructions", "Alphanumeric input")
The channel list chosen is generally that sorted by categories (satellites, favourites and alphabetic) using the ←→ buttons (the standard list shown on calling up is the "All Satellites" channel list). Selection of channels in the list is performed using the cursor buttons (*). The ▲▼ buttons allow you to select individual channels, and the ◀▶ buttons allow you to scroll from page to page of the currently selected list.
EDIT CHANNEL LIST
EDITING LISTS / CHANNELS
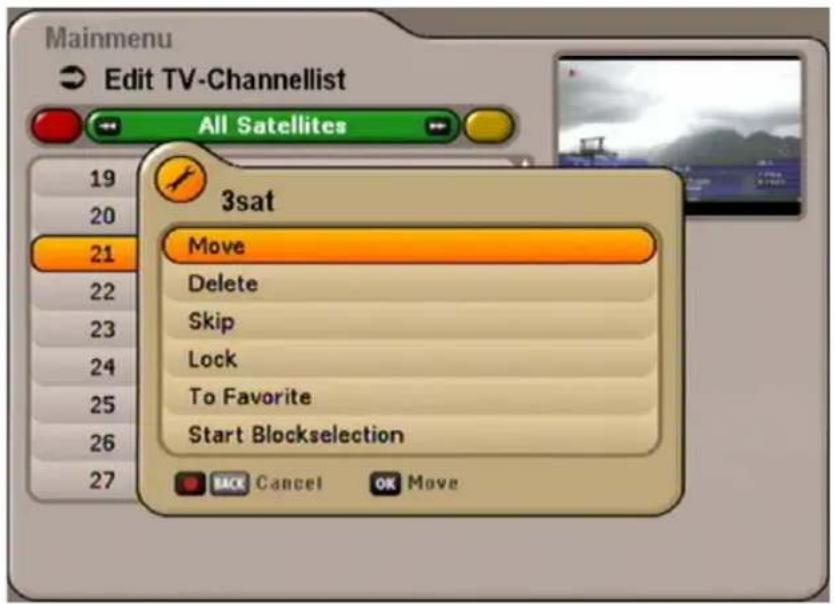
When you have selected the channel or channel list to be edited, press the (red dot) button to open the edit menu. You have the following edit options:
- Move:
Channel can be moved within the current list to another channel slot
- Delete:
Delete the channel from the current list
- Skip:
Channel will be skipped when zapping through the channels
- Lock:
Channel can be viewed only by entering a PIN
- To favorite:
A channel can be assigned to any Favourites List
- Start Blockselection:
Several channels can be selected at the same time and edited together

As soon as you exit the menu under which you made the edit changes, you will be asked if you wish to save the changes. Use the ▲▼ buttons to select either "Yes, save changes" or "No, don't save changes". Confirm your selection with the OK button.
EDIT CHANNEL LIST
"LAST FUNCTION" MEMORY
The last editing action performed is saved on the ☐ button, so by pressing the ☐ button you can apply the last selection to other channels without having to open the edit menu again. As soon as you leave the current display, this option is cleared and becomes available again only after the edit menu has been opened and an action selected.
MOVE CHANNELS
Use the ▲▼ buttons to select the channel to be moved from the current channel list (use the □ (green) button to switch to the overall list, use the OPT (yellow) button to switch to the alphabetically sorted list). Press the ● button to open the edit menu and use the ▲▼ buttons to select the "Move" function. Confirm the command by pressing the OK button.
The channel you previously selected will now be shown inset slightly from the left. Now use the cursor buttons (☐) or the number buttons to select the new desired position for the channel, and confirm the new channel slot by pressing the OK button.
DELETE CHANNELS
Use the ▲▼ buttons to select the channel to be deleted from the channel list you have selected. Press the ● button to open the edit menu and use the ▲▼ buttons to select the “Delete” function. Confirm the command by pressing the OK button.

A deleted channel can be recovered only by performing another channel search (see section "Channel Search")!
The channel you previously selected will be deleted (from the favourites lists also!).
SKIP CHANNELS
Use the ▲▼ buttons to select the channel to be skipped from the current channel list. Press the ○ button to open the edit menu and use the ▲▼ buttons to select the "Skip" function. Confirm the command by pressing the OK button.
The channel you previously selected is now shown in grey text. When zapping the channels this channel will in future be skipped and no longer shown in the channel list (called up using the OK button). This function can be restored again using the edit menu (select: "Unskip").
EDIT CHANNEL LIST
LOCK CHANNELS
Use the ▲▼ buttons to select the channel to be locked on the channel list you have selected. Press the button to open the edit menu and use the ▲▼ buttons to select the "Lock" function. Confirm the command by pressing the OK button. You are now prompted to enter the PIN code (factory default setting: 0000).
The channel you previously selected is now shown with a padlock to its right. In future this channel can be viewed only by entering the four-digit PIN code. This function can be restored again using the edit menu (select: "Remove lock").
COPY CHANNELS TO THE FAVOURITES LIST
Use the ▲▼ buttons to select the channel to be copied from the current channel list. Press the button to open the edit menu and use the ▲▼ buttons to select the "To favorite" function. Use the buttons to select the favourites list to which the channel is to be copied. The channel remains in the satellite channel list. Confirm the command by pressing the OK button.
The channel you previously selected is now shown with an “F” and a yellow field in the channels list. The “F” shows that it is a favourite channel; the black dot in the yellow field shows in which of the eight favourites lists the channel can be found.
See the item “Editing Favourite Lists” for information on how to delete a channel from a favourite list.
START BLOCKSELECTION (HIGHLIGHTING SEVERAL CHANNELS)
Use the ▲▼ buttons to select the channel from which you want to highlight further channels. You can only select channels that are listed in succession in the channel list you have selected. Press the ● button to open the edit menu and use the ▲▼ buttons to select the "Start Blockselection" function. Confirm by pressing the OK button. Use the ▲▼ buttons to highlight the desired channels, starting from the previously highlighted channel and working upwards or downwards. The highlighted channels will be highlighted in yellow and marked with a tick on the left.
When you have highlighted the channels that you wish to select, press the button to open the edit menu once again and use the ▲▼ buttons to select the desired function (“Move”, “Delete”, “Skip”, “Lock” or “To Favorite”). Confirm with the OK button
The selected function can now be used in the same way as described for the respective items in this section for a single channel.
EDIT CHANNEL LIST
EDIT FAVOURITES LISTS

When you have selected the favourites list to be edited (called up using the □ (red) button and selected using the ◀▶ buttons), press the ○ (red dot) button to open the edit menu. You have the following edit options:
- Remove from favorites list:
The channel will be removed from the favourites list
- Lock:
Channel can be viewed only by entering a PIN
- Rename favorites list:
The favourites list can be renamed
- Start Blockselection:
Several channels can be selected at the same time and edited together
REMOVE FROM THE FAVOURITES LIST
Use the ▲▼ buttons to select the channel to be removed from the favorites list you have selected. Press the ● button to open the edit menu and use the ▲▼ buttons to select the "Remove from favourites list" function. Confirm the command by pressing the OK button.
The channel you previously selected is now removed from the favourites list (but not deleted from the overall satellites list).
EDIT CHANNEL LIST
LOCK CHANNELS
Use the ▲▼ buttons to select the channel to be blocked in the favourites list you have selected. Press the ● button to open the edit menu and use the ▲▼ buttons to select the “Lock” function. Confirm the command by pressing the OK button. You are now prompted to enter the PIN code (factory default setting: 0000).
The channel you previously selected is now shown with a padlock to its right. In future this channel can be viewed only by entering the four-digit PIN code.
The channel is also locked on all other channel lists. You need not additionally lock the channel in the other channel lists.
This function can be restored again using the edit menu (select: "Remove llock").
RENAME FAVOURITES LIST
Use the ←→ buttons to select the favourites list to be renamed. Press the ○ button to open the edit menu and use the ▲▼ buttons to select the “Rename favorites list” function. Confirm the command by pressing the OK button. A keypad will now be displayed with which you can enter the desired name alphanumerically using the numeric pad on the remote control. See also the section “Operating Instructions”, “Alphanumeric Input”.
START BLOCKSELECTION (HIGHLIGHTING SEVERAL CHANNELS)
Use the ▲▼ buttons to select the channel starting from which you want to highlight further channels. You can only select channels that are listed in succession in your selected favourites list. Press the ○ button to open the edit menu and use the ▲▼ buttons to select the "Start Blockselection" function. Confirm by pressing the OK button. Now use the ▲▼ buttons to highlight the desired channels, starting from the previously highlighted channel and working upwards or downwards. The highlighted channels will be highlighted in yellow and marked with a tick on the left.
When you have highlighted the channels that you wish to select, press the button to open the edit menu once again and use the ▲▼ buttons to select the desired function (“Remove from favorites list”, or “Unlock”). Press the OK button to confirm.
The selected function can now be used in the same way as described for the respective items in this section for a single channel.
SEARCH CHANNELS (CHANNEL SEARCH)
Select the "Channel search" menu using the MENU button, the ▲▼ buttons in the main menu and OK.

Also pay attention to the bars at the bottom of the on-screen display! These provide information on what to do next.
You have three options for a channel search.
- Automatic Channel Search – all transponders for the satellite you selected will be searched
- Manual Channel Search – only the selected transponder for the satellite you selected will be searched
- Channel search with service ID -
Search for a specific channel using its service ID
Use the ▲▼ buttons to select the desired type of search and confirm your selection using the ok button.
AUTOMATIC (CHANNEL) SEARCH

The ▲▼ buttons allow you to select different sets of parameters for the scan.
SEARCH CHANNELS (CHANNEL SEARCH)
Satellite
Using the ▶▶ buttons, select the satellite to be scanned. Make sure your reception system is aligned to the selected satellite. You can search only one satellite at a time. If you have connected a multi-feed reception system (e.g. reception of ASTRA 19.2° East and HOTBIRD 13° East), you must repeat this procedure once for each satellite. You can however start the first installation again, in the course of which a channel search of all the satellites you selected is performed.
Press the ▼ button to move to the next selection item.
Channel Search Mode
Use the ▶▶ buttons to select whether you wish to search "free & encrypted" or "only free" channels.
Press the ▼ button to move to the next selection item.
Network Search
Use the ▶▶ buttons (On/Off) to select whether a network scan should be performed. If you set the network search to "Off", only the factory stored transponders of the satellites you previously selected will be searched for new as yet unlisted channels.
If you set the network scan to "On", the transponder network enables additional transponders that have not yet been stored to be located. They are then stored and searched for new channels in the same way as the existing transponders.
When you have made your settings, use the ▲▼ buttons to select "Start Search" and press the OK
button to start scanning. You can cancel the scan at any time by pressing the BACK button. During the search you will see the following message (example):
![graph TD A["Radio channels found"] --> B["TV channels found"] B --> C["Satellite with the transponder currently being searched"] C --> D["Progression bar"] E["Mainmenu"] --> F["Search Channels"] F --> G["Automatic Channel Search"] H["TV Channel"] --> I["FOX new"] H --> J["DCINE ESPAÑOL new"] H --> K…](/content/2026/06/1257707/images/d02c3a494c13445d93da8bd24eee597ecca14656ecdf6dd02aabe6e5739943dc.jpg)
SEARCH CHANNELS (CHANNEL SEARCH)
Newly found channels are identified with the designation "New" after the channel name. After completion of the search, you will see the following message (example):

Press the OK button You will be asked whether you wish to save the changes or not. Use the ▲▼ buttons to make the selection and confirm with the OK button. If you select "Yes, save changes", the newly found channels will be added to the end of the channel list. Then press the BACK button to exit the menu. The channel list is opened on to the TV screen by pressing the OK button (see also section "On-screen displays" "Channel list TV/Radio").

After a scan (of whatever type) the receiver shows all newly found channels in the channel list under the rubric "New Channels". You will find this rubric in the channel
list at the end of the green satellite channel lists (select using the ←→ buttons).
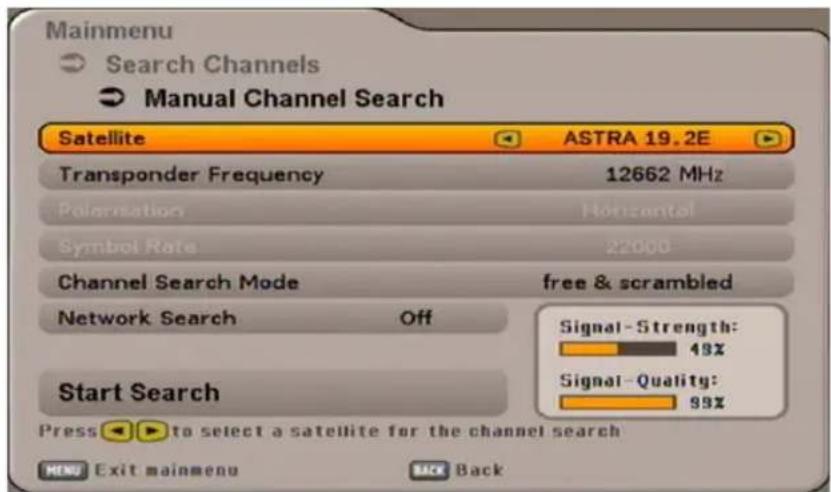
MANUAL (CHANNEL) SEARCH
SEARCH CHANNELS (CHANNEL SEARCH)
The ▲▼ buttons allow you to select different sets of parameters for the scan.
Satellite
Use the ▶▶ buttons to select the satellite on which the transponder you wish to scan is located. Make sure your reception system is aligned to the selected satellite. You can search only one transponder at a time. If you wish to search several transponders on a satellite, you should start an automatic search of the transmitting satellite.
Press the ▼ button to move to the next selection item.
Transponder frequency
Select the transponder to be scanned, using the ▶▶ buttons or the keypad. At the bottom right of the screen display, the receiver shows the current signal strength and signal quality of the selected transponder.
Press the ▼ button to move to the next selection item.
Polarisation and symbol rate
These settings must only be adjusted if you intend to scan a transponder that has not yet been saved by the receiver. Adjust settings using the ▶▶ buttons or the numeric keys.
Channel Search Mode
Use the ▶▶ buttons to select whether you wish to search “free & encrypted” or “only free” channels.
Press the ▼ button to move to the next selection item.
Network Search
Use the ▶▶ buttons (On/Off) to select whether a network scan should be performed. If you set the network search to "Off", only the factory stored transponders of the satellites you previously selected will be searched for new as yet unlisted channels.
If you set the network scan to "On", the transponder network enables additional transponders that have not yet been stored to be located. They are then stored and searched for new channels in the same way as the existing transponders.
When you have made your settings, use the ▲▼ buttons to select "Start Search" and press the OK
button to start scanning. You can cancel the scan at any time by pressing the BACK button.
During the search you will see a display that shows you the progress of the search and the channels found so far. Newly found channels are identified with the designation “New” after the channel name.
SEARCH CHANNELS (CHANNEL SEARCH)
After completion of the search, you will see the following message (example):
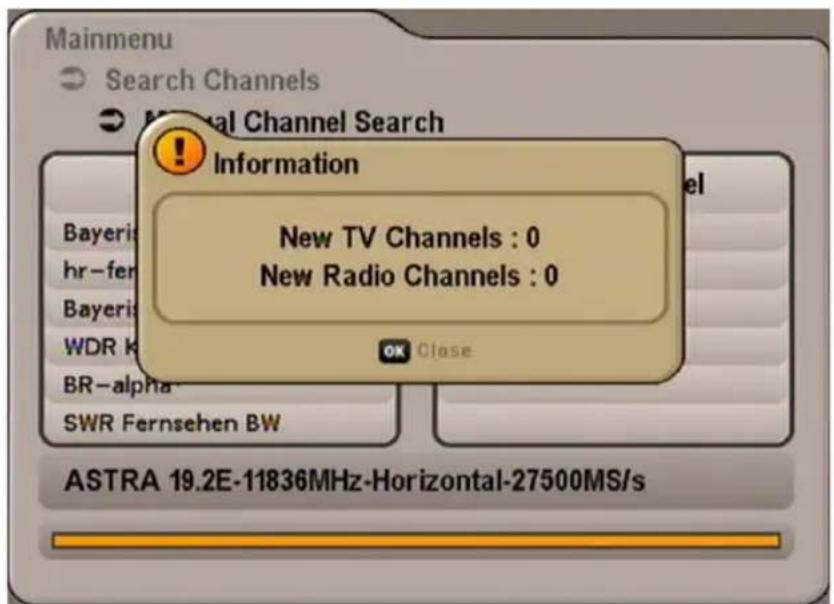
Press the OK button You will be asked whether you wish to save the changes or not. Use the ▲▼ buttons to make the selection and confirm the selection with the OK button. If you select "Yes, save changes", the newly found channels will be added to the end of the channel list. Then press the BACK button to exit the menu. The channel list is opened on to the TV screen by pressing the OK button (see also section "On-screen displays" "Channel list TV/Radio").
CHANNEL SEARCH WITH SERVICE ID
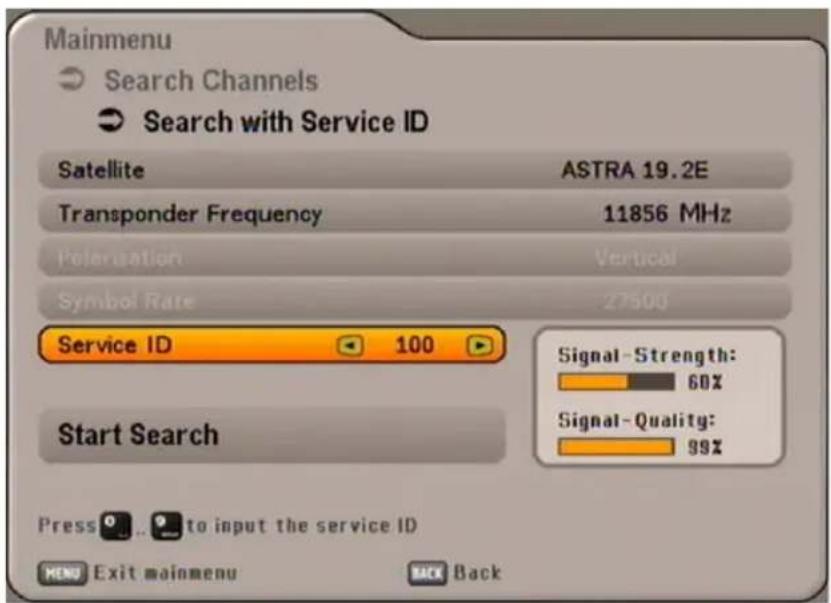
The ▲▼ buttons allow you to select different sets of parameters for the scan.
Satellite
Use the □▶ buttons to select the satellite that is transmitting the channels to be scanned.
SEARCH CHANNELS (CHANNEL SEARCH)
Make sure your reception system is aligned to the selected satellite.
Press the ▼ button to move to the next selection item.
Transponder frequency
Use the ▶▶ buttons or the keypad to select the transponder frequency on which the channel being sought is transmitted. At the bottom right of the screen display, the receiver shows the current signal strength and signal quality of the selected transponder.
Press the ▼ button to move to the next selection item.
Polarisation and symbol rate
These parameters must only be adjusted if you intend to scan a transponder that has not yet been saved by the receiver. Adjust settings using the ▶▶ buttons or the numeric keys.
Service ID
Using the ▶▶ buttons or the keypad, enter here the service ID of the channel being sought.
When you have made your settings, use the ▲▼ buttons to select "Start Search" and press the OK button to start scanning. You can cancel the scan at any time by pressing the BACK button.
During the search you will see a display that shows you the progress of the search.
After completion of the search, you will see the following message (example):

Press the OK button You will be asked whether you wish to save the changes or not. Use the ▲▼ buttons to make the selection and confirm the selection with the OK button. If you select "Yes, save changes", the newly found channels will be added to the end of the channel list. Then press the BACK button to exit the menu.
PARENTAL CONTROL
The channel list is opened on to the TV screen by pressing the OK button (see also section "On-screen displays" "Channel list TV/Radio").
Select the "Parental Control" menu using the menu button ☐, the ▲▼ buttons on the main menu and OK. You are now prompted to enter the PIN code (factory default setting: 0000). After entering
the PIN using the keypad you are shown the following display:

Also pay attention to the bars at the bottom of the on-screen display! These provide information on what to do next.
Select the parameters to be changed using the ▲▼ buttons.
LOCKING MAIN MENU
Use the ▶▶ buttons (On/Off) to select whether the main menu should be blocked. If the menu is locked, changes can be made only by entering the four-digit PIN code.
LOCK SET-TOP-BOX
Use the ◀▶ buttons (On/Off) to select whether the receiver should be blocked. If the receiver is locked, it can be operated only by entering the four-digit PIN code after it is switched on (factory setting: 0000).
Press the BACK button to exit the menu again.
PARENTAL CONTROL
DEFINE NEW PIN CODE
Press OK to replace the old PIN with a new one. Enter the new (four digit) PIN. For security you must repeat the new PIN code once again. Confirm the change of PIN code by pressing the OK button.

Keep your PIN code in a safe place, so that you always have access to your channels should you ever forget it.
If you have forgotten your PIN code, you must contact your dealer, who will be able to unlock your receiver for you.
SETTINGS
The selected menus, sub-menus and positions, as well as the parameters to be set, are each highlighted in colour. The menus are largely self-explanatory.
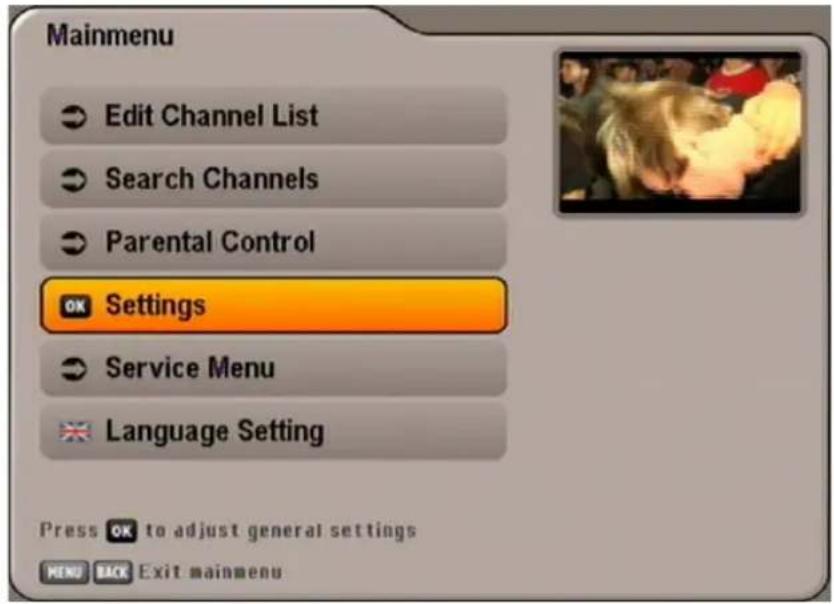
Pay attention to the bar at the bottom of the on-screen display. These provide information on what to do next.
Select the "Settings" menu using the MENU button, the ▲▼ buttons in the main menu and OK.
The first installation process is described in the chapter "First installation".

Press the ▼ and OK buttons to access the menu "TV, Video and Audio". The following display appears (see next page):
Use the ▲▼ buttons to select the further options. If there is another sub-menu layer, press the OK button to open it. If there are no more sub-menus, make the settings using the or numeric pad.
Press the BACK button to save your settings and return to the previous menu. Press the MENU button to return directly to the TV picture, the changes will also be saved.
SETTINGS
TV SETTINGS (TV, PICTURE AND SOUND)

TV ASPECT RATIO
Here you can use the ▶▶ buttons to select the picture format for your TV. Either
4:3 or
16:9 format.
PICTURE FORMAT
Use the ▶▶ buttons here to select the type of screen display.
- Pan & Scan
- Letterbox
- Full-screen image
TV-SCART-OUTPUT
Here you can use the ▶▶ buttons to select the type of video signal at the TV Scart socket. Select the signal that your TV set can process. When doing this, refer to the operating instructions for your TV set!
• FBAS - composite baseband signal
(Colour Video Baseband Signal) or
- RGB - Red/Green/Blue signal
TELEVISION SYSTEM
Here you can use the ▶▶ buttons to specify whether your TV set is a
- PAL or
- NTSC set.
SETTINGS
HDMI FORMAT
Here you can use the ▶▶ buttons to set the picture format to be transmitted to your TV set via HDMI
Available options: "Auto" (automatic format choice), 576p, 720p or 1080i
Here you can use the ▶▶ buttons to set whether the automatic stand-by circuit should be activated after three hours („On“) or deactivated („Off“). When this function is activated, after three hours during which no buttons are pressed on the receiver remote control, you will see the following display:
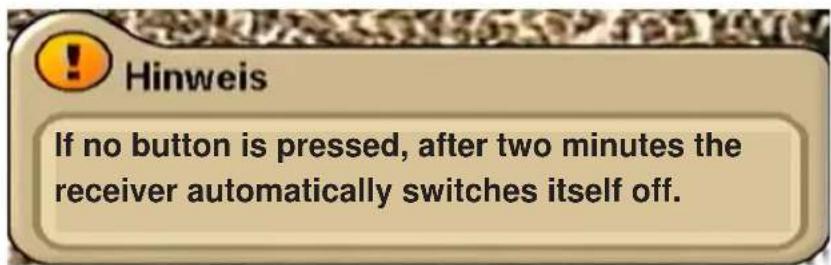
Unless a button on the receiver remote control is pressed within two minutes, after two minutes the receiver will switch automatically into stand-by mode.
However you can switch the receiver back into active mode at any time by pressing the stand-by button (on/off).
SETTINGS
CUSTOMIZE SCREEN MENU
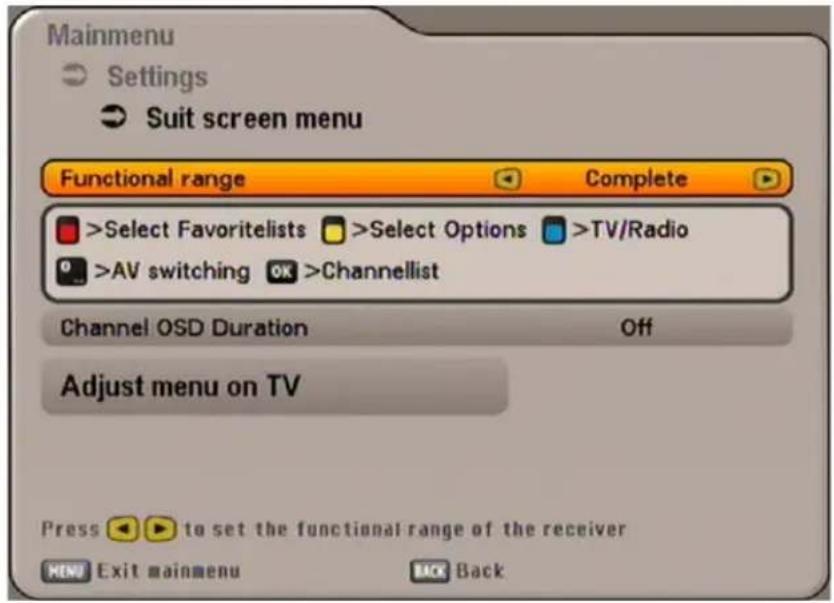
FUNCTIONAL RANGE
Here you can configure the functional scope of your receiver. You can choose between "Complete", "Simple" and "Medium". The following table shows which functions are available at each configuration step.
| [CDT] - (red) button |  - (yellow) button - (yellow) button | [BOX3] - (blue) button | [SHW] button | [CX06] button | |
| High Select favourites Select options TV/Radio AV changeover Channel list | |||||
| Low Not assigned Not assigned Not assigned Programme Guide | |||||
| Normal Select favourites Select options TV/Radio Not assigned Programme Guide | |||||
CHANNEL OSD DURATION
Use the ▶▶ buttons to select the time after which you want the on-screen channel message display to be automatically cancelled. The selections available are "Off", 1, 2, 3, 4, 5 or 6 seconds.
ADJUST MENU ON TV
Press the OK button to align the on-screen displays on the TV screen. Now
you can use the cursor buttons ( ) to determine the position of the on-screen display. When you have achieved the
desired position, press the OK button to fix the desired position.

SETTINGS
DATE AND TIME
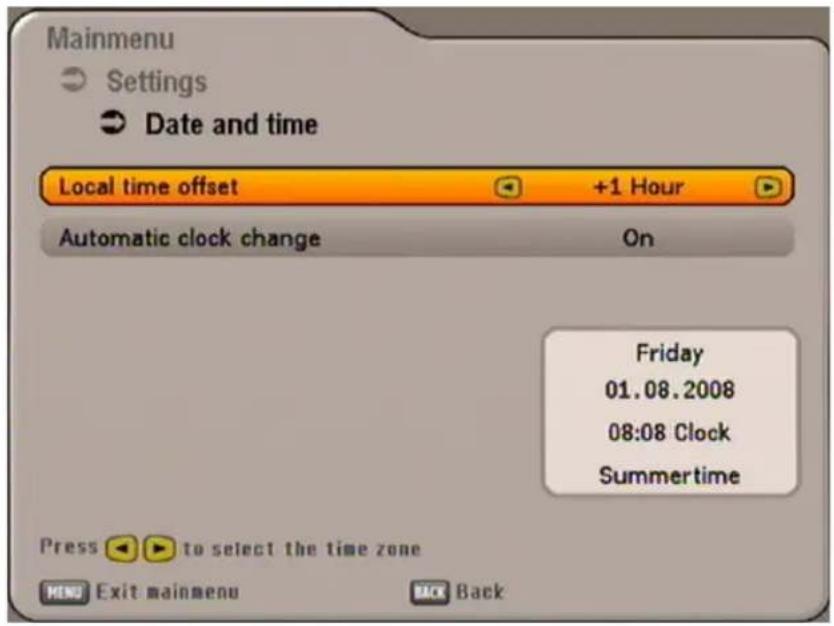
Local time offset
Use the ▶▶ buttons to set the time zone variation from UTC (formerly GMT) (e.g. for Germany +1 hour).
Use the ▲▼ buttons to switch to the "Automatic clock change" field.
Automatic clock change
Use the ▶▶ buttons to select whether the receiver should automatically change over to and from summer and winter time. If "On" is selected, the receiver automatically sets itself to the right time. If "Off" is
selected, the field for manual selection of summer and winter time is displayed below. The ▶▶ buttons are also used to perform the setting.
Press the BACK button to exit the menu again.
See "First Installation" section, pages 15ff
SERVICE MENU
Select the "Service" menu using the MENU button, the ▲▼ buttons in the main menu and OK. The following display appears:

UPDATING SOFTWARE
You can also check manually whether new software is available.
Use the ▲▼ buttons to switch to "Software Update" and to call it up press the OK button. The following display appears:

SERVICE MENU
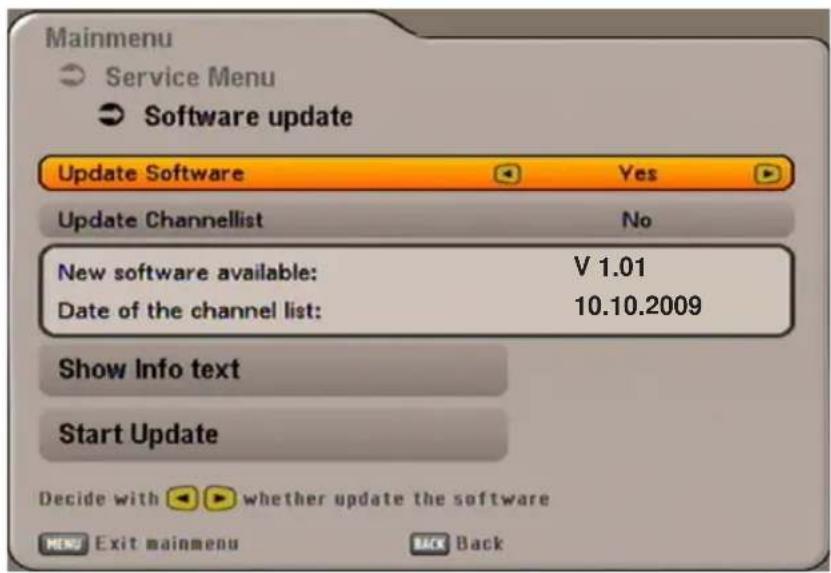
Also pay attention to the bars at the bottom of the on-screen display! These provide information on what to do next.
Updating software
If new software is available (but only then), use the ▶▶ buttons (No/Yes) to select whether you wish to load the new software that is available. If you are unsure whether you wish to load the new software, you can initially set the reply to "No". If you do agree to the changes, you can then proceed to download the software.
Channel list
If a new channel list is available (but only then), use the ▶ buttons (No/Yes) to select whether you wish to load the new channel list that is available.
When you have made your settings, use the ▲▼ buttons to select "Start Update" and press the OK button to start updating.
SERVICE MENU
The following display appears (example):
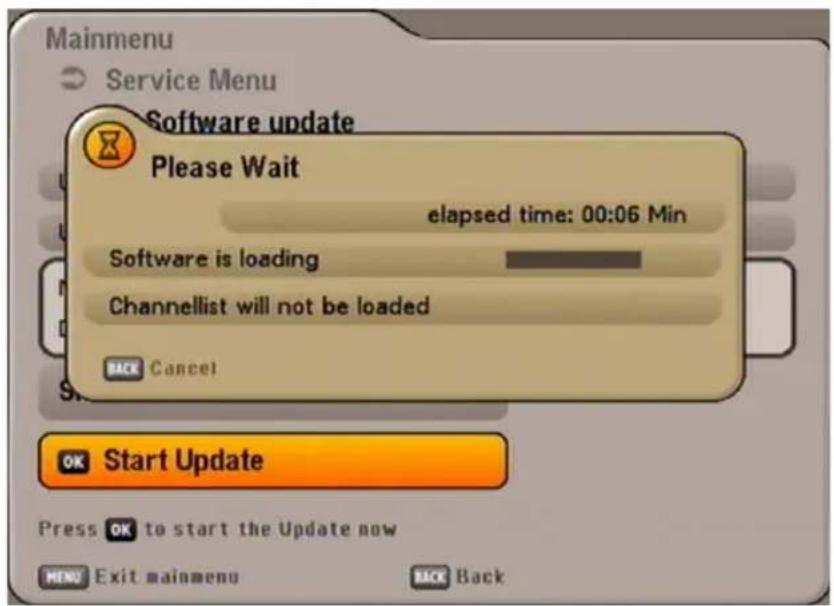
RESTORE FACTORY SETTINGS
Select the "Service" menu using the □ button, the ▲▼ buttons in the main menu and OK. Use the ▲▼ buttons to switch to "Restore factory settings" and to call them up press the OK button. The following display appears:

Press the OK button to load the factory settings. The channels and favourites lists remain unchanged.
CONNECTING UP THE VIDEO/DVR
For details of how to connect your external recorder to the receiver refer to the connection diagram provided at the end of this manual and the instructions for the external recorder.
RECORDING
In order to make a VCR recording (Record), the satellite receiver must be switched on or the timers must be pre-programmed (see “EPG” “Recording (timer)” section).
PLAYBACK
For VCR/DVR playback you must have previously set the UFS 651 Scart socket to "VCR mode" (Scart changeover), using the 📄 button, so that the signal path is set up from the VCR or DVR/AUX Scart socket to the TV Scart socket.
In this setting, the external recorder's video signal is put through to the TV set during playback. If the button is pressed once more, "Scart>TV" is selected. The TV set's Scart socket is thereby given priority.
Pressing the 🔒 button again restores priority to the signal from the UFS 651 "Scart>Sat".
The settings "Scart>VCR" and "Scart>TV" are shown in the display of the receiver.
USING THE FRONT PANEL
If you have misplaced your remote control, or if the batteries are flat, you can still operate your receiver from the front panel.
BACKUP OPERATION

There are two buttons on the front of the receiver.
▼ button:
The channel down button switches to the next channel down in the currently selected channel list.
▲ button:
The channel up button switches to the next channel up in the currently selected channel list.

Because there are no numbered buttons, no password/PIN-protected functions can be displayed.
SERVICE
If, despite studying this operating manual, you still have questions about getting started with the unit or using it correctly, or if unexpected problems occur, please contact your specialist dealer.
TECHNICAL APPENDIX
FEATURES
■ Reception of digital satellite TV and radio programmes
■ Typical power consumption in operational mode: 5 W (without SAT antenna)
■ Stand-by power consumption: < 0.5 W
■ HDMI output for high video quality on your fl at-screen TV
■ Upscaler to upscale Pal signals (576i) to 576p, 720p and 1080i
4-digit display
■ Kathrein EPG with timer programming 1)
■ Guided fi rst installation with national programme lists
■ Pre-programmed programme list - immediate viewing without a programme scan
■ Suitable for software downloads via satellite and PC
■ 8 favourite programme lists each for TV and radio
■ On-screen display (OSD) in 8 languages (D, GB, F, I, E, CZ, NL, TR)
■ 14 timers; convenient programming via EPG
■ Language selection for programmes broadcast in several languages
■ Electrical audio output for Dolby Digital data stream (AC 3)
■ CVBS and RGB signal output programmable on Scart socket
■ Cinch sockets for AV signal
■ Videotext decoder with 800-page memory capacity and videotext generation (only for Scart)
■ Automatic 4:3 and 16:9 format recognition with optional output format
Programme scan
■ Automatic date and time setting via DVB data stream
■ Programme position sort function
DiSEqC™1.0, SCR single-cable system control signals
■ 4,000 programme memory positions
■ Infra-red remote control
■ Mains switch 2)
■ Facility to connect an external IR sensor
■ Delivery scope: Infrared remote control, batteries, Operating manual, safety instructions, mains cable
1) Only displayed if this information is broadcast by the channel provider
2) The unit is not completely disconnected from the power supply (see chapter „Safety Instructions - Important notes“, „Periods of extended absence, thunderstoms, mains socket accessibility“)
TECHNICAL APPENDIX
| Type UFS 651si UFS 651sw | CE | ||
| Order no. 20210155 20210156 | |||
| Colour Silver Black | |||
| RF characteristics | |||
| Input frequency range MHz 950-2,150 | |||
| Input level range dBμV 44-83 | |||
| TV system Video | |||
| Modulation, FEC, Demultiplexer DVB-S standard | |||
| Video resolution CCIR 601 (720 x 576 lines), 576p, 720p, 1080i | |||
| Video decoding MPEG-1 and MPEG-2 compatible | |||
| S/N dB >53 | |||
| TV system Audio | |||
| Audio decoding | MPEG-1 and MPEG-2, layer 1 and 2 | ||
| Sampling rate | kHz | 32/44,1/48 | |
| S/N dB >65 | |||
| Power supply | |||
| Supply voltage | VAC/Hz | 230/50 | |
| DC voltage | V | 12 | |
| Power consumption(max./typ. operation/stand-by) | W | < 15/5/< 0.5 | |
| LNB supply vert./horiz. | V/mA | 14/18/Max. 400 | |
| Control signal | kHz | 22; DiSEqCTM1.0; SCR single-cable system | |
| Connections | |||
| Sat-IF input/output (loop through) | 2 x F socket | ||
| TV/VCR output | 2 x Scart sockets | ||
| Video output | Cinch socket | ||
| Video/audio output (digital) | 1 x HDMI | ||
| Audio output (analogue) | 2 x Cinch sockets | ||
| Audio digital output (electrical) | Cinch socket | ||
| Data interface | RJ 11 socket | ||
| General Information | |||
| Perm. ambient temperature | °C | +5 to +40 | |
| Dimensions | mm | 255 x 47 x 190 | |
| Weight | kg | 1,0 | |
TECHNICAL APPENDIX
SCART SOCKET ASSIGNMENT
| Signal Pin no. TV VCR/AUX | |||
| Right audio output 1 X X | |||
| Right audio input 2 X | |||
| Left audio output 3 X X | |||
| Audio earth 4 X X | |||
| Blue earth 5 X X | |||
| Audio left input 6 X | |||
| Blue signal 7 X X | |||
| Switching voltage 8 X X | |||
| Green earth 9 X X | |||
| Data signal 10 | |||
| Green signal | 11 | X X | |
| Data signal 12 | |||
| Red earth | 13 X X | ||
| Data earth | 14 | ||
| Red signal (C) | 15 X X | ||
| Blanking signal | 16 X X | ||
| Video earth | 17 X X | ||
| Blanking signal earth | 18 X X | ||
| Video output (FBAS/Y) | 19 X X | ||
| Video input 20 | X | ||
| Connector shield 21 X X |
VHS/S-VHS SWITCHING
The Scart sockets are switchable between VHS and S-VHS. The switch is made by selecting “Main menu”, “Settings”, “TV, Video and Audio”.
VHS (RGB): The red signal is connected to terminal 15, the composite colour output to terminal 19. For S-VHS (Y/C): The Y output is connected to pin 19, the C output to pin 15.
TECHNICAL APPENDIX
CONNECTION EXAMPLE

TECHNICAL APPENDIX
SAT IF CONNECTIONS
STAND-ALONE SYSTEMS
![graph LR A["SatAn®"] -->|2 x UAS 177| B["Sat-ZF 950-2150 MHz"] B --> C["EXR 21"] C --> D["Y"] D --> E["ESD../ESC.."] C --> F["Position OPTION UC1"] F --> G["**"]](/content/2026/06/1257707/images/ca40e8294b4fb55ef35ad024cedd93f9eb4bc6f50933cd2abe312949204a35f4.jpg)
PARTY SYSTEMS (4 X SAT-IF)


** Overvoltage protection KAZ 11/KAZ 12
TECHNICAL APPENDIX
PARTY SYSTEMS (8 X SAT-IF), MULTIFEED

PARTY SYSTEMS (16 X SAT-IF), MULTIFEED
![graph TD A["Sat-ZF 950-2150 MHz"] --> B["Sat-ZF 950-2150 MHz"] B --> C["Sat-ZF 950-2150 MHz"] C --> D["Sat-ZF 950-2150 MHz"] D --> E["Sat-ZF 950-2150 MHz"] E --> F["Sat-ZF 950-2150 MHz"] F --> G["Sat-ZF 950-2150 MHz"] G --> H["Sat-ZF 950-2150 MHz"] H --> I["Sat-ZF 950-2150 MHz"] I --> J["Sat-ZF 950-…](/content/2026/06/1257707/images/f54b30a766399d490680c291765866d5244c4b06898401dc6472babda9d6db2e.jpg)
** Overvoltage protection KAZ 11/KAZ 12
TECHNICAL APPENDIX
SINGLE-CABLE SYSTEMS
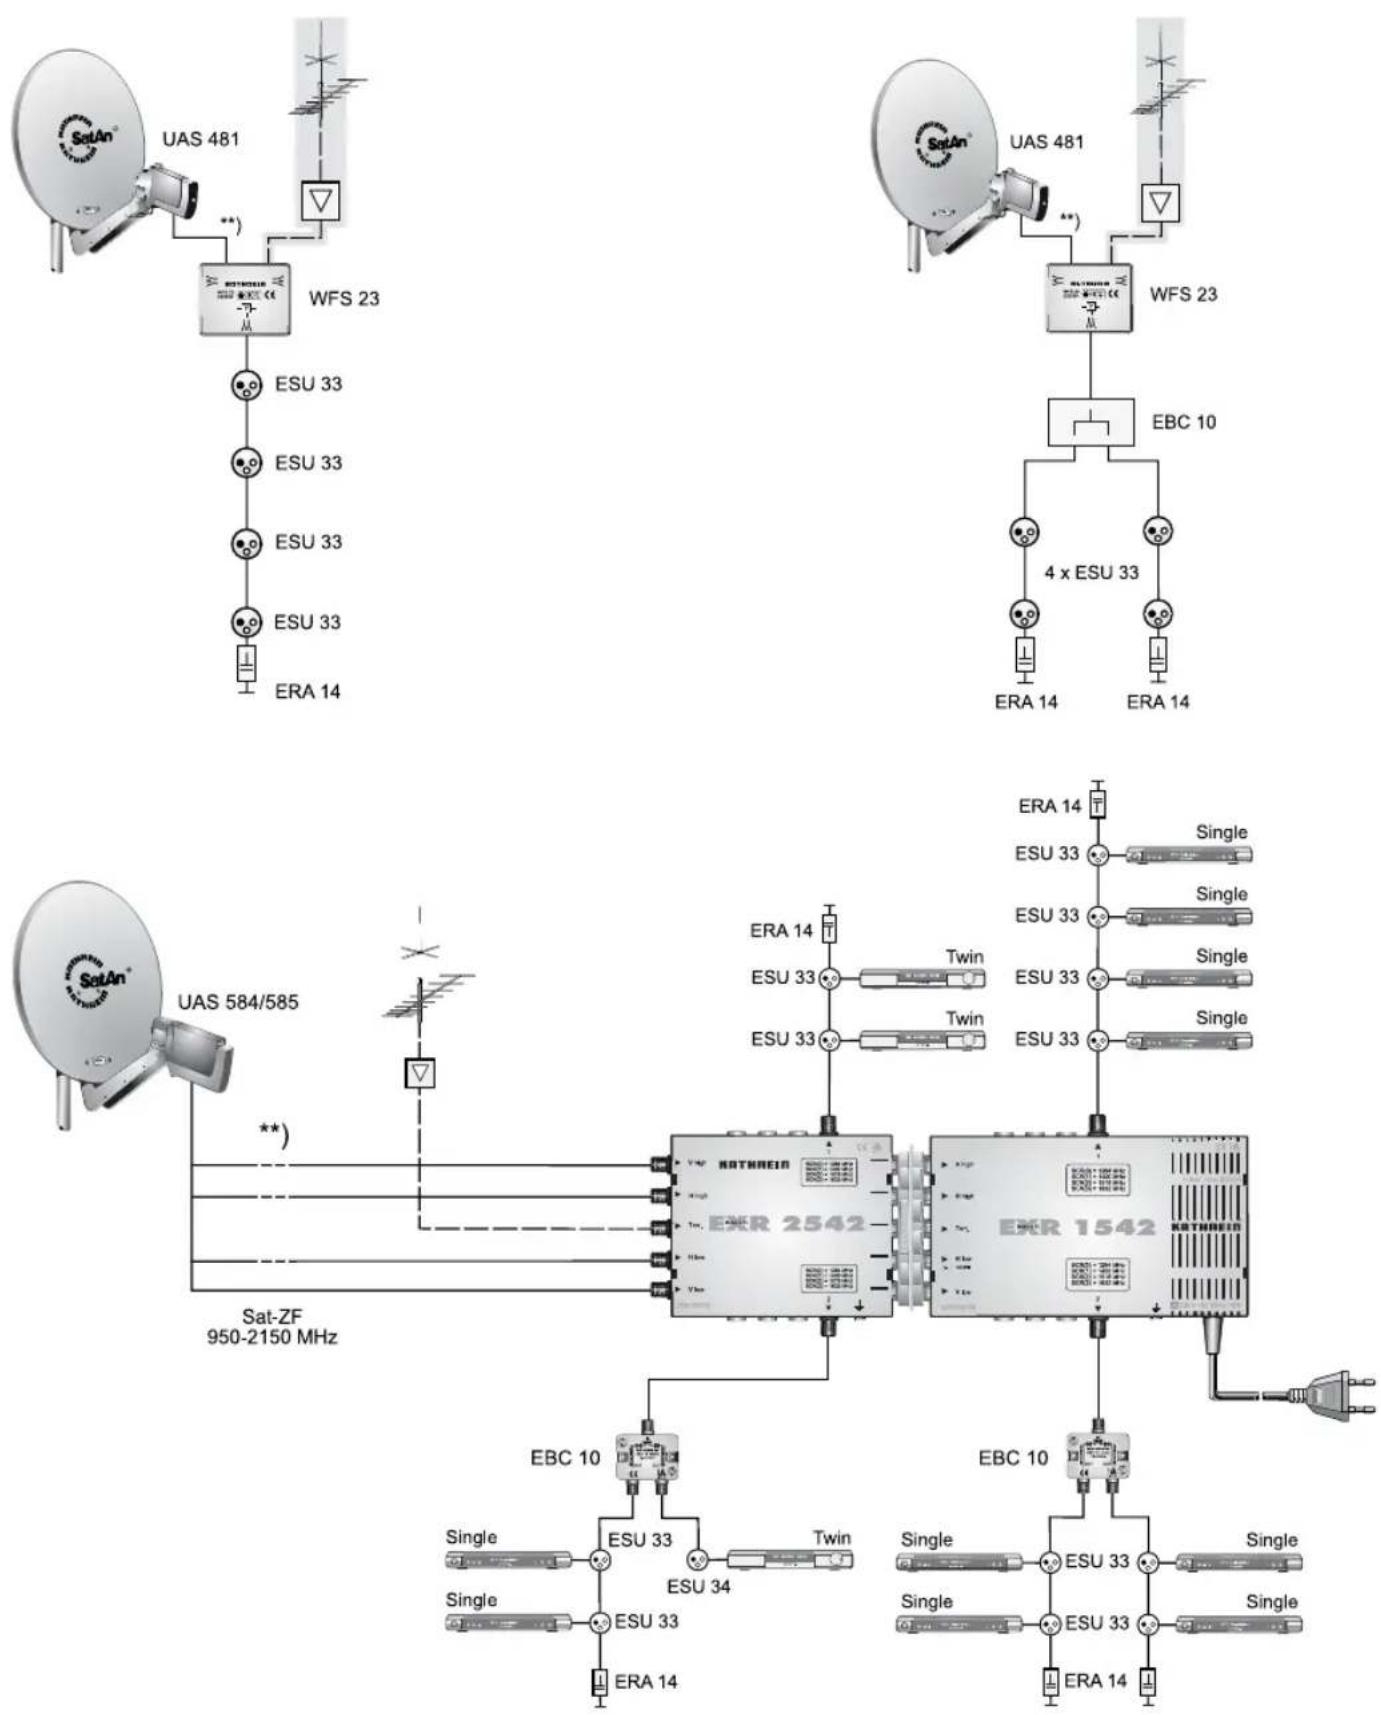
** Overvoltage protection KAZ 11/KAZ 12
TECHNICAL APPENDIX
![graph TD A["UAS 584/585"] -->|**| B["Sat-ZF 950-2150 MHz"] B --> C["EKR 1581"] C --> D["EBC 10"] D --> E["ESU 33"] E --> F["Twin"] E --> G["Twin"] E --> H["ERA 14"] I["UAS 584/585"] --> J["Sat-ZF 950-2150 MHz"] J --> K["ESR 2558"] K --> L["ESD../ESC.."] L --> M["ESU 33"] M --> N["Twin"] L --> O["Twi…](/content/2026/06/1257707/images/2447966854092816da134f50356622eed1e3544be1634e7b2db3028c620a4804.jpg)
** Overvoltage protection KAZ 11/KAZ 12
SHORT TECHNICAL GUIDE
CHANNEL PACKAGE
The channel package for a digital transponder normally includes several TV and radio channels. Each channel package has a fixed assignment for the transponder transmission frequency, for polarisation (horizontal or vertical), for the symbol rate and for the Viterbi rate or error rate.
DISEQC™
DiSEqC™ (Digital Satellite Equipment Control) is a communication system between a satellite receiver (master) and the peripheral satellite components (slaves), such as LNBs, multi-switches, rotating antenna systems.
It is a single master/multi-slave system, i.e. there is only ever one master in the satellite system. All activities start from the master.
DISEQC™ COMPONENTS
If DiSEqC TM switching matrices are cascaded, the master receiver must transmit the DiSEqC TM signal several times, so that all DiSEqC TM multi-switches in the cascade receive their commands.
These days, DiSEqC ™ components (slaves) must be downward compatible, i.e. respond to the analogue switching criteria from receivers that are only equipped with H/V and 22 kHz control signals.
A DiSEqC ™ switching matrix will work with analogue switching criteria until the DiSEqC ™ command from the master is received. All analogue switching criteria are then ignored.
DVB MPEG-2
DVB is the abbreviation for Digital Video Broadcasting. DVB-S refers to the transmission method (S = satellite). MPEG is the abbreviation for Moving Picture Experts Group, a working group that formulates internationally applicable standards for the digital compression of video and audio. MPEG -2 has established itself as the standard for compression of digital TV signals. MPEG -2 works up to a data rate of 100 Mbit/s.
EB/NO RATIO
The Eb/No ratio is a measure of the signal to noise ratio of a digital signal. The value is not identical to the C/N value familiar from analogue reception technology. At Eb/No values below 5 dB no reception is normally possible.
FEC
FEC is the abbreviation for "Forward Error Correction". The FEC error rate corresponds to the Viterbi rate.
SHORT TECHNICAL GUIDE
PID
The PID (Packet IDentification) number is an identification number for video signals and audio signals in the digital data stream of DVB-MPEG -2 signals. The receiver uses the PID number to create a unique assignment for the video and audio data transmission. The PCR PID is the identification number for the synchronisation signal. The PID-PCR is normally identical to the video PID. For programmes broadcast in multiple languages, the audio PD can be entered manually to assign a different language to the TV programme. After the PID is entered, the digital receiver automatically selects the audio data identified by the PID number from the data stream and assigns it to the video signal.
SYMBOL RATE
The symbol rate describes the quantity of data that is transmitted per second. The symbol rate is measured in MSymbols/s and is equal to the number of symbols received per second.
TRANSPONDER
A transponder is a frequency converter which receives TV and radio signals broadcast from the earth, converts them and the rebroadcasts them to the earth at a different frequency. Each satellite carries several transponders.
Analogue transponders transmit only one TV channel and possibly multiple radio channels on a single transmission frequency.
Digital transponders simultaneously transmit several TV and several radio programmes on a transmission frequency. If a programme provider is broadcasting several TV channels via a digital transponder, we refer to the provider's channel package. The terms “digital transponder” and “channel package” have the same meaning.
VIDEO-BIT-RATE
The video bit rate describes the quantity of data from the digitised video signal that is transmitted per second.
VITERBI RATE
The Viterbi rate (code rate, error rate) characterises the error protection used by the programme provider. The DVB standard provides the following values: 1/2 - 2/3 - 3/4 - 5/6 - 7/8
SHORT TECHNICAL GUIDE
GLOSSARY
| AC 3 Output for Dolby | Digital signal |
| Audio output Sound o | output on the receiver |
| AV programme pos. P | Preferred programme position on TV set for Scart input |
| CA Conditional Access | (for decoding encrypted programmes) |
| CI Internationally stand | ardised interface for CA modules |
| Decoder Decoder for Pay TV | |
| DiSEqCTM Control system between receiver and LNB, multi-switch | |
| DVB Digital Video Broadcasting | |
| Eb/No [dB] Power density per unit of information | |
| Eb/No ratio Digital signal to noise ratio | |
| LED display Display on receiver | |
| LNB Low Noise Block Converter | |
| Mute Muting of sound | |
| OSD On Screen Display | |
| PAL | Analogue TV standard |
| Pay TV | Pay-per-view TV channels (e.g. PREMIERE) |
| PCMCIA | Standard for internal decoder interface for pay-TV |
| PID | See “Short technical glossary” |
| PIN | Personal Identification Number |
| Receivers | Satellite receiver |
| RGB | Video signal made up of three individual colour signals(red, green, blue) |
| Satellite IF signal | Receiver input signal |
| Scart cable 21-pin connecting cable (e.g. receiver/TV) | |
| Smart card | Card from Pay TV provider to decode its channels |
| Stand-by | Standby mode |
| S-VHS | Super Video Home System (video recorder standard) |
| Symbol Rate | Rate of data transmission of satellite signal |
| Timer function | Clock function for pre-programmed switch on and off times |
| Transponder | See “Short technical glossary” |
| VCR connection | Video recorder connection |
| Viterbi rate | See “Short technical glossary” |
TROUBLESHOOTING
In the event of a malfunction, first check all the cable connections and operating states:
- Receiver and TV set power plugs are connected to wall socket
- Antenna cables on receiver input
- Receiver and TV set correctly connected by a Scart or cinch cable
- Audio connections are made to Hi-Fi or Dolby Digital system as appropriate
- Receiver and TV set (Hi-Fi/Dolby Digital system) are switched on (check power indicators)
- Receiver is responding to remote control
A selection of troubleshooting tips is offered below.
| Problem Cause Remedy | ||
| “Weak or no signal!” warning appears on some or all channels | Antenna signal of satellite reception system missing or faulty. Incorrect LNB frequencies set in the “Antenna Configuration” menu. | Consult an antenna specialist to have it checked and repaired as necessary. On “Installation” menu check LNB configuration for the satellite in question: High L.O. “10.600” GHz, Low L.O. “9.750” GHz, and Limit frequency L.O. “11.700 MHz”, and change as necessary. |
| Remote control no longer responding | Receiver or remote control command set may have been unintentionally changed | Set infrared code 1 (simultaneously press the buttons BACK +...@). Check the batteries |
| Wrong time being displayed | “Summer Time” setting wrong. An incorrect time was imported from the reception signal | On “Settings” - “Date and Time Setup” menu check “Summer Time Enabled” and change as necessary Switch off receiver at mains switch from current channel, e.g. ARD or ZDF, wait 10 seconds and then switch back on |
| The following channels cut out or “Weak or no signal!” appears: DSF, Tele 5, HSE 24 and Sonnenklar TV | DECT telephones operate on the same frequency as these channels. Interference may occur due to inadequate level or poor shielding of cable | Consult your antenna specialist |
| Black or blue screen, no on-screen displays | Scart connection to TV deactivated by accidentally pressing the 0 button | Keep pressing the 0 button until the TV picture reappears on-screen |


- DVB SATELLITE RECEIVER UFS 651SI/SW
- PREFACE
- IMPORTANT INFORMATION
- INFORMATION ON AUDIO MPEG INC. AND S.I.SV.EL, S.P.A
- CONTENTS
- EDIT CHANNEL LIST.... 43
- SEARCH CHANNELS (CHANNEL SEARCH).... 49
- PARENTAL CONTROL.... 55
- SETTINGS 57
- SHORT TECHNICAL GUIDE 76
- TROUBLESHOOTING.... 79
- SAFETY INSTRUCTIONS - IMPORTANT NOTES
- MAINS CABLE
- CLEANING
- PLAYING CHILDREN
- EARTHING
- POWER SUPPLY VOLTAGE
- MOISTURE, DIRECT SUNLIGHT, HEAT, NAKED FLAMES
- BATTERIES
- VENTILATION
- INSTALLATION LOCATION
- REPAIRS
- CONNECTIONS
- PERIODS OF EXTENDED ABSENCE, THUNDERSTORMS, MAINS SOCKET ACCESSIBILITY
- SPENT BATTERIES ARE SPECIAL WASTE
- AUTOMATIC STAND-BY
- RECEIVER FEATURES / SCOPE OF SUPPLY
- PRODUCT PACKAGE
- DISPLAY OF ANTENNA SIGNAL LEVEL AND EMISSION OF SEARCH TONE (SAT FINDER) ON THE TV SET
- CONTROLS, DISPLAYS AND CONNECTIONS
- FRONT PANEL CONTROLS AND DISPLAYS
- REAR PANEL CONTROLS AND DISPLAYS
- CONNECTION AND SET-UP
- CONNECTING THE UNIT (SAT-IF CONNECTIONS)
- RECEPTION REQUIREMENTS
- RECEPTION SYSTEM PRESETS
- AUDIO CONNECTION
- ELECTRICAL DIGITAL OUTPUT
- INSERTING BATTERIES INTO THE REMOTE CONTROL
- REMOTE CONTROL
- FIRST INSTALLATION: GENERAL
- TV FORMAT
- PICTURE FORMAT
- TV-SCART-OUTPUT
- HDMI FORMAT
- FIRST INSTALLATION: DISEQC™1.0
- NUMBER OF SATELLITES
- SATELLITE AND POSITION
- LNB SETTINGS
- TEST TRANSPONDER
- IF YOU DO NOT RECEIVE A SIGNAL, CHECK YOUR SETTINGS AGAIN AND IF NECESSARY CALL FOR EXPERT HELP
- FIRST INSTALLATION: SIMPLE LNB
- LNB VOLTAGE
- FIRST INSTALLATION: ONE CABLE
- CONFIGURE SATELLITES
- UNIVERSAL
- WIDEBAND
- SINGLE
- FIRST INSTALLATION: SINGLE-CABLE SYSTEM
- CONNECTED EQUIPMENT
- SELECTION "USER-DEFI NED
- TRANSMISSION CHANNEL
- TRANSMISSION FREQUENCY
- SECURE CHANNEL WITH PIN
- TEST CONNECTION
- SELECTION "EXR 552
- SELECTION "EXU 908
- FIRST INSTALLATION: CHANNEL SEARCH
- PERFORM A CHANNEL SEARCH
- CHANNEL SEARCH MODE
- NETWORK SEARCH
- FIRST INSTALLATION: CHANNEL SEARCH/DATE AND TIME
- LOCAL TIME OFFSET
- OPERATING INSTRUCTIONS
- MENU CONCEPT
- MENU TREE
- MAIN MENU
- ALPHANUMERIC INPUTS
- LANGUAGE SETTING - OSD
- ON-SCREEN DISPLAYS (OSD)
- CHANNEL MESSAGES
- RADIO CHANNEL MESSAGES
- CHANNEL INFORMATION
- CALLING UP THE OPTIONS CHANNEL
- OPTION SELECTION
- ERROR SIGNALLING
- CHANNEL LIST - TV/RADIO
- SELECTION AND SORTING OPTIONS
- SEARCH FUNCTION
- EPG - ELECTRONIC PROGRAMME GUIDE
- CALLING UP THE EPG
- SELECTION OPTIONS
- CURRENT" VIEW
- PREVIEW" VIEW (PROGRAMME LISTINGS)
- ADDITIONAL INFORMATION (I BUTTON)
- RECORDING (TIMER)
- IF THE PROGRAMME IS PRESENT IN THE EPG
- PROGRAMME NOT PRESENT IN THE EPG
- RECORD ONCE
- RECORD DAILY
- RECORD WEEKLY
- PLAN RECORDING
- VIDEOTEXT (TELETEXT)
- EDIT CHANNEL LIST
- SELECTION OF THE LIST / CHANNELS TO BE EDITED
- EDITING LISTS / CHANNELS
- MOVE
- DELETE
- SKIP
- LOCK
- TO FAVORITE
- START BLOCKSELECTION
- LAST FUNCTION" MEMORY
- MOVE CHANNELS
- DELETE CHANNELS
- SKIP CHANNELS
- LOCK CHANNELS
- COPY CHANNELS TO THE FAVOURITES LIST
- START BLOCKSELECTION (HIGHLIGHTING SEVERAL CHANNELS)
- EDIT FAVOURITES LISTS
- REMOVE FROM THE FAVOURITES LIST
- RENAME FAVOURITES LIST
- SEARCH CHANNELS (CHANNEL SEARCH)
- AUTOMATIC (CHANNEL) SEARCH
- SATELLITE
- MANUAL (CHANNEL) SEARCH
- TRANSPONDER FREQUENCY
- POLARISATION AND SYMBOL RATE
- CHANNEL SEARCH WITH SERVICE ID
- SERVICE ID
- PARENTAL CONTROL
- LOCKING MAIN MENU
- LOCK SET-TOP-BOX
- DEFINE NEW PIN CODE
- SETTINGS
- TV SETTINGS (TV, PICTURE AND SOUND)
- TV ASPECT RATIO
- TELEVISION SYSTEM
- CUSTOMIZE SCREEN MENU
- FUNCTIONAL RANGE
- CHANNEL OSD DURATION
- ADJUST MENU ON TV
- DATE AND TIME
- AUTOMATIC CLOCK CHANGE
- SERVICE MENU
- UPDATING SOFTWARE
- CHANNEL LIST
- RESTORE FACTORY SETTINGS
- CONNECTING UP THE VIDEO/DVR
- RECORDING
- PLAYBACK
- USING THE FRONT PANEL
- BACKUP OPERATION
- ▼ BUTTON
- ▲ BUTTON
- SERVICE
- TECHNICAL APPENDIX
- FEATURES
- VHS/S-VHS SWITCHING
- CONNECTION EXAMPLE
- SAT IF CONNECTIONS
- SHORT TECHNICAL GUIDE
- CHANNEL PACKAGE
- DISEQC™
- DISEQC™ COMPONENTS
- DVB MPEG-2
- EB/NO RATIO
- FEC
- PID
- SYMBOL RATE
- TRANSPONDER
- VIDEO-BIT-RATE
- VITERBI RATE
- TROUBLESHOOTING
Brand : KATHREIN
Model : UFS 651sw
Category : Digital decoder