
WD900DSL30R-2C Proline Excel - Microwave Oven BEEM - Free user manual and instructions
Find the device manual for free WD900DSL30R-2C Proline Excel BEEM in PDF.


| Product type | Microwave oven |
| Brand | BEEM |
| Model | WD900DSL30R-2C Proline Excel |
| Capacity | 30 L |
| Power output | 900 W |
| Power levels | 10 levels |
| Dimensions (W x D x H) | 510 x 420 x 310 mm |
| Interior dimensions (W x D x H) | 330 x 330 x 210 mm |
| Weight | 15.5 kg |
| Power supply | 230 V, 50 Hz |
| Current | 10 A |
| Frequency | 2450 MHz |
| Functions | Microwave, grill, convection, defrost, auto cook menus |
| Display | LED digital display |
| Control type | Touch buttons and rotary dial |
| Interior light | Yes |
| Turntable diameter | 315 mm |
| Child lock | Yes |
| Cleaning | Wipe interior with damp cloth; mild detergent; avoid abrasive cleaners |
| Safety features | Overheat protection, door interlock, fuse protection |
| Spare parts | Turntable, glass plate, fuse, door latch; available via BEEM service |
| Repairability index | Not scored |
| Warranty | 2 years |
Frequently Asked Questions - WD900DSL30R-2C Proline Excel BEEM
User questions about WD900DSL30R-2C Proline Excel BEEM
0 question about this device. Answer the ones you know or ask your own.
Ask a new question about this device
Download the instructions for your Microwave Oven in PDF format for free! Find your manual WD900DSL30R-2C Proline Excel - BEEM and take your electronic device back in hand. On this page are published all the documents necessary for the use of your device. WD900DSL30R-2C Proline Excel by BEEM.
USER MANUAL WD900DSL30R-2C Proline Excel BEEM
- Introduction.... 19
- Components 20
- Important Safeguards 21
- Preparing for initial use 22
- Microwave cooking principles.... 22
- Utensils guide 22
- How to set the oven controls 23
7.1 Beeps during oven settings.... 23
7.2 Setting the clock 23
- Oven features 23
8.1 Microwave Cooking....23
8.2 Grill 24
8.3 Convection 24
8.4 To Preheat and Cook with Convection 25
8.5 Micro + Grill 25
8.5.1 Combination 1 25
8.5.2 Combination 2 25
8.6 Micro + Convection 26
8.7 Defrosting 26
8.8 Multi-Stage Cooking 26
- Settings about "AUTO-MENU" 27
9.1 Baked potatoes....27
9.2 Beverage 27
9.3 Popcorn 27
9.4 Reheat 28
9.5 Pizza 28
9.6 Meat skewers 28
9.7 Cake 28
- Other convenient features....29
10.1 Minute Timer 29
10.2 Child Proof Lock 29
10.3 Quick Start....29
10.4 To stop the oven while the oven is operating 29
- Before you call for service 29
- Cleaning and care 30
- Disposal 30
- Technichal data 30
- Certifications.... 31
- Guarantee, service and repairs 31
- Spare parts and accessories 32
- Circuit diagram.... 33
- European conformity Declaration.... 34
1. Einführung
Congratulations and thank you for buying the quality product Microwave oven Proline Excel WD900DSL30R-2C of BEEM.
This appliance offers you 5 different features:
- Microwave
- Grill
- Convection-Oven
- Microwave and Convection combined
- Microwave and Grill combined
Therefore this appliance can be used in many different ways. Starting with warming up, defrosting up to baking and grilling; all can be done with this one appliance. Moreover the cleaning is very easy as the cavity is completely done out of stainless steel.
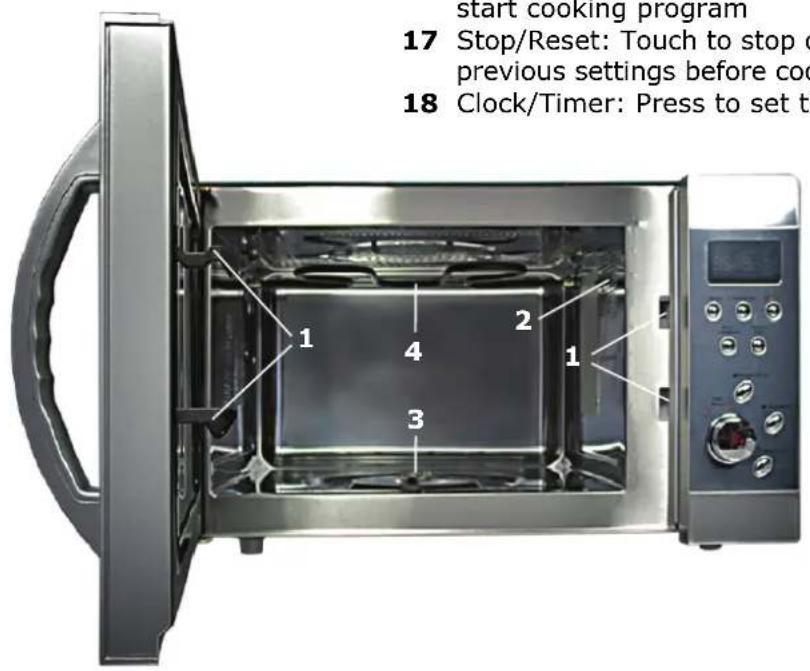
2. Components
Key
1 Door Safety Lock System
2 Oven Air Vent
3 Axis
4 Grill Heater
5 Pan, large
6 Glass Tray
7 Roller Ring
8 Display: Cooking time, power, indicators and present time are displayed
9 Micro: Press a number of times to select microwave power level
10 Convection: Press to program convection temperature
11 Grill: Press to set a grill-cooking program
12 Micro + Convection: Press to select different combination cooking settings
13 Micro + Grill: Press to select different combination cooking settings
14 Weight Adjust: Press to select the amount of food or enter cooking time
15 + 16 Time Menu (rotary): Rotate to set cooking time or select auto-menu, respectively,
Start/Quick Start: Press to start cooking program or set quick start cooking program
17 Stop/Reset: Touch to stop or hold cooking program or clear all previous settings before cooking
18 Clock/Timer: Press to set the clock or timer


Please read this instruction manual carefully and keep it.
- Please pay attention to the following basic safety precautions while using electrical appliances, in order to reduce the risk of fire, electric shock or injury of persons.
- Please read all the instructions carefully, even if you are familiar with the appliance.
- Use this appliance only for its intended use as described in this manual. This type of oven is specifically designed to heat, cook and dry food. It is not designed for industrial or laboratory use. Do not use corrosive chemicals or vapors in this appliance.
- Do not operate the oven when empty.
- Do not operate this appliance if it has a damaged cord or plug, if it is not working properly or if it has been damaged or dropped. If the supply cord is damaged, it must be replaced by the manufacturer or its service agent or a similarly qualified person in order to avoid a hazard
- WARNING: Do not allow children to use the oven without supervision.
- To reduce the risk of fire in the oven cavity:
a. When heating food in plastic or paper container, keep an eye on the oven due to the possibility of ignition.
b. Remove wire twist-ties from paper or plastic bags before placing bag in oven.
c. If smoke is observed, switch off or unplug the appliance and keep the door closed in order to stifle any flames.
d. Do not use the cavity for storage purposes. Do not leave paper products, cooking utensils or food in the cavity when not in use.
- WARNING: Liquid or other food must not be heated in sealed containers since they are liable to explode.
- Microwave heating of beverages can result in delayed eruptive boiling, therefore care has to be taken when handling the container.
- Do not fry food in the oven. Hot oil can damage oven parts and utensils and even result in skin burns.
- Eggs in their shell and whole hard boiled eggs should not be heated in microwave ovens since they may explode even after microwave heating has ended.
- Pierce foods with heavy skins such as potatoes, whole squashes, apples and chestnuts before cooking.
- The contents of feeding bottles and baby jars should be stirred or shaken and the temperature should be checked before serving in order to avoid burns.
- Cooking utensils may become hot because of heat transferred from the heated food. Potholders may be needed to handle the utensil.
- Utensils should be checked to ensure that they are suitable for use in microwave oven.
- WARNING: It is hazardous for anyone other than a trained person to carry out any service or repair operation which involves the removal of any cover which gives protection against exposure to microwave energy.
- Do not attempt to operate this oven with the door open since open door operation can result in harmful exposure to microwave energy. It is important not to defeat or tamper with the safety interlocks.
- Do not place any object between the oven front face and the door or allow soil or cleaner residue to accumulate on sealing surfaces
- Do not operate the oven if it is damaged. It is particularly important that the oven door closes properly and that there is no damage to the
a. Door (bent),
b. Hinges and latches (broken or loosened)
c. Door seals and sealing surfaces.
- Ensure that the voltage rating on the rating label corresponds to the mains voltage in your home.
- Operation of the microwave oven can cause interference to you radio, TV or similar equipment. When there is interference, it may be reduced or eliminated by taking the following measures:
a. Clean door and sealing surface of the oven.
b. Reorient the receiving antenna of radio or television.
c. Move the microwave oven away from the receiver.
d. Plug the microwave oven into a different outlet so that microwave oven and receiver are on different branch circuits.
4. Preparing for initial use
- Make sure that all the packing materials are removed from the inside of the door.
- WARNING: Check the oven for any damages, such as misaligned or bent door, damaged door seals and sealing surfaces, broken or loose door hinges and latches and dents inside the cavity or on the door. If there is any damage, do not operate the oven and contact qualified service personnel.
- This microwave oven must be placed on a flat, stable surface to hold its weight and the heaviest food likely to be cooked in the oven.
- Do not place the oven where heat, moisture, or high humidity are generated, or near combustible materials
- For correct operation, the oven must have sufficient airflow. Allow 20 cm of space above the oven, 10 cm at the back and 5 cm at both sides. Do not cover or block any openings on the appliance. Do not remove feet
- It is recommended that a separate circuit serving only the oven be provided.
- Do not operate the oven without glass tray, roller support and axis in their proper position.
- Make sure that the power supply cord is undamaged and does not run under the oven or over any hot or sharp surface.
- The socket must be readily accessible so that it can be easily unplugged in an emergency.
- Do not use the oven outdoors.
5. Microwave cooking principles
- Arrange food carefully. Place thickest areas towards outside of dish.
- Watch cooking time. Cook for the shortest amount of time indicated and add more as needed. Food severely overcooked can smoke and ignite.
- Cover foods while cooking. Covers prevent spattering and help foods to cook evenly.
- Turn foods over once during microwaving to speed cooking of such foods as chicken and hamburgers. Large items like roasts must be turned over at least once.
- Rearrange foods such as meatballs halfway through cooking both from top to bottom and from the centre of the dish to the outside.
6. Utensils guide
The ideal material for a microwave utensil is transparent to microwave, it allows energy to pass through the container and heat the food. Microwave can not penetrate metal, so metal utensils or dishes with metallic trim must not be used. Do not use paper products.
Round/oval dishes rather than square/oblong ones are recommended, as food in comers tends to overcook.
The list below is a general guide to help you select the correct utensils:
| Cookware | Microwave | Grill | Convection | Combination* |
| Heat-Resistant glass Yes Yes Yes Yes | ||||
| Non Heat-Resistant glass No No No No | ||||
| Heat-Resistant Ceramics without metal components | Yes | Yes | Yes | |
| Microwave-Safe Plastic Dish | Yes | No | No | |
| Metal Tray No Yes Yes No | ||||
| Metal Rack | No Yes Yes | No |
* Combination: Microwave + Grill and Microwave + Convection
7. How to set the oven controls
7.1 Beeps during oven settings
- 1 beep: Oven accepts the entry.
- 2 beeps: Oven does not accept the entry. Please check and try again.
7.2 Setting the clock
- Press CLOCK/TIMER button.
- Rotate the TIME MENU dial until the correct hour is displayed.
- Press CLOCK/TIMER button.
- Rotate the TIME MENU dial until the correct minute is displayed.
- Press CLOCK/TIMER button to confirm.
Note:
- This is a 12-hour clock (1:00 - 12:59), which automatically starts working at default setting of 1:00 when the oven is plugged in.
- You can check the clock time while cooking is in progress by pressing the CLOCK/TIMER button.
8. Oven features
8.1 Microwave Cooking
Microwave cooking allows you to customize cooking power and time. First, you select a power level by pressing the MICRO button a number of times (see the table below). Then you set the cooking time (maximum 95 minutes) by rotating the TIME MENU dial, before pushing the START button.
Press MICRO button, to select different cooking power:
| Press | Power | Description |
| 1x | 100% (P - HI) = 900 Watt | High |
| 2x | 90% (P - 90) = 810 Watt | High |
| 3x | 80% (P - 80) = 720 Watt | High |
| 4x | 70% ( P - 70 ) = 630 Watt | Medium to High |
| 5x | 60% ( P - 60 ) = 540 Watt | Medium to High |
| 6x | 50% ( P - 50 ) = 450 Watt | Medium |
| 7x | 40% ( P - 40 ) = 360 Watt | Medium |
| 8x | 30% ( P - 30 ) = 270 Watt | Medium to Low/Defrost |
| 9x | 20% ( P - 20 ) = 180 Watt | Medium to Low/Defrost |
| 10x | 10% ( P - 10 ) = 90 Watt | Low |
Suppose you want to cook for 5 minutes at 60% power level:
- Press MICRO button 5 times.
- Rotate the TIME MENU dial until the correct cooking time (5:00) is displayed.
- Press START button.
Note:
- If you want to temporarily stop a cooking session, press the STOP/RESET button once and then you can start the cooking again by pressing START; or press the STOP/RESET twice to cancel the cooking program altogether.
- After the cooking time ends, the system will beep four times and END is displayed. Before starting another cooking session, you need to clear the display and reset the system by pressing the STOP/RESET button.
8.2 Grill
Grill cooking is particularly useful for thin slices of meat, steaks, chop, kebabs, sausages and pieces of chicken. It is also suitable for hot sandwiches and au gratin dishes.
Suppose you want to program grill cooking for 12 minutes:
- Make sure the system is reset, which means no current cooking program is running, and the system is waiting for the instructions by pressing the STOP/RESET button
- Press GRILL button.
- Turn TIME MENU to display 12:00.
- Press START button.
Note:
Grill cooking power is set at full power level by the system. Maximum cooking time for grill is 95 minutes.
8.3 Convection
During convection cooking, hot air is circulated throughout the oven cavity to brown and crisp foods quickly and evenly. This oven can be programmed for ten different cooking temperatures. To cook with convection press CONVECTION button to set temperature.
| Press | Temperature* |
| 1x | 230°C |
| 2x | 215°C |
| 3x | 200°C |
| 4x | 185°C |
| 5x | 170°C |
| 6x | 155°C |
| 7x | 140°C |
| 8x | 125°C |
| 9x | 110°C |
| 10x | 90°C |
* The temperature figures quoted here may be updated according to different specifications. Please take what is actually shown on the oven's screen as the correct setting.
Suppose you want to cook at 185° C for 40 minutes:
- Press CONVECTION button 4 times.
- Rotate the TIME MENU dial until the correct cooking time (40:00) is displayed.
- Press the START button.
Note:
- The maximum convection cooking time is 9 hours and 30 minutes. After time has elapsed four beeps sound and END appears in display. Press STOP/RESET button or open door to clear END before starting another cooking function.
- You can check the convection temperature while cooking is in progress by pressing the CONVECTION button.
8.4 To Preheat and Cook with Convection
Your oven can be programmed to combine preheating and convection cooking operations.
Suppose you want to preheat to 170° C and then cook 35 minutes:
- Press CONVECTION button 5 times.
- Press START button. When the oven reaches the programmed temperature, one beep will sound and PREH will flicker in the display.
- Open the door and place container of food at the centre of the turntable.
- Rotate the TIME MENU dial to program cooking time (35:00).
- Press START button.
8.5 Micro + Grill
This feature allows you to combine grill and microwave cooking on two different settings. First, press this button once or twice to choose an appropriate combination setting, then, at the screen prompt, enter the desired cooking time by turning the TIME MENU dial. After you have pushed the start button, the system begins to count down.
Note:
- The maximum cooking time here is 95 minutes.
- During cooking, you can see the programmed setting by pressing this button.
8.5.1 Combination 1
The longest cooking time is 95 minutes. 30% time for microwave cooking, 70% for grill cooking. Use for fish, potatoes or au gratin.
Suppose you want to set combination 1 cooking for 26 minutes:
- Press STOP/RESET button.
- Press MICRO+GRILL button once.
- Turn TIME MENU to 26:00.
- Press START button.
The ingredients will be cooked for 7 minutes at the highest microwave setting and afterwards grilled for 18 minutes.
8.5.2 Combination 2
The longest cooking time is 95 minutes. 55% time for the microwave cooking, 45% for grill cooking. Use for pudding, omelets, baked potatoes and poultry.
Suppose you want to set combination 2 cooking for 12 minutes:
- Press STOP/RESET button.
- Press MICRO+GRILL button twice.
- Turn TIME MENU to 12:00.
- Press START button.
The ingredients will be cooked for 5 minutes at the highest microwave setting and afterwards grilled for 7 minutes.
8.6 Micro + Convection
This oven has four pre-programmed settings that make it easy to cook with both convection heat and microwave automatically.
Press CONVECTION+MICROWAVE button to select convection temperature:
| Press | Temperature °C |
| 1x | 230° |
| 2x | 200° |
| 3x | 180° |
| 4x | 150° |
Suppose you want to bake a cake for 26minutes with 180°C:
- Press MICRO+CONVECTION button 3 times
- Rotate the TIME MENU dial to program cooking time (26:00).
- Press START button.
The ingredients will be cooked alternately for 10 seconds at the highest microwave setting and the convection setting.
Note:
- The maximum cooking time is 9 hours, 30 minutes. After time has elapsed four beeps sound and END appears in display. Press RESET button or open door to clear END before starting another cooking function.
- You can check the convection temperature while cooking is in progress by pressing the MICRO+CONVECTION button.
8.7 Defrosting
Suppose you want to defrost frozen food for 5 minutes:
- Rotate the TIME MENU dial until „08“ and CODE are displayed.
- Press WEIGHT ADJUST button.
- Rotate the TIME MENU dial to program defrosting time.
- Press START button
Note:
- For either raw or previously cooked frozen food the rule of thumb is approx. 5 minutes per pound. For example, defrost 5 minutes for 1 pound of frozen spaghetti sauce.
- Always stop the oven periodically to remove or separate the portions that are defrosted. If food is not defrosted at the end of the estimated defrosting time, program the oven in one-minute steps until totally defrosted.
- When using plastic containers from the freezer, defrost only long enough to remove from plastic in order to place in a microwave-safe dish.
- The maximum defrosting time is 45 minutes. After time has elapsed four beeps sound and END appears in display. Press RESET button or open door to clear END before starting another cooking function.
8.8 Multi-Stage Cooking
Your oven can be programmed for up to 3 automatic cooking sequences. DEFROSTING can only be selected before the cooking stage in a program.
Suppose you want to set the following cooking program:
Defrosting → Microwave cooking → Convection cooking (without preheat function)
-
- Rotate the TIME MENU dial until „08“ and CODE are displayed.
-
- Press WEIGHT ADJUST button.
-
- Rotate the TIME MENU dial to program defrosting time.
-
- Press MICRO to set power level.
-
- Rotate TIME MENU dial to program cooking time.
-
- Press CONVECTION button to set convection temperature.
-
- Rotate the TIME MENU dial to program cooking time.
-
- Press START button.
9. Settings about "AUTO-MENU"
"AUTO MENU" allows you to cook or reheat food automatically without entering power level or time. For the following five pre-programmed settings only the microwave function is used:
9.1 Baked potatoes
Each amount is about 140 g to 200 g:
| Amount | WEIGHT/ADJUST | Cooking time* |
| 1 1x 5 Min. 40 Sek. | ||
| 2 2x 9 Min. 40 Sek. | ||
| 3 | 3x | 13 Min. |
| 4 | 4x | 17 Min. |
* The following quoted cooking times may be updated according to different specifications. Please always take the timings actually shown on the screen of your oven as the correct settings.
- Rotate the TIME MENU dial until „01“ and CODE are displayed.
- Press WEIGHT ADJUST button to select needed amount.
- Press START button.
Note:
After the cooking program has finished, let food stand in the oven for 5-10 minutes.
9.2 Beverage
Each amount is about 250 g to 310 g:
| Anmount | WEIGHT/ADJUST | Cooking time* |
| 1 1x 2 min. | 20 sec. | |
| 2 | 2x | 4 min |
| 3 3x 5 min. | 40 sec. | |
| 4 4x 7 min. | 20 sec. |
* The following quoted cooking times may be updated according to different specifications. Please always take the timings actually shown on the screen of your oven as the correct settings.
- Rotate the TIME MENU dial until „02“ and CODE are displayed.
- Press WEIGHT ADJUST button to select needed amount.
- Press START button.
9.3 Popcorn
- Rotate the TIME MENU dial until „03“ and CODE are displayed.
- Press WEIGHT ADJUST button once, the cooking time (2 min. 30 sec.) will be displayed.
- Press START button.
Note:
To reset the POPCORN time: Rotate the TIME MENU dial until „03" and CODE are displayed, press WEIGHT ADJUST button twice, rotate the TIME MENU dial to program the new popcorn time, and then press START button to verify. The new popcorn time will remain whenever you use the POPCORN function until you reset it.
9.4 Reheat
- Rotate the TIME MENU dial until „4“ and CODE are displayed.
- Press WEIGHT ADJUST button, reheating time (3 min. 40 sec.) will be displayed.
- Press START button.
9.5 Pizza
Roast a pizza of 110 g to 140 g:
- Rotate the TIME MENU dial until „05“ and CODE are displayed.
- Press WEIGHT ADJUST button once, the roasting time (1 min. 10 sec.) will be displayed.
- Press START button.
Roast a bigger Pizza:
- Rotate the TIME MENU dial until „05“ and CODE are displayed.
- Press WEIGHT ADJUST button twice, the roasting time (3 min. 30 sec) will be displayed.
- Press START button.
For the following two pre-programmed settings the air circulation function must be used:
9.6 Meat skewers
| WEIGHT/ADJUST | Weight | Cooking time* |
| 1x 170 g 12 minutes | ||
| 2x 310 g 15 minutes | ||
| 3x 540 g 23 minutes | ||
| 4x 800 g 30 minutes |
* The following quoted cooking times may be updated according to different specifications. Please always take the timings actually shown on the screen of your oven as the correct settings.
- Rotate the TIME MENU dial until „06“ and CODE are displayed.
- Press WEIGHT ADJUST button to select needed amount.
- Press START button.
Note: At the middle time of cooking process, a beep will sound to remind you to rearrange the food.
9.7 Cake
- Rotate the TIME MENU dial until „07" and CODE are displayed.
- Press WEIGHT ADJUST button once, the cooking time (40 min) will be displayed.
- Press START button.
Note:
To reset cooking time: Rotate the TIME MENU dial until „07" and CODE are displayed, press WEIGHT ADJUST button twice, rotate the TIME MENU dial to program the needed cooking time, and then press START button to verify. The new cooking time will remain whenever you use the CAKE function until you reset it.
10. Other convenient features
10.1 Minute Timer
Holding down the CLOCK/TIMER button for 3 seconds. Rotate the TIME MENU dial until the desired time is displayed. Press START Button.
Note:
The maximum time is 95 minutes. Time countdown can be seen in display for 3 seconds before clock or cooking time is returned to display. When the count down ends, a long beep will sound. Touch TIMER and then touch RESET to cancel TIMER during timing process.
10.2 Child Proof Lock
The child proof lock prevents unsupervised operation by little children. To set the child proof lock: Press RESET button for 3 seconds, then a beep will sound and the indicator light will come on. In the lock state, all buttons are disabled. To cancel the child proof lock: Press RESET button for 3 seconds, then a beep will sound and the indicator light will come off.
10.3 Quick Start
Use this feature to program the oven to microwave food at 100% power conveniently. Press START button in quick succession to set the cooking time. The maximum cooking time is 10 minutes. The oven will auto-start 2 seconds later. After time has elapsed 4 beeps sound and END appears in display. Press RESET button or open door to clear END before starting another cooking function.
10.4 To stop the oven while the oven is operating
- Press STOP button. You can restart the oven by pressing START pad. Touch RESET to erase all instructions.
- Open the door. You can restart the oven by closing the door and pressing START pad.
Note: Oven stops operating when door is opened.
11. Before you call for service
If the oven fails to operate:
- Check to ensure that the oven is plugged in securely. If it is not, remove the plug from the outlet, wait 10 seconds, and plug it in again securely.
- Check for a blown circuit fuse or a tripped main circuit breaker. If these seem to be operating properly, test the outlet with another appliance.
- Check to ensure that the control panel is programmed correctly and the timer is set.
- Check to ensure that the door is securely closed engaging the door safety lock system. Otherwise, the microwave energy will not flow into the oven.
- If the glass tray is not turning, check that the axis is fixed properly.
If none of the above rectifies the situation, then contact a qualified technician. Do not try to adjust or repair the oven yourself.
12. Cleaning and care
- Turn off the oven and remove the power plug from the wall socket before cleaning.
- Keep the inside of the oven clean. When food splatters or spilled liquids adhere to oven walls, wipe with a damp cloth. Mild detergent may be used if the oven gets very dirty. Avoid the use of spray and other harsh cleaners as they may stain, streak or dull the door surface.
- The outside surfaces should be cleaned with a damp sloth. To prevent damage to the operating parts inside the oven, water should not be allowed to seep into the ventilation openings.
- Wipe the door and window on both sides, the door seals and adjacent parts frequently with a damp cloth to remove any spills or splatters. Do not use abrasive cleaner.
- Do not allow the control panel to become wet. Clean with a soft, damp cloth. When cleaning the control panel, leave oven door to prevent oven from accidentally turning on.
- It is occasionally necessary to remove the glass tray for cleaning. Wash the tray in warm sudsy water or in the dishwasher.
- The roller ring and oven floor should be cleaned regularly to avoid excessive noise. Simply wipe the bottom surface of the oven with mild detergent. The roller ring may be washed in mild sudsy water or dishwasher. When removing the roller ring from cavity floor for cleaning, be sure to replace in the proper position.
- Smell can be removed from your oven by combining a cup of water with the juice and skin of one lemon in a deep microwaveable bowl, microwave for 5 minutes. Wipe thoroughly and dry with a soft cloth.
- Necessary repairs should only be done by an authorized dealer or the manufacturer.
13. Disposal
The following regulations apply under certain circumstances only to countries belonging to the European Community.
Dispose of the packaging sorted according to type. If you should wish to get rid of the appliance, dispose it in an environmentally harmless manner and in accordance with the latest stipulations.
The following standard regulation applies for Germany and some other countries of the European Community:
This appliance is not to be treated as normal domestic rubbish, but must be taken to a collection point for the recycling of electrical and electronic devices, in accordance with the regulations valid in the country in question. Information can be obtained from your local authorities. Some EU and non-EU countries have their own country-specific regulations concerning the disposal of old devices. Information may be obtained from the responsible authorities.
14. Technical data
Model: Proline Excel
Type: WD900DSL30R-2C
Power requirement: 230 V\~50 Hz.
Received power: 1400 W (Microwave)
1400 W (Convection)
1200 W (Oven)
Power output: 900 W (Microwave)
Frequency: 2450 MHz
Measurements: 305 mm x 525 mm x 478 mm
Oven Cavity Dimensions: 219 mm x 350 mm x 384 mm
Oven Capacity: 30 liters
Protection category: I
Level of protection: IP X0
Design alterations and technical alterations reserved. Printing errors reserved.
15. Certifications

This appliance has been tested and certified by TÜV Rheinland Product Safety GmbH.

This appliance complies the EC-directives concerning Electro-Magnetic Compatibility (EMC) 89/336/EC amended by 93/68/EC and the low voltage directive 73/23/EC amended by 93/68/EC.

This appliance complies with the RoHS Directive 2002/95/EC on the restriction of the use of certain hazardous substances in electrical and electronic equipment.

This appliance complies with the WEEE-Directive 2002/96/EC on waste electrical and electronic equipment (WEEE).
15. Guarantee, service and repairs
This high quality product from BEEM has been made in accordance with the latest manufacturing methods. We guarantee that this high-quality product is in perfect condition. We will remedy all material or manufacturing defects free of charge within the guarantee period.
Warranty exclusion: The warranty specifically excludes defects that have been caused by incorrect manipulation, disregard of the operating instructions and safety notes, use of force, alterations, attempts at self-repair or repair attempts undertaken by unqualified third parties. Also excluded are defects caused by normal wear & tear.
In the case of commercial or similar use e.g. in hotels, guest houses or community facilities, or if the customer is not a consumer in the sense of the German civil code, the manufacturer guarantees the product for 6 months unless the product has been specifically designated as being for commercial use. Warranty exclusions (see above) are not affected.
Insofar as we are legally obliged to provide a warranty, we will either repair or replace the defective item free of charge – with rights of swapping or reduction in price being excluded. If it is not possible to repair the product after a number of attempts have been made, or if the replacement is also defective for reasons which are our responsibility, then the customer is entitled to a reduction in price or, at his discretion, to withdraw from the contract. The warranty is not extended by availment thereof.
The dealer from whom you purchased the product is responsible in the first instance for swapping (exchange or replacement), return of the product (withdrawal from the sales
contract) or reduction in the sale price. This is especially the case in the event of return or claims for reduction in price, since these must be regulated with consideration for the sale price. Refunding of the sale price in the event of a return or issue of a credit note in the event of a price reduction can only be effected by the dealer from whom you bought the product.
If defects should transpire, contrary to expectations, please fill in the Service Cheque on the reverse of the warranty certificate and send it together with the carefully-packed article to your dealer or to the customer service address given below. Outside of Germany and especially in non-EC countries, send the article to your dealer or to your local distributor. You can get information from the customer service address below, preferably via email.
You can also arrange for repairs that are not covered by the warranty to be carried out by customer service, outside of Germany via your dealer or distributor. These will be invoiced on their individual merits.
The following applies for warranty and non-warranty repairs:
Rapid processing and return of your product can only be effected if you fill in the Service Cheque on the reverse of the warranty certificate as completely as possible, especially describing the defects or deficiencies in detail, and send the product directly to your distributor or dealer or to the service centre that is responsible for your country.
In addition, the following applies for warranty repairs and warranty spare parts deliveries:
A machine-generated and dated sales receipt or invoice is to be enclosed with the product or spare parts order. Warranty services cannot be rendered without a machine-generated and dated sales receipt or invoice, neither for repairs, spare parts nor other claims.
Consumable parts & materials can be ordered from your dealer or from the stated customer service address. Outside of Germany, please contact your dealer or the responsible distributor in the first instance.
Contact your dealer or the stated customer service department if you want information on products or wish to order accessories or ask questions relating to service matters. Outside of Germany and especially in non-EC countries, please contact your dealer or distributor in the first instance.
Customer service address, Germany:
BEEM GmbH, Customer Service Department, Dieselstrasse 19-21, D-61191 Rosbach, Germany | Telephone: +49 6003 9113-12 | Fax: +49 6003 9113-40
email: service@beem.de | Internet: www.beem.de.
16. Spare parts and accessories
| No.* | Item number | Item discription |
| 3 900 | 221 041 | Axis |
| 5 900 | 221 046 | Pan, large |
| 6 900 | 221 031 | Glass tray |
| 7 900 | 221 036 | Roller ring |
* according to the sketch in the product description (see above)
17. Schaltplan / Circuit diagram

CE
7.2 EUROPEAN CONFORMITY DECLARATION
Mikrowelle/Heissluftofen/Grill Microwave/Convection-Oven/Grill
Proline Excel Type: WD900DSL30R-2C 230 V\~ 50Hz., 1200 - 1400 W
We herewith confirm that this appliance complies with the European Directives for electromagnetic compatibility (EMC) 89/336/EC (EN55014-1+A1+A2 / EN55014-2+A1 / EN61000-3-2 / EN61000-3-3+A1 / EN55011+A1) amended by 93/68/EEC, as well as the European security regulations for low voltage Directives 73/23/EEC (EN60335-1+A11 / EN60335-2-25 / EN60335-2-6) amended by 93/68/EEC.


- EINFÜHRUNG
- COMPONENTS
- KEY
- PLEASE READ THIS INSTRUCTION MANUAL CAREFULLY AND KEEP IT
- PREPARING FOR INITIAL USE
- MICROWAVE COOKING PRINCIPLES
- UTENSILS GUIDE
- HOW TO SET THE OVEN CONTROLS
- 7.1 BEEPS DURING OVEN SETTINGS
- 7.2 SETTING THE CLOCK
- NOTE
- OVEN FEATURES
- 8.1 MICROWAVE COOKING
- 8.2 GRILL
- 8.3 CONVECTION
- 8.4 TO PREHEAT AND COOK WITH CONVECTION
- 8.5 MICRO + GRILL
- 8.5.1 COMBINATION 1
- 8.5.2 COMBINATION 2
- 8.6 MICRO + CONVECTION
- 8.7 DEFROSTING
- 8.8 MULTI-STAGE COOKING
- SETTINGS ABOUT "AUTO-MENU
- 9.1 BAKED POTATOES
- 9.2 BEVERAGE
- 9.3 POPCORN
- 9.4 REHEAT
- 9.5 PIZZA
- 9.6 MEAT SKEWERS
- 9.7 CAKE
- OTHER CONVENIENT FEATURES
- 10.1 MINUTE TIMER
- 10.2 CHILD PROOF LOCK
- 10.3 QUICK START
- 10.4 TO STOP THE OVEN WHILE THE OVEN IS OPERATING
- BEFORE YOU CALL FOR SERVICE
- CLEANING AND CARE
- DISPOSAL
- TECHNICAL DATA
- CERTIFICATIONS
- GUARANTEE, SERVICE AND REPAIRS
- THE FOLLOWING APPLIES FOR WARRANTY AND NON-WARRANTY REPAIRS
- IN ADDITION, THE FOLLOWING APPLIES FOR WARRANTY REPAIRS AND WARRANTY SPARE PARTS DELIVERIES
- CUSTOMER SERVICE ADDRESS, GERMANY
- SPARE PARTS AND ACCESSORIES
- SCHALTPLAN / CIRCUIT DIAGRAM
- CE
- 7.2 EUROPEAN CONFORMITY DECLARATION
Brand : BEEM
Model : WD900DSL30R-2C Proline Excel
Category : Microwave Oven