
Fishing Timer Ana Digital - Sports Watch CASIO - Free user manual and instructions
Find the device manual for free Fishing Timer Ana Digital CASIO in PDF.


| Product Type | Sports Watch |
| Brand | Casio |
| Model | Fishing Timer Ana Digital |
| Category | Sports Watch |
| Display Type | Analog-Digital |
| Case Material | Resin |
| Band Material | Resin |
| Water Resistance | 100 meters (10 ATM) |
| Battery Type | CR1616 |
| Battery Life | Approx. 2 years |
| Dimensions (Approx.) | 45 x 42 x 12 mm |
| Weight (Approx.) | 50 g |
| Main Functions | Time, Date, Stopwatch, Countdown Timer, Alarm, Fishing Timer (Moon Phase & Fish Activity) |
| Care and Cleaning | Wipe with a soft, dry cloth. Avoid solvents and detergents. |
| Safety Precautions | Not suitable for scuba diving. Remove battery if not used for long periods. |
| Spare Parts | Available through Casio service centers: batteries, bands, bezels. |
| Repairability | Battery replacement by a jeweler or authorized service. Other repairs by Casio service. |
Frequently Asked Questions - Fishing Timer Ana Digital CASIO
User questions about Fishing Timer Ana Digital CASIO
0 question about this device. Answer the ones you know or ask your own.
Ask a new question about this device
Download the instructions for your Sports Watch in PDF format for free! Find your manual Fishing Timer Ana Digital - CASIO and take your electronic device back in hand. On this page are published all the documents necessary for the use of your device. Fishing Timer Ana Digital by CASIO.
USER MANUAL Fishing Timer Ana Digital CASIO
Operation Guide 5056
CASIO
Getting Acquainted
Congratulations upon your selection of this CASIO watch. To get the most out of your purchase, be sure to read this manual carefully.
Warning!
- The measurement functions built into this watch are not intended for use in taking measurements that require professional or industrial precision. Values produced by this watch should be considered as reasonably accurate representations only. - When fishing, always take proper precautions to ensure your own personal safety and the personal safety of others around you.
The fishing level indicator and moon phase indicator produced by this watch are all based on calculations that use the watch's current time, date, and Home Site settings. Because of this, you should make sure that the current date and time, and your Home Site data are all correct before using the indicators.
Warning!
- See the "Timekeeping" section of this manual for information about setting the current time and date, and about specifying your Home Site.
- Note that the fishing level indicator and moon phase indicator are all based on calculated values. They are provided only for reference purposes.
Note that CASIO COMPUTER CO., LTD. assumes no responsibility for any damage or loss suffered by you or any third party arising through the use of this product or its malfunction.
About This Manual
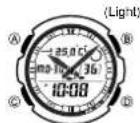
General Guide
- Press © to change from mode to mode.
- In any mode (except when a setting screen is on the display), press Ⓑ to illuminate the display. Fishing Mode

flowchart
graph LR
    A["Timekeeping Mode"] -->|Press ©| B["Hand Setting Mode"]
    B --> C["World Time Mode"]
    C --> D["Alarm Mode"]
    D --> E["Countdown Timer Mode"]
    E --> F["Ground"]
    style A fill:#f9f,stroke:#333
    style B fill:#f9f,stroke:#333
    style C fill:#ccf,stroke:#333
    style D fill:#ccf,stroke:#333
    style E fill:#ccf,stroke:#333
    style F fill:#ccf,stroke:#333
Temperature Data
Recall Mode
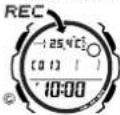
Stopwatch Mode
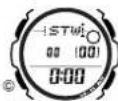
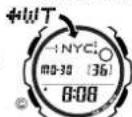
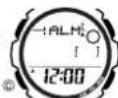

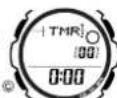
Timekeeping
Use the Timekeeping Mode to set and view the current time and date.
This watch features separate digital and analog timekeeping. The procedures for setting the digital time and analog time are different.
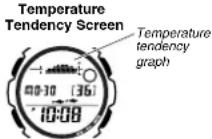
- In the Timekeeping Mode, press Ⓐ to toggle between the thermometer screen and the temperature tendency screen.
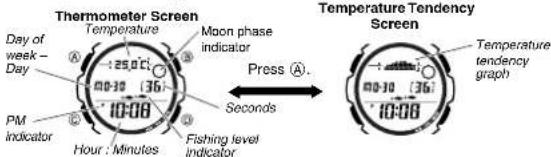
- The fishing level indicator indicates the times when fish can be expected to be feeding. For more information, see "Fishing Mode".
- The Moon phase indicator shows the current Moon phase in accordance with the current date as kept in the Timekeeping Mode.
- See "Thermometer" for details about the thermometer screen and temperature tendency graph.
Important!
- Be sure to configure the current time and date, and your Home Site data (data for the site where you use the watch) correctly before using the functions of this watch. See "Home Site Data" for more information.
Setting the Digital Time and Date
This watch is preset with UTC differential values that represent each time zone around the globe. Before setting the digital time, be sure to first set the UTC differential for your Home Site, which is the location where you normally will be using the watch. • Note that World Time Mode times are all displayed based on the time and date settings you configure in the Timekeeping Mode.
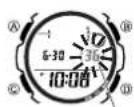
To set the digital time and date
Seconds
- In the Timekeeping Mode, hold down Ⓐ until the seconds start to flash, which indicates the setting screen.
- Be sure to configure the correct UTC differential for your Home Site before configuring any other Timekeeping Mode settings.
• See the "City Code List" for information about the UTC differential settings that are supported. - Press © to move the flashing in the sequence shown below to select the setting you want.

flowchart
graph LR
    A["Seconds"] --> B["DST"]
    B --> C["UTC Differential"]
    C --> D["Hour"]
    D --> E["Minutes"]
    E --> F["12/24-Hour Format"]
    F --> G["Year"]
    G --> H["Month"]
    H --> I["Day"]
    I --> J["Temperature Sensor Calibration"]
    J --> K["Temperature Unit"]
    K --> A
- When the setting you want to change is flashing, use Ⓓ and Ⓑ to change it as described below.
| Screen: | To do this: | Do this: |
| 36 | Reset the seconds to 00 | Press 5. |
| 00 | Toggle between Daylight Saving Time (GF) and Standard Time (GF) | Press 6. |
| +90 | Specify the UTC differential | Use 10(+) and 8(-). |
| 10:00 | Change the hour or minutes | Use 10(+) and 8(-). |
| 12H | Toggle between 12-hour (12H) and 24-hour (24H) timekeeping | Press 7. |
| 6:30 | Change the year, month, or day | Use 10(+) and 8(-). |
| 2008 |
- The UTC differential setting range is -12.0 to +14.0 in 0.5-hour units for Standard Time (DST turned off), and -11.0 to +15.0 in 0.5-hour units for summer time (DST turned on).
- For information about settings other than the time and date, see the following. Temperature Sensor Calibration: "Thermometer"
Temperature Unit: "To specify the temperature display unit"
- Press Ⓐ twice to exit the setting screen.
•The 12-hour/24-hour timekeeping format you select in the Timekeeping Mode is applied in all modes. - The day of the week is displayed automatically in accordance with the date (year, month, and day) settings.
- See "Daylight Saving Time (DST) Setting" below for details about the DST setting.
- Any time the seconds setting is changed, the analog hands are adjusted accordingly.
Daylight Saving Time (DST) Setting
Daylight Saving Time (summer time) advances the time setting by one hour from Standard Time. Remember that not all countries or even local areas use Daylight Saving Time.
To toggle the Timekeeping Mode digital time between DST and Standard Time
On/Off status
DST indicator
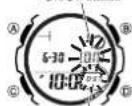
. In the Timekeeping Mode, hold down Ⓐ until the seconds start to flash, which indicates the setting screen.
- Press © once and the DST setting screen appears.
- Press © to toggle between Daylight Saving Time (SF displayed) and Standard Time (SF displayed).
- Press (A) twice to exit the setting screen.
- The DST indicator appears on the Timekeeping, Fishing, Alarm, and Hand Setting Mode screens to indicate that Daylight Saving Time is turned on. In the case of the Fishing Mode, the DST indicator appears on the fishing level screen only.
Home Site Data
Moon phase, the fishing level indicator, and Fishing Mode data will not be displayed properly unless Home Site data (UTC differential and longitude) is configured correctly.
•The UTC differential is a value that indicates the time difference between a reference point in Greenwich, England and the time zone where a city is located.
- The letters UTC is the abbreviation for Coordinated Universal Time, which is the world-wide scientific standard of timekeeping. It is based upon carefully maintained atomic (cesium) clocks that keep time accurately to within microseconds. Leap seconds are added or subtracted as necessary to keep UTC in sync with the Earth's rotation.
- The "Site Data List" provides UTC differential and longitude information around the world.
- The following is the initial factory default Home Site data (Tokyo, Japan) when you first purchase the watch and whenever you have the batteries replaced. Change these settings to match the area where you normally use the watch. UTC differential (+9.0); Longitude (East 140 degrees)
To configure Home Site data
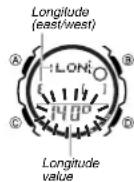
- In the Timekeeping Mode, hold down Ⓐ until the seconds start to flash, which indicates the setting screen.
- Press © twice to display the UTC differential setting screen, and confirm that the setting is correct. • If the UTC differential setting is not correct, use Ⓓ (+) and Ⓑ (−) to change it.
- Press Ⓐ to display the longitude value setting screen
- Press Ⓐ to toggle the flashing between the longitude value and the longitude unit (east/west).
- While the setting you want to change is flashing, use ① and ⑧ to change it as described below.
| Setting | Screen | Button Operations |
| Longitude Value | 1400° | Use 1 (+) and 8 (−) to change the setting. •You can specify a value from 0^ to 180^ , in 1-degree units. |
| Longitude Unit(East/West) | Use 1 to switch between east longitude ( )and west longitude ( ). |
- Press Ⓐ to exit the setting screen.
Setting the Analog Time
Perform the procedure below when the time indicated by the analog hands does not match the time of the digital display.
To adjust the analog time
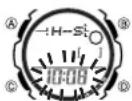
- In the Timekeeping Mode, press © seven times to enter the Hand Setting Mode.
- Hold down Ⓐ until the current digital time starts to flash, which indicates the setting screen.
- Use Ⓓ to adjust the analog setting.
- Press (D) once to advance the hands 20 seconds.
- Hold down Ⓓ to advance the hands at high speed.
- To lock high speed hands movement, hold down Ⓓ to start it and then press Ⓑ to lock. The hands will continue to advance for one 12-hour cycle or until you press any button to stop it.
It will also stop automatically after the time advances 12 hours or if an alarm (daily alarm, Hourly Time Signal, or countdown beeper) starts to sound.
- Press Ⓐ to exit the setting screen.
- The minute hand will be adjusted slightly to match the seconds when you exit the setting screen.
• To return to the Timekeeping Mode, press ©.
Fishing Mode
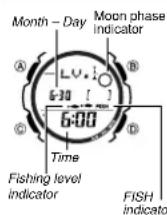
The Fishing Mode displays an indicator that shows, as one of five levels, the suitability of a specific date and time (minute 00 to minute 59 of a particular hour) for fishing. This mode also can be used to display Moon Data (Moon age and Moon phase) for a specific date.
- If you suspect that the fishing level indicator or current Moon data is wrong for some reason, check the current Timekeeping Mode settings (time, date, and Home Site), and correct them if required.
- See "Moon Phase Indicator" for information about the Moon phase indicator.
- All of the operations in this section are performed in the Fishing Mode, which you enter by pressing ©.
Fishing Level Screen
Fishing Level Indicator
The fishing level indicator shows the relative favorability of a fishing time (calculated in accordance with Moon transit and phase) as shown in the table below.
| Level 5 | Level 4 | Level 3 | Level 2 | Level 1 |
| Moon Phase\Moon Transit | Upper Lower | West East | Other |
| New moon*Full moon | Level 5 | Level 4 | Level 3 |
| First quarterLast quarter | Level 4 | Level 3 | Level 2 |
| Other | Level 3 | Level 2 | Level 1 |
* These indicators actually appear during Moon ages 13.0 to 16.6 (Full Moon and phase immediately preceding it) and 27.7 to 1.8 (New Moon and phase immediately preceding it).
- The fishing level indicator changes in accordance with the Moon data. - In the Timekeeping Mode, the FISH indicator flashes whenever the fishing level of the current time is 4 or 5.
To view the current fishing level and Moon data
In the Fishing Mode, press Ⓐ to toggle between the fishing level screen and the Moon Data screen.
- The fishing level indicator shows the level for the displayed time. The initial fishing level screen shows the level for 6:00 a.m. The Moon data screen shows the Moon age and Moon phase for the current date.
Fishing Level Screen
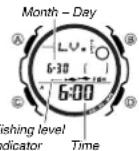

Moon Data Screen
Month - Day Moon phase indicator
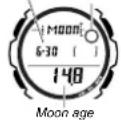
- While the fishing level screen is displayed, press Ⓓ to advance to the next hour.
- While the Moon Data screen is displayed, press Ⓓ to advance to the next day.
- You can also specify a particular date (year, month, day) to view its fishing level and Moon data. See "To specify a date" for more information.
- When you enter the Fishing Mode, the screen (fishing level or Moon data) that was displayed the last time you exited the mode appears first.
To specify a date
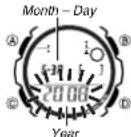
- In the Fishing Mode, hold down Ⓐ until the year setting starts to flash, which indicates the setting screen.
- Press Ⓐ to move the flashing in the sequence shown below to select the other settings.

- While a setting is flashing, use Ⓓ (+) or Ⓑ (−) to change it.
- You can specify a date in the range of January 1, 2000 to December 31, 2099.
- Press Ⓐ to exit the setting screen.
- Use Ⓐ to display either the fishing level screen or the Moon Data screen.
Thermometer
This watch uses a temperature sensor to measure temperature. A reading is taken during each even-numbered minute, and the result of the last reading is displayed on the thermometer screen.
The watch also takes separate readings and stores them in memory for display in the temperature tendency graph, which can be viewed in the Timekeeping Mode. Measured temperature values are stored in memory for later recall when you need them.
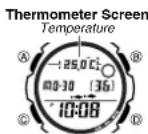
- You can select either Celsius (°C) or Fahrenheit (°F) units for the thermometer screen. See "To specify the temperature display unit" for more information.
- The thermometer screen displays temperature values in 0.1°C units (or 0.2°F units).
- The display range of the thermometer screen is -10.0^ to 60.0^ (or 14.0^ to
140.0°F). - You can calibrate the temperature sensor if you feel that the displayed temperature values are not correct. See "Temperature Sensor Calibration" for more information
Important!
- Temperature measurements are affected by your body temperature (while you are wearing the watch), direct sunlight, and moisture. To achieve a more accurate temperature measurement, remove the watch from your wrist, place it in a well ventilated location out of direct sunlight, and wipe all moisture from the case. It takes approximately 20 to 30 minutes for the case of the watch to reach the actual surrounding temperature.
Temperature Tendency Graph
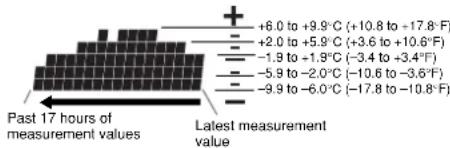
The watch also takes temperature readings at the top and the bottom of each hour and stores the results in memory for display on the temperature tendency graph. Depending on the current Timekeeping Mode time, the temperature tendency graph shows either the top of the hour measurements or the bottom of the hour measurements for the past 17 hours. From the top of each hour to the 29th minute, past top of the hour readings are shown in the graph. From the bottom of each hour to the 59th minute, past bottom of the hour readings are shown in the graph.
Temperature tendency graph contents are updated every 30 minutes.
other
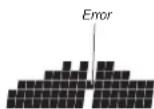
| Measurement Value Range | Color Scale (Approximate) | | :--- | :--- | | +6.0 to +9.9°C | (+10.8 to +17.8°F) | | +2.0 to +5.9°C | (+3.6 to +10.6°F) | | -1.9 to +1.9°C | (-3.4 to +3.4°F) | | -5.9 to -2.0°C | (-10.6 to -3.6°F) | | -9.9 to -6.0°C | (-17.8 to -10.8°F) |The horizontal axis of the graph represents time. The rightmost column is the newest temperature value in memory, while the leftmost column is the temperature value stored approximately 17 hours ago (1 dot = 1 hour). The vertical axis of the graph represents the relative change from one hour to the next.
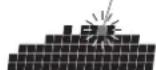
- When the relative change from one hour to the next exceeds +10.0^ (+18.0^) , the dot at the highest point for the applicable hour flashes.
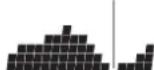
- When the relative change from one hour to the next exceeds -10.0^ ( -18.0^ ), there is no dot in the applicable hour's column.
- If a measurement error occurs for some reason, only a single the dot in the center column will be displayed.
Temperature change greater than +10.0°C (+18.0°F)
Temperature change greater than -10.0°C (-18.0°F)
Recalling Temperature Data
The measurements the watch takes at the top and the bottom of each hour are stored in memory automatically. Memory can hold up to 50 measurement records. You can use the Temperature Data Recall Mode to recall memory data when you need it.
•Each temperature data record has a number. The newest data record is number 01, while the oldest data record is the one with the highest number.
- When there are already 50 records in memory, storage of a new temperature
reading causes the oldest record (record number 50) to be deleted automatically to make room for the new data. The new data is assigned record number 1, and all of the numbers of all the other records (01 to 49) are incremented by 1 (becoming 02 through 50).
To recall temperature records
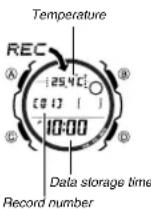
- In the Timekeeping Mode, press © twice to enter the Temperature Data Recall Mode.
•This displays the newest record currently in memory.
- Use (D) (+) to scroll through the records.
- Pressing (D) while the oldest record is displayed will scroll to the newest record.
- If a temperature measurement operation is performed while a record is displayed, the displayed record's number will be incremented by 1.
- If an error occurs during temperature measurement, “--.-” will be shown for the temperature value in the corresponding record.
Stopwatch
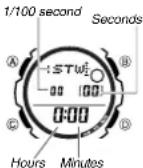
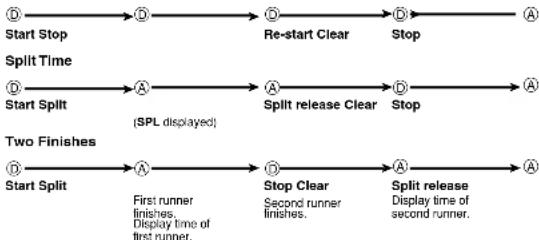
The stopwatch lets you measure elapsed time, split times, and two finishes.
•The display range of the stopwatch is 99 hours, 59 minutes, 59.99 seconds.
•The stopwatch continues to run, restarting from zero after it reaches its limit, until you stop it.
- All of the operations in this section are performed in the Stopwatch Mode, which you enter by pressing ©.
To measure times with the stopwatch
Elapsed Time
flowchart
graph LR
    A["Start Stop"] --> B["Split Time"]
    B --> C["Split Split"]
    C --> D["Split Release Clear"]
    D --> E["Split Release"]
    E --> F["Two Finishes"]
    F --> G["First runner finishes, Display time of first runner."]
    A --> H["Re-start Clear"]
    H --> I["Stop"]
    I --> J["A"]
    C --> K["(SPL displayed)"]
    K --> L["Split release Clear"]
    L --> M["Stop"]
    M --> N["A"]
    D --> O["Stop Clear"]
    O --> P["Second runner finishes, Display time of second runner."]
    E --> Q["Split release"]
    Q --> R["Display time of second runner."]
Countdown Timer
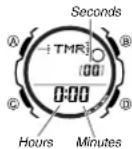
You can set the countdown timer within a range of one minute to 100 hours. An alarm sounds when the countdown reaches zero.
- You can also select auto-repeat, which automatically restarts the countdown from the original value you set whenever zero is reached.
- All of the operations in this section are performed in the Countdown Timer Mode, which you enter by pressing ©.
To use the countdown timer
Press Ⓓ while in the Countdown Timer Mode to start the countdown timer.
- When the end of the countdown is reached and auto-repeat is turned off, the alarm sounds for 10 seconds or until you stop it by pressing any button. The countdown time is automatically reset to its starting value after the alarm stops.
- When auto-repeat is turned on, the countdown will restart automatically without pausing when it reaches zero. The alarm sounds to signal when the countdown reaches zero.
•The countdown timer measurement operation continues even if you exit the
Countdown Timer Made
- To stop a countdown operation completely, first pause it (by pressing Ⓑ), and then press Ⓐ. This returns the countdown time to its starting value.
To configure countdown start time and auto-repeat settings
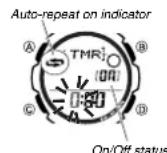
- While the countdown start time is on the display in the Countdown Timer Mode, hold down Ⓐ until the hour setting of the countdown start time starts to flash, which indicates the setting screen.
- If the countdown start time is not displayed, use the procedure under "To use the countdown timer" to display it.
- Press Ⓐ to move the flashing in the sequence shown below, and select the setting you want to change.

- Perform the following operations, depending on which setting is currently selected on the display.
- While the start time setting is flashing, use Ⓓ (+) and Ⓑ (−) to change it.
- Set 0:00 to specify 100 hours.
- While the auto-repeat on/off setting (ON or OF) is flashing on the display, press (D) to toggle auto-repeat on (ON) and off (OF).
- Press (A) to exit the setting screen.
- The auto-repeat on indicator (💡) is displayed on the Countdown Timer Mode screen while this function is turned on.
- Frequent use of auto-repeat and the alarm can run down battery power.
Alarm
Alarm time (Hour: Minutes)
While the alarm is turned on, the watch beeps when the alarm time is reached. You can also turn on an Hourly Time Signal, which will cause the watch to beep twice every hour on the hour.
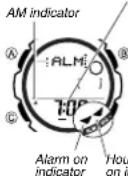
- All of the operations in this section are performed in the Alarm Mode, which you enter by pressing ©.
To set the alarm time
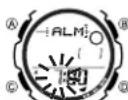
- In the Alarm Mode, hold down Ⓐ until the hour setting of the alarm time starts to flash, which indicates the setting screen.
- This operation turns on the alarm automatically. 2. Press © to move the flashing between the hour and minute settings
- While a setting is flashing, use Ⓓ (+) and Ⓑ (−) to change it.
- When setting the alarm time using the 12-hour format, take care to set the time correctly as a m. (A indicator) or p.m. (B indicator).
- Press Ⓐ to exit the setting screen.
Alarm Operation
The alarm sounds at the preset time for 10 seconds, regardless of the mode the watch is in.
•To stop the alarm tone after it starts to sound, press any button.
To test the alarm
In the Alarm Mode, hold down Ⓓ to sound the alarm.
To turn the Daily alarm and the Hourly Time Signal on and off
In the Alarm Mode, press (D) to cycle through the settings shown below.

flowchart
graph LR
    A["ALM SIG"] --> B["ALM SIG"]
    B --> C["ALM SIG"]
    C --> D["ALM SIG"]
    D --> E["Alarm On Signal On"]
    F["Alarm Off Signal Off"] --> A
    G["Alarm On Signal Off"] --> B
    H["Alarm Off Signal Off"] --> C
    I["Alarm Off Signal On"] --> C
- The alarm on indicator and the Hourly Time Signal on indicator are shown on the display in all modes while these functions are turned on.
World Time
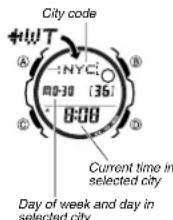
The World Time Mode digitally displays the current time in 50 cities (30 time zones) around the world.
- The times kept in the World Time Mode are synchronized with the time being kept in the Timekeeping Mode. If you feel that there is an error in any World Time Mode time, check the UTC differential of your Home Site Data (Home City) and the current setting of the Timekeeping Mode time.
- Select a city code in the World Time Mode to display the current time in any particular time zone around the globe. See the "City Code List" for information about the UTC differential settings that are supported.
- All of the operations in this section are performed in the World Time Mode, which you enter by pressing ©.
To view the time in another city
While in the World Time Mode, press Ⓓ to scroll eastward through the city codes (time zones).
To toggle a city code time between Standard Time and Daylight Saving Time
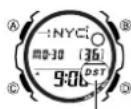
DST indicator
-
In the World Time Mode, use Ⓓ to display the city code (time zone) whose Standard Time/Daylight Saving Time setting you want to change.
-
Hold down Ⓐ to toggle between Daylight Saving Time (DST indicator displayed) and Standard Time (DST indicator not displayed).
- The DST indicator is shown on the World Time screen while Daylight Saving Time is turned on.
- Note that changing the Daylight Saving Time for any city code causes the setting to be applied to all city codes.
Illumination
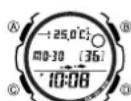
This watch has an EL (electro-luminescent) panel that causes the entire display to glow for easy reading in the dark.
- See "Illumination Precautions" for other important information about using illumination.
To turn on illumination
In any mode (except when a setting screen is on the display), press Ⓑ to illuminate the display for about one second.
Reference
This section contains more detailed and technical information about watch operation. It also contains important precautions and notes about the various features and functions of this watch.
Moon Phase Indicator
The Moon phase indicator of this watch indicates the current phase of the Moon as shown below.
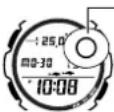
(part you cannot see) Moon phase (part you can see)
| Moon Phase Indicator | ||||||||
| Moon Age | 0.0 - 1.827.7 - 29.5 | 1.9 - 5.5 | 5.6 - 9.2 | 9.3 - 12.9 | 13.0 - 16.7-20.2 | 20.3 - 23.9 | 24.0 - 27.6 | |
| Moon Phase | New Moon | First Quarter (Waxing) | Full Moon | Last Quarter (Waning) |
•The Moon phase indicator shows the Moon as viewed at noon from a position in the Northern Hemisphere looking south. Note that at times the image shown by the Moon phase indicator may differ from that of the actual Moon in your area.
- The left-right orientation of the Moon phase is reversed when viewing from the Southern Hemisphere or from a point near the equator.
Moon Phases and Moon Age
The Moon goes through a regular 29.53-day cycle. During each cycle, the Moon appears to wax and wane as the relative positioning of the Earth, Moon, and Sun changes. The greater the angular distance between the Moon and the Sun, ^* the more we see illuminated.
* The angle to the Moon in relation to the direction at which the Sun is visible from the Earth.
This watch performs a rough calculation of the current Moon age starting from day 0 of the moon age cycle. Since this watch performs calculations using integer values only (no fractions), the margin for error of the displayed Moon age is ± 1 day.
Thermometer
Temperature Sensor Calibration
The temperature sensor built into the watch is calibrated at the factory and normally requires no further adjustment. If you notice serious errors in the temperature readings produced by the watch, you can calibrate the sensor to correct the errors.
Important!
Incorrectly calibrating the temperature sensor can result in incorrect readings. Carefully read the following before doing anything.
- Compare the readings produced by the watch with those of another reliable and accurate thermometer.
- If adjustment is required, remove the watch from your wrist and wait for 20 or 30 minutes to give the temperature of the watch time to stabilize.
To calibrate the temperature sensor
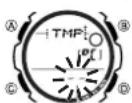
Calibration value
- In the Timekeeping Mode, hold down Ⓐ until the seconds start to flash, which indicates the setting screen.
- Press © nine times to display the temperature sensor calibration screen.
- Use ① (+) and ② (−) to change the calibration value.
• You can change the value in 0.1°C (0.2°F) steps, in a
range of ± 10^ ( ± 18^ ). The calibration value shows “--.” when the setting is outside the allowable range.
- To return the calibration value to its default (no calibration, indicated by “- -”), press Ⓓ and Ⓔ at the same time.
- Temperature sensor calibration will not be possible if the current reading is outside the allowable display range (-10.0°C/14.0°F to 60.0°C/140.0°F) and the calibration value shows “-”.
- Setting a sensor calibration value does not affect temperature values that are already stored in memory.
- After configuring the setting you want, press Ⓐ twice to exit the setting screen.
To specify the temperature display unit
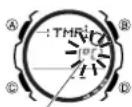
Temperature unit
-
In the Timekeeping Mode, hold down Ⓐ until the seconds start to flash, which indicates the setting screen.
-
Press © 10 times to display the temperature unit setting screen.
-
Use ① to switch between Celsius ( ^0 ) and Fahrenheit ( ^0 F).
- The initial factory default and the initial default after battery replacement is Celsius (°C).
- After configuring the setting you want, press Ⓐ twice to exit the setting screen.
- The temperature display unit setting you select is also applied to temperature values that are already stored in memory.
Button Operation Tone
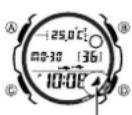
Mute indicator
The button operation tone sounds any time you press one of the watch's buttons. You can turn the button operation tone on or off as desired.
- Even if you turn off the button operation tone, the alarm, Hourly Time Signal, and Countdown Timer Mode alarm all operate normally.
To turn the button operation tone on and off In any mode (except when a setting screen is on the display), hold down Ⓐ to toggle the button operation tone on (mute indicator not displayed) and off (mute indicator displayed).
- Since the Ⓒ button is also the mode change button, holding it down to turn the button operation tone on or off also causes the watch's current mode to change.
- The mute indicator is displayed in all modes when the button operation tone is turned off.
Auto Return Feature
- If you leave a screen with flashing digits on the display without performing any operation for two or three minutes, the watch saves any settings you have made up to that point and exits the setting screen automatically.
- The watch will change to the Timekeeping Mode automatically if you do not perform any operation in the Fishing Mode. Temperature Data Recall Mode, Alarm Mode, or Hand Setting Mode for two or three minutes.
Scrolling
The Ⓑ and Ⓞ buttons are used in various modes and setting screens to scroll through data on the display. In most cases, holding down these buttons during a scroll operation scrolls through the data at high speed.
Timekeeping
- Resetting the seconds to 00 while the current count is in the range of 30 to 59 causes the minutes to be increased by 1. In the range of 00 to 29, the seconds are reset to 00 without changing the minutes.
- With the 12-hour format, the P (PM) indicator appears on the display for times in the range of noon to 11:59 p.m. and the A (AM) indicator appears for times in the range of midnight to 11:59 a.m.
- With the 24-hour format, times are displayed in the range of 0:00 to 23:59, without any indicator.
•The year can be set in the range of 2000 to 2099. - The watch's built-in full automatic calendar makes allowances for different month lengths and leap years. Once you set the date, there should be no reason to change it except after you have the watch's batteries replaced.
World Time
•The seconds count of the World Time is synchronized with the seconds count of the Timekeeping Mode.
- All World Time Mode times are calculated from the current time in the Timekeeping Mode using UTC time differential values.
Illumination Precautions
- The electro-luminescent panel that provides illumination loses power after very long use.
- Illumination may be hard to see when viewed under direct sunlight.
- The watch may emit an audible sound whenever the display is illuminated. This is due to vibration of the EL panel used for illumination, and does not indicate malfunction.
- Illumination turns off automatically whenever an alarm sounds.
•Frequent use of illumination runs down the batteries.
Specifications
Accuracy at normal temperature: ± 30 seconds a month
Digital Timekeeping: Hour, minutes, seconds, a.m. (A)/p.m. (P), day, day of the week
Time format: 12-hour and 24-hour
Calendar system: Full Auto-calendar pre-programmed from the year 2000 to 2099
Other: Daylight Saving Time (summer time)/Standard Time; Home Site data settings (UTC differential and longitude)
Analog Timekeeping: Hour, minutes (hand moves every 20 seconds)
Fishing Mode: Fishing level for a specified date and time; Moon phase indicator and Moon age for a specified date.
Thermometer:
Measurement and display range: -10.0^ to 60.0^ (or 14.0^ to 140.0^ )
Display unit: 0.1°C (or 0.2°F)
Thermometer measurement timing: During each even-numbered minute
Memory measurement timing: At the top and the bottom of each hour
Memory capacity: Up to 50 sets of data (time, temperature)
Temperature sensor precision: ±2°C (±3.6°F)
Other: Thermometer/temperature tendency graph switching in the Timekeeping Mode; Temperature unit switching (°C/°F); Temperature sensor calibration (Range: ±10°C/±18°F and unit: 0.1°C/0.2°F)
Stopwatch:
Measuring unit: 1/100 second
Measuring capacity: 99:59' 59.99"
Measuring modes: Elapsed time, split time, two finishes
Countdown Timer:
Measuring unit: 1 second
Input range: 1 minute to 100 hours (1-minute increments and 1-hour increments) Other: Auto-repeat timing
Alarm: Daily alarm; Hourly Time Signal
d Time: 50 cities (30 time zor
Other: Standard time/Daylight Saving Time
Illumination: EL (electro-luminescent panel)
Other: Button operation tone on/off
Battery: Two silver oxide batteries (Type: SR927W)
Approximately 2 years on type SR927W (assuming alarm operation 10 seconds per day, one illumination operation 1.5 seconds per day, and temperature measurement every 2 minutes)
Frequent use of illumination shortens the battery life.
Operation Guide 5056
CASIO®
City Code Table
| City Code | City | UTC Offset GMT Differential |
| PPG | Pago Pago | -11 |
| HNL | Honolulu | -10 |
| ANC | Anchorage | -9 |
| YBH | Vancouver | |
| SFO | San Francisco | -8 |
| LAX | Los Angeles | |
| DEN | Denver | -7 |
| MEX | Mexico City | -6 |
| CHI | Chicago | |
| MIA | Miami | -5 |
| NYC | New York | |
| OCS* | Caracas | -4 |
| YYT | St. Petersburg | -3.5 |
| RIO | Rio de Janeiro | -3 |
| RAI | Prairie | -1 |
| LIS | Lisbon | 0 |
| LON | London | |
| BCN | Barcelona | +1 |
| PAH | Paris | |
| MIL | Milan | |
| ROM | Rome | |
| BER | Berlin | |
| ATH | Athens | +2 |
| JNB | Johannesburg | |
| IBI | Istanbul | |
| CAI | Carlo | |
| JRS | Jerusalem | |
| MINOW | Minneapolis | +3 |
| JED | Jeddah | |
| THF | Tehran | -3.5 |
| DXB | Dubai | +4 |
| KBL | Kabul | +4.5 |
| KHI | Karachi | +5 |
| MLE | Maine |
| City Code | City | UTC Offset GMT Differential |
| DEL | Delhi | +5.5 |
| DAC | Dhaka | +5 |
| RGN | Yangon | +5.5 |
| BKK | Bangkok | +7 |
| JKT | Jakarta | |
| SIN | Singapore | +8 |
| HKG | Hong Kong | |
| BJS | Beijing | |
| SEL | Seoul | +9 |
| IYO | Tokyo | |
| AOL | Adelaide | +9.5 |
| GUM | Guam | +10 |
| SYD | Sydney | |
| NOU | Noumena | +11 |
| WLD | Wellington | +12 |
| TBU | Nukuoka | +13 |
- Based on data as of March 2008.
- The rules governing global times (GMT differential and UTC offset) and summer time are determined by each individual country.
In December 2007, Venezuela changed its offset from -4 to -4.5. Note however, that this watch displays an offset of -4 (the old offset) for the CCS (Caracas, Venezuela) city code.
Site Data List
| Site | UTC Offset/GMT Differential | Longitude | |
| Standard Time | DST/Summer Time | ||
| Anchorage -9.0 -8.0 143°W | |||
| Bahamas -5.0 -4.0 77°W | |||
| Baja, California -7.0 -6.0 110°W | |||
| Bangkok +7.0 +8.0 101°E | |||
| Boston -5.0 -4.0 71°W | |||
| Buenos Aires -3.0 -2.0 58°W | |||
| Casablanca +0.0 +1.0 8°W | |||
| Christmas Island | +14.0 | +15.0 158°W | |
| Dakar | +0.0 -1.0 17°W | ||
| Gold Coast | +10.0 | +11.0 154°E | |
| Great Barrier Reef, Cairns +10.0 | +11.0 146°E | ||
| Guam | +10.0 | +11.0 145°E | |
| Hamburg | +1.0 -2.0 10°E | ||
| Hong Kong | +8.0 -9.0 118°E | ||
| Honolulu | -10.0 | -9.0 | 158°W |
| Jakarta | +7.0 | +8.0 | 107°E |
| Jeddah | +3.0 | +4.0 | 39°E |
| Karachi | +5.0 | +6.0 | 67°E |
| Kona, Hawaii | -10.0 | -9.0 | 156°W |
| Lima | -5.0 | -4.0 | 77°W |
| Lisbon | +0.0 | +1.0 | 9°W |
| London | -0.0 | +1.0 | 0°E |
| Los Angeles | -8.0 | -7.0 | 118°W |
| Maldives -5.0 | +6.0 | 74°E | |
| Manila | +8.0 | +9.0 | 121°E |
| Mauritius | +4.0 | +5.0 | 57°E |
| Melbourne +10.0 | +11.0 | 145°E | |
| Miami | -5.0 | -4.0 | 80°W |
| Noumea | +11.0 | +12.0 | 186°E |
| Pago Pago | -11.0 | -10.0 | 171°W |
| Palau | +9.0 | +10.0 | 135°E |
| Panama City | -5.0 | -4.0 | 80°W |
| Papeete -10.0 | -9.0 | 150°W | |
| Rio De Janeiro | -2.0 | 43°W | |
| Seattle -8.0 | -7.0 | 122°W | |
| Shanghai +8.0 | +9.0 | 121°E | |
| Singapore | +8.0 | +9.0 | 104°E |
| Sydney +10.0 | +11.0 | 151°E | |
| Tokyo | +9.0 | +10.0 | 140°E |
| Vancouver | -8.0 | -7.0 | 123°W |
| Wellington | +12.0 | +13.0 | 175°E |
■Based on data as of 2008

- Operation Guide 5056
- Getting Acquainted
- Warning!
- General Guide
- Timekeeping
- Important!
- Setting the Digital Time and Date
- Daylight Saving Time (DST) Setting
- Home Site Data
- Setting the Analog Time
- Fishing Level Screen
- Fishing Level Indicator
- To view the current fishing level and Moon data
- Thermometer
- Temperature Tendency Graph
- Recalling Temperature Data
- To use the countdown timer
- Alarm Operation
- To view the time in another city
- To turn on illumination
- Reference
- Moon Phase Indicator
- Moon Phases and Moon Age
- Temperature Sensor Calibration
- To calibrate the temperature sensor
- To specify the temperature display unit
- Button Operation Tone
- Auto Return Feature
- Scrolling
- World Time
- Illumination Precautions
- Specifications
- Thermometer:
- Stopwatch:
- Countdown Timer:
Brand : CASIO
Model : Fishing Timer Ana Digital
Category : Sports Watch