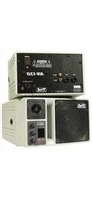
AN-130RC - Loudspeaker Anchor Audio - Free user manual and instructions
Find the device manual for free AN-130RC Anchor Audio in PDF.


| Product Type | Portable PA Speaker |
| Brand | Anchor Audio |
| Model | AN-130RC |
| Power Output | 130W RMS |
| Channels | 2 (including wireless mic) |
| Frequency Response | 50 Hz – 20 kHz |
| Maximum SPL | 120 dB |
| Driver Configuration | 10" woofer, 1" tweeter |
| Wireless Microphone | Included UHF handheld |
| Bluetooth | Built-in, v5.0 |
| Battery Type | Rechargeable Li-ion |
| Battery Life | Up to 12 hours |
| Charging Time | 4 hours |
| Inputs | 1x XLR/1/4" combo, 1x RCA, 1x USB |
| Outputs | 1x XLR line out |
| Dimensions (W x H x D) | 15.75 x 18.5 x 10.5 inches (40 x 47 x 27 cm) |
| Weight | 32 lbs (14.5 kg) |
| Enclosure Material | Molded polypropylene with metal grille |
| Mobility | Built-in wheels and telescopic handle |
| Power Supply | AC 100-240V, 50/60 Hz (internal adapter) |
| Maintenance | Wipe with damp cloth; avoid moisture |
| Safety Features | Overload protection, thermal shutdown |
| Accessories Included | Wireless mic, power cord, remote control |
Frequently Asked Questions - AN-130RC Anchor Audio
User questions about AN-130RC Anchor Audio
0 question about this device. Answer the ones you know or ask your own.
Ask a new question about this device
Download the instructions for your Loudspeaker in PDF format for free! Find your manual AN-130RC - Anchor Audio and take your electronic device back in hand. On this page are published all the documents necessary for the use of your device. AN-130RC by Anchor Audio.
USER MANUAL AN-130RC Anchor Audio
- plug in power cord
No Sound (Power LED Lights) • check for output from source
• make sure all cables are completely plugged in
- increase volume control
- press mute button on remote
• turn power switch to off then back to on
Distorted Sound • check input cable connection
- lower input signal level
Excessive Hum or Noise • use shielded input cables
(AN-130RC only)
(AN-130RC only)
HAVING TROUBLE W/ YOUR WIRELESS SYSTEM? (Wireless Model Only)
No Sound • confirm transmitter power switch is set to on
- turn up volume control
- plug microphone into body-pack transmitter
- turn sound system on
- replace mic/transmitter battery
• make sure hands free mic cable is fully plugged into transmitter - turn off mute by pressing, volume up/down or mute
Frequent Transmitter Dropouts • replace mic/transmitter battery
• move mic/transmitter closer to AN-130
• change transmitter to different channel
NEED MORE HELP? View demonstration videos on proper system setup
& operation at our website - www.anchoraudio.com.
Anchor Audio Customer Service
888-444-6077
AN-130 TECHNICAL SPECIFICATIONS
Rated Power Output 30 watts
| Max SPL @ Rated Power | 101 dB @ 1 meter |
| Frequency Response | 65 Hz – 18 kHz ± 3 dB |
| Speaker Type | 4.5" woofer, 10 mm dome tweeter |
| AC Power Reqs. | 110 – 125 VAC, 50/60 Hz |
| Export Model | 208 – 240 VAC, 50/60 Hz (50W max |
| Fuse Rating | T 1.0A / 250V |
| Export Model | T 0.5A / 250V (internally mounted) |
| Dimensions (HWD) | 5.25 x 8.4 x 9" / 13 x 21 x 23 cm |
| Weight | 8.5 lbs / 3.8 Kg |
Inputs
| Line (2) | Hi-Z, unbalanced, RCA (sum L + R) |
| Microphone | Lo-Z, unbalanced, 1/4" phone |
Output
| Line | Lo-Z, buffered, 1/4" phone |
Sensitivity For Rated Output
| Line | -20 dBV (100 mVrms) |
| Microphone | -43 dBV (7.5 mVrms) |

RoHS COMPLIANT
(Specifications subject to change without notice)

Anchor Audio, Inc.
Portable Sound Systems • Torrance, California
natural_image
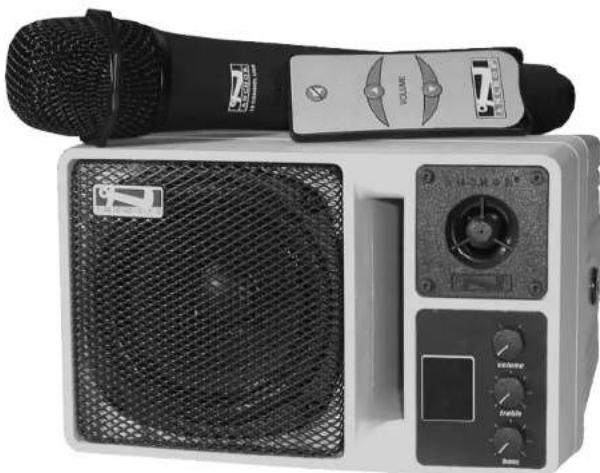
Exterior view of a portable electronic device with a black microphone and control panel (no visible text or symbols)AN-130
Portable Public Address Sound System
OWNER'S MANUAL

CONTENTS
GETTING STARTED 2
FEEDBACK....3
WIRELESS REMOTE CONTROL....3
AN-130 ACCESSORIES....4/5
OPERATING THE BUILT-IN UHF WIRELESS RECEIVER 6
Thank you for choosing an Anchor Audio portable sound system. Our products incorporate state-of-the-art design and the finest quality of materials and workmanship. We're proud of our products and appreciate the confidence which you have shown by selecting an Anchor system.
I hope you'll take a few minutes to review this manual. We've incorporated several unique features into our products, and your knowledge of how to use them will enhance the performance and your enjoyment of the system.

David Jacobs, President
on behalf of all Anchor Employees
GETTING STARTED
Please check your new unit carefully for any damage which may have occurred during shipment. Each Anchor product is carefully inspected at the factory and packed in specially designed boxes for safe transport.
Notify the freight carrier immediately of any damage to the shipping box or product. Repack the unit in the original box and wait for inspection by the carrier's claim agent. Notify your dealer of the pending freight claim.
NOTE: All damage claims must be made with freight carrier!
RETURNING SYSTEMS FOR SERVICE OR REPAIR
For service or repair, please contact the dealer you purchased your system from or Anchor Audio Customer Service at (888) 444-6077 to obtain a RA (Return Authorization) number. All shipments to Anchor Audio must include an RA number and must be shipped prepaid. C.O.D. shipments will be refused and returned at your expense.
IMPORTANT: Save the shipping box & packing materials, they were specially designed to ship your unit!
WARRANTY REGISTRATION
Please go to our website (www.anchoraudio.com) and select "Warranty Registration". Completing this online registration form will activate your limited six-year warranty.
-
Unscrew battery cover on bottom of microphone
-
Set the CHANNEL SELECTOR dial to match the channel setting of your receiver
- Replace the battery cover

CHANNEL SELECTION - BODY-PACK TRANSMITTER
- The channel selection dial is located on the side of the transmitter
- Set the CHANNEL selection dial to match the channel setting of the receiver

NOTE: When using dual wireless, each microphone must be set to a different channel!
After you have set the transmitter channel (see above) you are ready to use your wireless microphone:
- Body-pack transmitter users must insert the mic plug into the transmitter jack marked MIC
-
Turn the transmitter power switch to ON (The red LED will flash when the mic is turned on. If the red LED stays on, the battery is low)
-
Turn the AN-130 power switch to ON
- The RX indicators will light (one indicator at a time lights) when the wireless signal is being transmitted and received
CAUTION: Harmful feedback may occur when walking in front of a sound system or speaker with a wireless microphone. Always point microphone away from speakers!
REPLACE BATTERY - HANDHELD TRANSMITTER
- Unscrew battery cover on bottom of microphone
- Replace old batteries with 2 fresh 'AA' alkaline batteries
- Replace and tighten the battery cover
REPLACE BATTERY - BODY-PACK TRANSMITTER
- Slide open battery cover on front of transmitter
- Replace old batteries with 2 fresh 'AA' alkaline batteries
- Replace and tighten the battery cover
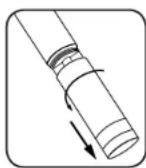


NOTE: Transmitter power must be OFF when changing batteries!
DIVERSITY WIRELESS BY ANCHOR AUDIO
Anchor Audio UHF wireless is a 16 channel, diversity wireless system that utilizes two independent antennae to receive signals. The diversity feature means the receiver will process the stronger of the two antenna signals, effectively minimizing dropouts and interference from other transmitting sources. The antennae are mounted internally so there are no obstructions or risk of damage.
CHANNEL SELECTION - BUILT-IN RECEIVER
Before you can use your UHF wireless system, you will need to select a wireless frequency, set the built-in receiver, and microphone transmitter, to that channel.
- Choose from any of the 16 available wireless channels
- Set the wireless channel selector knob "CHANNEL" to the channel/frequency you have chosen
If you have two wireless receivers repeat above for the second receiver. Remember each receiver/transmitter pair must be set to different channels to work properly.
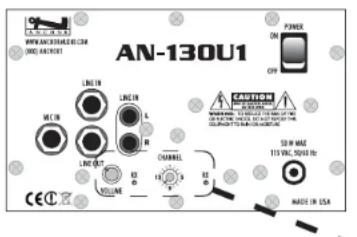
UHF WIRELESS
VOLUME CONTROL

RX INDICATOR LIGHTS
NOTE: If you experience ongoing interference with your wireless system, the selected frequency may be incompatible w/ other systems in the area. Try different channels to find a clear frequency.
UHF WIRELESS ACCESSORIES
WH-6000: 16 channel wireless handheld microphone/transmitter
WB-6000: 16 channel wireless body-pack transmitter for hands free microphone (microphone not included - see below)
CM-60: Lightweight, low-profile collar microphone - works w/ the WB-6000 transmitter
EM-60: UltraLite "Over-the-Ear" hands free microphone - works w/ the WB-6000 transmitter
LM-60: Lightweight, clip-on lapel microphone - works w/ the WB-6000 transmitter
HBM-60: Ultra-lightweight headband microphone - works w/ the WB-6000 transmitter
FEEDBACK
Feedback is a howling noise or shrill sound that is self-generated by the sound system. It is caused by a microphone picking up the sound coming from the speaker and then being re-amplified. Once a feedback loop is started it will continue until the system is adjusted.
FEEDBACK CAUSES
- Microphone too close, pointing towards or in front of the speaker
• Volume setting too loud for room
• Sound reflections from hard surfaces, walls, etc.
AVOIDING & ELIMINATING FEEDBACK
- Point the microphone in a different direction
- Keep the microphone away from the speaker; position speaker in FRONT of microphone
- Reduce the sound system volume levels
CAUTION: Feedback can damage your equipment & may be hazardous to hearing.
WIRELESS REMOTE CONTROL
Point the red Mute button towards the front of the AN-130RC, aiming the remote at the red window located near the Volume and Tone controls.
- Raise volume by pressing Volume Up
• Lower volume by pressing Volume Down - Mute system by pressing Mute
- Stop mute by pressing Mute again or pressing either volume button

NOTE: If the system is not responding be sure the signal is not blocked.
REPLACING THE REMOTE BATTERY
- Locate the latch on the bottom of the remote, near the back
- Gently pull the latch towards the center of the remote
- Slide out the battery holder carefully
- Place a new battery in holder with positive symbol on the battery facing up
- Carefully re-insert the battery holder

NOTE: Use only CR2025 or CR2032 type batteries.
The AN-130 monitor is used to amplify the signal from a microphone, electronic musical instrument or line-level sources (cassette, CD, VCR, etc).
You'll need a connection cable and an AC outlet.
- Place the AN-130 in desired location
- Set volume control on front of speaker to minimum
- Plug the power cord into a grounded 115 volt outlet (220 volt outlet for export model)
- Plug a microphone into the MIC input jack, or an audio source into a LINE IN jack
- Turn the power switch on the rear panel "ON" (red LED on front panel should light)
- Adjust the volume, bass & treble controls to desired levels
IMPORTANT: To avoid feedback, do not position a microphone in front of speaker.
PROBLEMS? Consult the troubleshooting section on the back page of this manual.
CAUTION: ALWAYS use shielded audio cables on input connections to prevent interference.
NOTE: For UHF Wireless microphones & transmitters see page 6.
LINE IN
The line-level RCA input jacks may be used with audio sources such as computers, VCR's, and cassette tape or compact disc players. The inputs may be used for two separate sources, or they may be used to sum L+R stereo outputs to a mono signal without the need for adapters.

AN-130 ACCESSORIES
REMOTE-130 - Wireless Remote Control
Controls volume level and mute for the AN-130RC.
MIC-90P - Handheld Microphone
Anchor's dynamic, balanced, low impedance microphone with a unidirectional pick-up pattern. It has a on/off switch and comes with a 20' cable and mic clip.
SS-250 - Speaker Stand
Adjustable stand made of black, anodized aluminum.
MSB-201 - Combo Mic/Speaker Stand
Floor stand w/ 33" adjustable boom. Speaker stand when combined w/ SB-1 mounting bracket.
HS-1 - Carry Handle
Convenient attachable handle for AN-130.
HC-1550 - Hard Case
Traveling hard case, holds up to two AN-130's, two mics & accessories.
HC-1610B - Hard Case
Projector Protector hard case - holds projector, AN-130 and mic.
CC-100 - Carry Bag
Cordura nylon bag w/ storage compartment.
SB-1 - Swivel Stand Mounting Bracket
Mounts the AN-130 to a wall, ceiling or on a speaker stand. Spekaer stand adapter included.
SB-3 - Swivel Wall Mounting Bracket
Mounts the AN-130 to the wall or ceiling.
SB-360 - Swivel (360°) Wall Mounting Bracket Mounts the AN-130 to the wall or ceiling.
RM-1 / RM-12 - Single / Dual Rackmount Kits
Mounts AN-130 monitors in a standard equipment rack, three spaces high or 5-1/4". All kits include mounting hardware and are adjustable front & back.
- HAVING TROUBLE W/ YOUR WIRELESS SYSTEM? (Wireless Model Only)
- Anchor Audio Customer Service
- 888-444-6077
- RoHS COMPLIANT
- Anchor Audio, Inc.
- AN-130
- Portable Public Address Sound System
- OWNER'S MANUAL
- CONTENTS
- GETTING STARTED
- NOTE: All damage claims must be made with freight carrier!
- RETURNING SYSTEMS FOR SERVICE OR REPAIR
- IMPORTANT: Save the shipping box & packing materials, they were specially designed to ship your unit!
- WARRANTY REGISTRATION
- CHANNEL SELECTION - BODY-PACK TRANSMITTER
- REPLACE BATTERY - HANDHELD TRANSMITTER
- REPLACE BATTERY - BODY-PACK TRANSMITTER
- DIVERSITY WIRELESS BY ANCHOR AUDIO
- CHANNEL SELECTION - BUILT-IN RECEIVER
- UHF WIRELESS ACCESSORIES
- FEEDBACK
- FEEDBACK CAUSES
- AVOIDING & ELIMINATING FEEDBACK
- WIRELESS REMOTE CONTROL
- REPLACING THE REMOTE BATTERY
- LINE IN
- AN-130 ACCESSORIES
Brand : Anchor Audio
Model : AN-130RC
Category : Loudspeaker