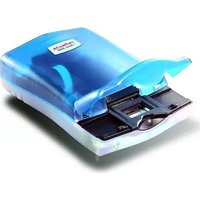
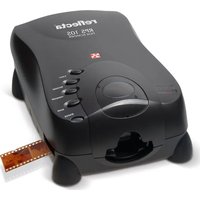
iScan 3600 - Scanner Reflecta - Free user manual and instructions
Find the device manual for free iScan 3600 Reflecta in PDF.


| Product Type | Film Scanner |
| Supported Film Formats | 35mm mounted slides, 35mm filmstrips |
| Optical Resolution | 3600 dpi |
| Color Depth | 8-bit or 16-bit per channel (24-bit or 48-bit total) |
| Interface | USB 1.1 or USB 2.0 |
| Power Adapter | Model HPW-1512B or LAD1512DBH; 15V DC |
| Operating Temperature | 50°F to 104°F (10°C to 40°C) |
| Operating Humidity | 15% to 76% relative humidity (non-condensing) |
| Scanning Control | One-button scan, prescan, scan current frame |
| Image Adjustment | Color balance, curves, levels, auto exposure, auto gamma, digital noise reduction |
| Advanced Features (optional) | Digital ICE³ (ROC, GEM) on select models |
| Output File Formats | TIF, JPG |
| Software Included | CyberView X-SF driver, TWAIN/Plug-In compliant application software |
| Compatible Operating Systems | Windows XP, Windows 2000, Windows 7/8/10 (likely), Mac OS (classic, 10.x) |
| Package Contents | Scanner, power adapter, USB cable, CyberView X-SF CD, software CD, user manual |
| Dimensions (Approx.) | Not specified in manual; typical film scanner size ~ 6 x 4 x 5 inches |
Frequently Asked Questions - iScan 3600 Reflecta
User questions about iScan 3600 Reflecta
0 question about this device. Answer the ones you know or ask your own.
Ask a new question about this device
Download the instructions for your Scanner in PDF format for free! Find your manual iScan 3600 - Reflecta and take your electronic device back in hand. On this page are published all the documents necessary for the use of your device. iScan 3600 by Reflecta.
USER MANUAL iScan 3600 Reflecta
TO INSTALL SOFTWARE AND DRIVER (FOR PC USER)......2
TO INSTALL SOFTWARE AND DRIVER (FOR MAC USER)....2
TO INSTALL HARDWARE....3
ONE BUTTON SCAN FUNCTION....4
HOW TO SCAN FILM OR SLIDE....5
CYBERVIEW X - SF USER'S INTERFACE....7
I、MAIN WINDOW AREA【FIXED WINDOW】....8
Ⅱ、PREVIEW WINDOW AREA【FIXED WINDOW】....16
Ⅲ、ACTIVE FRAME SETTING WINDOW AREA【FLOATING WINDOW】……18
TECHNICAL SUPPORT....19
GETTING STARTED
Check the package content before getting started.
For Quick Installation please refer to Quick Installation Guide.

Important! Please save the original box, receipt and packing materials for possible return purposes.
Package Contents
- Film Scanner.
- Power Adapter.
[ Model : HPW-1512B (HIGH POWER) or LAD1512DBH (LINEARITY) ]
Warning! Using any other power adapter may severely damage the scanner and will void the product warranty.
- USB 1.1 or USB 2.0 Cable. (subject to your purchased model)
- CyberView X - SF driver CD. (SF = Single Frame capability.)
- TWAIN or Plug-In compliant application software CD.
- Printed User Manual.
REMARKS :
- The models implanted with Digital ICE ^3TM TECHNOLOGY please refer to Digital ICE ^3TM user's guide.
- TWAIN or Plug-In compliant application software means the imaging software such as Photoshop Elements, this is subject to change without notice.
| Operating Ambient Temperature Range50° to 104°F (10° to 40°C) |
| Note: Do not turn on the scanner unless it is within this range.If the scanner has been stored or transported outside of this range, allow it to return to within this range before turning it on. |
| Operating Ambient Humidity Range15% to 76% relative humidity (non-condensing) |
| Note: If the scanner is stored or to be transported in cold temperature and then brought into a warm / humid environment condensation may occur. |
QUICK INSTALLATION GUIDE (QIG)
TO INSTALL SOFTWARE AND DRIVER... (For PC Users)

IF WINDOWS XP IS INSTALLED ON YOUR SYSTEM DURING DRIVER INSTALLATION A LOGO TESTING DIALOGUE BOX MAY APPEAR, IF THIS IS THE CASE PLEASE SELECT "CONTINUE ANYWAY".
Be sure to install the Application Software BEFORE installing the scanner driver CyberViewX -SF.
You may install the scanner driver directly if you have already installed TWAIN compliant application software in your computer.
A. Install the Software :
Place the TWAIN or Plug-In compliant application software CD into CD-ROM and follow the on-screen instructions to complete the installation then eject the CD.
B. Install the Driver :
Place the CyberView X-SF CD into CD-ROM which will auto play. If you have auto play switched off on the CD drive then you will need to explore the CD and double click the file "LAUNCH.EXE" icon, click the "CyberView X" and follow the on screen instructions to complete the installation.
Notice : If you are Win XP user, please DO NOT eject the Cyberview X CD after installing the driver.
After turning on the scanner and Windows XP will detect USB hardware and search for the driver on the CD :
-
In "Found New Hardware Wizard" window, select "Install the software automatically (Recommended) and click "Next".
-
In "Completing the Found New Hardware Wizard" window, click "Finish", then eject the CD.
TO INSTALL SOFTWARE AND DRIVER... (For MAC User)
Be sure to install the Application Software BEFORE installing the scanner driver CyberViewX -SF.
You may install the scanner driver directly if you have already installed TWAIN compliant application software in your computer.
A. Install the Software :
Place the TWAIN or Plug-In compliant application software CD into CD drive wait for it to mount, then on your desktop locate the CD icon and double click to open it locate the appropriate installer to install the application software.
B. Install the Driver :
Place the CyberView X-SF driver CD into CD-ROM, double click the "CyberView X - SF" icon on the desktop then "CyberView X installer" folder then select your OS version folder open it and then double click on the installer to install the driver.
TO INSTALL HARDWARE...
Connect The Film Scanner...
- To a power source
• Make sure the main power is TURNED OFF.
- Make sure the adapter is the one included, warranty will be VOID if the wrong adapter is used.
- Plug the AC adapter in to the power source FIRST before plugging into the scanner.
-
Connect USB
-
Attach one end of USB cable to computer.
- Attach another end of USB cable to scanner.

-
DC In.
-
USB Port.
-
Power Switch.
To Scan Film (Film strips & Mounted Slides)...
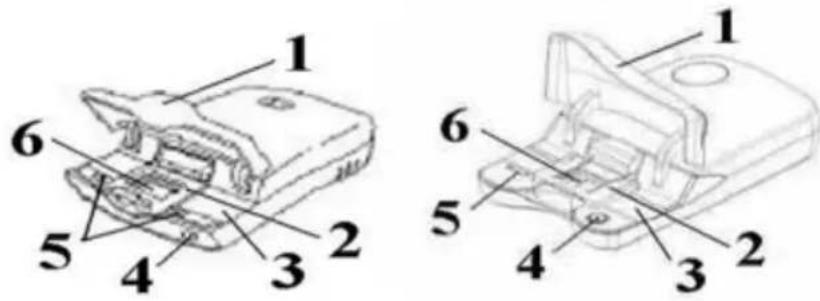
- Lid.
- Slide Holder
- Film Deck.
- One Button Scan.
- Release Switch.
- Viewing Window.
Please Note:
When installing your new scanner onto a Windows XP/2000 system that already has another USB Flatbed scanner or All-in-one Scan/Copier/Printer device installed, it may be necessary for you to disconnect the other Flatbed scanner from the USB port for the Film scanner to work properly, as stated on the Microsoft website.
Knowledgebase article # 324756
Inserting Film Media...
1. Mounted Slides
1-1. Open the scanner lid.
1-2. Insert the mounted slide with emulsion side (shiny side) up into the slot.
1-3. Close the scanner lid and you are ready to scan.
2. Filmstrips
2-1. Open the scanner lid and release the slide holder.
2-2. Position the film that you wish to scan in the center of the viewing window.
2-3. Push down the slide holder until it click-locks and you are ready to scan.
※ One Button Scan Function
There is a one touch "SCAN" button on the front panel of the scanner. It may be used to save the scanned image files directly into a designated folder.
FIRST Open the CyberView X – SF User Interface once it opens, press the "SCAN" button on the unit for one button scan function to begin. There are 2 ways to open the CyberView X – SF scanning interface :
3-1. Open the application software and acquire or import the CyberView X-SF user interface directly.
3-1-1. Select the film type and resolution.
3-1-2. Press the scan button and the scanner will automatically scan the current film frame into the application software which you opened.
3-2. Click "Start > Programs > CyberView X_SF" and select "CyberView X" to open the CyberView X user interface.
3-2-1. Select the film type and resolution.
3-2-2. Press the scan button and it'll pop-up a setting window for saving to file. (Please refer to the section on "Scan Current Frame to File" in this manual.
3-2-3. After setting, click "OK" to scan the image to a file.
NOTE : If you do not open CyberViewX – SF FIRST, the scan button function will fail to operate.
HOW TO SCAN FILM OR SLIDE
Start To Scan...
STEP 1 – Acquire Driver
Insert the filmstrip or slide as instructed previously, then open TWAIN or Plug-In compliant application software.
STEP 2 -Scan Setting...
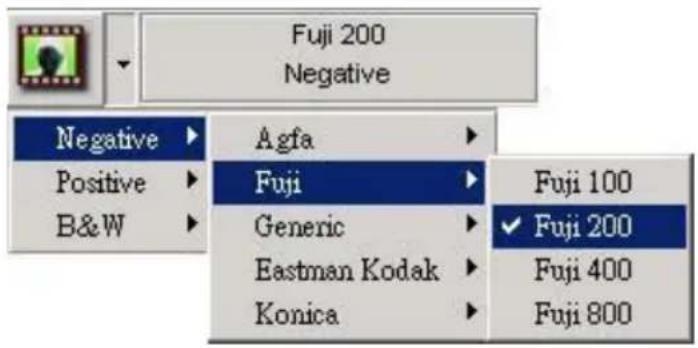
If you are PC User, select the film type, brand and speed.
EX : If the film is Fuji 200 Negative, select Negative > Fuji > Fuji 200.
If you are MAC User, select the film type and speed.
EX : If the film is Agfa 200 Negative, select Negative Film > Agfa 200.

STEP 3 – Pre-scanning...
Press the "Prescan" button to pre-scan the slide or filmstrip.

【Pre-scan】
STEP 4 – Setup Resolution...
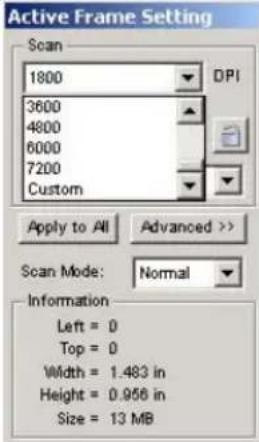
Setup the resolution you wish to scan at, the default image resolution is 1800dpi.
Notice :The more resolution (the higher the number) you set the more scanning time and larger hardisk space needed.
Example :
| Scanning Resolution Color Depth Hard Discs Space | ||
| 300dpi 24 bit About 350KB | ||
| 600dpi 24 bit About 1 MB | ||
| 1800dpi 24 bit About 12 MB | ||
| 3600dpi 24 bit About 52 MB | ||
| 7200dpi | 24bit | About |
208MB
Choose "Scan Current Frame" to scan current frame.
Choose "Scan Current Frame to File" to scan the current frame directly to appointed folder.

Scan Current Frame
Scan Current Frame to File...
After scanning, the image will transferred to the imaging application software, click "Scan > Exit" on the menu bar to close the scanning interface then you can edit, save and print the image from the application software.
CyberView X - SF USER INTERFACE

工の一厂〇Zm
Description of CyberView X - SF
There are three major parts of the CyberView X users interface.
- Prescan Current Frame : Pre-scans the current frame under the viewing window.
2. Scan
Scan Current Frame : Scans the current frame under the viewing window.
Scan Current Frame to File : Scans the current frame under the viewing window to a file of your choosing.

i. Select Browse and choose the designated folder you wish to save the scanned image to.
ii. Enter the file name.
iii. Trailing Index after Base File Name
-Digits: user can adjust the digits to define the length of the file name and can carried up to 6 digits at most)
-Options:
use Film Index: Automatically accumulate the number and the default number is 1 user Defined Start Number: user can change the default number
iv. Choose the file type to "TIF" or "JPG".
v. Choose image quality in JPEG file. (Good, Better, or Best)
- Revert : Discards all modifications and restores the image back to the original previewed state.
4. Preference :
Scan and pre-scan setting windows.

i. "Prescan Resolution" - Select the pre-scan resolution.
ii. "Using default scan resolution" – Click to select the default scan resolution or click "Reset" to restore to original settings.
iii. "Color Depth" — To set the default color depth "8 bit" or "16 bit" while scanning, 16 bit will take longer time to scan.
iv. "Scan Mode" – To set the default scan mode "Normal" or "Quality" mode while scanning, quality mode will take longer time to scan and process the image for better quality.

i. "Auto Exposure" - Click to apply Auto Exposure to all of the scanned images, if the image is Overexposed (too bright) or underexposed (too dark), enable this for auto correction.
ii. "Auto Gamma" — Click to apply Auto Gamma to all of the scanned images, if the photo is very dark, enable this for auto correction and color balance.
iii. "Digital Noise Reduction" – Enables you to auto reduce the film grain noise while scanning.
iv. "Default Crop Area" – Enables you to crop the scanning area by default and disable
to crop the scanning area by custom.
v. Auto detect –Preview Image Auto crop.
vi. "Auto calibrate each frame" – Enables you to start the auto calibration for each frame, this will increase the scanning time.
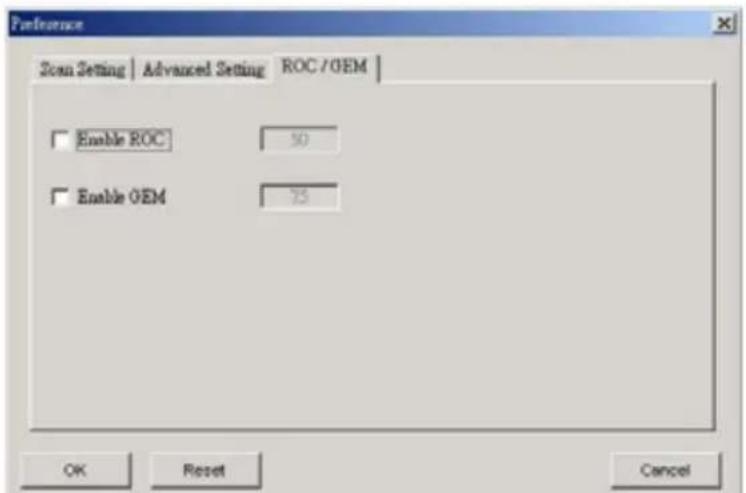
(ONLY AVAILABLE ON UNITS WITH DIGITAL ICE ^3TM TECHNOLOGY BUILT IN.)
i. Enable / disable "Enable ROC" to start or close the ROC function default while scanning.
ii. Enable / disable the "Enable GEM" to start or close the GEM function default while scanning.
5. Exit : Closes the CyberView X-SF user interface.
"Preview" Option :
- Zoom In : Magnify image.
- Zoom Out : Reduce image.
- Rotate 90 Left :Turn the image 90^ counter clockwise.
- Rotate 90 Right :Turn the image 90° clockwise.
- Flip Horizontal : Flips the image horizontally.
- Flip Vertical :Flips the image vertically.
"Image Adjustment" Option :
- Variations : Provides different views of image with options to make changes to highlights midtones etc.
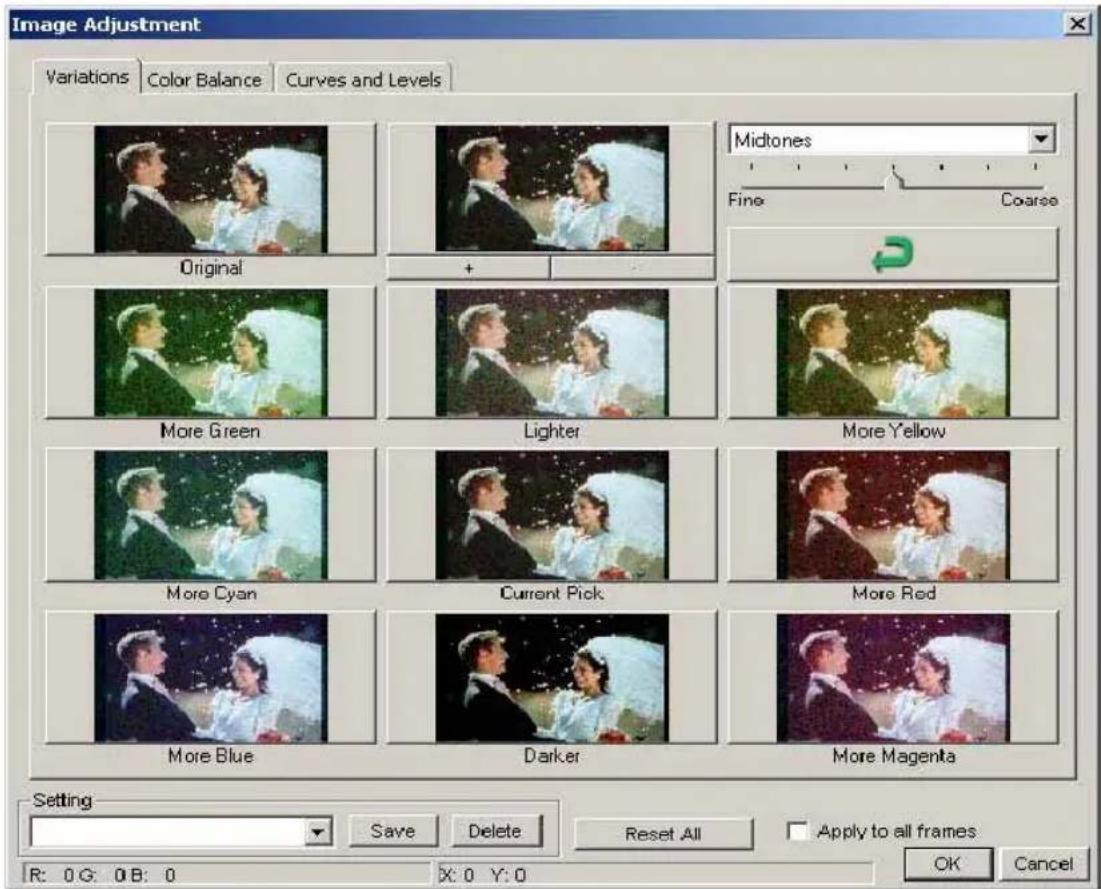
- Color Balance : To adjust the brightness, contrast, saturation, and color (CMY or RGB) of the image. Comparison between before and after adjustments will be shown for reference.

For Example :
Your previewed image appears to be too dark you can use the "Brightness" slider in the "Color Balance" window to adjust the image, selecting the slider in the center and moving it to the right you will notice your image's "After" view is getting lighter, once it is adjusted to your liking you can click on "OK" and the changes will be sent to the scanning hardware, this can also be used to adjust each of the functions in "Color Balance" by moving slider to adjust the image then select OK to save changes to be sent to the scanner when you select SCAN. (for more precise adjustments please use the Curves and Levels option window) See Next...
3. Curves and Levels :
To adjust image quality by selecting Curve and Levels. Comparison between before and after adjustments will be shown for reference.

Example :
Your previewed image appears to be too dark you can use the Input slider in the Curves and Levels window to adjust the image, selecting the Gray slider in the center and moving it to the left you will notice your image's "After" view is getting lighter, once it is adjusted to your liking you can click on "OK" and the changes will be sent to the scanning hardware, this can also be used to adjust each color channel independently, using the channel drop down menu "RGB = All colors" R = Red, G = Green, and B = Blue, if you find your image has too much or not enough of any one color you can adjust this using these tools Example : Too much/not enough Red select R from the Channel drop down menu (just below the "Before" image on the left) and using the input slider adjust the color then select OK to save changes to be sent to the scanner when you select SCAN.
"Windows" Option :
- Exposure Setting : To adjust the exposure time (R, G, B) press "Reset" to restore to the default setting.

- Output Preview : To preview the output format of an image select this tool from
the menu bar. A pop-up window will appear to set the output media (type and size), and the Output Parameter (resolution and size). Showing you the ratio at which the image will print out at.

300 DPI
To obtain a print approximately 8"x5" from an 1800 Dpi scan, set the output parameter to 300 DPI you will see in the "Width/Height" boxes, your print output measurement.
"Help" Option :
- User Manual : Select "Help > User Manual" to open the electronic user's manual.
- Update Firmware : This function only applies to 3600 dpi scanners to upgrade the firmware version, select the path where the file of firmware has been saved. (These files may be downloaded from our website)
- About : Displays system information (including operation system, CPU), product information (including product name, model name, hardware version, firmware version, software version, device information (including interface and optical resolution))
◆ Menu Function Bar Diagram
In order to optimize scanned image quality, please select your film type and brand from the toolbar.

【Negative】

【Positive】(also known as Slide)

【Black and White】

Prescan : Pre-scan the current film.

Scan : Scan film, press ▼ drop down button for more options.

Image Adjustment : Press ▼ drop down button for more options.

Output Preview : To display the output preview image.

Auto Calibrate : Auto detects the minimum density of the film term, click to re-calculate the minimum density of the film term after changing the film term.
◆ Status Line
This shows the RGB values in the image on the lower right hand corner.
PART II: Preview Window Area【Fixed Window】
◆ Toolbar Diagram

Select : To select the scan area, more than one selection may be done at one time.

Zoom In : To magnify the image where the cursor is pointing, the image will magnify one times every click until maximum multiple (1000%).

Zoom Out : To reduce the size point the cursor to the desired area, the image will reduce by half with every click until the least multiple (25%) .

Rotate 90 Left : To rotate the image counter-clockwise 90 degrees.

Rotate 90 Right : To rotate the image clockwise 90 degrees.

Flip Horizontal : To Flip the image 180 degrees horizontally.

Flip Vertical : To Flip the image 180 degrees vertically.

Revert : Discard all modifications and restores the image back to the original state in preview windows.

ROC : Automatically restores original colors by analyzing the base image and applying corrections to the faded colors. (ONLY AVAILABLE ON UNITS WITH DIGITAL ICE ^3 TM TECHNOLOGY BUILT IN.)

GEM : Automatically enhances the clarity of a scanned film image while preserving its colors, gradations and sharpness. (ONLY AVAILABLE ON UNITS WITH DIGITAL ICE ^3 TM TECHNOLOGY BUILT IN.)
Note: GEM will only have obvious effect on 1800 DPI or above
◆ Preview Window
Shows a preview of the image you pre-scan, you can select the measurement unit in (Inches=in Centimeters=cm and Pixels=px) by clicking the upper-left corner.

◆ Status Line
On the lower left hand corner, it shows the color level of red, green, blue and coordinates of location 【ex :I】 On the lower right hand corner, it shows the zoom scale, which frame it located, how many blocks you selected 【ex :II】.
| R:0 G:0 B:0 | X:0.000 Y:0.000 | [1] |
| Zoom Scale: 100% | Location: 1 | Selections: 0 |
[II]
PART III : Active Frame Setting Window Area [Floating Window]
A comprehensive advanced mode is available to allow for more user defined adjustments.
Normal mode【ex :l】to input the basic parameter before scan (including scan resolution, film size, color bit depth).
Advanced mode 【ex :II】 to input the parameter of scan and output (including scan resolution, size, color depth and output resolution, and scan mode).
The "Active Frame Setting" window can only be used on the current pre-scanned image, it will return to the default settings when scanning the next image, click "Apply to All" to apply to all of the scanned images.
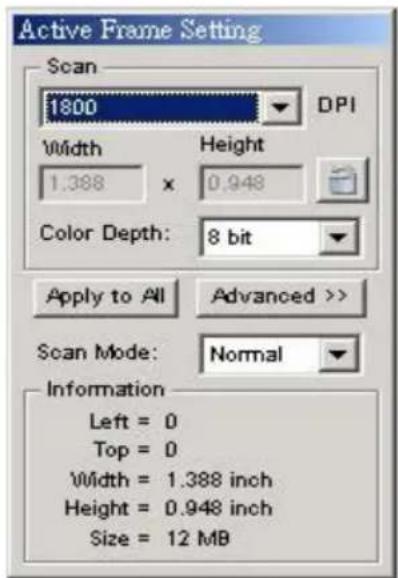
Normal Mode [I]
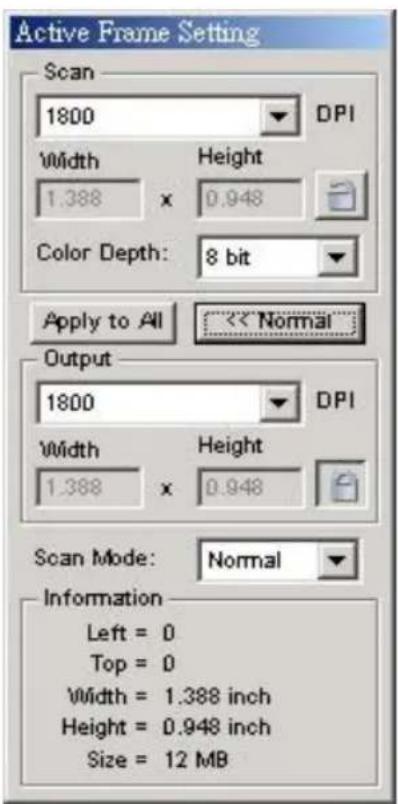
Advanced Mode [II]
TECHNICAL SUPPORT
CyberView X - SF
For question regarding film scanner and CyberView X-SF driver, please contact with your dealer immediately.
Bundled application software
For questions regarding bundled application software, you can refer to the HELP function on the application menu bar or visit the software company's website.
**This user manual has also been archived in the packaged CD.

- HOW TO SCAN FILM OR SLIDE....5
- CYBERVIEW X - SF USER'S INTERFACE....7
- TECHNICAL SUPPORT....19
- GETTING STARTED
- Package Contents
- REMARKS :
- QUICK INSTALLATION GUIDE (QIG)
- TO INSTALL SOFTWARE AND DRIVER... (For PC Users)
- Install the Software :
- Install the Driver :
- TO INSTALL SOFTWARE AND DRIVER... (For MAC User)
- TO INSTALL HARDWARE...
- Connect The Film Scanner...
- Please Note:
- Inserting Film Media...
- Mounted Slides
- Filmstrips
- ※ One Button Scan Function
- HOW TO SCAN FILM OR SLIDE
- Start To Scan...
- STEP 1 – Acquire Driver
- STEP 2 -Scan Setting...
- STEP 3 – Pre-scanning...
- STEP 4 – Setup Resolution...
- CyberView X - SF USER INTERFACE
- Description of CyberView X - SF
- Scan
- Preference :
- "Preview" Option :
- For Example :
- Curves and Levels :
- Example :
- "Windows" Option :
- "Help" Option :
- ◆ Menu Function Bar Diagram
- ◆ Status Line
- PART II: Preview Window Area【Fixed Window】
- ◆ Toolbar Diagram
- ◆ Preview Window
- TECHNICAL SUPPORT
- CyberView X - SF
- Bundled application software
Brand : Reflecta
Model : iScan 3600
Category : Scanner